-
Senior Member

Pin drive setup thread for 289 and 427s
**Mike Bray and Jeff Kleiner keep me honest here. This will be a work in progress until we all settle on the right setup**
Okay here we go. For those who love the idea of a taking a wheel on and off in 5 seconds vs 30 seconds, OR maybe you're nostalgic, OR just want to look cool using a lead mallet to beat off your wheels, PIN DRIVE is for you! I can't tell you how handy it was to remove the wheel so many times when my drivers ebrake was sticking and I had to replace the caliper two or three times before I learned of the spring mod.
Pin-drive appears to be a skunk works project going on 20 years at FFR. No docs, no descript mentions on inventory, and nary a photo of the correct setup to be found. Therefore with the help of some fellow Pin-drivers, here's how you gotta set it up:
READ THIS IN FULL BEFORE MOUNTING YOUR Upper Control Arms (UCAs) because you may need to make some cuts to the threads and it's easier with the UCA off the car.
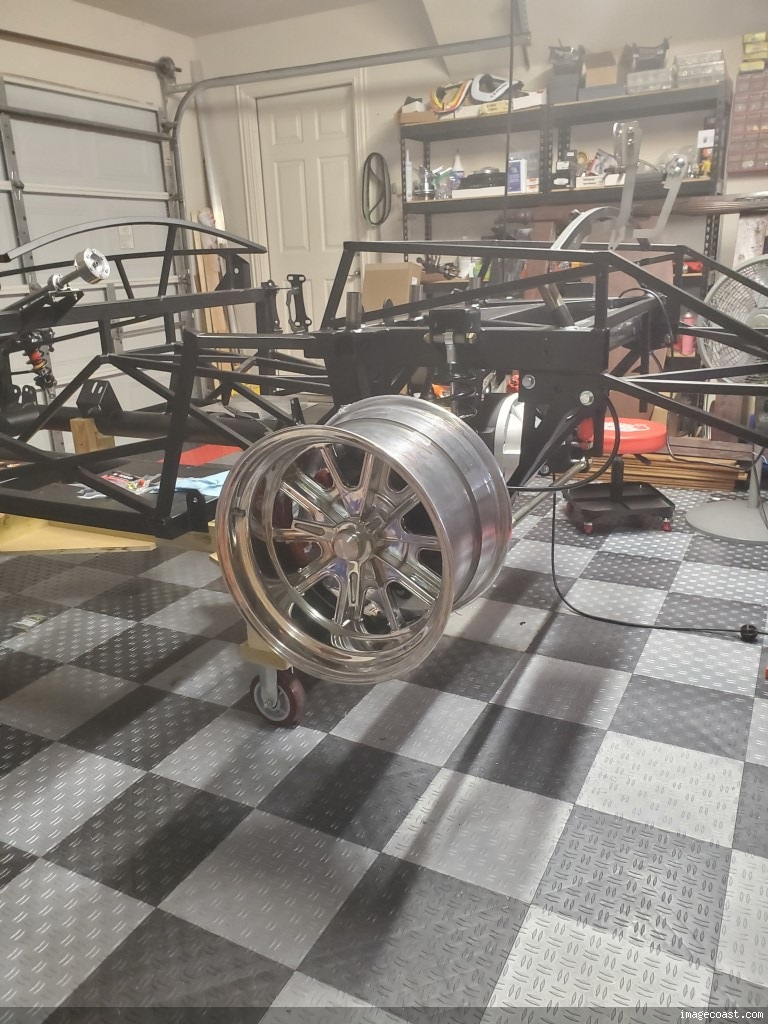
Essentially you're bringing everything inboard and need some proper parts and make even make some cuts. We're going to start with the narrower, 289 USRRC kit. When ordering, you'll need the SN95 spindles, these funky adapter brackets FFR makes, and some 5/8"x 3" Grade 8 bolts and Machine nuts. FFR can forget these last two items so best you call them and remind them to put them in the box.
Here's the spindle. You can see there is no top for the ball joint to mount to.
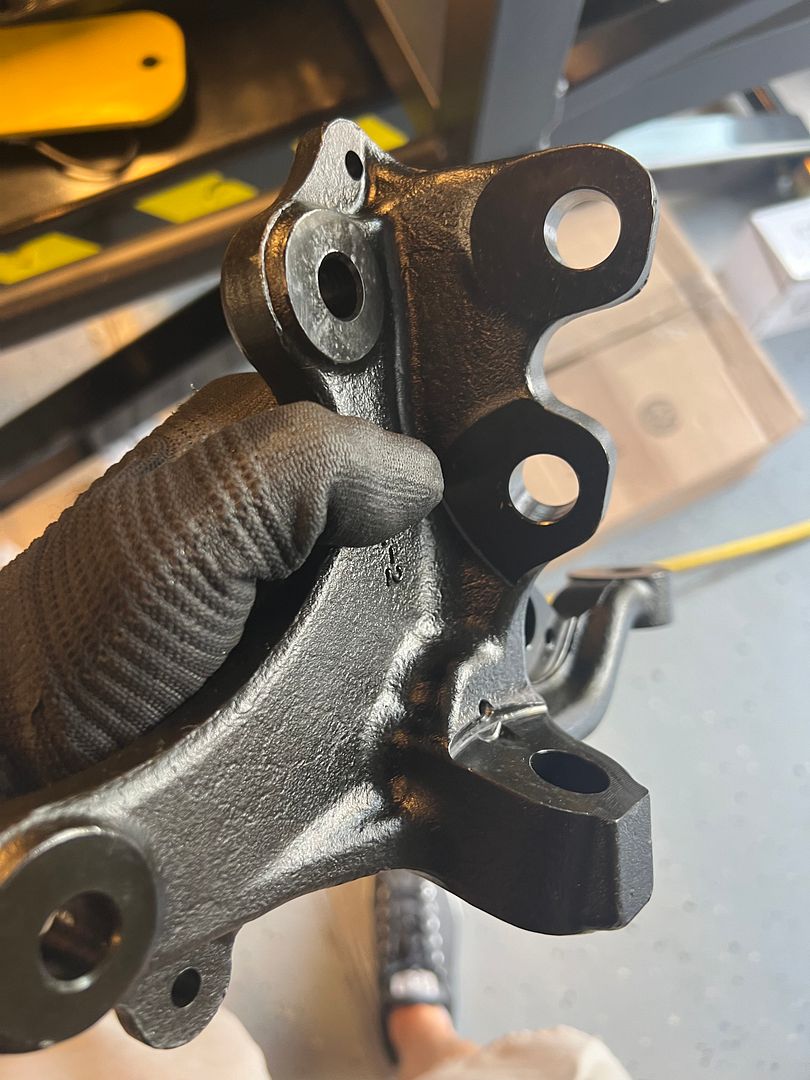
Thus the need for this bracket. Ain't she a beaut, Clark? Now this bracket serves two builds, using Fox body donor spindles, and the FFR supplied SN95 spindles.
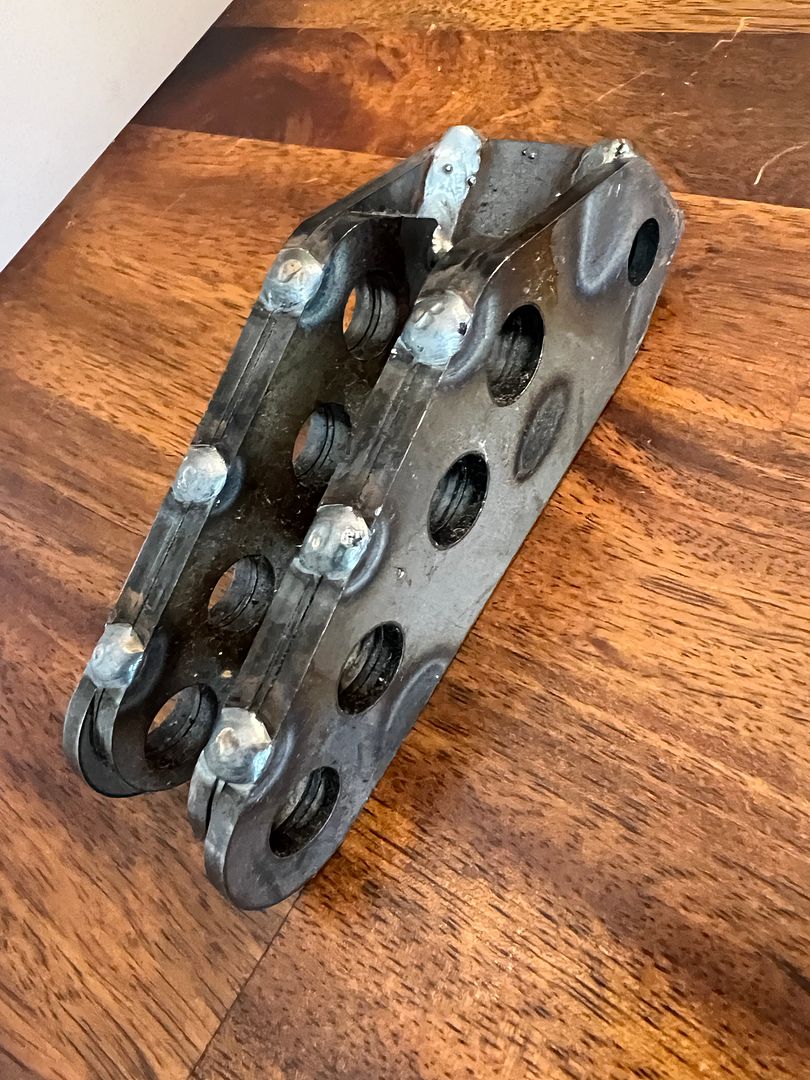
To get the UCA and LCAs to be as symmetrical as possible, many have chosen to use the top bolt hole and the 3rd down so we cut off the bottom so it would fit on the spindle. YOU WILL ALSO NEED TO MOVE THE UCA mount to the top holes vs the holes on the side of the mount.
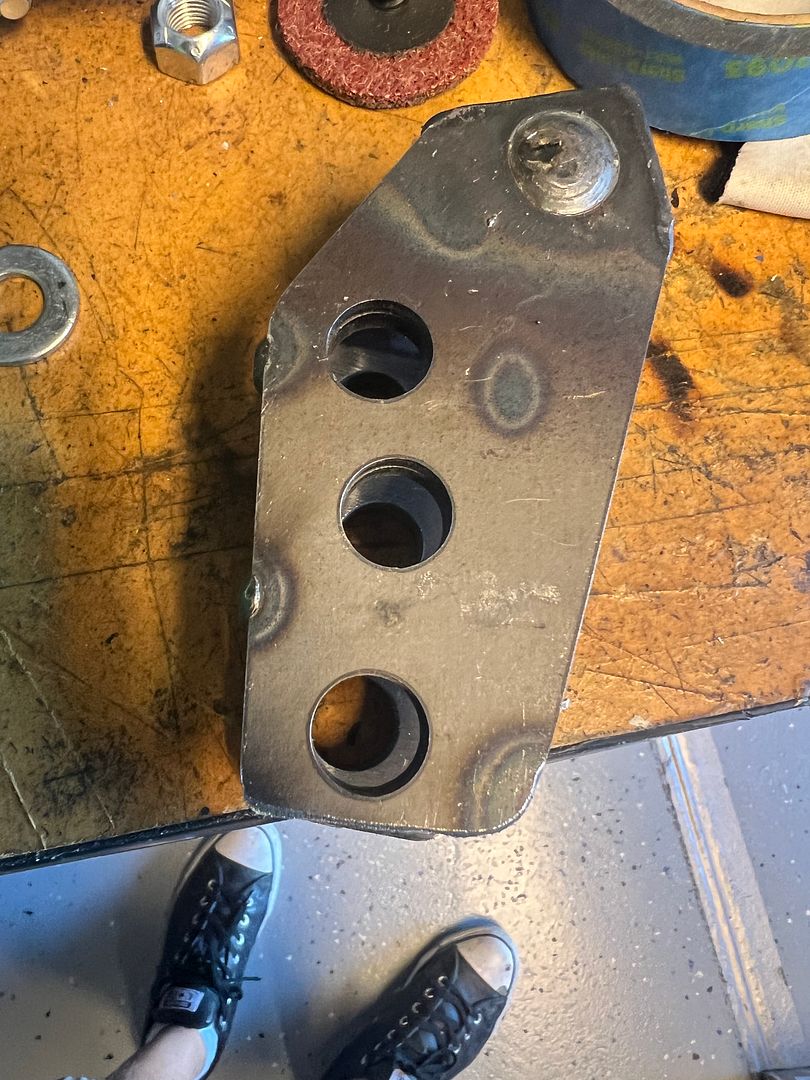
NOW that we have the parts assembly is pretty straightforward after some minor massaging of the brackets to fit over the spindle mount.
However it's important to note that for the 289 the UCA it is mounted up on top of the frame mount (not the side as mentioned in the manual). Now, from here you'll need to shorten the rear threads of the UCA adjusters in order to get enough caster into the car (7-9 degrees). If you're not running power steering you may not need this much as it more caster will make it more difficult to turn the wheels. If you are using PS, then put as much caster in as you can for straight driving at speed.
For the Roadster I believe you can use the provided adjusters but for the 289 (and it's narrower stance) I've got a smaller one from the 818 you can see here that I can use.
_IMG_9141.png)
Now you should have the adjustability you need to get the alignment right.
Please feel free to add comments as we build this tutorial so we get it right.
Last edited by ehansen007; 10-10-2024 at 06:11 PM.
-
Post Thanks / Like - 0 Thanks, 1 Likes
-
Not a waxer

Well, to further confuse things and keeping in mind that the 427 and 289 FIA cars are different...The narrower track of the 289 FIA roadster allows it to be built for pin drive width by using the FFR 2 piece spindles, pin drive width lower control arms and mounting the UCAs in the top, horizontal location. When Erik Treves built his "Black Mamba" we discussed this and got verifying input from Jim Schenck:
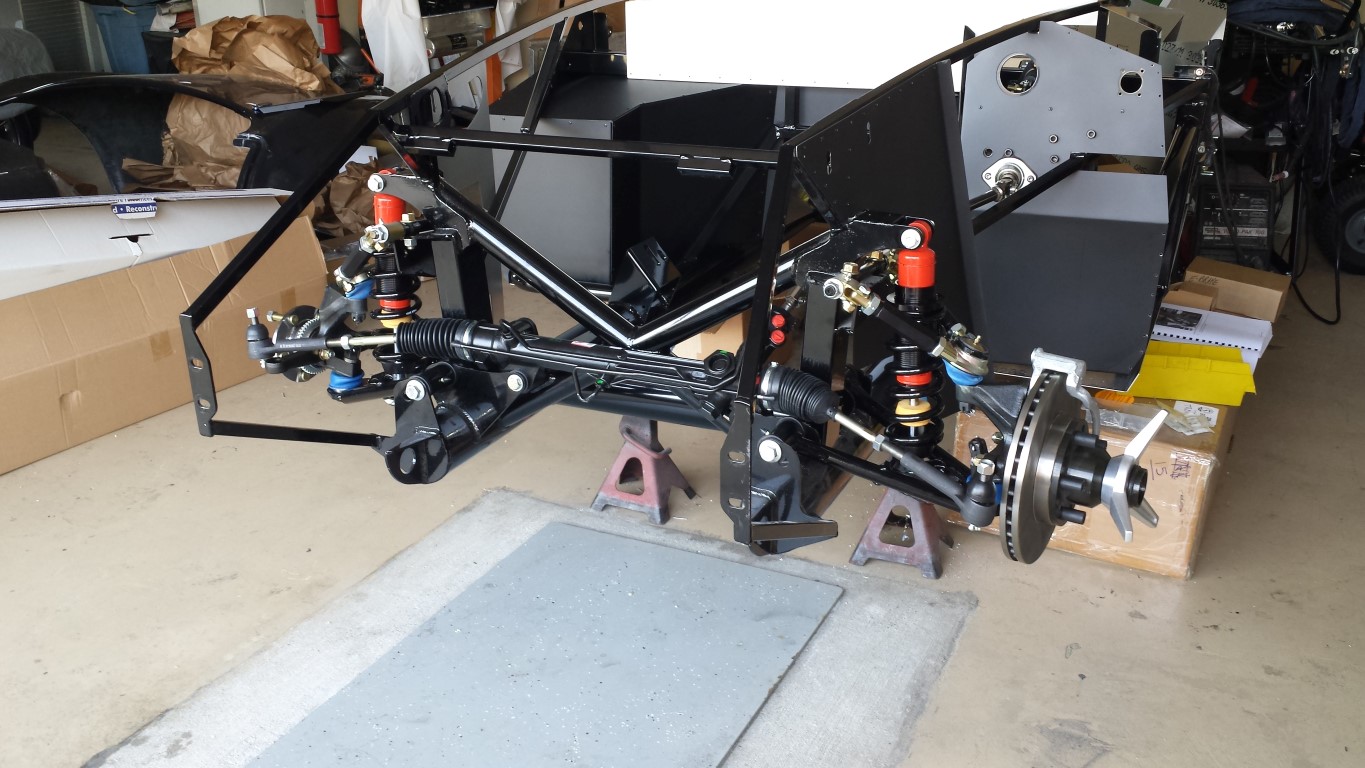
Jeff
-
Post Thanks / Like - 0 Thanks, 2 Likes
-
Senior Member

Just pulled a wheel off and took some measurements.
The front sleeve is about 100mm long, it looks like I didn't trim it any.
The rear sleeve is 70mm long, it's trimmed down quite a bit.
Using Jeff Kleiner's famous picture measuring from grease zerk to grease zerk I got:
Front is 245mm
Rear is 203mm

As you can see in this picture the front upper control arm gets really close to the coilover shock, even with it turned upside down. If I did it again I would probable look at making some different spacers to offset the coilover some.
-
Post Thanks / Like - 0 Thanks, 2 Likes
-
Senior Member

That is caster city man. Now I'm remembering it. You got 7.5 degrees?
-
Post Thanks / Like - 0 Thanks, 1 Likes
-
Senior Member

-
Post Thanks / Like - 0 Thanks, 2 Likes
-
Thank you guys for putting this thread together. I cant tell you how many times Ive gone back and forth between Mike's thread, both of the Erik 289 builds as well as scouring the internet to try and understand all the nuances of the pindrive IFS. I am building an FIA myself and have the base chassis on the ground with the suspension buttoned up using the SN95 spindles along with the adapters shown above. I have way too much positive camber on the front end when its at ride height and I have a feeling its because I havent trimmed the brackets to use the upper (1&3) holes.
That all said.. I have been trying forever to figure out how the Black Mamba build got away with the 2 piece spindles, but it seems that there is some confirmation from Jeff above that it is possible. I do like the simplicity of the 2 piece spindles - the way the adapter mounts to the upper ball joint with the SN95s does spook me a little. The question is do I try to shift over to the two piece spindles and mod the UCA adjusters to buy the camber? FFR sent me the 2 piece first and then followed up with the SN95s, so I have options.
Last edited by 7litergt; 10-09-2024 at 05:58 PM.
Reason: spelling
-
Post Thanks / Like - 0 Thanks, 3 Likes
-
Senior Member

I'm using the 2 piece spindles on my 289 build, shorter LCA's, Trigo pin drive FIA 15” wheels. No problem getting 7 degrees caster and half degree negative camber. I did not have to shorten the UCA links, but I did mount the UCA pivot bar on top, not on the side. https://thefactoryfiveforum.com/show...l=1#post564002
Last edited by Jphoenix; 10-09-2024 at 10:28 PM.
Jim Phoenix
Coupe-R delivered 8/10/2024
289 USRRC, F5R1011063RD - delivered same day
Coupe-R has a Ford Performance 363 mated to a TKX, 18084.
Many details on my Coupe-R are different from a typical Coupe build because mine is not street legal, race only.
289 has a BP 302 mated to a TKX 18084.
"For a little more, you can do it yourself." - Ed Hollingsworth... 6-Pack forums
-
Post Thanks / Like - 0 Thanks, 1 Likes
-
Yep, and its your build that inspired me to go dust that box off with the 2 piece spindles and try them out. I think I am going to break down the front end this weekend and shift over to the 2 piece assemblies and see where things land. I figure worst case, I can always shift back to the SN95s with the modified adapters if all else fails.
-
Post Thanks / Like - 0 Thanks, 1 Likes
-
Senior Member


Originally Posted by
7litergt

Yep, and its your build that inspired me to go dust that box off with the 2 piece spindles and try them out. I think I am going to break down the front end this weekend and shift over to the 2 piece assemblies and see where things land. I figure worst case, I can always shift back to the SN95s with the modified adapters if all else fails.
I may still shorten the rear link on the UCA’s, they are at minimum length and I haven’t performed a final alignment yet. As stated in other threads, better to do it now than later. I still have to change out a spring and check for bump steer over full travel, so I have an opportunity to give some more adjustment room.
Jim Phoenix
Coupe-R delivered 8/10/2024
289 USRRC, F5R1011063RD - delivered same day
Coupe-R has a Ford Performance 363 mated to a TKX, 18084.
Many details on my Coupe-R are different from a typical Coupe build because mine is not street legal, race only.
289 has a BP 302 mated to a TKX 18084.
"For a little more, you can do it yourself." - Ed Hollingsworth... 6-Pack forums
-
Senior Member

If you draw an imaginary line between the LCA pivot and the UCA pivot the ball pivot on the rack needs to be in this line to eliminate bump steer. On mine it was perfect but something to check.
-
Post Thanks / Like - 0 Thanks, 2 Likes
-
Senior Member


Originally Posted by
Mike.Bray

If you draw an imaginary line between the LCA pivot and the UCA pivot the ball pivot on the rack needs to be in this line to eliminate bump steer. On mine it was perfect but something to check.
Thanks, I want to get it back on the ground and adjust ride height again then re-check everything. I believe the shorter front track on the pin drive 289's alleviates the need for the bump steer kit FFR sells, but I'll be checking and re-checking. I'll post some photos after I get to level and at ride height again, I'm currently installing driveline, fuel lines and electrical stuff.
Jim Phoenix
Coupe-R delivered 8/10/2024
289 USRRC, F5R1011063RD - delivered same day
Coupe-R has a Ford Performance 363 mated to a TKX, 18084.
Many details on my Coupe-R are different from a typical Coupe build because mine is not street legal, race only.
289 has a BP 302 mated to a TKX 18084.
"For a little more, you can do it yourself." - Ed Hollingsworth... 6-Pack forums
-
Senior Member


Originally Posted by
Jphoenix

Thanks, I want to get it back on the ground and adjust ride height again then re-check everything. I believe the shorter front track on the pin drive 289's alleviates the need for the bump steer kit FFR sells, but I'll be checking and re-checking. I'll post some photos after I get to level and at ride height again, I'm currently installing driveline, fuel lines and electrical stuff.
I believe you're correct, the narrower track eliminates the bump steer kit.
You don't have to be on the ground for a lot of these checks, especially checking bump steer. Just remove the coilover and block up the LCA until it's level. Plus this way you can move the suspension through it's range of motion. If you attached a laser to the front wheel pointed at a target you can really check the bump steer.
-
Post Thanks / Like - 0 Thanks, 1 Likes
-
Senior Member

I still noticed quite a bit of bump steer with my first 289. I bought and still have the bump steer kit but then installed the electric power steering and that eliminated it. Here's a video of the pin drive setup going through the range of motion and you can see the tendency for it to move naturally due to the tweaked geometry to get the caster. The normal angle to the steering shafts/tie rods will exacerbate this and be felt in the wheel. The bump steer kit will help get the steering arms more parallel and take out a lot of it. At least that's what it's designed to do.
https://youtube.com/shorts/1udQRiOhhXs
(never mind the squeaky suspension, I haven't put grease in the fittings just yet!)
-
Post Thanks / Like - 0 Thanks, 1 Likes
-
Senior Member

I checked the steering arm alignment to the UCA/LCA pivots and it appears to be right on - got lucky again. I may need to change out the tie-rods, the left one is bottomed on the threads (after cutting some steering rod threads already). I may trim the tie rod end itself, but I need at least 1/8" of adjustment in on both sides to get them in to 1/16 in - they're toed out now about 1/16" - since I put the engine in and adjusted ride height.
I run toe-out on the race cars - but not on this grocery-getter 
Jim Phoenix
Coupe-R delivered 8/10/2024
289 USRRC, F5R1011063RD - delivered same day
Coupe-R has a Ford Performance 363 mated to a TKX, 18084.
Many details on my Coupe-R are different from a typical Coupe build because mine is not street legal, race only.
289 has a BP 302 mated to a TKX 18084.
"For a little more, you can do it yourself." - Ed Hollingsworth... 6-Pack forums
-
Senior Member


Originally Posted by
Jphoenix

I checked the steering arm alignment to the UCA/LCA pivots and it appears to be right on - got lucky again. I may need to change out the tie-rods, the left one is bottomed on the threads (after cutting some steering rod threads already). I may trim the tie rod end itself, but I need at least 1/8" of adjustment in on both sides to get them in to 1/16 in - they're toed out now about 1/16" - since I put the engine in and adjusted ride height.
I run toe-out on the race cars - but not on this grocery-getter

I had to cut some off of my tie rods.
-
Post Thanks / Like - 0 Thanks, 1 Likes
-
Not a waxer


Originally Posted by
Jphoenix

I checked the steering arm alignment to the UCA/LCA pivots and it appears to be right on - got lucky again. I may need to change out the tie-rods, the left one is bottomed on the threads (after cutting some steering rod threads already). I may trim the tie rod end itself, but I need at least 1/8" of adjustment in on both sides to get them in to 1/16 in - they're toed out now about 1/16" - since I put the engine in and adjusted ride height.
Sounds like you don't have the rack centered.
Jeff
-
Post Thanks / Like - 0 Thanks, 2 Likes
-
Senior Member


Originally Posted by
Jeff Kleiner

Sounds like you don't have the rack centered.
Jeff
Good point, I'll check it again.
Jim Phoenix
Coupe-R delivered 8/10/2024
289 USRRC, F5R1011063RD - delivered same day
Coupe-R has a Ford Performance 363 mated to a TKX, 18084.
Many details on my Coupe-R are different from a typical Coupe build because mine is not street legal, race only.
289 has a BP 302 mated to a TKX 18084.
"For a little more, you can do it yourself." - Ed Hollingsworth... 6-Pack forums
-
You're smoking crack if you think centerlock-style rims are easier/faster than regular 5/6-lug
By the time I get out my 6ft long torque wrench and breaker bar and special centrelock socket I could do a regular car several times over.
At least a 917 uses a socket/torque wrench setup ... I could only imagine the misery if I had to use a lead hammer to get the nut on/off
TLDR - I can't believe people would voluntarily subject themselves to the misery of centerlocks.
-
Senior Member

-
Post Thanks / Like - 0 Thanks, 1 Likes
-
Senior Member

True true Mike.
There is a reason they stopped using lug nuts on race cars and use a single point attachment.
Last edited by rich grsc; 10-11-2024 at 10:33 AM.
Mrk III, 331 stroker, Borla stack injection, T5, 3:55 IRS, Power steering and brakes. Kleiner body & paint
-
Post Thanks / Like - 0 Thanks, 1 Likes
-
Senior Member


Originally Posted by
rich grsc

True true Mike.
There is a reason they stopped using lug nuts on race cars and use a single point attachment.
Even the taxicabs eventually came around!
-
Senior Member


Originally Posted by
efnfast

You're smoking crack if you think centerlock-style rims are easier/faster than regular 5/6-lug
By the time I get out my 6ft long torque wrench and breaker bar and special centrelock socket I could do a regular car several times over.
At least a 917 uses a socket/torque wrench setup ... I could only imagine the misery if I had to use a lead hammer to get the nut on/off
TLDR - I can't believe people would voluntarily subject themselves to the misery of centerlocks.
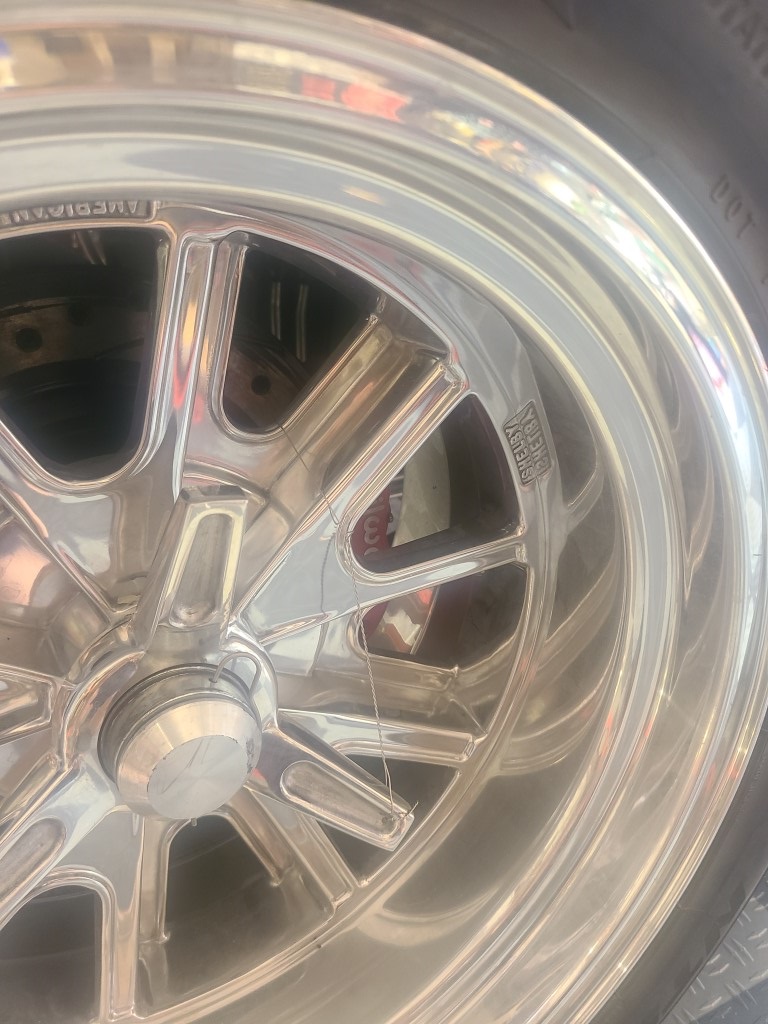
Efnfast I think you might be the crack smoker. LOL. We aren't talking about Center Locks. These are knock offs. The kind that were used at Le Mans and every other race event with pit stops before air guns were invented. It takes me 2 seconds to clip the wire and 3 more seconds to knock the knock-off loose. Then I spin it loose and pull the wheel off. I've done it 100 times myself. No lug nuts, no air gun, love it.
Last edited by ehansen007; 10-11-2024 at 04:00 PM.
-
Senior Member

He was banded from the other forum for a reason
Mrk III, 331 stroker, Borla stack injection, T5, 3:55 IRS, Power steering and brakes. Kleiner body & paint
-
Post Thanks / Like - 0 Thanks, 1 Likes
-

Originally Posted by
ehansen007

Efnfast I think you might be the crack smoker. LOL. We aren't talking about Center Locks. These are knock offs. The kind that were used at Le Mans and every other race event with pit stops before air guns were invented. It takes me 2 seconds to clip the wire and 3 more seconds to knock the knock-off loose. Then I spin it loose and pull the wheel off. I've done it 100 times myself. No lug nuts, no air gun, love it.
center lock nut ... knock off ... it's all basically the same thing. Pin drive with 1 attachment point.
At least on a 917 I can use a torque wrench to have peace of mind that the nut is at proper spec .... whacking a wing with hammer and hoping that's enough torque to not end up killing you ... whatever floats your boat.

Originally Posted by
rich grsc

He was banded from the other forum for a reason
I hurt too many people's feelings .... but the fact you remember that 15 years later warms my heart <3


 Thanks:
  Likes:


_IMG_9141.png)

 Reply With Quote


