Boig Motorsports

Visit our community sponsor

Thanks Thanks:  33
Likes Likes:  65
Page 5 of 6 FirstFirst ... 3456 LastLast
Results 161 to 200 of 225

Thread: Jesse builds another Cobra #11,061 - Merry Christmas to me !!

  1. #161
    Senior Member Blitzboy54's Avatar
    Join Date
    Oct 2020
    Location
    Albany, NY
    Posts
    1,545
    Post Thanks / Like
    Center Console

    I am have been lurking on a lot of other build threads on the best way to construct a center console. I need to house a 7x4 in touch screen. I purchased one from Whitby my last build but never used it and sold it to someone else on the forum. I didn't work for me, just too bulky. I want something a little more minimal. I found a thread from 10 years ago and a fella posted plans to one he designed. I will update the thread when I find it again. It wasn't perfect for my use but it was a great starting point. I mocked it up in cardboard and started making adjustments


    I decided to trim it down and have it bend at the corners of the button console portion of the dash. I trimmed down the cardboard then modified the plans to fit my needs.


    I then mocked up where my buttons would go. I used the dash template and measured 5 evenly spaced holes represented by the blue dots. I want to put the head lights, wipers, hazards, heater fan and heater bypass in it. I put the console in and manually mocked the bigger switches. I then had to trim a little of the console off the top but everything will fit. I also have a 1/4 inch gap before the frame contacts the dash. This will be more than enough to account for the upholstery. I am going to try a carbon fiber wrap to match the dash. If I don't like it I may transition to black leather. We will see. It will be secured with rivnuts to the back panel with button head screws so I can remove it for access without taking off the dash.


    Now that I have identified where everything is going to live I will break it down and return to the wiring.
    Last edited by Blitzboy54; 11-11-2024 at 05:41 PM.
    Build 1 MK4 #10008 - Delivered 03/03/21, Graduated 7/20/22 - Sold 6/6/24
    Build Thread #1 https://thefactoryfiveforum.com/show...been-delivered
    Build 2 MK4 #11061- Delivered 08/24/24
    Build Thread #2 https://thefactoryfiveforum.com/show...006#post562006

  2. #162
    Senior Member PNWTim's Avatar
    Join Date
    Aug 2024
    Location
    Damascus OR USA
    Posts
    171
    Post Thanks / Like
    That looks pretty good. It's hard to tell from the picture but does the lower center portion of your dash project far enough to act as an anti-glare eyebrow? I know a lot of the better screens you can see in full sunshine/broad daylight but every little bit helps.
    Coupe complete kit ordered: 9/26/24. Gen 4 Coyote. T-56. IRS w/3.73. Wilwoods. PS. HVAC. Side windows.

  3. #163
    Senior Member Blitzboy54's Avatar
    Join Date
    Oct 2020
    Location
    Albany, NY
    Posts
    1,545
    Post Thanks / Like
    That’s a good question. What it boils down to is there is only so much space to work with so you kind of get what you get. My last car I used a RAM phone holder. On real sunny days there wasn’t much you could do. I can’t put the screen any further back as I need the space for wiring and the unit itself is 5 inches deep. I was more concerned with how it looked against the dash ascetically.

    Just for funnzies I powered it up outside to see how it looked and it showed out pretty well. At the end of the day I’m not using 75% of what this unit can do. Calls, music, voice text, Siri are all useless in a roadster. This is purely navigation, dash cam and backup camera

    I just noticed your avatar. My kids were both born in OR. Wife and I still have 503 phone numbers. She loves the Ducks.
    Last edited by Blitzboy54; 11-12-2024 at 08:54 AM.
    Build 1 MK4 #10008 - Delivered 03/03/21, Graduated 7/20/22 - Sold 6/6/24
    Build Thread #1 https://thefactoryfiveforum.com/show...been-delivered
    Build 2 MK4 #11061- Delivered 08/24/24
    Build Thread #2 https://thefactoryfiveforum.com/show...006#post562006

  4. #164
    Senior Member PNWTim's Avatar
    Join Date
    Aug 2024
    Location
    Damascus OR USA
    Posts
    171
    Post Thanks / Like
    Quote Originally Posted by Blitzboy54 View Post
    That’s a good question. What it boils down to is there is only so much space to work with so you kind of get what you get. My last car I used a RAM phone holder. On real sunny days there wasn’t much you could do. I can’t put the screen any further back as I need the space for wiring and the unit itself is 5 inches deep. I was more concerned with how it looked against the dash ascetically.

    Just for funnzies I powered it up outside to see how it looked and it showed out pretty well. At the end of the day I’m not using 75% of what this unit can do. Calls, music, voice text, Siri are all useless in a roadster. This is purely navigation, dash cam and backup camera

    I just noticed your avatar. My kids were both born in OR. Wife and I still have 503 phone numbers. She loves the Ducks.
    Go Ducks! You guys are about as far away from Oregon as you can get these days.

    For what it's worth, the newer screens seem capable of low angle resolution and have brightness capable of overcoming direct sunlight. I just know from personal experience I will overlook something until someone else says "what about fill in the blank" and I have an aha moment. I didn't realize how deep the unit is either. I should've though - I just put in a new dash insert and Kenwood head unit in my truck and those double DIN units are pretty deep.

    Your build is looking great and coming along nicely.
    Coupe complete kit ordered: 9/26/24. Gen 4 Coyote. T-56. IRS w/3.73. Wilwoods. PS. HVAC. Side windows.

  5. #165
    Senior Member Blitzboy54's Avatar
    Join Date
    Oct 2020
    Location
    Albany, NY
    Posts
    1,545
    Post Thanks / Like
    Wiring continues

    The cool thing about doing this a second time is when you know what you didn't the first time you have a better plan. One of the priorities of this one is I want to be able to separate the dash from the chassis if I need to by only removing the mounts and disconnecting connectors. There will be nothing wired that does not have a connector of some type if its mounted on the dash.

    Last time I had ground screws all over the place. There is absolutely nothing wrong with this approach it worked fine but I wanted to be more organized this time. I created a master ground with some heavy wire and a self tapping screw after cleaning off all the powder coat. Now i have a one stop shop for all my stray grounds of which there are many.


    I also used two smaller bus bars. The red is battery power (fed from the "radio memory") and the black is ACC power (fed from "radio power")

    On the hot side I have the parking brake relay, the head unit power including camera connections, reverse lights and trunk light power. ACC side is the parking brake sensor (for the dash light) the accessory head unit power including camera connections, accessory charging ports and the heater bypass valve.

    I mounted the relay board for the parking brake so everything will tuck in nicely behind the head unit.


    I posted this on another thread but this is a more appropriate place. These are the two leaders in the club house for paint scheme. I have played with some aqua blues. While I still have not completely ruled it I would have to make it a 4 color scheme for it to work.


    Last edited by Blitzboy54; 11-14-2024 at 09:13 PM.
    Build 1 MK4 #10008 - Delivered 03/03/21, Graduated 7/20/22 - Sold 6/6/24
    Build Thread #1 https://thefactoryfiveforum.com/show...been-delivered
    Build 2 MK4 #11061- Delivered 08/24/24
    Build Thread #2 https://thefactoryfiveforum.com/show...006#post562006

  6. #166
    Junior Member
    Join Date
    Feb 2023
    Location
    Mechanicville, NY
    Posts
    10
    Post Thanks / Like
    Thanks for this. I was planning to add a 2nd fuse box for future accessory wiring. I didn't think about having a common bus bar for ground connections. How many spare circuits are you running in the wire loom to the rear trunk area?

  7. Likes Blitzboy54 liked this post
  8. #167
    Senior Member PNWTim's Avatar
    Join Date
    Aug 2024
    Location
    Damascus OR USA
    Posts
    171
    Post Thanks / Like
    I think the base orange/tangerine with grey stripes will really pop. The reverse will be much more subdued but still be an attention getter. It probably comes down to the statement you want to make .
    Coupe complete kit ordered: 9/26/24. Gen 4 Coyote. T-56. IRS w/3.73. Wilwoods. PS. HVAC. Side windows.

  9. Thanks Blitzboy54 thanked for this post
  10. #168
    Namrups's Avatar
    Join Date
    Sep 2021
    Location
    Mechanicville, NY
    Posts
    1,164
    Post Thanks / Like
    Quote Originally Posted by Blitzboy54 View Post
    Wiring continues

    The cool thing about doing this a second time is when you know what you didn't the first time you have a better plan. One of the priorities of this one is I want to be able to separate the dash from the chassis if I need to by only removing the mounts and disconnecting connectors. There will be nothing wired that does not have a connector of some type if its mounted on the dash.

    Last time I had ground screws all over the place. There is absolutely nothing wrong with this approach it worked fine but I wanted to be more organized this time. I created a master ground with some heavy wire and a self tapping screw after cleaning off all the powder coat. Now i have a one stop shop for all my stray grounds of which there are many.
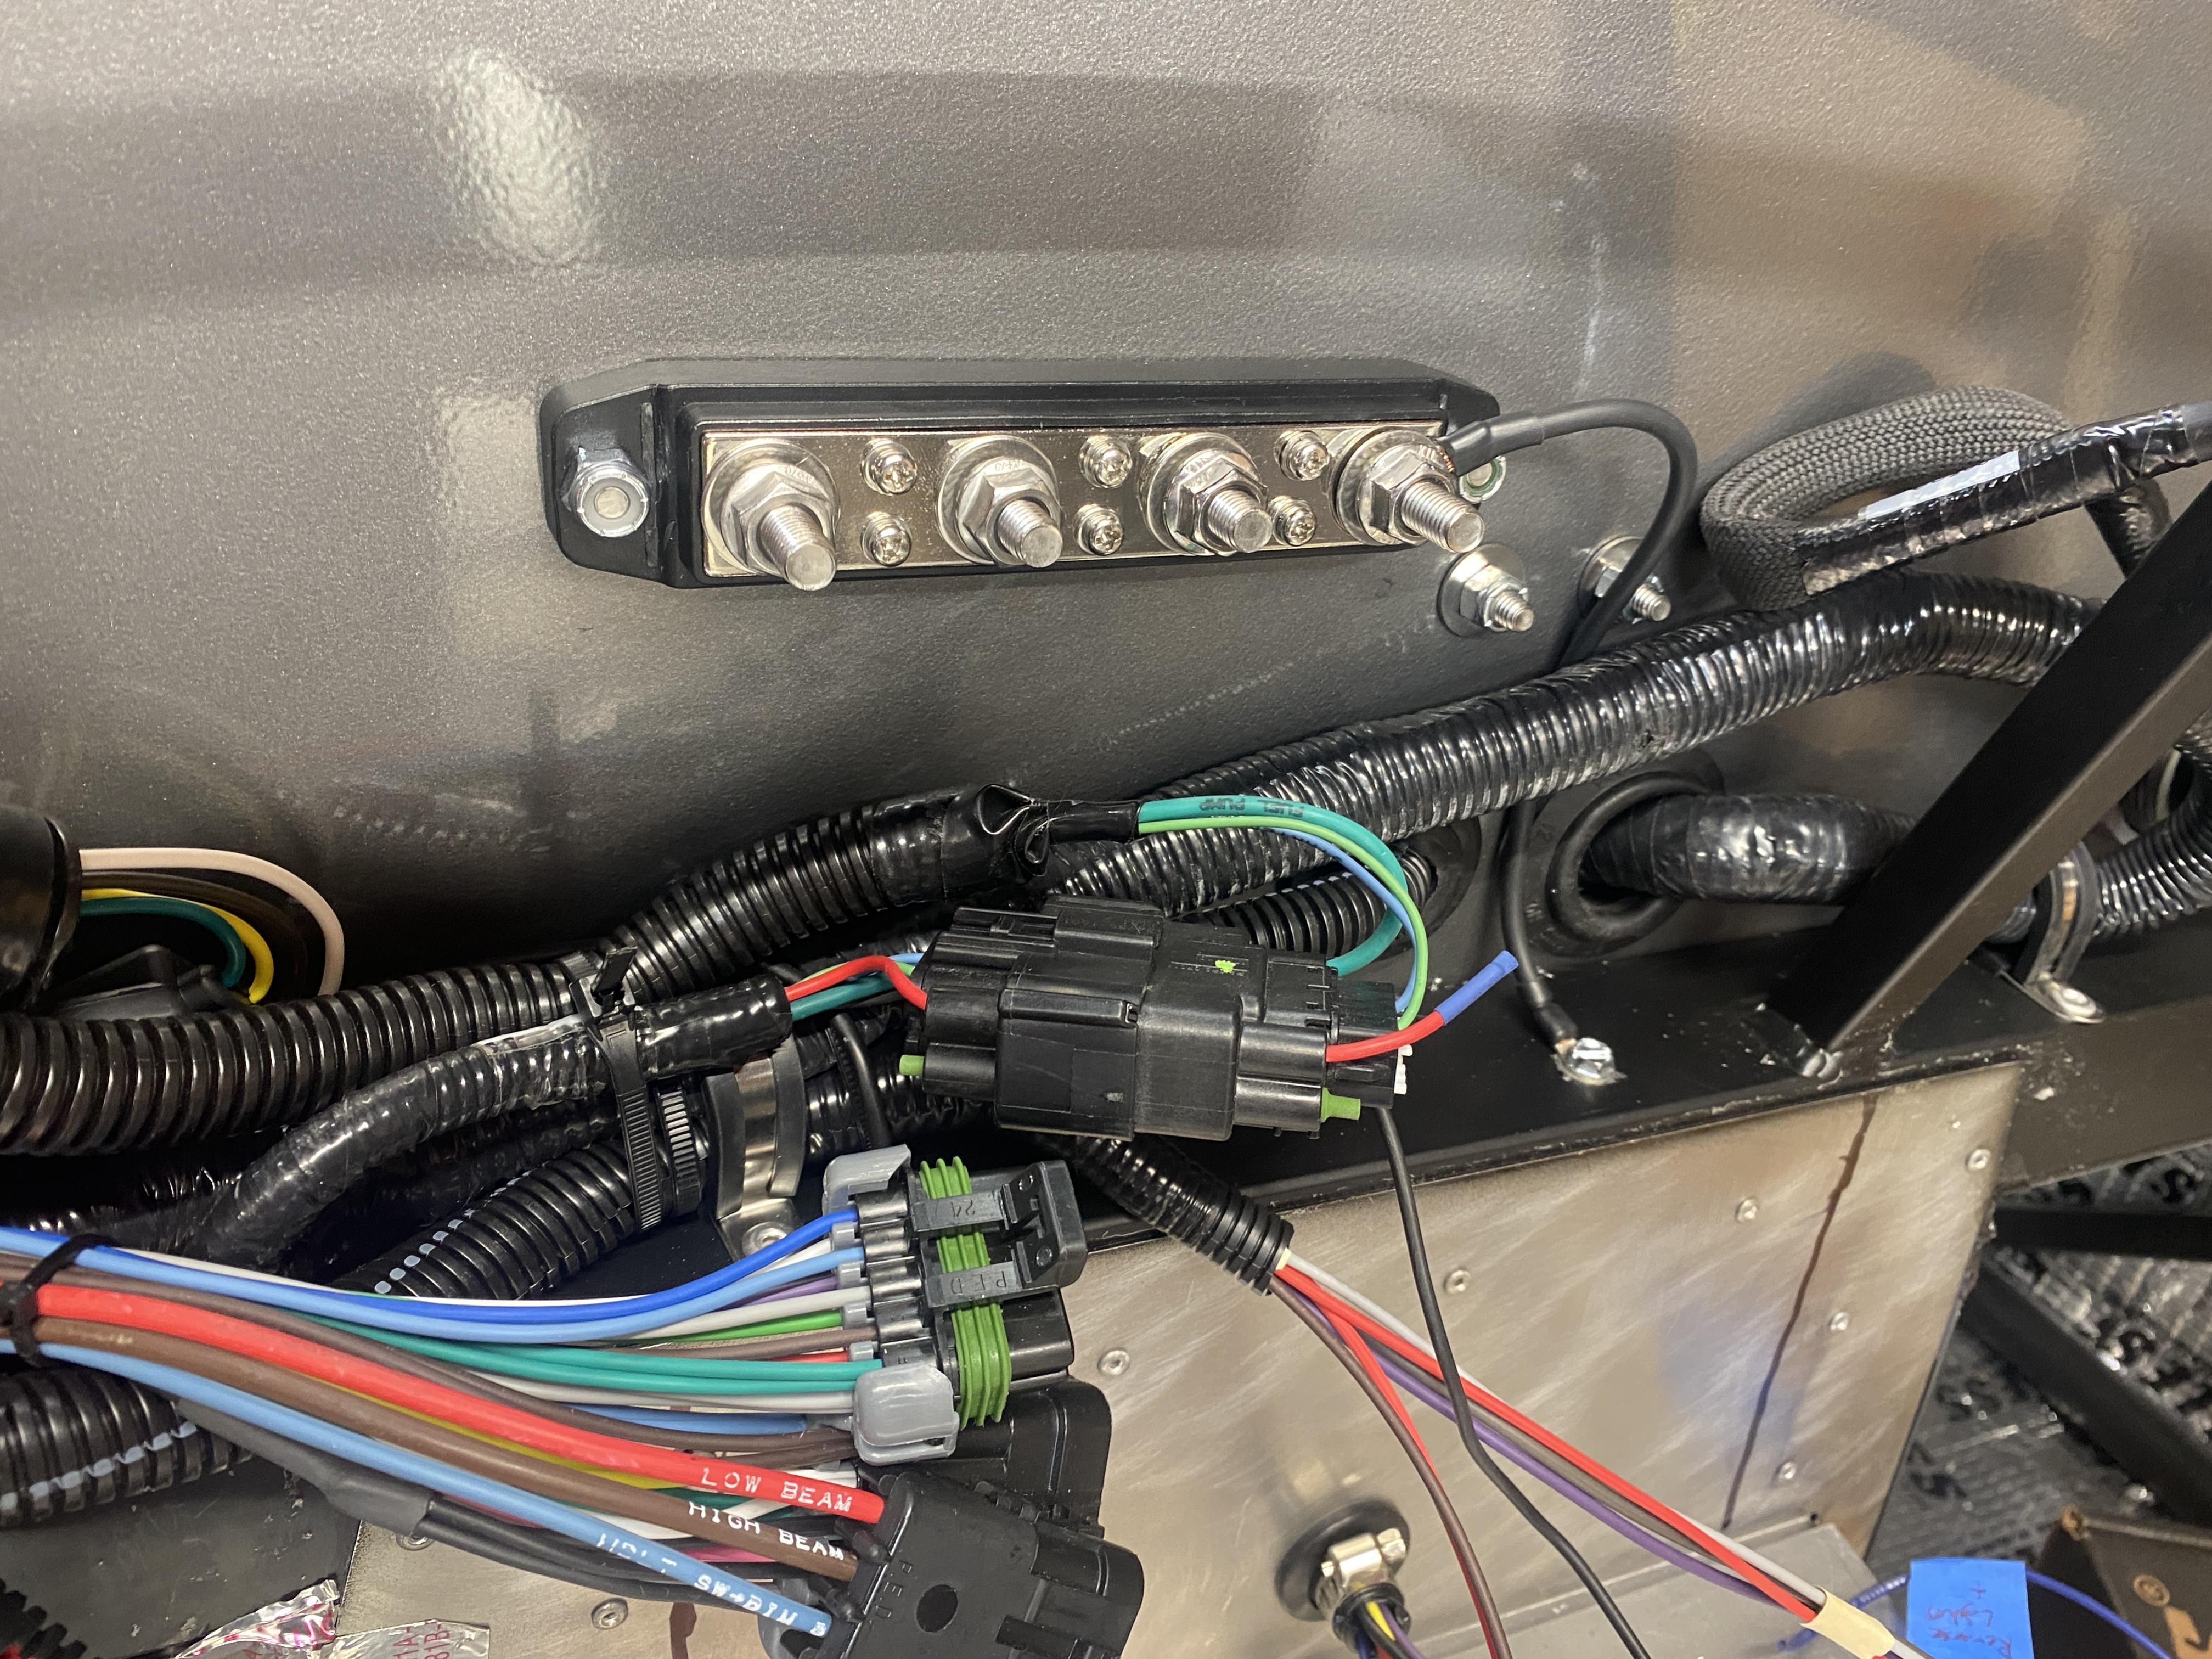


    I also used two smaller bus bars. The red is battery power (fed from the "radio memory") and the black is ACC power (fed from "radio power")

    On the hot side I have the parking brake relay, the head unit power including camera connections, reverse lights and trunk light power. ACC side is the parking brake sensor (for the dash light) the accessory head unit power including camera connections, accessory charging ports and the heater bypass valve.

    I mounted the relay board for the parking brake so everything will tuck in nicely behind the head unit.


    I posted this on another thread but this is a more appropriate place. These are the two leaders in the club house for paint scheme. I have played with some aqua blues. While I still have not completely ruled it I would have to make it a 4 color scheme for it to work.



    IMO I like the gray with orange stripes.
    Scott Pregont
    Present build: 65 Daytona Coupe #393 - Forte 427 EFI crate w/TKX 2.87/ .81 - Ordered 11/16/21 - Delivered 6/23/2022
    Location: Mechanicville, NY
    Build Thread: https://thefactoryfiveforum.com/show...na-Coupe-build
    My Albums
    Build album: https://thefactoryfiveforum.com/album.php?albumid=2151
    Build album 2: https://thefactoryfiveforum.com/album.php?albumid=2437
    Special Tools, Custom Parts, misc supplies: https://thefactoryfiveforum.com/album.php?albumid=2045
    Garage Pics: https://thefactoryfiveforum.com/album.php?albumid=2041
    POR15 First Try: https://thefactoryfiveforum.com/album.php?albumid=2068
    Silicone application tips: https://thefactoryfiveforum.com/album.php?albumid=2063

  11. Thanks Blitzboy54 thanked for this post
  12. #169
    cv2065's Avatar
    Join Date
    Dec 2017
    Location
    Orlando, FL
    Posts
    2,120
    Post Thanks / Like
    Looking good Jessie. I think you've almost caught me. I like the Grey with Orange stripes personally. Either way, great build!
    MKIV Roadster - #9380 - Complete Kit - Delivered 7/17/18 - SOLD 5/2023
    Build Thread #1: https://thefactoryfiveforum.com/show...V-Build-Thread
    MKIV Roadster - #TBD - Complete Kit - Delivered 11/6/23 - In Progress
    Build Thread #2: https://thefactoryfiveforum.com/show...Build-Thread-2

  13. Thanks Blitzboy54 thanked for this post
  14. #170
    Senior Member Blitzboy54's Avatar
    Join Date
    Oct 2020
    Location
    Albany, NY
    Posts
    1,545
    Post Thanks / Like
    Quote Originally Posted by jengum View Post
    Thanks for this. I was planning to add a 2nd fuse box for future accessory wiring. I didn't think about having a common bus bar for ground connections. How many spare circuits are you running in the wire loom to the rear trunk area?
    Two, first is the backup lights (not required everywhere but NY they are). The second is a hot feed that will run a charging port in my rear cubby and go to a switch that will operate trunk lights.

    Quote Originally Posted by PNWTim View Post
    I think the base orange/tangerine with grey stripes will really pop. The reverse will be much more subdued but still be an attention getter. It probably comes down to the statement you want to make .
    Very good points

    Quote Originally Posted by Namrups View Post
    IMO I like the gray with orange stripes.
    Appreciate it. FYI, I think I am going to probably drop the engine in early spring. I won't have tires until this winter and It will be cold and miserable. I'll reach out to the crew sometime in March/April.

    Quote Originally Posted by cv2065 View Post
    Looking good Jessie. I think you've almost caught me. I like the Grey with Orange stripes personally. Either way, great build!
    Not Even close Devil Dog, but thank you
    Last edited by Blitzboy54; 11-16-2024 at 07:30 PM.
    Build 1 MK4 #10008 - Delivered 03/03/21, Graduated 7/20/22 - Sold 6/6/24
    Build Thread #1 https://thefactoryfiveforum.com/show...been-delivered
    Build 2 MK4 #11061- Delivered 08/24/24
    Build Thread #2 https://thefactoryfiveforum.com/show...006#post562006

  15. Likes Namrups liked this post
  16. #171
    Junior Member
    Join Date
    Feb 2023
    Location
    Mechanicville, NY
    Posts
    10
    Post Thanks / Like
    If you would please put me on your notice list for the engine drop. I have a good idea how it's done based on other build threads but seeing it in person would be beneficial.

  17. Likes Blitzboy54 liked this post
  18. #172
    Member
    Join Date
    May 2023
    Posts
    45
    Post Thanks / Like
    I think the bright stripes will look stunning!

  19. Thanks Blitzboy54 thanked for this post
  20. #173
    Senior Member Blitzboy54's Avatar
    Join Date
    Oct 2020
    Location
    Albany, NY
    Posts
    1,545
    Post Thanks / Like
    I guess if I am sharing colors this has always been in the mix as well. It's not the front runner but I keep coming back to it.

    BMW Atlantis (sometimes called Snapper Rock) Blue


    Last edited by Blitzboy54; 11-18-2024 at 09:49 PM.
    Build 1 MK4 #10008 - Delivered 03/03/21, Graduated 7/20/22 - Sold 6/6/24
    Build Thread #1 https://thefactoryfiveforum.com/show...been-delivered
    Build 2 MK4 #11061- Delivered 08/24/24
    Build Thread #2 https://thefactoryfiveforum.com/show...006#post562006

  21. #174
    Senior Member Blitzboy54's Avatar
    Join Date
    Oct 2020
    Location
    Albany, NY
    Posts
    1,545
    Post Thanks / Like
    I ran a hard line to the hydraulic clutch last time but I also used and external slave cylinder. Mike Forte sold me a hydraulic TOB this time around so a flex line seemed the better bet. I went with a ss braided -3an @ 36 inches this time. According to the collective this length should work out. I used a 3an to 1/8 NPT fitting and connected directly to the end of the MC.


    Dash Template

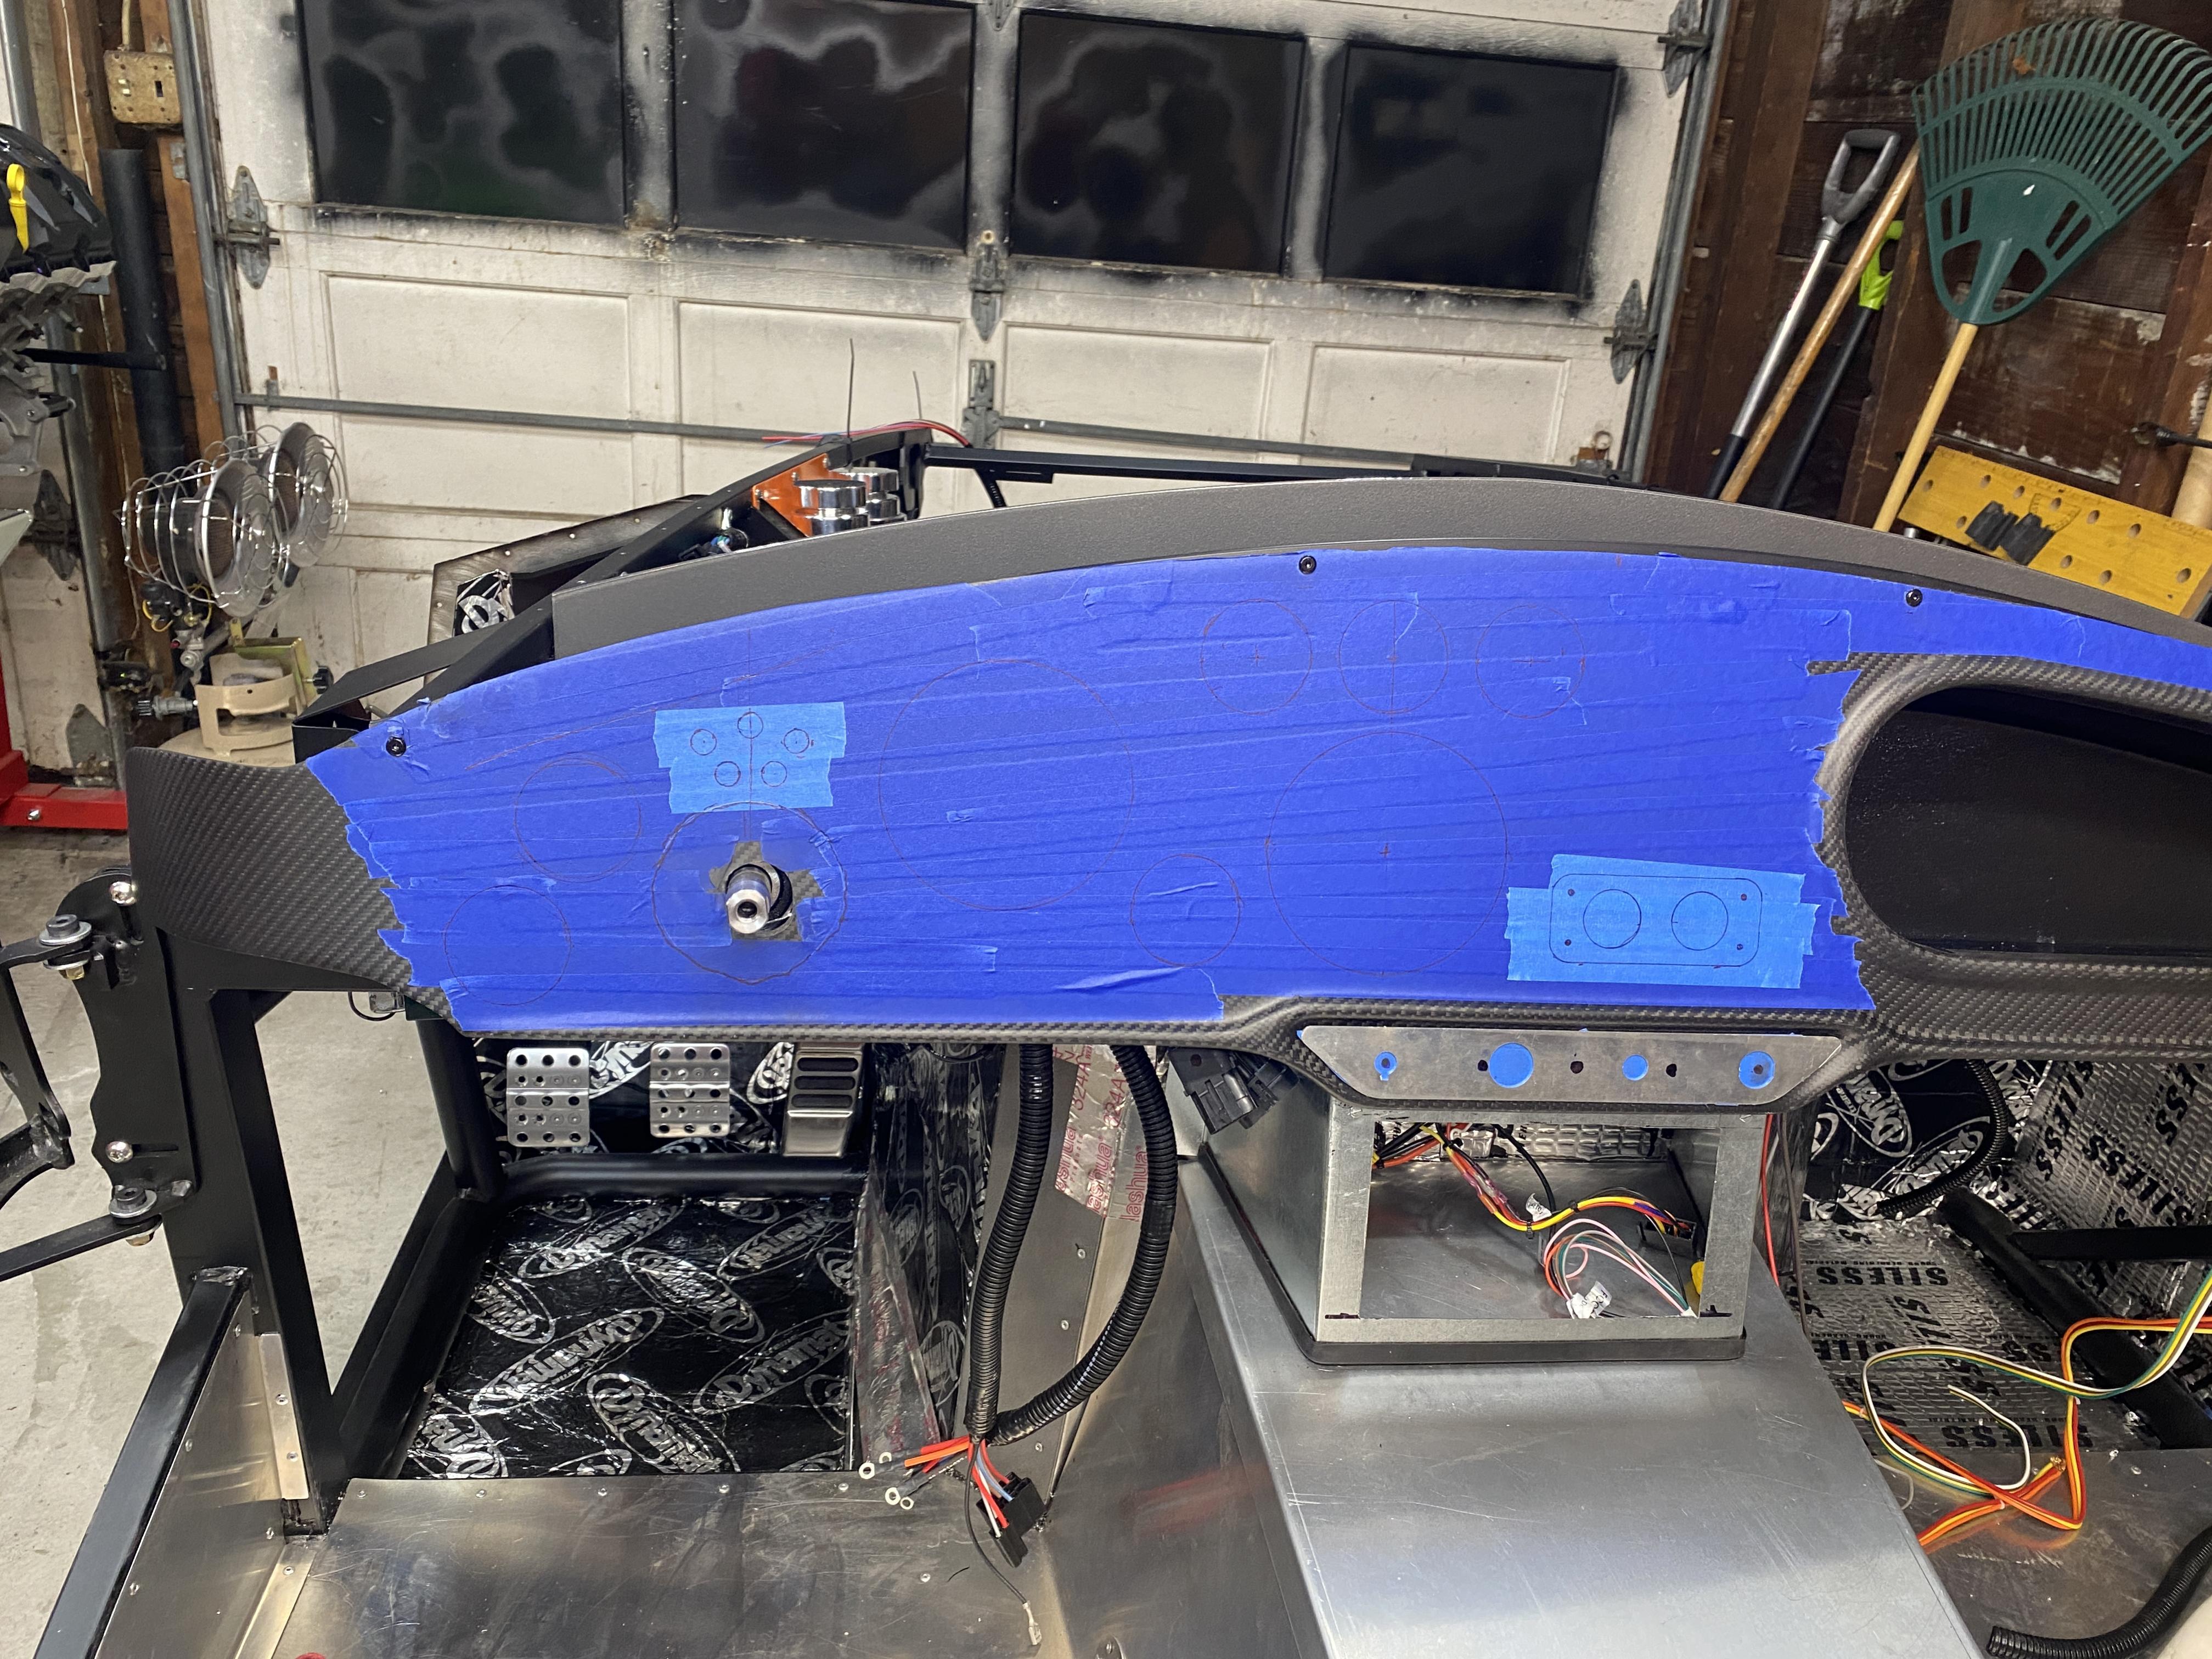
    So far I have been impressed with the quality of the CF dash. It is by far more rigid than any other options that FFR offers and it's a good looking piece. It is also not cheap. This brings me to the template that comes with it. It has marks for MK 1-2 or MK 3-4 for cutting the steering shaft opening. I used it and lined up my dash. It sets it a little higher than I wanted but not a big deal. Then I set the glove box and realized it did not clear the dash support. I needed to move it almost a full CM to the right. The hole is now completely jenky. I then researched it and those that know say to set the glove box first then cut the hole for the steering shaft. I didn't know that was a thing and I thought it was safe to assume the template would be close. It wasn't.

    I get out of jail for free here because I am using Franks turn signal assy. The plate that mounts to the dash is 3 3/8 diameter so I am covered. I would have had to come up with some sort of bezel otherwise.


    I made the adjustments I needed to. The turn signal bezel will cover it, I properly marked the dash for gauges, indicators, switches and accessories for level and clearance. I will be cutting and setting this weekend. I also mounted the dash using 4mm black powder coated hex machine screws. I like the look and preferred this to the hidden options that I had considered.
    Last edited by Blitzboy54; 11-18-2024 at 10:25 PM.
    Build 1 MK4 #10008 - Delivered 03/03/21, Graduated 7/20/22 - Sold 6/6/24
    Build Thread #1 https://thefactoryfiveforum.com/show...been-delivered
    Build 2 MK4 #11061- Delivered 08/24/24
    Build Thread #2 https://thefactoryfiveforum.com/show...006#post562006

  22. Likes PNWTim liked this post
  23. #175
    Member TTimmy's Avatar
    Join Date
    Sep 2021
    Location
    Emmaus, PA
    Posts
    88
    Post Thanks / Like
    Quote Originally Posted by Blitzboy54 View Post

    I also used two smaller bus bars. The red is battery power (fed from the "radio memory") and the black is ACC power (fed from "radio power")

    On the hot side I have the parking brake relay, the head unit power including camera connections, reverse lights and trunk light power. ACC side is the parking brake sensor (for the dash light) the accessory head unit power including camera connections, accessory charging ports and the heater bypass valve.
    Hey Blitzboy - really enjoying your thread and look forward to seeing how it all plays out!

    Regarding the power source for each of these bus bars, will each of the radio feeds provide enough power to support everything that will be connected? If this is a concern, you might consider adding relays and triggering them from each of the radio feeds. The power source for the relays would be the battery. Of course that complicates matters because then you either need fuses or circuit breakers for whatever is hanging off the bus bar.

  24. Likes Blitzboy54 liked this post
  25. #176
    Not a waxer Jeff Kleiner's Avatar
    Join Date
    Feb 2011
    Location
    Bloomington, Indiana
    Posts
    8,678
    Post Thanks / Like
    Quote Originally Posted by Blitzboy54 View Post
    ... I also mounted the dash using 4mm black powder coated hex machine screws. I like the look and preferred this to the hidden options that I had considered.

    Just an FYI; should you ever need to remove the dash once the body is on you won't be able to access those screws.

    Jeff

  26. #177
    Senior Member Blitzboy54's Avatar
    Join Date
    Oct 2020
    Location
    Albany, NY
    Posts
    1,545
    Post Thanks / Like
    Quote Originally Posted by Jeff Kleiner View Post
    Just an FYI; should you ever need to remove the dash once the body is on you won't be able to access those screws.

    Jeff
    I understand. I gave it a lot of thought and with out boring everyone with all my neurotic reasons I decided I just didn't like any of the other options. My Tach and Speedo are 5 inches and easily removable as is the glove box. This gives me a lot of access. If I REALLY need to remove the dash then the body has to come off too and then, at that point, I may be disappointed in my life's choices.

    As an aside, I got the sleeves welded in my roll bars today.

    Thanks as always for looking out.
    Build 1 MK4 #10008 - Delivered 03/03/21, Graduated 7/20/22 - Sold 6/6/24
    Build Thread #1 https://thefactoryfiveforum.com/show...been-delivered
    Build 2 MK4 #11061- Delivered 08/24/24
    Build Thread #2 https://thefactoryfiveforum.com/show...006#post562006

  27. #178
    Senior Member PNWTim's Avatar
    Join Date
    Aug 2024
    Location
    Damascus OR USA
    Posts
    171
    Post Thanks / Like
    Jesse - can you refresh my memory on which gauges you are using? When you mentioned a 5" tach and Speedo I am thinking you must have gone aftermarket and somehow I missed it earlier in your thread.
    Coupe complete kit ordered: 9/26/24. Gen 4 Coyote. T-56. IRS w/3.73. Wilwoods. PS. HVAC. Side windows.

  28. #179
    Senior Member Blitzboy54's Avatar
    Join Date
    Oct 2020
    Location
    Albany, NY
    Posts
    1,545
    Post Thanks / Like
    Quote Originally Posted by TTimmy View Post
    Hey Blitzboy - really enjoying your thread and look forward to seeing how it all plays out!

    Regarding the power source for each of these bus bars, will each of the radio feeds provide enough power to support everything that will be connected? If this is a concern, you might consider adding relays and triggering them from each of the radio feeds. The power source for the relays would be the battery. Of course that complicates matters because then you either need fuses or circuit breakers for whatever is hanging off the bus bar.
    Thank you, I appreciate it.


    The short answer is yes, there is enough. As you said at the end of the day all the power for everything short of spark comes from the battery. The only concern is would I be putting too large a load on those wires. I added up all the amp potential and it's very low. My biggest concern was the parking brake. It has a max current load of 3 amps. I am using less than 1 ( tested it with a small power supply that only has a max of 0.3 amps and the brake operated fine. The rest is less than an amp even if everything is running at the same time. The fuses in the RF harness for the Radio Memory is 15 amps. This is what I have the brake on. The ACC is 10 amp.
    Build 1 MK4 #10008 - Delivered 03/03/21, Graduated 7/20/22 - Sold 6/6/24
    Build Thread #1 https://thefactoryfiveforum.com/show...been-delivered
    Build 2 MK4 #11061- Delivered 08/24/24
    Build Thread #2 https://thefactoryfiveforum.com/show...006#post562006

  29. #180
    Senior Member Blitzboy54's Avatar
    Join Date
    Oct 2020
    Location
    Albany, NY
    Posts
    1,545
    Post Thanks / Like
    Quote Originally Posted by PNWTim View Post
    Jesse - can you refresh my memory on which gauges you are using? When you mentioned a 5" tach and Speedo I am thinking you must have gone aftermarket and somehow I missed it earlier in your thread.
    I am not using FFR supplied gauges but I am using Autometer. So really apples to apples to what FFR offers. I just went my own direction aesthetically
    Build 1 MK4 #10008 - Delivered 03/03/21, Graduated 7/20/22 - Sold 6/6/24
    Build Thread #1 https://thefactoryfiveforum.com/show...been-delivered
    Build 2 MK4 #11061- Delivered 08/24/24
    Build Thread #2 https://thefactoryfiveforum.com/show...006#post562006

  30. #181
    Senior Member Blitzboy54's Avatar
    Join Date
    Oct 2020
    Location
    Albany, NY
    Posts
    1,545
    Post Thanks / Like
    Dash

    I have turned my focus to the dash. Plan is pretty straight forward. First make all the cuts, rough everything in, assemble the glove box and then get to all the wiring.

    Fist things first. I have a fairly busy dash by design so lots of cuts. What I have learned about carbon fiber is I don't like working with carbon fiber. It is nice and rigid, pretty easy to cut but that dust gets everywhere. I wore a respirator but the little fibers get all over your skin and can be itchy. I also had to pull a couple of splinters. Headed right to the shower after all the cutting and sanding. The only issue I had is the small gauge holes a touch too large. I undersized the big 5 inch holes and opened them slowly, that was the plan with the other ones too but I didn't set my bit quite right. They are fine, everything fits nice I just couldn't make them any bigger.


    I went with BIG 5 inch tach and speedo. I really like the look although it has that old guy extra big text font vibe. This is fine with me. The 3 white gauges are LED lit and go from white with silver numbers to black with red numbers with the headlights on. The black gauges are traditional incandescent but I put red back lights in them. When my steering hub arrives it will have the turn signal, horn and high beam integrated into it. The only hole I didn't cut is the ignition. I have not decided on what push button ignition I want to use but I know where it will go when I choose it.


    Glove box

    I broke everything back down and built the glove box. I did have one issue. First the bar that the hinges attach to are pre drilled. The holes do not line up with the glove box holes. They needed to be widened significantly. The other is the aluminum plate that gets epoxied to the glove box door. The grooves that go around the hinges needed to be cut a CM deeper. If you don't the plate doesn't fit right. Originally I wanted to install a push button lockable latch. I don't love having to use a key every time but all the latches I found were too big. I did however find this one that better fits the look of the dash. It uses a round key and looks pretty sharp. I also lined the box with felt, I am unsure If I will also line the door. We will see.


    US Customs

    Lastly I mentioned in another thread. My custom seats, transmission tunnel cover and door cards were made by Intatrim. They are in the UK. My stuff shipped last week but was flagged at Customs because the shipper messed up some of the paperwork. The declared value didn't match the commercial invoice. They sent the correct paperwork within 24 hours and FedEx uploaded these documents to them. That was a week ago. All I know is my stuff is in Ft. Worth TX and I have no idea when or if I will ever see it. I am cautiously optimistic this will eventually get resolved but who knows. So in the mean time I will continue to work on the build and try to keep a positive attitude about it.
    Last edited by Blitzboy54; 11-24-2024 at 11:53 PM.
    Build 1 MK4 #10008 - Delivered 03/03/21, Graduated 7/20/22 - Sold 6/6/24
    Build Thread #1 https://thefactoryfiveforum.com/show...been-delivered
    Build 2 MK4 #11061- Delivered 08/24/24
    Build Thread #2 https://thefactoryfiveforum.com/show...006#post562006

  31. #182
    Senior Member Blitzboy54's Avatar
    Join Date
    Oct 2020
    Location
    Albany, NY
    Posts
    1,545
    Post Thanks / Like
    Aaaaand just as I typed it my stuff was released from customs. Yay, delivery scheduled for tomorrow.....

    All stressed out for nothing
    Build 1 MK4 #10008 - Delivered 03/03/21, Graduated 7/20/22 - Sold 6/6/24
    Build Thread #1 https://thefactoryfiveforum.com/show...been-delivered
    Build 2 MK4 #11061- Delivered 08/24/24
    Build Thread #2 https://thefactoryfiveforum.com/show...006#post562006

  32. Likes cv2065, PNWTim, JimStone liked this post
  33. #183
    cv2065's Avatar
    Join Date
    Dec 2017
    Location
    Orlando, FL
    Posts
    2,120
    Post Thanks / Like
    Happy to see you got your seats coming. Has to be a big relief. Your dash is looking great! Are you planning to have removal access once the body is on?
    MKIV Roadster - #9380 - Complete Kit - Delivered 7/17/18 - SOLD 5/2023
    Build Thread #1: https://thefactoryfiveforum.com/show...V-Build-Thread
    MKIV Roadster - #TBD - Complete Kit - Delivered 11/6/23 - In Progress
    Build Thread #2: https://thefactoryfiveforum.com/show...Build-Thread-2

  34. Thanks Blitzboy54 thanked for this post
  35. #184
    Senior Member Blitzboy54's Avatar
    Join Date
    Oct 2020
    Location
    Albany, NY
    Posts
    1,545
    Post Thanks / Like
    Quote Originally Posted by cv2065 View Post
    Happy to see you got your seats coming. Has to be a big relief. Your dash is looking great! Are you planning to have removal access once the body is on?
    I am relieved for sure.

    I can’t find a way to do it that I like. As of right now, no. Like most things I reserve the right to change my mind.
    Last edited by Blitzboy54; 11-25-2024 at 07:03 PM.
    Build 1 MK4 #10008 - Delivered 03/03/21, Graduated 7/20/22 - Sold 6/6/24
    Build Thread #1 https://thefactoryfiveforum.com/show...been-delivered
    Build 2 MK4 #11061- Delivered 08/24/24
    Build Thread #2 https://thefactoryfiveforum.com/show...006#post562006

  36. Likes cv2065 liked this post
  37. #185
    Senior Member PNWTim's Avatar
    Join Date
    Aug 2024
    Location
    Damascus OR USA
    Posts
    171
    Post Thanks / Like
    Quote Originally Posted by Blitzboy54 View Post
    I am relieved for sure.

    I can’t find a way to do it that I like. As of right now, no. Like most things I reserve the right to change my mind.
    Building a car is synonymous with changing your mind...
    Coupe complete kit ordered: 9/26/24. Gen 4 Coyote. T-56. IRS w/3.73. Wilwoods. PS. HVAC. Side windows.

  38. Likes Blitzboy54 liked this post
  39. #186
    Junior Member
    Join Date
    Feb 2023
    Location
    Mechanicville, NY
    Posts
    10
    Post Thanks / Like
    Where did you source the five indicator lights to the left of the tachometer?

    Also did you decide on a source for the backup light? I was looking at your first build thread photos and it looks like there are LED lights mounted mounted below the trunk area? I see some builders are using the mini Cooper lights which are DOT compliant but require a body cutout for mounting.

    The competition dash looks great.

  40. #187
    Senior Member Blitzboy54's Avatar
    Join Date
    Oct 2020
    Location
    Albany, NY
    Posts
    1,545
    Post Thanks / Like
    Quote Originally Posted by jengum View Post
    Where did you source the five indicator lights to the left of the tachometer?

    Also did you decide on a source for the backup light? I was looking at your first build thread photos and it looks like there are LED lights mounted mounted below the trunk area? I see some builders are using the mini Cooper lights which are DOT compliant but require a body cutout for mounting.

    The competition dash looks great.
    As of right now I am going to use the same lights as last time. Very small and DOT approved. Now that I have a backup camera I will do some testing first though. I may make them bigger and brighter since they will serve an actual purpose. If you want I have some extras. You are welcome to take two of them if that's the route you want to go.

    The indicators I got here. Dark but colorful when lit. Just the right size for my build.

    https://www.amazon.com/gp/product/B0...?ie=UTF8&psc=1
    Build 1 MK4 #10008 - Delivered 03/03/21, Graduated 7/20/22 - Sold 6/6/24
    Build Thread #1 https://thefactoryfiveforum.com/show...been-delivered
    Build 2 MK4 #11061- Delivered 08/24/24
    Build Thread #2 https://thefactoryfiveforum.com/show...006#post562006

  41. #188
    Senior Member Blitzboy54's Avatar
    Join Date
    Oct 2020
    Location
    Albany, NY
    Posts
    1,545
    Post Thanks / Like
    Finishing up the dash wiring. I am waiting on some diodes for the hazards and the rest of the stray wires go into the steering hub. That will house directional, horn and high beams. I secured the dash harness and tested all the circuits with an external power supply. it all seems to be working as it should. Autometer does not make a 16-158 ohm fuel gauge in the style I wanted but they do offer a fully programmable one. I tried to pre program it but I don't think my little power supply had a enough juice to make the program feature work. Have to wait until I get a proper battery to complete that task


    Odd little happenstance my hazard button I purchased from Billet Buttons failed. It stopped latching and doesn't operate properly.Weird because they are generally well made. I am assuming I just got a random dud. in the mean time I have a spare button I was going to use for something else that I can use. I may keep it


    My upholstery arrived from Intatrim safe and sound. Incredibly well made stuff. They are not cheap but for what you get and that they are 100 percent custom made to order the cost is quite reasonable. The quality is exceptional. The trans cover has a layer of foam already attached and it is slightly oversized which is perfect. The door cards are wrapped around plywood. Really nice stuff.


    I set them in and the fit is great. The seat base is smaller than the last set I used and they have a lot of adjustability. The Monaco's I used previously only fit one way and not by a lot. They were also very heavy these are feather lite. These also sit very low so if you use a riser our mount you have a lot of room to work with. I am smitten. I purchased on set of FFR sliders that I never used but still have. I am going to mock up the drivers seat with it to see if that works. I would like to be able to move the seat. if for no other reason than to move the seat forward to clean behind it.


    Last edited by Blitzboy54; 11-27-2024 at 10:17 PM.
    Build 1 MK4 #10008 - Delivered 03/03/21, Graduated 7/20/22 - Sold 6/6/24
    Build Thread #1 https://thefactoryfiveforum.com/show...been-delivered
    Build 2 MK4 #11061- Delivered 08/24/24
    Build Thread #2 https://thefactoryfiveforum.com/show...006#post562006

  42. Likes JimStone liked this post
  43. #189
    Senior Member
    Join Date
    Feb 2022
    Location
    Flower Mound, TX
    Posts
    492
    Post Thanks / Like
    Looks great, I love orange.

    And those 2" roll bars make a big difference. I just ordered a set.

  44. Likes Blitzboy54 liked this post
  45. #190
    Junior Member
    Join Date
    Feb 2023
    Location
    Mechanicville, NY
    Posts
    10
    Post Thanks / Like
    What are the diodes for? I saw another discussion thread about using diodes with the hazardous flasher billet button. Is there a specific wiring diagram for this?

  46. #191
    Senior Member Blitzboy54's Avatar
    Join Date
    Oct 2020
    Location
    Albany, NY
    Posts
    1,545
    Post Thanks / Like
    Quote Originally Posted by jengum View Post
    What are the diodes for? I saw another discussion thread about using diodes with the hazardous flasher billet button. Is there a specific wiring diagram for this?
    The dash wiring for turn signal system for FFR is setup where you run two sets of wires for the turn signals. Left is dark green and right is light blue (there are some other wires for the rear lights bundled in there too but not relevant here) There are 2 separate switches for the turn signal and the hazards. The turn signal has a grey 12v wire fed from the ACC circuit that applies power to either the right or left depending on the position of the switch. The kit comes with a Double Pole Single Throw switch for the hazards. That switch is fed from a pink 12v wire that is fed from the Battery circuit. The switch is designed so that the blue and green do not touch electrically. If they did when you used the turn signal all 4 lights would flash because you would have created a short, but you need power to both sides so the pink wire has a jumper to apply power to both the left and right side when activated.

    I don't want to use that switch, I am using one from Billet Buttons. This button is a traditional On Off. The issue is how do you apply power with this switch to both the left and right without having the left and right connected to each other because if they do touch again the turn signals wont work right. So you can either use a different switch or put diodes in line with the turn signals. Diodes only allow electricity to flow in one direction. You can apply power through them when you activate but you will not have electrical continuity between the turn signal wires. You just have to make sure you install them in the correct direction.
    Last edited by Blitzboy54; 11-29-2024 at 11:11 AM.
    Build 1 MK4 #10008 - Delivered 03/03/21, Graduated 7/20/22 - Sold 6/6/24
    Build Thread #1 https://thefactoryfiveforum.com/show...been-delivered
    Build 2 MK4 #11061- Delivered 08/24/24
    Build Thread #2 https://thefactoryfiveforum.com/show...006#post562006

  47. #192
    Senior Member Blitzboy54's Avatar
    Join Date
    Oct 2020
    Location
    Albany, NY
    Posts
    1,545
    Post Thanks / Like
    As I round third base on the dash I wanted to add a handle and re enforce the dash. The number one thing you will end up telling everyone that gets in the passenger seat for the first time is not to use the windshield to support themselves. It is not load bearing. I like having a grab rail. It gives people something to use to sit and pull themselves up.


    In order to make this functional it has to be bolted to the frame. I used a generic steel strip and bent it to form with a little heat, my vise and a big ol hammer. I drilled and tapped the holes for M8 bolts.


    It also has the bonus of locking the bottom of the dash down. There is zero flex now. I added a steel strap to the drivers side as well. Before final assembly I will likely powder coat the straps. They will rust in the humidity if you don't


    I re designed the head unit enclosure a bit. The rake was too deep. It created a number of fitment issues. I also had made the first one with galvanized steel. I ordered a proper piece of aluminum (.040) and it is much more rigid. I flattened it out a bit and made it a touch shorter I added a few strips of heat mat under the trans dash and set the cover on it so I could measure with everything at it's final thickness. Everything fits much better now


    I pulled everything down and finished the wiring. I installed diodes on the hazard input and tested. Everything works exactly as it should. I also put the rest of the switches in permanently. My bottom row of switches is (from left to right) Heater core bypass valve, heater fan, hazards, wipers and headlights.


    Lastly I wrapped the enclosure in carbon fiber wrap, it matches the dash nicely and the head unit looks nice against it.

    Last edited by Blitzboy54; 12-01-2024 at 08:20 PM.
    Build 1 MK4 #10008 - Delivered 03/03/21, Graduated 7/20/22 - Sold 6/6/24
    Build Thread #1 https://thefactoryfiveforum.com/show...been-delivered
    Build 2 MK4 #11061- Delivered 08/24/24
    Build Thread #2 https://thefactoryfiveforum.com/show...006#post562006

  48. Likes ydousurf, JimStone liked this post
  49. #193
    Senior Member PNWTim's Avatar
    Join Date
    Aug 2024
    Location
    Damascus OR USA
    Posts
    171
    Post Thanks / Like
    Looking really good. The CF wrap is great to tie it in with the dash.
    Coupe complete kit ordered: 9/26/24. Gen 4 Coyote. T-56. IRS w/3.73. Wilwoods. PS. HVAC. Side windows.

  50. Thanks Blitzboy54 thanked for this post
  51. #194
    Namrups's Avatar
    Join Date
    Sep 2021
    Location
    Mechanicville, NY
    Posts
    1,164
    Post Thanks / Like
    Where do you get the carbon fiber wrap?
    Scott Pregont
    Present build: 65 Daytona Coupe #393 - Forte 427 EFI crate w/TKX 2.87/ .81 - Ordered 11/16/21 - Delivered 6/23/2022
    Location: Mechanicville, NY
    Build Thread: https://thefactoryfiveforum.com/show...na-Coupe-build
    My Albums
    Build album: https://thefactoryfiveforum.com/album.php?albumid=2151
    Build album 2: https://thefactoryfiveforum.com/album.php?albumid=2437
    Special Tools, Custom Parts, misc supplies: https://thefactoryfiveforum.com/album.php?albumid=2045
    Garage Pics: https://thefactoryfiveforum.com/album.php?albumid=2041
    POR15 First Try: https://thefactoryfiveforum.com/album.php?albumid=2068
    Silicone application tips: https://thefactoryfiveforum.com/album.php?albumid=2063

  52. #195
    Senior Member Blitzboy54's Avatar
    Join Date
    Oct 2020
    Location
    Albany, NY
    Posts
    1,545
    Post Thanks / Like
    Quote Originally Posted by Namrups View Post
    Where do you get the carbon fiber wrap?
    I broke the bank. LOL

    https://www.amazon.com/gp/product/B0...e?ie=UTF8&th=1
    Build 1 MK4 #10008 - Delivered 03/03/21, Graduated 7/20/22 - Sold 6/6/24
    Build Thread #1 https://thefactoryfiveforum.com/show...been-delivered
    Build 2 MK4 #11061- Delivered 08/24/24
    Build Thread #2 https://thefactoryfiveforum.com/show...006#post562006

  53. Thanks ydousurf thanked for this post
  54. #196
    Not a waxer Jeff Kleiner's Avatar
    Join Date
    Feb 2011
    Location
    Bloomington, Indiana
    Posts
    8,678
    Post Thanks / Like
    Hey Jesse,
    Which Intatrim model are the seats?.

    Jeff

  55. #197
    Junior Member
    Join Date
    Nov 2024
    Posts
    5
    Post Thanks / Like
    Good Luck and have a fun with your project! Awesome project!

  56. Thanks Blitzboy54 thanked for this post
  57. #198
    Senior Member Its Bruce's Avatar
    Join Date
    May 2014
    Location
    Houston TX
    Posts
    214
    Post Thanks / Like
    Blog Entries
    1
    Quote Originally Posted by Jeff Kleiner View Post
    Hey Jesse,
    Which Intatrim model are the seats?.

    Jeff
    Those are Stoneleighs.
    MK4, 427LS3, IRS, T56 Magnum, Wilwoods

  58. Likes Blitzboy54 liked this post
  59. #199
    Senior Member ydousurf's Avatar
    Join Date
    Feb 2019
    Location
    Greality, Colorado
    Posts
    397
    Post Thanks / Like
    Blitz, the dash looks awesome and thanks for the link to the vinyl wrap too! I was planning on doing my lower dash kick-out and trans tunnel in real carbon fiber, but maybe this an easier route to go? I’ll have to decide on which direction to go. Again thanks for sharing that info.

    Jeff, here is a link to those seats. They are the model: Stoneleigh - (Not cheap but you can go full customized with them).
    https://intatrim.co.uk/products/stoneleigh/

    I was considering getting those as well, but now I’m thinking of getting Corbeau Evolution X seats. I’m just not sure if these will fit?

    Doug
    Dj or Doug or TheLateDude
    ----- #19 of 25th Anniversary MKIV 9769 -----
    Build Link: https://thefactoryfiveforum.com/show...-Slow-Progress
    Ordered: Oct 07, 2019 / Production: Dec 28th, 2019 / Shipped: Jan 19th, 2019 First Start: In the future... / Graduation: Even further in the future...

  60. Thanks Blitzboy54 thanked for this post
  61. #200
    Senior Member Blitzboy54's Avatar
    Join Date
    Oct 2020
    Location
    Albany, NY
    Posts
    1,545
    Post Thanks / Like
    Quote Originally Posted by Jeff Kleiner View Post
    Hey Jesse,
    Which Intatrim model are the seats?.

    Jeff
    As others have said they are Stoneleigh. I learned about these from Hacksaw84's build. He was the first one I had ever seen use them.

    Just to educate anyone that is interested this is how it works. Reach out to Robin via the websites email. He will give you pricing and lead time. You can also call but if you don't have an international plan I recommend using Whatsapp or Google voice. Calls to the UK are very pricey. Once you've agreed on everything he requires payment up front. He uses Paypal and it does the conversion for you. Once paid you can provide him with anything to show him what you want.

    Mine were about 12 weeks. Once complete he will send you some pics and then ship them.

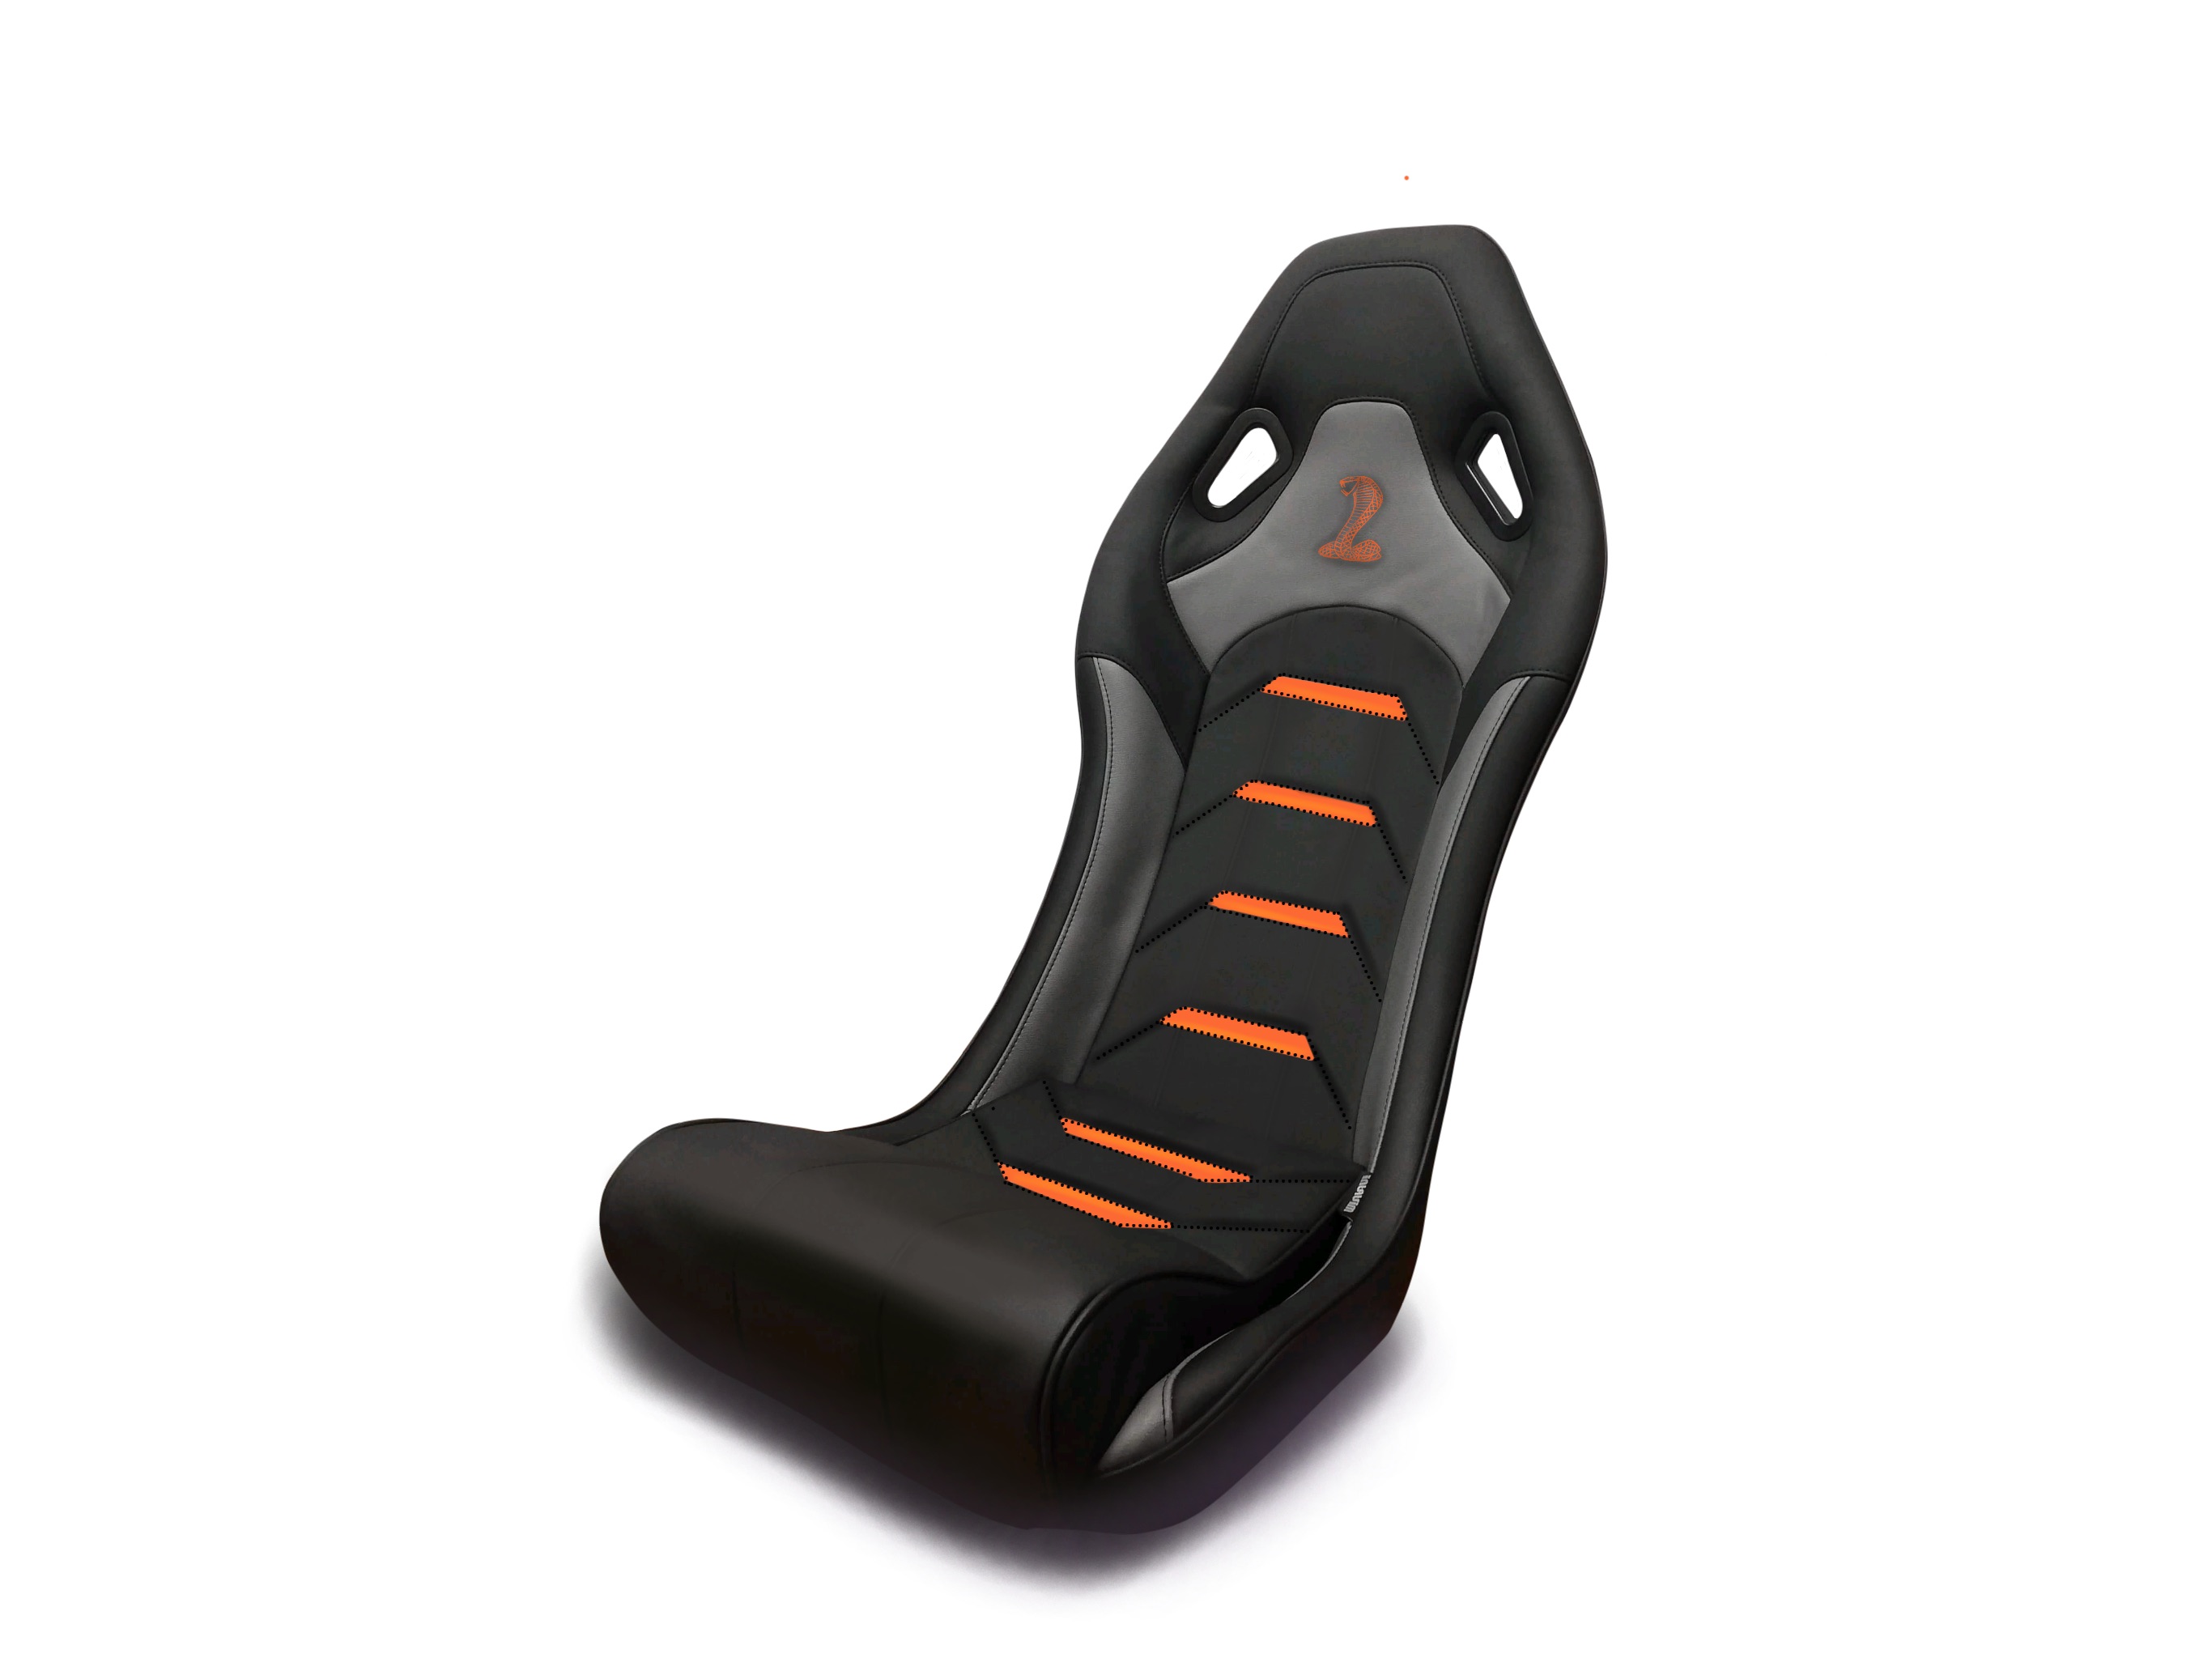
    Just to give you an idea I sent him this picture that looks like the work of a pre schooler
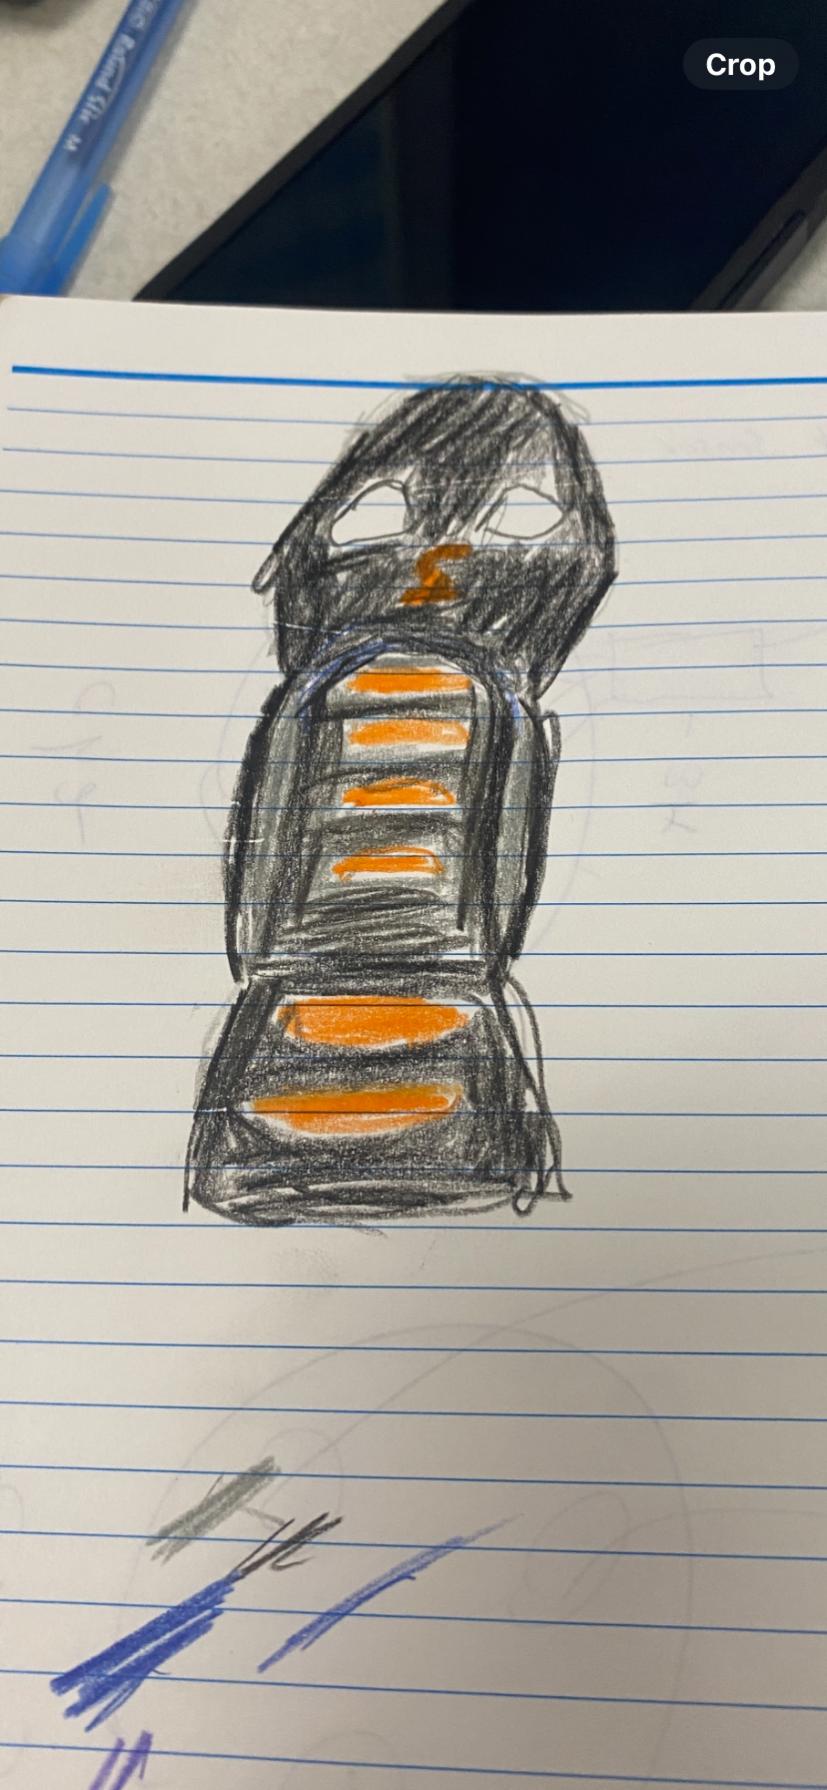


    and he returned me this 20 minutes later
    Build 1 MK4 #10008 - Delivered 03/03/21, Graduated 7/20/22 - Sold 6/6/24
    Build Thread #1 https://thefactoryfiveforum.com/show...been-delivered
    Build 2 MK4 #11061- Delivered 08/24/24
    Build Thread #2 https://thefactoryfiveforum.com/show...006#post562006

Page 5 of 6 FirstFirst ... 3456 LastLast

Posting Permissions

  • You may not post new threads
  • You may not post replies
  • You may not post attachments
  • You may not edit your posts
  •  

FFMetal

Visit our community sponsor