-
Cracking Body-Bumper Grommets the answer?
Hey all
Newb here to the site. Dreamed of a cobra for 40 years and finally got one. Due to time constraints and resources (not skill) I could not build one. I spent a lot of time researching and driving my wife nuts looking at this one and that one........I think she almost bought one just to bring one home 
So I finally pulled the trigger.
I reviewed the build manual and it looks like the previous owner built it to spec per the manual.
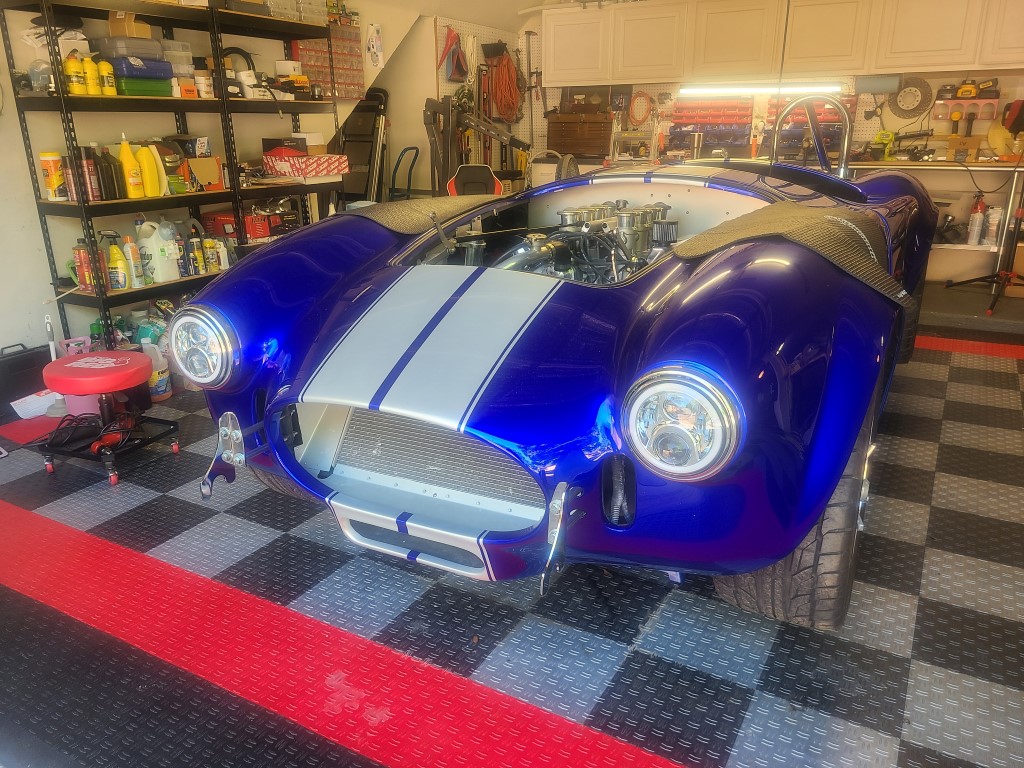
Its a 2018 build FFR Mk4 with ~500 miles on it. 302cu fairly stock nothing crazy. Bought with a blemish on top of passenger fender (seam where the nose cone, fender and hood surround meet.) Ive done some body work in my day so what I saw didn't overly concern me. Wasn't too concerned as it looked like paint blemish and still does.
HOWEVER, in the past few weeks a delamination has presented itself quickly in the same spot on the drivers side. (ill try to post a picture).
The paint is aged but well done. Could have easily got another 5-10 years out of it had I not had cracking
I suspect, while I don't bag on the car, I drive it rougher than the previous owner.
What may be notable is this car started it life in hot, dry environment and was stored indoors. When I purchased the car I moved it down to a valley that's much more humid. It spends its life with me in a temp/humidity controlled shop so I can rule out that.
I notice on previous Mk's I looked at there were rubber grommets on the quick jacks. Obviously this allows the body to move as opposed to the hard mounting method shown in our build books.
When I asked FFR about this a month ago (before the cracking started) they said they "do not recommend the grommets on the Mk4 as this is an integral mounting method on the Mk 4 as opposed to older gens".
When I reached out again after the cracking started on the drivers side, FFR's response is "Those are grommets that we do not have available, and do not have any real information on them".
This has been my experience so far with FFR and makes me glad I didn't try to build one from scratch. Where I would expect the manufacturer to be able to provide info on their own product, I routinely hit a dead end, hence why I am posting this question here.
I literally have a set of these grommets in my hand from Finish Line but am unsure if I should put them in, waste of time, cause more issues?
Does anyone here have the bumper grommets on a Mk4 and if so what's been your experience?
Any info would be kindly appreciated
Main Cobra.jpgDrivers Fender Crack.jpgDrivers Fender Crack 2.jpgMain Car 2.jpg
-
I doubt the presence or absence of grommets is the source of your cracking and delamination, but FWIW lots of folks, myself included, have used the rubber grommets to mount the quickjacks. My completely uneducated assessment is that some vibration isolation at those points is a good thing.


MkIV Roadster build: Gen 2 Coyote, IRS, TKO600. Ordered 10/24/18. Delivered 1/29/19. Engine installed 8/8/21. First start 9/12/21. First go-kart 9/17/21. Off to paint 4/11/22. Back from paint 12/30/22.
Build thread here.
-
Did you have to do anything special to the hole size to fit the grommets?
I guess you had to get some full length SS tube to go from the quick jack, through the grommet to the frame?
-
My body/paint guy installed them so I'm not sure if he had to massage the holes to fit the grommets. Finish Line also has the stainless steel tubes you want to use that go along with the grommets you have. I cut them all down a bit in order to tuck the quick jacks in a bit closer to the body.
Edited to add: since you're new here I'll mention that some folks get triggered at the suggestion of purchasing from this vendor, as some people have had bad experiences with them. I've purchased from them several times and have always received my parts (albeit with terrible communication). Others have not been so lucky. Just pointing this out, as mentioning this vendor is apt to derail a thread.
Last edited by JohnK; 08-27-2024 at 05:52 PM.
MkIV Roadster build: Gen 2 Coyote, IRS, TKO600. Ordered 10/24/18. Delivered 1/29/19. Engine installed 8/8/21. First start 9/12/21. First go-kart 9/17/21. Off to paint 4/11/22. Back from paint 12/30/22.
Build thread here.
-
Post Thanks / Like - 1 Thanks, 0 Likes
 Doc76
Doc76 thanked for this post
-
Senior Member

x2 on what JohnK said about **********. Most guys nowadays source their grommets from Metro Moulded Parts (#EX 17-B), but since you have a set on-hand I wouldn't hesitate to use them. Check out https://thefactoryfiveforum.com/show...-jack-Grommets for information on how to install, and note that you'll need larger OD tubing around the bolts to make the grommets work.
There have to be hundreds if not thousands of MKIV builds using those grommets (including mine). No complaints so far blaming the grommets for the problem you describe.
John
Last edited by phileas_fogg; 08-27-2024 at 06:49 PM.
MK IV Roadster #8631
Ford 302, Holley Terminator EFI, T5z, 3.55 Rear End, IRS, 17 Halibrand Replicas (9 front, 10.5 rear), Nitto 555 G2s (275/40ZR17 front, 315/35ZR17 rear), Fast Freddies Power Steering, F5 Wilwood Brakes, FFMetals Firewall Forward, Fortes Hydraulic Clutch & Throttle Linkage
https://www.ffcars.com/threads/phile.../#post-4776313
-
Post Thanks / Like - 1 Thanks, 1 Likes
Doc76 thanked for this post
-
Not a waxer

I use the grommets on every car along with changing the quick jack tubes to 3/4" OD and send the "horseshoes" that bridge between the chassis and parking lamp base to the trash. Some of the other pro painters here like Jeff Miller and Ken Pike do the same. Several cars that I have had come in for body & paint with them (the horseshoes) installed have had fractures in the fiberglass around the parking lamp pad. Regarding the delamination area on the top of the front fended it has nothing to do with whether or not it has rubber grommets for the quick jacks and is strictly a matter of flawed bodywork &/or paint preparation.
Jeff
-
Post Thanks / Like - 1 Thanks, 1 Likes
Doc76 thanked for this post
-
Hey guys thanks for the feedback.
Its much appreciated.
The paint is so good everywhere else its extremely disappointing 
I guess the $ thats was going to go to stroking the 302 out will now go to fixing the body. Super bummed!
Yes my experience purchasing parts from F##ish Line has not been a great one. Im the future Ill redirect to another vendor for several reasons.
-
I do wonder why FFR doesnt do/recommend grommets on the body.
Do you guys think theres enough support elsewhere to let the body safely float at the front and back?
-

Steve >> aka: GoDadGo

Doc,
I went a completely different route, as I tend to do, to support the front of the body.
I got the idea because Jeff Kleiner adds supports to the front of the body near the hinges.
You can see the brackets I made between 1:30 and 2:24 minutes into the video linked below:
https://youtu.be/V38Jajo_qOQ
These brackets supports the body plus I did use the rubber grommets for my bumper overriders along with the horse shoes.
I was very careful dealing with the horse shoe brackets and everything aligned well with good support at all contact points.
After seeing your cracks I inspected my car just to make sure & things were still look good with no cracking by the lights.
Hope This Helps & Good Luck!
Steve
Three Year Update Video:
https://youtu.be/iwslgKJUaKc
Last edited by GoDadGo; 08-28-2024 at 03:18 AM.
-
Post Thanks / Like - 1 Thanks, 0 Likes
Doc76 thanked for this post
-
Senior Member

If you're looking for grommets, I got some here last year. grommetts.PNG
FFR 9883 MKIV ,427 Windsor engine
TKX 5 speed, Three Link 3.55 gears
Power Steering, Leather Seats
18" Wheels and Tires, Drop Trunk
Fun Package
-
Post Thanks / Like - 1 Thanks, 0 Likes
Doc76 thanked for this post
-

Originally Posted by
Doc76

When I reached out again after the cracking started on the drivers side, FFR's response is "Those are grommets that we do not have available, and do not have any real information on them".
My guess is that like much of the other included hardware items, the grommets came in a "kit" made up by a 3rd party fastener/hardware house. These houses are not beholden to FFR to tell them where they source items from. Thus the answer you got...
OEMs like FFR do this to help keep prices down.
Earl
1st Speedstar in Canada 31 March 2023.
Built by me 302 engine, AOD trans, 3.55 IRS.
-
Post Thanks / Like - 1 Thanks, 0 Likes
Doc76 thanked for this post
-
Not a waxer
Originally Posted by
narly1
My guess is that like much of the other included hardware items, the grommets came in a "kit" made up by a 3rd party fastener/hardware house.
FFR does not include grommets for the QJ/bumper tubes. They run them through the body holes and leave the openings untrimmed with the tubes offering no body support. The early Mk4s used a set of 8 angle cut split tubes (all of different lengths!) and 4 oversized insulating washers at the front...this method didn't really work out especially well and that's when many builders started going to the grommet and 3/4" tube method to secure the nose.
Jeff
-
Post Thanks / Like - 1 Thanks, 0 Likes
Doc76 thanked for this post
-
Thanks guys
Seemingly stupid question
.what do you mean by horseshoes?
Also when you guys used 3/4 SS tubes through the grommets, did you place any bushings inside the tube between the 3/4 tube and the bolts?
Given the bolts are 3/8, thats an awful lot of slop.
Cheers
-
I didn't use any bushing inside the SS tube but I did replace the bolts that FFR provides with larger all-thread (don't remember the exact size, maybe 7/16" ?) so I could use SS acorn nuts on the exterior (see my photos above) and nylock nuts on the inside.
The horseshoes that Jeff is recommending you don't use are these bits:

MkIV Roadster build: Gen 2 Coyote, IRS, TKO600. Ordered 10/24/18. Delivered 1/29/19. Engine installed 8/8/21. First start 9/12/21. First go-kart 9/17/21. Off to paint 4/11/22. Back from paint 12/30/22.
Build thread here.
-
Post Thanks / Like - 1 Thanks, 1 Likes
Doc76 thanked for this post
-
Ah ok, noted thanks guys. Looks like mine have already been deleted. I dont have them which would explain why I couldnt see what was being described LOL
For future spare grommets Im trying to avoid buying again from Finish Line just because of reliability of the order delivery.
Im not seeing rear bumper grommets on any sites other than Finish Line.
Good chance Im doing a husband glance as my wife would say but can someone post a link to the rear grommets from Icon, or Rock Auto, or?
Much appreciated
-
Senior Member

Hi Doc76, check post 10 above but hold your breath. I ordered them yesterday and with shipping to Va. they were over $40.
JR
Mk4 complete kit #9059 ordered 1/19/17 delivered 3/23/17, 2015 IRS, Fortes/DART347,TKO 600, hyd clutch, P/S, 12.88 wilwood brakes front and rear, heater/defrost and vintage gauges
First start and go-cart 4/11/18. Taken To Whitby Motorcars Greensboro, N.C. 2/5/21 for body/paint
-
Post Thanks / Like - 1 Thanks, 0 Likes
Doc76 thanked for this post
-
Not a waxer
Originally Posted by
Doc76
Thanks guys
Seemingly stupid question….what do you mean by “horseshoes”?
Also when you guys used 3/4” SS tubes through the grommets, did you place any bushings inside the tube between the 3/4” tube and the bolts?
Given the bolts are 3/8”, that’s an awful lot of slop.
Cheers
The bolts---at least as supplied by FFR, perhaps the builder of your car did something different---are 7/16". The tubing I use is 0.75" OD x 0.125" Wall x 0.50" ID Stainless Round Tube from onlinemetals.com. The bolts don't have to be a precision fit through the tube; when the tubes are tightened to the chassis they are are rock solid. I do not use grommets at the rear because we do not want the back of the body "floating" horizontally. We want to be able to adjust the lower valance in or out as necessary to match the trunk lid. With grommets and pass through sleeves this is not possible. I put a 1/8" thick rubber washer against the body along with a SS washer and then the rear tubes.
Looking at the photo of your car that shows the front it appears that you have the early Mk4 configuration of split tubes that sandwich the body with rubber insulated SS washers. This would explain why you don't have the horseshoes. FFR used the split tube/washer configuration up until about 2012, 2013 or so and then went to solid tubes that pass all the way through the body and added the horseshoe brackets. If you're so inclined you can use the grommets that you got from ********** along with the correct tubing that I mentioned. After having built cars using all three methods of attaching the nose this is by far the best option.
Jeff
-
Post Thanks / Like - 1 Thanks, 0 Likes
Doc76 thanked for this post
-
Thanks guys
So Jeff you would recommend moving to the tube and grommets but just so I am clear you would keep with the deleted-horseshoe method, yes?
-
Senior Member

Originally Posted by
Doc76
Thanks guys
Seemingly stupid question….what do you mean by “horseshoes”?
Also when you guys used 3/4” SS tubes through the grommets, did you place any bushings inside the tube between the 3/4” tube and the bolts?
Given the bolts are 3/8”, that’s an awful lot of slop.
Cheers
I didn't like the slop between the tube and bolt and did buy some brass bushings from mcmaster-carr with the appropriate OD/ID.
-
Not a waxer
Originally Posted by
Doc76
Thanks guys
So Jeff you would recommend moving to the tube and grommets but just so I am clear you would keep with the deleted-horseshoe method, yes?
That's how I've done dozens of 'em.
Regarding "slop" between the bolt and tubes; with a 7/16 bolt in a .50 ID tube we're talking 1/32" (.03125") all the way around. Since the assembly of tube, bolt and bumper are all drawn tight to the chassis it's a non-issue---but if you want to make it a precision fit go ahead and knock yourself out! 
Jeff
Last edited by Jeff Kleiner; 08-29-2024 at 09:42 AM.
-
Post Thanks / Like - 1 Thanks, 0 Likes
Doc76 thanked for this post
-
Well Used Member

As for me, I used McMaster 2129T15 FEP Clear Tubing for Chemicals 7/16" ID, 1/2" OD for the Stainless Steel ¾" OD, ½ ID tube, and the 7/16-14 (grade 8) bolts. Works good and easy to assemble (slip fit both the bolt and tube).
If Brute Force doesn't work, you're not using enough of it.
Basic Stuff: MK4 Complete Kit #8439, Wilwood's, 17" Halibrands. Extra Stuff: Stainless brake and fuel lines, Breeze cooling, Battery mount, SS Roll Bar. Old Fart Stuff: Heater, Seat Heaters, Footbox Fresh Air, Stereo, Keyless ignition, Power Steering, Hyd Clutch.
Young & Dumb Stuff: 427w Dart, TKO600, 3 link Moser M9/Ford 9", 3.5:1, Eaton TruTrac Posi. Graduation Thread
-
Post Thanks / Like - 0 Thanks, 1 Likes
-
David aka Ducky2009

Something else to look at. The body does not sit on the 3/4" rails under the hood opening edge. The manual says to add the foam to fill the gap. This does not support the body, only seals the gap at that point. DON'T lean on the body while looking at the engine. If you do, you're flexing the body. I added PVC (3/4" x 1", available at Home Depot, etc..) to fill the gap. The gap is approx 3/4" at the firewall, but tapers down close the radiator. I didn't like the idea of the horseshoe brackets and the rubber grommets to support the nose.
Last edited by Ducky2009; 09-01-2024 at 03:43 PM.
MK4 Build #9035 Delivered 2/17/17, First Start & Go-Kart 6/2/17, Licensed 9/1/17
Paint - Lightning Blue Metallic, No Hood Scoop, No Stripes
Gen 2 Coyote Engine & TKO-600. Solid Axle, 8.8-3.55, Power Steering, Power Brakes, Dual Roll Bars
Heater and Glove Box, Drop Trunk, Wipers, Radio, FFR Vintage Gauges, Custom Dash
Build Thread:
http://thefactoryfiveforum.com/showt...MK4-Build-9035
-
Post Thanks / Like - 0 Thanks, 1 Likes
-
Some folks will add shims or strips of plywood or rubber to the 3/4" tubes to support the body at the nose. I added two rubber bumpers for the body to rest on so it's not floating completely. Here's the P/N (from McMaster of course).

MkIV Roadster build: Gen 2 Coyote, IRS, TKO600. Ordered 10/24/18. Delivered 1/29/19. Engine installed 8/8/21. First start 9/12/21. First go-kart 9/17/21. Off to paint 4/11/22. Back from paint 12/30/22.
Build thread here.
-
Post Thanks / Like - 1 Thanks, 0 Likes
Doc76 thanked for this post
-
On thanks guys
I looked and theres nothing under mine in that spot.
-
Senior Member

I took the horseshoe brackets off and the turn indicators fell off
-
Post Thanks / Like - 0 Thanks, 1 Likes
-
Senior Member

Mike, don't you just hate when that happens.
Mrk III, 331 stroker, Borla stack injection, T5, 3:55 IRS, Power steering and brakes. Kleiner body & paint
-
Post Thanks / Like - 0 Thanks, 1 Likes
-
-
Post Thanks / Like - 1 Thanks, 0 Likes
-
Originally Posted by
rich grsc
Mike, don't you just hate when that happens.
~18yrs ago just after I finished building my cobra I took it out for one last drive before putting it away for the winter. Just before heading home I decided to wring it out and proceeded to do ~140mph in a 50mph zone.
Except when I stomped on it there was a cop behind me, but I didn't see him because I didn't have any rear view or side view mirrors because they look like ***.
He ended up chasing me for about a mile, again because i didn't see him until I went to do a u-turn to go home.
When he got out he started yelling at me, saying he understood why I couldn't hear him (straight piped 408W w/ big cam) but how come I didn't see him. Then he noticed my lack of mirrors.
I told him the vibrations caused them to fall off and I was waiting on Summit to ship me a replacement set.
He yelled at me for a good 10 minutes threatening to impound the car, then just said 'okay, cool car, don't do that **** again' and let me go.
I installed a rearview mirror after that but those damn sideview mirrors never showed up from Summit. Oh well, sideview mirrors look like ***.
-
It appears that the ideal tube size (3/4 OD, .120 wall thickness) is hard to come by in my neck of the woods.
I do readily have 3/4 OD, .070 wall SS however.
You guys think thatll be sufficient?
I guess I could always machine a bushing.
-
Not a waxer
It will be fine. As I said previously it does not need to be a precision fit; the bolts will draw up tight.
Jeff
-
-
Do you guys recall if you straight-cut the tubes or did you have to cut them on an angle?
I have the FFR bumpers Ill be putting on at the same time as the grommets.
-
Not a waxer
Square cut, 5.5” in length.
Jeff
-
Post Thanks / Like - 1 Thanks, 0 Likes
Doc76 thanked for this post
-
Thanks Jeff
Is the 5.5 cut length good for the overiders with the Tube bumper, or is that only for the overiders?
-
Think I figured it out on the weekend as to why my body cracked. While in the wheel well replacing the booster I ran my hand along the underside where the crack is forming and along the seam. The body, on both fenders, is noticeablely thinner in those spots. And I mean by a lot.
There are obvious depressions in the locations of the seams. Without measuring I would venture to say the body is half as thin in these locations.
Bummer
Guess when I repaint I have to do some inner fender work too. ")
-
Not a waxer
They are not seams. These bodies are continuous layup. That said, if the person who did the body didn’t know better they may have ground deep into the mold parting lines without restoring structure afterwards.
Jeff
-
Post Thanks / Like - 1 Thanks, 0 Likes
Doc76 thanked for this post
-
Senior Member

The seams represent the parting lines of mold tool segments assembled to have gel coat and wet FRP applied. If your body was repaired it could have been convenient to repair at the seam.
In the marine industry production parts (hull & deck) are weighed after they come out of the mold as a quality check (too thin) and cost control (too thick). Weight does not address chopper gun application/distribution of material. High stress areas will have roving (chopped strand mat or woven cloth) applied for additional strength. My Dino replica body has 100% cloth over mat, molded by a performance boat company. For the most part it thin and strong.
jim
-
Post Thanks / Like - 1 Thanks, 0 Likes
Doc76 thanked for this post
-
Originally Posted by
J R Jones
The seams represent the parting lines of mold tool segments assembled to have gel coat and wet FRP applied. If your body was repaired it could have been convenient to repair at the seam.
In the marine industry production parts (hull & deck) are weighed after they come out of the mold as a quality check (too thin) and cost control (too thick). Weight does not address chopper gun application/distribution of material. High stress areas will have roving (chopped strand mat or woven cloth) applied for additional strength. My Dino replica body has 100% cloth over mat, molded by a performance boat company. For the most part it thin and strong.
jim
Good to know, thanks for the explanation.
Last edited by Doc76; 01-20-2025 at 10:56 AM.
-
Originally Posted by
Jeff Kleiner
They are not seams. These bodies are continuous layup. That said, if the person who did the body didn’t know better they may have ground deep into the mold parting lines without restoring structure afterwards.
Jeff
In your experience is this something that a body shop will be able to fix from top-side or is that more in depth to fix it correctly from underneath (where I am feeling the depressions) in the wheel wells?
-
Not a waxer
Originally Posted by
Doc76
In your experience is this something that a body shop will be able to fix from top-side or is that more in depth to fix it correctly from underneath (where I am feeling the depressions) in the wheel wells?
Can't answer without seeing it.
Jeff
-
Post Thanks / Like - 1 Thanks, 0 Likes
Doc76 thanked for this post


 Thanks:
  Likes:


 Reply With Quote
