-

Originally Posted by
460.465USMC

Thanks for the background and chiming in, John. I recall what Edwardb did to get a workable oil pickup on his Gen 3. It didn't look easy to me. Glad I have PLENTY of stuff to do on the build before I'm in a pinch for a shallow oil pan/oil pickup. I'm hoping Moroso has it figured out by the time I'm ready.
Agreed, Georgie puts out high quality/custom work. I remember what he did on your build. It was great.
Good to know - I haven't even ordered the kit yet so no where near needing to deal with this, I'm just trying to get all my ducks in a row before I drop any cash on this project. I've also heard from my Canadian rep that FFR is working on the driver's side header for it since the bolt pattern is different (same as the 5.2 from what I've read) and that's coming soon. I think the twin intake should fit and have seen some good videos about how it makes the car more drivable at low rev's and also increases the power (like we need more right?). I just feel that overall it has more potential but like others have said the 4x is plenty.
-
For those that are interested this is a good video that compares the single Gen 3 to the Gen 4 dual intakes - https://youtu.be/lMyA_6rJJAg?si=f_vKnTc-IZYTYnHt
-
Senior Member

Testing the DIY Tubing Straightener
I previously mentioned making a DIY tubing straightener I copied from a design I found on YouTube. Yesterday, it was finally time to test it on the 3/8" SS tubing I'll be using for my supply and return fuel lines. It worked well.
If you have absolutely nothing better to do, here's a one-minute video of me straightening my first 6' section of tubing. The genius of this design is that it's vice mounted. This makes it easy to finely adjust the two sets of pulleys to press against the tube with just the right amount of clamping force. Not too much. Not too little.
Next comes the challenging part (for me): forming the tubes to run through the left side of the transmission tunnel as others have done. I really struggled to bend the brake tubing on my Roadster build. Multidimensional thinking is not my forte. I suspect this time will be no different. I will have to estimate the location of the jog for T-56 shifter clearance, as I don't yet have my transmission. Thankfully, there are pictures from others who've already done this.
Note: after this post, I noticed the 3/8" SS tubing I straightened was distorted. It appears I applied too much pressure to the pulleys, and now the tubing is oval in spots. I tried additional pieces, eating most of the way through the 25' roll of tubing without good results. Huge bummer! Probably just my inexperience/lack of skill, as I'm sure this DIY tool will work if done correctly. Stepping back to consider this, I decided to wave the white flag on stainless, and go with SS braided PFTE for fuel lines, and Ni-Cop for brake lines.
See below for additional details on what happened.
Last edited by 460.465USMC; 01-19-2025 at 02:36 PM.
Chris
Coupe complete kit. Index. Delivered: 4/22/24.
Build Thread. Coyote Gen 4X. T-56. IRS w/3.55. Wilwoods. PS. HVAC. Side windows.
MK4 Complete kit.
Build Thread Index. Delivered: 10/15/2020. Legal: 7/25/23. Coyote Gen3. TKO600 (0.64 OD). IRS w/3.55. PS. Wilwoods. Sway bars. This build is dedicated to my son, Benjamin.
Build Thread.
-
Senior Member

Apparently I have nothing better to do so I watched the video  . It looked like it worked pretty well but difficult to tell from the angle of the camera. Do you feel like it straightened the line well or were there still humps and jogs in it afterwards?
-
Senior Member
Very little if any in the way of humps or jogs. The 6'3" piece I straightened has a gentle bow. I'm a newbie in all this, so I may prove myself wrong here, but I don't expect the slight bow to come into play as I bend the tube. I'll see if I can grab a picture and post here.
Chris
Coupe complete kit. Index. Delivered: 4/22/24.
Build Thread. Coyote Gen 4X. T-56. IRS w/3.55. Wilwoods. PS. HVAC. Side windows.
MK4 Complete kit.
Build Thread Index. Delivered: 10/15/2020. Legal: 7/25/23. Coyote Gen3. TKO600 (0.64 OD). IRS w/3.55. PS. Wilwoods. Sway bars. This build is dedicated to my son, Benjamin.
Build Thread.
-
Post Thanks / Like - 0 Thanks, 1 Likes
-
Senior Member
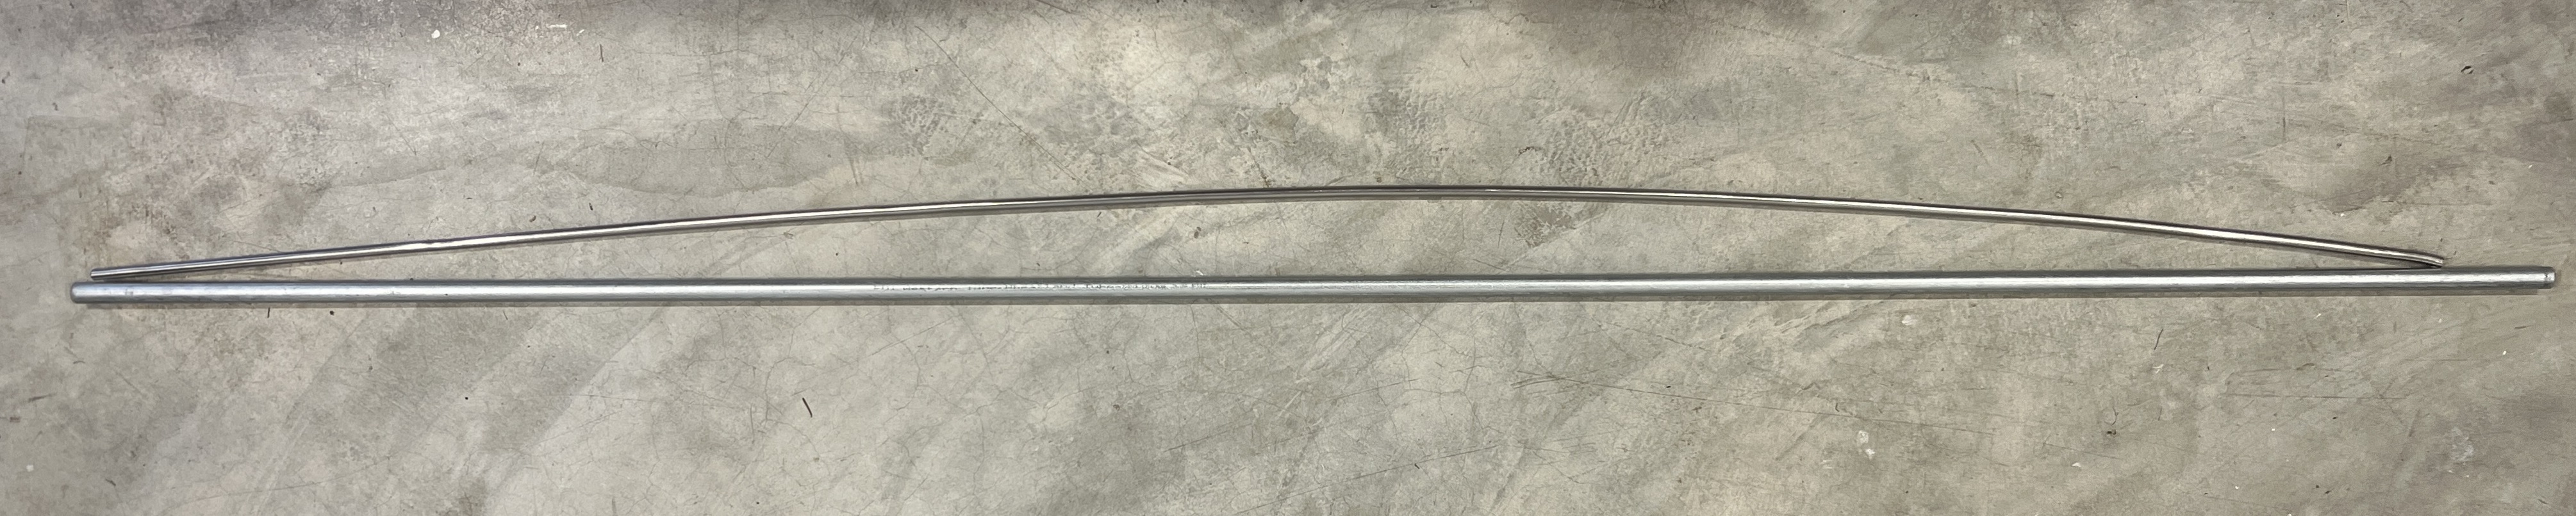
Here's a picture of the 3/8" SS tubing next to a piece of rigid conduit after I ran it through my DIY straightener. I don't know if it's typical to have a gentle curve in coiled SS tubing after it's been through a straightener. Or, if my straightening process needs improvement?
Chris
Coupe complete kit. Index. Delivered: 4/22/24.
Build Thread. Coyote Gen 4X. T-56. IRS w/3.55. Wilwoods. PS. HVAC. Side windows.
MK4 Complete kit.
Build Thread Index. Delivered: 10/15/2020. Legal: 7/25/23. Coyote Gen3. TKO600 (0.64 OD). IRS w/3.55. PS. Wilwoods. Sway bars. This build is dedicated to my son, Benjamin.
Build Thread.
-
Hey Chris. Nice work with the DIY straightener. That’s pretty cool. When I was straightening coils of SS tubing I ended up with a similar bow in the tubing. In my experience, ff you run it through again, pulling down slightly on the end as it’s coming out of the straightener in the opposite direction of the bow, it should straighten it out. A tiny bit of bow isn’t a big deal. The tubing has enough spring in it that as you set it in its final position on the chassis and clamp it you can pull it straight.
MkIV Roadster build: Gen 2 Coyote, IRS, TKO600. Ordered 10/24/18. Delivered 1/29/19. Engine installed 8/8/21. First start 9/12/21. First go-kart 9/17/21. Off to paint 4/11/22. Back from paint 12/30/22.
Build thread here.
-
Post Thanks / Like - 1 Thanks, 0 Likes
-
Senior Member
Gen4X ECU Shipped!
I thought there could be some interest in an update on my Coyote Gen 4X ECU (M-6017-M50HM). I received notice today that it finally shipped (Summit Racing). I emailed Dan G. at F5, as I'm curious if they've also received theirs, or will receive it soon. Looking forward to their Coyote fitment update for the Gen 4X.
Chris
Coupe complete kit. Index. Delivered: 4/22/24.
Build Thread. Coyote Gen 4X. T-56. IRS w/3.55. Wilwoods. PS. HVAC. Side windows.
MK4 Complete kit.
Build Thread Index. Delivered: 10/15/2020. Legal: 7/25/23. Coyote Gen3. TKO600 (0.64 OD). IRS w/3.55. PS. Wilwoods. Sway bars. This build is dedicated to my son, Benjamin.
Build Thread.
-
Post Thanks / Like - 0 Thanks, 1 Likes
-
Senior Member
Fuel Tank Progress. Fuel Line Fail.
Fuel Line Fail
Bad news first--not bad, really. Just disappointing. My attempt at 3/8" SS tubing is a Fail. Why? I believe the root cause is my handy dandy DIY straightener (and I was so proud of it!). However, after several attempts, I found the straightener is pressing the tube into an oval shape. I believe this is caused by a slight misalignment between the pulleys as they face each other. One side of pulleys sits >1/16 inch above the other row. Just bad quality control in the straightener manufacturing process (by yours truly). I think the straightener would work fine otherwise, but do keep in mind the amount of pressure from the vise.
I could either re-make/fix my straightener (time), and buy more SS tubing ($$). Or, go with the SS braided option (like I did on my Roadster build). I chose to go braided. Plus, I was able to return the pricey Tube Swage Let-Lok connectors (for the hardline) to cover the braided hose. Big thanks to Mark at Breeze for helping out! A great forum vendor, he is (in my best Yota impersonation)! Ultimately, I decided not to make 3/8" SS tubing a career project. There are so many other challenges I'm looking forward to in this build. Moving on.
Fuel Tank Progress
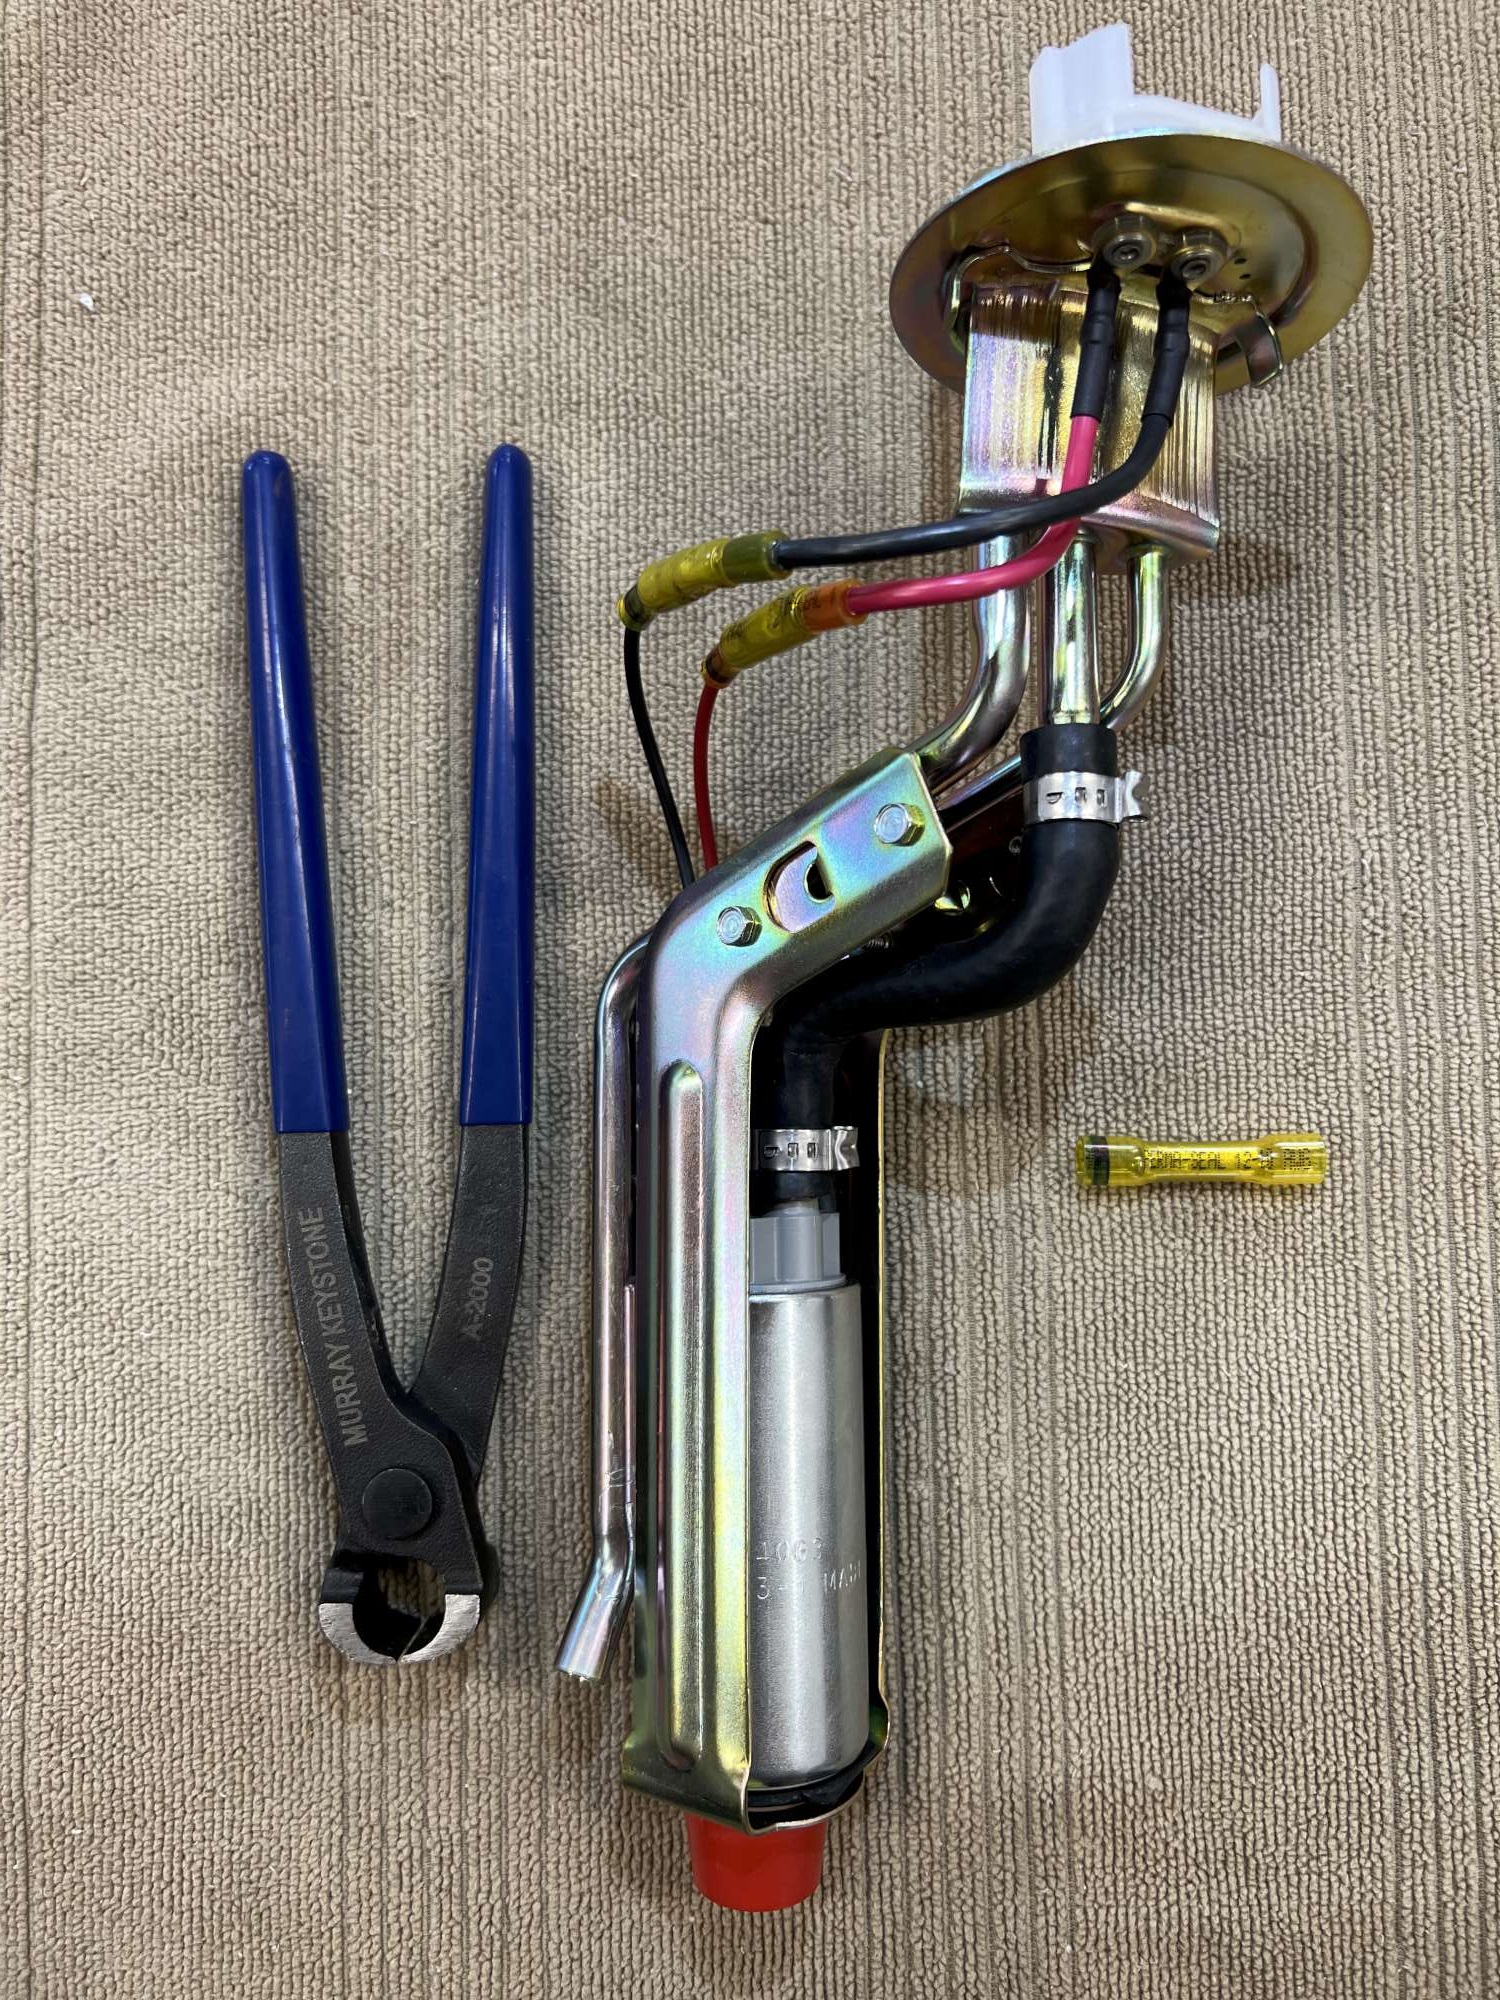
The fuel tank install was pretty straight forward overall. The new parts for me are the Pro-M hangar, Walbro pump, and Trick Flow filter. New to me, but far from new on this forum.
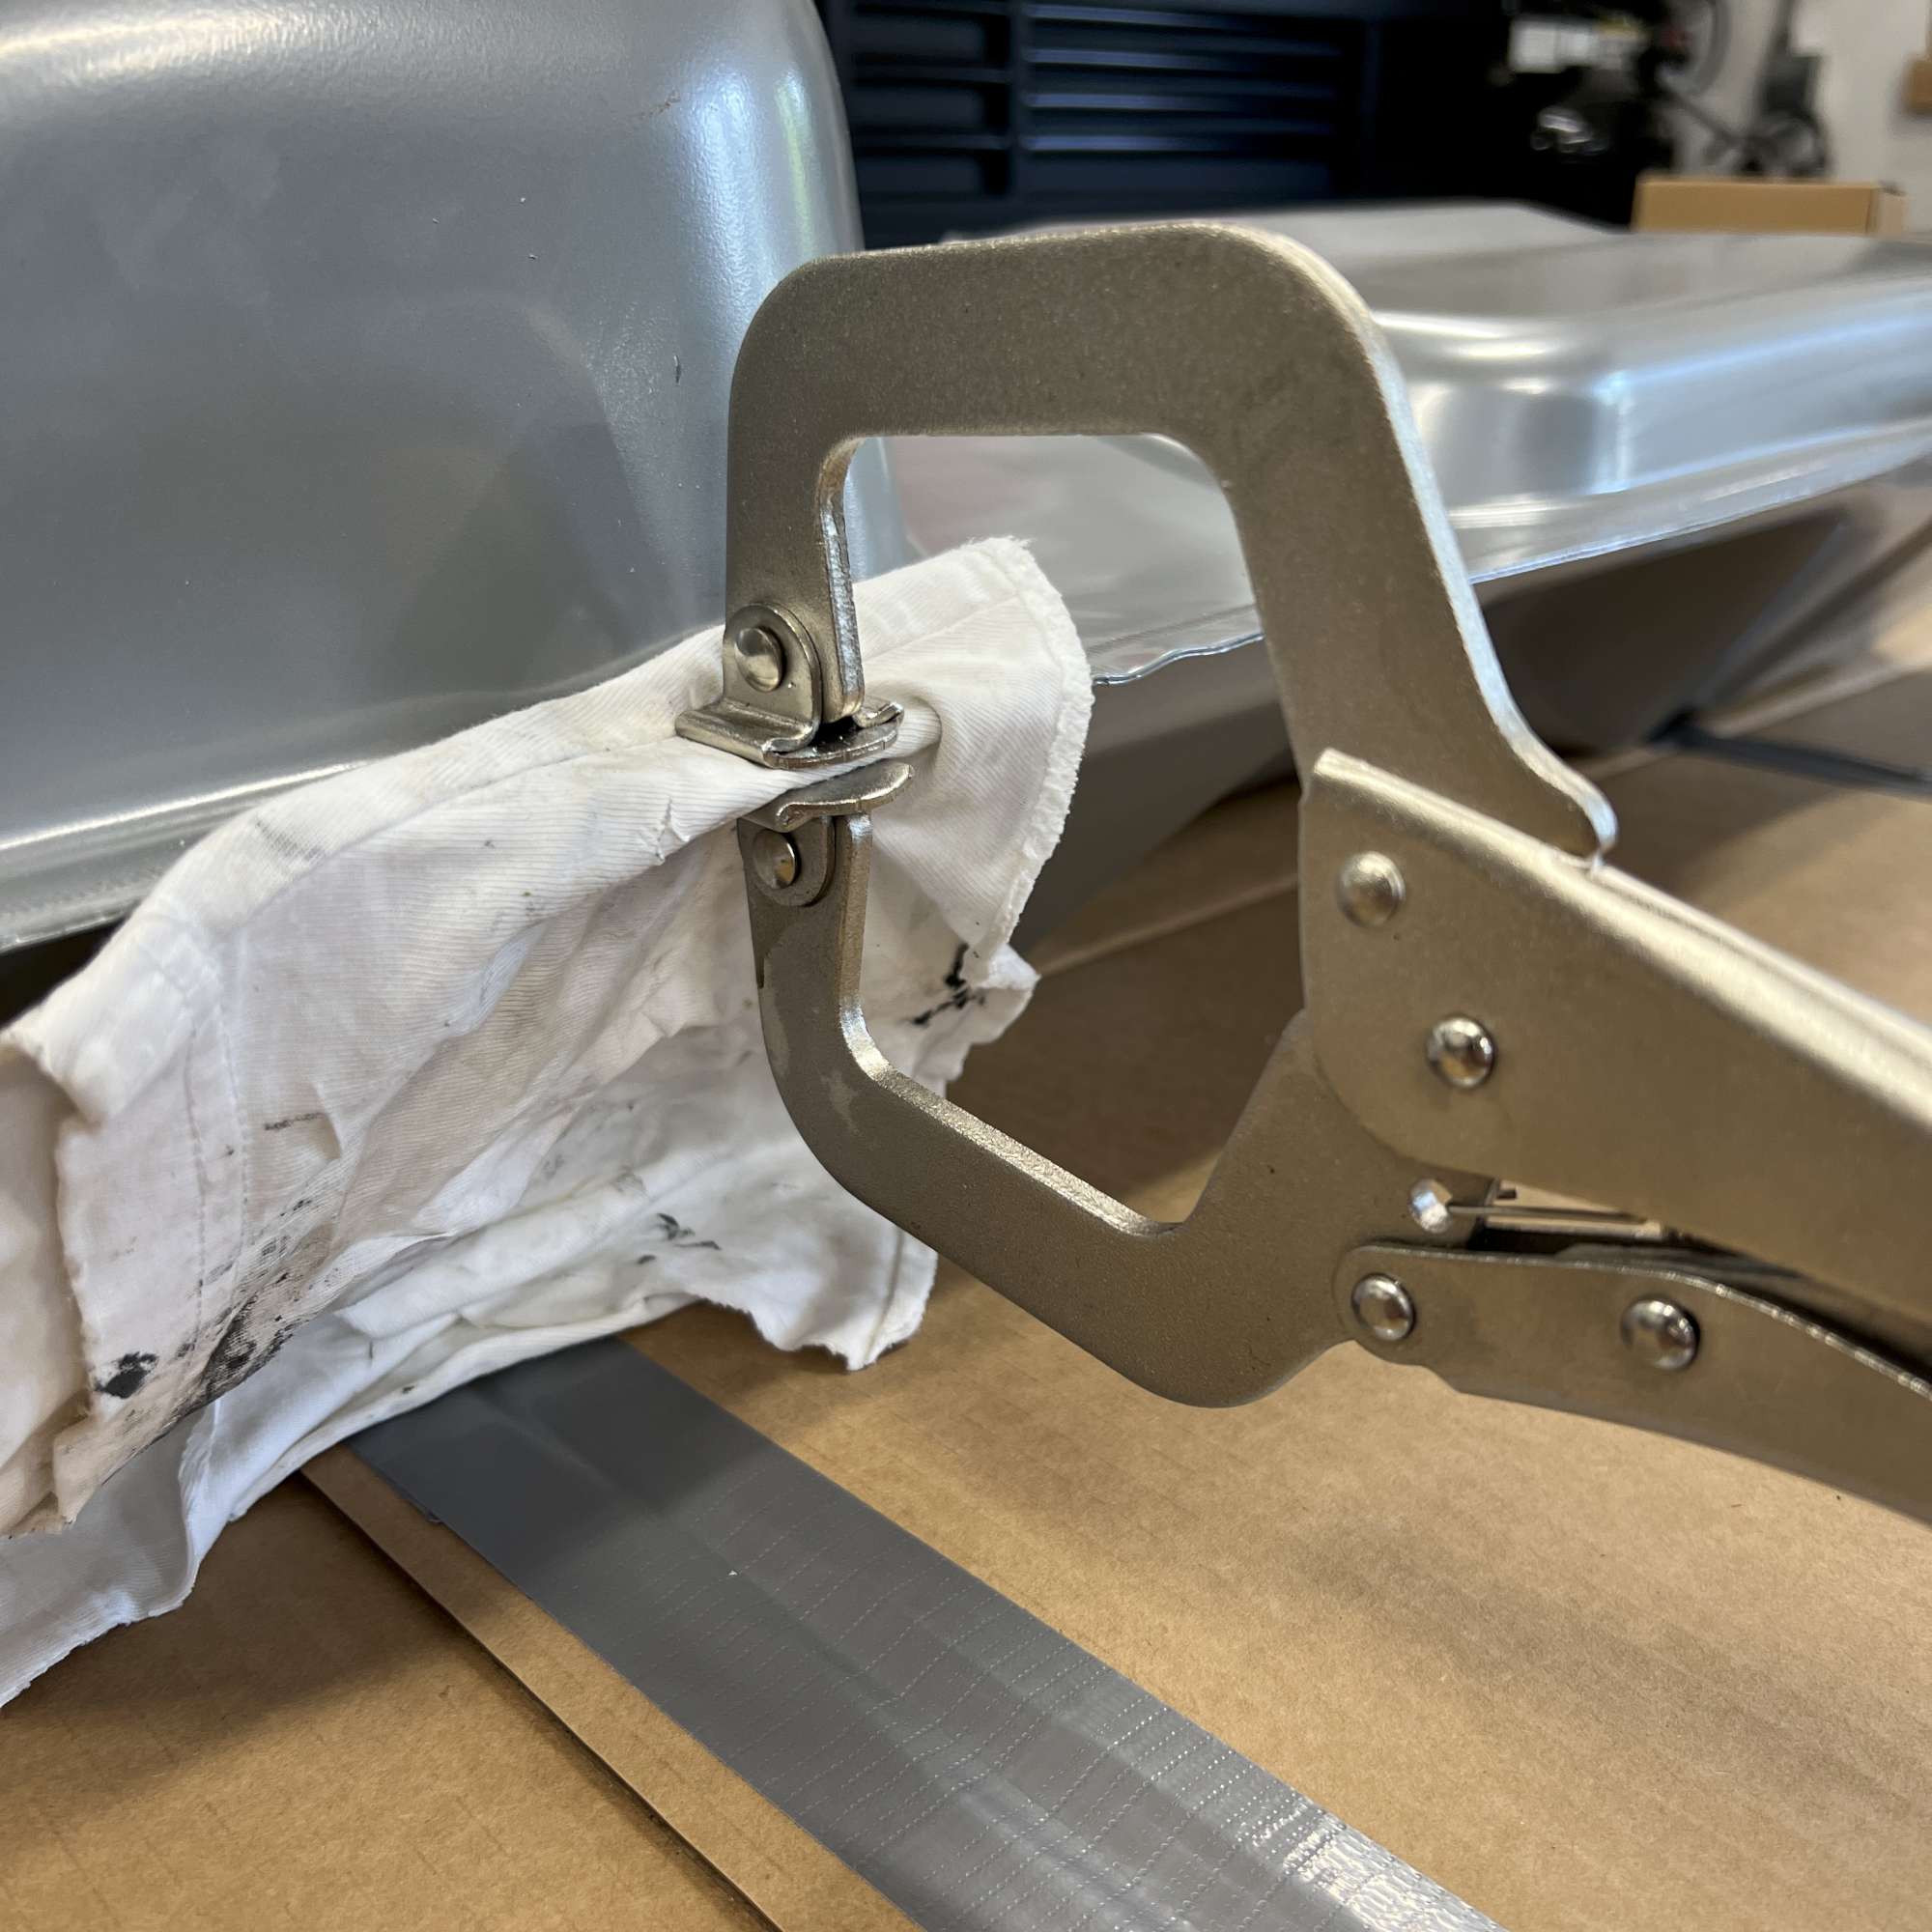
Straightening the raised lip on the front of the tank (per instructions) so the 3/4" square tube will snug up flush. I tried these clamps (HF specials), and they worked pretty good.
I found this Walbro power connector that snaps into the fuel pump for a solid connection. Less than $10.

Here is a view of the hangar and pump together, ready to be installed (part numbers for everything below). The Molex crimp and seal butt connectors are not cheap, but I trust Edwardb's recommend for this application. The fuel filter sock is not attached in this picture, but it was before going into the tank. I was glad to see Walbro supplied pinch style clamps, as I had a worm-drive clamp fail early on my Roadster. The pinch tool is something I have on hand for lawn sprinkler repair.
The bracket that secures the filler tube caught me off guard. Something I've read about in the past, but had since forgotten. Others have improved upon this setup (e.g. JimStone, Edwardb), but I'm calling F5's design functional and good enough. Admittedly, dropping the tank full of gas in the future would be a pain in the hind quarters, because it's not easy to get an Allen wrench in there to loosen the bracket (filler tube and bracket must be removed for tank install and removal).

Placement of the Trick Flow fuel filter similar to others.
Here's what the Trick Flow looks like with the cannister cover removed. Talk about easy maintenance for fuel filter replacement!

IRS vent (<$10), and fits perfectly in the F5 supplied IRS breather hose. (Thanks, Fman!).

Part numbers and a few musings
- Tank straps - rear bolts: used SS 5/16" again. The hoops in the straps are too small for the provided 3/8" bolts. I'm sure I could bang them in--removing plenty of paint in the process. Plus, difficult to remove when/if I need to remove the straps (had to a few times during my Roadster build-up).
- Tank straps - front bolts: bought 3/8"-18 x 2.5" socket heads. I know there are workarounds, but I'm not going to mess around again trying to get the straps closed over the bolt with the too short (2.25)" kit-supplied bolts. Especially, since I seem to pull the tank off/on more times than I care to admit during the build up. Probably not an issue for other builders.
- Tank filler gasket: Ford F4ZZ-9072-DA. This is a highly recommended/documented upgrade. There have been a number of leakage reports on the forum. Easy and cheap insurance to do now.
- Fuel level sender: measured 15 ohms (empty) and 160 ohms (full) as expected. Similar to my Roadster.
- Walbro fuel pump (Now TI Automotive (P/N: GSS340BX): 255 lph
- Pro-M Racing hangar (1986 – 1997 Mustangs) with 3/8" inlet/outlet and 6AN female connections
- Walbro wiring harness (VPN-94-615). Shown above. Clicks into the pump connector
- Molex 19164-0077, Perma-Seal™ Heat Shrink & Crimp Step-Down Butt Connector (Del City). Cut the wires to length so they're not resting or making contact with the hangar.
- Light coating of motor oil on the round gaskets (not the square edged ones), and tightened retaining rings with channel locks. "Use the O-ring [gaskets] included with the kit not the square profiled O-ring sent with the sender"
- Got the fuel pump and bracket assembly installed without having to notch the tank opening. Great tip from Rsnake showing this was possible! Check out his build video #14, around the 11 minute mark.
- Bought a Dorman vent for the IRS breather hose end (see picture above). I don't like the idea of leaving it open.
P.S. My Gen 4X ECU just arrived. A quick glance and so far it looks identical to the Gen 3 (same/similar DBW accelerator pedal, O2 sensors, etc.).
Last edited by 460.465USMC; 10-17-2024 at 09:22 AM.
Chris
Coupe complete kit. Index. Delivered: 4/22/24.
Build Thread. Coyote Gen 4X. T-56. IRS w/3.55. Wilwoods. PS. HVAC. Side windows.
MK4 Complete kit.
Build Thread Index. Delivered: 10/15/2020. Legal: 7/25/23. Coyote Gen3. TKO600 (0.64 OD). IRS w/3.55. PS. Wilwoods. Sway bars. This build is dedicated to my son, Benjamin.
Build Thread.
-
Senior Member

Great write up!
Now I understand your choice to abandon the SS fuel hard lines. Honestly, it's probably for the best. So much easier to deal with flex lines I'm learning.
-
Post Thanks / Like - 1 Thanks, 0 Likes
-
Senior Member
For what it's worth, I used a combination of flex line and NiCop on my last build. There are many pros and cons to all sides of the story but installing PTFE/steel braid with AN fittings to run the length of the frame rails made a ton of sense to me. I know OEM is in lawsuit avoidance mode with hard lines but in these applications I truly feel either direction is more than adequate. If I recall correctly, I used all Fragola hose and a combination of Fragola and Summit fittings.
-
Post Thanks / Like - 1 Thanks, 0 Likes
-
Senior Member
Swarf. Shavings. Filings. Chips. (Panel Fitting)
As I was waiting for SS braided fuel line from Breeze, I turned to panel fitting. Yes, swarf is a new term to me. According to the ever trusty inter-webs, it's a term synonymous for the shavings, filings, chips, etc. that pile up from from drilling, grinding, machining, etc. That's pretty much what I've been doing over the last couple of weeks. Creating an abundance of swarf.
- Wilwood pedal assembly: install was pretty straight forward per F5 instructions. I had to file down the brake and clutch switch mounting tabs, so they would lay flat. Top triangle bracket didn't quite square up to the diagonal cross member--see picture below. So, I added some spacers (washers) to shim the gap--see picture.
- Top of footbox panels. It only took me 11 rivnuts for the left footbox cover panel. That is, before I asked myself why not simply tap the chassis for these 10-32 SS button heads? D'Oh! Forehead slap! That panel can feel like one-of-a-kind, because the rest of the panels are fastened without rivnuts. One more thing (translate as palm smacking forehead again!): I managed to locate one of the holes directly (and I mean directly) above one of the 1/4"-20 bolts used to secure the triangle pedal box bracket to the diagonal cross member--picture below. I can now say from experience SS bolts don't like to be tapped. The fix? Low profile 10-32 weld nut--see picture below. That first panel almost became a career project. Sheesh!
- Engine bay panels: next up was making up four engine bay panels that sit forward of the footboxes (as others have done). I think it makes for a clean looking engine bay. Easy to pull off if access is needed by removing a few 10-32 screws. I also made a panel for the area above the transmission tunnel. A clean look IMHO.
- Aeromotive fuel pressure regulator (40-75 PSI; 13129) and gauge (0-100 psi; 15633 - not yet installed). I mounted it in a location I've seen others use. Easy access for the fuel line connections. The socket head screws supplied for the mount use a 9/64" hex bit (i.e. allen wrench), not a common size.
- At this point both footboxes are fitted for all their panels, as well as the above mentioned additional panels I made.
Left side footbox. Here you can see shims for the pedal assembly bracket, as well as the low profile weld nut to fix my mislocated hole. Attached the weld nut with JB Weld (what else?) after removing the powder coat for a good bond.

Here's a view looking down on the additional panels I made. These will be powder coated to match the chassis black, once I have my first batch ready. I dig the SS button head contrast against the black.
Aeromotive pressure regulator is mounted with two 10-32 screws. That particular chassis member isn't very thick for tapping. So, I ran the holes through both sides, and secured with nuts. The panel above the transmission tunnel is also visible.

The footboxes sure have a lot of gaps--here's just one example on the right side FB. No doubt a more professional install could minimize them, but they're still there. Wondering what others have done to close these gaps?

Moving on to the cockpit panels.
Last edited by 460.465USMC; 11-14-2024 at 06:40 PM.
Chris
Coupe complete kit. Index. Delivered: 4/22/24.
Build Thread. Coyote Gen 4X. T-56. IRS w/3.55. Wilwoods. PS. HVAC. Side windows.
MK4 Complete kit.
Build Thread Index. Delivered: 10/15/2020. Legal: 7/25/23. Coyote Gen3. TKO600 (0.64 OD). IRS w/3.55. PS. Wilwoods. Sway bars. This build is dedicated to my son, Benjamin.
Build Thread.
-
Post Thanks / Like - 0 Thanks, 1 Likes
-
I will likely use silicone on the hidden areas. I plan on 3D printing and painting a part to cover the hood latch bolt mount.
-
Post Thanks / Like - 1 Thanks, 0 Likes
-
Senior Member

Didn’t use the filler tube retainer on mine, that sh”t goes in like 6in, never coming out. I see people attempting hard lines on every build, why why why, completely unnecessary. Not ragging on you just hoping someone else reads this in the future too. AN flex is superior in every way. Stainless or nylon doesn’t matter.
-
Post Thanks / Like - 1 Thanks, 0 Likes
-
Senior Member
Originally Posted by
burchfieldb
I will likely use silicone on the hidden areas. I plan on 3D printing and painting a part to cover the hood latch bolt mount.
Appreciate your input, Burchfieldb. I just don't remember this many gaps on my Roadster build, and I still have a loooong ways to go. 3D printing sounds like a sweet solution; however, I don't have the equipment or know-how. Someday...maybe.
Originally Posted by
Kbl7td
Didn’t use the filler tube retainer on mine, that sh”t goes in like 6in, never coming out. I see people attempting hard lines on every build, why why why, completely unnecessary. Not ragging on you just hoping someone else reads this in the future too. AN flex is superior in every way. Stainless or nylon doesn’t matter.
Hello Kbl7td. No offense taken. I've checked in on your build and I'm a bit envious at your creativity and skill. Some really cool stuff going on there.
Stainless lines? Just a new challenge I wanted to try on this build, but it ain't going to happen. I used braided flex lines on my Roadster build. I agree: they are a solid setup, indeed. Appreciate you dropping by.
Last edited by 460.465USMC; 11-15-2024 at 01:57 PM.
Chris
Coupe complete kit. Index. Delivered: 4/22/24.
Build Thread. Coyote Gen 4X. T-56. IRS w/3.55. Wilwoods. PS. HVAC. Side windows.
MK4 Complete kit.
Build Thread Index. Delivered: 10/15/2020. Legal: 7/25/23. Coyote Gen3. TKO600 (0.64 OD). IRS w/3.55. PS. Wilwoods. Sway bars. This build is dedicated to my son, Benjamin.
Build Thread.
-
Senior Member
Chris - pretty good progress so far. I really like the engine compartment panels, I will probably go the same direction - did you use 6061 or 5052? Still haven't decided on a color for my panels but I guess I have a few months to figure that out. I really like the button heads that have the built in washer. The last car I built I used a significant number of button heads but hadn't seen those like a lot of F5 builders use. I spent a lot of time centering SS washers so they weren't off by 1/32nd .
Can't really help on the built in "venting" in the foot boxes but I am sure other builders will ring in on that subject. I would suspect it's important to to seal up every gap, regardless.
-
Senior Member
Originally Posted by
PNWTim
Chris - pretty good progress so far. I really like the engine compartment panels, I will probably go the same direction - did you use 6061 or 5052? Still haven't decided on a color for my panels but I guess I have a few months to figure that out. I really like the button heads that have the built in washer. The last car I built I used a significant number of button heads but hadn't seen those like a lot of F5 builders use. I spent a lot of time centering SS washers so they weren't off by 1/32nd
.
Can't really help on the built in "venting" in the foot boxes but I am sure other builders will ring in on that subject. I would suspect it's important to to seal up every gap, regardless.
I used 6061 because those are flat, no bends. And, I like the extra rigidity for those. However, I'm going to try to build a recessed trunk box next, so picked up some 5052 remnants from my local metal supplier, as I'll need to bend 90 degree corners.
On the Roadster, it was critical to seal any and all gaps in the footboxes to keep the engine heat out. I assume it's similar for the Coupe, but wow! A lot more gaps to deal with in the FBs.
Last edited by 460.465USMC; 11-15-2024 at 01:58 PM.
Chris
Coupe complete kit. Index. Delivered: 4/22/24.
Build Thread. Coyote Gen 4X. T-56. IRS w/3.55. Wilwoods. PS. HVAC. Side windows.
MK4 Complete kit.
Build Thread Index. Delivered: 10/15/2020. Legal: 7/25/23. Coyote Gen3. TKO600 (0.64 OD). IRS w/3.55. PS. Wilwoods. Sway bars. This build is dedicated to my son, Benjamin.
Build Thread.
-
Post Thanks / Like - 0 Thanks, 1 Likes
-
Filling any holes or gaps is a must, especially when you add the panels your adding. The engine bay heat is real. there are a number of ways to close off the holes/gaps. I used clear silicone, aluminum tape and a two part marine putty.
-
Post Thanks / Like - 1 Thanks, 0 Likes
-
Senior Member

I really like the direction this build has taken. Namrups speaks the truth. I've been in his car, its warm
and loud
-
Post Thanks / Like - 1 Thanks, 0 Likes
-
11-19-2024, 10:20 AM
#100
Senior Member
Originally Posted by
Namrups
Filling any holes or gaps is a must, especially when you add the panels your adding. The engine bay heat is real. there are a number of ways to close off the holes/gaps. I used clear silicone, aluminum tape and a two part marine putty.
Thanks, Scott. Kind of what I figured. And, it makes sense that the heat transfer from the engine bay would be similar to the Cobra. I'll be installing Thermo-Tec on my FB panels (and others), so that should double as insulation from the heat, and help close some of the gaps. For the exposed gaps, I'll have to address those one by one to see how I can close them. But not in a way that shouts DIY.
Originally Posted by
Blitzboy54
I really like the direction this build has taken. Namrups speaks the truth. I've been in his car, its warm
and loud
Thanks, Jesse. I think both of us are having a blast on our second builds. I will be going with the Gas-N pipes, so I hope those tame the exhaust noise a tich.
Chris
Coupe complete kit. Index. Delivered: 4/22/24.
Build Thread. Coyote Gen 4X. T-56. IRS w/3.55. Wilwoods. PS. HVAC. Side windows.
MK4 Complete kit.
Build Thread Index. Delivered: 10/15/2020. Legal: 7/25/23. Coyote Gen3. TKO600 (0.64 OD). IRS w/3.55. PS. Wilwoods. Sway bars. This build is dedicated to my son, Benjamin.
Build Thread.
-
12-12-2024, 03:16 PM
#101
Senior Member

HOLY COW!! Not sure how I missed this; feel like I'm showing up to a party at 10 when the invite said 7. Congrats on the build, Chris, it looks like as much fun as the first. And you're doing a top notch job as usual. Strangely, our roadsters are still exactly the same color of gel coat red, so I'll skip the part where I give you a hard time about starting a second build before finishing your first. I'll continue to enjoy your updates, glad to see you dove in again!
MK4 #7838: IRS 3.55 TrueTrac T5z Dart 347
The drawing is from ~7th grade, mid-1970s
Meandering, leisurely build thread is
here
-
Post Thanks / Like - 1 Thanks, 0 Likes
-
12-12-2024, 04:00 PM
#102
Senior Member
Hi John! Yeah, you can call a spade a spade. Needless to say, the build process is so rewarding for me. I fully accept I'm not following the proven path paved by so many great F5 builders before me.
Yes, I'm having a blast (again!). Given my limited garage space at our "new" place, and funding needed for a second build, I had to make a choice. However, it was smiles for me the whole time driving my Roadster in gel coat. Yep, I miss it!
I hope you stop by from time to time. Your observations and tips are high value to me. I look forward to seeing your beauty in its new "clothing".
Chris
Coupe complete kit. Index. Delivered: 4/22/24.
Build Thread. Coyote Gen 4X. T-56. IRS w/3.55. Wilwoods. PS. HVAC. Side windows.
MK4 Complete kit.
Build Thread Index. Delivered: 10/15/2020. Legal: 7/25/23. Coyote Gen3. TKO600 (0.64 OD). IRS w/3.55. PS. Wilwoods. Sway bars. This build is dedicated to my son, Benjamin.
Build Thread.
-
12-12-2024, 09:13 PM
#103
Senior Member
Originally Posted by
460.465USMC
I'm still pretty tickled to have received all of the suspension pieces with my delivery. Nice to be able to plug away at the front and rear suspension and keep the march toward roller stage moving forward.
A few issues to resolve:
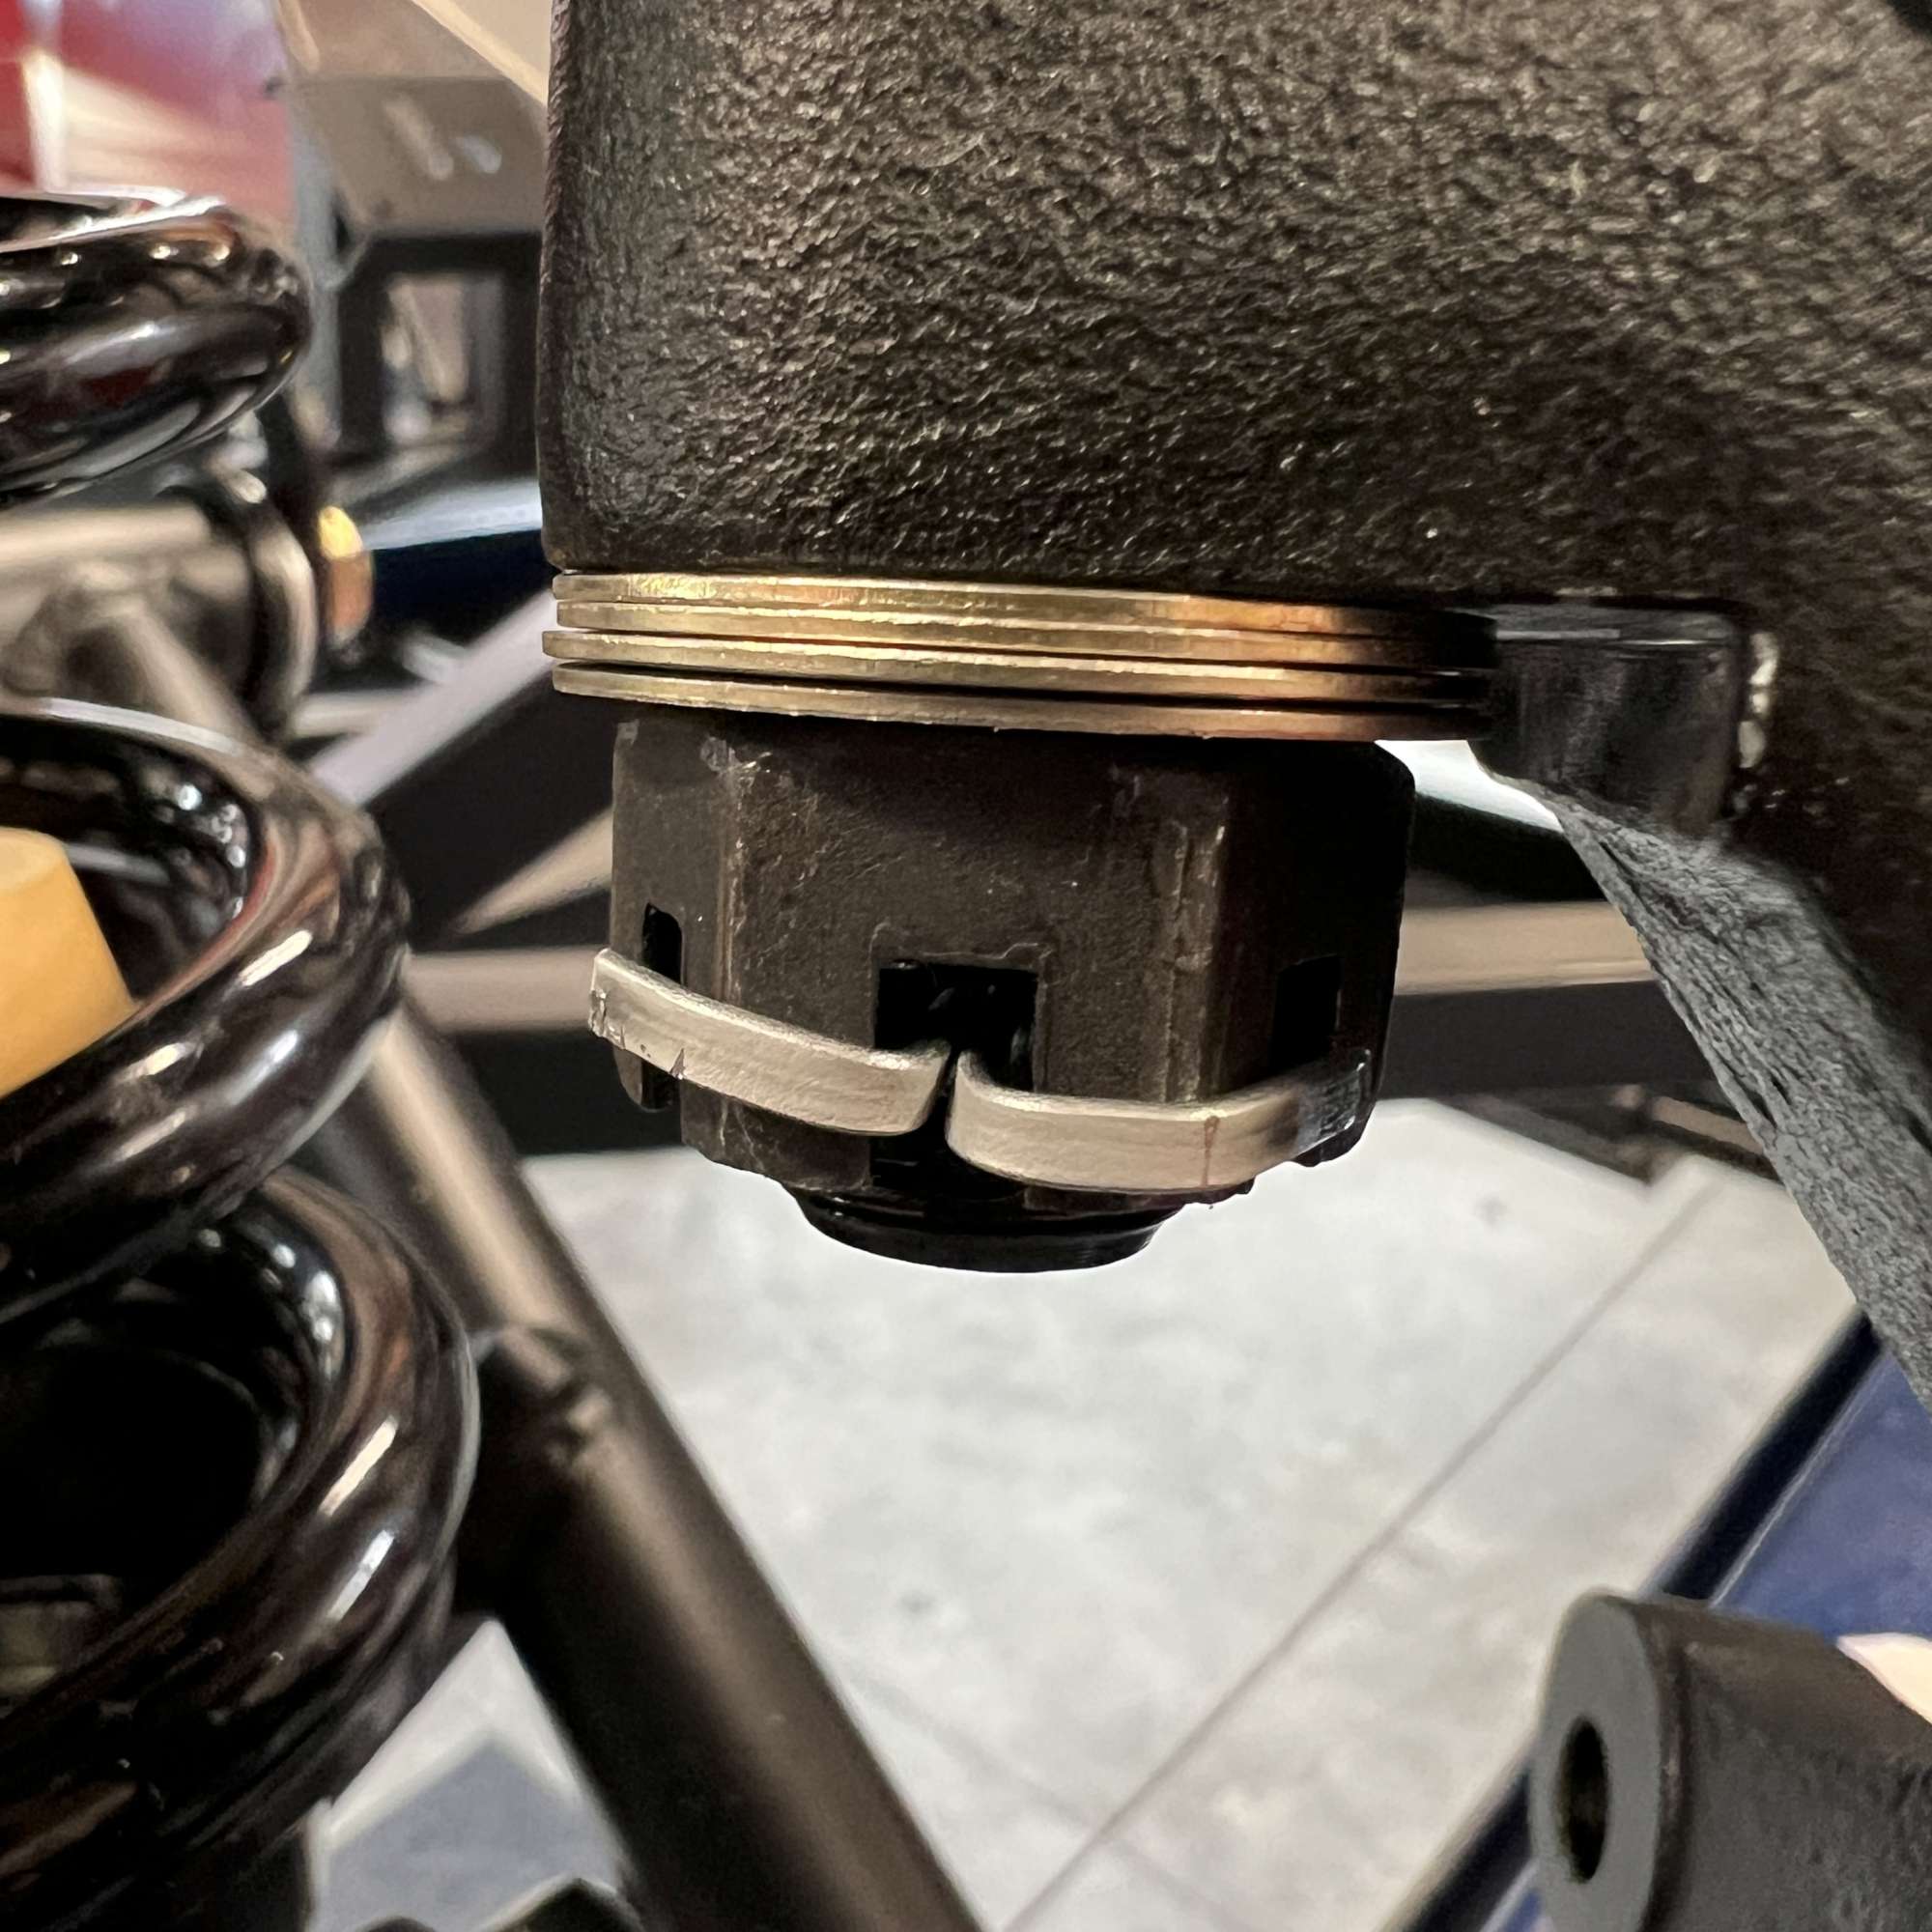
- PS rack: swapped out the pre-installed bushings with the Breeze aluminum offset centering bushings. Installed the PS rack and centered it within the frame. (I will center the steering wheel and equalize lock-to-lock later).
* The Breeze bushings are nice pieces, but I think they are probably a better fit for the Roadster application. Here's why: it appears the PS rack must be mounted in the top holes (race car height) in order to keep the Breeze adjustment slots accessible. Thankfully, this doesn't actually put the rack at the full upper height, because the offset bushing holes are not centered--see picture below. So, after all is said and done the rack is probably slightly higher than the lower street use holes. After trading emails with Mark at Breeze, I may set ride height about 1/4" lower. If I had to do it over, for the Coupe application I would probably save the money. The silver lining is it was easy to center the rack in the frame. - The 1/2"-20 grade 8 bolts to attach the UCA to the frame stopped a couple threads short of being flush with the nut (I normally like a 2+ threads sticking past the nut). And, they were not mechanical lock nuts as advertised. I emailed F5 last week, but still no word back. So, Ace to the rescue for grade 8, 1/2"-13 x 2" bolts. Already had extra 13 pitch nylon locknuts on-hand.
- Upper ball joint castle nut threads too far down the shaft for reasonable cotter pin engagement. Added spacers to fix--see picture below.
What went well:
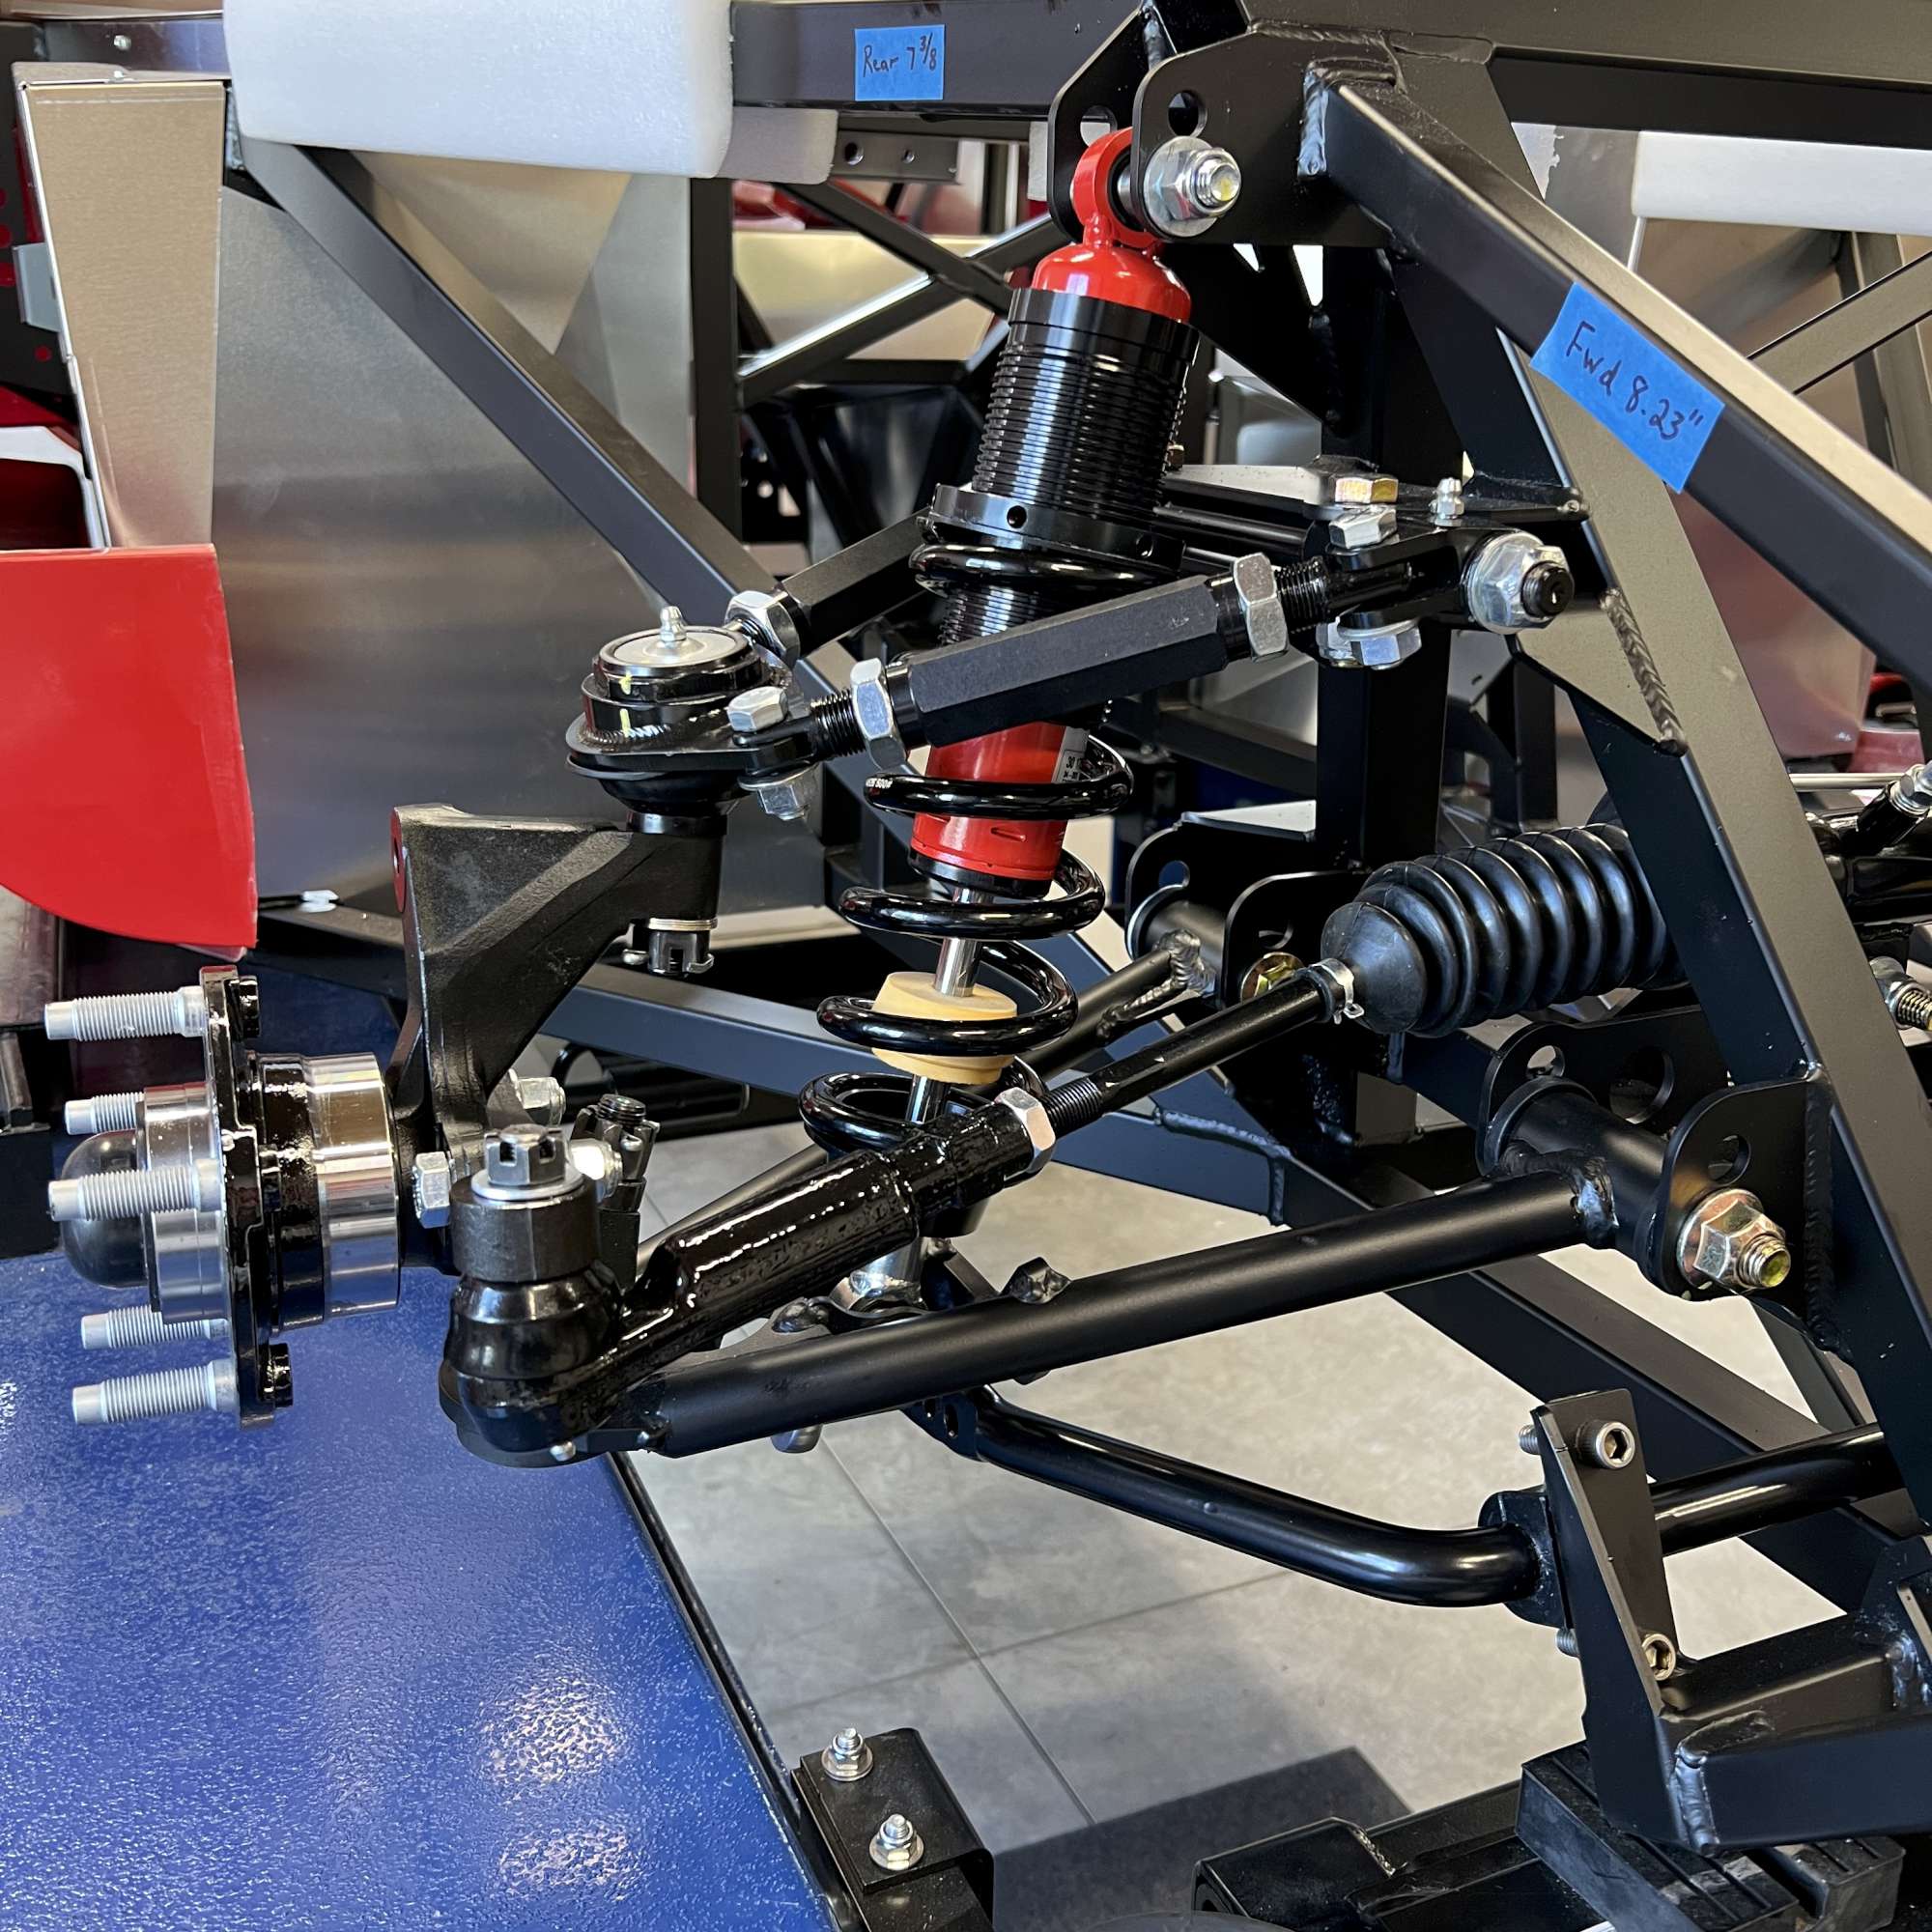
- Front UCAs: pushed right into position with a spacer on the rear bushing. Primed the bushings with a bit of grease (4-5 pumps on my grease gun). I like to see it come through the flutes in the bushing before assembly. On a tip I saw in cv2065's build thread, I picked up the Lock N Lube attachment for my grease gun. As he said, no more swinging from the grease gun trying to get it to release. Boy, can I relate to that! Not expensive ($30), and worth every penny IMHO.
- KONI single adjustable shocks: before assembly I made sure they were set for lowest (softest) setting as my starting point. This is the same setting I'm running on my Roadster. This can be checked/adjusted later, but easier now. Link to Koni's website with instructions and video: https://www.koni-na.com/en-US/NorthA...stment-Guides/
- UCA upper ball joints: used my 18" Harbor Freight adjustable wrench to install. (I'll also use it on the IRS UCA nuts later on).
Some resistance on the second one, but overall no serious issues. - Swapped front UCA ball joint dust boots for Energy Suspension (5.13102G) per wisdom of the forum.
- Swapped tie rod ends for Moog and the Moog dust boots for Energy Suspension (9.13101G).
- POR-15. Love this stuff. My favorite coating. Takes some work, but well worth the effort. Coated the tie rod ends, inside face of front hubs, and rear sway bar brackets--see picture below. Also planning to coat the rear hubs, CV axles, and forward facing section of IRS differential.
First up was the PS rack install:

Here's a view of the Breeze offset bushing installed.

Not mentioned in the manual, and probably not necessary, but I like to prime the bushings with some grease before install.

POR-15: no I don't own their stock, but this stuff is awesome! Front hubs, Moog tie rods, and rear sway bar brackets.
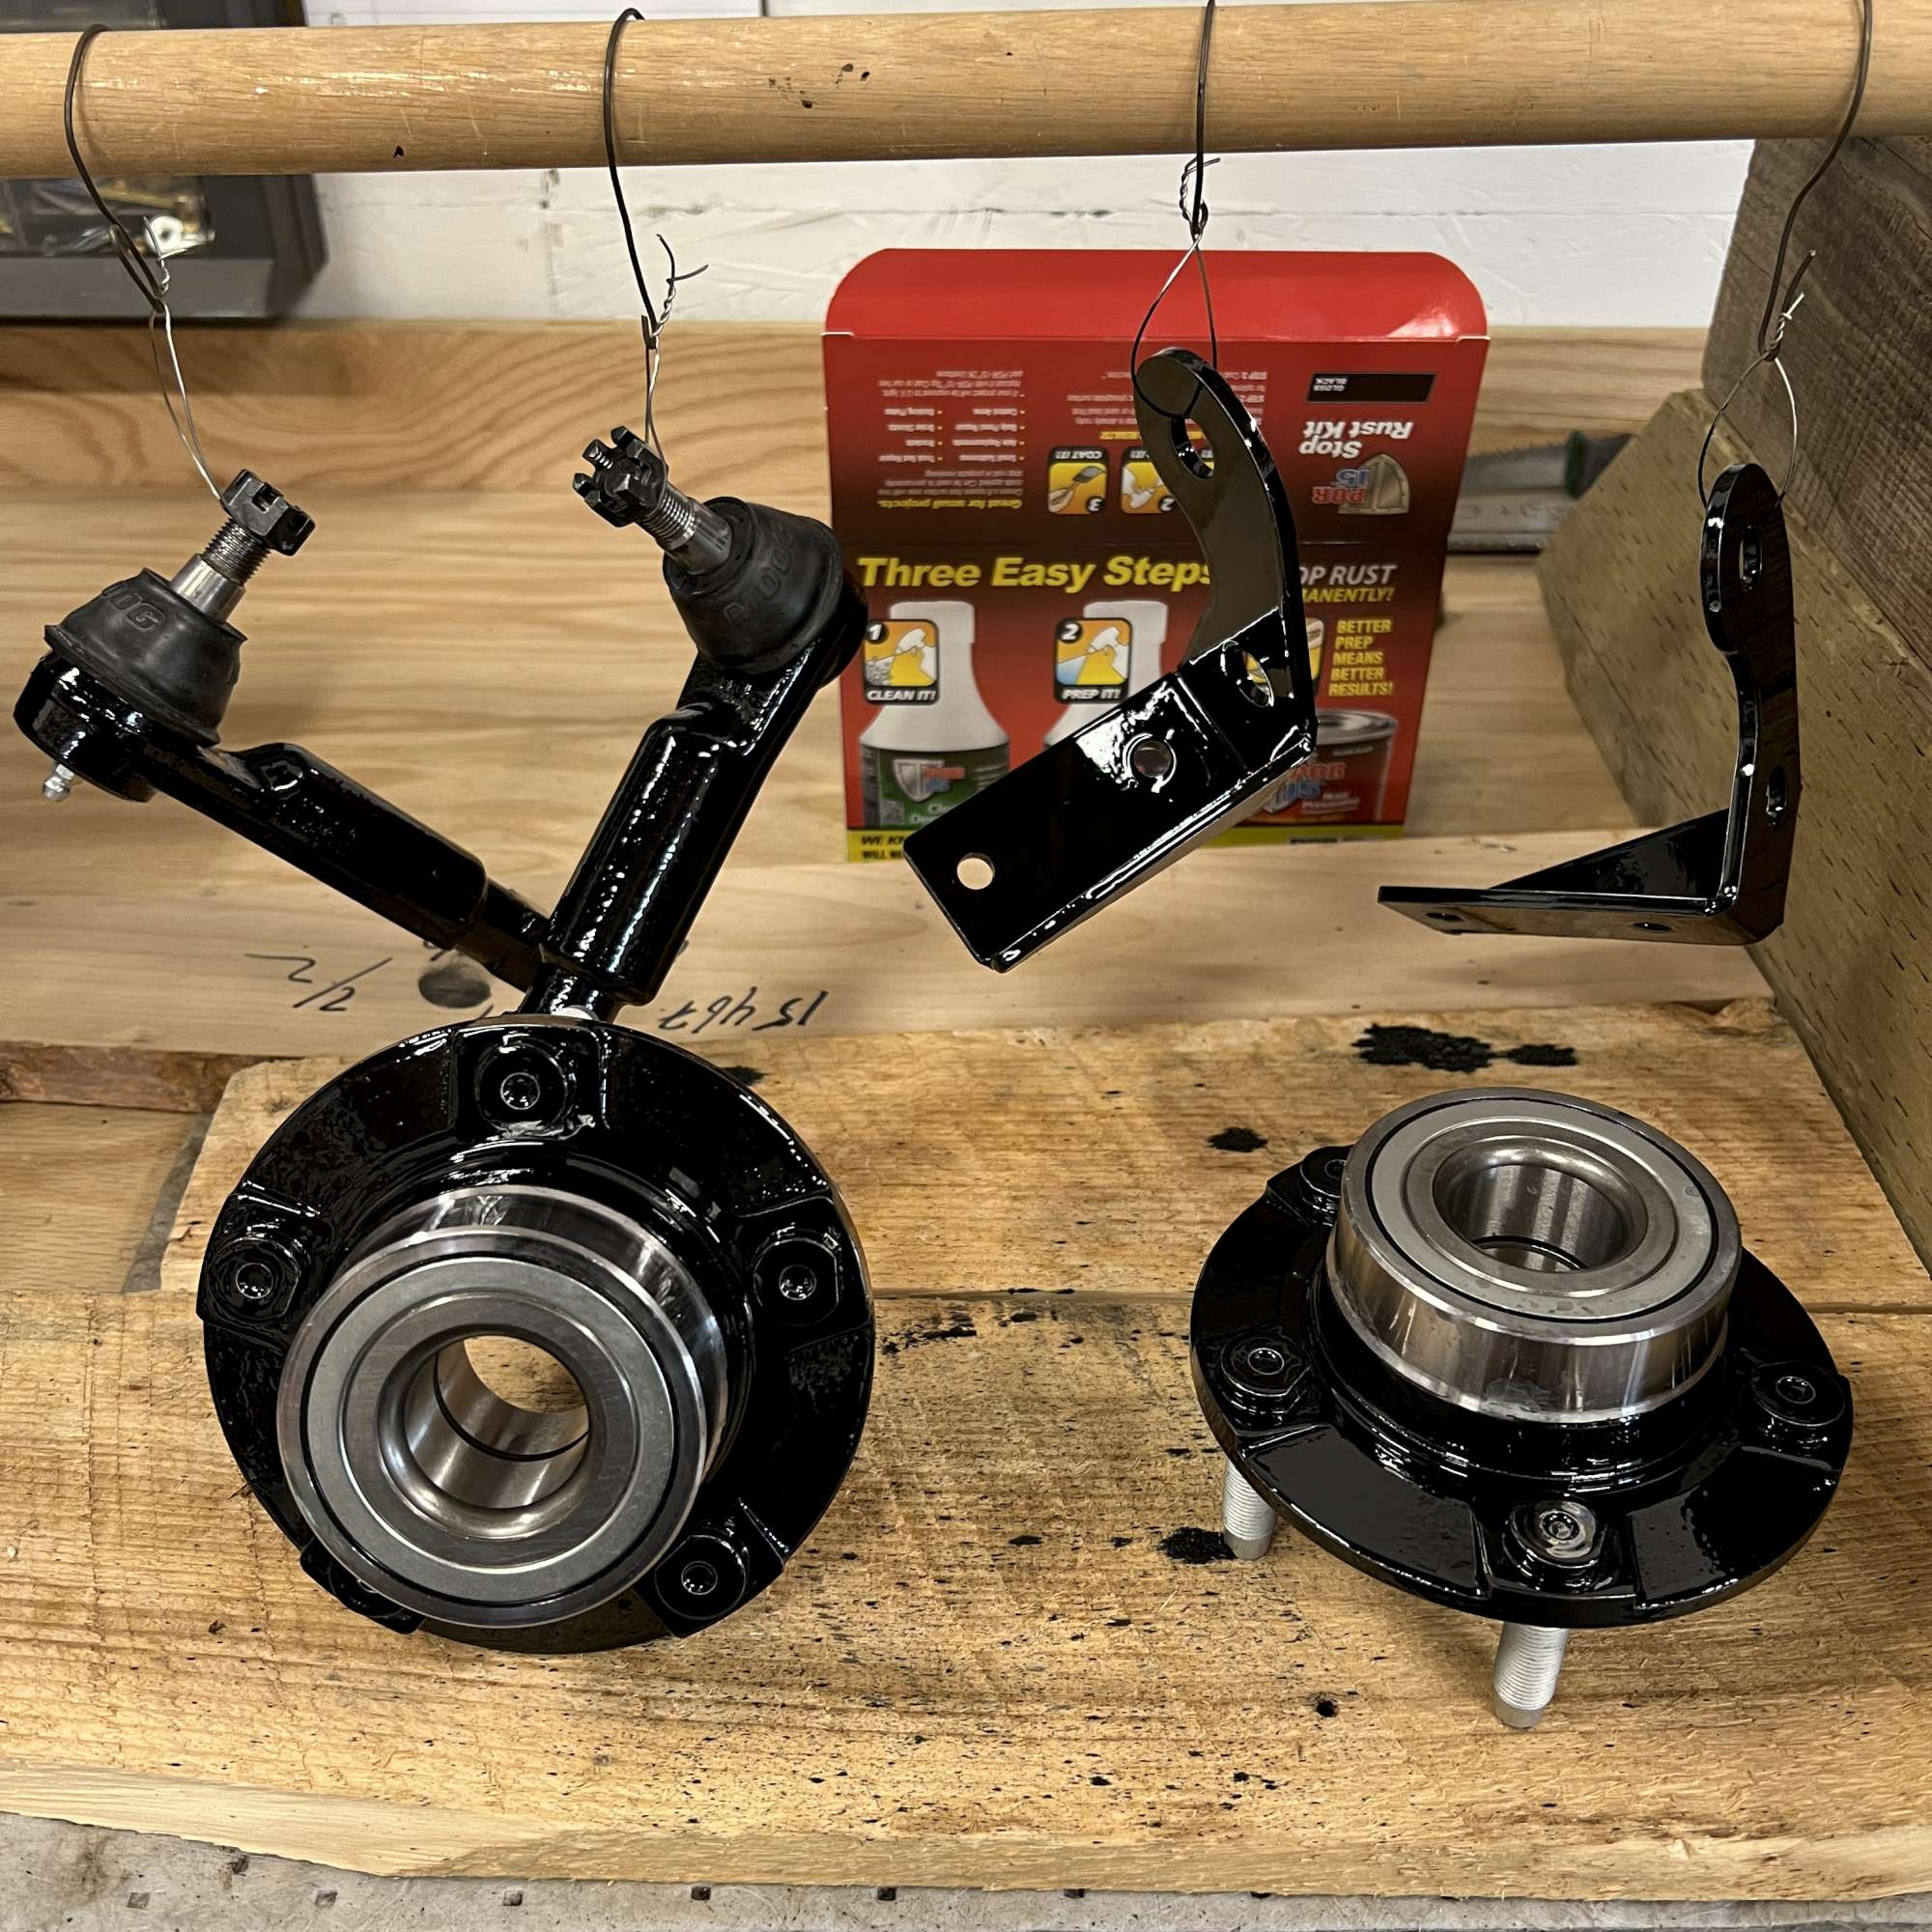
I'm not using the tone ring (I think these are for ABS?), so I removed them. Ground a small slot into the ring with my Dremel, then tapped there and they split apart easily.

Added spacers to push the castle nut closer to the end to get cotter pin engagement. Had this same issue with my Roadster. Interestingly, extra spacers from my Wilwood brake kit fit perfectly in both cases.
View of passenger side together and ready for brake install. Planning to trim ~3/16" off the adjustment sleeve and stud of the rear UCA arms, to be sure I can dial in alignment specs later on.
Chris - great work. I have not ordered the Breeze spacers as yet so do you think I should pass? Sounds like with the new engineering in the frame mounts they're not necessary?
-
Post Thanks / Like - 1 Thanks, 1 Likes
-
12-13-2024, 10:13 AM
#104
Senior Member
Hi Tim. I think the two sets of mounts (upper for race height) have been available for quite some time, so no engineering change there that I'm aware of. The only engineering change I'm aware of relative to the steering rack mount is the new hold-down bracket F5 shipped out to builders who bought them within a certain time range as I noted above.
The Breeze offset spacers were on my list of new things to try. But as I mentioned above, I really don't see the advantage in the Coupe application. The one exception is centering the rack is a breeze (sorry--that pun slipped right out). 
Chris
Coupe complete kit. Index. Delivered: 4/22/24.
Build Thread. Coyote Gen 4X. T-56. IRS w/3.55. Wilwoods. PS. HVAC. Side windows.
MK4 Complete kit.
Build Thread Index. Delivered: 10/15/2020. Legal: 7/25/23. Coyote Gen3. TKO600 (0.64 OD). IRS w/3.55. PS. Wilwoods. Sway bars. This build is dedicated to my son, Benjamin.
Build Thread.
-
12-13-2024, 10:24 AM
#105
Senior Member
Originally Posted by
460.465USMC
Hi Tim. I think the two sets of mounts (upper for race height) have been available for quite some time, so no engineering change there that I'm aware of. The only engineering change I'm aware of relative to the steering rack mount is the new hold-down bracket F5 shipped out to builders who bought them within a certain time range as I noted above.
The Breeze offset spacers were on my list of new things to try. But as I mentioned above, I really don't see the advantage in the Coupe application. The one exception is centering the rack is a
breeze (sorry--that pun slipped right out).
Thanks for steering me in the right direction... . I was thinking more like details on the rack had changed but I think I'll see how it works without and if needed I can always order. I think he ships pretty quickly.
Last edited by PNWTim; 12-13-2024 at 10:27 AM.
-
12-30-2024, 03:29 PM
#106
Senior Member
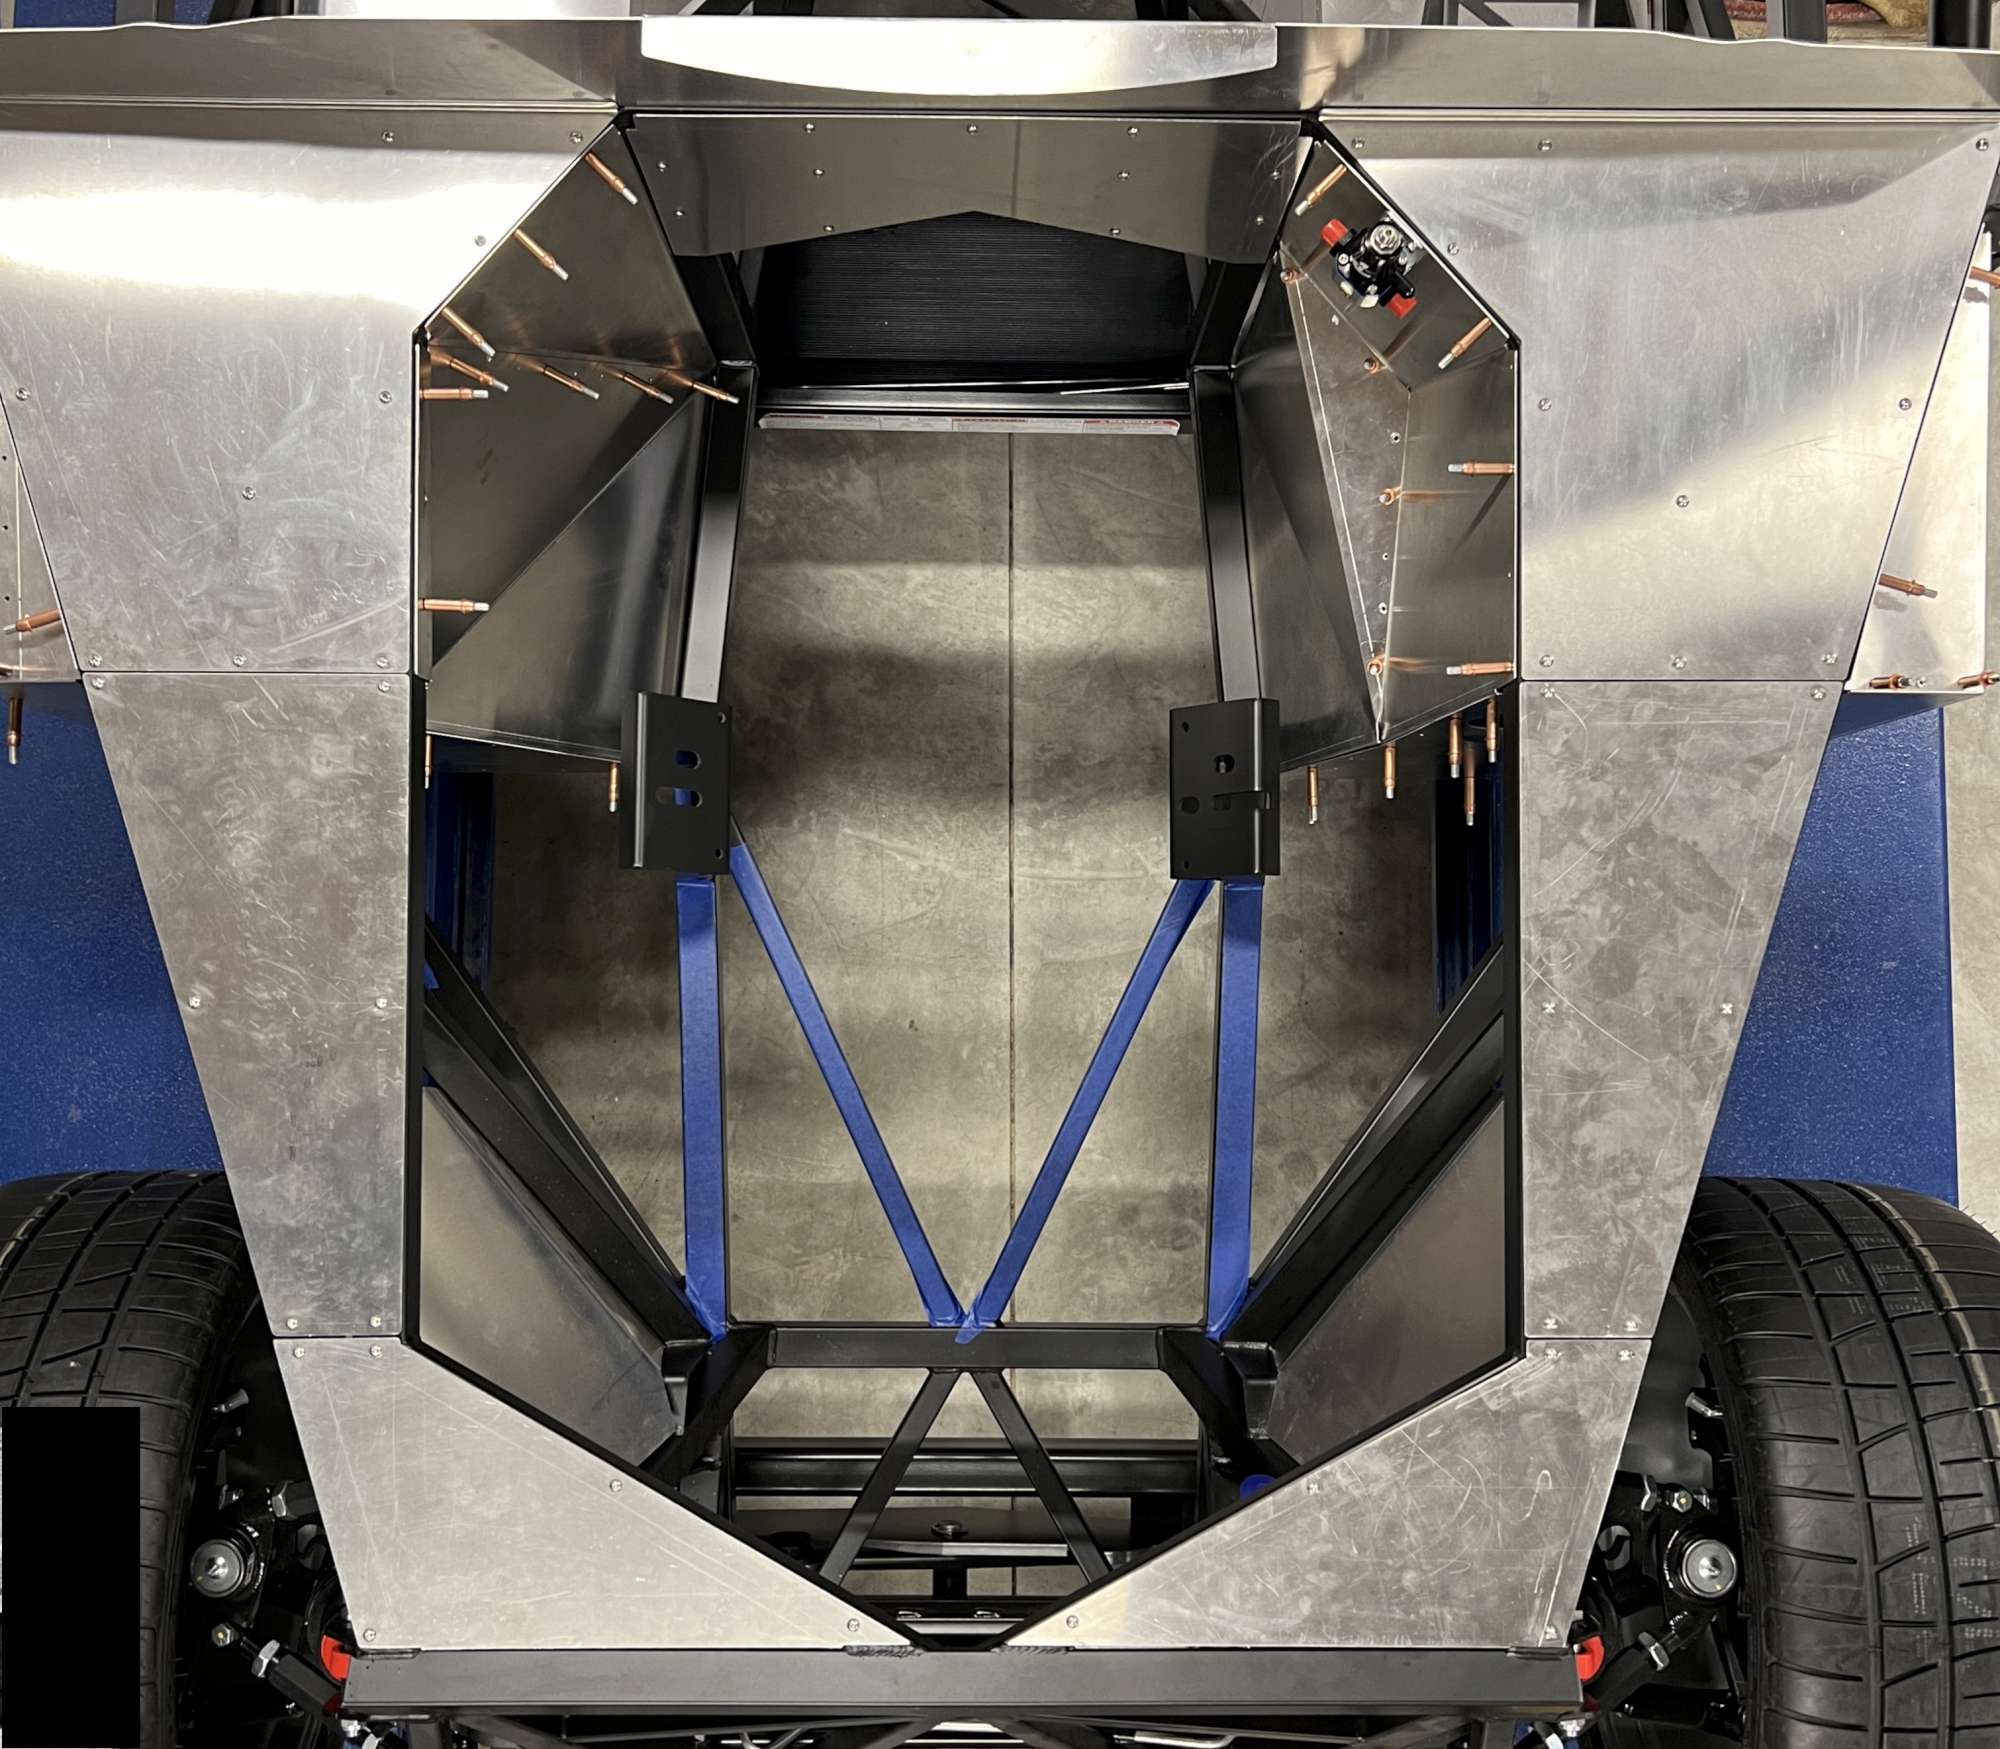
Panel fitting: the next chapter. Rear hatch floor and Trunk Box.
Might as well continue flinging more swarf and chips. Seems a little more efficient to continue with panels since all of the tools are out, and the vacuum is nearby.
I'm wrapping up the trunk area, including a trunk box. Again, no trailblazing here, but the box was fun. I doubt the extra utility from the additional space is a good trade for the hours I have into it so far. But the fun factor is the ROI for me.
The rear hatch floor went in pretty straight forward. The forward piece is a powder-coat-scratching you-know-what to get in/out. I had the pleasure a number of times, as I took it out to nibble away clearances for welds around the upright chassis tubes. Touch up paint required.
Trunk Box
- Materials: four sides from .040 5052 (better for bending). Bottom and lid from .063 6061 to add some rigidity. A couple 12" stainless piano hinges from McMaster-Carr (1582A216 - without holes).
- Dimensions: per forum wisdom I also went with 23"(L) x 16"(W) x 5.5"(D). That does not include the 1" flange for the four sides. To my chagrin, I had another "Der De Der" moment. The bottom and top pieces should not be sized identically. The top should be a bit wider--just enough to extend past the sides and rear of the opening. Realization only came after I cut both pieces. To fix, I trimmed 1/2" off the length of the bottom.
- Placement: I ended up about 7 1/8" from the left rearmost 1.5" cross tube; 13" from the right rearmost corner; 2 3/4" forward of the same cross tube. This provides the ample clearance from the raised section on the right hand side of the gas tank. The forward flange rides on top of the 3/4" crossbar, which by the way is not square in my case. I'm guessing it warped during the welding process. It added extra challenge to square the box.
- Cut out perimeter of trunk box using aluminum disc on my cutoff wheel. To locate the hole, I held the box in position with clecos. This allowed me to trace the opening from underneath. (Removed a side panel, so with marker in hand I could trace the perimeter from below).
- Bending boo boo: I hoped to bend all four sides (side panels) with my 30 inch brake. Despite my best intentions, I fell short. I feel pretty dumb, because it's so obvious now. To overcome my bending boo boo, it was all available clamps on-deck--see pix below. I should have made the long bends with the 30" brake first. Next, I should have made the short bends with a 6" hand brake. (Trip to Harbor Freight to buy the handheld seamer/brake tool recommended by Edwardb [$20]).
- Tools: a tool setup I recently added to the arsenal is a portable bandsaw mounted to a Swag table. Works great for shorter cuts (up to ~6"). For the longer cuts, I'm using a jigsaw (or cutoff wheel). For the small detailed cuts (e.g. trunk box tubing cut outs) I'm using a Dremel. A few different hand files to smooth and straighten the edges. I can see where a proper bandsaw would be really nice for this metal work. Someday...maybe ($$$$!). Circle cutter attachment on the drill to cut out the curved ends of the Sender access hole.
- Tube openings: again, despite careful measurements, a couple of my tube openings steadily grew larger as I returned to the bench time and again to whittle away material until the box fit as squarely as possible. I will make a couple patches to tighten-up the gaps.
- Pump and Sender access holes: I like the idea of easy access to both, so cut out an oval hole in the bottom for the Sender. I made it an inch shorter in length (6") than the factory size (7"). Installed 10-32 rivnuts (6 ea) to secure the covers.
- Lid: work in progress. Bought a couple 12" SS hinges to attach to the forward edge. Clearance around the leftmost diagonal will be a factor.
Bending boo-boo: this is what it took to make the long bend of the first side panel because I didn't anticipate it wouldn't lay flat on the brake due to the short side bends made first. Why didn't I foresee this? So obvious now, of course. Thankfully, that bend is hidden beneath the hatch floor--it isn't pretty. Wasn't a problem with the other side panel, because I picked up a small handheld brake.

Portable bandsaw mounted on a swag table. Has come in very handy for short cuts on panels, but also many other uses like shortening SS screws (which I seem to have to do a lot!).

Bottom view of the box. Ready for fitting around the diagonal cross tubes.

And the trunk box finally located after much trimming. Will close a couple gaps next to the right diagonal with small patch panels.

View of the trunk box in position with hatch floor cut out. Rivet nuts used to secure access covers. Also, here are the handheld brake and circle cutter I used.

The 5.5" depth of the box gives about 2.5" of clearance from the lowest point on the tank. Plenty of clearance for the Sender wiring plug/harness, etc.

While I was in the area, drilled through the chassis tube to allow easy drop-in of the screw that anchors the fill tube bracket. Otherwise, the screw head is sandwiched between that tube and the lip of the tank.

Next up is installing the lid with a couple hinges. Then on to wrap-up the cockpit panels.
Last edited by 460.465USMC; 12-31-2024 at 10:10 AM.
Reason: Adding McMaster number for piano hinges.
Chris
Coupe complete kit. Index. Delivered: 4/22/24.
Build Thread. Coyote Gen 4X. T-56. IRS w/3.55. Wilwoods. PS. HVAC. Side windows.
MK4 Complete kit.
Build Thread Index. Delivered: 10/15/2020. Legal: 7/25/23. Coyote Gen3. TKO600 (0.64 OD). IRS w/3.55. PS. Wilwoods. Sway bars. This build is dedicated to my son, Benjamin.
Build Thread.
-
12-30-2024, 05:46 PM
#107
Senior Member
In the end, looks really good. Nothing like a few trials and tribulations to get there. Nice job on the access cutouts as well. I have to believe having that little extra storage space is pretty valuable. And great tip on the filler neck mod, I don't think I have seen that before so good to know.
Curious if you used the circle cutter with a handheld drill? I had a pretty bad experience several years ago with one of those (1/2" drive so a bit bigger) and after dusting myself off, looked at the packaging and it indicated "for stationary drill press only". I guess that was one of those "wisdom" moments.
-
Post Thanks / Like - 1 Thanks, 0 Likes
-
12-31-2024, 10:17 AM
#108
Senior Member
Originally Posted by
PNWTim
Curious if you used the circle cutter with a handheld drill? I had a pretty bad experience several years ago with one of those (1/2" drive so a bit bigger) and after dusting myself off, looked at the packaging and it indicated "for stationary drill press only". I guess that was one of those "wisdom" moments.
Hi Tim. Plenty of trials and tribulations going on over here. Courtesy of my small mind. So, the circle cutter. I used it back on my Roadster build in my drill press to drill out all the gauge holes in my .060 dash. I, too, noticed it said drill press only on the package. However, for the Sender holes, I used it in my 3/8" hand drill this go-round. Slow and steady. I'm not recommending this approach, and could see how things could go wrong in a hurry. Glad your story had a good ending.
Chris
Coupe complete kit. Index. Delivered: 4/22/24.
Build Thread. Coyote Gen 4X. T-56. IRS w/3.55. Wilwoods. PS. HVAC. Side windows.
MK4 Complete kit.
Build Thread Index. Delivered: 10/15/2020. Legal: 7/25/23. Coyote Gen3. TKO600 (0.64 OD). IRS w/3.55. PS. Wilwoods. Sway bars. This build is dedicated to my son, Benjamin.
Build Thread.
-
Post Thanks / Like - 0 Thanks, 1 Likes
-
01-11-2025, 02:44 PM
#109
Senior Member
Trunk Box and Cockpit Complete
Trunk box lid: I bought my first set of SS piano hinges from the hardware store. They came with pre-drilled holes, but those holes weren't going to line up with the existing holes I already drilled into the 3/4" cross tube that runs left<-->right. So, back to McMaster for a set of 12" hinges with no holes. The McMaster hinges cost more, but are thicker, and higher quality. Bonus.
I aligned the hinges to the existing holes in the 3/4" tube and (1) drilled the forward side holes. Then, (2) I pre-drilled the other side of the hinges. Then, (3) aligned the trunk box lid and drill through the hinge holes and the .063 6061 lid aluminum at the same time. The lid rotates back far enough that it will stay open on its own. Good. Of course, the hatch glass will need to be open for lid clearance. Trunk box is officially done: well, except for powder coating, Thermo-tec, and carpet.
Cockpit panels (and general observations)
- Weld clearancing: my panels required a lot of clearancing (is that a word?) around welds. Seemingly, more than my Roadster build. But I want the panels to lay flat, so lots of grinding and filing around the weld joints. I used a Dremel (cutoff wheel and sanding drum), round carbide burr bit on the drill, and flat file, for most of it. See example of the rear cockpit wall below.
- Panel bends: A number of the panels had at least one bend too shallow. Unfortunately, my 30" brake isn't an option because the panel must be flat to use it. So, it gets interesting to make the adjustment, e.g. steel bar stock and clamps as I noted in my last post. However, the 6" hand bender from HF proved helpful in this task, even on some of the longer bends because they only needed a few degrees of adjustment.
- Angled cover - trans tunnel: this was an odd one to drill. The 1" square tube is rotated (30 degrees?), so it doesn't sit square for drilling. Visions of broken drill bits and powder coat scarring filled my head. Good news: the two layers of aluminum (cover and side panels) acted as a drill guide. So, I was able to drill holes at an angle. To my surprise it all worked out just fine.
- More 1/8" clecos? Thought for sure I had plenty with one build under my belt. Nope. It must be because I'm leaving more panels mocked in place longer on this build. Bought another 50 from Aircraft Spruce ($0.99 ea). That puts me at 150 in total. I also have ten 3/16" clecos.
- Drill: Except for the tight spaces that require an angle drill, my 25+ year old Black and Decker corded drill is the workhorse for panel installs. It gives better feedback when the bit is about to break through the metal. It's just a better drilling experience than my Milwaukee battery-powered drills. Yeah, dragging the cord around isn't as convenient, but for the hundreds of chassis holes in these builds, for me it's the right tool for the job. Don't forget the cutting fluid. I pour some into a cap, then dip the tip of the bit into the cap when starting each hole. For the thicker chassis tubes, I dip it a second time half way through.
Trunk box lid mocked in place (closed).

View with lid open. Can't really tell from this picture, but it rotates back far enough to stay open on its own.

Here's just one example of clearance needed for the rear cockpit panel to lay flat. Lots of trips back and forth to the bench to grind away a little at a time.

Drilling into these trans tunnel support tubes at an angle was interesting. It worked out just fine.

View of cockpit panels--forward looking. Trans tunnel top cover is not drilled yet. It's just sitting in place. Will wait until after the drivetrain is installed to see what I'm dealing with for shifter placement. Plus, there won't be a hole for the e-brake handle, as I have the Wilwood electric parking brake.

View of cockpit panels--looking rearward. I drilled the rear corner panels. I'm not completely sure if there's any harm in doing so now? I know they go in permanently after the body is on, but I'd rather not be drilling these panels at that point in the build.

Left side of cockpit.

Last edited by 460.465USMC; 01-18-2025 at 04:19 PM.
Chris
Coupe complete kit. Index. Delivered: 4/22/24.
Build Thread. Coyote Gen 4X. T-56. IRS w/3.55. Wilwoods. PS. HVAC. Side windows.
MK4 Complete kit.
Build Thread Index. Delivered: 10/15/2020. Legal: 7/25/23. Coyote Gen3. TKO600 (0.64 OD). IRS w/3.55. PS. Wilwoods. Sway bars. This build is dedicated to my son, Benjamin.
Build Thread.
-
01-11-2025, 02:46 PM
#110
Senior Member
Trunk Box and Cockpit Complete (continued)
Right side of cockpit.

Chris
Coupe complete kit. Index. Delivered: 4/22/24.
Build Thread. Coyote Gen 4X. T-56. IRS w/3.55. Wilwoods. PS. HVAC. Side windows.
MK4 Complete kit.
Build Thread Index. Delivered: 10/15/2020. Legal: 7/25/23. Coyote Gen3. TKO600 (0.64 OD). IRS w/3.55. PS. Wilwoods. Sway bars. This build is dedicated to my son, Benjamin.
Build Thread.
-
01-11-2025, 10:47 PM
#111
Senior Member
Chris - looks great. I have a couple of questions:
Curious why you used two 12" hinges instead of a 24"? I am sure you had a good reason, maybe just easier?
Did you use one of the spacing tools that are available out there to mark your holes or just a ruler?
I know exactly what you mean about the clearancing (and yes, we'll formally declare that a word). Even though I haven't really started my build yet I still poke around thinking about things and just today I was looking at how some of the panels fit against/around some of the welds and realized there would need to be adjustments made for them to fit flush and flat. Looks like you did it right. I currently only have 50 1/8" clecos so obviously will need to enhance that collection. Keep up the good work.
-
Post Thanks / Like - 1 Thanks, 0 Likes
-
01-12-2025, 05:14 PM
#112
Senior Member
Hi Tim. I believe the shipping on the 24" was quite a bit more. A single hinge would be a little easier to align everything, but it still needs to be cut (if your box is 23"). Since my hinges will likely get powder coated, and the topside will be covered in carpet, I opted to save a few shekels in shipping. If the hinge will be exposed on top, then the argument for a single hinge is stronger IMHO.
I don't have a spacing tool other than the one F5 supplies with the kit. These hinge holes I had already drilled through the hatch floor aluminum and into the 3/4" tube, and are spaced 3" apart. For those situations (and there are many) where 3" or 2" spacing doesn't come out even, I do the math for consistent spacing between the start and end point. Then dial that spacing into my micrometer, and mark the hole placements accordingly. No doubt a spacing tool would make that part much faster/easier.
Chris
Coupe complete kit. Index. Delivered: 4/22/24.
Build Thread. Coyote Gen 4X. T-56. IRS w/3.55. Wilwoods. PS. HVAC. Side windows.
MK4 Complete kit.
Build Thread Index. Delivered: 10/15/2020. Legal: 7/25/23. Coyote Gen3. TKO600 (0.64 OD). IRS w/3.55. PS. Wilwoods. Sway bars. This build is dedicated to my son, Benjamin.
Build Thread.
-
01-18-2025, 05:02 PM
#113
Senior Member
Radiator and Panels Installed
Still plugging away at panels. Moving to the front, I tackled the radiator duct, side panels, and radiator install. Again, nothing much new here, but really enjoyed the process.
- Radiator sides: I did not drill the last 7 inches or so on the upper portions, because riveting in that area would introduce a pretty severe curve/bend. The duct back panel sits about 1/2" shy of the nose tubes on both sides.
- Radiator and Breeze shroud fitment: I had to go back to the build manual (AKA Edwardb's build thread) to see how to solve the shroud fitment challenge, because it comes in contact at the bottom with the radiator duct panel. Wedel did a nice job of documenting this recently, so no need to go into any detail here. I'll just say I enjoyed making the strip that sandwiches the top of the shroud to the radiator channel. In fact, I did it twice. The first one was too narrow, about 5/8" tall. The second was much better at 1".
- Radiator top mount bracket: the F5 manual threw me for a bit with the following: "Position the top mount bracket so that the small tab sticking up is on the rearward side of the bracket". I wondered if maybe my bracket was bent backwards, or was I just experiencing a low IQ moment? So, I checked out some other builders for sanity. Sure enough the tab goes on the forward edge. I don't see any other way to mount it.
- Spacers: Like JimStone, I had to make a couple spacers to fill in the space between the bracket and the 1" nose tubes. Thankfully, I had some stock .020 aluminum bar on-hand. My portable bandsaw on the Swag table made quick work of cutting out the spacers. Man, that setup is handy.
Radiator duct and side panels drilled. Wow, that back panel takes a lot of holes.

This is the solution from Edwardb which sandwiches the Breeze shroud on the top (rear) channel of the radiator. I used a couple washers to create a space of about .07 inches. So, the shroud hangs on the top channel of the radiator, and is secured on the bottom channel with a couple screws (Breeze supplies the required hardware with the shroud). I also used the Breeze shroud on my Roadster build and liked it.

These are spacers to fill the gap between the nose tube and the radiator top mount bracket. Made from some scrap .020 aluminum bar I had on hand.

Spacer installed. Thanks to JimStone for inspiring this spacer idea!

And, here's everything mocked in place. Will be taking off soon and adding to the pile of panels for powder coating.

I watched the F5 unveiling of the new MK5 this morning. Some really nice changes/upgrades. Great to see them forge ahead with continuous improvement.
Chris
Coupe complete kit. Index. Delivered: 4/22/24.
Build Thread. Coyote Gen 4X. T-56. IRS w/3.55. Wilwoods. PS. HVAC. Side windows.
MK4 Complete kit.
Build Thread Index. Delivered: 10/15/2020. Legal: 7/25/23. Coyote Gen3. TKO600 (0.64 OD). IRS w/3.55. PS. Wilwoods. Sway bars. This build is dedicated to my son, Benjamin.
Build Thread.
-
01-18-2025, 11:48 PM
#114
Senior Member
More good progress Chris. I am trying to absorb all the details of the radiator, shroud and panel mounting as it seems a bit fiddly.
"I had to go back to the build manual (AKA Edwardb's build thread) to see how to solve the shroud fitment challenge" Isn't that the truth.
-
01-30-2025, 09:21 PM
#115
Senior Member
Brake and Clutch Reservoirs
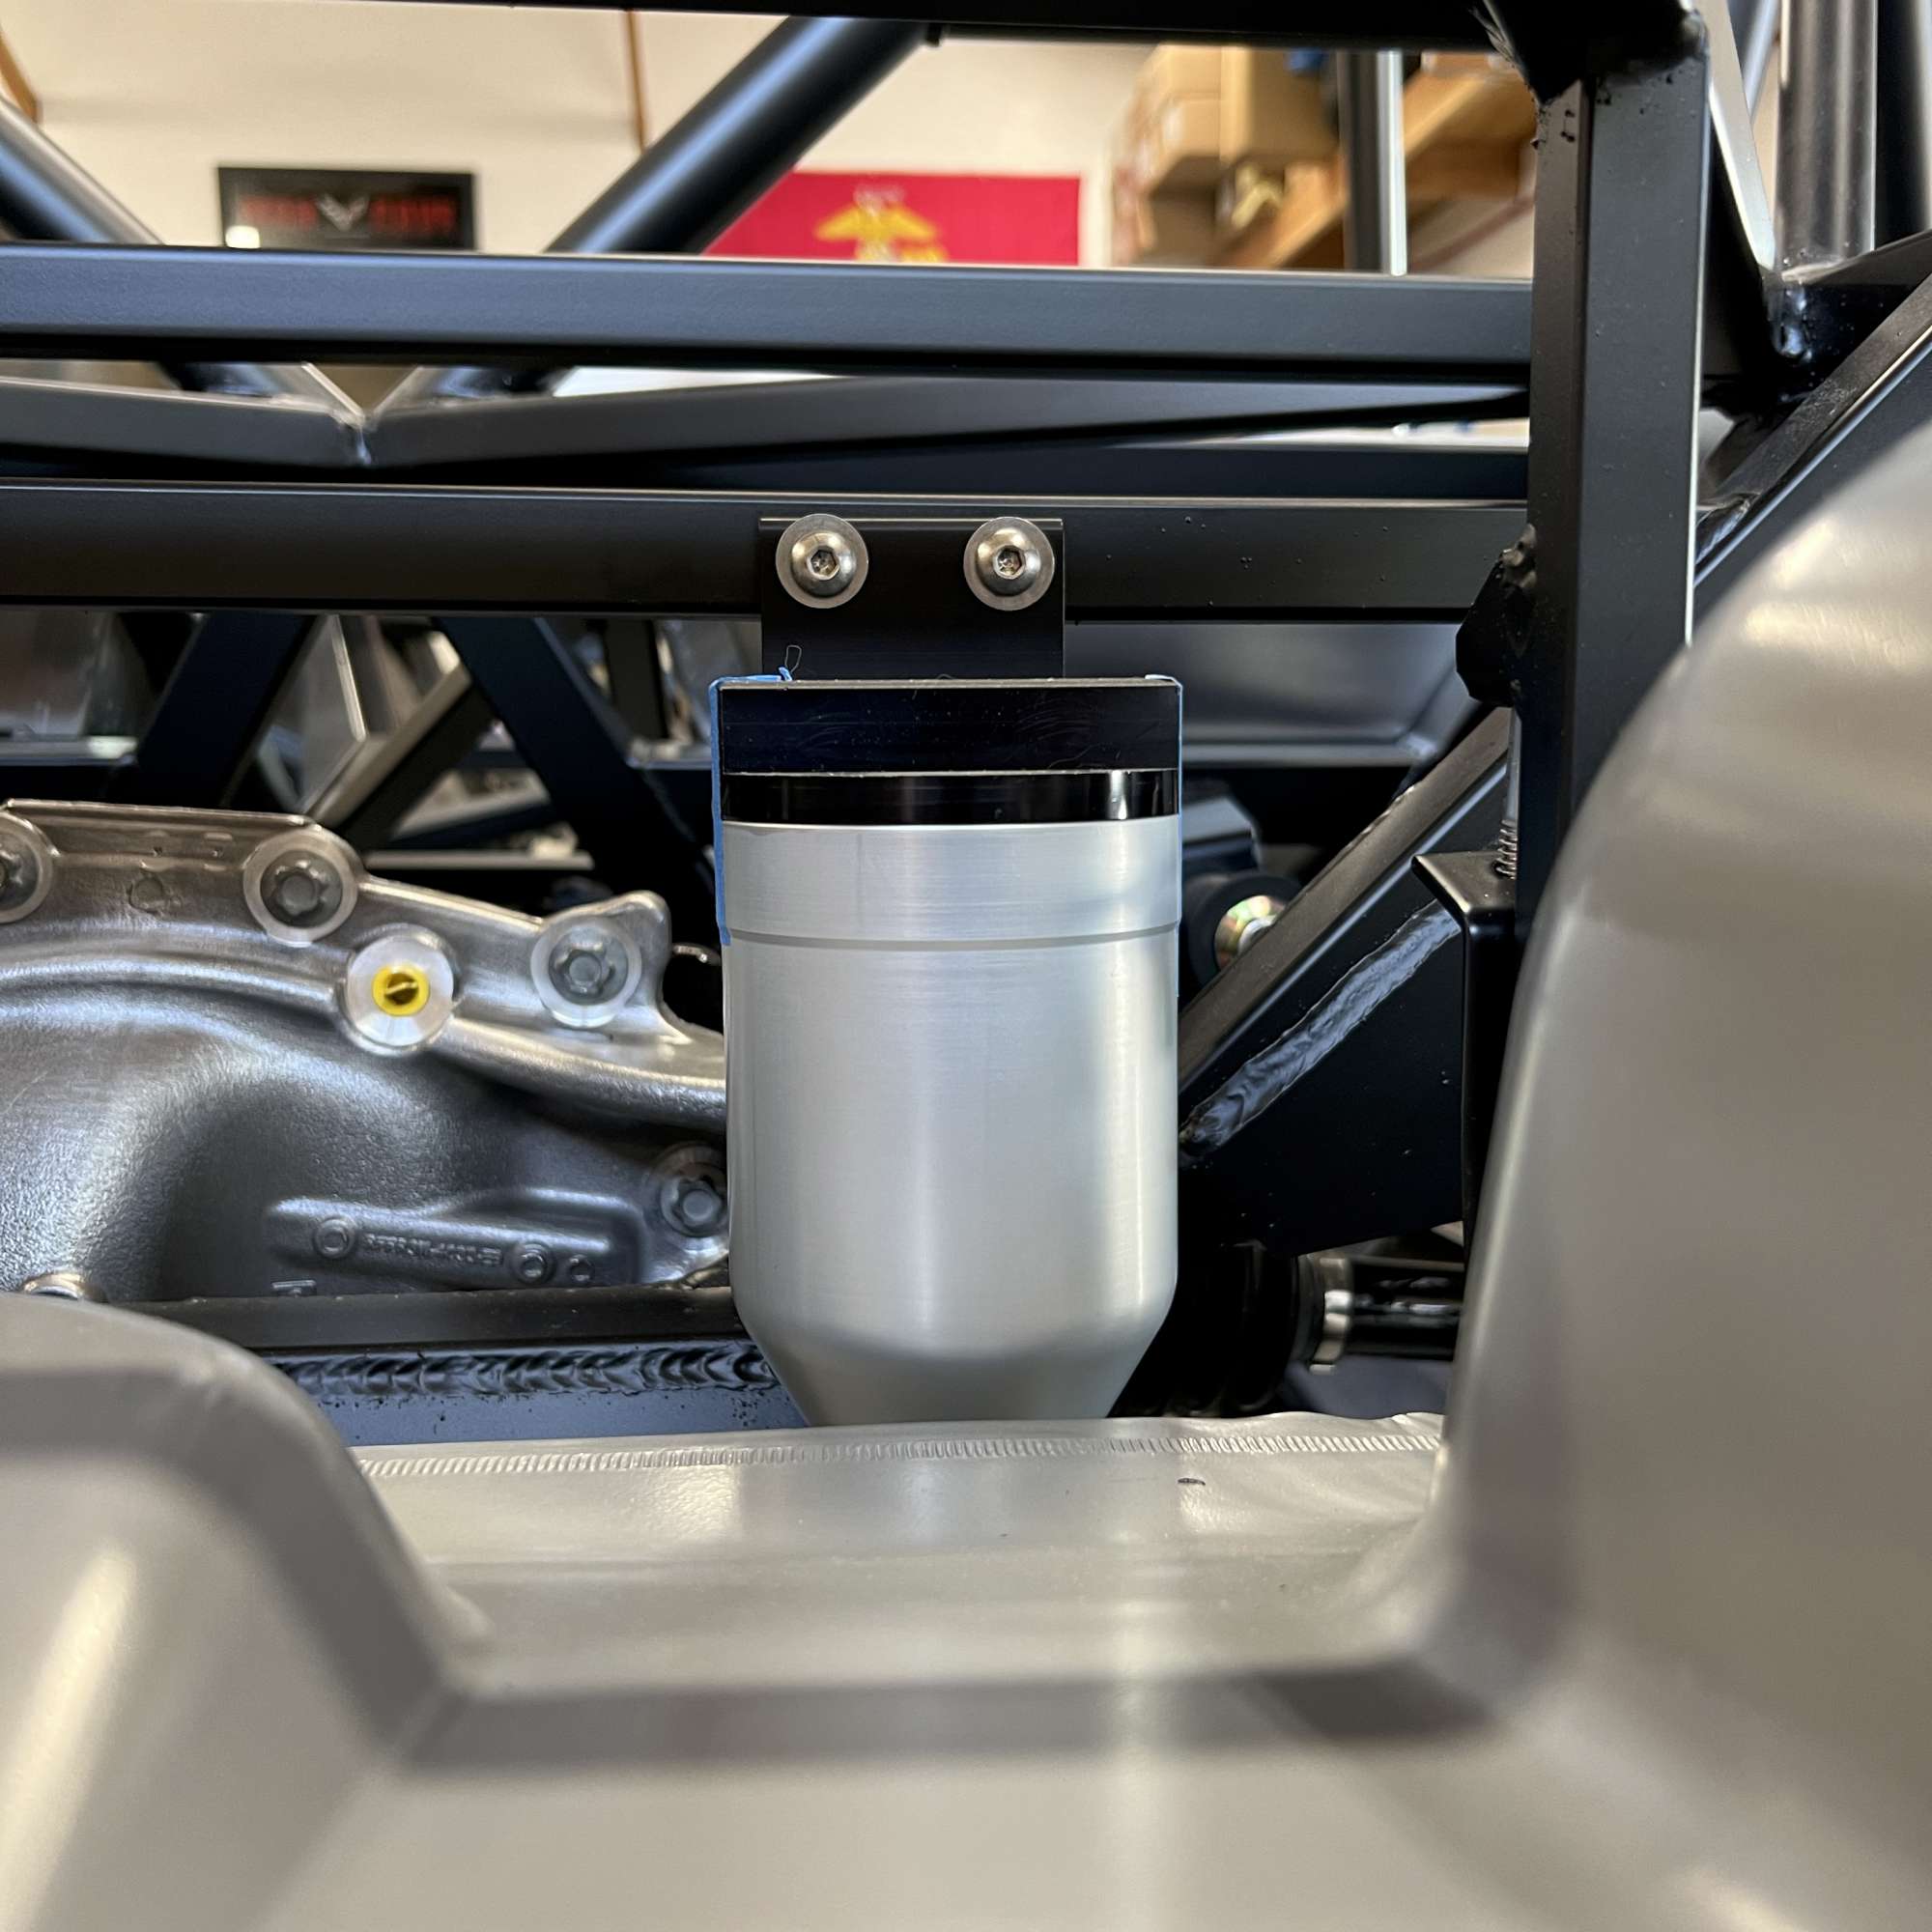
Finally! Time to work on something other than panels. Well, sort of. I tackled the brake and clutch reservoirs. Separate reservoirs for front and rear brakes, and one for hydraulic clutch. And, yes, a panel was involved.
Using a piece of 1.5" x 1/8" thick angle aluminum, I made a mounting bracket for the reservoirs. I personally like the F5 reservoirs, but they don't fit where I wanted to install them (forward of the DS footbox). As other builders have found, some modification to the reservoir brackets are necessary. More on that in a minute.
The 1.5" angle aluminum had to be trimmed to match the reservoir brackets. I used my portable bandsaw setup (again!), and was able to roughly cut out the circular shape of the brackets. Then, clean up with the sander. How convenient it was to find my sander is exactly the right size. Nice. I'll hit the easy button when I can.

I used 10-32 flat head screws to attach the reservoir brackets to the angled aluminum after lopping off the bracket ears. Bandsaw made quick work of the lopping. Here's a view of the bottom with the ears removed.

Top view.

Unfortunately, my thread tap was too long to tap from the inboard side of the chassis tube. So, I used a couple 5/16" button head screws all the way through the 1.5" chassis tube to mount the bracket assembly.

Here's where the panel part comes in. I followed Wedel's method to locate the holes: cut 2.5" hole plug out of wood and place in reservoir bracket. Perfectly centers the hole saw in the aluminum panel. Thanks, Wedel!

I think it was Rsnake's build videos where I first saw this setup. It makes for a clean install IMHO, not to mention easy access to check fluid levels. Thanks to him and the forum for the inspiration and help.

Chris
Coupe complete kit. Index. Delivered: 4/22/24.
Build Thread. Coyote Gen 4X. T-56. IRS w/3.55. Wilwoods. PS. HVAC. Side windows.
MK4 Complete kit.
Build Thread Index. Delivered: 10/15/2020. Legal: 7/25/23. Coyote Gen3. TKO600 (0.64 OD). IRS w/3.55. PS. Wilwoods. Sway bars. This build is dedicated to my son, Benjamin.
Build Thread.
-
Post Thanks / Like - 0 Thanks, 1 Likes
-
01-30-2025, 09:24 PM
#116
Sweet, that looks very nice.
-
Post Thanks / Like - 1 Thanks, 0 Likes
-
01-30-2025, 10:37 PM
#117
Coupe Complete Kit - Ordered 7/8/24 - Received 10/13/24
-
Post Thanks / Like - 1 Thanks, 0 Likes
-
01-30-2025, 11:26 PM
#118
Senior Member
Nicely done Chris. I feel fortunate to be several months behind you. I get to review all these great modifications and integrate with my build, so thanks in advance!
-
Post Thanks / Like - 1 Thanks, 0 Likes
-
01-31-2025, 07:29 AM
#119
Agreed! I appreciate the level of detail you are providing for us.
If you could just make another one of those brackets and ship it to me that would be great lol
-
Post Thanks / Like - 0 Thanks, 1 Likes
-
01-31-2025, 10:56 AM
#120
Senior Member
Originally Posted by
Smiley
Sweet, that looks very nice.
A simple, clean approach IMHO. Kudos to the creative builder (Rsnake?) who first did it.
Originally Posted by
Dmac800
Great looking setup!
Thanks!
Originally Posted by
PNWTim
Nicely done Chris. I feel fortunate to be several months behind you. I get to review all these great modifications and integrate with my build, so thanks in advance!
All the great ideas and skilled builders on this forum...I can't thank them enough.
Originally Posted by
TwinFins
Agreed! I appreciate the level of detail you are providing for us.
If you could just make another one of those brackets and ship it to me that would be great lol
Thanks, guys. These "little" detours take me a lot of time, but it's enjoyable, and that's what it's all about for me. Learning new things, and trying to duplicate a few of the great ideas I see here on the forum. This is one of the few detours that didn't require much coin, just my time.
TwinFins: I'm hoping to finish the Coupe before my grandkids are driving. At my turtleee build pace, that's in question.
Chris
Coupe complete kit. Index. Delivered: 4/22/24.
Build Thread. Coyote Gen 4X. T-56. IRS w/3.55. Wilwoods. PS. HVAC. Side windows.
MK4 Complete kit.
Build Thread Index. Delivered: 10/15/2020. Legal: 7/25/23. Coyote Gen3. TKO600 (0.64 OD). IRS w/3.55. PS. Wilwoods. Sway bars. This build is dedicated to my son, Benjamin.
Build Thread.


 Thanks:
  Likes:


 Reply With Quote


