FormaCars

Visit our community sponsor

Thanks Thanks:  0
Likes Likes:  0
Page 1 of 2 12 LastLast
Results 1 to 40 of 73

Thread: Rod's BB Street Cobra Build

  1. #1
    Senior Member
    Join Date
    Jul 2013
    Location
    Tacoma, WA
    Posts
    139
    Post Thanks / Like

    Rod's BB Street Cobra Build

    I started this build quite a while ago, 9 years. Almost all of that time it has been in storage because of a career change. Didn't have the time or money. I have just recently started up building again and wanted to start some documenting and sharing.

    My plan is to build a 427 street Cobra. That is- NO roll bar, NO side pipes, NO hood scoop with a FE. I really like the lines of the body and the sleeper look. Options will include heater, wipers, and full bumpers with other things that I can do to make it more original without going over the top. The MRKII also came with a Tri-States body, full hood and trunk with hidden hinges. This helps with the hood scoop because the hood scoop is separate so I just wont install that.

    I started with a MRKII that was started by someone on this site. When I got the car the suspension front and rear was assembled including the IRS super coupe rear and axles. Prior owner started to change to a MP Brakes master with a full power booster by cutting out some of the braces. I didn't like the master so I fabbed in a Tilton dual master and hyd clutch hanging pedals. This and some changes to drop the trunk floor over the tank where the only things I did before storage.

    Now I have started back up with more changes. My plan is to mock up as much as I can and do the modifications before I pull it back apart and powder coat the frame. I also started back up by spending the money for my TKO 600 from Mike Forte. This is behind a 428 PI. Bored .030 over with Edelbrock heads.

    So far I have moved the parking brake to the top pass side of the tunnel. I made my own mounts and made a leaver that pulls the cables so the feel is better.

    I also moved my firewall 5" forward and modified the foot boxes. Here is that thread from the other forum.
    Firewall Forward

    My biggest change so far that I am still trying to work out is the under car exhaust. The headers is the hardest part of that. With limited options for FE headers I was looking at custom headers but locally I have found that would cost $1500-$1800! I then tried some Sanderson Galaxie headers installed in reverse. The exhaust would then go under the foot boxes using oval pipe and mufflers from Spintech. The driver side works but the passenger side is right where the motor mount goes. I then tried to find someone that would be willing to modify the Sanderson passenger side or the FFR headers to make them work but without any luck with that I tried some Sanderson headers for a F100. They hug the block enough that they will dump the exhaust between the oil pan and the frame rails. So the headers work but create other issues. One is the 4" cross tube between the main rails. It has been done so I will probably notch the cross tube to allow frame clearance tubes. The other is that the headers interfere with the frame part of the motor mounts. Not a big deal that some welding won't fix. I will cut off the FFR mounts and weld in some street rod universal mounts. I think I have found what will work. I talked to Sanderson and they are going to make me another set of F100 headers with the collector tilted to the rear a few degrees so my pipes coming out will not have such a sharp turn as the collector ends about the top of the 4" main rails.

    I included a picture of my car on delivery day with the body installed and one of the engine and trans just before the first of many installs. I know if there are no pictures it didn't happen! Should be able to do more updates now with more pictures of the future progress.
    Thanks for reading the long post, Rod
    Attached Images Attached Images
    FFR 3749 MkII, 428PI, TKO-600, IRS, Pin-Drive, Tri-States body, Under Car Exhaust
    Rod's BB Street Cobra Build

  2. #2
    Senior Member JL1958's Avatar
    Join Date
    Jul 2013
    Location
    Atlanta
    Posts
    159
    Post Thanks / Like
    I like the "sleeper" idea.
    Sounds like it will be awesome.

  3. #3
    Senior Member NICK C's Avatar
    Join Date
    Jul 2011
    Location
    Lawton, Oklahoma
    Posts
    299
    Post Thanks / Like
    I like your build idea. I am interested in seeing your under exhaust set up especially with a big block. Keep us posted. Neat. Nick

  4. #4
    Senior Member NICK C's Avatar
    Join Date
    Jul 2011
    Location
    Lawton, Oklahoma
    Posts
    299
    Post Thanks / Like
    I just returned from the Tacoma area visiting my daughter at Bangor Naval Base. You'll have some beautiful driving days up there. Nick

  5. #5
    Senior Member
    Join Date
    Jul 2013
    Location
    Tacoma, WA
    Posts
    139
    Post Thanks / Like

    Frame Modifications

    I got some progress on my frame modifications last week. I cut off and grinded the motor mounts from the frame. Now it's ready to weld on the new motor mounts when I get my headers back. This will give me the clearance needed for the block huger headers for my under car exhaust.


    I also finished the frame mods to the truck area to drop the bumper attachments for a full dropped butt. Ended up framing it in all the way. Thought that would be a little stronger. I will weld in bolts and use coupling nuts to attach the bumper. I moved the passenger side trunk strap down to match the passenger side so it will be below the aluminum inside the trunk when I lower it as well. Will need to change the trunk straps now but I'm thinking of not using the tank cover and coating with undercoat so that will change the straps as well. You know, one mod leads to another...


    You can also see the mod I did previously to drop the trunk floor over the tank.


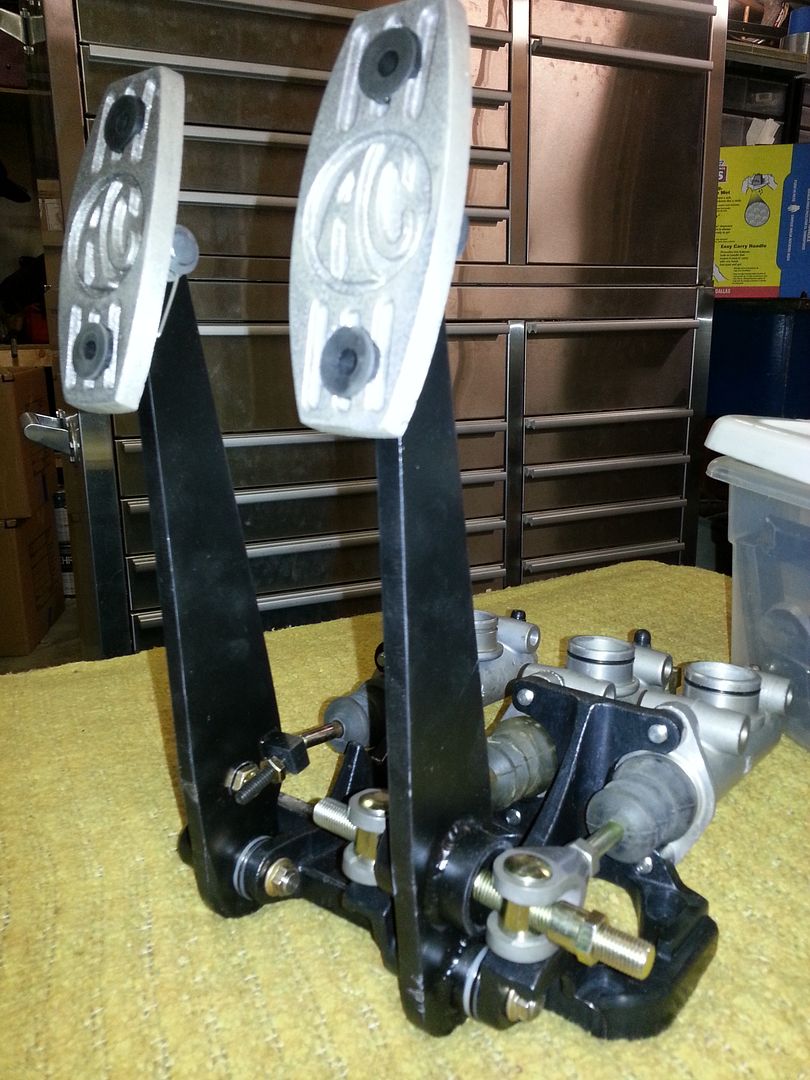
    I have decided to change to floor mount pedals. I also wanted be able to lower the drivers foot box like the passenger side to look more like the original. I cut out the 2" outside tube in the foot box so I could mock up the pedals. Looks like it will work well. I will weld in some steel support plates in the front of the foot box and extend the side tubes to connect. That should support the pedals. I sent the pedal assembly to Nick Acton so he can make me new pedal arms with AC pedals that look like the original. Looks like he does great work and with talking to him he is very open to do what you want. With his pedals and the new foot box should look and work great. On his recommendation I spent some time trying different pedal spacing and I think I have what will work for me. Nick will make them bent to space how I adjusted the Tilton ones.


    I finished cutting out the upper pedal supports and the front metal plate on the top of the foot box. I left the vertical 3/4" tube on the front inside of the foot box. Figure I might use it later. Everything else is gone.


    I welded back in the forward horizontal 3/4" tube that the previous owner cut out. Ground down the welds flush and it should be invisible after powder coat. I also added in a vertical cross tube to match the passenger side.

    Last edited by rlampman; 02-11-2014 at 07:24 PM.
    FFR 3749 MkII, 428PI, TKO-600, IRS, Pin-Drive, Tri-States body, Under Car Exhaust
    Rod's BB Street Cobra Build

  6. #6
    Senior Member riptide motorsport's Avatar
    Join Date
    Feb 2011
    Location
    Fort Lauderdale Fl.
    Posts
    3,296
    Post Thanks / Like
    Nice work!
    FFR Daytona Type 65 Coupe
    67 427 Cobra
    57' Belair
    72 Pinto Wagon ,306" 1/4 miler
    34 5 window coupe Ford
    2003 Mustang GT
    99' ZX9
    85 Goldwing

    All toys still in the Scuderia!


    Every Saint has a past..................every sinner a future

    Don't take yourself so seriously........no one else does.

    You never see a motorcycle parked outside a Psychiatrists office.

  7. #7
    Member aks801's Avatar
    Join Date
    Feb 2011
    Location
    Houston, TX
    Posts
    64
    Post Thanks / Like
    That is looking great, and I especially like the floor-mounted pedals.
    Alan

    "Meet the new boss. Same as the old boss."
    - Pete Townshend

  8. #8
    Senior Member
    Join Date
    Jul 2013
    Location
    Tacoma, WA
    Posts
    139
    Post Thanks / Like

    Exhaust frame holes

    I need to catch up with some updates so I will start with the holes in the frame for my under car exhaust. I decided to go with the hole through the cross member with a welded in sleeve. Not really as hard as I thought and probably easier than notching the bottom. I think it will work out better in the long run as long as I get the exhaust set up right.
    I am using 2 1/2" exhaust so I wanted a 3" ID tube. With a 1/8" wall I needed a 3 1/4" OD tube. Took some looking but I found one and ordered a 1 ft length of DOM tubing. I ordered a MK Morse 3 1/4" hole saw from what I read about them but don't waste your time or money. Mine broke 4 teeth cutting the first hole. Then I went to HD and picked up a cheep Milwaukee one for half the price. It cut the other three holes no problem and is still good to cut more. It really cuts easy because the saw is never cutting all the way around.

    I first tried to do measurements and get as accurate as I could but it didn't look right. I ended up just eyeballing it. Hard to tell where the hole will be with starting the pilot and the outside if the hole saw so far away from the top of the cut. Ended up working out great.

    I had to grind out one hole because I didn't get the back side strait with the front. The other side was right on.

    Once it was all strait and test fit I welded it in.


    I am happy with how it turned out. I am planning on ceramic coating the exhaust and where it goes through the cross member I will use header wrap. The wrap should hold the exhaust in place so it doesn't rub and I hope will keep the heat away from the powder coat on the frame. If anyone has any other ideas for support and protecting the powder coat let me know.

    If I did it again I would have put the holes another 1/4 to 1/2 inch inward. I put my holes just at the edge of the welds at the main rails. It would be easier to weld if it wasn't so close. On the drivers side it would be into the edge of the backbone but the new tube would replace the support.
    Last edited by rlampman; 02-11-2014 at 07:26 PM.
    FFR 3749 MkII, 428PI, TKO-600, IRS, Pin-Drive, Tri-States body, Under Car Exhaust
    Rod's BB Street Cobra Build

  9. #9
    Senior Member
    Join Date
    Jul 2013
    Location
    Tacoma, WA
    Posts
    139
    Post Thanks / Like

    Motor Mounts

    I finally got the correct headers for my under car exhaust. They where the hardest part to get figured out. I tried three sets before I came to these. I even looked into custom headers but $1800 for headers where excessive. Headers for the FE are limited compared to a SBF. The ones I ended up with are for a FE in a F100 pickup from Sanderson Headers.

    They dump right behind the motor mounts, the stock F100 ones.. Hence my project of cutting off the FFR frame mounts and welding new one's in. I got mounts from TinMan Fabrication. Really nice pieces even though they missed the mounting holes for the block by about 1/8". Had to elongate two holes on each one and they bolted to the block. The frame side is left long so after setting the engine and making templates I cut the frame mounts to fit the frame. They even included the gussets between the vertical brackets.


    With some welding I finally have my motor and transmission where it will end up.


    I ended up with the oil pan 1/2" back from the front cross member and oil pan flush with the bottom of the frame rails, which is enough to remove the oil pan with the motor in. On the sides I have about 1/2" from the starter pocket to the 3/4" cross tube on the passenger side and the hydraulic clutch mount touching the tube on the drivers side. This leaves the motor and transmission square in the frame and with a 1" spacer under the trans mount my pinion angle is about 1 1/2 degrees. The transmission is only about 3/8 from the side of the backbone on the passenger side.

    I decided to clearance the clutch mount a little and trim some of the tube on the drivers side to make room. I cut one slit in the top


    and three slits in the bottom.


    Then I took a BFH and bent the inside wall to close the gaps.


    This gave a gradual notch and I welded it all up and ground smooth.


    It now has 3/8 to 1/2 inch between the frame and the hydraulic clutch bracket. A little tight but there is room to install and remove the slave cylinder from the bottom. Looks good to me and I don't think the strength lost will be a problem.
    Last edited by rlampman; 02-11-2014 at 07:28 PM.
    FFR 3749 MkII, 428PI, TKO-600, IRS, Pin-Drive, Tri-States body, Under Car Exhaust
    Rod's BB Street Cobra Build

  10. #10
    Senior Member
    Join Date
    Jul 2013
    Location
    Tacoma, WA
    Posts
    139
    Post Thanks / Like

    Seat Frame

    Last week I built frames and added brackets to bolt in my seats. I have TriStates leather seats. They look great but with the tubular frame there is only 4 pads at the corners to bolt the seat down. I have sliders from Jegs for both seats. I know not needed on the passenger side but I would have to build spacers to make the passenger seat the same height and I wanted to be able to access the storage space behind the seat easier.

    Started with some angle iron on the sides so I had a better place to bolt the sliders.


    Added 3/4" long sections of tubing to give some rear tilt.


    I didn't like the way the sliders where so close together or the way the leaver was on the outside. After playing around with different positions and directions I decided to swap the rails and reverse one. That way both of the locks where on the inside and I can place them farther out.


    I added a cross bar to hold it in place as well as some spacers to give the locks room to work. Then I welded it all together.


    In the correct arrangement the slide locks are connected with a cable that pulls both locks when one is pulled. With some flat bar, #10 bolts, brass washers, and nylon lock nuts I made some leavers to deal with the reversed slide.


    Now with a pull of the leaver both locks are released.


    Now onto a place to bolt them into the car. I placed the slides so that none of the bolts went into the frame rails. I drilled out the aluminum floor and marked the frame where the bolts come through. Made brackets with some gussets for each location and welded them in.


    I still need to do the inside back bracket but I will do that after I get my drive line loop in as it may help with this bolt location.
    I did all this for both sides and kept everything the same. At this point both frames will bolt to either seat and once together the seats will bolt to the passenger or drivers side. I now have the ability to move all the way back against the rear wall or move it forward a little over 5". More than I can use but may allow my wife to reach the clutch.
    Last edited by rlampman; 02-11-2014 at 07:29 PM.
    FFR 3749 MkII, 428PI, TKO-600, IRS, Pin-Drive, Tri-States body, Under Car Exhaust
    Rod's BB Street Cobra Build

  11. #11
    Senior Member
    Join Date
    Jul 2013
    Location
    Tacoma, WA
    Posts
    139
    Post Thanks / Like
    Forgot to post a picture of the finished install.


    I'm not sure about how high the seats sit with the adjusters. I hope it's not to high. Can someone tell me how high the top of the windshield is above the dash?

    BTW, FedEx dropped off an early Christmas present for me from Nick Acton. Just a taste as I won't have time to work on them till next month.

    Rod
    Last edited by rlampman; 02-11-2014 at 07:31 PM.
    FFR 3749 MkII, 428PI, TKO-600, IRS, Pin-Drive, Tri-States body, Under Car Exhaust
    Rod's BB Street Cobra Build

  12. #12
    Senior Member
    Join Date
    Jul 2013
    Location
    Tacoma, WA
    Posts
    139
    Post Thanks / Like

    Drive Line Loop

    Finished my drive line loop. I started with a universal one from Jegs that bolts together.


    With the bolts inside the loop it makes things pretty close but after some cutting and welding I have it ready to go in. I wanted to maximize the space on the passenger side to allow the parking brake cables to go beside it to get to my tunnel mounted handle. I welded one side to the bottom of the loop and one to the side so it was long enough to reach the drivers side main rail.


    I'm ready to weld it to the frame but not sure how far forward I should go. I'm thinking this is where.


    What do you think about the position?
    Rod
    FFR 3749 MkII, 428PI, TKO-600, IRS, Pin-Drive, Tri-States body, Under Car Exhaust
    Rod's BB Street Cobra Build

  13. #13
    Senior Member
    Join Date
    Jul 2013
    Location
    Tacoma, WA
    Posts
    139
    Post Thanks / Like

    Forward Firewall 5"

    I finished up my firewall today! Really happy with how it turned out. This is my second attempt so I knew what I wanted going in. Here is my first one http://www.ffcars.com/forums/17-fact...-5-inches.html

    The first one turned out great but now that I am going to lower the drivers foot box with floor pedals I need the firewall to go all the way across on both sides. I moved the firewall 5" forward and comes from the bottom of the 2" dash tube. It goes all the way across between the supports for the windshield. I used .090 5052 aluminum that I bought from OnLine Metals. Because it is 51" long I had a local shop bend it 90*.


    I welded in some tabs to attach the top to the outer 3/4" tubes. I may change this to a full tube across the back of the firewall but I don't want to take up any more space than I have to for the heater.


    I used the original firewall to trace the curve for under the body and then cut notches for the 3/4" outer tubes on each side.


    I then used my HF bender to make pieces to cover the top/ends inside the windshield mount to finish sealing the dash area in. Cleco'd it all together and trimmed the firewall to match the angle.


    It turned out very sturdy and it gives a lot more room behind the dash. I will be putting the wipers, heater, defrosters, and a glove box in there.


    I put my passenger foot box back in to see the look and fit. Don't have the drivers side made yet as well as the floor pedals. I will still need to drill a hole for the steering shaft but I need to get a laser pointer to get the right location before I drill that.
    Last edited by rlampman; 02-11-2014 at 07:32 PM.
    FFR 3749 MkII, 428PI, TKO-600, IRS, Pin-Drive, Tri-States body, Under Car Exhaust
    Rod's BB Street Cobra Build

  14. #14
    Senior Member
    Join Date
    Jul 2013
    Location
    Tacoma, WA
    Posts
    139
    Post Thanks / Like
    I finished up the firewall. Using a laser pointer to find the path between the steering shaft bearings I drilled a hole in the firewall. I have a bearing that will cover the hole where the steering shaft goes through the firewall.


    I haven't decided yet. I may turn the bearing around and have it more recessed in the panel. It may look a little more finished that way but the hole will have to be more exact to be covered up.

    I also put the body on today to check the fit and it looks good.

    BTW, Here is a better picture of the dash side where I will access the windshield bolts.
    With cover installed


    With Cover removed. Note you can reach around the right side as well.


    Drivers side is identical.
    Rod
    Last edited by rlampman; 02-11-2014 at 07:34 PM.
    FFR 3749 MkII, 428PI, TKO-600, IRS, Pin-Drive, Tri-States body, Under Car Exhaust
    Rod's BB Street Cobra Build

  15. #15

    Join Date
    May 2011
    Location
    Pittsburgh, PA
    Posts
    729
    Post Thanks / Like
    That looks great.

    Just as a very respectful word of caution, as I see it, and at least on my coupe, the steering bearing mounting has a safety component engineered into it, to prevent the steering shaft from being pressed into the driver's chest in a serious front end collision. Before flipping that thing around, I'd make sure the safety aspect of the stock configuration isn't being significantly compromised.

  16. #16
    Senior Member
    Join Date
    Jul 2013
    Location
    Tacoma, WA
    Posts
    139
    Post Thanks / Like
    Jocob,
    Thanks and good call. I think I have that covered. The shaft is collapsible and the split is just behind the firewall. Also, the bearing that I have at the firewall is something added to the original setup. It really is just to help seal up the hole and will be attached to the firewall but the steering shaft will slip through. That's why I'm not bolting it down until I have the steering bolted in at final assembly. I will pull it all back apart to powder coat the frame and aluminum panels. I had a hard time finding something that would seal the hole with shaft so ended up with the bearing.
    Rod
    FFR 3749 MkII, 428PI, TKO-600, IRS, Pin-Drive, Tri-States body, Under Car Exhaust
    Rod's BB Street Cobra Build

  17. #17
    Jazzman's Avatar
    Join Date
    Jan 2014
    Location
    Scottsdale, AZ
    Posts
    1,164
    Post Thanks / Like
    I am really glad to read your thread. I am at the very beginning of planning my first build. I have been seriously considering doing under car exhaust. WOW! That is a very complex fabrication and modification. I am not sure if I am up to it. I will have to think more on the subject. Thank you for your detailed explanations and photos. Please keep it up. I will be interested to follow your progress.

    Jazz

  18. #18
    Senior Member
    Join Date
    Jul 2013
    Location
    Tacoma, WA
    Posts
    139
    Post Thanks / Like
    Jazz, thanks for the kind words. The problem with the modifications is the more I do the more I want to do! To much fun. Don't discount the under car exhaust if thats what you want. Depending on what engine you use there are options. If you can get the headers figured out first you are most of the way there. You can run under the footbox without frame modifications with headers that are reversed to dump forward. Spintec makes oval piping and low mufflers that work well. Search on this forum and there is a great two part writeup with a small block. If you do go between the frame rails like I did the holes in the cross member was really not that hard but does need welding. If you have a FE engine pm me and I can give you more details on what I found out for options.
    Rod
    FFR 3749 MkII, 428PI, TKO-600, IRS, Pin-Drive, Tri-States body, Under Car Exhaust
    Rod's BB Street Cobra Build

  19. #19
    Senior Member
    Join Date
    Jul 2013
    Location
    Tacoma, WA
    Posts
    139
    Post Thanks / Like
    Last week I made my own air splitter for the front grill. I wanted it close to original but I want to mount it different. Here is a picture of an original:


    Note that it just has a small tab bolted to the grill opening. I want to make brackets that will bolt to the frame behind the body so it doesn't stress the fiberglass. I may make it bolt to the quick jack bolts. I ordered some trim molding and clips from wolfsburgwest.com for the front edge. It should look great but I will need to shorten it as the trim is for a VW Bug running board.

    It's really a simple piece but I wanted to give it enough strength so it didn't flop around. I ordered some 0.050 6160 aluminum so I could bend it in my 30" HF break. I started with a simple template and cut out the aluminum and added relief holes and lines for bending.


    The break is supposed to bend up to .050 aluminum but maybe not 6160. I really couldn't get it to bend at all. I ended up getting out the hammer and dolly and went old school hand formed. The aluminum is really easy to work with compared to steal. I put two bends to wrap around the front and bent the sides down. I also added a bend at the back to make a Gurney Flap (a small flat tab projecting from the trailing edge of a wing at 90 degrees). This flap up should add down force to the aerodynamics. I'm not sure it will make any difference but I wanted a bend in the back to add strength and you won't see the back unless you are almost on ground looking up.


    I still need to do some final work to get the rest of the waves out of the sides and back. I will also make some pieces for the inside to double the sides where it will bolt to the bracket and wrap them around the front corners for some more strength. I will cut slots in the front for the trim clips. After it is all done it will be painted body color. Really happy how it turned out.

    Rod
    FFR 3749 MkII, 428PI, TKO-600, IRS, Pin-Drive, Tri-States body, Under Car Exhaust
    Rod's BB Street Cobra Build

  20. #20
    Senior Member
    Join Date
    Jul 2013
    Location
    Tacoma, WA
    Posts
    139
    Post Thanks / Like

    Moved Dash Forward

    I moved my dash brace forward. I wanted to give a more original look by having more lip or shelf of the body over the top of the dash. I also wanted to give it less angle (more vertical).
    I ended up cutting the forward 3/4" tubes about 1 1/4 and moved the center 3/4" forward. This only changed the angle about 4 degrees but I didn't want to move the sides any more forward. It looks better to me so I will see after the body is mounted with the dash. Because of the forward tubes get closer together as they move forward I ended up using a BFH and adjusting the sides to meet up with the original ends of the dash support.


    I still need to relocate the center support but I will wait till I get further on installing everything behind the dash as I may want to move it for clearance for the heater or other things.

    Before:


    After:


    FFR 3749 MkII, 428PI, TKO-600, IRS, Pin-Drive, Tri-States body, Under Car Exhaust
    Rod's BB Street Cobra Build

  21. #21
    Senior Member
    Join Date
    Jul 2013
    Location
    Tacoma, WA
    Posts
    139
    Post Thanks / Like

    Dropped Butt

    I finished one more thing for the dropped butt mod. I already welded new lower holes for the bumper and now the old lower holes are the upper new upper holes. I also cut and welded the side 3/4 tubes to lower them.
    Now I trimmed the side trunk aluminum to fit the new location. My pre-drilled bumper holes in the body are not even. Passenger side is 3/8" higher than the drivers side. I ended up using bolts and floor jacks to split the difference so the body was level to the frame. Once it's all lined up that should give me the right clearance with a little trimming. Once the body was set I used poster board to make a template to transfer to the aluminum panels.


    Trimming to the template got me close enough to put the panels in. Then trimming little by little they are installed in the right place with the body dropped.

    Rod
    FFR 3749 MkII, 428PI, TKO-600, IRS, Pin-Drive, Tri-States body, Under Car Exhaust
    Rod's BB Street Cobra Build

  22. #22
    Senior Member
    Join Date
    Jul 2013
    Location
    Tacoma, WA
    Posts
    139
    Post Thanks / Like

    Trunk Latch

    I wanted to have a trunk latch that I can unlock without using the key. Originally I was thinking of a lock solenoid that would lock the latch from opening and release with an alarm. I then could open the handle when unlocked. After some searches I found the idea of using a Mustang latch with electronic release. There are a few that have done it already and I liked it.

    I mounted the latch to the trunk floor and then I will make a striker to mount on the trunk lid. I made a bracket for the latch.


    Welded to the 3/4" tube that runs below the rear lower trunk panel.


    With a hole cut in the panel just the top of the latch shows through.


    I may make a box to cover the bottom of the latch. That way it is covered from road grime as well as secured. I will make some way to use the manual release in case the battery dies since it's in the trunk. I'm thinking of a hole in the bottom of the cover that will be a drain hole as well as access to the release. Kind of secure by being hidden.

    I still need to build the striker to mount on the trunk lid but that will be done after the body and trunk lid are aligned.
    Rod
    FFR 3749 MkII, 428PI, TKO-600, IRS, Pin-Drive, Tri-States body, Under Car Exhaust
    Rod's BB Street Cobra Build

  23. #23
    Senior Member
    Join Date
    Jul 2013
    Location
    Tacoma, WA
    Posts
    139
    Post Thanks / Like

    Tail Lights

    Got my tail lights installed with boxes on the back. I disassembled the tail lights and cut out the upper portion of the backing plate and the bulb socket. This is to get ready for two 36 LED PCB Lamp's to be installed. I still need to get them ordered but wanted to get the lights mounted before paint.


    I used the template from CCRsAC to make boxes for the back of the lights. Drew lines and drilled relief holes for the bends. I cut out with trimming shears and a Dremel cut off tool.


    They worked out great and I am glad I used the .025 thick aluminum as suggested. Much of the bending was done with sheet metal pliers and the thinner sheet bends great. Plenty strong once its all bent up and riveted together.


    All bolted up but no light yet...


    The light lenses are held together by six small tabs on the chrome trim bent over and screwed through the backing plate into the lenses. When I put the chrome trim ring back on the lenses the tabs broke off. It will hold together as they are but I probably need to take them back apart when I put the LED's in. As thin as these are I'm sure more may break. Right now they will still work but if more break I may need to replace them.
    Rod
    FFR 3749 MkII, 428PI, TKO-600, IRS, Pin-Drive, Tri-States body, Under Car Exhaust
    Rod's BB Street Cobra Build

  24. #24
    Senior Member
    Join Date
    Jul 2013
    Location
    Tacoma, WA
    Posts
    139
    Post Thanks / Like

    Air Splitter

    I completed more for the air splitter. More metal work and block sanding and I have it pretty strait. I made some doubling plates for the sides. These will serve as reinforcement for the front corners as well as the mounting points on the sides.


    Once everything was fitted I pulled it apart, sanded, cleaned and shot with SEM Metal Etch Primer. I wanted to get the primer behind the doubler plates so I did this before riveting. Then refitted with clecos after primer. You can see the doubler plate on the side and it wraps around the front.


    I wanted flush look so I went with solid aluminum 1/8" flush rivets. Using a bucking bar and impact rivet gun I hammered in the rivets. I have limited experience with this so I practiced quite a bit on scraps. I think they still needed to go down more but I tried to balance how much marring on the front verses how much impact on the back.


    After all rivets where done I sanded, cleaned, and primed the bare areas again with metal etch primer. Then I put on two coats of build primer. After drying I started wet sanding to get more level and fill some. Not sure if I didn't wait long enough before sanding or if I didn't sand and prep the aluminum enough but not good... A small area on the bottom started to lift. Before I knew it I have an area about 6 inches across that totally pealed up. All the edges and the top side seem very solid so maybe I didn't sand the bare aluminum enough in that area. I think I'm going to quit while I'm behind and have Ken (SRP) try to salvage/redo before paint.
    Rod
    Last edited by rlampman; 03-02-2014 at 01:27 AM.
    FFR 3749 MkII, 428PI, TKO-600, IRS, Pin-Drive, Tri-States body, Under Car Exhaust
    Rod's BB Street Cobra Build

  25. #25
    Senior Member
    Join Date
    Jul 2013
    Location
    Tacoma, WA
    Posts
    139
    Post Thanks / Like

    Loaded up for long trip to Yuba

    I've been pushing lately to get as much done that affected the body fit. I have as much done as I can so I put the wimpy roller tires back on and put it in the trailer. I will be dropping it off to Ken Pike, aka Street Rod Painter, on Tuesday. Big step and exciting!

    I know, not really the time that most do body and paint but I took advantage of Ken's year end sale. Time to get rid of the white gel coat!


    FFR 3749 MkII, 428PI, TKO-600, IRS, Pin-Drive, Tri-States body, Under Car Exhaust
    Rod's BB Street Cobra Build

  26. #26
    Senior Member
    Join Date
    Jul 2013
    Location
    Tacoma, WA
    Posts
    139
    Post Thanks / Like
    While waiting for my car to get back I wanted to get back in the garage for awhile.

    I ordered a '96 T-Bird fan and shroud from RockAuto.com. Fits the radiator with only the stock mounting brackets hanging over.


    I used a Dremel cut off wheel, then file, then sand paper down to 500 grit to remove and smooth out the unneeded mounts.


    I used some 1" aluminum angle iron to attach the shroud at the top and bottom flanges of the radiator. It runs full length of the shroud with four bolts top and bottom. I used an extra nut between the inside of the shroud and the bracket to space it in more to set on the flanges correctly.


    I think I will need to clearance some space for the hose and clamp on the lower radiator hose but I will make that after I get the radiator installed and see where I am.
    Simple cheep and I think it looks like it belongs
    FFR 3749 MkII, 428PI, TKO-600, IRS, Pin-Drive, Tri-States body, Under Car Exhaust
    Rod's BB Street Cobra Build

  27. #27
    Senior Member
    Join Date
    Jul 2013
    Location
    Tacoma, WA
    Posts
    139
    Post Thanks / Like

    Picked up from SRP!

    I picked up my painted body Friday from SRP. Ken does a great paint job!


    More pictures in this post.
    http://www.ffcars.com/forums/17-fact...ml#post4071113

    Now finally back to the garage. Going to work on fitting bumpers today!
    Rod
    FFR 3749 MkII, 428PI, TKO-600, IRS, Pin-Drive, Tri-States body, Under Car Exhaust
    Rod's BB Street Cobra Build

  28. #28
    Senior Member
    Join Date
    Jul 2013
    Location
    Tacoma, WA
    Posts
    139
    Post Thanks / Like

    Rear Bumper

    I installed the rear bumper today. Worked out well and pretty simple to get aligned. I have the Finnish Line bumpers and the grommets. I used all tread so I can put nuts on the inside and remove with the tank installed. I also used some 3/8" fuel hose inside the SS tubes to center on the bolts. I still need to make some short spacers out of the SS tubes to go between the bumper and over rider. That will cover up the all thread and I will make them only long enough to separate the two. I also put the tail lights and license plate light.


    I'm not sure what I am going to do for a license plate holder. I have one from Finnish Line. It bolts behind the light and I like the way it works but it doesn't fit into the recess for the light. I may make my own that just attaches to the trunk lid.
    Rod
    FFR 3749 MkII, 428PI, TKO-600, IRS, Pin-Drive, Tri-States body, Under Car Exhaust
    Rod's BB Street Cobra Build

  29. #29
    Senior Member
    Join Date
    Feb 2011
    Location
    Myrtle Beach, SC
    Posts
    2,108
    Post Thanks / Like
    Rod-

    She looks great! Paint is terrific, and I think the finish line is in sight. Good luck finishing things off, and I look forward to seeing how it turns out.

    Very exciting stuff! Well done!

    Regards,

    Steve

  30. #30
    Senior Member
    Join Date
    Jul 2013
    Location
    Tacoma, WA
    Posts
    139
    Post Thanks / Like
    Thanks for the kind words Steve. Unfortunately the end is not as close as it looks. I had the paint done and I am finishing up all the trim so everything with the body is done. Then I will take it back off and finish the build. Lots to do there...
    It is really great to start to see what looks like a finished car. If I had wheels I could really see what the final version will look like.
    FFR 3749 MkII, 428PI, TKO-600, IRS, Pin-Drive, Tri-States body, Under Car Exhaust
    Rod's BB Street Cobra Build

  31. #31
    Senior Member
    Join Date
    Jul 2013
    Location
    Tacoma, WA
    Posts
    139
    Post Thanks / Like

    Front Bumper

    Today I installed my front bumper. I used all thread like in the rear with fuel hose inside the support tubes to keep them centered. The front is a little tricky with the angle of the bumper that follows the nose. Pretty much took the whole day. It really wasn't that hard so if you are hesitant I say jump in. It just took a lot of trial adjustment, more trial, more adjustment..
    I have the Finish Line bumpers so the all thread had to be bent for the angle of the nose as the threads go strait in.


    My grommets where left at the body shop so I just supported the body so the holes lined up. I will have to do some final adjustment after the gourmets get installed. I installed just the overriders first to get the the right angle with the body. Kind of liked that look so I see why some people stop there but I want the full street look. Now the hard part. Where to drill the holes in the overriders for the nudge bar? I ended up using what someone else suggested to mock everything up. Tie wraps and painters tape to find the right position. The angle isn't as important as that can be adjusted by the mounts later the vertical position where it aligns to the body is the hard part. I used painters tape and sharpie to mark the position and drilled the top hole then fitted again.


    Drilled the bottom and bolted it all up. Remember, SS nuts and bolts gall up without anti-seize! Forgot that and had to cut the bolts off one side. Now another trip to the hardware store.. Either way I think it turned out great. Lots of on and off to adjust the support tubes but well worth it I think.


    I went ahead and installed the head lights, trim rings, and front marker lights. Really finishes it off.


    Can't wait to see how the air splitter will fill in with all the other chrome.
    I still need to install the brake vents and screens. I have the Cobra Earl vents and screens but I'm not sure how they should go on as my body is right against the frame mount. I may need to trim the side off to make it fit.
    FFR 3749 MkII, 428PI, TKO-600, IRS, Pin-Drive, Tri-States body, Under Car Exhaust
    Rod's BB Street Cobra Build

  32. #32
    Senior Member
    Join Date
    Jul 2013
    Location
    Tacoma, WA
    Posts
    139
    Post Thanks / Like

    Door Latch Mod

    Today I did the latch mod on my doors. They where really stiff. Part of the problem was there was no gap behind the latch so the round part of the latch that the handle attaches to was binding on the door. That and the small spring made them almost impossible to move.
    I used my Dremel to make a recess in the door for the carriage bolt head.


    I drilled and taped the knob for a #6 screw so it won't pop off. It is brass and really much easier than I expected.


    Ground off the head of the carriage bolt head used to hold the handle on. Attached with a nylock nut.


    After lubing it all up and leaving the small spring out they work real smooth. I filed down the latch stop so the pin would retract all the way. On my passenger side the pin was hanging up because of this. I also chamfered out the hole where the pin goes into the striker post. I don't think that has anything to do with how smooth it works but it does effect how far the pin extends in. I think this may be a source for some that have had the door come unlatched.
    All back together and working much better

    Rod
    FFR 3749 MkII, 428PI, TKO-600, IRS, Pin-Drive, Tri-States body, Under Car Exhaust
    Rod's BB Street Cobra Build

  33. #33
    Senior Member
    Join Date
    Jul 2013
    Location
    Tacoma, WA
    Posts
    139
    Post Thanks / Like

    Wheel Alignment

    I talked with Richard Oben about wheel spacing. I have a somewhat unique setup. (I'm sure there is someone out there with parts and pieces of what I have) Tri-States body (different fender flair sizes than FFR) with standard width IRS and pin drive front. I am planning to do the SAI mod as well. The narrow front is to get a deeper look on the front and with the wider rear should have pretty deep there. Anyway, Richard said to get everything aligned and then make some measurements (simply stated) and he could figure out what size.

    I started alignment on the rear IRS. Using some 1/2 conduit I made two bars, front and rear, to hold the strings. Cut them to 6'4" long and measured 1" in from each end and marked for the string. I was able to use bungie cords to strap the rear to the bottom of the bumper. Added some tape for padding.


    The front was a little harder as the body is too close to put the conduit behind the bumper. I made some wood blocks to place on the flat spot where the hoop bolts to the overriders with slots to hold the conduit.


    Ran strings and measured each side to the frame and adjusted so they are the same. (strings parallel to the frame) I ended up with 23 1/8" from the frame on each side. I had to use a tape measure and a plum bob to get a good measurement. Not sure if that is the most accurate but it's what I had on hand.
    Per Richard Oben's instructions I started by adjusting the rear heim joints to 5/8" with two spacers at the back. That way all adjustments will be done on the front and upper points. I also removed the shocks and raised the arms with a floor jack to simulate a 4 3/4" ride height.

    Really a tedious process, adjust, measure, repeat, repeat, repeat... After all set I ended with 1/16" toe (1/32 each side), -0.9 Degree's camber, 59 7/8" wide and both sides the same distance from the frame. I need to get it to 59 1/2" wide and there is a lot of threads showing on the passenger side. I emailed Richard and he said get it to 59 1/2" so I will go back later and move all joints 3/16" in. That should give me what I need and help bring the threads in to a safe distance.

    I'm back out of town for work for two weeks now so I will order the SAI kit. That way when I get back I can bring the rear in and start on the front. I also need to decide what alignment tool I want for the front. I know I am going to do my own alignments moving forward I'm just not sure if I will want the bubble type or the digital tool. I also need to find a good way to attach to the wheels. Either buy the tool or make something that holds it square.
    Rod
    FFR 3749 MkII, 428PI, TKO-600, IRS, Pin-Drive, Tri-States body, Under Car Exhaust
    Rod's BB Street Cobra Build

  34. #34
    Senior Member
    Join Date
    Jul 2013
    Location
    Tacoma, WA
    Posts
    139
    Post Thanks / Like

    Update

    I haven't posted on my build in a while. Not much progress because of work getting in the way. If I could just do this full time think what I could accomplish :-)

    Most of what I have done is centered around the suspension and determining the final location of the tires so I can order my wheels. Having a somewhat rare setup my wheels will be a little different offset. The rear is standard width IRS but the TriStates body is an extra 1" wider so the rear can be moved out for a deeper dish look. My front is pin drive lowers so I can have a deeper dish wheel in the front as well. Richard Oben has been great help with this. I now know how to measure for the wheels I just need to get the suspension setup the way I want. I have another thread dealing with the modifications and correction of bump steer on the front. Once I get this setup as I want I can move on with the wheels.
    http://www.ffcars.com/forums/17-fact...ump-steer.html
    Basically I am installing the SAI mod but with the upper control arms installed on the bottom of the frame mount. That gives a longer arm plus with pin drive lower control arms it helps with clearance of the spring.
    FFR 3749 MkII, 428PI, TKO-600, IRS, Pin-Drive, Tri-States body, Under Car Exhaust
    Rod's BB Street Cobra Build

  35. #35
    Senior Member
    Join Date
    Jul 2013
    Location
    Tacoma, WA
    Posts
    139
    Post Thanks / Like

    Windshield Wiper Install

    Fun with Lucus wipers :-) They really where not as bad as some I have read about. First was to drill the dreaded hole in my pained body. Not something I was looking forward to but had to be done. Put down some tape to protect the paint and went for it. I don't have the angled tool for the drill bit but I read about others just drilling the angle by hand. I went for it using the upper cone as a guide. You can see it behind the drill bit.


    Started with a small 1/8" bit and worked up to the full size. First one went fine. On the second one I had a slip with the drill bit and it skipped across the paint! Ouch! !@#$%^&* first scratch always hurts but I have a few other things Ken will be fixing so add this to the list.
    If I did this again instead of drilling at an angle I would drill strait down and then twist the drill bit to make the angle. The fiberglass drills so easily I think that would work out great and be easier to control where the hole starts.

    My gear boxes came with an unfinished cone as well as a metal support for the underside. I also have a set of chrome cones that I want to use but they are a different angle. I made new spacers for the underside out of 3/4" aluminum square tubing. Slowly shaving them down until the nut fits right.


    My kit came with copper tubing and I ended up using it. One issue I had was that the tubing was coiled up and I had to straighten it out. I found that any kinks or turns other than a very gradual bend dragged on the cable. Once straight, I cut to length and flared the ends based on where the gear boxes fit to the body. The biggest thing is getting the cable to slide smoothly, not only through the tube but at each transition in and out of the gear boxes. After the tubing itself was smooth enough, the ends cleaned up and flared I moved to installing to the gear boxes. I didn't have to adjust either gear box for the cable engagement to the gear. They both held the cable in the right spot without being able to skip or bind. One of my boxes even lined up great for the tubing. On the other box I had to do quite a bit of bending and adjusting where the tubing clamped on. I found that by doing one tube and gear box at a time I could adjust until smooth.
    FFR 3749 MkII, 428PI, TKO-600, IRS, Pin-Drive, Tri-States body, Under Car Exhaust
    Rod's BB Street Cobra Build

  36. #36
    Senior Member
    Join Date
    Jul 2013
    Location
    Tacoma, WA
    Posts
    139
    Post Thanks / Like

    Windshield Wiper Install

    Once everything was lined up and sliding smoothly I added the motor. Hooked up the battery charger and it works! Even the park feature. At least on the bench. The cable and gear boxes are quiet. The motor itself is loudest.


    I have my firewall forward 5" so the wheel boxes as well as the motor are all between the firewall and dash. I will have a full glove box as well as a heater to fit behind the firewall so I decided to put the motor on the drivers side. This also means the tubing and cable are on the top of the gear boxes so more clearance for everything else. Two holes drilled in the firewall and bolted down the motor. The supplied clamp was wrapped with rubber and a block for the rear side. They really hold the motor well. Even on the bench it didn't really move much at all.


    The wiper arms have a nice clamp to keep them on as well as lock to the gear.

    They also are telescopic so they can extend but with the short windshield the shortest is what I need. I know some have modified the springs to change the tension on the windshield but I found it to be about right.

    I didn't like the way the wipers pointed up at the ends. Not enough bend in the arm. I ended up heating them up and adding more angle. Now they sit nice and level with the bottom of the windshield.


    Overall pretty happy with how they turned out. Still want to add a cap the the end tubing and I may look into some gear boxes that have a larger sweep.
    Rod
    FFR 3749 MkII, 428PI, TKO-600, IRS, Pin-Drive, Tri-States body, Under Car Exhaust
    Rod's BB Street Cobra Build

  37. #37
    Senior Member
    Join Date
    Jul 2013
    Location
    Tacoma, WA
    Posts
    139
    Post Thanks / Like

    Gas Cap

    I received my new gas cap from Acton Cobra! Nick built a threaded sleeve for me that threads onto the cap base and goes down to 2" for the hose. He also installed a vent tube. Looks amazing!


    I needed to drill a 2 1/2" hole for the base but it needs to be tight so the base stays up just right. I used a 2 1/8" hole saw and then a drum sander in the Dremel to open it up.


    I have the base installed but the threaded sleeve can't go on yet. The fiberglass is almost a 1/2" thick. I will have to grind down the bottom side of the fiberglass to get the sleeve threads to attach. I like the look so far.


    Rod
    FFR 3749 MkII, 428PI, TKO-600, IRS, Pin-Drive, Tri-States body, Under Car Exhaust
    Rod's BB Street Cobra Build

  38. #38
    Senior Member
    Join Date
    Jul 2013
    Location
    Tacoma, WA
    Posts
    139
    Post Thanks / Like

    Gas Cap

    I forgot to post updates on my gas cap. The fiberglass was too thick where the gas cap went though, over 1/2". I ended up sanding a recess in the bottom about half that so I could thread the base onto the cap. Slowly and little by little with the Dremel drum. With the curve of the body and the circle of the hole it was really hard to tell what was level. Just had to go little by little and trial fit many times.


    Now the base screws on and holds the cap tightly to the body. I used a toilet gasket to make a trim around the base. It's not the original look but I like it.


    FFR 3749 MkII, 428PI, TKO-600, IRS, Pin-Drive, Tri-States body, Under Car Exhaust
    Rod's BB Street Cobra Build

  39. #39
    Administrator David Hodgkins's Avatar
    Join Date
    Feb 2011
    Location
    Corona del Mar, CA
    Posts
    6,066
    Post Thanks / Like
    Blog Entries
    7
    Your build is incredible. I am impressed beyond words. Your fabrication skills, wow.

    Really. Wow.


    FFR 5369 Pin Drive, IRS, Trigos, Torsen, Wilwoods, FMS BOSS 302 "B" cam , Mass-flo. CA SB100 (SPCN) Registered
    Delivered 4/23/06. "Finished" 4/2012 (still not done!)


  40. #40
    Senior Member 2FAST4U's Avatar
    Join Date
    Feb 2011
    Posts
    1,006
    Post Thanks / Like
    Incredible! Simply incredible!

Page 1 of 2 12 LastLast

Posting Permissions

  • You may not post new threads
  • You may not post replies
  • You may not post attachments
  • You may not edit your posts
  •  

FFMetal

Visit our community sponsor