Midwest Classic Insurance

Visit our community sponsor

Thanks Thanks:  0
Likes Likes:  1
Page 4 of 11 FirstFirst ... 23456 ... LastLast
Results 121 to 160 of 438

Thread: 15th Anniversary MKIV build thread - TROJAN

  1. #121
    Junior Member
    Join Date
    Jan 2015
    Posts
    9
    Post Thanks / Like
    David,

    I come back to your build thread to see photos but it seems that ever since you posted your happy dance first start video the pictures all disappeared. Quick question on your motor: It looks like you chose the Edelbrock Pro-Flo EFI. Was there any consideration for the E-Street setup instead? I sure like the look of the port injection and it looks like about a $1500 increase over the E-Street TBI.

    Thanks for doing such a great job documenting everything! Makes it so much easier for my novice brain

    Rob

  2. #122
    Administrator David Hodgkins's Avatar
    Join Date
    Feb 2011
    Location
    Corona del Mar, CA
    Posts
    6,072
    Post Thanks / Like
    Blog Entries
    7
    Rob, sounds to me like you are not logged in?


    FFR 5369 Pin Drive, IRS, Trigos, Torsen, Wilwoods, FMS BOSS 302 "B" cam , Mass-flo. CA SB100 (SPCN) Registered
    Delivered 4/23/06. "Finished" 4/2012 (still not done!)


  3. #123
    Administrator David Hodgkins's Avatar
    Join Date
    Feb 2011
    Location
    Corona del Mar, CA
    Posts
    6,072
    Post Thanks / Like
    Blog Entries
    7
    This weekend was kinda slow feeling, as I was just going around the build cleaning up rushed decisions from before the HB show and hooking up engine sensors.
    We also bled the breaks, so theoretically the car can start, drive AND stop now...

    These are the two wires that needed to connect to the Holley wiring harness for power. The red in 12+ and the blue is the EFI crant. In order for the red connection to not bleed over to the crank a .25 volt diode had to be used. This weekend I re-did it in it's final location:


    I also read the instructions again as I was attaching the oil pressure sensor and realized I had put it together wrong. It needs to be installed with Teflon PASTE, NOT Teflon TAPE. THis is because the sensor has to ground to the block through the brass adapters. I took it apart and took the opportunity to buy a proper 1/2" npt to 1/8" npt fitting instead of the 1/2-to-1/4 to-1/8 fittings that were there before. Here is how it is set up now:


    And installed. This image is from below, showing why the 45 degree fitting is needed to miss the remote oil fittings:


    I also installed a oil temp probe in the oil pan. Since I had dropped an unknown amount of oil during the desperate attempt to load the roadster last week, I emptied the pan completely so I could fill from scratch and set the dipstick "full" height. The probe used another 1/2 to 1/8 npt brass adapter:


    As already mentioned, the wiring is being trimmed and fitted to it's permanent location. Here's how the EFI ECU looks now. I am going to mount it to the firewall with industrial velcro:

    The wires from the Russ Francis to the ECU will have their own loom and will be mounted to the base of the firewall where it is riveted to the frame.

    The only thing left to do before I can try heat-cycling the engine to power the gauges and fill the motor with a fresh 8 quarts of oil. I'll do that today.

    I do have one other issue that needs to be tended to. The rear dif cover and the battery box do not want to play nice together. I'll be replacing the dif cover with something less substantial in an attempt to find clearance. If that doesn't work I will have to pull the trunk floor and completely re-do it while sliding the box over more. Man, I hope I don't have to do that...


    FFR 5369 Pin Drive, IRS, Trigos, Torsen, Wilwoods, FMS BOSS 302 "B" cam , Mass-flo. CA SB100 (SPCN) Registered
    Delivered 4/23/06. "Finished" 4/2012 (still not done!)


  4. #124
    Administrator David Hodgkins's Avatar
    Join Date
    Feb 2011
    Location
    Corona del Mar, CA
    Posts
    6,072
    Post Thanks / Like
    Blog Entries
    7
    PS it's really starting to look like a go-cart now. This pic doesn't show it, but I also installed the air temp gauge in the temporary air filter I have, which was also "mounted" to the car.:


    FFR 5369 Pin Drive, IRS, Trigos, Torsen, Wilwoods, FMS BOSS 302 "B" cam , Mass-flo. CA SB100 (SPCN) Registered
    Delivered 4/23/06. "Finished" 4/2012 (still not done!)


  5. #125
    Tool Baron frankeeski's Avatar
    Join Date
    Feb 2011
    Location
    "The I.E." SoCal
    Posts
    1,356
    Post Thanks / Like
    Great progress Dave!
    Frank
    __________________________
    Factory Five Racing MKIII Super Snake Replica. Cannonball Cobra Drop Trunk Box, Horn Button and other machined Do Dads.
    i.e.427 Chromed Full Width Roll Bar with integrated LED Third Brake Light.
    I will never forget My Buddy Paul.

  6. #126
    Senior Member Carlos C's Avatar
    Join Date
    Nov 2013
    Location
    Apollo Beach, FL
    Posts
    494
    Post Thanks / Like
    Looking great, David. Can't wait to get back to my build.

    Carlos
    FFR Coupe #0635; Ford 347ci, Tremec TKO500, 8.8 rear end w/ 3.27:1 gears, Cobra/SVO brakes

  7. #127
    Senior Member ehansen007's Avatar
    Join Date
    Mar 2011
    Location
    Aliso Viejo, CA
    Posts
    1,625
    Post Thanks / Like
    Quote Originally Posted by David Hodgkins View Post
    I have to still verify the fuel sender gauge is set up and then I'll rivet in the rest of the trunk. I also have to get back to polishing and engine turning the remote reservoir and maybe the dash. I've been kicking around a few different ideas for the dash, from fully turned to... ? I don't think polished stripes are a good idea for the dash... Maybe solid turned with a polished gauge bezel?
    How about you engine turn it and then anodize it black?

  8. #128
    Administrator David Hodgkins's Avatar
    Join Date
    Feb 2011
    Location
    Corona del Mar, CA
    Posts
    6,072
    Post Thanks / Like
    Blog Entries
    7
    Quote Originally Posted by ehansen007 View Post
    How about you engine turn it and then anodize it black?
    Hmmm... I wonder what that would look like?


    FFR 5369 Pin Drive, IRS, Trigos, Torsen, Wilwoods, FMS BOSS 302 "B" cam , Mass-flo. CA SB100 (SPCN) Registered
    Delivered 4/23/06. "Finished" 4/2012 (still not done!)


  9. #129
    Administrator David Hodgkins's Avatar
    Join Date
    Feb 2011
    Location
    Corona del Mar, CA
    Posts
    6,072
    Post Thanks / Like
    Blog Entries
    7

    Plug that leak! and MORE on sensors

    I haven't posted in a few days but I have been working on the car, with a faint hope of taking it to Willow Springs this weekend for some shakedown testing. It was a tall order and may be too tall to accomplish, but it's an excuse to keep working so that's what I did.

    I can't tell you how much having a lift helps the build process! I was able to check out the whole underside of the car for leaks while it idled above me. I found that my remote filter hoses were weeping and after I shut the motor down I gave it a wiggle and it pulled out of it's fitting!


    Lesson learned? Do NOT leave electrical tape around the stainless hose just because it makes cutting and trimming easier! I had put the tape around the hose when I sheared it to length to help contain all the wire strands and that's a BIG no-no!

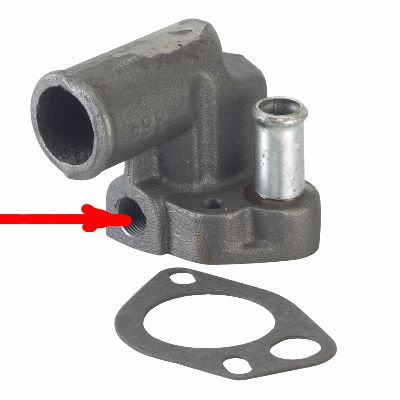
    I continue to put sensors on the motor. It turns out you need TWO water temp sensors: one for the gauges and one to trip the fan on and off. So I determined the best spot for the fan temp sensor is on the water neck, on the rad side of the thermostat. The water neck is not drilled and tapped out of the box, so I had to drain the coolant - I'm using water until I heat-cycle the motor several times and no hoses burst like my first build - and then hit several stores to get the tap, a 9/16 bit and sensor. Here's a shot of the water neck before the mod:


    And here it is after removal. There was no gasket. Just RTV. What's your opinion about running with or without a gasket? My motor wasn't leaking at all, and the water neck took some persuasion with a rubber mallet before it released...:


    Here's the hole after drilling the 9/16th hole. The tap calls for a 37/64th bit which neither Ace Hardware or Home depot had.


    And here's the hole after being tapped. The sensor fits in there nicely.:


    Finally, I cleaned the RTV off with a utility knife the best I could. Does that look OK or should I hit it with mineral spirits? Anything better at getting the remaining RTV off?

    FFR 5369 Pin Drive, IRS, Trigos, Torsen, Wilwoods, FMS BOSS 302 "B" cam , Mass-flo. CA SB100 (SPCN) Registered
    Delivered 4/23/06. "Finished" 4/2012 (still not done!)


  10. #130
    Tool Baron frankeeski's Avatar
    Join Date
    Feb 2011
    Location
    "The I.E." SoCal
    Posts
    1,356
    Post Thanks / Like
    I think you clean it well enough Dave. I usually hit it with some Acetone but you should be fine.

    BTW, that does look like the t-stat I described to you. The one with the hole in it to let coolant bypass as the engine warms up.
    Frank
    __________________________
    Factory Five Racing MKIII Super Snake Replica. Cannonball Cobra Drop Trunk Box, Horn Button and other machined Do Dads.
    i.e.427 Chromed Full Width Roll Bar with integrated LED Third Brake Light.
    I will never forget My Buddy Paul.

  11. #131
    Not a waxer Jeff Kleiner's Avatar
    Join Date
    Feb 2011
    Location
    Bloomington, Indiana
    Posts
    8,094
    Post Thanks / Like
    An FYI for anyone who may have the same needs in the future--- I've used Autozone #814884 on a few roadsters. It's already tapped and less than 10 bucks:


    Cheers,
    Jeff

  12. #132
    Administrator David Hodgkins's Avatar
    Join Date
    Feb 2011
    Location
    Corona del Mar, CA
    Posts
    6,072
    Post Thanks / Like
    Blog Entries
    7
    Thanks for the FYI Jeff, good for others to note.

    The one I drilled out and tapped is this part from Ford:


    I also mocked up the gauges for the first time. I used the dash that came with the kit for this purpose. It is cut at the factory for Autolite gauges and the two larger ones have to have the holes enlarged to fit the Speedhut Gauges. Luckily FFR makes it easy to increase the holes by pre-cutting the holes (mostly). All you have to do is drill out some connection material, like so:


    The two gauge holes, after being enlarged:


    And the first time the dash meets the car!:


    The super-cool aluminum 15th Anniversary Dif cover is coming off this week in favor of a standard 8.8 cover, in order to clear the FFMetal Battery box. Wish me luck, because if it doesn't fit, the trunk floor will have to come out and be completely re-done...


    FFR 5369 Pin Drive, IRS, Trigos, Torsen, Wilwoods, FMS BOSS 302 "B" cam , Mass-flo. CA SB100 (SPCN) Registered
    Delivered 4/23/06. "Finished" 4/2012 (still not done!)


  13. #133
    Junior Member
    Join Date
    Jan 2015
    Posts
    9
    Post Thanks / Like
    Quote Originally Posted by David Hodgkins View Post
    Rob, sounds to me like you are not logged in?

    Well, don't I feel dumb! Good thing I found that check box to keep me logged in

  14. #134
    Administrator David Hodgkins's Avatar
    Join Date
    Feb 2011
    Location
    Corona del Mar, CA
    Posts
    6,072
    Post Thanks / Like
    Blog Entries
    7
    Yesterday I continued to hook up the gauges, relying on the informative post by Jeff Kleiner. I did find some differences in his advice vs what I had to do to make some of them work but he definitely help get me down the road. Thanks Jeff!

    But first I re-installed my water neck after tapping it for the sensor. It didn't have a gasket originally so I thought I'd try RTV only as an experiment to see if I could get it to hold without leaking. I guess we'll find out today!


    more to come later today...


    FFR 5369 Pin Drive, IRS, Trigos, Torsen, Wilwoods, FMS BOSS 302 "B" cam , Mass-flo. CA SB100 (SPCN) Registered
    Delivered 4/23/06. "Finished" 4/2012 (still not done!)


  15. #135
    Administrator David Hodgkins's Avatar
    Join Date
    Feb 2011
    Location
    Corona del Mar, CA
    Posts
    6,072
    Post Thanks / Like
    Blog Entries
    7


    All the gauge lights work! The fuel sender, volts, oil pressure and water and oil temp are all hooked up.


    I started the motor and got these readings at idle:


    Doesn't the oil pressure seem a little high? Is that something that needs to be calibrated?


    FFR 5369 Pin Drive, IRS, Trigos, Torsen, Wilwoods, FMS BOSS 302 "B" cam , Mass-flo. CA SB100 (SPCN) Registered
    Delivered 4/23/06. "Finished" 4/2012 (still not done!)


  16. #136
    Not a waxer Jeff Kleiner's Avatar
    Join Date
    Feb 2011
    Location
    Bloomington, Indiana
    Posts
    8,094
    Post Thanks / Like
    No calibration necessary for Speedhut pressure or temperature gauges. 50 PSI cold is pretty typical for a SBF. It will probably drop to about 40 at operating temperature. Don't get alarmed if the oil temp gauge doesn't come up; you won't begin seeing heat in the oil until you're running higher revs.

    Jeff

  17. #137
    Administrator David Hodgkins's Avatar
    Join Date
    Feb 2011
    Location
    Corona del Mar, CA
    Posts
    6,072
    Post Thanks / Like
    Blog Entries
    7
    Jeff, your amazing man, always helping out. Thanks, again.

    Ever since I put the FFMetal battery box in I knew I had an issue with clearance due to the rather large aluminum dif cover that came as part of the 15th anniversary kit. It is engraved with a special 15th anniversary logo and is a really nice piece, but due to it's size I couldn't find any way to keep it other than either modifying the battery box or removing it completely. So I picked up a new standard Ford 8.8 dif cover yesterday and changed them out. Here are some pics of the process:

    The cover that I removed. It's actually very nice:


    ...and I replaced it with this:


    Here you can see the size comparison:


    No doubt, the FFR (Moser) Dif cover is MUCH nicer! But it wouldn't look so hot after bashing into the battery box a few times. Since I had the rear open it gave me an opportunity to document the gearset and limited slip dif:


    And here's what the new dif cover looks like installed:


    As you can see, the new cover does just barely clear the battery box:


    So tonight I'll fill it with gear oil (Royal Purple 70W-90 with friction modifier added) and button up the water neck I installed on Wednesday. Then I have to finish wiring the fan switch and I believe I'll be at the heat-cycle test stage!

    My better half is enjoying a nice mother's day weekend away doing girly stuff so I get the whole weekend in the shop. Look out for go-cart videos, coming SOON!

    FFR 5369 Pin Drive, IRS, Trigos, Torsen, Wilwoods, FMS BOSS 302 "B" cam , Mass-flo. CA SB100 (SPCN) Registered
    Delivered 4/23/06. "Finished" 4/2012 (still not done!)


  18. #138
    Senior Member 68GT500MAN's Avatar
    Join Date
    Feb 2011
    Location
    Fresno, CA
    Posts
    1,808
    Post Thanks / Like
    Looks like a solution has been found. I could have sent you a stock cover if I knew this was the direction you needed to go. Mount the engraved one in a frame and display it somewhere important.
    Doug
    Built FFR5196 MKII in 2003, 427w
    Building FFR0058HR, Edlebrock 347-AOD

  19. #139
    Administrator David Hodgkins's Avatar
    Join Date
    Feb 2011
    Location
    Corona del Mar, CA
    Posts
    6,072
    Post Thanks / Like
    Blog Entries
    7
    For the past few days I have been working on cleaning up the dash wiring and trying to get the radiator fan to work. I created a dedicated thread for mixing the RF harness with the FFR (speedhut) gauges:
    http://thefactoryfiveforum.com/showt...ing-out-wiring

    The short story is the rad fan is working(!) and I moved on to riveting the cockpit and trunk and will be mounting the seats so we can go-cart this sucker! I called DA-BAT Jeff Miller to arrange a drop off of the body for next weekend! Woohoo!

    Todays' pics!:

    Puttin' on the goop:


    FFR 5369 Pin Drive, IRS, Trigos, Torsen, Wilwoods, FMS BOSS 302 "B" cam , Mass-flo. CA SB100 (SPCN) Registered
    Delivered 4/23/06. "Finished" 4/2012 (still not done!)


  20. #140
    Administrator David Hodgkins's Avatar
    Join Date
    Feb 2011
    Location
    Corona del Mar, CA
    Posts
    6,072
    Post Thanks / Like
    Blog Entries
    7
    A Few More:


    FFR 5369 Pin Drive, IRS, Trigos, Torsen, Wilwoods, FMS BOSS 302 "B" cam , Mass-flo. CA SB100 (SPCN) Registered
    Delivered 4/23/06. "Finished" 4/2012 (still not done!)


  21. #141
    Administrator David Hodgkins's Avatar
    Join Date
    Feb 2011
    Location
    Corona del Mar, CA
    Posts
    6,072
    Post Thanks / Like
    Blog Entries
    7
    I've been busy trying to figure out how to integrate the speedhut senders with the Ron Francis wiring harness. For most of them it's pretty easy: just use the senders supplied with the gauges directly and ignore the wires in the sending harness. This works for all of the sender harness wires EXCEPT the Fan Thermo Switch wire. I created a dedicated thread to work on the problem HERE.

    Today I cut down a few ground wires and permanently mounted them, and that leads me to a question. The engine wiring harness has a ground wire and the way it was labeled told me to ground it to the engine block. I routed it to one of the aluminum heads:


    My question is, is this sufficient, or did I need to ground it to the block? The car starts, and there doesn't seem to be any issue, but I'm wondering if this could pop up later as a problem...


    FFR 5369 Pin Drive, IRS, Trigos, Torsen, Wilwoods, FMS BOSS 302 "B" cam , Mass-flo. CA SB100 (SPCN) Registered
    Delivered 4/23/06. "Finished" 4/2012 (still not done!)


  22. #142
    Senior Member TouchStone's Avatar
    Join Date
    Sep 2014
    Location
    Dallas, TX
    Posts
    512
    Post Thanks / Like
    Blog Entries
    1
    Do you know what that ground line is for? If its a dedicated ground line for a certain sensor/device it would be best to mount it closest to that sensor/device.

    My problem with aluminum is that the surface oxidizes very quickly and this layer of oxide is non-conductive. I prefer to mount electrical connections to steel and if I had to mount to aluminum I would want to use a star type lock washer to help mar the surface and break through the layer of oxide to make a strong electrical connection.

    But considering this is an automotive application these suggestions are probably too nit-picky to matter.
    818S Chassis #288 2.5L 323hp
    Ordered: 9/19/14 Received Kit: 11/2/14 First Start: 5/31/15 First Drive: 6/7/15 Registered: 3/10/2016 Completed: 2/10/2017
    Status: Complete Build Thread Sold 9/22/2017
    joshuajach.com

  23. #143
    Not a waxer Jeff Kleiner's Avatar
    Join Date
    Feb 2011
    Location
    Bloomington, Indiana
    Posts
    8,094
    Post Thanks / Like
    I consider it good practice to run a #2 ground cable from the block to chassis, usually putting the engine end under one of the starter bolts and then drilling a hole in the engine mount pedestal to nut & bolt the chassis end.

    Jeff

  24. #144
    Senior Member 68GT500MAN's Avatar
    Join Date
    Feb 2011
    Location
    Fresno, CA
    Posts
    1,808
    Post Thanks / Like
    Put some di-electric grease under each connection (especially Al) and it will help the connection remain conductive. I use it on steel and aluminum.
    Doug
    Built FFR5196 MKII in 2003, 427w
    Building FFR0058HR, Edlebrock 347-AOD

  25. #145
    Administrator David Hodgkins's Avatar
    Join Date
    Feb 2011
    Location
    Corona del Mar, CA
    Posts
    6,072
    Post Thanks / Like
    Blog Entries
    7
    Quote Originally Posted by Jeff Kleiner View Post
    I consider it good practice to run a #2 ground cable from the block to chassis, usually putting the engine end under one of the starter bolts and then drilling a hole in the engine mount pedestal to nut & bolt the chassis end.

    Jeff
    I already have a main ground cable that is exactly as you describe. This is a small (16-18 gauge) wire coming from the EFI harness.


    FFR 5369 Pin Drive, IRS, Trigos, Torsen, Wilwoods, FMS BOSS 302 "B" cam , Mass-flo. CA SB100 (SPCN) Registered
    Delivered 4/23/06. "Finished" 4/2012 (still not done!)


  26. #146
    Senior Member
    Join Date
    Aug 2014
    Posts
    127
    Post Thanks / Like
    Quote Originally Posted by 68GT500MAN View Post
    Put some di-electric grease under each connection (especially Al) and it will help the connection remain conductive. I use it on steel and aluminum.
    Doug
    x2. Works great on battery terminals too. I have a can of NoOx from my time as a telco switch installer. We used it like Frank's Red Hot. We put that sh!t on everything.

  27. #147
    Administrator David Hodgkins's Avatar
    Join Date
    Feb 2011
    Location
    Corona del Mar, CA
    Posts
    6,072
    Post Thanks / Like
    Blog Entries
    7
    Quote Originally Posted by 68GT500MAN View Post
    Put some di-electric grease under each connection (especially Al) and it will help the connection remain conductive. I use it on steel and aluminum.
    Doug
    Thanks Doug, I'll throw some DG on the connection and call it good.


    FFR 5369 Pin Drive, IRS, Trigos, Torsen, Wilwoods, FMS BOSS 302 "B" cam , Mass-flo. CA SB100 (SPCN) Registered
    Delivered 4/23/06. "Finished" 4/2012 (still not done!)


  28. #148
    Administrator David Hodgkins's Avatar
    Join Date
    Feb 2011
    Location
    Corona del Mar, CA
    Posts
    6,072
    Post Thanks / Like
    Blog Entries
    7
    Considering this was memorial day weekend, I didn't get TOO much accomplished. I found the overflow tank finally and the mounting brackets were nowhere to be seen so I fabricated some new ones and mounted the tank on the passenger F-Panel. I have some braided steel hose left over so I decided that I would get a fitting for the hose to the tank today and just use a small hose clamp for the fitting under the t-filler. Pics of that tomorrow.

    The main thing I did this weekend with the help of my kids was to put the body on the car. I'm going to prep it this week for the trip to the Bat Cave. Here are some pics:


    I also finished setting up the engine-turning jig in anticipation of engine-turning the dash. I haven't finalized what pattern - if any - i will leave un-turned. It's looking more and more in my mind like I will turn the whole thing, unlike the firewall that has the polished stripes. If anyone has input or ideas on the matter I'd love to hear it!


    FFR 5369 Pin Drive, IRS, Trigos, Torsen, Wilwoods, FMS BOSS 302 "B" cam , Mass-flo. CA SB100 (SPCN) Registered
    Delivered 4/23/06. "Finished" 4/2012 (still not done!)


  29. #149
    Senior Member jayguy's Avatar
    Join Date
    Feb 2011
    Location
    Las Vegas
    Posts
    234
    Post Thanks / Like
    Looking good Dave. How about continuing the stripes across the dash?

  30. #150
    Administrator David Hodgkins's Avatar
    Join Date
    Feb 2011
    Location
    Corona del Mar, CA
    Posts
    6,072
    Post Thanks / Like
    Blog Entries
    7
    Quote Originally Posted by jayguy View Post
    Looking good Dave. How about continuing the stripes across the dash?
    Thanks Jay! That was my first idea, but I'm concerned about sun reflection. I don't think that much polished aluminum on the dash would be a good thing during some parts of the day. My current thought is a fully turned dash with a polished gauge bezel. The bezel would look like this, only polished instead of engine-turned:


    FFR 5369 Pin Drive, IRS, Trigos, Torsen, Wilwoods, FMS BOSS 302 "B" cam , Mass-flo. CA SB100 (SPCN) Registered
    Delivered 4/23/06. "Finished" 4/2012 (still not done!)


  31. #151
    Junior Member
    Join Date
    May 2015
    Posts
    5
    Post Thanks / Like
    Dave

    Your build looks great, I like the look of the March pully setup and everything else that you have done. From reading your thread it looks like I will end up having to cut the tunnel support to make the mid shift kit to work.

    Rick

  32. #152
    Administrator David Hodgkins's Avatar
    Join Date
    Feb 2011
    Location
    Corona del Mar, CA
    Posts
    6,072
    Post Thanks / Like
    Blog Entries
    7
    Rick,

    There's really no getting around it, with a TKO/Midshift. My MKIII has the same engine/bellhousing but has a T5 with S10 tailhousing that puts the shifter just a bit forward of the bar. If I build another down the line it will get another TKO.


    FFR 5369 Pin Drive, IRS, Trigos, Torsen, Wilwoods, FMS BOSS 302 "B" cam , Mass-flo. CA SB100 (SPCN) Registered
    Delivered 4/23/06. "Finished" 4/2012 (still not done!)


  33. #153
    PLATNUM Supporting Member
    wallace18's Avatar
    Join Date
    Apr 2012
    Location
    Trenton, Florida
    Posts
    5,382
    Post Thanks / Like
    Beautiful job so far!

  34. #154
    Administrator David Hodgkins's Avatar
    Join Date
    Feb 2011
    Location
    Corona del Mar, CA
    Posts
    6,072
    Post Thanks / Like
    Blog Entries
    7
    Quote Originally Posted by wallace18 View Post
    Beautiful job so far!
    Thank you sir! That means a lot!

    It's been a week since my last update, but that doesn't mean nothing has been done on the build!

    The last thing I had to do before draining the water and adding real coolant was to set up the overflow tank. I used the one that came with the complete kit and had a 90 degree barb attached to the bottom. I then mounted it and used some left-over stainless hose from my fubar'd 1st attempt at fuel lines. The stainless actually looks real good in the engine bay. Here are a few pics:


    I'll cut a piece of rubber tubing later so that the clamp doesn't scratch up the filler tube...

    Moving on, last Saturday I loaded up the roadster behind the ol' Excursion and headed out to Da' Bat Cave in Temecula:


    continued...


    FFR 5369 Pin Drive, IRS, Trigos, Torsen, Wilwoods, FMS BOSS 302 "B" cam , Mass-flo. CA SB100 (SPCN) Registered
    Delivered 4/23/06. "Finished" 4/2012 (still not done!)


  35. #155
    Senior Member jayguy's Avatar
    Join Date
    Feb 2011
    Location
    Las Vegas
    Posts
    234
    Post Thanks / Like
    Yeah, I guess there is a little bit of sunshine once in a while in SoCal, isn't there?

    I like the polished gauge bezel idea too. That'll be less to reflect off of, and broken up by the gauges, but still continue the theme.

  36. #156
    Senior Member 68GT500MAN's Avatar
    Join Date
    Feb 2011
    Location
    Fresno, CA
    Posts
    1,808
    Post Thanks / Like
    Dave,
    I noticed water spots on the alternator and bracket, must be from HB. When will you have it back from the cave?
    Doug
    Built FFR5196 MKII in 2003, 427w
    Building FFR0058HR, Edlebrock 347-AOD

  37. #157
    Administrator David Hodgkins's Avatar
    Join Date
    Feb 2011
    Location
    Corona del Mar, CA
    Posts
    6,072
    Post Thanks / Like
    Blog Entries
    7
    Quote Originally Posted by 68GT500MAN View Post
    Dave,
    I noticed water spots on the alternator and bracket, must be from HB. When will you have it back from the cave?
    Doug
    Yeah, that was from HB. I'm not sure how long Jeff will have the body. Dag nabbit, that reminds me; I never finished the Bat Cave post!


    FFR 5369 Pin Drive, IRS, Trigos, Torsen, Wilwoods, FMS BOSS 302 "B" cam , Mass-flo. CA SB100 (SPCN) Registered
    Delivered 4/23/06. "Finished" 4/2012 (still not done!)


  38. #158
    Administrator David Hodgkins's Avatar
    Join Date
    Feb 2011
    Location
    Corona del Mar, CA
    Posts
    6,072
    Post Thanks / Like
    Blog Entries
    7
    I haven't had much time to post about my trip to Jeff Miller's place so here's a recap.

    I still don't own a trailer so after picking one up at uhaul I loaded the roadster up on Friday evening for the trip down to Jeff's on Saturday. I told him I'd be ther at 9 am but ended up arriving at 10. This is significant because he told me he had to be out of there by 3:30 pm.

    When I arrived Jeff wasted no time diving into setting up the body so he could hang the doors. I only attached it to the frame at the two factory-drilled mounting points under the doors. Jeff instructed me to NOT drill the front so he could do it. Fine by me! First thing we did was remove the pipes so we could get the body off. We flipped the body upside down and jeff marked and cut down the rolled cockpit edges to create more clearance for the carpet and dash, and then we re-mounted the body. He drilled out the front quick-jack holes and mounted the front and after quick jacks, and drilled out and mounted the forward body-mount bolts under the foot boxes. With the body now snugly fitted to the frame he mounted the doors. I couldn't believe how much material he had to add to both doors. Definitely different than my MKIII. He then used rage to build up the tops to meet the cowl. Here are some pics of that process:

    Adding material to the doors. First he identified areas that needed material and ground off the gel-coat in that area. For the driver's door most of it was in the front and on the passenger side it was almost all on the bottom of the door:


    Open, adjust fit, close, grind, repeat. Over and over!


    After he fit the door and ID'd the area he needed to add material to, he taped off the area and adjusted the door inward so he wouldn't add TOO much material. Then he filled the gap and waited for it to set up:


    After the goop set up, he "broke the door away from the tape and re-fit the door again. this time he cut down the other areas of the door to get the final gap all around:


    When the gaps were done he scuffed up the top of the door and taped off the gap again in preparation for the rage body filler:


    The speed in which he filled and contoured the rage was amazing! after it first started to set he had the whole think done in like 10 minutes:


    Continued...

    FFR 5369 Pin Drive, IRS, Trigos, Torsen, Wilwoods, FMS BOSS 302 "B" cam , Mass-flo. CA SB100 (SPCN) Registered
    Delivered 4/23/06. "Finished" 4/2012 (still not done!)


  39. #159
    Administrator David Hodgkins's Avatar
    Join Date
    Feb 2011
    Location
    Corona del Mar, CA
    Posts
    6,072
    Post Thanks / Like
    Blog Entries
    7
    Continued...

    Then he repeated the whole process on the other door:


    He worked fast! but before We knew it he was already and hour over schedule (because I was late) and we had the body off and the go-cart back on the trailer by 4:30. In our haste I forgot to ask him to verify that I had the proper measurement for the polished striped on the firewall. I guess we'll find out if I blew it or not when we mount the painted body!

    One thing I did notice that I hadn't before was that the body was stamped with an ID.:


    So that was my trip to Da Bat Cave. Jeff's turn time is roughly 4-6 weeks. I have a lot to do between now and then! I made some progress in the week since my visit to Jeff's; that will be detailed in my next update.


    FFR 5369 Pin Drive, IRS, Trigos, Torsen, Wilwoods, FMS BOSS 302 "B" cam , Mass-flo. CA SB100 (SPCN) Registered
    Delivered 4/23/06. "Finished" 4/2012 (still not done!)


  40. #160
    Administrator David Hodgkins's Avatar
    Join Date
    Feb 2011
    Location
    Corona del Mar, CA
    Posts
    6,072
    Post Thanks / Like
    Blog Entries
    7
    This past week I didn't get too much time to work on the car but I did manage to drain the water from the motor and replace it with proper coolant. One thing I had done when first assembling is I didn't add an "adapter" piece of hose over the radiator bottom outlet, but instead I had just cinched the connecting tube real tight, which deformed it. It held water but I knew it wasn't 100% correct so I fixed that before adding coolant:

    Before:


    After:


    I also fixed a problem where the clutch pedal was hitting the 3/4 tube, limiting it's throw. It would stop a good 1.5' - 2 " from the front of the footbox. Since I need all the legroom I could get this had to be remedied. I've read, and see pics of examples where folks just cut the tube out completely. I didn't want to do this and my first thought was to cut the arm but once I started I thought better of it. I marred the arm some but will smooth it back out and throw some black paint on it. You can see the abortion in this next shot. So after deciding to notch the frame instead of cutting the tube completely I marked the frame with a straight edge and took a guess at just how much to cut:


    This is something that should have been done early in the build, and is worth noting if you are reading this thread before building. If I hadn't mounted the floor aluminum I could have made quick work of this but since the floor was riveted I couldn't get a sawzall in there so I attacked it with my dremel. After cutting I tested the throw and couldn't believe how lucky I got with my cross cut. The frame now acts as a stop for the pedal and is just 1/8" from the front of the box. Perfect!


    The car now shifts with the ease of a hot knife through butter.


    FFR 5369 Pin Drive, IRS, Trigos, Torsen, Wilwoods, FMS BOSS 302 "B" cam , Mass-flo. CA SB100 (SPCN) Registered
    Delivered 4/23/06. "Finished" 4/2012 (still not done!)


Page 4 of 11 FirstFirst ... 23456 ... LastLast

Posting Permissions

  • You may not post new threads
  • You may not post replies
  • You may not post attachments
  • You may not edit your posts
  •  

FFMetal

Visit our community sponsor