Very Cool Parts

Visit our community sponsor

Thanks Thanks:  0
Likes Likes:  0
Page 1 of 3 123 LastLast
Results 1 to 40 of 86

Thread: Usudno's 4 generation MK IV build

Hybrid View

Previous Post Previous Post   Next Post Next Post
  1. #1
    Senior Member
    Join Date
    Oct 2016
    Posts
    407
    Post Thanks / Like

    Usudno's 4 generation MK IV build

    So it's finally time! After drooling over Shelby Cobras my entire life, I finally have the opportunity to build a roadster.

    A little background on myself and my "hired hands". I am a general contractor specializing in insurance restorations. I recently took over the family business and have had the pleasure of working with my father and grandfather on a daily basis for the past 11 years. All of the work on the roadster will be complete in our office warehouse and as you will see in pictures it can get a little crowded with projects at times.

    My father is semi retired. He comes In and works 2-3 days a week on smaller projects and tinkers in the woodshop from time to time.

    Pop is a retired army mechanic who worked as a texaco mechanic after his service for nearly 30 years. He has wrenched on just about anything you can imagine and has a wealth of knowledge.

    My son Collin is a typical 8 year old. He has two passions at his young age. Sports (mainly baseball) and cars.

    Myself my father and Pop have restored several cars in the past. Most were minor restorations. The latest was a complete frame off. Previous restorations consisted of a 1966 Ford Mustang gt California special. 1973 Porsche 911, 1969 Volkswagen Super Beatle Convertible, and our most resent, 1956 for thunderbird. The t-bird was my fathers dream car. We started it my senior year in high school and finished it in roughly 5 months or so. I'm hoping there is a lot less researching and finding parts for this build. The t bird was defiantly a challenge finding parts for a 312cid v8.

    My build plan is as follows.
    Complete kit with the following options
    Chrome roll bar (drivers side only)
    351w Factory Five headers
    Body cut outs
    Powder coated frame
    Side pipe delete (buying a set of ceramic coated from a member)
    Wind wings
    Visors
    17x9 front and rears halibrands

    Drivetrain will consist of the following
    351w long block from Tristar engines
    T-5 transmission with G force gear set
    1994 mustang gt rear end trac lock with 3.27 gearing

    Color will be either ford sonic blue or Lexus spectre mica with white stripes.
    My build will be straight forward right off of the manual. The only deviations I plan or to paint the engine compartment panels, insulate the cockpit, and undercoat the back side of the panels and body.

    Here's to a fun and rewarding journey!!

  2. #2
    Senior Member KDubU's Avatar
    Join Date
    May 2015
    Location
    Kennebunkport, ME
    Posts
    1,192
    Post Thanks / Like
    Congrats on making the leap. Hold on to your pocket book as we will gladly spend your money.
    Kyle

    Complete Kit pickup 09/05/2015, 351w, QF680, 3.55, 3-Link, 15" Halibrands with MT's, Painted Viking blue with Wimbledon white stripes on 03/15/2017. Sold in 08/2018 and totally regret it.

  3. #3
    Senior Member
    Join Date
    Oct 2016
    Posts
    407
    Post Thanks / Like
    Today we got the body buck put together. Collin had a blast cutting the 2x4's with the chop saw. He did most of the drilling as well (i figured he should practice for all the holes he will be drilling in the panels!) We followed the how to on the other site and it came out good. Clearance will be a bit tight but I think we have sufficient room. I have some cleaning up to do in order to make room for the boxes. I have an area in mind. Today we also got air to our work station. I have a 80 gallon compressor in the wood shop but we needed to get a line to where the car will be. We simply ran a line from one of the stations in the woodshop by t'ing off of it and now we have all the air we need with the compressor noise hidden away! I only snapped a few pics of the body buck but we also got a delivery of our first specialty tool. The indispensable clecos. My rear end should be arriving via freight Tuesday. We are lucky enough to have a good friend that works in the shipping department of a local electrical supply house. They have graciously allowed us use of one of the many loading docks. This will make for some savings in shipping. It also helps that he is a neighbor of mine and has offered to load them up in his truck in the afternoons and haul them over to us. What would we do without friends??

    Onto the pics
    Attached Images Attached Images

  4. #4
    Senior Member
    Join Date
    Oct 2016
    Posts
    407
    Post Thanks / Like
    I am just realizing that the body buck picture is sideways... How does one flip the picture once loaded up?

  5. #5
    Senior Member
    Join Date
    Oct 2016
    Posts
    407
    Post Thanks / Like
    KDubU

    I'm sure you guys could help with that aspect. Being that as it may, I squeeze budgets and manage projects on a daily basis and I have gotten pretty good and sticking to it. So unless you guys catch me a few whiskey's in I think I will keep to my budget.

  6. #6
    Senior Member wareaglescott's Avatar
    Join Date
    Apr 2016
    Location
    Auburn, AL
    Posts
    2,146
    Post Thanks / Like
    Sounds like a great family project. Enjoy the build.
    Im glad you listed your only planned deviations up front so we can come back and check on that! haha
    I am finding more deviations than planned all the time!
    Do you still have the 66 Mustang? My first car was a 67 convertible and I am partial to them.
    MK4 #8900 - complete kit - Coyote, TKO600, IRS - Delivered 6/28/16 First Start 10/6/16 Go cart - 10/16/16 Build completed - 4/26/17 - 302 days to build my 302 CI Coyote Cobra - Registered and street legal 5/17/17
    Build Thread http://thefactoryfiveforum.com/showt...e-build-thread
    PHIL 4:13 INSTAGRAM - @scottsrides

  7. #7
    Senior Member
    Join Date
    Oct 2016
    Posts
    407
    Post Thanks / Like
    wareaglescott, we do not have it. I have been a mustang fanatic since I was roughly 5 years old. I loved that car. It was affectionaly named We-Bomb. The story goes that I would tell my father when it would backfire that we bomb... It stuck and we still have a license plate that we had made for the front of the car. That was my first experience with cars and at the young age of 5 I was hooked. We will see about those deviations... The only thing that i was hesitant on was the rear end. Going fox width with wider wheels in the back was my original plan but, for ease and time I decided to stick with the SN95 width.

  8. #8
    Senior Member
    Join Date
    Oct 2016
    Posts
    407
    Post Thanks / Like
    So today my rear end came in from prestige mustang. I'll get a picture up in the morning but my question is pretty simple. What besides the brake calipers, e brake cable, and axles will I want to keep? I'm replacing the rotors and boy it's a good thing I planned on it because they are in rough shape.

  9. #9
    Senior Member
    Join Date
    Oct 2012
    Location
    Tybee Island, GA
    Posts
    505
    Post Thanks / Like
    Quote Originally Posted by Usudno View Post
    So today my rear end came in from prestige mustang. I'll get a picture up in the morning but my question is pretty simple. What besides the brake calipers, e brake cable, and axles will I want to keep? I'm replacing the rotors and boy it's a good thing I planned on it because they are in rough shape.
    In addition, because you'll be swapping ends with the calipers, to do that you'll need to take out the axles to remove the brackets. So, because You'll have it opened up, go ahead and change out the traction loc kit, axle bearings on the ends of the rear end, oil, and gasket for cover. Paint with POR-15 after pressure washing. I took off the brake line, but kind of wish I had kept it.

    Here is a link to my rebuilding the rear end on my build.

    Restoring my '95 8.8 Rear
    Dave
    Mk 3.1 - #6882 - 5.0L 302 - FiTech EFI - 3-Link - 3.08 Ratio - 15" Wheels
    Greenhorn and doing the best I can
    My photos are at: My Flickr acct
    Videos are at: YouTube Videos

  10. #10
    Senior Member
    Join Date
    Oct 2016
    Posts
    407
    Post Thanks / Like
    So here is the rear end. I plan on taking all of the brackets off. I'll flip the rotors as per Jeff's recommendation and get it all cleaned up and painted. Does anyone have any suggestions for the calipers. Should i replace anything in them besides the brake pads?

    Thanks
    Attached Images Attached Images

  11. #11
    Senior Member
    Join Date
    Oct 2012
    Location
    Tybee Island, GA
    Posts
    505
    Post Thanks / Like
    Quote Originally Posted by Usudno View Post
    So here is the rear end. I plan on taking all of the brackets off. I'll flip the rotors as per Jeff's recommendation and get it all cleaned up and painted. Does anyone have any suggestions for the calipers. Should i replace anything in them besides the brake pads?

    Thanks
    I started to redo the rear calipers with new rubber/seals/hardware/pads etc. I repainted them too. But during reassembly, they are a little trickier than the fronts because of the ebrake assy. you need a special tool, and I couldn't get them to actuate smoothly. I ended up purchasing a set of powdercoated NEW calipers for $112 . https://www.summitracing.com/parts/pwr-s4824 By this time, I had already spent $50ish in trying to redo the old ones. I wish I had just spent the extra $67.00 to just buy new.

    BTW, I didn't move the calipers to the front because I found out about it after install.

    Last edited by DadofThree; 11-18-2016 at 10:12 AM.
    Dave
    Mk 3.1 - #6882 - 5.0L 302 - FiTech EFI - 3-Link - 3.08 Ratio - 15" Wheels
    Greenhorn and doing the best I can
    My photos are at: My Flickr acct
    Videos are at: YouTube Videos

  12. #12
    Senior Member
    Join Date
    Oct 2016
    Posts
    407
    Post Thanks / Like
    What special tool is this that you speak of?? Can it be rented from orielly auto parts? As far as the rebuild, you say seals rubber and hardware, my rubber on the slide pins are actually in good shape. I'm not sure about the seals and the hardware for mounting them will defiantly be replaced. I appreciate the input DadofThree.

  13. #13
    Senior Member
    Join Date
    Oct 2012
    Location
    Tybee Island, GA
    Posts
    505
    Post Thanks / Like
    Quote Originally Posted by Usudno View Post
    What special tool is this that you speak of?? Can it be rented from orielly auto parts?
    Skip to 8:12 in the video. Yes, they can be rented.

    https://www.youtube.com/watch?v=m5MxG1m7X5U
    Dave
    Mk 3.1 - #6882 - 5.0L 302 - FiTech EFI - 3-Link - 3.08 Ratio - 15" Wheels
    Greenhorn and doing the best I can
    My photos are at: My Flickr acct
    Videos are at: YouTube Videos

  14. #14
    Senior Member
    Join Date
    Oct 2016
    Posts
    407
    Post Thanks / Like
    That's a perfect video for what I needed. Thanks. Looks like 100$ for a new set of calipers.

  15. #15
    Senior Member
    Join Date
    Oct 2016
    Posts
    407
    Post Thanks / Like
    So this afternoon i spent an hour or so tearing down and cleaning up the rear end. It cleaned up pretty good but i ran into a few issues. After struggling for a bit to get this bolt and nut loose, IMG_1725.JPG
    I cannot for the life of me get the bolt out. These two arms have been shaken, beaten, and PB blasted to kingdom come. If anyone has any ideas, I'm all ears. Collin's idea was "Dad get a bigger hammer"

    My next question deals with the E-Brake cables. Do i need these? I left them attached to the calipers. After getting a closer look at the calipers, I'm convinced a rebuild is needed. That being said, I priced a hardware kit for the brackets and a rebuild kit for the calipers. For a few bucks more I can grab new ones. I think i will go that route. Rotors should arrive Wednesday.

    Question #3 is do i need the caliper mounting bracket that sits behind the tone ring for the ABS? Do i even need the ABS sensor? I don't plan on running it but I thought it would be good to get an answer before removal. The bracket that I am referring to is in this picture.
    IMG_1724.JPG
    Its the large bracket closest to the pumpkin besides the previously mention arms that won't come off. When watching the assembly videos, Dan removes the axles from the moser rear end and installs a caliper bracket. I'm not sure if this is only with the willwood brakes or if this is something that comes standard with the complete kit. A few members mentioned moving the calipers forward of the rotor and switching sides. If this is done I'm not sure what brackets will be needed.

    Here are a few misc. pics Collin took with my phone. He snapped pictures while parts were soaking in rust remover.
    IMG_1721.JPG

    Thanks for the help!
    Attached Images Attached Images

  16. #16
    Senior Member wareaglescott's Avatar
    Join Date
    Apr 2016
    Location
    Auburn, AL
    Posts
    2,146
    Post Thanks / Like
    Maybe try some heat on that stuck bolt
    MK4 #8900 - complete kit - Coyote, TKO600, IRS - Delivered 6/28/16 First Start 10/6/16 Go cart - 10/16/16 Build completed - 4/26/17 - 302 days to build my 302 CI Coyote Cobra - Registered and street legal 5/17/17
    Build Thread http://thefactoryfiveforum.com/showt...e-build-thread
    PHIL 4:13 INSTAGRAM - @scottsrides

  17. #17
    Senior Member
    Join Date
    Oct 2016
    Posts
    407
    Post Thanks / Like
    It's actually both. Not just one!

  18. #18
    Not a waxer Jeff Kleiner's Avatar
    Join Date
    Feb 2011
    Location
    Bloomington, Indiana
    Posts
    8,094
    Post Thanks / Like
    You're gonna' have to sawzall both ends of the bolt on the inside of the mounts. What's happened is that the bolt rusted inside of the bushing sleeve and then when you torqued on it the sleeve broke free of the rubber bushing so now both the bolt and inner sleeve are spinning.

    Jeff

  19. #19
    Senior Member
    Join Date
    Oct 2016
    Posts
    407
    Post Thanks / Like
    Jeff, sawzall is next. It that bolt does not spin at all!! It's crazy. I was able to remove the nut without holding the head of the bolt. I'll update tommorow but it's comming out!

  20. #20
    Not a waxer Jeff Kleiner's Avatar
    Join Date
    Feb 2011
    Location
    Bloomington, Indiana
    Posts
    8,094
    Post Thanks / Like
    Quote Originally Posted by Usudno View Post
    Jeff, sawzall is next. It that bolt does not spin at all!! It's crazy. I was able to remove the nut without holding the head of the bolt. I'll update tommorow but it's comming out!
    Ahhh, I misunderstood and thought it was spinning but would not come out. I think it's the same root cause though---bolt rusted to the bushing sleeve.

    Yes, you will reuse the OEM caliper brackets. Remember, if you relocate the calipers you need to swap everything side to side; that bracket, the caliper mounts, calipers and the anti-moan brackets. Tone rings are not used if you don't incorporate ABS but can be left in place. You'll need parking brake cables. I always use new ones and modify them to the proper length but it's your choice whether to do so what you have or replace 'em.

    Good luck,
    Jeff

  21. #21
    Senior Member
    Join Date
    Oct 2016
    Posts
    407
    Post Thanks / Like
    Got an early start this morning! One bolt down before work started. The sawzall worked good. Both of my parking brake cables seem to be in good shape. I will remove the ABS sensor and leave the tone rings as they are. Today i plan to take the differential cover off and putt the axles to finish prepping for paint. Thanks again Jeff.

  22. #22
    Straversi's Avatar
    Join Date
    Nov 2014
    Location
    Palos Verdes, CA
    Posts
    1,278
    Post Thanks / Like
    Congratulations and welcome aboard. How cool to be able to share the experience with multiple generations. Will seniority determine who gets to drive?

    -Steve
    Mk IV #8901 - Complete kit, Coyote, TKO-600, IRS. Ordered 5/23/16, Delivered 7/14/16, First Start 8/13/17, First Go-Kart 10/22/17, Registered and Completed 10/18/18. Build Thread: http://thefactoryfiveforum.com/showt...V-Coyote-Build Graduation Thread: https://thefactoryfiveforum.com/show...-Roadster-8901

  23. #23
    Senior Member
    Join Date
    Oct 2016
    Posts
    407
    Post Thanks / Like
    Just an quick update. I got both of those suckers off! I have a few more questions. I snapped a few picks of what looks like a caliper mounting bracket and some sort of backing plate that attacked with a u bolt type of assembly around the axle housing. I'll upload the pictures when I get to the house. I really wanted to get the cover off and finish prepping for paint but my daughter has a dance camp presentation this afternoon and the wife made it clear that if I wanted to take Collin hunting Friday morning and spend Friday afternoon working on the car that I would have to make the dance thing!

    Straversi, it's funny that you speak of seniority, Pop hasn't actually been apart of the build yet. He has been under the weather as of late. I guess I will give him a little slack. He does turn 85 December 9th. What an awesome birthday present it would be if Stewart makes it on the 9th rather than the 10th!!

    As always thanks guys.

  24. #24
    Not a waxer Jeff Kleiner's Avatar
    Join Date
    Feb 2011
    Location
    Bloomington, Indiana
    Posts
    8,094
    Post Thanks / Like
    Quote Originally Posted by Usudno View Post
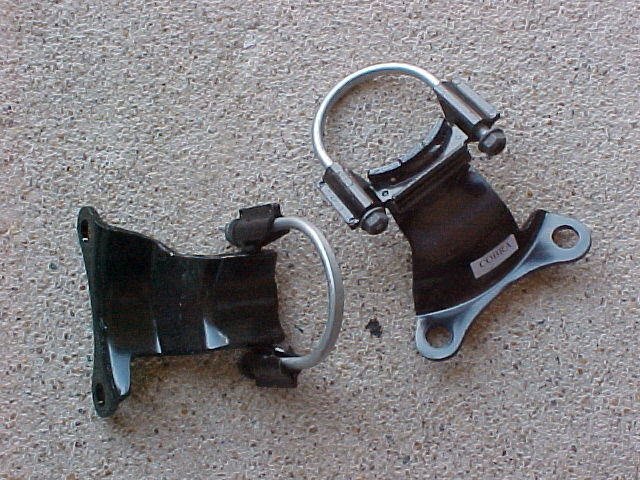
    ...I snapped a few picks of what looks like a caliper mounting bracket and some sort of backing plate that attacked with a u bolt type of assembly around the axle housing.
    These?


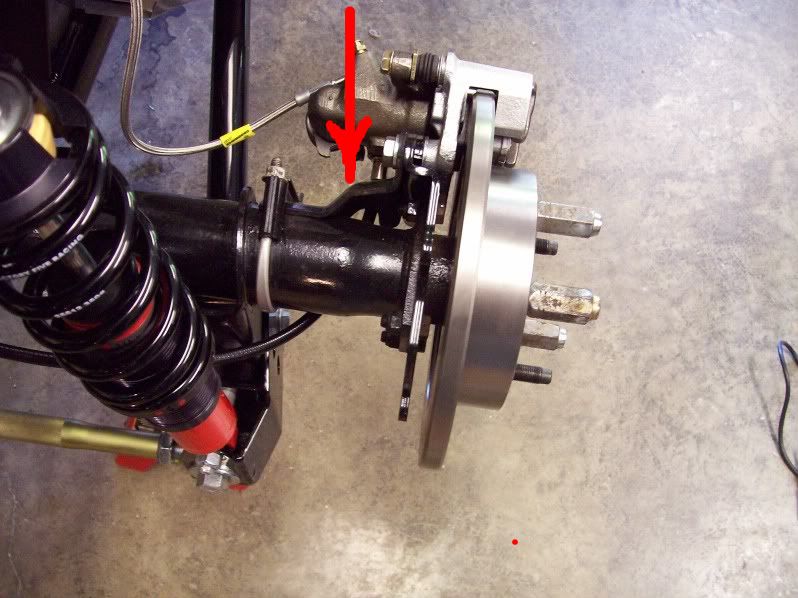
    Those are the anti-moan brackets. In this photo you'll see them installed on the axle assembly after I swapped the calipers to the front:


    Keep them---without 'em the rear brakes can howl like a coon hound under a full moon as you come to a stop

    Jeff

  25. #25
    Straversi's Avatar
    Join Date
    Nov 2014
    Location
    Palos Verdes, CA
    Posts
    1,278
    Post Thanks / Like
    Call Stewart and get the driver's number. I couldn't be there on the day he had me scheduled so I called the driver and he dropped a different car on that day and pushed me up two days. Didn't make any difference to him. He might have another car in your area to drop. Can't hurt to ask. Let them know it's Pop's 85th. That's great.
    -Steve
    Mk IV #8901 - Complete kit, Coyote, TKO-600, IRS. Ordered 5/23/16, Delivered 7/14/16, First Start 8/13/17, First Go-Kart 10/22/17, Registered and Completed 10/18/18. Build Thread: http://thefactoryfiveforum.com/showt...V-Coyote-Build Graduation Thread: https://thefactoryfiveforum.com/show...-Roadster-8901

  26. #26
    Senior Member
    Join Date
    Oct 2016
    Posts
    407
    Post Thanks / Like
    So Jeff, you stole a bit of my post thunder. The anti moan brackets were one of my concerns. Here are the others.
    IMG_1737.JPG
    1. This guy here which I am assuming is a caliper location bracket. Do i need to keep this around? Should i blast it and paint it?

    IMG_1735.JPG
    2. This guy here which I know attached to the brake line previously and to the caliper with a banjo bolt. Should i be keeping this as well? Any ideas on cleanup?

    IMG_1738.JPG
    3. I'm sure this is a vent but I am not sure what goes here. I have been plugging it with random objects to keep rust remover and gunk out.


    IMG_1731.JPGIMG_1732.JPG
    Above you will see evidence of my battle won! Triumph came with sawzall in hand! For the life of me I can't figure out how they got that stuck. As you can tell in one of the photos, the bolt head remained after being cut. Not until several blows with a punch did it come out.

    And lastly, A coat of Rustoleum Rust reformer.
    IMG_1743.JPG

    I'm just about done with it. Hopefully tomorrow afternoon i can get it cleaned up more. I'll get the cover off and drain it. Probably pull the axles and blast the cover. I'm thinking of going alumablast on the cover and just a black on the rear end.

    An update on Pop. My father and aunt went to see him this afternoon. He wasn't looking to good. The plan is to bring him to his doc tomorrow run some tests. He has been feeling week as of late and his morning visits to Lowes to solve all of the worlds problems with the old men behind the contractors counter have all but ended. Hopefully he can rest up and feel better before the car makes it!

    Thanks for the advice as always

    Scott

  27. #27
    Senior Member
    Join Date
    Oct 2016
    Posts
    407
    Post Thanks / Like
    Just a heads up, the Rust Reformer that i have used to help prep the rear end seems to have done a pretty good job. You can see a bit of the reaction once it has been on a while.
    One question I do have is, Can i go back on with a few coats of primer to help smooth it out more before my final coat of paint?? I know that I can prime over the Rust Reformer, I'm just not sure about building up a few coats of primer to smooth things out. Does Por 15 go on thick enough to hide imperfections?

  28. #28
    Not a waxer Jeff Kleiner's Avatar
    Join Date
    Feb 2011
    Location
    Bloomington, Indiana
    Posts
    8,094
    Post Thanks / Like
    1. Yes, caliper bracket. You will use it for OEM brakes.

    2. Although the axle mounted factory flex lines can be used (I'm not sure I would trust that rusty one however) I prefer to run hard lines to the chassis corners and then braided flex lines from chassis to caliper as can be seen in my photo in post #24 above. Mark at Breeze can set you up:


    http://www.breezeautomotive.com/deta...d=488&cat_id=1

    3. That is where the axle vent/breather mounts. Obviously yours is missing. Again Breeze has what you need:


    http://www.breezeautomotive.com/details.php?prod_id=407

    If you haven't figured this out already you need to put Breeze on your speed dial. Mark is a wealth of knowledge with a tremendous selection of parts (the RIGHT parts the FIRST time!) and great service.

    Hope that helps and good luck!

    Jeff

  29. #29
    Senior Member
    Join Date
    Oct 2016
    Posts
    407
    Post Thanks / Like
    I have spoken with Mark quite a bit during my planing. I will go with both of your suggestions. I will put a call into him. Monday morning and get them ordered. I purchased new calipers and plan on getting new e brake cables to complete the rear brake setup. My rotors came in today as well. Thanks again Jeff for the help.

  30. #30
    Senior Member
    Join Date
    Oct 2012
    Location
    Tybee Island, GA
    Posts
    505
    Post Thanks / Like
    Subscribing to your build thread.
    Dave
    Mk 3.1 - #6882 - 5.0L 302 - FiTech EFI - 3-Link - 3.08 Ratio - 15" Wheels
    Greenhorn and doing the best I can
    My photos are at: My Flickr acct
    Videos are at: YouTube Videos

  31. #31
    Senior Member
    Join Date
    Oct 2016
    Posts
    407
    Post Thanks / Like
    Unfortunately my build plan has taken a turn for the worse. Pop was rushed to the hospital early thanksgiving morning and put in ICU. They got him stabilized and he his in good spirits but he experienced major Blood loss. This has been over a week and a half or so. This morning the Doc's ran tests to figure out the cause. He has been diagnosed with colon cancer! They have taken him out of ICU and he is in a regular room. My father and his siblings are meeting with doctors tommorow to discuss his treatment options but the initial outlook is not looking to good. My only hope now is that pop can at least be around for the delivery. The build will go on but my dream was to build my dream car with all 4 of us!

    I would greatly appreciate any thoughts and prayers for him.

  32. #32
    Senior Member wareaglescott's Avatar
    Join Date
    Apr 2016
    Location
    Auburn, AL
    Posts
    2,146
    Post Thanks / Like
    Sorry to hear of your grandfathers health issues. Prayers sent!
    MK4 #8900 - complete kit - Coyote, TKO600, IRS - Delivered 6/28/16 First Start 10/6/16 Go cart - 10/16/16 Build completed - 4/26/17 - 302 days to build my 302 CI Coyote Cobra - Registered and street legal 5/17/17
    Build Thread http://thefactoryfiveforum.com/showt...e-build-thread
    PHIL 4:13 INSTAGRAM - @scottsrides

  33. #33
    Straversi's Avatar
    Join Date
    Nov 2014
    Location
    Palos Verdes, CA
    Posts
    1,278
    Post Thanks / Like
    Our thoughts and prayers are with you.
    Mk IV #8901 - Complete kit, Coyote, TKO-600, IRS. Ordered 5/23/16, Delivered 7/14/16, First Start 8/13/17, First Go-Kart 10/22/17, Registered and Completed 10/18/18. Build Thread: http://thefactoryfiveforum.com/showt...V-Coyote-Build Graduation Thread: https://thefactoryfiveforum.com/show...-Roadster-8901

  34. #34
    Senior Member
    Join Date
    Oct 2016
    Posts
    407
    Post Thanks / Like
    Prognosis got a little worse. A scan yesterday revealed that it has spread to his lungs. Docs don't think he can handle treatment for the lungs so the game plan is take care of the lower GI and keep him comfortable for 6mo to a year. He is taking it well. He told Collin yesterday to get started in the car without him and he would " come show us what we did wrong". We all got a kick out of it. Thanks for listening guys. We have decided to try and get the car done so he can see the finished product. I would love to take him for a ride. Any tips on speeding things up would be greatly appreciated!

  35. #35
    Straversi's Avatar
    Join Date
    Nov 2014
    Location
    Palos Verdes, CA
    Posts
    1,278
    Post Thanks / Like
    Quote Originally Posted by Usudno View Post
    Prognosis got a little worse. A scan yesterday revealed that it has spread to his lungs. Docs don't think he can handle treatment for the lungs so the game plan is take care of the lower GI and keep him comfortable for 6mo to a year. He is taking it well. He told Collin yesterday to get started in the car without him and he would " come show us what we did wrong". We all got a kick out of it. Thanks for listening guys. We have decided to try and get the car done so he can see the finished product. I would love to take him for a ride. Any tips on speeding things up would be greatly appreciated!
    Build it right out of the box if you want to go faster. Small mods take (me) a lot of time. Might not be the same for guys with better skills and tools. I'm not in a hurry and I'm enjoying th process.

    I can't help thinking that racing the clock might take the fun out of the project for you and your family. My brother and I worked on cars together as kids but he lives in Northern California. He is a very talented word worker so he emails me photos of what he is working on and I do the same with the car. Our mom asked that we copy her on our emails because she loves that we are both perusing projects that we are passionate about. It makes her happy to be included when we tease each other or complain about a mishap or brag about a small detail at only a brother would care about. My mom is especially excited if any of our kids are involved. I sent her a photo of my son and I installing the IRS rear end and she said it made her cry because she was so happy to see us smiling and working together. My long winded point is this; finishing the car might not be as important to your dad as you think. I bet he loves watching you and the rest of your family work on the car. Probably enjoys talking about the details with you as much as turning a wrench. I bet there is someone in your area with a FFR roadster that would come by and give your dad a ride, now, while his health is better and he can enjoy it and take the pressure off of you. I just fear that if his health is deteriorating you might not feel like spending 5 hours working on the car to meet a deadline. Without a time frame you might be able to spend an hour or so in the garage to clear your head and keep the project fun (therapeutic) for you and your family. Sorry if I'm overstepping here. God bless.
    -Steve
    Mk IV #8901 - Complete kit, Coyote, TKO-600, IRS. Ordered 5/23/16, Delivered 7/14/16, First Start 8/13/17, First Go-Kart 10/22/17, Registered and Completed 10/18/18. Build Thread: http://thefactoryfiveforum.com/showt...V-Coyote-Build Graduation Thread: https://thefactoryfiveforum.com/show...-Roadster-8901

  36. #36
    Senior Member
    Join Date
    Oct 2016
    Posts
    407
    Post Thanks / Like
    One more note... I went by oreilly auto parts for the seals, bearings, and a new differential cover gasket and bolts. Turns out that I can get the Differential cover, bolts, and gasket all for under $50 Chrome plated. I would have spent that on the gasket and bolts separately and it saves me from having the painted cover. I also got a new God forsaken locking pin retainer bolt from the help section at oreilly and a new axle vent from the Ford Stealership.

  37. #37
    Senior Member
    Join Date
    Oct 2016
    Posts
    407
    Post Thanks / Like
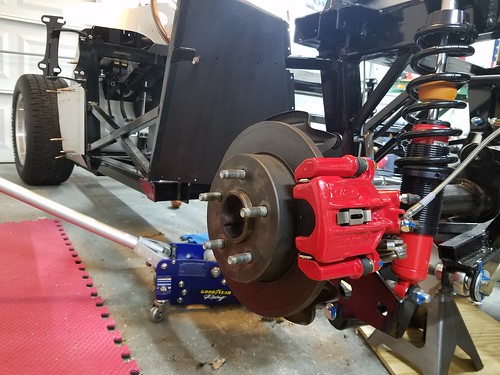
    So I've been a bit lazy with the updates... I have gotten the front suspension hung, brakes on and steering rack partially installed. I had both of the kids with me this afternoon and had a blast working with them. I ran into a small issue with the steering rack. I need to put the suspension under a load in order to get the tie rods lined up with the steering arms. That being said, My father has the floor jack with his T-bird. I got as far as I could tonight before the kids got hungry. Its perfect gumbo weather here!! Here are a few pics of my progress.IMG_1906.JPGIMG_1906.JPG
    Here is the passenger side suspension. It took about 3 times as long as the second drivers side. Guess which one I did first!!

    IMG_1910.JPGIMG_1908.JPG
    Here is Collin having a good time with the cleco pliers and showing off our first true accomplishment on the car!

    IMG_1912.JPGIMG_1911.JPG

    I took a break from the car Sunday and worked in the wood shop with my father. I made a little Christmas present for Collin. Here it is before the cushion and cover.

    And last but not least, tonight's progress with the kids.

    IMG_1914.JPGIMG_1924.JPGIMG_1923.JPGIMG_1922.JPGIMG_1921.JPG

  38. #38
    Senior Member
    Join Date
    Oct 2016
    Posts
    407
    Post Thanks / Like
    It's been a few since my last post. In the last week or so I have gotten my pedal box together, rear end complete with brakes and all, all brake lines run (except parking brake cables) fuel tank installed, fuel lines run, and I have started working on mounting the panels. I posted up on the main board about my throttle cable issue. If anyone can provide pictures or an explanation on how the cable attaches to the pedal I would appreciate it.

    This week I plan on tackling the clutch cable (I was missing the firewall spacer) and alluminum. I am still waiting on my upper steering shaft as well as my fuel level sending unit. I was told that they were expecting to have them in the wharehouse in two weeks. Some aluminum will have to wait.

    On another note.. my transmission selection has changed. I'm now going with a TKO 500 that I kind of fell into. I will be sending my driveshaft back to FFR for a swap. The transmission should be here by weeks end. The engine unfourtunaly will be about 4-5 weeks. Had I known I would get this far along this quickly, I would have ordered it at the same time as the kit. I just didn't want it laying around the shop. I will snap some pictures tommorow when I get back to it. It's really beginning to look like a car!

  39. #39
    Senior Member
    Join Date
    Oct 2016
    Posts
    407
    Post Thanks / Like
    Its been a while since my last post. Don't fret! I have been steadily working on the car. I have hit a couple of road blocks as of late, but with the help of you guys and some of our great vendors, I have pushed through them.

    My most recent problem is with my transmission. Pictured here!
    IMG_2061.JPG

    Being a contractor has its benefits when doing a project like this. After all, Don't all contractors run into burned mustangs with a 347 and TKO 500 transmission with under 1300 miles on it! It was a customer of mines car that was involved in a house fire. I purchased the entire car from the insurance company for $1894. A plumber that I work with has purchased the engine from me (will need a bit of work, the fire got to it pretty good before being extiguished) for $625. We had agreed on it before i purchased the car. I orignally doubted the homeowner on the milage but once I got it to my shop and opened it up, this is what I saw.
    IMG_2031.JPG

    It looks to be almost new! There is a bit of plastic melted onto the bell housing from drippings from lord knows what and one plug missing as well as the covers are rusted from what I assume is from whatever the fire was put out with. The plug is for the reverse light switch. I plan to grab one from forte or someone that can help with this. I am assuming its similar to pigtail pictured here on the rear of the transmission.
    IMG_2060.JPG

    Transmission issues aside. I have figured out my clutch cable issues. A long story short, I was convinced that I was missing the clutch cable spacer, Factory Five sent me one, Then i was convinced something was terribly wrong because it didn't fit. Tony at FFR sent me over revised instructions which showed the cable going directly into the far left corner of the firewall (when standing in front of the car). I responded to him that something didn't add up. My quadrant is attached directly to the pedal. After looking at it, i decided to mount the cable straight to the firewall and sent tony this picture.
    IMG_2029.JPG

    Apparently that is all that was needed from the get go. A combination of an out of date portion of the build manual and phone conversations made it a bit more confusing than it needed to be, but all is well now. Factory Fives technicians are great and very helpful.

    Next order of business was sending off my T-5 driveshaft for a swap. Dan quickly obliged and my new driveshaft should be here shortly. While waiting on the engine i compiled a list of things that I will need in order to finish it off. My list is as follows, (please feel free to chime in if I am missing anything)

    Fuel pump (originally figured on a mechanical pump but i am second guessing this now)
    Pulley setup/water pump (ordered from Mike Everson)
    Alternator (will pick up locally)
    Coolant neck (not sure what is recommended here)
    Fluids (awaiting a recommendation from the engine builder on break in procedures)

    The pulleys have been a trial by fire!! I have tried to come up with a simple cost effective solution by going to auto parts stores requesting pulleys. I have even found a 5.0 out of an explorer that i planned on scavenging the pulley setup but to no avail. Every solution i came up with wouldn't work. Next step, buy from a vendor that has probably done the exact same thing that I was trying to do!!

    Between getting those things sorted out and my sons first Baseball tournament of the year I have gotten just about all of the aluminum together. Except for that darn drivers foot box. Still waiting on my upper steering shaft. At least the sending unit made it! My battery has been located and loosely mounted. It will have to come out for carpet. I have been cleaning up and getting it ready for cockpit insulation. The plan is to layout the wiring harness this weekend and insulate. Here she is ready for the Engine!!!
    IMG_2014.JPG

    Did I mention that I am having a blast building this thing! Next up is figuring out the fuel pump!

    Thanks for following along!

  40. #40
    Senior Member
    Join Date
    Oct 2016
    Posts
    407
    Post Thanks / Like
    I found a little time between visiting pop in the hospital and work today to tear into the rear end and get the axles pulled. I had a couple of surprises. First off when I removed the cover I was presented with this.
    IMG_1764.JPG
    I put a little rust remover on it and it looks much better now. I will be sure to clean it out good before running it. I read up a little and most things I read say run it and change the fluid after 100 miles to make sure any debris is out.

    Next up the 8mm bolt holding the pin in had previously been rounded off a bit. I will need a replacement for it. If anyone has any ideas on where i can find just this bolt i would appreciate it.

    The was the trouble of getting the C clips out. The plastic knob/pin for the abs stops the axle from being pushed in far enough to grab the C clips. The bolts holding the plastic abs sensors are were nearly rusted through. I decided that i would break the plastic end on the hub side and finish removing it once i get the caliper brackets off.

    Once all of this was done (which should have taken what 5 minutes) I pulled the axles to see rust on them as well as what seems to be ruined seals for the axles. Here are a few pics of what I found. What do you guys suggest with the axles??? How about the seals?
    IMG_1770.JPGIMG_1768.JPGIMG_1767.JPGIMG_1771.JPGIMG_1765.JPGIMG_1766.JPG

    Thanks for following and any help as always is greatly appreciated.

Page 1 of 3 123 LastLast

Posting Permissions

  • You may not post new threads
  • You may not post replies
  • You may not post attachments
  • You may not edit your posts
  •  

FFMetal

Visit our community sponsor