BluePrint Engines

Visit our community sponsor

Thanks Thanks:  0
Likes Likes:  1
Page 9 of 11 FirstFirst ... 7891011 LastLast
Results 321 to 360 of 438

Thread: 15th Anniversary MKIV build thread - TROJAN

  1. #321
    Administrator David Hodgkins's Avatar
    Join Date
    Feb 2011
    Location
    Corona del Mar, CA
    Posts
    6,072
    Post Thanks / Like
    Blog Entries
    7
    Quote Originally Posted by Carlos C View Post
    David:

    I stand corrected on my previous comment. It looks amazing mounted on the car. My concern is that the piece is only attached at one end, leaving the other longer end unsecured, and susceptible to vibration. It also looks like it touches the body at that end. Are you planning to add some rubber bulb seal?

    Carlos
    Yeah, It has bulb seal on that side. It's under a small amount of tension (more so with the bulb seal on) and the air will be pushing it into the body so I don't anticipate any problems. I'll probably shoot a gopro vid at speed of the opening anyway after I install the new nose piece.


    FFR 5369 Pin Drive, IRS, Trigos, Torsen, Wilwoods, FMS BOSS 302 "B" cam , Mass-flo. CA SB100 (SPCN) Registered
    Delivered 4/23/06. "Finished" 4/2012 (still not done!)


  2. #322
    Administrator David Hodgkins's Avatar
    Join Date
    Feb 2011
    Location
    Corona del Mar, CA
    Posts
    6,072
    Post Thanks / Like
    Blog Entries
    7
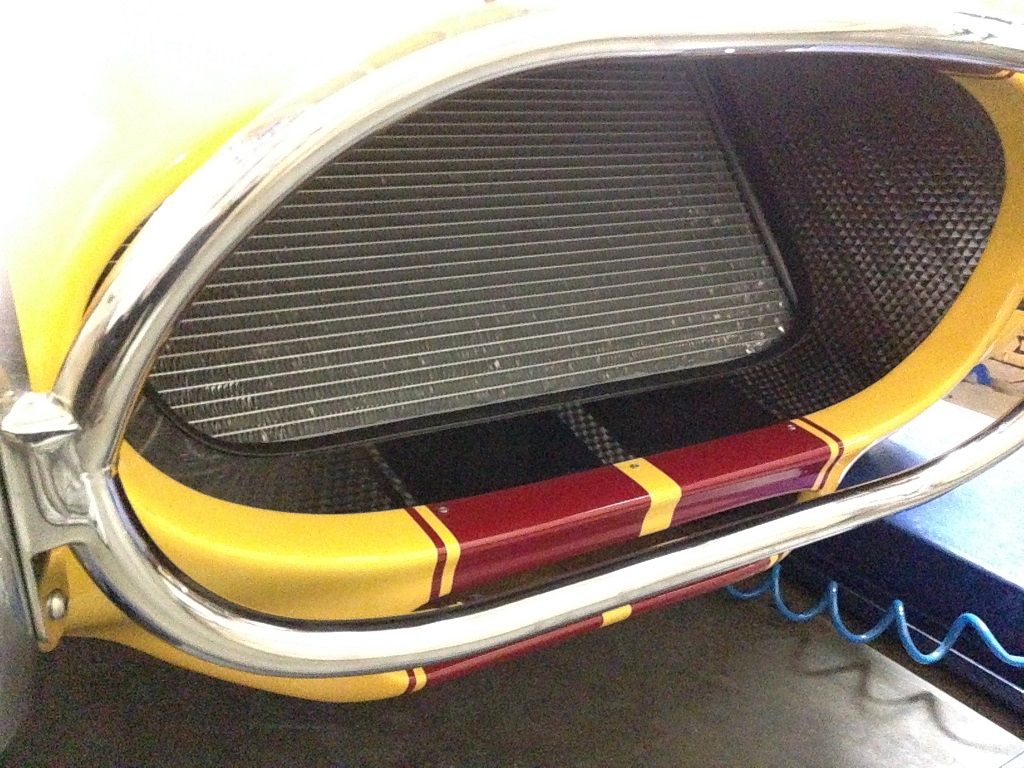
    Yesterday started out with me installing the hood again to check the clearance between the hood hinge and the new shroud. Once it was mounted, I took some quick shots:


    OK so that looks just about as good as I could have hoped for.

    continued...

    FFR 5369 Pin Drive, IRS, Trigos, Torsen, Wilwoods, FMS BOSS 302 "B" cam , Mass-flo. CA SB100 (SPCN) Registered
    Delivered 4/23/06. "Finished" 4/2012 (still not done!)


  3. #323
    Administrator David Hodgkins's Avatar
    Join Date
    Feb 2011
    Location
    Corona del Mar, CA
    Posts
    6,072
    Post Thanks / Like
    Blog Entries
    7
    Now if it turns out that the hood wont close, well, I don't know what I was thinking as an alternative at that point. Just stay positive, right? So I closed the hood, SLOWLY...

    And it closed. The hood wasn't bulging, so far so good. The only way to know for sure though is to get some shots from under the hood so I got her lifted up and stuck my hand up from below with the ol' cell phone and got these shots.

    Passenger side:


    That looks great! Lot's of clearance. And the Driver's side?:


    Ooh. No Bueno. It's just(?) touching. Well, maybe once the shroud is screwed down all the way maybe that will create a gap. Alternatively, I think the other option is to alter the shape of the hood mount arm. But before that happens, I had to pull shroud out so I could apply the sharkhide. Once it was out I got some "before" pics of the upper rad area:


    Don't ask me why, but that last shot reminds me of a kid with braces. I know, I know, don't ask.

    I needed access to the under-bench area to get to the bulb seal so after a few shots of the shroud I did a quick bench cleanup...


    ...and "finished" the piece. At some point in the future I'll probably Por15 the back. I gotta say, I think this is my best custom piece so far:


    I unfortunately didn't get as much more done last night, as I encountered a rivnut issue that stopped me dead in my tracks during final assembly when one of them fell apart while I was installing the screw. I had put in some late hours already this week so even though it was only 7:30 I hung it up. So hopefully tonight.

    I'll stop by the hardware store on my way to the shop and pick up some more rivnuts. Hopefully the shroud is done tonight and I can work on the truck cover panel.

    FFR 5369 Pin Drive, IRS, Trigos, Torsen, Wilwoods, FMS BOSS 302 "B" cam , Mass-flo. CA SB100 (SPCN) Registered
    Delivered 4/23/06. "Finished" 4/2012 (still not done!)


  4. #324
    Senior Member ehansen007's Avatar
    Join Date
    Mar 2011
    Location
    Aliso Viejo, CA
    Posts
    1,625
    Post Thanks / Like
    Looks great! Lots of hard work has not got wasted my friend.

  5. #325
    Junior Member pavieSD's Avatar
    Join Date
    Feb 2011
    Posts
    27
    Post Thanks / Like
    Great work Dave! It's looking really really sharp. Did you get the issue with the battery box and rear axle clearance figured out?

    Mark

  6. #326
    Administrator David Hodgkins's Avatar
    Join Date
    Feb 2011
    Location
    Corona del Mar, CA
    Posts
    6,072
    Post Thanks / Like
    Blog Entries
    7
    Quote Originally Posted by pavieSD View Post
    Great work Dave! It's looking really really sharp. Did you get the issue with the battery box and rear axle clearance figured out?

    Mark
    Yes, I removed the aluminum cover and stuck a standard cover on:
    http://thefactoryfiveforum.com/showt...736#post197736


    FFR 5369 Pin Drive, IRS, Trigos, Torsen, Wilwoods, FMS BOSS 302 "B" cam , Mass-flo. CA SB100 (SPCN) Registered
    Delivered 4/23/06. "Finished" 4/2012 (still not done!)


  7. #327
    Carl carlewms's Avatar
    Join Date
    May 2012
    Location
    Nokesville, VA
    Posts
    1,125
    Post Thanks / Like
    David,

    This shroud is truly a work of art. I really like the finish with the included stripes.

    BTW I have had similar problems with the hardware store variety rivnuts and reverted to McMaster-Carr with excellent results. They have some with a slight hexagonal shape that won't spin in place when installing.

    Carl
    Mk 4 Roadster
    October 25, 2012 - Kit Arrives
    April 8, 2013 - Build Starts
    August 23, 2015 - Rolling Chassis/Engine & Transmission Installed
    March 26, 2016 - Go Cart

  8. #328
    Administrator David Hodgkins's Avatar
    Join Date
    Feb 2011
    Location
    Corona del Mar, CA
    Posts
    6,072
    Post Thanks / Like
    Blog Entries
    7
    Quote Originally Posted by carlewms View Post
    David,

    This shroud is truly a work of art. I really like the finish with the included stripes.

    BTW I have had similar problems with the hardware store variety rivnuts and reverted to McMaster-Carr with excellent results. They have some with a slight hexagonal shape that won't spin in place when installing.

    Carl
    Carl, thanks for the kind words. Great to know about ordering from McMaster-Carr. I definitely had that problem during the last install. I hope I can get them all in tonight so I can move on the the trunk lid block off plate...


    FFR 5369 Pin Drive, IRS, Trigos, Torsen, Wilwoods, FMS BOSS 302 "B" cam , Mass-flo. CA SB100 (SPCN) Registered
    Delivered 4/23/06. "Finished" 4/2012 (still not done!)


  9. #329
    Senior Member
    Join Date
    Feb 2011
    Location
    Myrtle Beach, SC
    Posts
    2,108
    Post Thanks / Like
    Dave-

    The shroud looks great! I really like how you continued your stripes throughout the car; makes it really very sharp looking!

    I was curious if you would consider sharing the drawings for this piece.

    Also, and it is probably too late for this piece anyway, but I wanted to let you know that POR-15 has a clear product. I have no personal experience with it yet, but if it is like all their other stuff, it should be great. I know you are into using shark hide throughout, but I just wanted to share the info about the POR-15.

    Great build, and I appreciate you sharing so much of it with us!

    Regards,

    Steve

  10. #330
    Senior Member Carlos C's Avatar
    Join Date
    Nov 2013
    Location
    Apollo Beach, FL
    Posts
    494
    Post Thanks / Like
    David:

    I'd like to echo Carl's advice on the rivnuts. I've used the auto part store and Harbor Freight variety, with mixed results. Once I started using higher quality units from McMaster Carr and Grainger, I've had much better results. Just remember that they come in aluminum and steel. You choose the material of the rivnut, depending on the material they're going into.

    I hope I can put that much level of detail onto my build as you have put onto yours.

    Carlos
    FFR Coupe #0635; Ford 347ci, Tremec TKO500, 8.8 rear end w/ 3.27:1 gears, Cobra/SVO brakes

  11. #331
    Senior Member KDubU's Avatar
    Join Date
    May 2015
    Location
    Kennebunkport, ME
    Posts
    1,192
    Post Thanks / Like
    Beautiful work as always David. This roadster is truly a work of art.
    Kyle

    Complete Kit pickup 09/05/2015, 351w, QF680, 3.55, 3-Link, 15" Halibrands with MT's, Painted Viking blue with Wimbledon white stripes on 03/15/2017. Sold in 08/2018 and totally regret it.

  12. #332
    Administrator David Hodgkins's Avatar
    Join Date
    Feb 2011
    Location
    Corona del Mar, CA
    Posts
    6,072
    Post Thanks / Like
    Blog Entries
    7
    Quote Originally Posted by WIS89 View Post
    Dave-

    The shroud looks great! I really like how you continued your stripes throughout the car; makes it really very sharp looking!

    I was curious if you would consider sharing the drawings for this piece.

    Also, and it is probably too late for this piece anyway, but I wanted to let you know that POR-15 has a clear product. I have no personal experience with it yet, but if it is like all their other stuff, it should be great. I know you are into using shark hide throughout, but I just wanted to share the info about the POR-15.

    Great build, and I appreciate you sharing so much of it with us!

    Regards,

    Steve
    Steve I can give you the dimensions, yeah. I used paper and then 3 physical revisions to make the final piece, so I don't have any drawings per se. I've got the measurements written down at the shop, so I'll pick them up this afternoon and post them soon. Regarding Por15 clear, I was unaware of that. I'm definitely going to pick some up to test.


    Quote Originally Posted by Carlos C View Post
    David:

    I'd like to echo Carl's advice on the rivnuts. I've used the auto part store and Harbor Freight variety, with mixed results. Once I started using higher quality units from McMaster Carr and Grainger, I've had much better results. Just remember that they come in aluminum and steel. You choose the material of the rivnut, depending on the material they're going into.

    I hope I can put that much level of detail onto my build as you have put onto yours.

    Carlos
    Carlos there is a Grainger nearby so I'll check them out. I might even change out what's currently installed at some point.


    Quote Originally Posted by KDubU View Post
    Beautiful work as always David. This roadster is truly a work of art.
    Thanks Kyle, although scrolling through the other build threads tells me it's not the only one. There are some killer builds going on right now. Very humbling.


    FFR 5369 Pin Drive, IRS, Trigos, Torsen, Wilwoods, FMS BOSS 302 "B" cam , Mass-flo. CA SB100 (SPCN) Registered
    Delivered 4/23/06. "Finished" 4/2012 (still not done!)


  13. #333
    Administrator David Hodgkins's Avatar
    Join Date
    Feb 2011
    Location
    Corona del Mar, CA
    Posts
    6,072
    Post Thanks / Like
    Blog Entries
    7
    So a quick followup to the rad shroud. After drilling out and re-installing a rivnut that failed, I tightened everything down and checked the hood alignment, which was way off. Since the rad shroud was tightened, I wanted to see if I had created enough clearance for the hood hinge arm so I took a few pics:


    Boy, that's close. Too close for comfort. Here's a close-up:


    Here's a shot that ended up causing some more issues. I noticed that the hood was mounted to the extreme one side of the horizontal mounting holes:


    So I decided to loosen the mounting bolts and notch the forward hood hinge arm. I put the arm back in and aligned the hood from above. The driver's side corner right above the arm wouldn't drop to it's natural spot so I lifted the car again and took a few shots of the area:


    Well that doesn't look right. Is that nut now hitting the arm?


    Yep, the nut is RIGHT under the arm when the hood is loosely, but properly, aligned. UGH! So I took the front arm off again and extended the notch to clear the nut. Put it all back together and the hood fits perfectly. The hood mounting bolts ended up almost perfectly centered. Turns out it's pretty easy to get the hood to close to where it APPEARS to be aligned, but when viewed from below it can be seriously out of whack. I think this is the result of eyeballing the alignment and tightening the bolts with the hood open. When I released all the tension in the hinge and tightened it up from below the hood hinge definitely ended up in a different spot. Now I know where NOT to drill on any future shrouds I make!

    Once that drama was solved I got around to installing a vent tube for the rear axle, which I had neglected to do during the build. The vent hole was simply covered with painter's tape. So I went down to the Ford dealer (after searching around town and NO ONE having one) and attempted to purchase a vent tube. Turns out I had to drive to another dealer 1/2 hr. away just to get the part. It wasn't what I was expecting. It looked like a little mini-breather. So I take it home and go to install - doesn't fit! Well that kinda figures. This isn't a stock axle, it's a Moser. Well this isn't too hard of a fix; just get an adapter. So off I go again to search for an adapter. Big name parts houses don't have it but one local non-franchised one can get me on same day so I order it and wait. It comes in a short time later and I take it back to the shop to install. This is what the vent and adapter look like:


    I do a test fitting on the adapter and find that I can thread it in right up to the shoulder. That's pretty deep. Plus, it threaded in a little bit too easily. So I decided to wrap it with thread tap before installing. I put a dab of thread lock on the breather and mated it to the adapter and then threaded the whole thing into the axle. I'm not sure how far I needed to thread it in so I went in half way. It's not really tight, but it's not finger-loose either. Do you think this is engaged enough, or should I crank it down further? (Sorry for the rotated pic):


    continued...

    FFR 5369 Pin Drive, IRS, Trigos, Torsen, Wilwoods, FMS BOSS 302 "B" cam , Mass-flo. CA SB100 (SPCN) Registered
    Delivered 4/23/06. "Finished" 4/2012 (still not done!)


  14. #334
    Administrator David Hodgkins's Avatar
    Join Date
    Feb 2011
    Location
    Corona del Mar, CA
    Posts
    6,072
    Post Thanks / Like
    Blog Entries
    7
    After that round-about I was running out of time but I did manage to mount the shoulder harness. Confounded cell phone camera really just can NOT deal with yellow! Believe me, it's not day-glo!:


    What do you guys do with all the left over shoulder strap material? How do I cut it and burn the edges so it's nice and even? I just rolled it and cinched it down for now. I'm also considering getting a different set of shoulder harness clips, after noting that the Simpson ones are 2", not 3"...


    PS got the shifter ball in last night!

    FFR 5369 Pin Drive, IRS, Trigos, Torsen, Wilwoods, FMS BOSS 302 "B" cam , Mass-flo. CA SB100 (SPCN) Registered
    Delivered 4/23/06. "Finished" 4/2012 (still not done!)


  15. #335
    Senior Member CDXXVII's Avatar
    Join Date
    Feb 2011
    Location
    Santa Clarita, CA.
    Posts
    757
    Post Thanks / Like
    Dave

    With regards to the seat belt cross bar attachment. Not sure if it's "race" sanctioned but how about eliminating all that extra hardware and just attaching to the crossbar.

    sternum-strap-utv-seat-belt.jpg

  16. #336
    Administrator David Hodgkins's Avatar
    Join Date
    Feb 2011
    Location
    Corona del Mar, CA
    Posts
    6,072
    Post Thanks / Like
    Blog Entries
    7
    Quote Originally Posted by CDXXVII View Post
    Dave

    With regards to the seat belt cross bar attachment. Not sure if it's "race" sanctioned but how about eliminating all that extra hardware and just attaching to the crossbar.

    sternum-strap-utv-seat-belt.jpg
    That's a very good idea Marcel. I'll hook it up with that configuration tomorrow.


    FFR 5369 Pin Drive, IRS, Trigos, Torsen, Wilwoods, FMS BOSS 302 "B" cam , Mass-flo. CA SB100 (SPCN) Registered
    Delivered 4/23/06. "Finished" 4/2012 (still not done!)


  17. #337
    Administrator David Hodgkins's Avatar
    Join Date
    Feb 2011
    Location
    Corona del Mar, CA
    Posts
    6,072
    Post Thanks / Like
    Blog Entries
    7
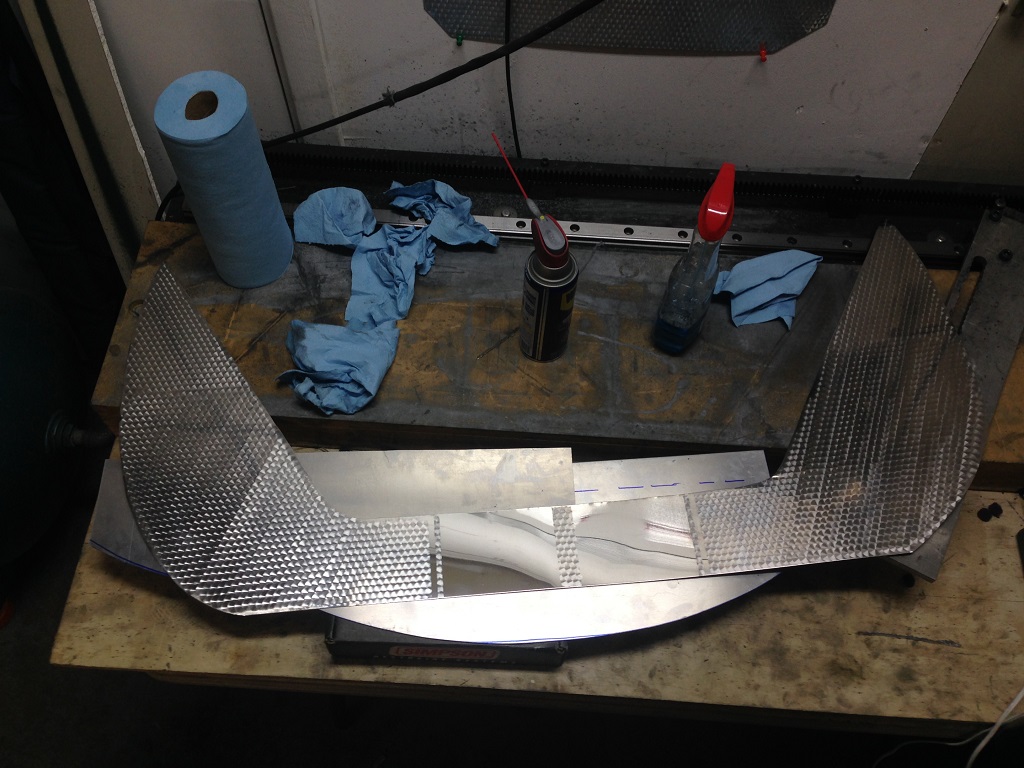
    Last night I test fit the shift knob and started work on engine turning the front nose shroud.

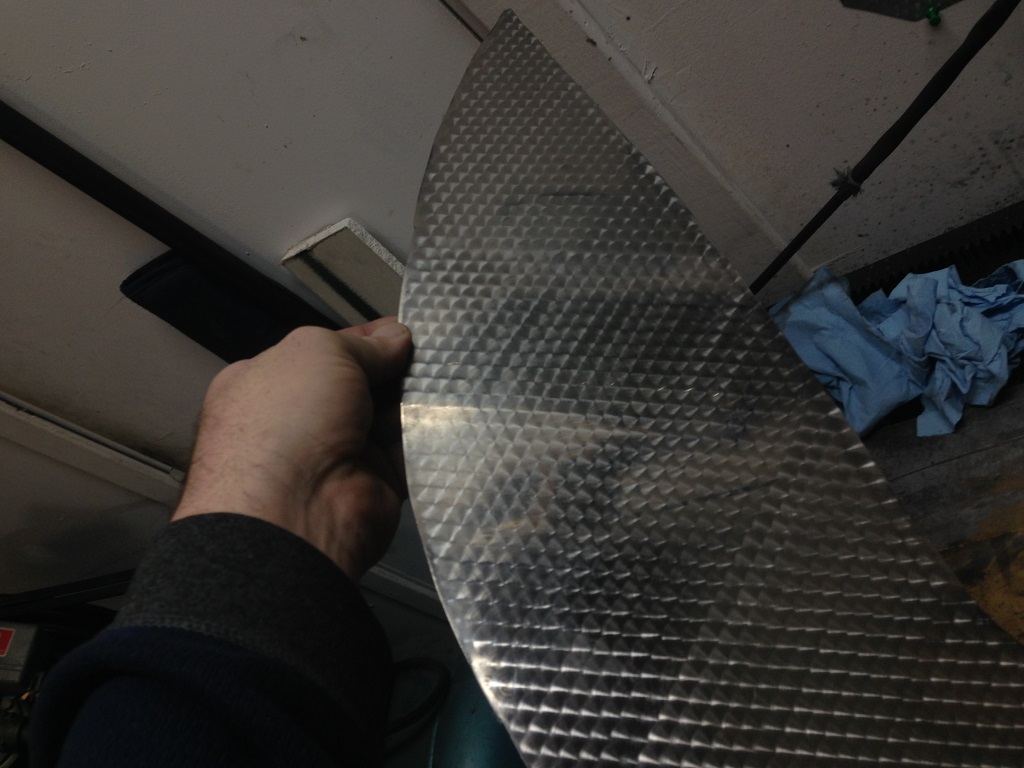
    The nose shroud is thin gauge stainless steel instead of galvanized steel or aluminum. Galvanized steel (the typical flashing material others have used) is very "springy", meaning when you bend it and it and then let go it will return to it's original shape. This is required for my application because of the way the piece is installed. The problem is that you can't polish it. Plus, it can crease pretty easily if you're not careful. Aluminum on the other hand polishes up very nicely but if you bend it, it takes that shape. That won't work here. The thin (26?) gauge stainless steel has pretty good "memory", not as good as the galvanized but enough so that when I curl it into a ball to install, when I unfurl it inside the nose it should spring into place. I haven't tried installing it yet so I'm going out on a limb a bit with the polishing and engine turning before install. But I have curled the piece up and it does spring back almost all the way, which is more than I need for the install. If you don't get what I'm saying, I'll take pics during the install and then you'll see what I'm talking about.

    Speaking of pics...


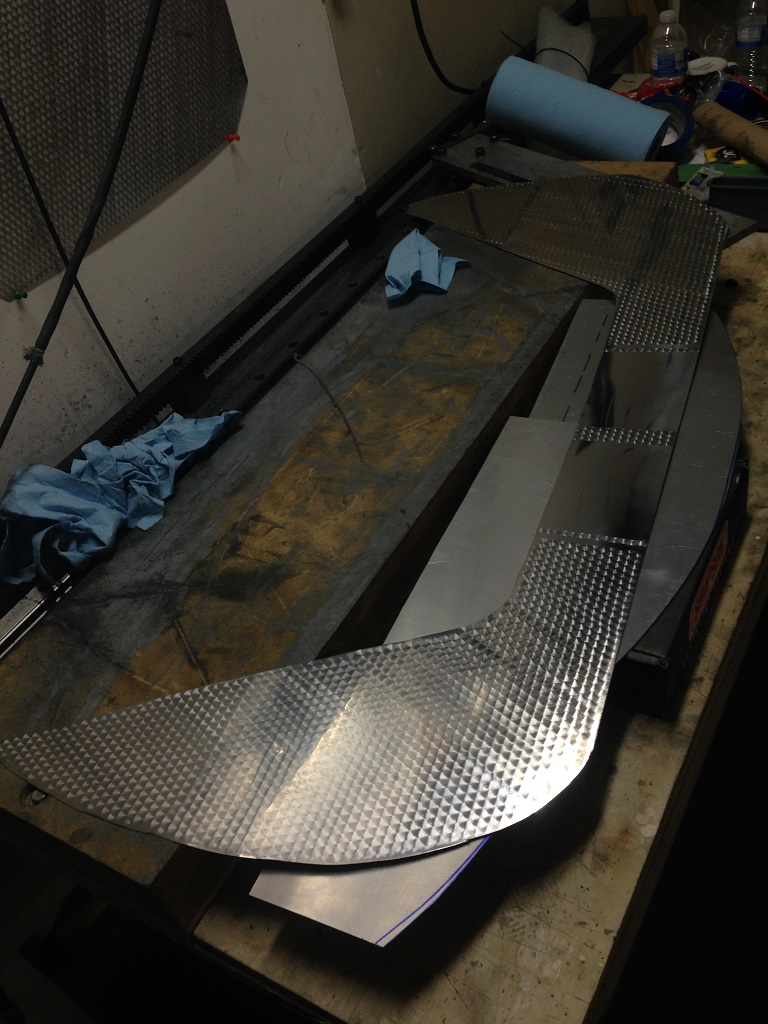
    Here's the deal with engine turning the nose piece: it's too big for my jig. I can take a week or two and spend $$$ to have a new arm made up, plus add more wood to the jig to increase the work surface size. Or, I can try to get creative. I tried a small test where I set a test piece in the jig upside down and then engine turned, starting on the lower right corner and turning in an upward sweep, and worked right to left. I then flipped the piece over and then after carefully lining up the piece, I was able to "extend" the engine turning by starting in the turning the traditional way, in the upper left corner, sweeping down, and working left to right.

    Confused yet?

    Look at the last pic above. The piece is actually upside-down in the jig. I started in the lower right corner, swept up, and moved from right to left. You can see that there are parts of the piece to the right that aren't polished yet. After I finish the racing stripe, I'm going to flip the piece around and the polished parts will now be within reach to engine turn, starting in the upper left, sweeping down, moving left to right. If I align the piece correctly, I should be able to start in the upper left, sweep down, and blend into the existing pattern, moving left to right.

    Theoretically.

    I'll find out tonight if the theory works or not!


    FFR 5369 Pin Drive, IRS, Trigos, Torsen, Wilwoods, FMS BOSS 302 "B" cam , Mass-flo. CA SB100 (SPCN) Registered
    Delivered 4/23/06. "Finished" 4/2012 (still not done!)


  18. #338
    2bking's Avatar
    Join Date
    Jul 2013
    Location
    Garland, Texas
    Posts
    799
    Post Thanks / Like
    David, you have amazing patience and it shows in your work. One needs to be challenged with the building of one of these cars to really appreciate the detail you have put into it. Is this going to be a show car or frequently driven? If its a show car, it should garner a lot of trophies.
    King
    Roadster #8127, ordered 7/12/13, received 9/11/13
    http://thefactoryfiveforum.com/showt...4-Coyote-Build

  19. #339
    Administrator David Hodgkins's Avatar
    Join Date
    Feb 2011
    Location
    Corona del Mar, CA
    Posts
    6,072
    Post Thanks / Like
    Blog Entries
    7
    Quote Originally Posted by 2bking View Post
    David, you have amazing patience and it shows in your work. One needs to be challenged with the building of one of these cars to really appreciate the detail you have put into it. Is this going to be a show car or frequently driven? If its a show car, it should garner a lot of trophies.
    Actually it started out as - and will remain - a driver. I just got a little carried away as we went on, especially after I figured out the whole engine turning thing. If it was a show car i would have kept with the original plan of a stack injected 427 stroker. My brother has been incredibly patient with me and has green-lighted every suggestion. I'll admit I kicked it up a notch to take advantage of the plate it's going to have. A Bruin building the ultimate TROJAN car. Who'da thunk it? Ultimately though, the care I'm putting in is a direct reflection of the thankfulness I feel that he survived a horrific accident 9 years ago and is still here. He has developed other medical stuff during the build that has me worried so I'm rushing to get the car done so he can enjoy it. We never know how long we have on this planet do we? The current drive plan is 95% cruising with some auto-x and track days thrown in once in a while.

    Thanks for the compliment, brother. I think your fabricating skills are better than mine though. You're flip-top Coyote build is truly amazing!


    FFR 5369 Pin Drive, IRS, Trigos, Torsen, Wilwoods, FMS BOSS 302 "B" cam , Mass-flo. CA SB100 (SPCN) Registered
    Delivered 4/23/06. "Finished" 4/2012 (still not done!)


  20. #340
    Administrator David Hodgkins's Avatar
    Join Date
    Feb 2011
    Location
    Corona del Mar, CA
    Posts
    6,072
    Post Thanks / Like
    Blog Entries
    7
    "How'd I do?" asked the little jig.

    That'll do jig, that'll do.


    FFR 5369 Pin Drive, IRS, Trigos, Torsen, Wilwoods, FMS BOSS 302 "B" cam , Mass-flo. CA SB100 (SPCN) Registered
    Delivered 4/23/06. "Finished" 4/2012 (still not done!)


  21. #341
    Administrator David Hodgkins's Avatar
    Join Date
    Feb 2011
    Location
    Corona del Mar, CA
    Posts
    6,072
    Post Thanks / Like
    Blog Entries
    7
    I'm so stoked.

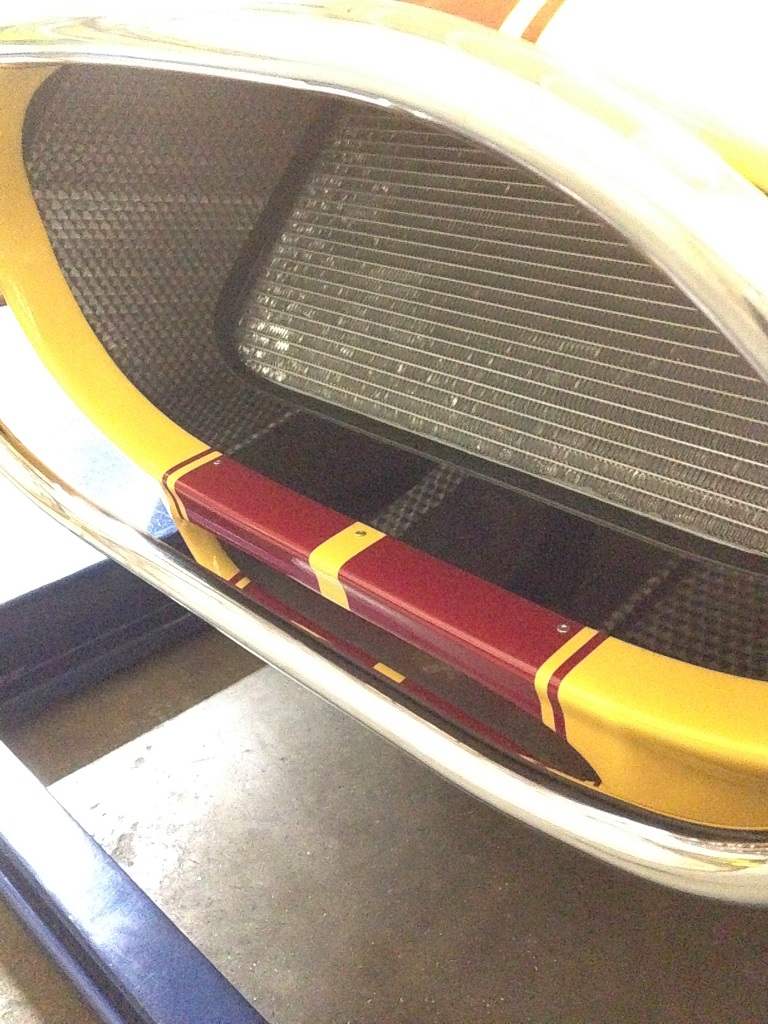
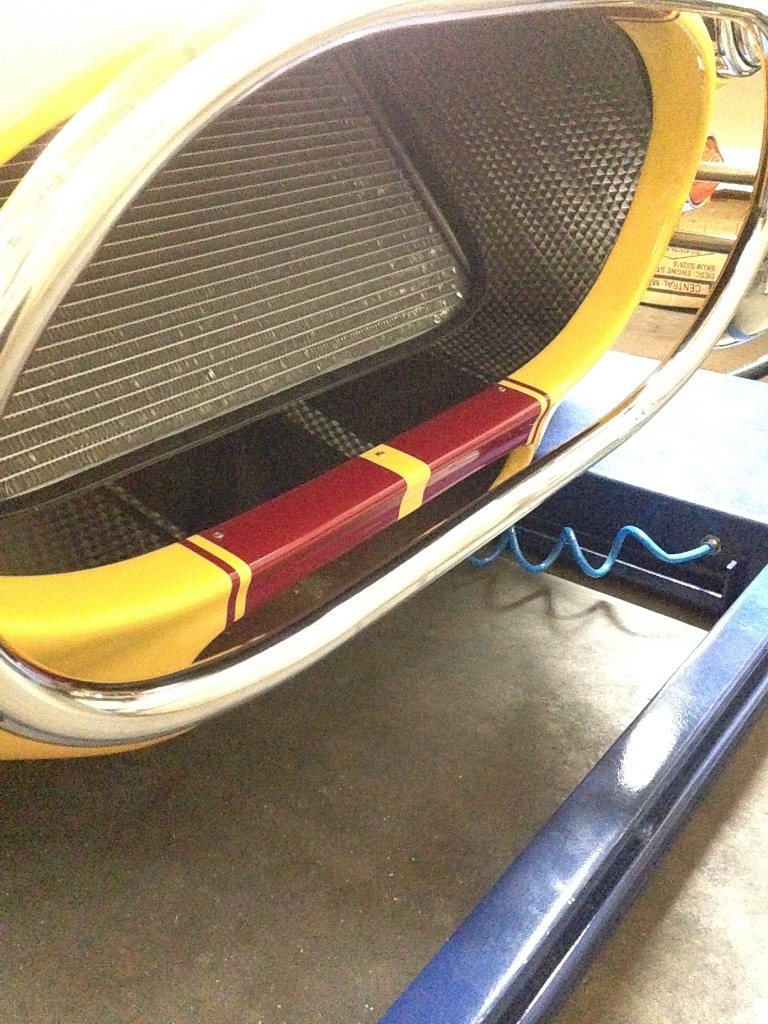
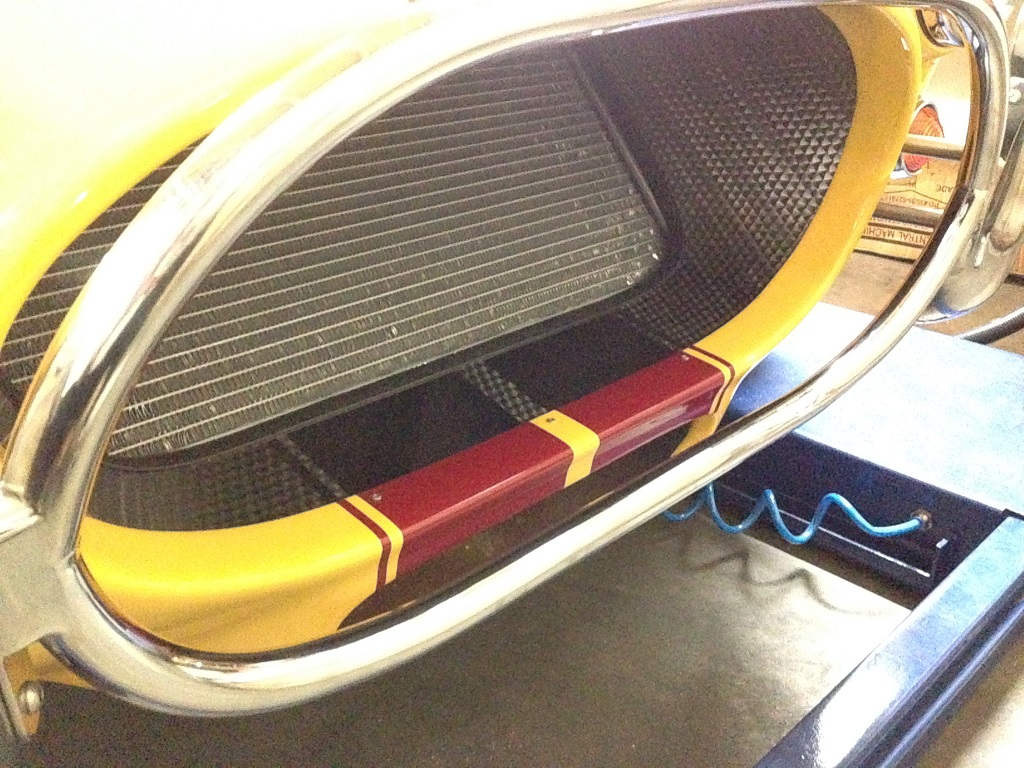
    The front shroud and trunk lid plate were installed last night and look killer. Let get right to it.

    First thing I did was give the shroud a good cleaning and then coated it with sharkhide. I set the piece on some 2x4's so it was up off the work table and after soaking a single shop towel in sharkhide I coated the piece with one slow swipe. That's the thing with sharkhide. You want to have a SOAKED shop towel and apply it in a single swipe. Then open all the doors 'cause this stuff REAKS as it flashes off. I then added the bulb seal, trimmed the corners to match the bulb seal and got it ready for install:


    First thing you do it roll it up into a ball:


    ...and then just lay it in the nose, making sure you clear the opening so it can unfurl:


    ...and then you just tuck the front down under the body and line up the stripes...


    ...and you're almost done! I decided to add three 1/8" rivets after all, to hold the nose stripe in place. The piece just unfurls and lays up against the factory aluminum.

    The money shot:


    continued...

    FFR 5369 Pin Drive, IRS, Trigos, Torsen, Wilwoods, FMS BOSS 302 "B" cam , Mass-flo. CA SB100 (SPCN) Registered
    Delivered 4/23/06. "Finished" 4/2012 (still not done!)


  22. #342
    Administrator David Hodgkins's Avatar
    Join Date
    Feb 2011
    Location
    Corona del Mar, CA
    Posts
    6,072
    Post Thanks / Like
    Blog Entries
    7
    ...continued...

    After the shroud was installed I turned my attention to the trunk lid block off plate. For this piece I first drilled 6 holes in it and then just bent it by hand, using several test fittings until the piece had a shape close to the opening shape:


    I then drilled out a single hole and clecko'd the piece in place:


    I could tell that the piece was a little "fat" on one side so I trimmed it up a little with the bandsaw until I could line up the piece. I then lined it up and drilled out the second hole. Used a clecko to hold it in place...:


    And drilled out the rest of the holes.

    Now that the mock up was done I cleaned up the piece and got the 'ol sharkhide back out...


    Another soaking and a single swipe later I had my finished piece:


    And here it is installed:


    FFR 5369 Pin Drive, IRS, Trigos, Torsen, Wilwoods, FMS BOSS 302 "B" cam , Mass-flo. CA SB100 (SPCN) Registered
    Delivered 4/23/06. "Finished" 4/2012 (still not done!)


  23. #343
    Senior Member Carlos C's Avatar
    Join Date
    Nov 2013
    Location
    Apollo Beach, FL
    Posts
    494
    Post Thanks / Like
    Absolutely beautiful!

    Carlos
    FFR Coupe #0635; Ford 347ci, Tremec TKO500, 8.8 rear end w/ 3.27:1 gears, Cobra/SVO brakes

  24. #344
    Administrator David Hodgkins's Avatar
    Join Date
    Feb 2011
    Location
    Corona del Mar, CA
    Posts
    6,072
    Post Thanks / Like
    Blog Entries
    7
    Quote Originally Posted by Carlos C View Post
    Absolutely beautiful!

    Carlos
    I'm pretty happy with it, to say the least. I had a picture in my head and I knew I had to try it. The stainless worked out great. much stiffer than the galvanized, but still nice and "springy".

    Her's a few more. I got to get it out in the sun!!


    FFR 5369 Pin Drive, IRS, Trigos, Torsen, Wilwoods, FMS BOSS 302 "B" cam , Mass-flo. CA SB100 (SPCN) Registered
    Delivered 4/23/06. "Finished" 4/2012 (still not done!)


  25. #345
    Senior Member 68GT500MAN's Avatar
    Join Date
    Feb 2011
    Location
    Fresno, CA
    Posts
    1,808
    Post Thanks / Like
    I believe that many more HB awards will be in your brothers hands in the future! The roadster looks amazing, job well done my friend.
    Doug
    Built FFR5196 MKII in 2003, 427w
    Building FFR0058HR, Edlebrock 347-AOD

  26. #346
    Administrator David Hodgkins's Avatar
    Join Date
    Feb 2011
    Location
    Corona del Mar, CA
    Posts
    6,072
    Post Thanks / Like
    Blog Entries
    7
    Thanks Doug, BTW are you still looking for some engine turned pieces? send me a PM and let's get started!


    FFR 5369 Pin Drive, IRS, Trigos, Torsen, Wilwoods, FMS BOSS 302 "B" cam , Mass-flo. CA SB100 (SPCN) Registered
    Delivered 4/23/06. "Finished" 4/2012 (still not done!)


  27. #347
    PLATNUM Supporting Member
    wallace18's Avatar
    Join Date
    Apr 2012
    Location
    Trenton, Florida
    Posts
    5,382
    Post Thanks / Like
    Car looks amazing!

  28. #348
    Senior Member
    Join Date
    Feb 2011
    Location
    Myrtle Beach, SC
    Posts
    2,108
    Post Thanks / Like
    Hey Dave-

    Have you considered doing the same to a mesh screen in front of the oil cooler opening? I think you could pull it off, and I think it could look pretty sharp.

    Just a thought...

    Regards,

    Steve

  29. #349
    Administrator David Hodgkins's Avatar
    Join Date
    Feb 2011
    Location
    Corona del Mar, CA
    Posts
    6,072
    Post Thanks / Like
    Blog Entries
    7
    Quote Originally Posted by WIS89 View Post
    Hey Dave-

    Have you considered doing the same to a mesh screen in front of the oil cooler opening? I think you could pull it off, and I think it could look pretty sharp.

    Just a thought...

    Regards,

    Steve
    I've been trying to picture what you mean, but I'm not sure I could pull it off. I will be looking for some mest for the openings though so I'll keep that idea in mind.


    FFR 5369 Pin Drive, IRS, Trigos, Torsen, Wilwoods, FMS BOSS 302 "B" cam , Mass-flo. CA SB100 (SPCN) Registered
    Delivered 4/23/06. "Finished" 4/2012 (still not done!)


  30. #350
    Administrator David Hodgkins's Avatar
    Join Date
    Feb 2011
    Location
    Corona del Mar, CA
    Posts
    6,072
    Post Thanks / Like
    Blog Entries
    7
    I finally got a chance to take some pics in the sun today. I'm pretty much ready to graduate. Think I should wait for plates?


    FFR 5369 Pin Drive, IRS, Trigos, Torsen, Wilwoods, FMS BOSS 302 "B" cam , Mass-flo. CA SB100 (SPCN) Registered
    Delivered 4/23/06. "Finished" 4/2012 (still not done!)


  31. #351
    Administrator David Hodgkins's Avatar
    Join Date
    Feb 2011
    Location
    Corona del Mar, CA
    Posts
    6,072
    Post Thanks / Like
    Blog Entries
    7


    FFR 5369 Pin Drive, IRS, Trigos, Torsen, Wilwoods, FMS BOSS 302 "B" cam , Mass-flo. CA SB100 (SPCN) Registered
    Delivered 4/23/06. "Finished" 4/2012 (still not done!)


  32. #352
    Senior Member
    Join Date
    Feb 2011
    Location
    Myrtle Beach, SC
    Posts
    2,108
    Post Thanks / Like
    Dave-

    She looks outstanding!! Really nice job. I really like the whole USC theme too.

    Your brother has to be pretty much over the moon about this, right?

    Congratulations on wrapping things up, and appreciate you sharing the build. So, what's next? (Too soon?)

    Regards,

    Steve

  33. #353
    Administrator David Hodgkins's Avatar
    Join Date
    Feb 2011
    Location
    Corona del Mar, CA
    Posts
    6,072
    Post Thanks / Like
    Blog Entries
    7
    Quote Originally Posted by WIS89 View Post
    Dave-

    She looks outstanding!! Really nice job. I really like the whole USC theme too.

    Your brother has to be pretty much over the moon about this, right?

    Congratulations on wrapping things up, and appreciate you sharing the build. So, what's next? (Too soon?)

    Regards,

    Steve
    There are a couple of ideas floating around for 2016. One is that there may be an unbuilt kit available fairly soon. Don't want to really talk about that unless it presents itself. If that happens I'd sell my MKIII to cover building costs of this kit.

    Another idea is to build-to-suit a car, at which point I would become a vendor.

    A 3rd idea is to produce some of the pieces I created for this build; ie upper fan shroud, nose shroud, firewall, dash and cubby wall kits, again as a vendor. I'm also going to produce some 818 door inserts, as well as anything else someone want for their GTM, coupe or hot rod builds.

    There is nothing left to do on this build except registration and some lay-in carpet for the cubby and trunk. I might try doing a cover for the trunk box, maybe not.

    And finally, I'd like to go back my 1st build and complete it. It's still missing splash guards, footbox fan hoses, radiator shroud, etc.


    FFR 5369 Pin Drive, IRS, Trigos, Torsen, Wilwoods, FMS BOSS 302 "B" cam , Mass-flo. CA SB100 (SPCN) Registered
    Delivered 4/23/06. "Finished" 4/2012 (still not done!)


  34. #354
    2bking's Avatar
    Join Date
    Jul 2013
    Location
    Garland, Texas
    Posts
    799
    Post Thanks / Like
    Very nice work David, congratulations. You put a lot of detail and bling in it and your brother should be very proud to own it.
    King
    Roadster #8127, ordered 7/12/13, received 9/11/13
    http://thefactoryfiveforum.com/showt...4-Coyote-Build

  35. #355
    Carl carlewms's Avatar
    Join Date
    May 2012
    Location
    Nokesville, VA
    Posts
    1,125
    Post Thanks / Like
    David,

    You set a very high bar for quality, style and detail.

    Would you consider a detailed tutorial on polishing and the other engine finish?

    Carl
    Mk 4 Roadster
    October 25, 2012 - Kit Arrives
    April 8, 2013 - Build Starts
    August 23, 2015 - Rolling Chassis/Engine & Transmission Installed
    March 26, 2016 - Go Cart

  36. #356
    Administrator David Hodgkins's Avatar
    Join Date
    Feb 2011
    Location
    Corona del Mar, CA
    Posts
    6,072
    Post Thanks / Like
    Blog Entries
    7
    Quote Originally Posted by carlewms View Post
    David,

    You set a very high bar for quality, style and detail.

    Would you consider a detailed tutorial on polishing and the other engine finish?

    Carl
    Absolutely. I'll dig up an old thread detailing the polishing. EDIT here's a link to a thread I just created on how to polish panels:
    How I polish aluminum panels (just one technique of many)

    For the engine turning I posted a thread earlier this year showing the process. Here is the thread:
    I engine turned my firewall and here's how I did it


    FFR 5369 Pin Drive, IRS, Trigos, Torsen, Wilwoods, FMS BOSS 302 "B" cam , Mass-flo. CA SB100 (SPCN) Registered
    Delivered 4/23/06. "Finished" 4/2012 (still not done!)


  37. #357
    Senior Member Carlos C's Avatar
    Join Date
    Nov 2013
    Location
    Apollo Beach, FL
    Posts
    494
    Post Thanks / Like
    Hey, David:

    Maybe it's my iPad, but your engine turning link doesn't seem to be working. What post number was it?

    Unrelated request: Could you please move my build thread to the Coupe Build section?

    Thank you, sir. And still amazed by the level of detail you applied to your build. Thank you for sharing it with us, and hope to see another one from you soon.

    Carlos
    FFR Coupe #0635; Ford 347ci, Tremec TKO500, 8.8 rear end w/ 3.27:1 gears, Cobra/SVO brakes

  38. #358
    Administrator David Hodgkins's Avatar
    Join Date
    Feb 2011
    Location
    Corona del Mar, CA
    Posts
    6,072
    Post Thanks / Like
    Blog Entries
    7
    Quote Originally Posted by Carlos C View Post
    Hey, David:

    Maybe it's my iPad, but your engine turning link doesn't seem to be working. What post number was it?

    Unrelated request: Could you please move my build thread to the Coupe Build section?

    Thank you, sir. And still amazed by the level of detail you applied to your build. Thank you for sharing it with us, and hope to see another one from you soon.

    Carlos
    Carlos, thanks for the heads-up. The link is fixed. Also, your thread has been moved.

    I'm hoping to do another soon!


    FFR 5369 Pin Drive, IRS, Trigos, Torsen, Wilwoods, FMS BOSS 302 "B" cam , Mass-flo. CA SB100 (SPCN) Registered
    Delivered 4/23/06. "Finished" 4/2012 (still not done!)


  39. #359
    Not a waxer Jeff Kleiner's Avatar
    Join Date
    Feb 2011
    Location
    Bloomington, Indiana
    Posts
    8,094
    Post Thanks / Like
    Simply outstanding!

    Jeff

  40. #360
    Senior Member KDubU's Avatar
    Join Date
    May 2015
    Location
    Kennebunkport, ME
    Posts
    1,192
    Post Thanks / Like
    Just wow! Very nicely done David. You should be proud of an awesome build and the car looks fantastic.
    Kyle

    Complete Kit pickup 09/05/2015, 351w, QF680, 3.55, 3-Link, 15" Halibrands with MT's, Painted Viking blue with Wimbledon white stripes on 03/15/2017. Sold in 08/2018 and totally regret it.

Page 9 of 11 FirstFirst ... 7891011 LastLast

Posting Permissions

  • You may not post new threads
  • You may not post replies
  • You may not post attachments
  • You may not edit your posts
  •  

Brown County Customs

Visit our community sponsor