-
Swaybar Installation, Part 1
I am working on the Front and rear swaybars. I have thoroughly reviewed all of the photos that Edwardb was so kind to put on his thread. I think I can see what needs to be done. So I lay out all the various fittings that were packaged with the bars. I tried to lay them out in a front and rear sort of way so I could see how each set might go together.
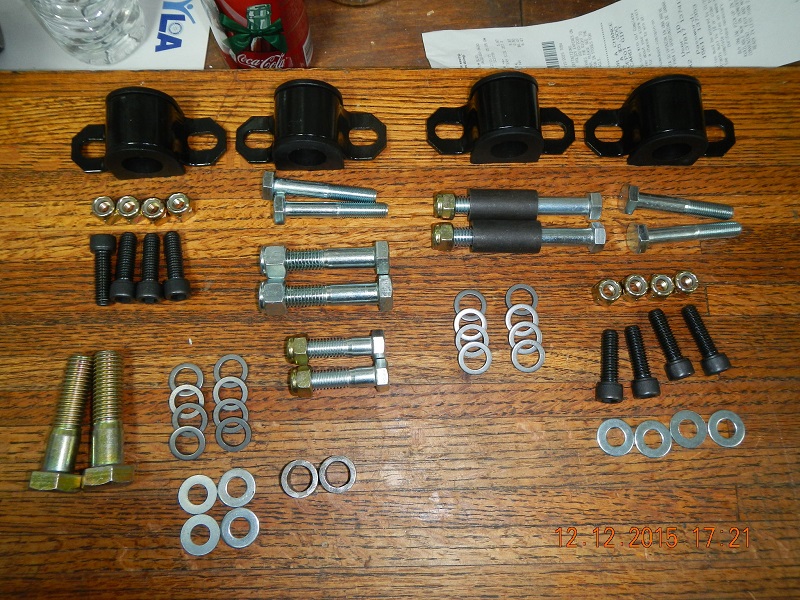
The problem is these four parts:
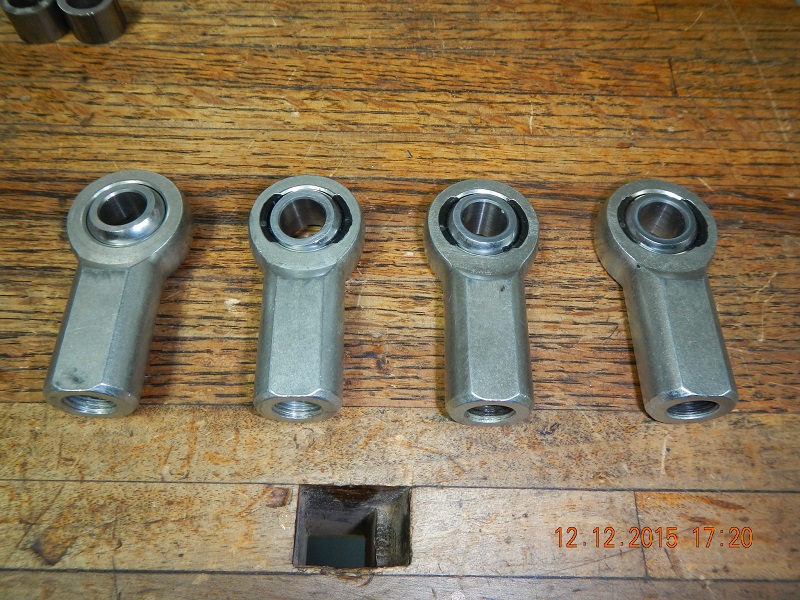
Based upon Edwardb's photos, it looks like I have four of the "female" side of these ends and no "male" ends that are supposed to attach to them. So, Edwardb, am I missing two parts?
Last edited by Jazzman; 01-01-2016 at 08:08 PM.
-
Senior Member


Originally Posted by
Jazzman

Based upon Edwardb's photos, it looks like I have four of the "female" side of these ends and no "male" ends that are supposed to attach to them. So, Edwardb, am I missing two parts?
You should have two male and two female rod ends for each sway bar. They get cut down and then put together. I just emailed the instructions to you.
Build 1: Mk3 Roadster #5125. Sold 11/08/2014.
Build 2: Mk4 Roadster #7750. Sold 04/10/2017.
Build Thread
Build 3: Mk4 Roadster 20th Anniversary #8674. Sold 09/07/2020.
Build Thread and
Video.
Build 4: Gen 3 Type 65 Coupe #59. Gen 3 Coyote. Legal 03/04/2020.
Build Thread and
Video
Build 5: 35 Hot Rod Truck #138. LS3 and 4L65E auto. Rcvd 01/05/2021. Legal 04/20/2023.
Build Thread. Sold 11/9/2023.
-


ThermoTec Heat/Sound protection.
I learned from DaleG and others that heat control in the cockpit is a very real issue, especially here in Arizona. Someone suggested that I make templates of each piece prior to installation so that I could easily cut sheets of heat control material to install at a later date. I started by connecting the panels which might be adjacent to each other, then made a cardboard template of each piece.


After doing a few of these for the passenger side panels, I realized that there were some panels that would be very difficult if not impossible to access after they were installed. Therefore, I decided to install the insulation before I install the panels. This is really important on the drivers side.
I bought two sheets of ThermoTec Suppressor Sheets, 36"x60". It will not be enough for the entire car, but it's a good start. I considered Dynamat (expensive and primarily focused on sound control, not heat) and on LizzardSkin (decided that it was too messy to apply. I wanted something I could cut and place.) Amazon, cheapest source and delivered in 36 hours. Nice.
http://www.amazon.com/gp/product/B00...ilpage_o00_s00
I emailed ThermoTec to be sure the Suppressor Sheets could be installed inside the footbox. Their response is that the sheets will stand up to the heat inside the engine compartment and provide a bit more effective heat protection if the foil side is facing the engine, covering the sheet metal. However, they understand that it does not look as nice and clean as many would like, so it is designed to also work with the foil side inside, away from the engine. The aluminum panels will get hotter this way, but the heat will still not be transmitted into the footbox as it would if there were no protection at all. I want a clean look, so mine is going inside under the carpet.
It is a bit stiff when cold, so I laid out the sheet in front of the fireplace to heat is up a bit. It worked. It relaxed in about 15 minutes. I then laid out as many pieces as I could on the first sheet.

The sheets have some weight to them, but they cut easily with scissors. After cutting them to the correct size, I then very carefully laid them on the sheet. The directions warn you that the adhesive is very strong. IT IS!! It is almost impossible to remove after just touching the aluminum, and after pressing it on, forget about it. It is there to stay. I then trimmed up all the edges with a razor knife. The scissors and razor knife will need some clean up with lacquer thinner or mineral spirits (not sure which yet, still working!) It is a slow process but the result is very nice.
to test the effectiveness of the heat protection, I laid a panel against the fireplace. (Yes, that is a gas fireplace with Glass on the front. I know those of you in colder climates are laughing at it, and yes, it is an embarrassment. It does put out some nice heat though. What can I say, it came with the house.) I got the glass up to 207 degrees, the aluminum side of the panel to 145 degrees, and the foil side of the heat barrier sheeting was at 79 degrees. (The tile and room are 69 degrees.) I would say that is a significant heat protection for just a bit over 1/16" thickness.

Last edited by Jazzman; 01-01-2016 at 08:14 PM.
-
Post Thanks / Like - 0 Thanks, 1 Likes


 Thanks:
  Likes:


 Reply With Quote
