This weekend we prepped for the GP Headers custom jig by setting on the body and test fitting a few things.
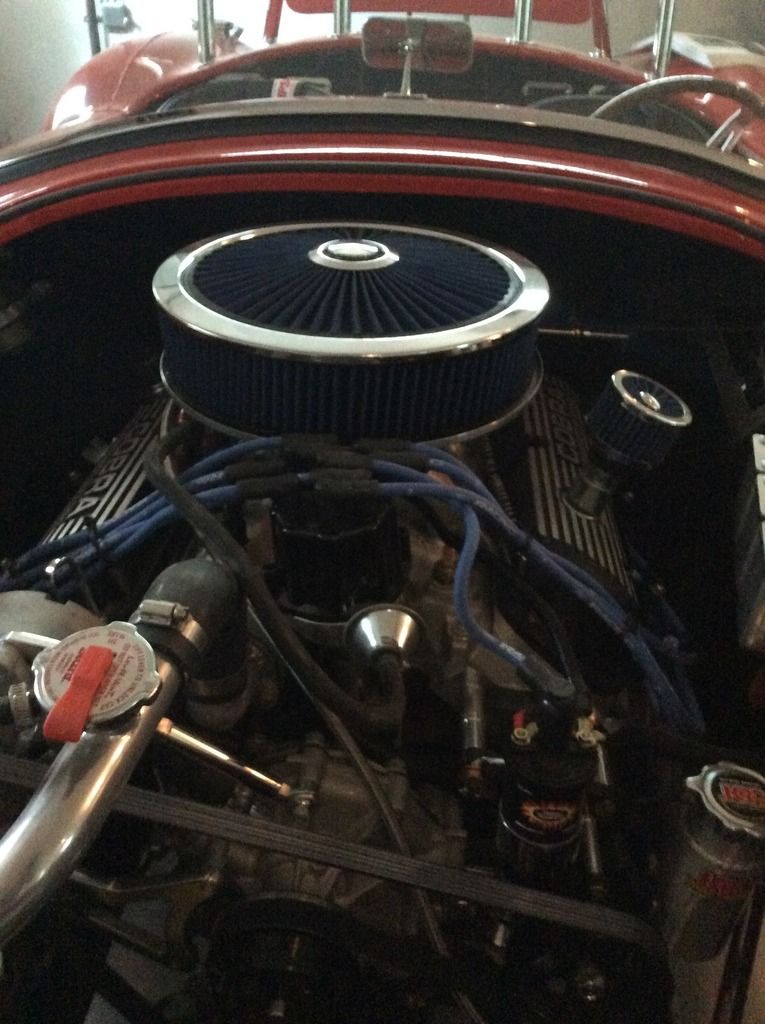
I first figured out that the Forte 427 engine does not fit with his air cleaner setup. I have about a 1/2" interference:
Has anyone encountered this? Any suggestions on how to solve?
Also, the jigs came in today from GP Headers but they did not have any header bolts with them so they are on order now along with a set of Remflex gaskets. I should have them in by the weekend so I can get them fitted and returned over the long weekend.
Any advice or pics on the best way to line up the side pipes would be welcomed!
I also ordered a set of the new DS footbox panels from Factory Five. I really want/need the extra header space and foot room that is provided by the new panel design so I'm hoping its a direct fit. I have not riveted in those panels yet so I'm hoping its just a matter of powder coating and installing them. I'll post pics of what comes in with the order after it arrives.
Last edited by RRussellTx; 07-30-2017 at 03:59 PM.
It's pretty normal to trim back the lip around the hood opening. I try for about 3/8-inch. That would help some, but not solve a 1/2-inch interference. Not unusual to have intake height limitations with the 351-sized engine you're using. Probably will require a different air cleaner or perhaps a dropped base. Those Cobra intakes are considered pretty restrictive anyway, BTW. This picture of my #7750 Mk4 shows how the hood opening is trimmed (if you open it and zoom in) and also a different configuration air cleaner. Although this is a 302-sized Dart block, so height isn't as critical.
It's cool you're going to have those headers custom made so your pipes fit exactly. Ideally, you should have the body on and the doors aligned. Sometimes the sills need to be moved around to get the best door alignment. Especially on the driver's side. Then hang the pipes parallel to the body using the fixtures.
Build 1: Mk3 Roadster #5125. Sold 11/08/2014. Build 2: Mk4 Roadster #7750. Sold 04/10/2017. Build Thread Build 3: Mk4 Roadster 20th Anniversary #8674. Sold 09/07/2020. Build Thread and Video. Build 4: Gen 3 Type 65 Coupe #59. Gen 3 Coyote. Legal 03/04/2020. Build Thread and Video Build 5: 35 Hot Rod Truck #138. LS3 and 4L65E auto. Rcvd 01/05/2021. Legal 04/20/2023. Build Thread. Sold 11/9/2023.
I had the exact same issue with my 351 from Forte. After several iterations I went with a nice round 14"x3" from Spectre with a drop base.
Kyle
Complete Kit pickup 09/05/2015, 351w, QF680, 3.55, 3-Link, 15" Halibrands with MT's, Painted Viking blue with Wimbledon white stripes on 03/15/2017. Sold in 08/2018 and totally regret it.
It's cool you're going to have those headers custom made so your pipes fit exactly. Ideally, you should have the body on and the doors aligned. Sometimes the sills need to be moved around to get the best door alignment. Especially on the driver's side. Then hang the pipes parallel to the body using the fixtures.
Thanks for the input on the air cleaner edwardb!
Also, I'm on the same page for the body fitment. Dad came into town this weekend for that exact reason and we got the body on and lined up with everything. That's when we found the dash fitment issue and the air cleaner issue. I also plan on checking out the #7750 thread to see if I can find a good shot of the side pipes coming out of the body as a point of reference. It's always a good starting point.
I had the exact same issue with my 351 from Forte. After several iterations I went with a nice round 14"x3" from Spectre with a drop base.
Thanks Kyle,
I just read your post on the other forum. It looks like you had the exact same gift from our buddy Mike. Did you ever talk to him about it?
I also don't want to lower the engine at all because the oil pan is already exactly flush with the bottom of the chassis.
I already had an issue with the Air Cleaner from him because the Holley EFI throttle linkage has an interference with the air cleaner as delivered from him. You can force it past the air cleaner but then it sticks on the way closed. Not safe at all. Anyway, I'll just keep researching alternative air cleaners. Thanks for posting yours!
No I did not discuss it with him as when I communicated my concerns about the oil pan clearance, he said to just avoid speed bumps. Not the best answer I was looking for. I also did not want to lower the engine and I went through three air cleaner assemblies before this latest one which I am most happiest about. There is a Summit oval one you could use that has an open top but you would have to go with the smaller of the two which I believe is 11" in length vs the longer one at 15". I also considered a turkey pan with a 9" that someone else did on their 351 and it looks really nice.
Kyle
Complete Kit pickup 09/05/2015, 351w, QF680, 3.55, 3-Link, 15" Halibrands with MT's, Painted Viking blue with Wimbledon white stripes on 03/15/2017. Sold in 08/2018 and totally regret it.
I've let myself get behind on my build posts but I just updated another thread with the information about my headers so I thought I would go ahead and post it here too and get the thread updates started. As stated earlier, I went the custom Header mockup route with GP Headers - they do very nice quality work and are easy to work with. They nudged me in the custom mockup direction for the 351w based on the different heads that could be used on that engine and the slight variations they see. They sent me the jigs in the photo posted previously and had me mount them and tighten them up with the Sidepipes lined up where I wanted them. This is not an easy one man job...
I first had to set the body on and get it positioned as close to the final position as I could. This included aligning the doors as it impacts the location of the body under the doors and therefore the alignment of the pipes. Once the body was where I wanted it, I mounted the jigs and tightened up the bolts to lock in the location for the sidepipes. The bolts and lock washers that they had on the jig had been used a few times and were not exactly smooth in operation. In retrospect, I probably should have replaced them as there was either some movement during shipping or the GP guys did not match the drivers side correctly.
I actually left the body mounted in the exact same position from the time that I mocked up the jigs until the finished headers were delivered and mounted so I could be sure of the accuracy of the header fabrication (took about 8 weeks out of my build activities but I had other things going on too). The location that the headers exit the body was perfect on both sides but the direction that the side pipes follow down the side of the body was about 1/2" off on the passenger side and a little over 2" off on the drivers side. They offered to have me cut the header down the weld where the O2 sensor bung is and then tack it into place and send it back to them to correct it. I was prepared to do that but I decided to try a couple of the wedges first and they lined up perfectly so I'm just going to stick with them. I have the headers installed now with Remflex Gaskets and Stage 8 locking bolts.
Here is a shot of the Headers upon delivery:
And here is a shot of the drivers side installed on the car with the misalignment. Note that the sidepipe touches the car and still has a gap at the header.
As noted in my previous post, I had ordered the new Factory Five Drivers Side Footbox Panels to get a little more space for my feet and my headers. After installing the headers I decided that there was plenty of room with the old inside panel and since the new inside panel was not compatible with the Russ Thompson throttle pedal, I decided not to use it. (free to a good home if anyone wants it). I also wound up just robbing the expansion metal from the outside footbox panel and reusing my original panel with the 20th anniversary powder coating. Turned out to be a pretty expensive way to get another 1.5" for my foot but I'm glad I have it.
Here is the outside footbox panel with the expansion metal (and lizard skin applied):
I'll try to get more updates soon as I'm pretty far behind.
Last edited by RRussellTx; 07-30-2017 at 04:05 PM.
As updated previously, I was able to purchase an Oil Temp Gauge that matched the 20th Anniversary Gauges as seen below:
I was pretty happy with myself until I realized that the Water Temp was in Celsius and the new Oil Temp was in Fahrenheit - Doh!
I was debating what to do about it when (first start spoiler alert) I found out that the Tachometer had a loose wire and was not working properly. I called Speedhut and they said to send in the tach and the water temp gauge and that they would fix the Tach and give me a new fahrenheit faceplate on the Water Temp gauge for $25.
Here is the new Water Temp Guage:
Everything is installed now and working correctly - Mischief Managed...
Last edited by RRussellTx; 07-30-2017 at 04:10 PM.
I am not sure why GP Headers told you to go the custom route. I also ordered a set for the exact engine from Mike and they made them up and shipped them in about 3 weeks with ceramic coat on them. They line up very well. Between the two sides, the passenger side sits a little high, 1/2 inch. I think Jeff Kleiner said to oval the holes a little for this type of adjustment. Building one of these cars takes a lot of time to sort thing out. Glad to see your making progress. Jim
20th Anniversary MK4 Roadster, #8752, 18 of 20, Delivered 12/03/15, 1st Start 01/28/2017, off to paint 4/13/2017, Forte 351w/ Holley EFI, Forte throttle linkage, TKO 600/Forte Hyd. Clutch, UniSteer Electra Steering, RT's turn Signals, many Breeze parts, Paint by the Jeff Miller. Finished on 10/08/2017. 500 mile inspection on 10/21/2017, 3000 mile inspection on 1/14/19.
Love the thread. Great work and great photography! Can't tell you how much the clear, well lit photos help the rest of us.
-Steve
Thanks Steve! Sometimes I feel like most of the things I have done lately have been done 1,000's of times so my updates are not really that helpful (and I'm always 'too busy' to make time to update the build page). I do try to update items that are unique or helpful though. I do appreciate the encouragement and I'll keep the updates coming!
Originally Posted by RR20AC
I am not sure why GP Headers told you to go the custom route.
Jim, GP was cool either way. They just gave me a gentle nudge (I did not need much) toward the custom route. My engine mounts were sitting pretty high in the saddle and the 1" spacer under the TKO transmission made me a little nervous about the exact fitment. I'm sure that minor adjustments to the standard GP Headers would have been just fine but I liked the idea of starting out closer to where I wanted it and then go from there.
I don't think it would be nearly as much fun if there was no 'sorting out' required!
Hey Russell, have you decided yet what you're doing for a back-up light? I need it for NYS inspection as well. I bought an LED license plate frame as one option, will run one wire there and use the fuel pump wire as another option do something temporary in rear?
Hey Russell, have you decided yet what you're doing for a back-up light? I need it for NYS inspection as well. I bought an LED license plate frame as one option, will run one wire there and use the fuel pump wire as another option do something temporary in rear?
No, not yet. I'm leaning towards 2bKings setup but he was having some issues with them (link below). I'll probably go that route unless he has not resolved them or I find another solution when I start that part of my project. http://thefactoryfiveforum.com/showt...kup#post223046
I did run the wire back through the TKO switch so I have it wired but I don't know what I'm going to do with it yet...
Last edited by RRussellTx; 07-30-2017 at 04:20 PM.
No, not yet. I'm leaning towards 2bKings setup but he was having some issues with them (link below). I'll probably go that route unless he has not resolved them or I find another solution when I start that part of my project. http://thefactoryfiveforum.com/showt...kup#post223046
I have not had anymore issues and have put many miles on the car since replacing all the original LEDs. I think the burn out may have been caused by the battery charger when the battery was removed. Other than that, I don't have a clue unless the first ones were not actually rated for 14V as stated. The replacements came from the same source.
Hey Russell, app one more question. My engine is similar to yours, 351 W, 427. Don't have it yet. I as well ordered the new panels from FFR and had them painted to give me the extra room for the headers. Sounds like this is only needed for a coyote setup and you were able to access the header bolts no problem using the original panels? I also have the Russ Thompson gas pedal, don't really want to sacrifice any pedal room as seems pretty tight already. Many Thanks
Hey Russell, app one more question. My engine is similar to yours, 351 W, 427. Don't have it yet. I as well ordered the new panels from FFR and had them painted to give me the extra room for the headers. Sounds like this is only needed for a coyote setup and you were able to access the header bolts no problem using the original panels? I also have the Russ Thompson gas pedal, don't really want to sacrifice any pedal room as seems pretty tight already. Many Thanks
Yep, I was able to get the header bolts in without too much trouble at all. Here is a shot of the clearance on the DS. The header is about .5" away from the panel but there is about 2.75" for the back bolt.
Not exactly roomy, but it was not too bad getting them threaded, tightened and the Stage 8 locking washers installed (the locking washers did require a bit of grinding but thats another topic that has been discussed lately).
Only a moderate level of patience is required.
Last edited by RRussellTx; 07-30-2017 at 04:21 PM.
I finally have my new Power Steering Pump and Pulley Kit fully sorted out!
I went with the CVF Racing 'Beast' pulley kit and the Saginaw Power Steering pump. It took some sorting out to get the spacers correct and the right belts/brackets but it worked out in the end.
If you use their products then I recommend calling first. They are somewhat familiar with the FFR setup but it's not on the website.
It also took some trial and error to get the right list of parts to connect the Power Steering pump to the Rack so here is my BOM in case it is helpful:
Saginaw P Series Power Steering Pump, 5/8" Keyway Shaft - Outlet : 5/8-18 in. SAE Inverted Flare
- Inlet: 5/16" Hose Barb
- Saginaw P Series Pressure Reducing Valve - 800 PSI High Pressure Side hose
- Aeroquip FCM1122 Steel -06AN 90-Degree Hose Fitting
- Aeroquip FCM1103 Steel -06AN Swivel Hose Fitting
- Aeroquip FCC0620 -06AN Teflon Racing Hose
- Breeze 21611 Fitting, 9/16-18 O-ring to 06AN (at rack)
- Breeze 21514 Fitting, 5/8-18 O-ring to 06AN (at pump) Low Pressure Side hose
- Aeroquip FCC0806 6' Size (8) Teflon Hose
- Aeroquip FCM1104 Steel -08AN Swivel Hose Fitting
- Fragola Performance Systems AN to Inverted Flare Fittings 491949BL (at rack)
- Russell 622270 Chrome -8AN Tube Seal Fuel Hose End (at pump)
Last edited by RRussellTx; 02-16-2017 at 10:13 PM.
I'm actually happy that I'm such a slacker when it comes to updating the build log because I just spent the last couple of hours transferring all of my photos off of Photobucket and onto the Factory Five Forum. I can't imagine the effort involved for an extensive build log like Edwardb - What a fiasco!
Anyway, I made my first legal drive this weekend. I got my insurance policy numbers last week from my Insurance agent through Grundy and then applied online for a Texas One-Trip Permit with intermediate stops at the Alignment/Inspection station and then the Weigh Station. Here is the website to get the One-Time Permit in Texas: https://rts.texasonline.state.tx.us/TempPermit/#nbb
I'm planning to drive the car for a while in gelcoat to shake out the kinks and see how everything settles in before I start the body work. I have all of the mechanical and electrical complete but none of the carpet or post paint panels or trim.
\
I first drove over to Cobb Tuning in Plano (they are actually changing their name to Growler Motor Labs) to get an alignment and my ASE inspection. It was about an 8 mile trip but I stopped 3 times checking on smells and sounds but there were no issues at all. They don't work on old Fords much but they were recommended as a good alignment shop for high performance vehicles. As soon as I drove up, the owner was out at my car before I turned the engine off to check out the ride. He said he had been thinking about getting a roadster for several years to build with his kids and they were getting to the right age now. He had seen a few 818's from Factory Five but had never seen the MK4. I'm not sure if he was pushed over the edge to getting a kit but he was definitely impressed with the it. No issues at all getting the inspection and alignment.
My second leg of the trip was up to the Truck stop with CAT Scales up in Anna about 25 miles away. I kept looking for a closer place to get the certified weight for the title application until I realized that the farther away it was, the more I would get to drive my car on my one-trip permit. I took the back roads up there this morning and got my weights with a full tank of gas at 2,440.
Next week I should be able to get my registration complete and start driving a little until it cools down a bit and then I'll start on the body work (or maybe have someone else do it after following srobinsonx2 - he's doing such a great job but it reminds me how much work it actually is!).
Anyway, I'm a happy camper being able to drive it a while and I'll figure out whats next a little later!
So it’s been almost 3 years since my last update…. The latest is that I had a lot of fun driving the car and I have now started the bodywork and paint process.
A little history, I hurried up to get the car titled in 2017 so I could give my buddy with brain cancer some rides while he had time. He was a big Harley guy and had some routes that he really enjoyed. I was able to pick him up a few times and take him along those routes before he passed in 2018. These cars are the BEST memory makers.
After that, I got on the waiting list of one of the painters here and had fun driving the car for a while. After about 16 months on the waiting list, my Dad could not take it anymore and talked me into painting it ourselves (he owned a body shop in the 70’s and has painted several cars at his house since then). I took the car down to his place about 3 hours away last fall and left it there in his garage. I went down for a few weekends but I was not able to get down there as much as I wanted. He is also getting pretty slow and short on energy in his old age so progress was slow. Then the virus hit and that stopped everything.
I was able to get down there when everything opened up in early June and we spent 3 solid weeks working every day for at least a little bit. We were able to get everything fitted, gapped and all of the bodywork done. I trailered the car home from there and now it’s back in my garage (which is also air conditioned now!!)
Things I found while driving:
1. The Edelbrock Air Gap Intake manifold was too tall and made the car run poorly at low RPM’s. It would not cruise at less than 20mph without bucking. Replaced it with the Edelbrock 2181 Performer Intake Manifold and it’s MUCH smoother at low RPMs now.
2. I really did not like the door latches. One of them had broken in the usual place but they both just seemed cheesy. I always thought you could tell the quality of a car by the way the door sounded. I have installed the Breeze Heavy Duty Door Latch Set and love the solid “Click, Click”. I’ll post some pics of that shortly in case anyone is interested.
3. My license plate/light trunk mount is almost 1/2” off center from the F5 drilled trunk handle. This makes the stripe layout interesting…. I’m currently working on installing the Ford Taurus remote trunk latch setup documented by ‘dale’ on the other forum so that I can just cover the hole for the trunk handle and also fix the license plate issue.
4. I have some very slow oil leaks in the 427W that I need to track down.
5. The Battery and Electrical systems seem great. I see posts about how much the Yellow Tops suck and how short the batteries stay up, but I have left it for 6 months and it always acts fully charged.
6. There is a slight tire rub over dips in the road on the right rear body. After looking at it with the body off, the best action is probably to raise the ride height just a smidge.
7. My left knee digs into the door hinge and gets annoying on longer drives. Not sure what I’m going to do there but that’s after paint.
8. LOVE the way it cruises on the highway with the .64 OD.
9. The Breeze radiator shroud does a great job of cooling the engine down. I’ve had it idle for a hot minute in 105 degree heat and the fan never runs for more than 75% of the time.
10. Getting snake bitten from hot pipes is a real thing!
11. Some of my fasteners are showing rust so I’ll be replacing them when the body is off.
12. Picking a color sucks…. (right now its Viper Blue and Abalone White)
Overall, there have been no real issues at all. It took me a while to trust my work but after taking the body off and inspecting everything I know everything is working well.
Here's a shot of Dad starting on the parting lines last December:
Last edited by RRussellTx; 07-24-2020 at 06:55 PM.
The cutting on the door was a bit brutal, but I just opened it up enough to see what I was dealing with and inched it out from there.
I also needed to fabricate some brackets to attach the latch to the frame. I just used some bar stock and angle iron. I threaded holes in the bar stock that lined up with the three holes in the latch as a backer so that I could sandwich the angle between the latch and the bar. This generally followed the instructions from Mark. The matching holes in the angle were oversized to give some adjustment.
I threaded one hole in the angle iron to bolt through the inside of the door and secure the latch to the door:
Turned a temporary striker on the lathe and attached it to the chassis with a dab of Rage Gold:
Based on that location, drilled and tapped the chassis and mounted the Breeze Strikers. After all the adjustments were good, filled in the gaps with HSRF cat hair and made a cover plate from 1/8 aluminum. Also used a rivnut in the handle and a shoulder screw as a door handle. Im looking for a better door handle but this works for now.
They really sounds solid and work perfectly. I love it!
Last edited by RRussellTx; 07-24-2020 at 07:54 PM.
For the hood latches, I copied edwardbs build but used 8-32 weld nuts (McMaster-Carr # 98001A115) secured to the back of the top hood panel with a dab of HSRF. It took a lot of patience and a couple of different shaped tweezers. I used the 8-32 because the head of the flat head screw I picked fit better in the hood latch. In addition to the underside bushing that Edwardb used (I used McMaster-Carr #, 5448T5), I also added a set screw collar (McMaster-Carr # 6058N18), to lock the hood handle in from the bottom against the bushing. Probably belt and suspenders again but it's nice and secure now.
Big milestone for me. I finally finished the bodywork and Slick Sand Phase. Dust is everywhere!
I feel pretty good about where its at now. I got all of the pinholes and imperfections filled in with the Metal Glaze Ultra. That stuff is really easy to sand but it sure kicks fast. I spent quite a bit of time trying to get everything right up to this point to save headaches later.
I keep thinking about a diagram that shows the level of quality you want to reach, your capability/talent level and how long a job takes. At some point, you just have to call it good enough!
Ive been sidetracked a couple of times over the past few months but I was able to get the garage setup for spraying before I started the Slick Sand. I installed a separate Dryer just for spraying and blowing off the car.
I also get my paint shaker back out and setup although this one gave out on the third can of Slick Sand and I had to buy a new one.
I also built some filter boxes for my garage doors. I have a two car garage door on the North side and a one car door on the South side. The neighbor down the street has a bounce house and I was able to borrow his blower for the inbound air and I bought a couple of HF air movers for the outbound side. Used some old Malt Extract buckets and garbage bags for ducting. The setup worked very well keeping the airflow moving through the garage.
Went to the PPG guys earlier in the week that definitely hurt!
Paint
Sanding was some dusty business! Im working on cleaning up the garage and prepping the garage to spray primer again.
Paint is on! It was a 30 hour affair but its done. I dont like to get in a hurry in the garage so I just took my time and tried to fix what I could at the time before moving ahead. I think I had an issue with something in the air supply but Im not sure. As a result, I have a bit of fisheye to clean up as well as some bug DNA to deal with. I had a good quality filter with a brand new cartridge so Im not 100% sure where the fisheye came from but its done so it is what it is.
I love the colors but they were pretty complicated for a first timer. No major sags but my technique is not as consistent as it needed to be at 3:00 am when I was spraying the blue. I think I let it get too wet in spots so I have some faint mottling in areas that I either need to live with or fix. It takes a certain kind of light to see it but its there
I was able to get it out in the sun early this morning before the clouds rolled in and get a couple of shots. Did I mention I love these colors! They both have so many dimensions in the different light settings. In low light, the blue is just blue and the white is just white. But when you get them out in the sun, which is the generally when Ill be driving it, the blue really comes alive and white will not be outdone. It may be Just Another Cobra but I love it!
Out in the sun. Scoop shot was yesterday in the sun before I started striping. These colors really confuse the iPhone camera so it was hard to get a shot that shows how much the color pops.
Just to complicate things for me, how about posting what color blue that is. I know you have it somewhere in thread, but figured you would not mind posting, since you think you like the color, just joking. I think it looks great too.
Last edited by Railroad; 10-15-2020 at 05:45 PM.
20th Anniversary Mk IV, A50XS Coyote, TKO 600, Trunk Drop Box, Trunk Battery Box, Cubby Hole, Seat Heaters, Radiator hanger and shroud.
Just to complicate things for me how about posting what color blue that is. I know you have it somewhere in thread, but figured you would not mind posting, since you think you like the color, just joking. I think it looks great too.
Sure thing. It's the early Viper Blue. The white I picked was called Abalone White but its the same Paint Code as is available on some 2020 GM cars. I think that one is called Iridescent Pearl. Here is a shot of the paint labels.
Complete Kit pickup 09/05/2015, 351w, QF680, 3.55, 3-Link, 15" Halibrands with MT's, Painted Viking blue with Wimbledon white stripes on 03/15/2017. Sold in 08/2018 and totally regret it.
Just beautiful, congratulations on doing the paint yourself. I'm guessing you saved thousands and it looks amazing. Can't wait to see it put back on.
I'm sure everyone is different, but I probably did not save much money at all. I bought a nice paint gun and a primer gun, quality air filters and new hoses, way too much paint because I was not sure and wanted to be on the safe side, all the air movers and booth filters and floor coverings etc. The list goes on, but for me it was more of a 'Built not Bought' decision. I've never worried about time or money on my project. I just consider it a hobby like an avid golfer might have and I just spread the cost over time and don't worry about it.
I would get a good plan if anyone wants to paint it themselves in order to save money. Include the amount of work and aggravation because it's not trivial. Cleanup alone is an ordeal. I have a Crawfish Boil every year with about 125 people over at the house and I'd rather cleanup after 3 of those than one paint job.
Also, I may have to wait a while for it to get on the car. My honey-do-list is backed up pretty good at this point!
_I Can Almost Smell Paint Fumes All The Way Over Hear Near NOLA!
You're braver than I was because I chickened out at the painting portion of the build!
Thanks GoDad,
I don't blame you! You would have had to deal with all those Hurricanes in the middle of the process!
My Grandfather worked a NASA in your neck of the woods for many years before he retired in Pass Christian, MS. He passed away a few years after Katrina but he loved the area. I also lived in Lake Charles for couple of years on a project. I LOVE the food and fishing down there. I always tell people that there are pros and cons everywhere you go, they are just a little more drastic in Louisiana!
I'm sure everyone is different, but I probably did not save much money at all. I bought a nice paint gun and a primer gun, quality air filters and new hoses, way too much paint because I was not sure and wanted to be on the safe side, all the air movers and booth filters and floor coverings etc. The list goes on, but for me it was more of a 'Built not Bought' decision. I've never worried about time or money on my project. I just consider it a hobby like an avid golfer might have and I just spread the cost over time and don't worry about it.
I would get a good plan if anyone wants to paint it themselves in order to save money. Include the amount of work and aggravation because it's not trivial. Cleanup alone is an ordeal. I have a Crawfish Boil every year with about 125 people over at the house and I'd rather cleanup after 3 of those than one paint job.
Also, I may have to wait a while for it to get on the car. My honey-do-list is backed up pretty good at this point!
That makes a lot of sense actually. My plan is to do all the body work and prep then have a pro shoot it. Also I enjoyed reading your story. My condolences on your friend. You did the right thing.
I host a block party every May roughly the same number of people. Your analogy definitely helped put it in perspective for me.
Yep, Amazon should be here any minute with a whole new batch of sanding and polishing supplies.
I believe that the PPG Concept 2021 Clear is not one of those that gets super hard, super fast so I'm going to take my time (like no hurry at all). I don't want that clear too soft anyway to keep me out of trouble. I'm not afraid of a little extra work as long as I can take my time with it.
That makes a lot of sense actually. My plan is to do all the body work and prep then have a pro shoot it. Also I enjoyed reading your story. My condolences on your friend. You did the right thing. )
Good plan having someone shoot it!
Thanks for the condolences on my buddy Ron. He was a good man and a good friend. He served in Desert Storm and married his wife when he got home. She told a story at the funeral that she never opened a door when he was with her and in 27 years she never put a drop of gas in her car. He treated her like a princess.
The cut & buff has NOT been very much ‘fun’!
But the body is done!
First, I had a couple of spots that I was not happy with and had to prep and respray them. Then I had a spot where I sanded through and had to respray that. My spraying skills are improving but I’m always nervous that I’m about to sand through again...
Anyway, I have finally gotten the body the way I like it. I found the Trizact 8000 sand paper works really well for the final sanding. I was able to sand all of the tight curves and openings by hand and not have any sand scratches left and then do the final polish by hand without too much effort.
Like everything else on this project, it seems so much easier AFTER I have done it.
Next up is the hood and trunk…
Hopefully this will go much faster!
Last edited by RRussellTx; 05-07-2021 at 01:58 PM.


 Thanks:
  Likes:


 Reply With Quote