
Visit our community sponsor

Thanks:
24

Likes:
101
-
Senior Member

I've been working on the seats for a few weekends. I decided instead of taking the easy route of bolting them directly to the floor, I would install seat sliders, because it seems like a nice feature to have in a car. Most race tracks require dual locking sliders, so I opted to not get the FFR sliders (which are single locking) and picked up two sets of dual locking universal sliders from Summit Racing. A lot people post that this is upgrade is not worth the effort. Now that I've done it, I can definitely see where they are coming from. If you are thinking of putting them in your car, seriously consider bolting your seats directly to the floor before spending the time and money on this upgrade. If you still decide to do it, check out my pictures and dimensions below and use them as a guide, but be sure to double check everything in your own car, because I can't guarantee it will be the same.
I'll start off by saying, the Summit sliders that I used are very similar to the FFR set. That fact they are similar made the FFR instructions useful as reference during assembly. The sliders I used are part number SUM-G1153. They are about half the price of the FFR sliders. Here's one set of the sliders. They had pressed in and crimped studs, that required me to hack saw, grind and press them out (which is also required on the FFR set).

Here's the driver's side bolted to the floor. Even though the floor is flat, there aren't a lot of options for solid mounting on the bottom side of the aluminum floor panel. I did a lot of laying out to get the sliders bolted down solid.
I modified the sliders so that the locking lever is in the center. It was designed to be on the outer left side. To get this to work, I fab'ed up the cross bar that goes between the two sides out of .125" thick steel strip.

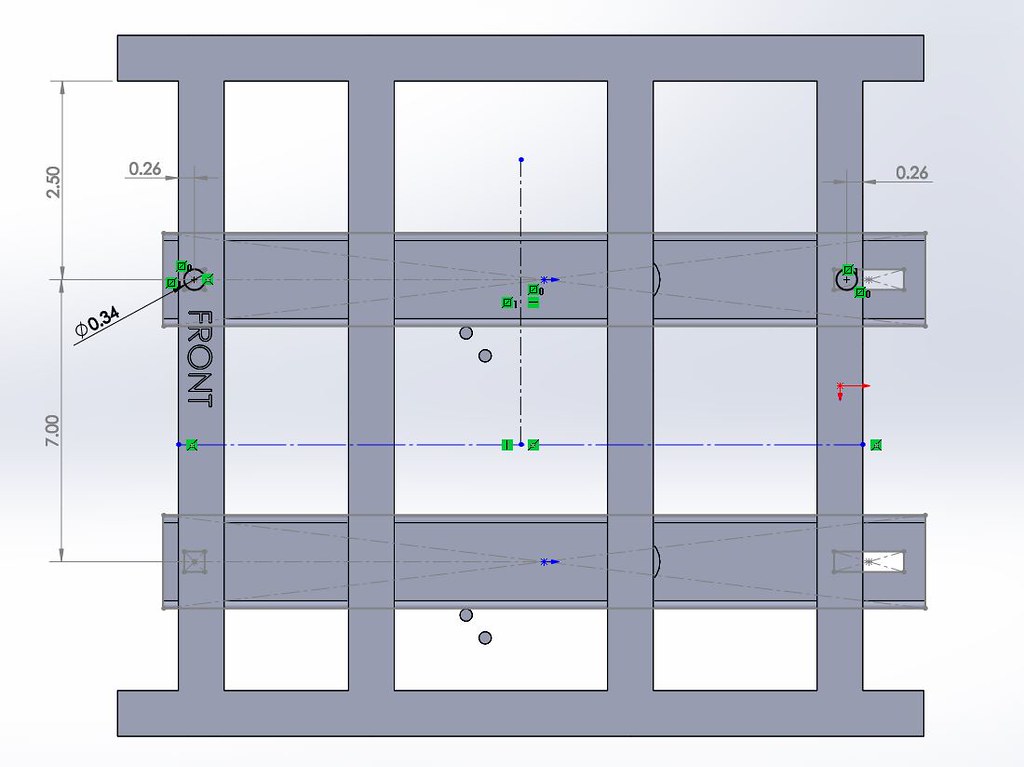
Here's the layout and dims for the holes. I didn't find to much info on this when I was searching, so I thought I'd share mine. Please double check all your measurements before cutting any metal. The images below are for the driver's side. The passenger side is mirrored.
Hole A is drilled directly into the 4" tube and the 2" square tube and then tapped for 5/16-18
Hole B is drilled thru the panel. Make sure to watch out for brake or fuel lines on the under side.
Hole C is drilled all the way thru the 2" square tube. Make sure this doesn't run into the 3 link mounting brackets on the underside.
Hole D is drilled thru the panel.
I used 5/16 hardware for mounting. I used stainless socket head cap screws to hold the sliders to the floor. Carriage bolts could also work for three of these if the sides of heads of the bolts were ground down to fit between the slides rails. There are stainless nyloc nuts on the underside of the 3 that go thru. I used carriage bolts up thru the sliders into the seats, with nuts on top.

This shows the drilling in the seat. Please note this doesn't show the first tube in the very front of the seat. The one you drill is the 2nd tube. The passenger side ended up being 2.38" vs 2.50". Also, I noticed I left off an important dimension...the distance between the holes in the seat from front to back. That dim is 10.70".
Here's a video of the slider in action. Note that I also bent the lever to miss the opposite side slider. Sorry for the shakiness. At each bolt, I used the spacers (that came with the sliders) and two 5/16" washers to space the seat up above the the locking mechanism.

Both seats in the car. The sliders have about 6" to 7" of travel. Unfortunately, due to the limited options for mounting locations, they don't go as far back as I had hoped. The farthest back position is about perfect for me (I'm 5'7"), but anyone taller would want it back farther. Each seat could go about 2" to 3" farther back. They are going to work for now, but I'm pondering an adapter/bracket that will allow the seats to go all the way to the back of the cockpit. It will allow it to fit taller people, plus make it easier to get in and out of for us short people. Stay tuned for part two.

Here's a top down view. I got the seats angled slightly outwards, like the originals.

Last edited by Yama-Bro; 05-08-2020 at 01:14 PM.
Started dreaming of a Cobra around 1987
Purchased Complete Kit 6/9/2017, Delivered 9/4/2017, Rolling Chassis 3/30/2018, Engine Dyno'ed 3/4/2022, Engine installed 8/27/2022
Click here for my build thread
Serial #9158
Design Engineer at BluePrint Engines
 Posting Permissions
- You may not post new threads
- You may not post replies
- You may not post attachments
- You may not edit your posts
-
Forum Rules

Visit our community sponsor


 Reply With Quote