-
01-10-2020, 11:24 AM
#841
The car looks really nice Paul! Sorry to see you gone from the other forum.
Jim
-
01-10-2020, 02:47 PM
#842
Senior Member


Originally Posted by
Jim1855

Paul,
Looks great.
And I "owe" you this. The engine cover looks really good too.
Jim
You're too funny Jim. It turned out as good as can be expected I think for that Gen 3 Coyote which isn't easy to dress up.
Originally Posted by
Papa
Paul,
The mirrors look really sporty. Are those part of the kit? Also, probably a really dumb question, how do you open the doors -- assume you have to reach inside to use the latch?
The car is amazing and is giving me bad (expensive) thoughts.

Dave
No, the kit comes with a single fender mounted mirror. Same one as the Roadster. Has the same problem. Poor visibility. Plus I want a mirror on both sides. Those mirrors I described in an earlier post. They're from Peter Brock and ones he has available for the Coupe. In addition to looking decent, you can actually see out of them. https://www.bre2.net/mm5/merchant.mv...ry_Code=mirror. Not cheap, but nice quality. The guys that painted my car recognized them as a commercially available item. But I have no idea where, and besides I can say I have something from Peter Brock on my build.
Yes, you have to reach through the side windows to pull the door handle to open it. Not that bad, but then I'm used to it now. Some guys put poppers on the doors to make it easier. I had enough complications going I skipped that.
Come on over to the Coupe side! Seriously, I'll be very interested to live with it this next season, after driving a Roadster for the past 8-9 seasons. Will have both for now to compare. It's a similar build, but also different in a number of ways.
Originally Posted by
JimS
The car looks really nice Paul! Sorry to see you gone from the other forum.
Jim
Me too. Gave them multiple chances with no luck. Just not worth it. 
Last edited by edwardb; 01-10-2020 at 08:14 PM.
Build 1: Mk3 Roadster #5125. Sold 11/08/2014.
Build 2: Mk4 Roadster #7750. Sold 04/10/2017.
Build Thread
Build 3: Mk4 Roadster 20th Anniversary #8674. Sold 09/07/2020.
Build Thread and
Video.
Build 4: Gen 3 Type 65 Coupe #59. Gen 3 Coyote. Legal 03/04/2020.
Build Thread and
Video
Build 5: 35 Hot Rod Truck #138. LS3 and 4L65E auto. Rcvd 01/05/2021. Legal 04/20/2023.
Build Thread. Sold 11/9/2023.
-
Post Thanks / Like - 0 Thanks, 1 Likes
 Papa
Papa liked this post
-
01-10-2020, 02:50 PM
#843
Member

Paul, what is the powder coat color code (or name) for the color on your sheet metal? It looks like a matte or semigloss charcoal gray, but I'm sure my computer screen is a little off.
Building Gen 3 Coupe complete kit / 2018 Gen 3 5.0 Coyote / T-56
-
01-10-2020, 03:26 PM
#844
Senior Member
Originally Posted by
GashF16
Paul, what is the powder coat color code (or name) for the color on your sheet metal? It looks like a matte or semigloss charcoal gray, but I'm sure my computer screen is a little off.
The powder coat shop I use calls it "IG 90 satin glimmer." Sorry I don't know the mfg name or any more details. I like it a lot. Nice contrast to the black frame. Satin is slightly shiny but not glossy so doesn't get light scratching like gloss powder coat. Used it on my 20th Anniversary Roadster build as well. Was a pretty close match to the color Factory Five used on those frames.
Build 1: Mk3 Roadster #5125. Sold 11/08/2014.
Build 2: Mk4 Roadster #7750. Sold 04/10/2017.
Build Thread
Build 3: Mk4 Roadster 20th Anniversary #8674. Sold 09/07/2020.
Build Thread and
Video.
Build 4: Gen 3 Type 65 Coupe #59. Gen 3 Coyote. Legal 03/04/2020.
Build Thread and
Video
Build 5: 35 Hot Rod Truck #138. LS3 and 4L65E auto. Rcvd 01/05/2021. Legal 04/20/2023.
Build Thread. Sold 11/9/2023.
-
Post Thanks / Like - 1 Thanks, 0 Likes
-
01-12-2020, 11:14 AM
#845
Senior Member

Paul all of your builds look amazing, but I have to say you have really outdone yourself this time, it's beautiful! You should be really proud of yourself and your coupe.
-
Post Thanks / Like - 1 Thanks, 1 Likes
-
01-14-2020, 09:38 PM
#846
Senior Member
Knocking Out More Details
Completed almost a page of my final punch list since the last update. Most are minor and don’t warrant any further description or pictures. Just all the details as a build wraps up. Another page to go...
I’ve decided what I’m going to do with the front of the pontoons in the front wheel wells. I’m going to make two pieces to put over those areas plus the exposed part of the lower splash guards. Then spray the same UPOL Raptor I’ve got everywhere else on those pieces plus the tire facing part of the upper splash guards. I’ll provide more details and pictures when completed. Waiting now for a couple pieces of aluminum.
Found out from Factory Five that they don’t have any plans right now to offer floor mats for the Gen 3 Coupe. I’ve found a company that will made custom mats. I’ll provide more details about that later as well. My personal experience is the standard Factory Five carpet holds up just fine in every area except the floors. Some type of floormat or protection is just about mandatory.
Installed the firewall extensions. I’ve been warned it’s critical to get these areas sealed up otherwise hot air from the engine compartment has a direct path into the cockpit. Can definitely see that’s the case. I did change and didn’t use short pieces of bulb seal in a couple places as shown in the instructions. Didn’t feel that it sealed all that well plus looks a little clunky. I used some exterior caulking material instead. Would come apart easily enough should that be necessary.
Another open item is gasket material for the doors. The kit comes with 3/8-inch thick self-adhesive foam that is just right for most of it, and I’ll be using it on the inside of the doors. But one thing I’ve found is that the top front 8-10 inches of the door opening, right below the windshield post, is much deeper than 3/8-inch. Actually increasing to almost 3/4-inch at the top. So the gasket material isn’t going to do anything there, and it’s probably the most vulnerable for wind, noise, and the inevitable rain. Looked at a bunch of other build pictures and also the Coupes in the galleries on Factory Five’s website. Every one I could see resolved by putting nothing there. So still looking at options. Want something that looks reasonably decent. Like it belongs there. I’ll share what I come up with (I hope) but if any other builders solved that one, please show your solution.
On to more successful progress. Installed the H3R Performance HalGuard HG100C 1.4 lb. fire extinguisher bottle between the seats. This is the same one I’ve used on previous builds. Agree it’s small and wouldn’t stop a major fire. It’s there as personal protection and to give time to get out. Obviously, hope it never leaves the mount. This was the best angle to see it.

Installed the wiper wheel boxes and wiper motor. This is the Specialty Power Windows WWK2 Complete Universal Wiper Drive Kit I’ve described previously. Plugged in the power and all works as it should. Check out my cool tie wrap wipers. Just to confirm one last time the proper operation and park directions. Actual wipers will go on once the windshield is installed.

Finished the access door on the added trunk box. Used a piece of carpet that I had edged and the hinged aluminum door shown previously. I riveted the hinge to the hatch floor and glued the carpet piece to the front half. The rear half needs to stay loose as the door needs to swing either direction and the carpet has to move. I glued short pieces of plastic harvested from report cover locking spines (yep, Stapes to the rescue) to the underside of the carpet and holds it in place while allowing it to slide. Used a piece of a cut-off seat belt shoulder harness for a handle. The red is an interesting contrast. All-in-all, happy with how this turned out. Do wish it laid a little flatter on the floor, and my next version (?) will probably have some improvements. But this is very workable.


Finally for this update, trimmed the Russ Thompson sill pieces since I wrapped the carpet over the corners as previously shown. This is the standard carpet setup, and I prefer it. Once trimmed, decided to put some of my body red paint in the Daytona script Russ cut into the pieces. Liked that OK, but still wasn’t convinced about the “look” with them set in place. Then I decided the real issue was the parts look unfinished. Russ does a nice job and they’re clean and unscratched. But still a standard mill finish, and just didn’t seem to fit in. So spent some time with progressive sanding, wet sanding up to 2000 grit, and then metal polish. All by hand since I don’t have actual polishing tools or compounds for pieces of this type. Not an absolute mirror finish, but not bad. I like the look better, but will decide going forward. I’m going to attach them with foam tape (3M VHB is amazing stuff) so can go either with the plates or the finished paint. I’ll put XPEL over whatever the final choice is.

The major remaining step is my windshield. Some of my final steps have been to prepare the opening and now I’m ready. Going to talk to a couple recommended installers and decide whether to let them do it or try it myself. The staging area in my basement for all the remaining parts is starting look pretty bare. That's a very good thing. This weekend we’re having another club event here at our house, similar to last year. A winter cars and coffee and shop talk with the nearly finished Coupe. Looking forward to it.
Last edited by edwardb; 01-15-2020 at 08:04 PM.
Build 1: Mk3 Roadster #5125. Sold 11/08/2014.
Build 2: Mk4 Roadster #7750. Sold 04/10/2017.
Build Thread
Build 3: Mk4 Roadster 20th Anniversary #8674. Sold 09/07/2020.
Build Thread and
Video.
Build 4: Gen 3 Type 65 Coupe #59. Gen 3 Coyote. Legal 03/04/2020.
Build Thread and
Video
Build 5: 35 Hot Rod Truck #138. LS3 and 4L65E auto. Rcvd 01/05/2021. Legal 04/20/2023.
Build Thread. Sold 11/9/2023.
-
01-15-2020, 09:21 AM
#847
Senior Member

everything looking sharpe i hope mine turns out half as well
can you tell me where body is mounted on frame beside
rear brackets
thanks for all you share
-
01-15-2020, 10:21 AM
#848
Senior Member
Originally Posted by
jwhit
everything looking sharpe i hope mine turns out half as well
can you tell me where body is mounted on frame beside
rear brackets
thanks for all you share
You're welcome. Having fun with the build and have enjoyed sharing. Now ready I think for it to be done. The main body piece is held by the referenced rear brackets (very solid BTW), and hard points along the door openings and the front lower splash guards that tie to the front of the pontoons. Additionally, it is supported by bulb seal on sheet metal on the firewall/instrument panel, cockpit side corners, hatch sides, and hatch rear. All much like the Roadster. Ends up being very rigid once everything is fitted and installed. Also like the Roadster, the hatch, doors, and hood (cowl) are all hinged off hard points on the frame.
Build 1: Mk3 Roadster #5125. Sold 11/08/2014.
Build 2: Mk4 Roadster #7750. Sold 04/10/2017.
Build Thread
Build 3: Mk4 Roadster 20th Anniversary #8674. Sold 09/07/2020.
Build Thread and
Video.
Build 4: Gen 3 Type 65 Coupe #59. Gen 3 Coyote. Legal 03/04/2020.
Build Thread and
Video
Build 5: 35 Hot Rod Truck #138. LS3 and 4L65E auto. Rcvd 01/05/2021. Legal 04/20/2023.
Build Thread. Sold 11/9/2023.
-
01-15-2020, 10:29 AM
#849
Senior Member
Originally Posted by
edwardb
You're welcome. Having fun with the build and have enjoyed sharing. Now ready I think for it to be done. The main body piece is held by the referenced rear brackets (very solid BTW), and hard points along the door openings and the front lower splash guards that tie to the front of the pontoons. Additionally, it is supported by bulb seal on sheet metal on the firewall/instrument panel, cockpit side corners, hatch sides, and hatch rear. All much like the Roadster. Ends up being very rigid once everything is fitted and installed. Also like the Roadster, the hatch, doors, and hood (cowl) are all hinged off hard points on the frame.
so under your door sill plates you have counter sunk screws i guess? my car was shipped with 1 screw on each side at sill and 1 per side on upright where hinges would come thru
not sure if i trust that body was centered on frame and i want be able to find hole sin frame after installing alum i had to slide it back a good 3/16 from where it was with
there self taping screws
-
01-15-2020, 10:45 AM
#850
Senior Member
Originally Posted by
jwhit
so under your door sill plates you have counter sunk screws i guess? my car was shipped with 1 screw on each side at sill and 1 per side on upright where hinges would come thru
not sure if i trust that body was centered on frame and i want be able to find hole sin frame after installing alum i had to slide it back a good 3/16 from where it was with
there self taping screws
I used three 1/4"-20 low profile screws into nutserts on each side. Only in the sill. They're covered by the carpet and not noticeable. You can see the locations with clecos in the picture below I posted earlier. I filled the holes they put in the body going into the upright. My body ended up slightly away from that, plus didn't want them visible. I wouldn't get too excited about body fit until you're doing everything. Location of the body, hood, doors, all interact and you'll need to work to find the best location for all at the same time. At least that was my experience. My body ended up somewhat close to the Factory Five shipping screw locations, but not exact.

Build 1: Mk3 Roadster #5125. Sold 11/08/2014.
Build 2: Mk4 Roadster #7750. Sold 04/10/2017.
Build Thread
Build 3: Mk4 Roadster 20th Anniversary #8674. Sold 09/07/2020.
Build Thread and
Video.
Build 4: Gen 3 Type 65 Coupe #59. Gen 3 Coyote. Legal 03/04/2020.
Build Thread and
Video
Build 5: 35 Hot Rod Truck #138. LS3 and 4L65E auto. Rcvd 01/05/2021. Legal 04/20/2023.
Build Thread. Sold 11/9/2023.
-
01-15-2020, 11:20 AM
#851
OMG that's a great Idea on body colour for the inscription. IM definitely gonna use that.
Next Step, Finding a very small brush ans a steady hand lolol
-
Post Thanks / Like - 0 Thanks, 1 Likes
-
01-15-2020, 11:50 AM
#852
Senior Member
Originally Posted by
Automan
OMG that's a great Idea on body colour for the inscription. IM definitely gonna use that.
Next Step, Finding a very small brush ans a steady hand lolol
There's actually an easier and simpler way. Since the script is cut sharp and clean (CNC per Russ) I used the following process: With a 1/2-inch artists brush, brushed around the lines of the lettering making sure to get coverage in the cut-out. Didn't get crazy with excess paint outside the lines on top, but didn't worry too much about it either. Once all filled, held a small piece of rag tightly on a piece of paint stick (anything else flat would work too) and wet the rag with a little lacquer thinner. Then swiped across the lettering with one pass. Used a clean piece of rag and the same process 4-5 times and all was clean and the lettering perfectly filled.
Note this is the opposite process of what the painter did on my customized engine cover. Notice how the raised lines on the extensions and the "Powered by Ford" and raised lines are perfectly white? I too commented about his steady hand, thinking he did it with a pin-striping brush or something. No, he sprayed the cover white all over. Let it dry overnight. Then sprayed it red all over. Let the red tack a little, then again with a rag, stick, and a little solvent, wiped the red raised lines and lettering. Exposing the white underneath. Then cleared over the whole thing. Turned out perfect. Said he's followed the process a number of times. Kind of the inspiration for how I did the sills.
Last edited by edwardb; 01-15-2020 at 08:05 PM.
Build 1: Mk3 Roadster #5125. Sold 11/08/2014.
Build 2: Mk4 Roadster #7750. Sold 04/10/2017.
Build Thread
Build 3: Mk4 Roadster 20th Anniversary #8674. Sold 09/07/2020.
Build Thread and
Video.
Build 4: Gen 3 Type 65 Coupe #59. Gen 3 Coyote. Legal 03/04/2020.
Build Thread and
Video
Build 5: 35 Hot Rod Truck #138. LS3 and 4L65E auto. Rcvd 01/05/2021. Legal 04/20/2023.
Build Thread. Sold 11/9/2023.
-
01-21-2020, 02:52 PM
#853
Senior Member
Even More Details
Another week and more items off the list. Lost some time this week since winter decided to finally arrive in Michigan. Caused the club Coupe and Coffee event we had planned at our place to be delayed a week. Will try again this coming Saturday. Spent the time shoveling snow instead. Well, full disclosure, mostly hanging onto the snowblower. I was hoping to have some progress to report on my windshield, since that’s the biggest single task yet to complete, and a couple things are dependent on it, e.g. wipers, center mirror, etc. After playing with it for a while, trial fitting, etc. have pretty much decided I want a pro to do it. Waiting for a call back from a company recommended by a build buddy. Hopefully will have something in my next update. Did receive some good news. My application to the Detroit Autorama was accepted. I’m in! Now the pressure’s really on to get this thing done. But with a month to go, expect to easily make it.
On to actual updates, although relatively minor (again). I mentioned in the last update about door gaskets. Not necessarily going for DD look and all weather seal. But want them to actually do what they’re supposed to do and look like they belong. Nothing screams "kit car" like haphazardly applied trim IMO. First issue was the very large drop-off in the flange at the front top of the doors discussed previously. I tried a bunch of things. But nothing was better than stacking two layers of the supplied 3/8” thick by 5/8” wide D-tube. Was only required at the top, so tapered down to a single layer for the rest. That piece applied to the body. Then another small piece on the underside of the door to finish the seal right at the top. Pretty much not visible. Looks reasonably OK and does the job. My door gaps came out a little wider than I would have liked. If they were tighter, the situation might better. But to be honest, not sure how much. Anyway, done. What I described is visible in this photo of the LH side. RH is the same.
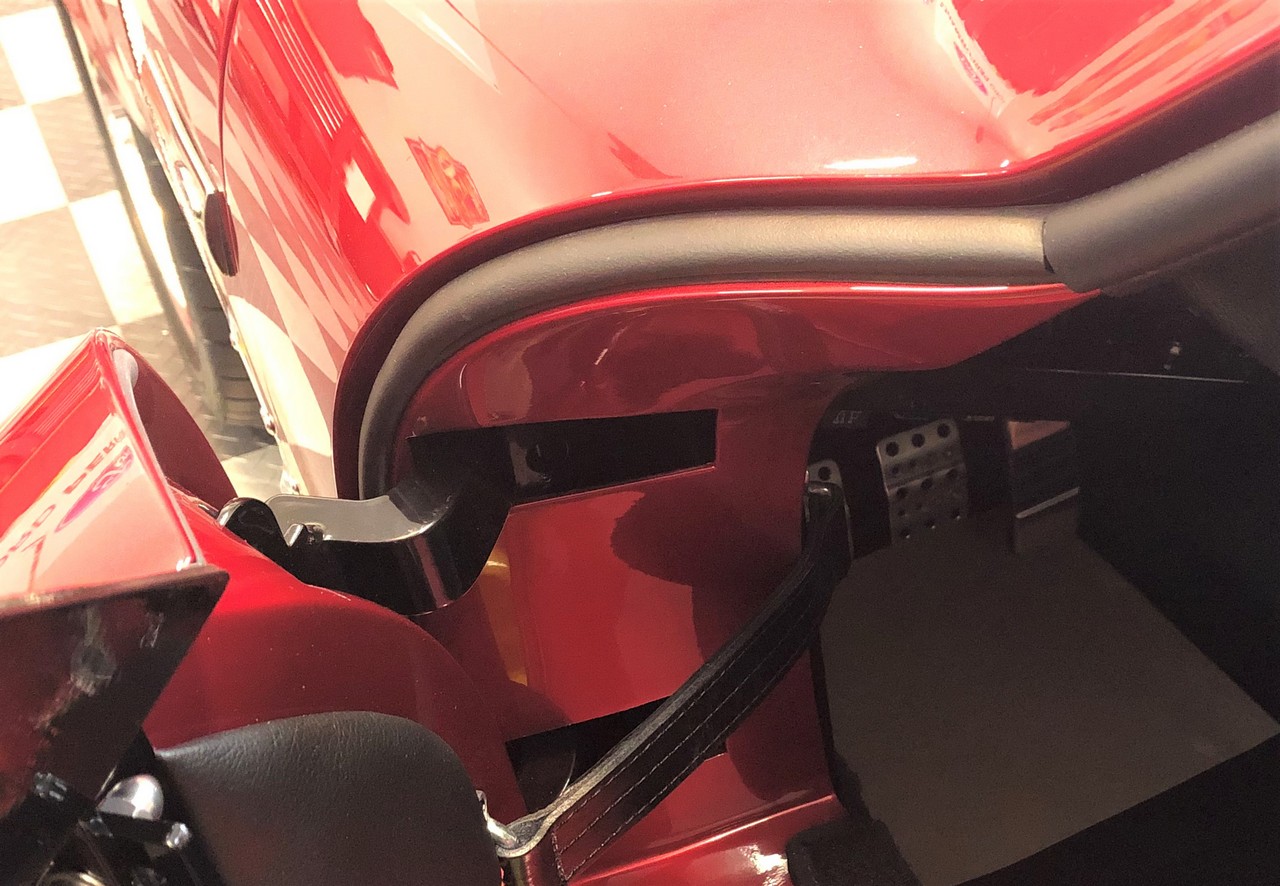
For the rest of the doors, I put the same 3/8” thick by 5/8” wide D-tube on the inside lips of the doors, set back about 1/4" or so from the edges. Called it done until I tried to close the doors. One side wouldn’t latch all the way. The other would but only if closed hard, and then the door handle was difficult to pull. Neither acceptable. Played around with what materials I had without success. Then spent time looking at other options, including McMaster and Steele Rubber Products. It was late, so gave up. Next morning it hit me that the inside of the doors and body openings both taper away from the edge somewhat, so if I set the 3/8” thick by 5/8” wide D-tube back from the edge the right amount, that would work. In hindsight, an obvious solution (no comments please) but needed a good night’s rest for me to think of it. So experimented with small pieces of the D-tube and strips of paper to find the right location around the perimeter for the D-tube to compress and seal but not too much. Marked with tape, applied the D-tube, and success. Doors open and close nicely with a reassuring thunk and are basically sealed. Never will be completely sealed with that sliding side window. But I'm satisfied with how it turned out. Note it’s slightly different from side-to-side. Hopefully this is helpful to other Coupe builders. I don’t recall the door seal being mentioned in the manual. If it is, certainly not to this detail.


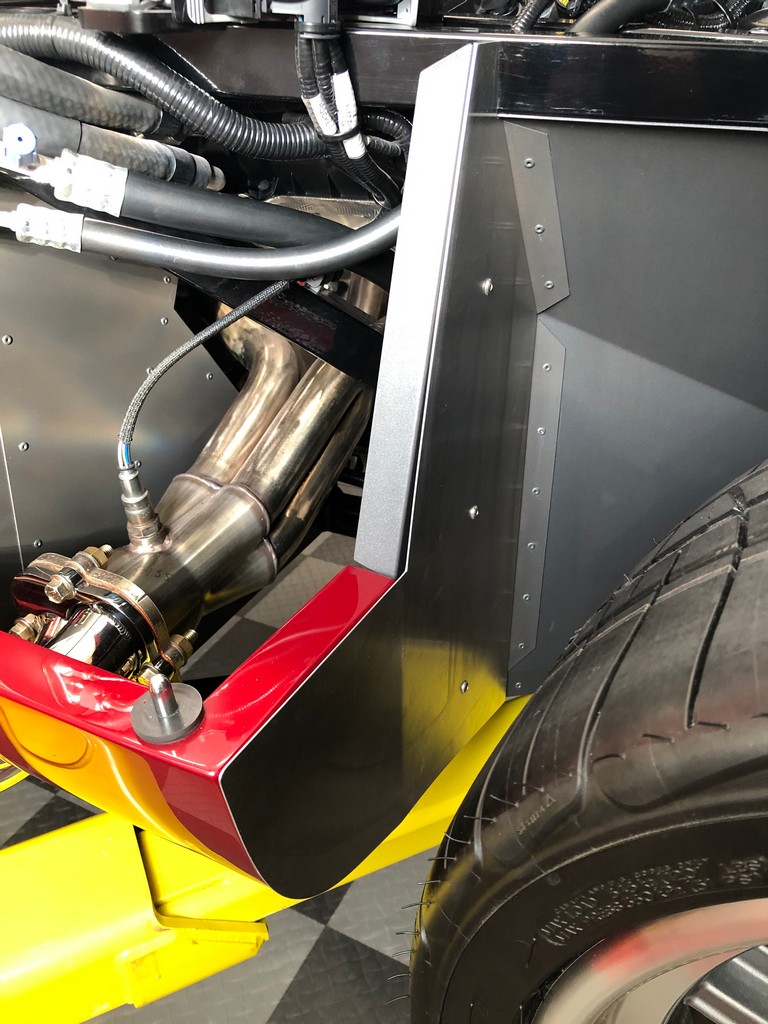
I fabricated the added front lower splash guards I mentioned in my last update out of the usual .040" 6061 aluminum. In hindsight, maybe could have done things differently earlier in the build. But this is where I’m at now. If built like the instructions, which mine is, the front of the pontoons are directly behind the front wheels and will get hammered. As some have suggested, putting the kit lower aluminum pieces in front of the pontoons would help. But I found when fitting the body that getting the pontoons into the right locations and locked there was critical to the body fitting. Specifically the alignment of the hood to the pontoons. So I attached them to the back. That leaves the pontoons exposed, along with the rest of the aluminum pieces above them. Now I want to add the same UPOL Raptor undercoat I've used everywhere else. But I really don’t want to mask as much as would be needed, plus I don’t want to spray what’s already been painted. So made these two pieces that will fit over what’s there. Before final attachment, I’ll spray with the Raptor, leaving the paint covered but untouched. They’ll still be removable should I need to renew the undercoat at some point. The upper splash guard, attached to the hood, interlocks into this area forming the complete splash guard. I'll be adding UPOL Raptor on those pieces as well before I finally attach them.

Finally, one other small detail. The rear vent grilles. Look away right now if you don’t want to see extreme OCD. When the pressed grill pieces are trimmed for fitting into the openings, it leaves dozens of little spikey ends that I really didn’t want scraping around in my new paint. Plus wasn't super excited with how unfinished that looked. So split some 7/32” vacuum hose and put around the perimeter. Ends up solidly in place, but added some instant glue to make sure. Briefly considered gluing in place on the body with something non-destructive like clear RTV. But decided that was a bad idea for several reasons. Used two screws as shown in the instructions and as others have done. The black border looks a little cleaner IMO. But my guess is this isn’t for everyone. Might think about blacking out the grille area on the white side. But leaving it like this for now.


Ordered custom floor mats. Should have those in a couple weeks. Will report back. Also ordered parts needed to resolve the Gen 3 Coyote oil pressure sensor open issue. Onward.
Last edited by edwardb; 01-21-2020 at 03:05 PM.
Build 1: Mk3 Roadster #5125. Sold 11/08/2014.
Build 2: Mk4 Roadster #7750. Sold 04/10/2017.
Build Thread
Build 3: Mk4 Roadster 20th Anniversary #8674. Sold 09/07/2020.
Build Thread and
Video.
Build 4: Gen 3 Type 65 Coupe #59. Gen 3 Coyote. Legal 03/04/2020.
Build Thread and
Video
Build 5: 35 Hot Rod Truck #138. LS3 and 4L65E auto. Rcvd 01/05/2021. Legal 04/20/2023.
Build Thread. Sold 11/9/2023.
-
Post Thanks / Like - 0 Thanks, 1 Likes
-
01-25-2020, 05:46 PM
#854
Senior Member
Walkaround Video at Idle
Today we had our club event with 20+ club members checking out the Coupe build. Good time sharing and lots of interest. Of course they had to see/hear it start. Hadn't been run since coming back from paint in early December. But the Gen 3 Coyote of course lit right off. After everyone left, decided to start it back up and let it run to temperature since it's not the best to start an engine and let it run only briefly. Let it go all the way until the cooling fan started, thermostat opened, etc. Checked the heater. Working. Checked for leaks. None. While waiting, walked around with my phone and took this video. Nothing exciting at all but this is the first time I've recorded the production Gas-N pipes. Mellow and not too loud. Very nice. RPM was in the 750 - 800 range. As you walk by the rear RH corner, you can hear the whine of the fuel pump pretty clearly. Also in the video you can briefly see my mocked up windshield and the pieces of tape making sure it won't fall out. Which it wouldn't anyway, but can't be too careful. There have been a couple developments with that, which I'll provide in my next update. That and the wiper arms, washers, and rear view mirror are literally the only things left on my list.
https://youtu.be/FHpB6L5VUa0
Last edited by edwardb; 01-25-2020 at 05:49 PM.
Build 1: Mk3 Roadster #5125. Sold 11/08/2014.
Build 2: Mk4 Roadster #7750. Sold 04/10/2017.
Build Thread
Build 3: Mk4 Roadster 20th Anniversary #8674. Sold 09/07/2020.
Build Thread and
Video.
Build 4: Gen 3 Type 65 Coupe #59. Gen 3 Coyote. Legal 03/04/2020.
Build Thread and
Video
Build 5: 35 Hot Rod Truck #138. LS3 and 4L65E auto. Rcvd 01/05/2021. Legal 04/20/2023.
Build Thread. Sold 11/9/2023.
-
Post Thanks / Like - 1 Thanks, 2 Likes
-
01-26-2020, 07:35 AM
#855
Thanks for hosting Paul!! Great time had by all. Here are some pictures for those who could not attend - click here.
Jeff
-
01-27-2020, 11:54 AM
#856
Senior Member
beautiful car and great job
thanks for sharing
-
01-29-2020, 12:43 AM
#857
Originally Posted by
edwardb
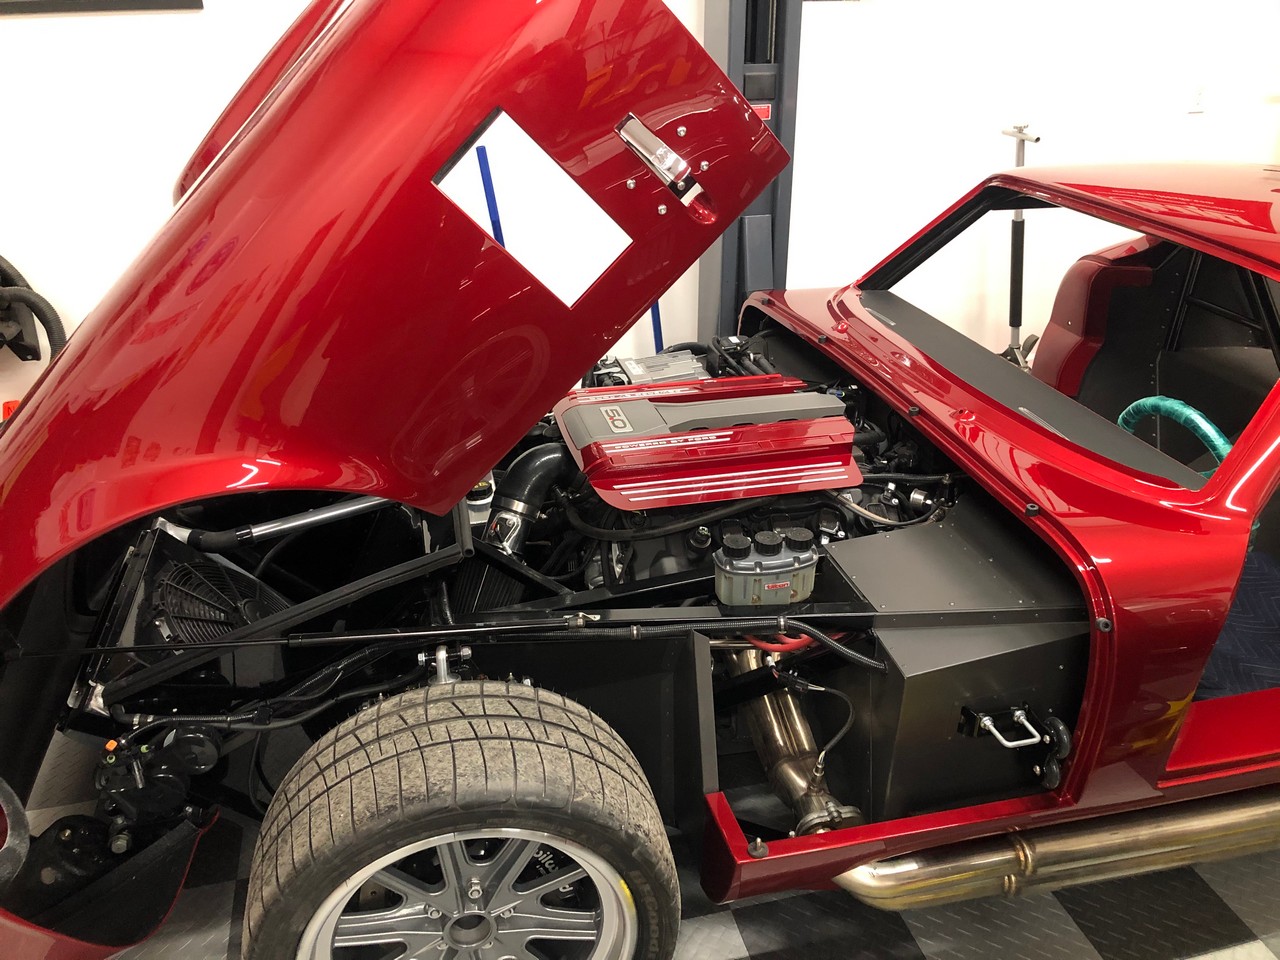
Drove to the shop today and brought the Coupe home. First time out for the new SE and worked great. The Coupe actually fits. Snowing off and on, and the coldest day of the year so far with the wind chill. But we got it done. Huge thanks to my friend Greg for keeping me company and lending a hand. The Coyote started right up after sitting there for two months (big surprise) and had no issues driving it in and back out of the trailer. Needless to say, Im really pleased with the paint. Should be since a Coupe isnt cheap to paint as Ive now found out. Especially to this level. But its done and thats behind me. Its a little dusty but not terrible. Tomorrow will get it up on the lift, cleaned up a bit, and start final assembly. Need to get it far enough along to take some decent pictures for my Autorama submission. Then completely done by the end of February for the show. After that, will start the title and registration process so its ready to drive by spring.
First couple pictures are at the shop. Bolted on the prototype side pipes back and put the nose back on. First time it had been together since early body work. Drew its first crowd. Looks amazing. Leaving the doors off until the interior is done. Way easier to work on plus helps prevents any damage.


Couple hours later, unloaded and safely back in the home shop. The sun was shining a bit when we loaded it onto the trailer. The color looks a little brighter and really pops in the sun. These pictures in general are a bit darker than it looks in natural light and especially in the sun. But you get the idea. The engine cover turned out great and does the best it can to clean up that busy Gen 3 Coyote engine compartment.


Tomorrow will start digging in.
How did you make that gen 3 engine shroud?
-
01-29-2020, 01:28 AM
#858
Top Notch Builder

Might think about blacking out the grille area on the white side
Maybe consider the matte black vinyl wrap. Peels right off if you dont like the result. Might want to consider doing both sides to match.
Its all coming down to the details. Congratulations looking really good.
-
01-29-2020, 07:32 AM
#859
Senior Member
Originally Posted by
coach36
How did you make that gen 3 engine shroud?
Discussed and shown in an earlier post in this thread. https://thefactoryfiveforum.com/show...l=1#post371325. I know, this book needs a table of contents. Maybe add that at some point.
Originally Posted by
P100DHG
Maybe consider the matte black vinyl wrap. Peels right off if you don’t like the result. Might want to consider doing both sides to match.
It’s all coming down to the details. Congratulations looking really good.
Thanks. Good suggestion. I'm thinking I want to black them out. But was hesitating to use paint. I'll play around with something less permanent and see how that turns out.
Build 1: Mk3 Roadster #5125. Sold 11/08/2014.
Build 2: Mk4 Roadster #7750. Sold 04/10/2017.
Build Thread
Build 3: Mk4 Roadster 20th Anniversary #8674. Sold 09/07/2020.
Build Thread and
Video.
Build 4: Gen 3 Type 65 Coupe #59. Gen 3 Coyote. Legal 03/04/2020.
Build Thread and
Video
Build 5: 35 Hot Rod Truck #138. LS3 and 4L65E auto. Rcvd 01/05/2021. Legal 04/20/2023.
Build Thread. Sold 11/9/2023.
-
01-30-2020, 11:17 PM
#860
Senior Member
Windshield Installed
Huge day today. I’ve been sweating about the windshield installation for some time. Now can say it’s basically done. I’ve been reading every build thread and post I could find trying to learn about installing the windshield in the Coupe since I’ve not done anything like that before. Several had some excellent detail, so thanks if you were one of them. Plus watched a bunch of YouTube videos. But then I got cold feet so thought I would go for a pro installation. Had a couple referrals but they didn’t want to do it. So, then I went back into DIY mode and decided I’d give it a try. Ordered up the needed materials and started prepping. Then last Saturday we had the club Cars and Coffee here at our house. I told my windshield story, and one of the club members approached me after the event and said he wanted to help. Retired now, but in his past life worked many years for a major chemical company and with OE’s and glass. He came back last Monday with a colleague who has also been doing this for many years. Is that perfect or what? Talked through the details, gave me some homework, they came back today, and it’s done. With a lot of coaching, I did some of the work. But experience counts for details like laying down the urethane bead, etc. Huge relief and I can’t thank them enough. Yeah, I probably could have done it myself. But I’m positive it wouldn’t have turned out so well and would have been much more stressful to say the least. Took a number of pictures so will caption them describing what we did.
The Coupe build manual recommends a 1-inch frit (black border) on the top and sides, and 2-inches along the bottom of the windshield. So after thoroughly cleaning the glass, used 1/2-inch 3M Fine Line to mask for this and an additional 1-inch of plain masking tape for sloppy painters like me. I had done some testing beforehand and found the Fine Line work great with the black primer material and left a perfectly sharp line.
After trying it both ways, decided I strongly preferred the trim around the edge versus no trim. Expecting that, I had previously ordered and received 15 feet of 19mm UM1913BR Flexline Windshield Auto Glass Universal Trim Rubber from Amazon. Recommended in other threads. So next up installed the trim. Takes some work to get it to fit over the glass, and has some adhesive inside that gets a little messy. But not too hard. It easily went around the large curves. I used just a bit of heat from a heat gun on the sharper curves at the top and it went on smoothly with no puckers. Looked great. One hint. I was going to do the black frit first, and then put on the trim. My guys said put the trim on first. Great advice.

Next up was prepping the opening on the body. This is where I though it got a little interesting. I was concerned (and a little skeptical) about the black frit and whether it would really stick to the glass. My coaches said just the opposite. Whatever chemicals are in the primer and the chemical properties of the glass said that was a total non-issue. The bigger issue was the body. They said the majority of failures they have are not sticking to the paint or the paint delaminating. So for them, body prep was very important. After some discussion, we decided I should abrade the paint where the primer and adhesive would be applied. Settled on 220 grit. So did that, added masking for protection, and covered the top of the dash. Hurt to be sanding on my paint, but kept reminding myself it would be buried. And it is.

That was my homework. Today we went for it. After another round of cleaning with the proper materials (cleanliness is critical) and one last push down on the tape, brushed a coat of primer on the body and three coats on the glass with daubers. Let it dry 15 minutes between coats and pulled the tape after 15 minutes. Had a couple of real tiny spots to clean up on the windshield, but mostly came out sharp and perfect.


Now time to set the glass. We had already determined the top and sides required a slightly larger bead of adhesive than the bottom. So had two different tips ready with the V-cut that glass installers use. The urethane was applied with a power caulking gun which gives a solid and clean bead. Little bit of tooling where it was necessary to stop and start. I was watching during this step.
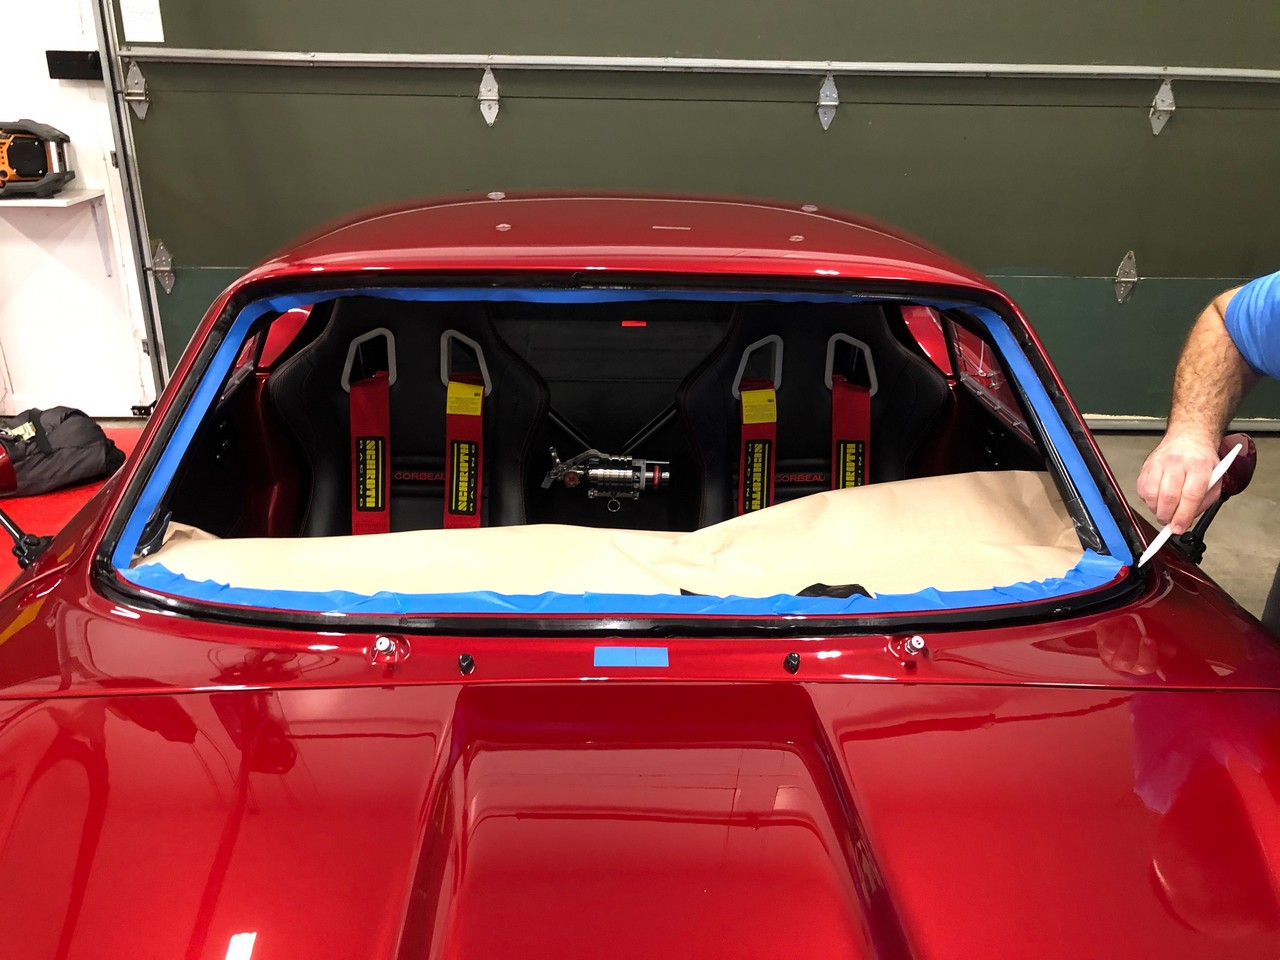
Then in with the prepped windshield. We had dry fit it previously, so knew if would fit OK. Once in place, pushed down firmly all around the perimeter. As I saw in another build thread, used some blocks wrapped with towels and straps to hold it in place. The windshield did need to be pulled down slightly on the ends. But not a lot or as much as some others have described. In the 1/8 to 1/4-inch range. Easily set without a lot of tension on the straps.

Last edited by edwardb; 01-31-2020 at 07:48 AM.
Build 1: Mk3 Roadster #5125. Sold 11/08/2014.
Build 2: Mk4 Roadster #7750. Sold 04/10/2017.
Build Thread
Build 3: Mk4 Roadster 20th Anniversary #8674. Sold 09/07/2020.
Build Thread and
Video.
Build 4: Gen 3 Type 65 Coupe #59. Gen 3 Coyote. Legal 03/04/2020.
Build Thread and
Video
Build 5: 35 Hot Rod Truck #138. LS3 and 4L65E auto. Rcvd 01/05/2021. Legal 04/20/2023.
Build Thread. Sold 11/9/2023.
-
Post Thanks / Like - 1 Thanks, 1 Likes
-
01-30-2020, 11:18 PM
#861
Senior Member
Windshield Installed (continued)
Had just a slight amount of squeeze out on the inside in a couple places, so cleaned that up. It turned out great. What a relief. They recommended leaving the straps for several days, so obviously that’s what I’ll do. You can see from this close-up that it fit very nicely and the trim lays down well. Including around the wipers. Note this particular trim is relatively flat and not rounded like the trim used on the side windows. The build manual says that no trim is a little more of a modern look. Which it is. Like the hatch glass. But the edges of the provided windshield aren't polished plus the gaps on mine were different on the ends versus the top and bottom. So for me, the trim is a much better look. Doesn't look out of place at all IMO.

I’m stoked how cool the car looks on the ground at ride height (first time for a while) and now with the finished look of the windshield. Really getting close now. Also the first time to get some decent pics of the new installed side pipes without the lift towers in the way. (With my riding mower and snowblower photobombing in the reflection.)

One last detail. I mentioned a few updates ago that Factory Five isn’t offering custom fitted floor mats for the Gen 3 Coupe. So after a little Google searching, found a company that will make custom mats from your supplied patterns. I think it’s OK to give details because (a) I’m not selling for them, (b) not aware any forum vendors offer such a service. https://www.floormatguys.com/ is the place. Contacted them and they had me make paper patterns and send. Received the finished floor mats a couple days ago and they look and fit great. They’re 28 oz nylon with a ribbed back and black serged yarn on the perimeter. They’ll do other colors, embroidery, heel pads, etc., but I kept it real simple. About $100 including shipping. This picture isn’t great but gives the idea.

Starting working on my show signs for Autorama. One month away now and just a few things left on the actual build.
Last edited by edwardb; 01-31-2020 at 08:07 AM.
Build 1: Mk3 Roadster #5125. Sold 11/08/2014.
Build 2: Mk4 Roadster #7750. Sold 04/10/2017.
Build Thread
Build 3: Mk4 Roadster 20th Anniversary #8674. Sold 09/07/2020.
Build Thread and
Video.
Build 4: Gen 3 Type 65 Coupe #59. Gen 3 Coyote. Legal 03/04/2020.
Build Thread and
Video
Build 5: 35 Hot Rod Truck #138. LS3 and 4L65E auto. Rcvd 01/05/2021. Legal 04/20/2023.
Build Thread. Sold 11/9/2023.
-
Post Thanks / Like - 0 Thanks, 2 Likes
-
01-31-2020, 06:58 AM
#862
Senior Member

Looks great Paul. Interesting to hear the steps of getting the glass in.
I cant remember but have you already done the alignment? Do you plan to do it yourself it not?
MK4 #8900 - complete kit - Coyote, TKO600, IRS - Delivered 6/28/16 First Start 10/6/16 Go cart - 10/16/16 Build completed - 4/26/17 - 302 days to build my 302 CI Coyote Cobra - Registered and street legal 5/17/17
Build Thread
http://thefactoryfiveforum.com/showt...e-build-thread
PHIL 4:13 INSTAGRAM - @scottsrides
-
01-31-2020, 07:56 AM
#863
Senior Member
Originally Posted by
wareaglescott
Looks great Paul. Interesting to hear the steps of getting the glass in.
I cant remember but have you already done the alignment? Do you plan to do it yourself it not?
Thanks Scott. Yes, I have the tools to do my own alignments. Longacre digital caster/camber gauge, toe plates and laser level instead of using string. Got it dialed in before the body was on. I'll check it one more time before driving season starts now that it's done and I've tweaked the ride height a couple times. But I expect it's very close right now.
Last edited by edwardb; 01-31-2020 at 08:10 AM.
Build 1: Mk3 Roadster #5125. Sold 11/08/2014.
Build 2: Mk4 Roadster #7750. Sold 04/10/2017.
Build Thread
Build 3: Mk4 Roadster 20th Anniversary #8674. Sold 09/07/2020.
Build Thread and
Video.
Build 4: Gen 3 Type 65 Coupe #59. Gen 3 Coyote. Legal 03/04/2020.
Build Thread and
Video
Build 5: 35 Hot Rod Truck #138. LS3 and 4L65E auto. Rcvd 01/05/2021. Legal 04/20/2023.
Build Thread. Sold 11/9/2023.
-
01-31-2020, 10:46 AM
#864
Soaking in all the details. You set the bar very high!
-
01-31-2020, 12:44 PM
#865
Senior Member
Originally Posted by
edwardb
Huge day today. Ive been sweating about the windshield installation for some time. Now can say its basically done. Ive been reading every build thread and post I could find trying to learn about installing the windshield in the Coupe since Ive not done anything like that before. Several had some excellent detail, so thanks if you were one of them. Plus watched a bunch of YouTube videos. But then I got cold feet so thought I would go for a pro installation. Had a couple referrals but they didnt want to do it. So, then I went back into DIY mode and decided Id give it a try. Ordered up the needed materials and started prepping. Then last Saturday we had the club Cars and Coffee here at our house. I told my windshield story, and one of the club members approached me after the event and said he wanted to help. Retired now, but in his past life worked many years for a major chemical company and with OEs and glass. He came back last Monday with a colleague who has also been doing this for many years. Is that perfect or what? Talked through the details, gave me some homework, they came back today, and its done. With a lot of coaching, I did some of the work. But experience counts for details like laying down the urethane bead, etc. Huge relief and I cant thank them enough. Yeah, I probably could have done it myself. But Im positive it wouldnt have turned out so well and would have been much more stressful to say the least. Took a number of pictures so will caption them describing what we did.
The Coupe build manual recommends a 1-inch frit (black border) on the top and sides, and 2-inches along the bottom of the windshield. So after thoroughly cleaning the glass, used 1/2-inch 3M Fine Line to mask for this and an additional 1-inch of plain masking tape for sloppy painters like me. I had done some testing beforehand and found the Fine Line work great with the black primer material and left a perfectly sharp line.
After trying it both ways, decided I strongly preferred the trim around the edge versus no trim. Expecting that, I had previously ordered and received 15 feet of 19mm UM1913BR Flexline Windshield Auto Glass Universal Trim Rubber from Amazon. Recommended in other threads. So next up installed the trim. Takes some work to get it to fit over the glass, and has some adhesive inside that gets a little messy. But not too hard. It easily went around the large curves. I used just a bit of heat from a heat gun on the sharper curves at the top and it went on smoothly with no puckers. Looked great. One hint. I was going to do the black frit first, and then put on the trim. My guys said put the trim on first. Great advice.
Next up was prepping the opening on the body. This is where I though it got a little interesting. I was concerned (and a little skeptical) about the black frit and whether it would really stick to the glass. My coaches said just the opposite. Whatever chemicals are in the primer and the chemical properties of the glass said that was a total non-issue. The bigger issue was the body. They said the majority of failures they have are not sticking to the paint or the paint delaminating. So for them, body prep was very important. After some discussion, we decided I should abrade the paint where the primer and adhesive would be applied. Settled on 220 grit. So did that, added masking for protection, and covered the top of the dash. Hurt to be sanding on my paint, but kept reminding myself it would be buried. And it is.
That was my homework. Today we went for it. After another round of cleaning with the proper materials (cleanliness is critical) and one last push down on the tape, brushed a coat of primer on the body and three coats on the glass with daubers. Let it dry 15 minutes between coats and pulled the tape after 15 minutes. Had a couple of real tiny spots to clean up on the windshield, but mostly came out sharp and perfect.
Now time to set the glass. We had already determined the top and sides required a slightly larger bead of adhesive than the bottom. So had two different tips ready with the V-cut that glass installers use. The urethane was applied with a power caulking gun which gives a solid and clean bead. Little bit of tooling where it was necessary to stop and start. I was watching during this step.
Then in with the prepped windshield. We had dry fit it previously, so knew if would fit OK. Once in place, pushed down firmly all around the perimeter. As I saw in another build thread, used some blocks wrapped with towels and straps to hold it in place. The windshield did need to be pulled down slightly on the ends. But not a lot or as much as some others have described. In the 1/8 to 1/4-inch range. Easily set without a lot of tension on the straps.
that turned out great looking ,what brand black frit did you use and where did you buy? thanks as always for sharing
-
Post Thanks / Like - 0 Thanks, 1 Likes
-
01-31-2020, 01:43 PM
#866
Originally Posted by
edwardb
I am CONSTANTLY STUNNED by how beautifully your builds are put together. Absolutely Incredible!
Dave
Mk 3.1 - #6882 - 5.0L 302 - FiTech EFI - 3-Link - 3.08 Ratio - 15" Wheels
Greenhorn and doing the best I can
My photos are at:
My Flickr acct
Videos are at:
YouTube Videos
-
Post Thanks / Like - 1 Thanks, 1 Likes
-
01-31-2020, 02:53 PM
#867
Senior Member
Originally Posted by
jwhit
that turned out great looking ,what brand black frit did you use and where did you buy? thanks as always for sharing
You're welcome. Enjoy sharing, especially when the outcome is good! I knew that question would come up. This installation was all done with Dow products. The black frit material is Black Betaprime 5504G. Adhesive is Betaseal Xpress. Both available on Amazon. Perhaps elsewhere. I've seen several other builds done with 3M products, which I'm sure is fine too. This was the brand my guys wanted to use. Whatever you do, use the same mfg for the black frit/primer and adhesive. And study their documentation for proper use and materials for cleaning the glass. Mentioned in my write-up, but I was also especially interested to see how the nozzle was cut to get the proper bead. And the use of a powered caulk gun. Lots of videos on YouTube showing both.
Build 1: Mk3 Roadster #5125. Sold 11/08/2014.
Build 2: Mk4 Roadster #7750. Sold 04/10/2017.
Build Thread
Build 3: Mk4 Roadster 20th Anniversary #8674. Sold 09/07/2020.
Build Thread and
Video.
Build 4: Gen 3 Type 65 Coupe #59. Gen 3 Coyote. Legal 03/04/2020.
Build Thread and
Video
Build 5: 35 Hot Rod Truck #138. LS3 and 4L65E auto. Rcvd 01/05/2021. Legal 04/20/2023.
Build Thread. Sold 11/9/2023.
-
02-01-2020, 10:07 AM
#868
Senior Member
That looks great Paul. I assume cracked windshields on the coupe are much less prevalent than the roadster.
-
02-01-2020, 12:37 PM
#869
Senior Member
Originally Posted by
shark92651
That looks great Paul. I assume cracked windshields on the coupe are much less prevalent than the roadster.
Thanks. Boy I hope so. Haven't heard or seen of any issues with the Coupe.
Build 1: Mk3 Roadster #5125. Sold 11/08/2014.
Build 2: Mk4 Roadster #7750. Sold 04/10/2017.
Build Thread
Build 3: Mk4 Roadster 20th Anniversary #8674. Sold 09/07/2020.
Build Thread and
Video.
Build 4: Gen 3 Type 65 Coupe #59. Gen 3 Coyote. Legal 03/04/2020.
Build Thread and
Video
Build 5: 35 Hot Rod Truck #138. LS3 and 4L65E auto. Rcvd 01/05/2021. Legal 04/20/2023.
Build Thread. Sold 11/9/2023.
-
02-01-2020, 12:39 PM
#870
Not a waxer

Maybe that's because fewer Coupes have the windshields installed incorrectly.
Go ahead guys, flame away 
Jeff
-
Post Thanks / Like - 0 Thanks, 1 Likes
-
02-01-2020, 03:31 PM
#871
Amazing build Paul. Good luck at the show. No cracks yet for me and car is running great now. Can't wait for some driving and drone videos. Jim
20th Anniversary MK4 Roadster, #8752, 18 of 20, Delivered 12/03/15, 1st Start 01/28/2017, off to paint 4/13/2017, Forte 351w/ Holley EFI, Forte throttle linkage, TKO 600/Forte Hyd. Clutch, UniSteer Electra Steering, RT's turn Signals, many Breeze parts, Paint by the Jeff Miller. Finished on 10/08/2017. 500 mile inspection on 10/21/2017, 3000 mile inspection on 1/14/19.
-
Post Thanks / Like - 1 Thanks, 0 Likes
-
02-01-2020, 05:09 PM
#872
Senior Member

Originally Posted by
Jeff Kleiner
Maybe that's because fewer Coupes have the windshields installed incorrectly.
Go ahead guys, flame away
Jeff
G'day Jeff,
I'll bite. Are you able to point me in the direction of the correct way to install a roadster windscreen? Mine hasn't cracked (although I have a nice stone chip) in the 12months on the road. However with freight prices and current exchange rate, a new windscreen glass is likely to cost about a grand... Any anti crack (windscreen that is) tips would be greatly received.
Cheers, Nigel in South Oz.
-
02-01-2020, 08:58 PM
#873
Senior Member
Originally Posted by
Nigel Allen
G'day Jeff,
I'll bite. Are you able to point me in the direction of the correct way to install a roadster windscreen? Mine hasn't cracked (although I have a nice stone chip) in the 12months on the road. However with freight prices and current exchange rate, a new windscreen glass is likely to cost about a grand... Any anti crack (windscreen that is) tips would be greatly received.
Cheers, Nigel in South Oz.
I'll respond and hopefully keep the build thread on track. This is a thread I started last year when I joined the broken Roadster windshield club. https://thefactoryfiveforum.com/show...dshield-Thread. Tells about my experience, a bunch of people weighed in, and has links to other threads on the topic. Digest that and you'll probably get most of the thoughts on the subject. My take is clearly they can be installed improperly. Mainly by installing in a way that puts stress on them via the side arms. But that was categorically not the case with mine (more details in the linked thread) yet it still broke. While sitting in the garage unattended, which is an somewhat common story. Lots of theories. Some common themes. But no single failure mode. If my Roadster windshield breaks again, it will be getting plastic. Local club member (also in the linked thread) just finished his and it looks great. Hope that helps, and for whatever it's worth, you don't have to join the club. It's not very exclusive.
Last edited by edwardb; 02-01-2020 at 09:01 PM.
Build 1: Mk3 Roadster #5125. Sold 11/08/2014.
Build 2: Mk4 Roadster #7750. Sold 04/10/2017.
Build Thread
Build 3: Mk4 Roadster 20th Anniversary #8674. Sold 09/07/2020.
Build Thread and
Video.
Build 4: Gen 3 Type 65 Coupe #59. Gen 3 Coyote. Legal 03/04/2020.
Build Thread and
Video
Build 5: 35 Hot Rod Truck #138. LS3 and 4L65E auto. Rcvd 01/05/2021. Legal 04/20/2023.
Build Thread. Sold 11/9/2023.
-
02-01-2020, 09:25 PM
#874
Not a waxer
Originally Posted by
edwardb
...you don't have to join the club. It's not very exclusive.
I dont know about that...Ive attempted to become a member almost 30 times and still havent been accepted or taught the secret handshake!
Now, back to Pauls build 
Jeff
-
02-02-2020, 05:57 AM
#875
-
02-02-2020, 12:43 PM
#876
Paul, question: what is the distance between the windshield and the body using the UM1913BR Flexline Windshield Rubber? The reason I ask is, with the windshield resting against with the flat side there is no play up down or left to right. Doubtful that the glass with the rubber fits.
As more distant from the body as more is the play.
Thanks
-
02-02-2020, 01:05 PM
#877
Senior Member
Originally Posted by
G-Pete
Paul, question: what is the distance between the windshield and the body using the UM1913BR Flexline Windshield Rubber? The reason I ask is, with the windshield resting against with the flat side there is no play up down or left to right. Doubtful that the glass with the rubber fits.
As more distant from the body as more is the play.
Thanks
The Flexline trim gasket material section that's between the edge of the glass and the body measures .100". Then there's a bead of adhesive type material. Butyl maybe? Sticky and gummy. I would say you need about 1/8-inch clearance to fit properly. It would compress to slightly less, but that's what I aimed for. I checked the fit of my windshield before the body went to paint. I had to do some sanding on the body opening along the top. To straighten it plus give the 1/8-inch clearance. I wasn't sure at that point if I was going to use the trim gasket, but wanted to have the option plus have it look straight if I didn't. The ends had about 3/16-inch clearance without doing anything. That's all with the glass shimmed out to be flush with the body, which is roughly where it ends up when finished. FWIW, the glass can be trimmed if it comes to that. Not DIY (at least I wouldn't recommend it...) but pros have the tools and processes and know how to do it.
Last edited by edwardb; 02-02-2020 at 01:40 PM.
Build 1: Mk3 Roadster #5125. Sold 11/08/2014.
Build 2: Mk4 Roadster #7750. Sold 04/10/2017.
Build Thread
Build 3: Mk4 Roadster 20th Anniversary #8674. Sold 09/07/2020.
Build Thread and
Video.
Build 4: Gen 3 Type 65 Coupe #59. Gen 3 Coyote. Legal 03/04/2020.
Build Thread and
Video
Build 5: 35 Hot Rod Truck #138. LS3 and 4L65E auto. Rcvd 01/05/2021. Legal 04/20/2023.
Build Thread. Sold 11/9/2023.
-
02-02-2020, 06:46 PM
#878
Thanks Paul, I really like the idea to trim the glass and beforehand order the rubber to guide the glass guy how much to trim.
Keep up your good work and c-ya maybe next year at the Texas Cobra Spring Meet.
-
02-03-2020, 01:56 PM
#879
Paul, awesomely beautiful. Thanks for sharing your ideas, techniques, and insights I have learned a great deal. Good luck at the show.
Gary
-
Post Thanks / Like - 1 Thanks, 0 Likes
-
02-05-2020, 08:32 PM
#880
Senior Member

Been away from the Forum for a bit and just got caught up with your build. Absolutely stunning Paul and as usual, you have set the bar high for craftsmanship, ingenuity and a commitment for documenting your build for everyone. Getting anxious to pull the trigger on a coupe build...
Chris
Generation 3 Type 65 Daytona Coupe Complete Kit #151885 received May 6, 2022. Gen 3 Coyote, IRS, Tremec TKX, American Powertrain hydraulic throwout bearing & Wilwood brakes.
MK4 Basic Kit #7404, 347 EFI - Pro M Racing ECM, 30# injectors, 70 mm throttle body, 80 mm MAF, Edelbrock Performer aluminum heads & RPM II intake, all new G-Force T5, 3:55 gears, Pro 5.0 shifter, 3-link, carbon fiber dash/custom Speedhut gauges and paint by Da Bat.
-
Post Thanks / Like - 1 Thanks, 0 Likes


 Thanks:
  Likes:


 Reply With Quote

