-
Haha - you're right. Sorry about that! Here you go...
https://wood-steering-wheels.com
MkIV Roadster build: Gen 2 Coyote, IRS, TKO600. Ordered 10/24/18. Delivered 1/29/19. Engine installed 8/8/21. First start 9/12/21. First go-kart 9/17/21. Off to paint 4/11/22. Back from paint 12/30/22.
Build thread here.
-


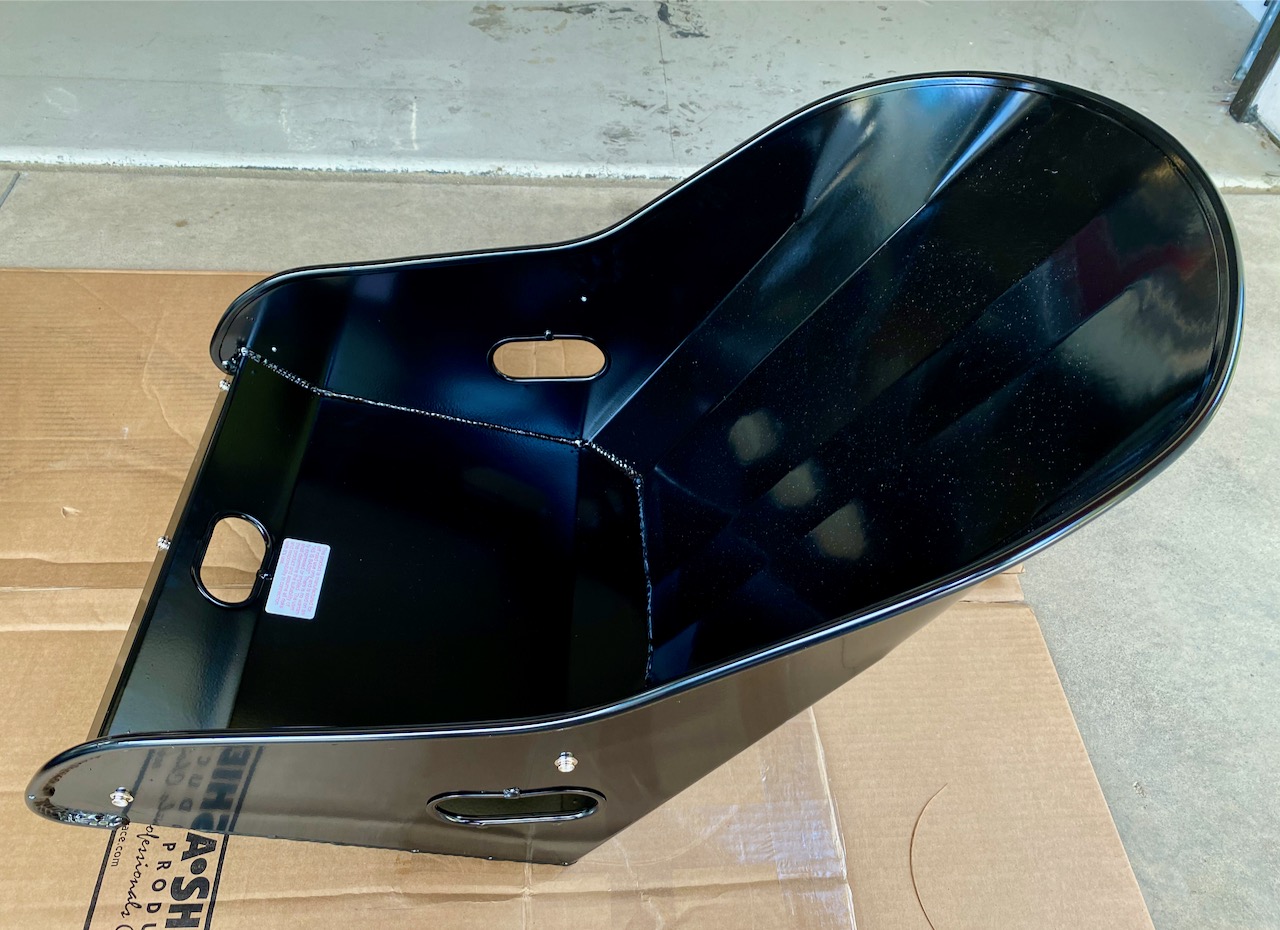
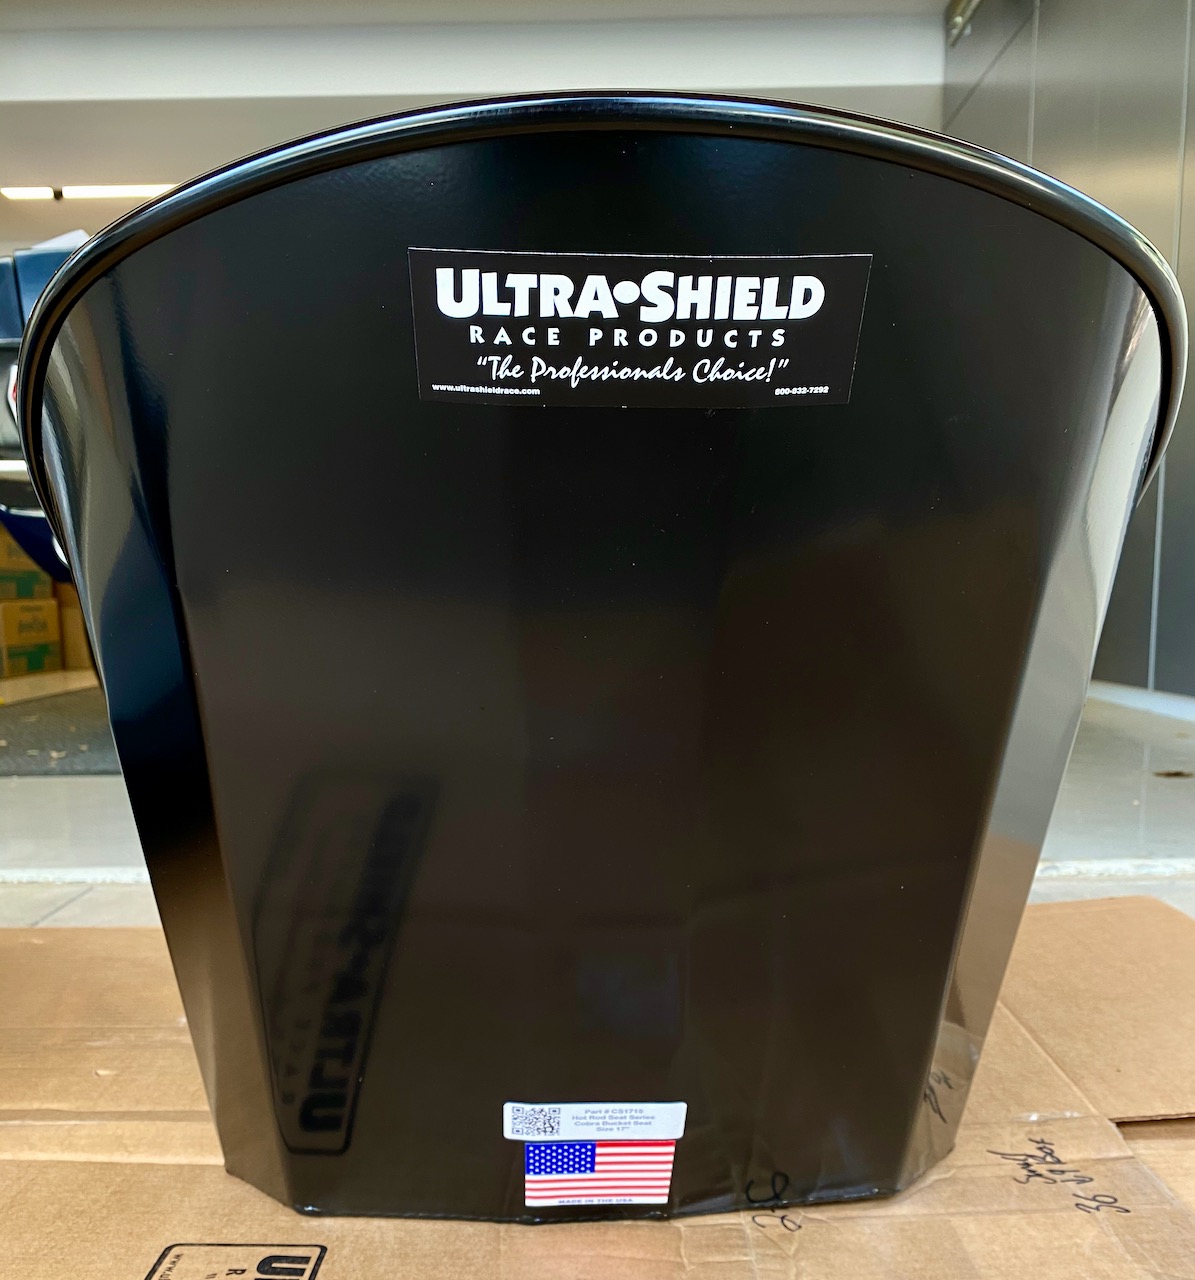
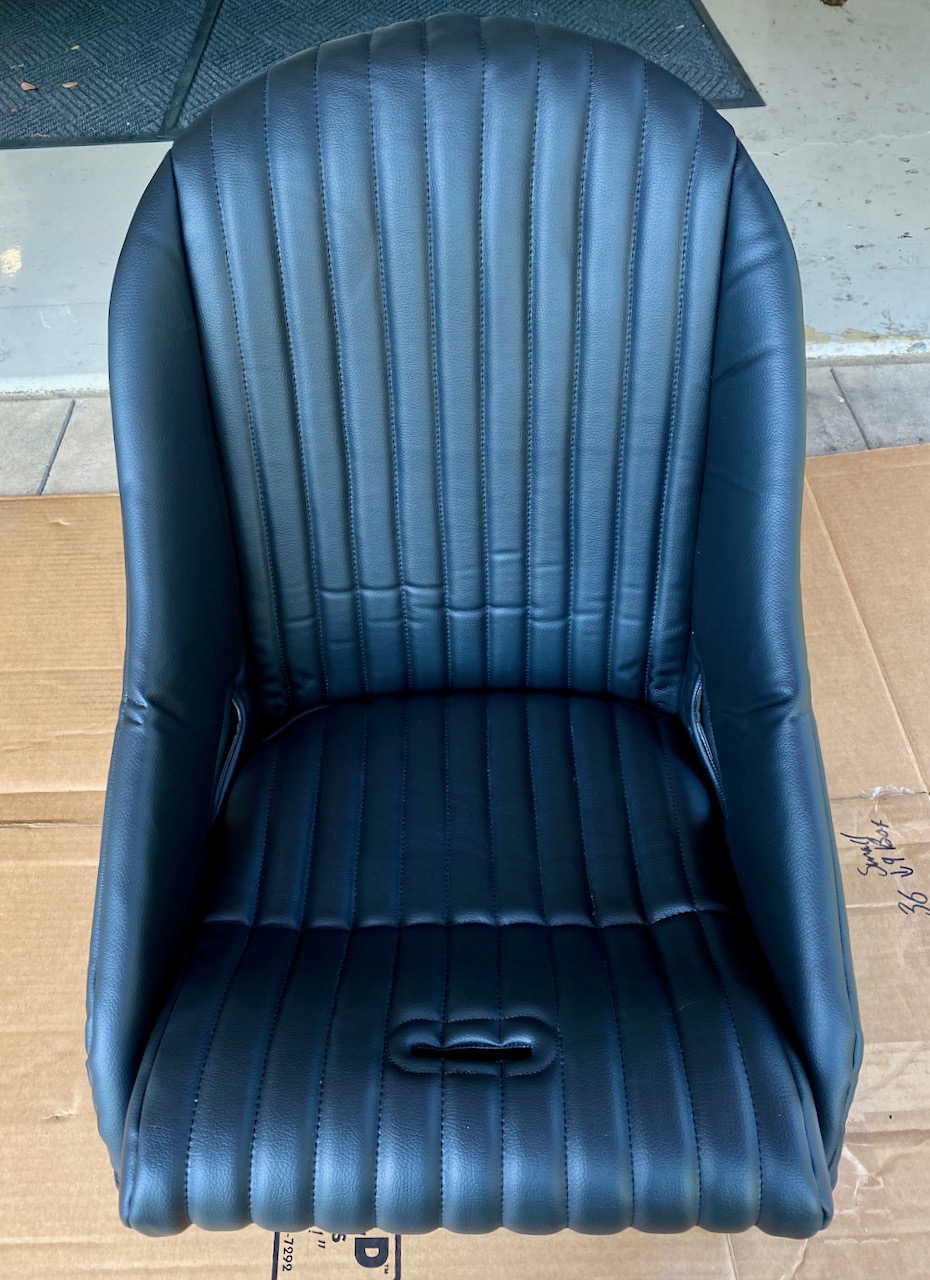
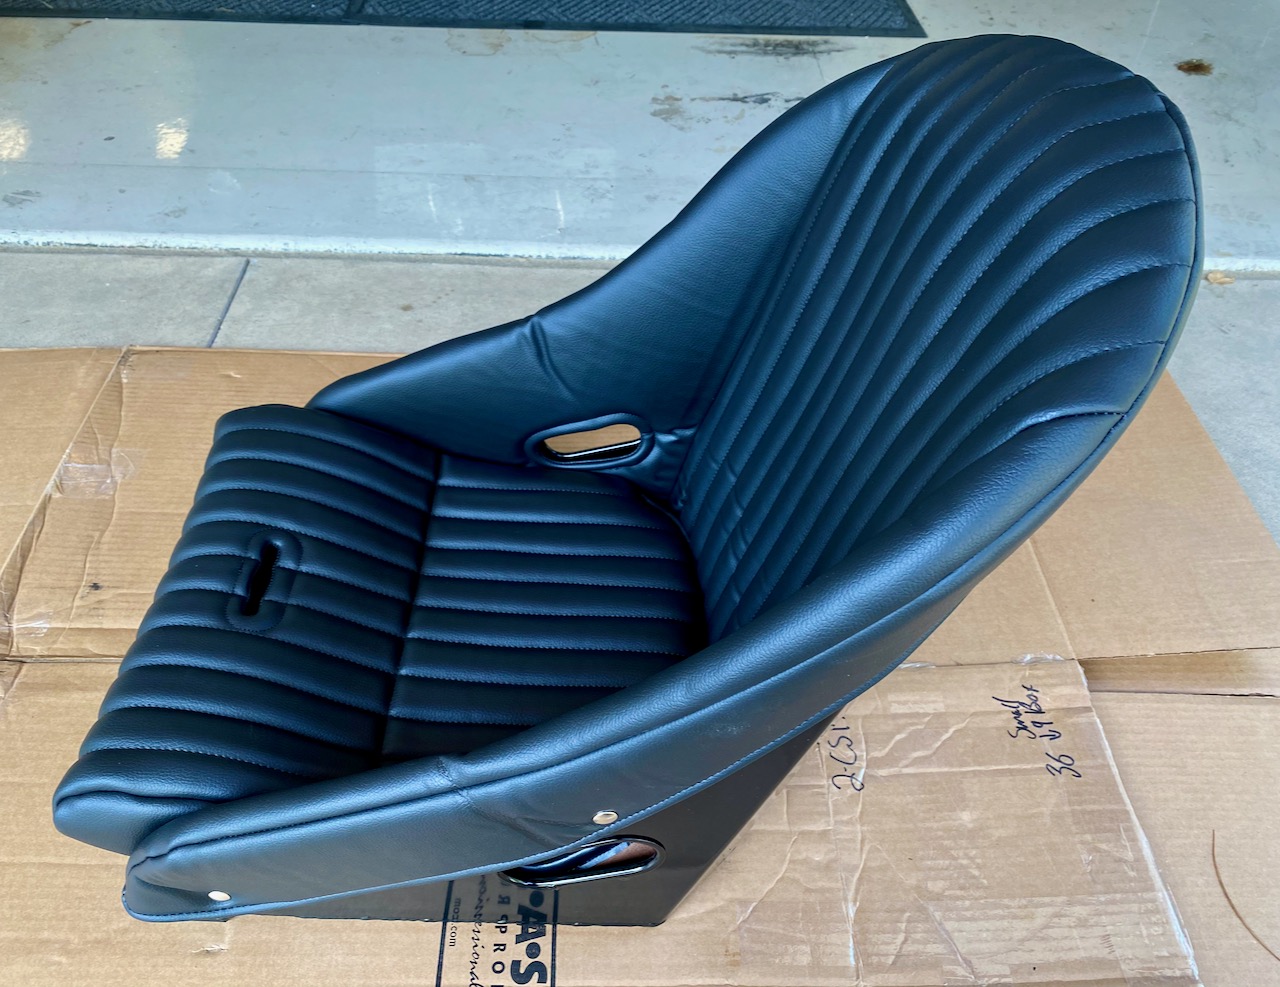
Greek Guys' Garage Roadster Build #9509 (New seats are here)
A big batch of sheet metal is finally off to powder coat, so now I get to work on a few other items while I'm waiting for those. They should be done by the end of next week. In the meantime, here are a couple of updates.
First, my new seats arrived today. These are the Ultrashield Cobra bucket seats. I ordered them with the frames powder coated in semi-gloss black, and they look really sharp. I'm having the Breeze seat bases coated in semi-gloss black to match. I was looking for something that provided a bit more safety than the leather roadster seats that came with my kit, as well as a built-in slot for the anti-sub strap. These definitely fit the bill! The feedback I'd heard on the seats was that the vinyl was *just ok* so I was planning to have the covers re-done in leather as well as adding an inflatable lumbar support and seat heaters. I'm pleasantly surprised that the vinyl is actually much nicer than I was expecting. I will likely still have them re-done in leather so that they match the center console and the dash and door cards, but they're definitely good-looking seats out of the box. At 17" wide, they're a touch wide for me, so I'll probably have the upholsterer add a bit more padding in the sides, but overall I think they'll work out great.
Question - The Breeze angled seat base seems like a pretty stout piece of steel. Would this be an acceptable place to mount the sub strap or do I need to devise a way to attach the sub strap to the frame?

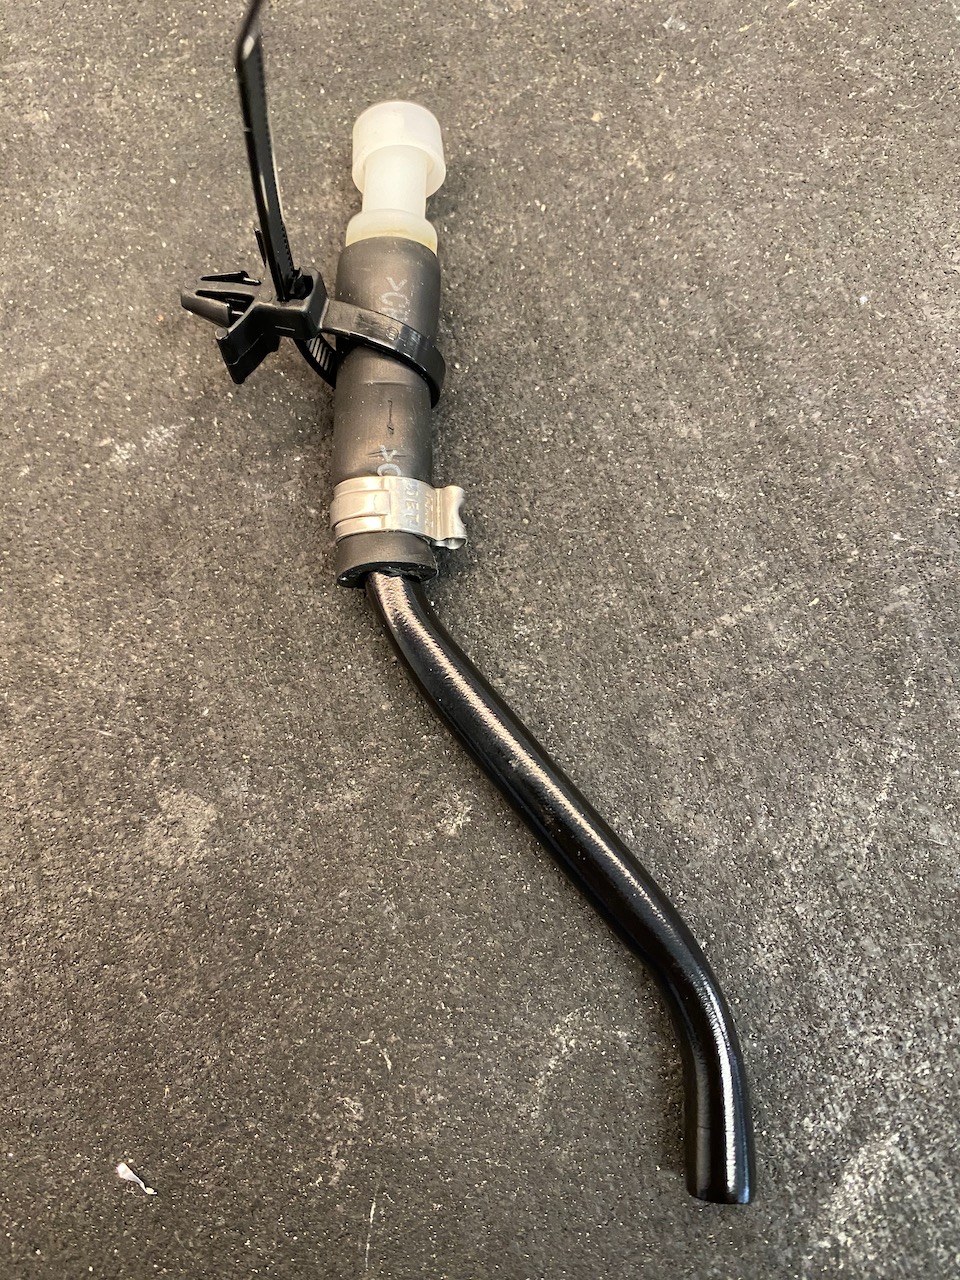
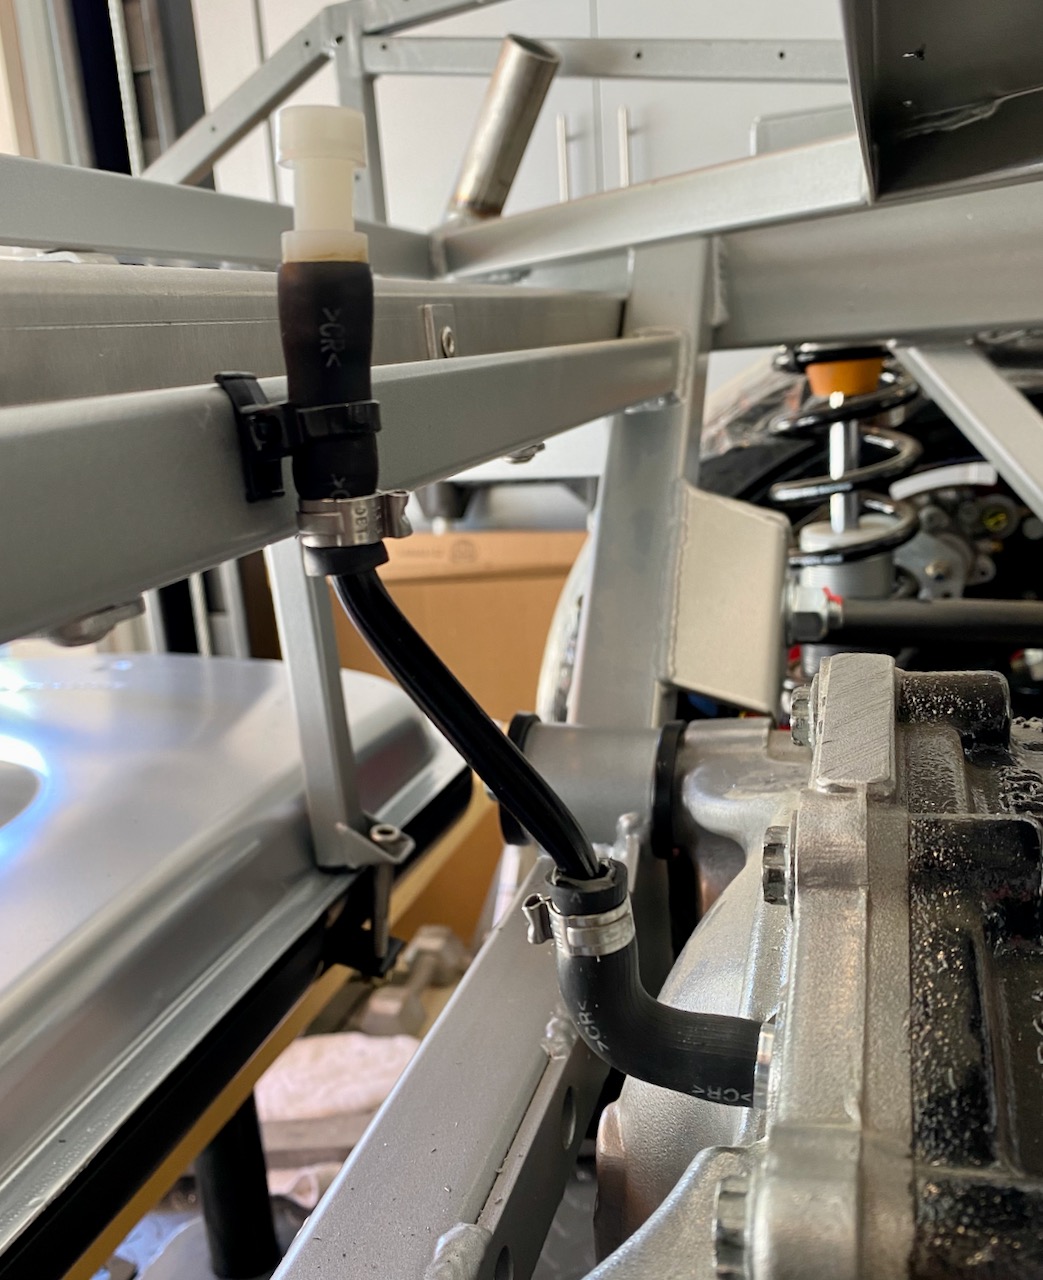
Another little item that I finished up was the IRS vent. I had ordered the Ford pre-bent vent tube, and had tried to find ways to route that but couldn't come up with anything I was happy with. I tried heating and re-bending the tube, but that didn't work out too well. In the end I just took the two ends off the OEM part and bent a short tube out of 5/16" Nicopp. Simple and clean.
Last edited by JohnK; 07-10-2020 at 03:40 PM.
MkIV Roadster build: Gen 2 Coyote, IRS, TKO600. Ordered 10/24/18. Delivered 1/29/19. Engine installed 8/8/21. First start 9/12/21. First go-kart 9/17/21. Off to paint 4/11/22. Back from paint 12/30/22.
Build thread here.
-
Post Thanks / Like - 0 Thanks, 1 Likes
 Fman
Fman liked this post
-
Greek Guys' Garage Roadster Build #9509 (coyote dbw pedal and clutch switch)
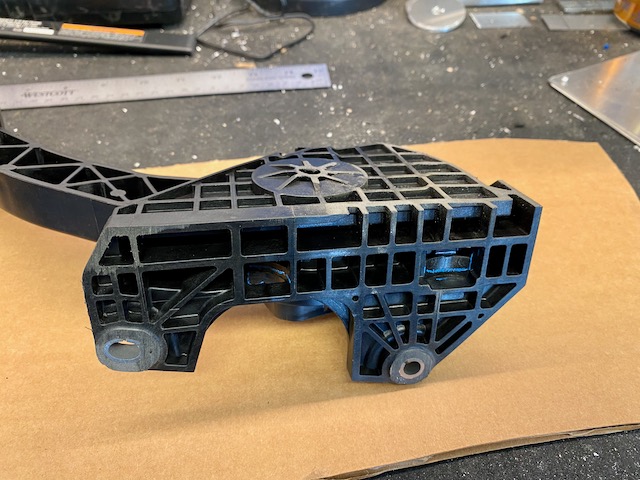
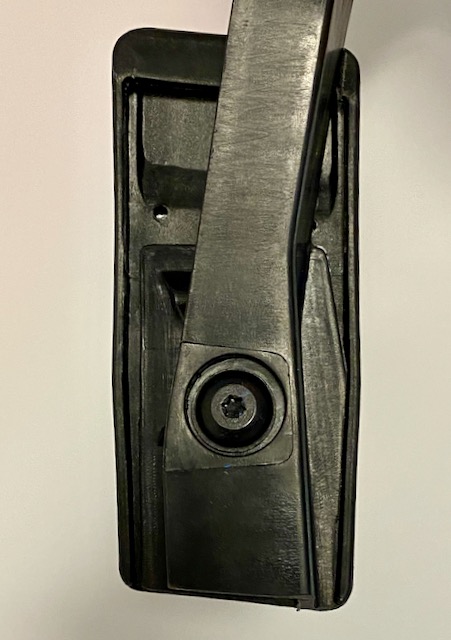
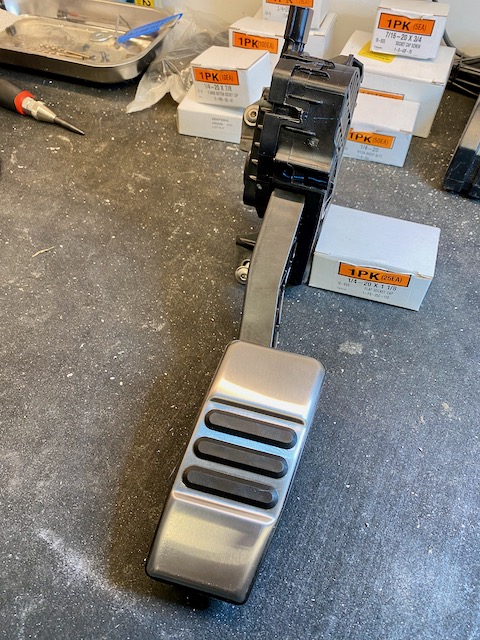
I spent the weekend working on a few items in the pedal box. I want to get the pedal box completely sorted before my sheet metal is back from PC. First, I tackled the coyote DBW pedal. I started by trimming the upper module of the pedal per the FFR instructions, and then also trimmed the left-side mounting tabs down. I ended up with this:
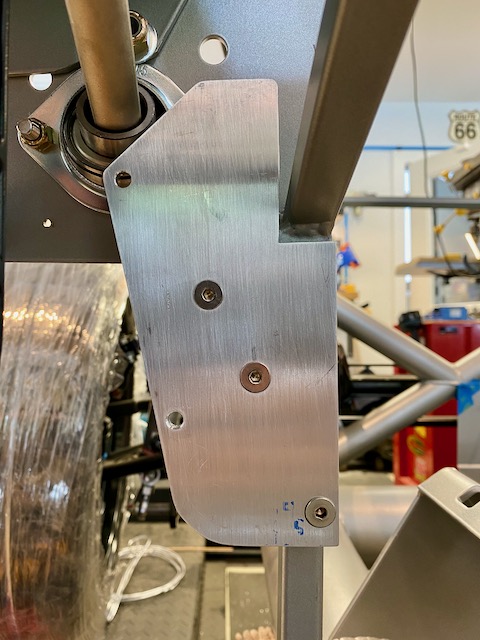
FFR provides a mounting bracket for the coyote pedal, but I wasn't thrilled with the resulting position, so I decided to copy Paul's (Edwardb) excellent mount. I made it out of 3/16" aluminum. Here's how it turned out (it'll head off to the powder coater today):
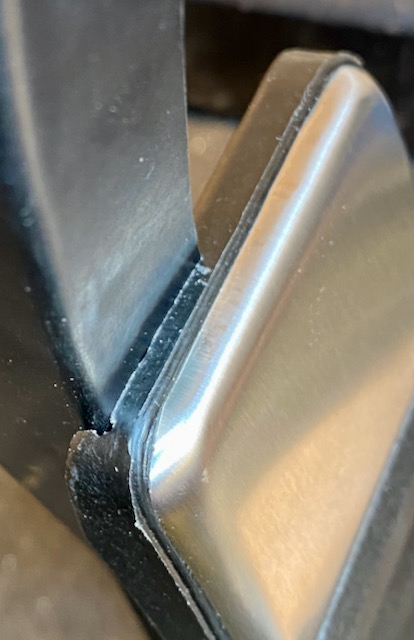
I really like the position of the coyote pedal but the pad was way too low. I do like the look of the factory pedal pad and wanted to retain it, so decided to follow the FFR instructions to flip it over and slightly trim the pedal arm. I flipped the pad over, then trimmed the arm down until it fit entirely within the pocket in the back of the pedal pad:
I was a little worried that the pad might twist since the original tab that held it in position got cut off, so I filed a notch in the top of the pad and the pedal arm now nests in the notch and prevents the pad from rotating:
Here's what the finished pedal looks like now:
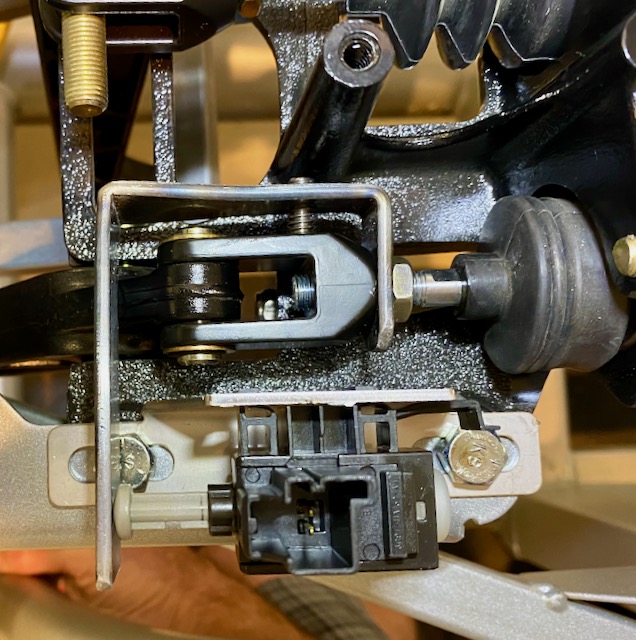
Next up was the coyote bottom clutch switch. FFR provides a mounting bracket for the switch itself, but does not not provide any way of actuating it if using a hydraulic clutch. Given that this location is impossible to access after the body is on, my goal was to come up with an actuator that didn't rely solely on the jam nut tightness to prevent it from rotating out of position. After trying out a few different concepts, I came up with this u-shaped doohickey. I drilled and tapped for a 1/4-20 set screw in the side of it that tightens against the side of the clutch arm clevis and, along with the jam nut, really locks the actuator in position and prevents if from shifting at all. The clutch arm clevis and clutch switch plunger are not in the same plane, so I put a small twist into the actuator to raise the pad so that the plunger makes contact in the center of the actuator arm:

Here it is in position. It activates the bottom switch with the clutch pedal about 1-1/2" from the pedal box wall, and the switch bracket is in the middle of it's adjustment range so plenty of room to adjust if necessary during final assembly. It's now ready to go off for powder coat too:
MkIV Roadster build: Gen 2 Coyote, IRS, TKO600. Ordered 10/24/18. Delivered 1/29/19. Engine installed 8/8/21. First start 9/12/21. First go-kart 9/17/21. Off to paint 4/11/22. Back from paint 12/30/22.
Build thread here.
-
Post Thanks / Like - 0 Thanks, 2 Likes
-
-
Post Thanks / Like - 0 Thanks, 1 Likes
Fman liked this post
-
Senior Member

The powdered coating looks really nice. Cant answer you on the submarine belt as I was never able to make it work in mine.
Kyle
Complete Kit pickup 09/05/2015, 351w, QF680, 3.55, 3-Link, 15" Halibrands with MT's, Painted Viking blue with Wimbledon white stripes on 03/15/2017. Sold in 08/2018 and totally regret it.
-
Post Thanks / Like - 1 Thanks, 0 Likes
 JohnK
JohnK thanked for this post
-
Greek Guys' Garage Roadster Build #9509 (video of E-Stopp in operation)
Now that I have the mounting tray for the E-Stopp back from powder coat, I went ahead and finished up the installation and shot a quick video of it in operation. I'm thrilled to finally have all the details and cable routing sorted out and the installation completed. I wanted to get this done before any of the trunk sheet metal went in. The built-in beeper is seriously annoying and unnecessary since the billet LED button blinks red when setting/releasing the brake, so it'll go away when I finalize the electrical side of it. Without further ado, here it is in action:
MkIV Roadster build: Gen 2 Coyote, IRS, TKO600. Ordered 10/24/18. Delivered 1/29/19. Engine installed 8/8/21. First start 9/12/21. First go-kart 9/17/21. Off to paint 4/11/22. Back from paint 12/30/22.
Build thread here.
-
Post Thanks / Like - 0 Thanks, 2 Likes
-
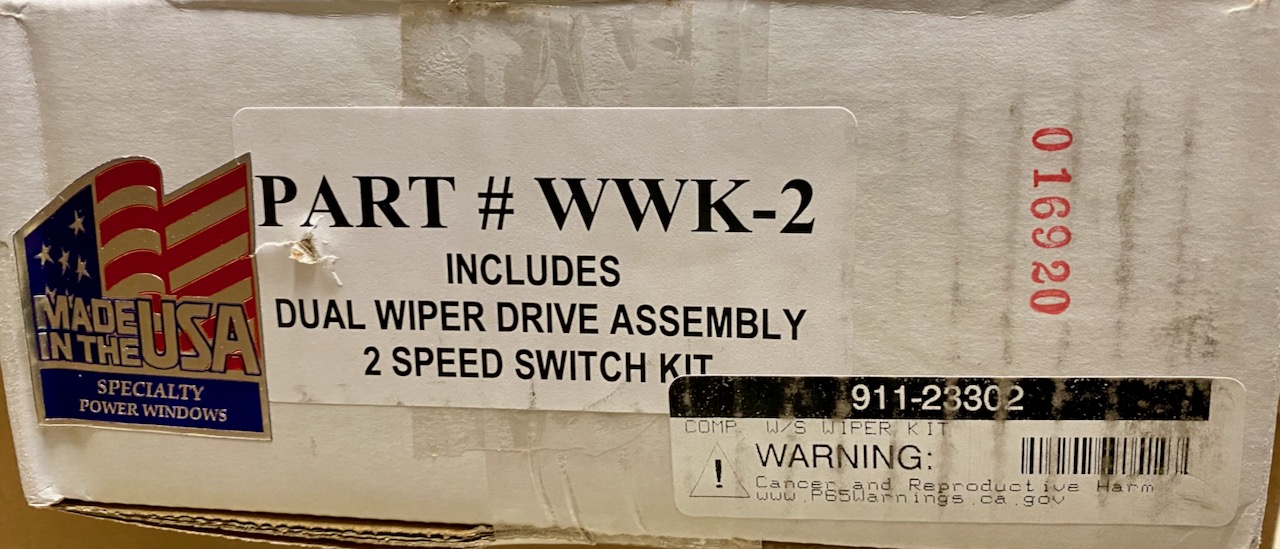
Greek Guys' Garage Roadster Build #9509 (Specialty Power Windows universal wiper kit)
I was reviewing Paul's (Edwardb's) excellent Coupe build thread recently, and came across his post on wipers here. I was intrigued by the idea of having a better alternative to the Lucas-style wipers that FFR provides, as I haven't heard too many flattering things about those. I looked into the wipers Paul used on the coupe build, and they look like a much nicer setup. One lingering question I had though, was whether I could use them with a Lucas 2-position toggle switch (Lucas P/N 35927) and preserve the 2-speed plus park features. I wanted the period-correct look of the Lucas toggle for wipers, so I was hoping to avoid having to use the rotary control that comes with the wipers. Nothing wrong with that switch - just not the aesthetic I'm going for.
I called Specialty Power Windows and asked about using the Lucas toggle. They had no idea if it would work but gave me a tantalizing lead by pointing me to a small boutique builder of Cobra replicas in Alabama called Unique Motorcars that use the Specialty Power Windows WWK universal wiper system in their builds. I gave them a call and explained what I was hoping to do and asked if they had any experience with it. They did - sort of. They do use the WWK system with a Lucas toggle, but they only use a simple on/off toggle to run the wipers in single-speed mode. But they said they didn't see any reason why it wouldn't work (famous last words - right?).
The wiper system finally arrived today from Speedway Motors, so I had to wire them up on the workbench and see if I could get them to work with the Lucas toggle. Below are the wiring diagrams for the Lucas Toggle and the wipers. After studying them for a while, I broke out some alligator clip jumpers and wired them up.
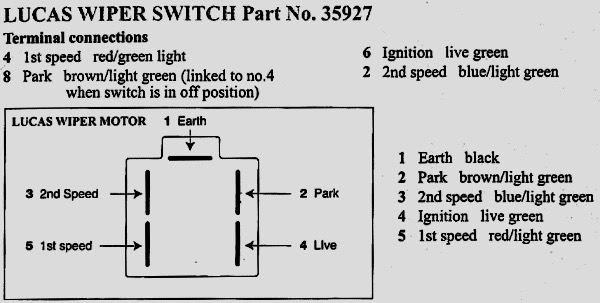


You can also see the rotary knob that comes with the wipers in the last photo. Nice piece, and I probably would have been OK using it if I couldn't get the toggle to work. However, after holding my breath and flipping the switch (and saying a quick prayer that I don't burn the garage down)... success!!! The wiper motor works with the toggle exactly as intended. I also wired up the rotary switch and the motor behaves exactly the same with either switch. Two speeds + park. Here's a quick video:
MkIV Roadster build: Gen 2 Coyote, IRS, TKO600. Ordered 10/24/18. Delivered 1/29/19. Engine installed 8/8/21. First start 9/12/21. First go-kart 9/17/21. Off to paint 4/11/22. Back from paint 12/30/22.
Build thread here.
-
Post Thanks / Like - 0 Thanks, 1 Likes
BCA liked this post
-
Senior Member

Looks very promising! I've been asked that question several times and wasn't sure. Will be interested to see how it goes installing into your Roadster. Have been asked about that numerous times as well. One hint, in case you may have missed it in my Coupe build thread. The gear box (not installed in your video obviously) along with the cable and wheelboxes are packed with grease. Instructions explain this in detail. I don't recommend running them other than very briefly without the lube. Especially in the gear box. I ran mine some when setting it up and it started showing some wear when run dry. Not the smartest thing I've ever done... No permanent damage. But could have been. Good luck.
Build 1: Mk3 Roadster #5125. Sold 11/08/2014.
Build 2: Mk4 Roadster #7750. Sold 04/10/2017.
Build Thread
Build 3: Mk4 Roadster 20th Anniversary #8674. Sold 09/07/2020.
Build Thread and
Video.
Build 4: Gen 3 Type 65 Coupe #59. Gen 3 Coyote. Legal 03/04/2020.
Build Thread and
Video
Build 5: 35 Hot Rod Truck #138. LS3 and 4L65E auto. Rcvd 01/05/2021. Legal 04/20/2023.
Build Thread. Sold 11/9/2023.
-
Thanks so much for the warning about running it without grease. I did see the page in the instructions about packing everything with bearing grease. It'll be a little while before I do any further work on the wipers (not until I get the Lizard Skin sprayed) but I just had to satisfy my curiosity on whether or not the Lucas switch would work.
MkIV Roadster build: Gen 2 Coyote, IRS, TKO600. Ordered 10/24/18. Delivered 1/29/19. Engine installed 8/8/21. First start 9/12/21. First go-kart 9/17/21. Off to paint 4/11/22. Back from paint 12/30/22.
Build thread here.
-
Greek Guys' Garage Roadster Build #9509 (lots of brake and fuel system work)
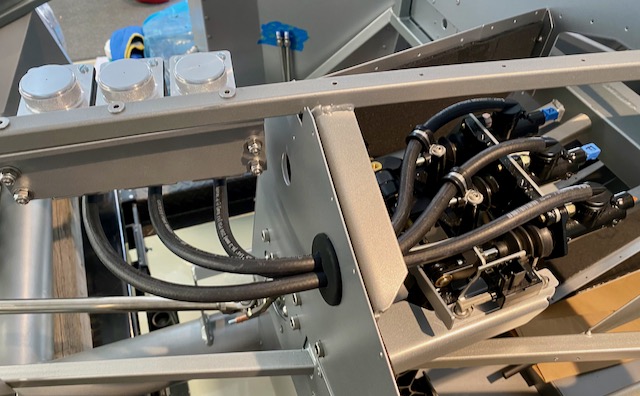
It's been a very productive last few weeks. I have the rear harness mods complete and the harness installed, 3/8" SS fuel hard lines installed (waiting to install tank to fab up the SS PTFE lines), and SS rear brake lines finished. I'm hoping to finish the front brake lines tomorrow so I can bleed the brakes. I'd like to bleed the brakes and know I have a leak-tight system before installing the rest of the sheetmetal as it'll be much easier to get to any lines that need rework (hopefully none).
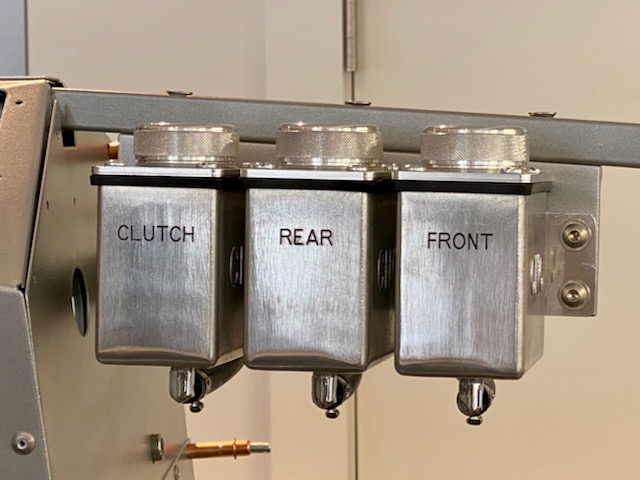
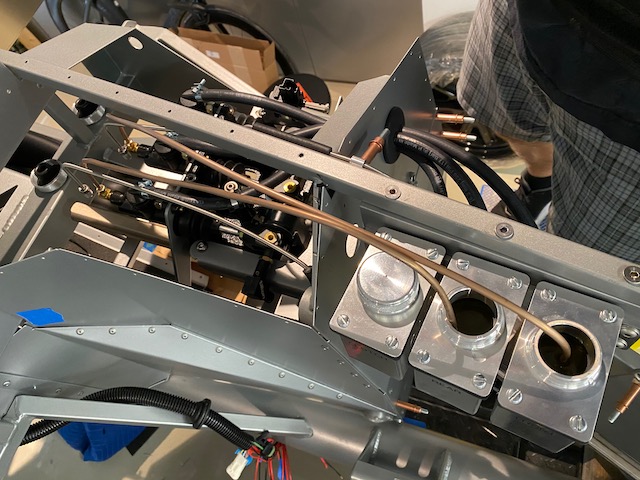
One small part of the brake system is the reserviors. I decided to get them engraved to make things less confusing down the road. I called a local engraver and described what I needed, and they did an amazing job. It's a husband and wife business. It turns out the husband has built a cobra replica (don't remember the brand) and they also have a '69 Ferrari that they've restored and show, and a Fiat that they're restoring. I love it when I go to run a quick errand and run into "car people" and end up chatting for an hour. I even got a recommendation for an upholstery place from them.
Here's the reservoir now in the car. It'll need to swing out of the way later to install the engine, but I can get it all plumbed up now.
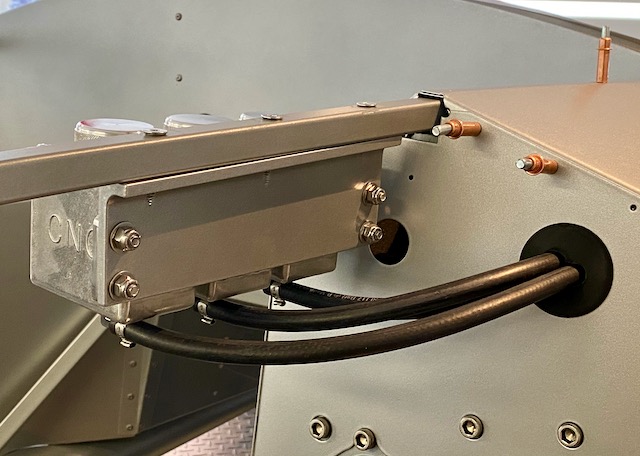
Here's a shot of the backside, showing the hose routing, and the grommet I made to pass the three hoses through the footbox wall. I'm very happy with how that turned out.
Question: I'm planning to run catalytic converters, and I'm a little concerned about heat. I'm considering installing heat shields on the hoses like these. Is that a good idea or not necessary?
Here's a shot of the hose routing in the footbox. I wanted to preserve as much serviceability in here as possible, so I've ordered some spring hose clamps for the hose connections to the MC's. I figure this will at least give me a fighting chance to be able to undo those clamps down the road if needed. No way in hell I'd be able to cut off pinch clamps in there, and I'm generally not a huge fan of worm gear clamps so I avoid those whenever I can.
MkIV Roadster build: Gen 2 Coyote, IRS, TKO600. Ordered 10/24/18. Delivered 1/29/19. Engine installed 8/8/21. First start 9/12/21. First go-kart 9/17/21. Off to paint 4/11/22. Back from paint 12/30/22.
Build thread here.
-
Senior Member

John, one comment on brake lines. I have read quite a few build threads and have never seen anyone wrap anything around the hoses coming from CNC reservoirs to M/C's. One item I did notice on a few builds and did do on my hard lines was to run the front hard line going to M/C around the upper channel around backside of the CNC reservoirs. This helps eliminate the brake line being down by the header on the lower section of the channel. I can only assume this would definitely help eliminate some heat on the brake line being away from the header.
Nice work on everything! Always enjoy reading your build thread and watching your progress....
Last edited by Fman; 08-18-2020 at 06:45 PM.
-
Post Thanks / Like - 1 Thanks, 1 Likes
JohnK thanked for this post
-
Senior Member

Hello JohnK,
I just found your build thread, and really enjoyed reading it. Great pictures and great job documenting your progress. Very helpful. I especially liked your e-stop install. First one I've seen. Very cool! Your build is coming along very nicely, and getting me excited for when my kit arrives. Keep up the great work and I'll keep following and taking notes of build tips!
Chris
Coupe complete kit delivered: 4/22/24.
Build Thread. Coyote. T-56. IRS w/3.55. Wilwoods. PS. HVAC. Side windows.
MK4 Complete kit.
Build Thread Index. Delivered: 10/15/2020. Legal: 7/25/23. Coyote Gen3. TKO600 (0.64 OD). IRS w/3.55. PS. Wilwoods. Sway bars. This build is dedicated to my son, Benjamin.
Build Thread.
-
Senior Member
P.S. I meant to give you a big THANK YOU for showing that a four-post lift can be used. I've had one for about four years, but couldn't really see a way to do the build (at least not the early part) on my four-post. My back thanks you in advance!!
Chris
Coupe complete kit delivered: 4/22/24.
Build Thread. Coyote. T-56. IRS w/3.55. Wilwoods. PS. HVAC. Side windows.
MK4 Complete kit.
Build Thread Index. Delivered: 10/15/2020. Legal: 7/25/23. Coyote Gen3. TKO600 (0.64 OD). IRS w/3.55. PS. Wilwoods. Sway bars. This build is dedicated to my son, Benjamin.
Build Thread.
-
Thank you so much! I'm glad to hear you're enjoying it, and finding it helpful. Honestly, I would never have had the nerve to take on a project like this were it not for the incredible build threads that others have posted here. Most of what I do I've copied from what others have done, so I'm very glad to hear that something I've posted can be of use to you or others. I'm really enjoying the build so far, and I'm sure you will too. It sounds like you're spending a bunch of time reading build threads before you start. That's so smart. I revised my plan in my head countless times as a result of seeing what others have done before me. It's definitely easier to change plans before you've done that part of the build. It sometimes entails re-buying parts, but I think that's to be expected, to some extent. The more research you do now, the less part re-purchasing you'll have down the road.
As far as the lift goes, I'm glad that's helpful. I can see that a 2-post lift would be an advantage over a 4-post lift in some situations, but that just wasn't an option for me due to my garage ceiling height. I'm very happy with the 4-post so far. No way my back could have handled building this car on jack stands. FWIW- I have the chassis on jacks and stands now, as I showed in the other thread, but for a long time it was just sitting on the frame cart. It wasn't until recently that the cart got in the way of things like brake and fuel line routing, but you'll be able to just roll the frame cart directly onto the 4 post lift, lock the casters, and get to work.
Edited to add: In the interest of full disclosure, getting the chassis off the frame cart and onto it's wheels (and eventually onto jacks and stands) was a bit of a "three Stooges trying to solve a Rubik's cube" affair. If you decide to go this route, build your frame cart in a way that it can be disassembled from below. What I ended up doing was jacking up one side, unscrewing the center brace from underneath, removing the cross brace from the side that was raised, and then repeating on the other side. Sounds easy but it took a while to get it without crushing myself in the process. You just want to give some thought as to how you're going to get the car off the cart down the road. I suppose I could have rolled the entire thing off the 4-post lift into the driveway and dealt with it there, but I didn't have any helpers around that day.

Last edited by JohnK; 08-23-2020 at 07:10 PM.
MkIV Roadster build: Gen 2 Coyote, IRS, TKO600. Ordered 10/24/18. Delivered 1/29/19. Engine installed 8/8/21. First start 9/12/21. First go-kart 9/17/21. Off to paint 4/11/22. Back from paint 12/30/22.
Build thread here.
-
Post Thanks / Like - 0 Thanks, 1 Likes
-
-
Post Thanks / Like - 0 Thanks, 2 Likes
-
-
-
And finally it was time to bleed the brakes. Thankfully I picked up a pressure bleeding cap for the CNC reservoirs before they went out of business. This thing was a godsend. I started by fabbing up a couple of short lines out of Nicopp to "bench bleed" the MC's in the car:
And then used the pressure cap. I set the pressure regulator to 10 psi, checked and refilled the reservoirs after bleeding each bleeder, went around twice, and then crossed my fingers and prayed.
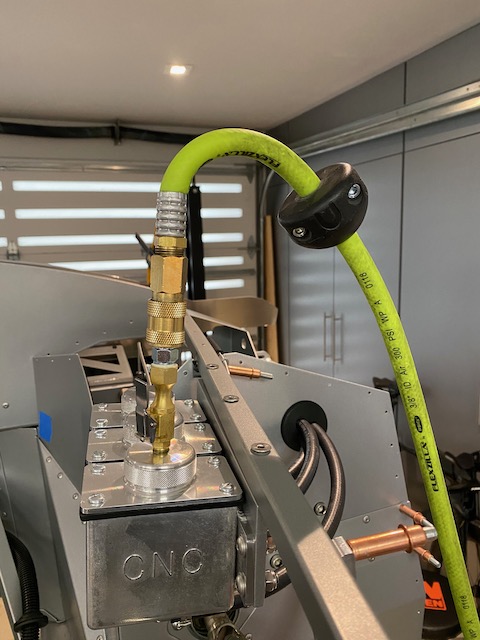
...and, success!!!! No leaks. The pedal felt a little spongy so I went around and bled everything a third time and now have a very firm pedal. It's been sitting for a couple of days and no leaks so I'm calling it good!
MkIV Roadster build: Gen 2 Coyote, IRS, TKO600. Ordered 10/24/18. Delivered 1/29/19. Engine installed 8/8/21. First start 9/12/21. First go-kart 9/17/21. Off to paint 4/11/22. Back from paint 12/30/22.
Build thread here.
-
Post Thanks / Like - 0 Thanks, 1 Likes
-
-
08-25-2020, 10:46 PM
#100
Senior Member
Very nice John! Those brake lines look sick... that is a huge task with stainless, well done! I also just bled out my brake system, I used the same method but needed to also go old school pump and hold one time around after the power bleed method.
-
08-25-2020, 11:05 PM
#101
Thanks Travis! I really appreciate it. Congrats on getting your brakes bled as well. It definitely feels good to get that sorted out.
MkIV Roadster build: Gen 2 Coyote, IRS, TKO600. Ordered 10/24/18. Delivered 1/29/19. Engine installed 8/8/21. First start 9/12/21. First go-kart 9/17/21. Off to paint 4/11/22. Back from paint 12/30/22.
Build thread here.
-
09-02-2020, 10:15 AM
#102
I've buttoned up all the details in the trunk area now, and think I'm ready to install the trunk sheet metal and move on with the rest of the sheet metal install. I ended up stripping and re-wrapping most of the rear harness in the trunk area to get the splits where I wanted them, and also shortened the leads going to the fuel pump and fuel level sender. I also wired up the E-Stopp (that's the weatherpak connector at the top of the photo) and confirmed that it works. I added wires for a backup light (not shown) and the coil of wires in the upper trunk will eventually get routed into the trunk for the license place light and trunk light. The Breeze big bore vent is also in, and then lastly I fabbed up and installed the Aeroquip -6 AN braided PTFE lines that connect the tank to the filter and hard lines.
One trick I picked up in a few build threads is to put some large zip ties around the connectors for the fuel pump and fuel level sender. Those don't clip in very securely, but the zip ties really lock them down nicely.

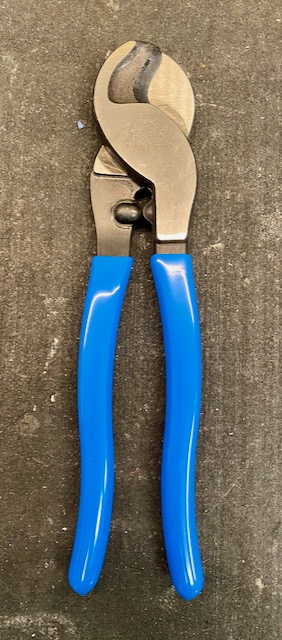
One quick tip - BUY THIS TOOL! This is an Ancor wire and cable cutter, up to 2/0 gauge from Del city (P/N 703005) but you can find similar ones in many other places. In the few weeks that I've had it I've used it to cut hoses, parking brake cable housings, and the Aeroquip braided SS hoses. Especially on the braided hoses it's been a godsend. It makes beautiful clean cuts with no fraying of the braided sleeve. Probably the best $24 I've spent in a long time.
MkIV Roadster build: Gen 2 Coyote, IRS, TKO600. Ordered 10/24/18. Delivered 1/29/19. Engine installed 8/8/21. First start 9/12/21. First go-kart 9/17/21. Off to paint 4/11/22. Back from paint 12/30/22.
Build thread here.
-
Post Thanks / Like - 0 Thanks, 2 Likes
-
09-06-2020, 12:25 PM
#103
Senior Member

Now you tell me! I could have used that tool a long time ago. Clean build, its almost a shame to cover up such pretty work. Good call on the zip ties, those connectors have a history of breaking.
Bradley
Build thread - Mk4, Coyote, IRS, Wilwood brakes, old-style soft top and accessories.
The distance between "finished" and finished is literally infinite.
-
Post Thanks / Like - 1 Thanks, 0 Likes
JohnK thanked for this post
-
09-06-2020, 08:55 PM
#104
Senior Member

Originally Posted by
JohnK

I've buttoned up all the details in the trunk area now, and think I'm ready to install the trunk sheet metal and move on with the rest of the sheet metal install. I ended up stripping and re-wrapping most of the rear harness in the trunk area to get the splits where I wanted them, and also shortened the leads going to the fuel pump and fuel level sender. I also wired up the E-Stopp (that's the weatherpak connector at the top of the photo) and confirmed that it works. I added wires for a backup light (not shown) and the coil of wires in the upper trunk will eventually get routed into the trunk for the license place light and trunk light. The Breeze big bore vent is also in, and then lastly I fabbed up and installed the Aeroquip -6 AN braided PTFE lines that connect the tank to the filter and hard lines.
One trick I picked up in a few build threads is to put some large zip ties around the connectors for the fuel pump and fuel level sender. Those don't clip in very securely, but the zip ties really lock them down nicely.
One quick tip - BUY THIS TOOL! This is an Ancor wire and cable cutter, up to 2/0 gauge from Del city (P/N 703005) but you can find similar ones in many other places. In the few weeks that I've had it I've used it to cut hoses, parking brake cable housings, and the Aeroquip braided SS hoses. Especially on the braided hoses it's been a godsend. It makes beautiful clean cuts with no fraying of the braided sleeve. Probably the best $24 I've spent in a long time.
Looking great John...
One question for you, are you waiting for first start of engine before you install trunk sheet metal? My thought was leave it off until I go-kart to check for leaks and make sure fuel level sender works because it would be much easier to take care of any issues with that area wide open.
-
Post Thanks / Like - 1 Thanks, 0 Likes
JohnK thanked for this post
-
09-07-2020, 12:04 AM
#105
Hey Travis. I've been debating the sequence of the next few steps. I think I prefer to get the rest of the sheet metal installed and get the Lizard Skin sprayed before I start wiring and prepping for engine install and first start. I'd rather have as little in the way as possible to have to mask off when spraying Lizard Skin, so I've been thinking that I'm going to do a functional test of the fuel system before installing sheet metal. I started another thread with that question here. I figure If I can power up the fuel pump and test the whole system up to the final line that will eventually feed the engine, and it's all leak-free, then I'd feel comfortable putting the trunk sheet metal in place. I'm not as worried about the fuel level sender, as I installed the access panel in the RT drop trunk with rivnuts so I could get to the fuel level sender pretty easily down the road if necessary.
MkIV Roadster build: Gen 2 Coyote, IRS, TKO600. Ordered 10/24/18. Delivered 1/29/19. Engine installed 8/8/21. First start 9/12/21. First go-kart 9/17/21. Off to paint 4/11/22. Back from paint 12/30/22.
Build thread here.
-
Post Thanks / Like - 0 Thanks, 1 Likes
Fman liked this post
-
09-08-2020, 07:11 PM
#106
Greek Guys' Garage Roadster Build #9509 (fuel system is complete and pressure-tested)
Today I was able to finish up the fuel system and get the entire system pressure-tested. My goal is to finish getting all the sheetmetal installed so I can spray Lizard Skin before starting any electrical/wiring work. But, I didn't want to be surprised by fuel leaks down the road once I'd already riveted in the trunk sheet metal, so I decided I'd get the fuel system finalized and cap off the line from the regulator to the engine so I could power up the pump and check for leaks.
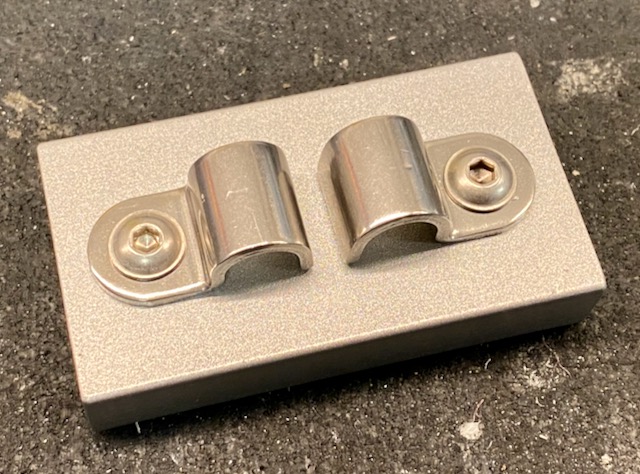
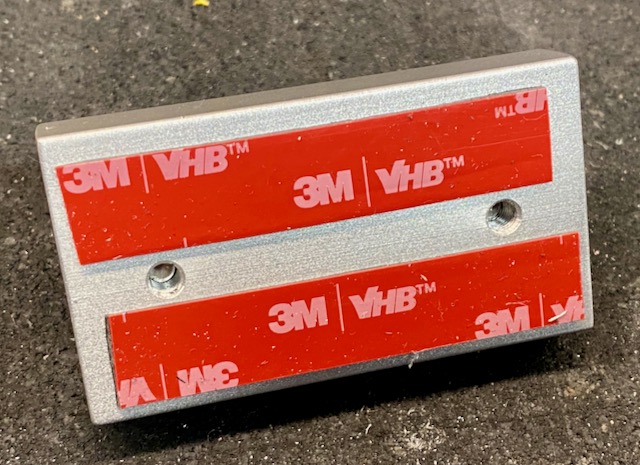
First I had to finish up a couple small brackets. This little block secures the end of the 3/8" hard lines. It's drilled/tapped for 10-32 fasteners and then painted to match the powder coat. I put a couple of strips of 3M VHB tape on the backside to secure it on the PS footbox wall, rather than putting fasteners through the footbox.
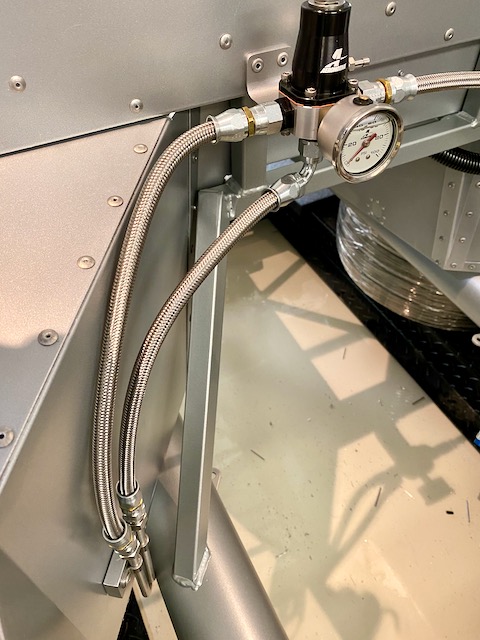
Next, I'd read in Paul's (Edwardb) build thread that he had made a new mounting bracket for the fuel pressure regulator to move it away from the firewall an inch so the coyote wiring harness can pass behind it, so I made something similar. The small silver bracket is what came with the regulator originally, and the longer one is the one I made. Again painted to match the PC. It's 1/8" x 1-1/2" steel that I bent using my Eastwood metal bender. I could have put it in a vice and heated it and pounded the ever-loving &*$% out of it, but the metal bender put a nice clean radius-bend on it.

Here they both are installed, and ready for the flex lines:

...and here are the lines, including the final line that will eventually run to the engine. I left it 3-4" long and I'll trim it to final length once the engine is in place:
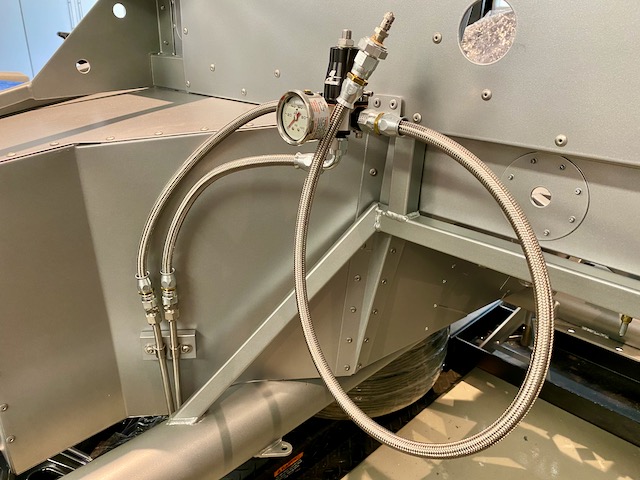
I put 3-4 gallons of gas in the tank, grabbed a fire extinguisher, and powered up the fuel pump with my Power Probe tester. Success!!! No leaks. I got the pressure dialed in to 58 psi. I'm sure I'll have to fine tune it once the engine is actually drawing fuel, but it's a good first pass. Here's a quick video because... why not.
The only thing I'm not 100% crazy about is the angle of the braided SS supply line into the pressure regulator. It fits OK and is leak-tight, but it just looks "not quite right" to me. I may pick up a 45 deg. fitting for the regulator end of that line, which will also bring it away from the PS footbox wall a little bit and prevent it from rubbing against it.
MkIV Roadster build: Gen 2 Coyote, IRS, TKO600. Ordered 10/24/18. Delivered 1/29/19. Engine installed 8/8/21. First start 9/12/21. First go-kart 9/17/21. Off to paint 4/11/22. Back from paint 12/30/22.
Build thread here.
-
09-09-2020, 12:21 PM
#107
John, so which pressure tester did you go with, I have all my lines in and would like to test the fuel system prior to motor coming in. Thanks
-
09-09-2020, 01:23 PM
#108
I used this kit to test each line individually after I assembled them, but I tested the whole system by powering up the fuel pump (Walbro 255lph electric pump on a Pro-M hanger in the tank) after the system was completed. I used one of the fittings from the test kit to cap off the line going to the engine (you can see it in one of the photos above). This effectively created a loop where fuel circulated from the pump, through the filter, to the pressure regulator and back to the tank so I was able to check all the fittings and their connections to hard lines through the whole system.
MkIV Roadster build: Gen 2 Coyote, IRS, TKO600. Ordered 10/24/18. Delivered 1/29/19. Engine installed 8/8/21. First start 9/12/21. First go-kart 9/17/21. Off to paint 4/11/22. Back from paint 12/30/22.
Build thread here.
-
09-09-2020, 05:55 PM
#109
Senior Member

John, amazing job! Are those compression fittings at the end of your hard fuel lines? Any problems getting them tightened onto the hard lines and leak-tight?
MKIV Complete Kit #9822 l BluePrint 347 EFI l TKO600 l Power Steering l Heater/Defrost l
Build Thread
-
09-09-2020, 06:29 PM
#110
Thank you very much! I appreciate it. Yes, those are Let-Lok compression fittings, Breeze part number 21608. They go onto the bare end of a 3/8" tube. They're extremely easy to tighten, and I had no leak issues. The instructions say to tighten them finger-tight and then another 1-1/4 turns. I did exactly that and had no problems at all. I could have put 37 deg. flares on the ends of the tubes with my Eastood tube flaring tool, but that would have involved spending another $100 on the 37 deg. die set. The compression fittings were far easier and fool-proof.
MkIV Roadster build: Gen 2 Coyote, IRS, TKO600. Ordered 10/24/18. Delivered 1/29/19. Engine installed 8/8/21. First start 9/12/21. First go-kart 9/17/21. Off to paint 4/11/22. Back from paint 12/30/22.
Build thread here.
-
09-09-2020, 09:15 PM
#111
Senior Member

Enjoyed catching up on your thread and progress here. Build is looking great!
MKIV Complete Kit #9494 l Delivered 1/5/19 l First Start
11/28/20 l First Go-kart
4/11/21 l Carb'd 347 l Mid-shift TKO600 l 3.55 IRS l P/S l Forte Mechanical Throttle Linkage l RT Turn Signal, Drop Trunk l Breeze Upper/Lower Radiator Support, Fan Shroud l Boig Upper/Lower Cool Tubes & Quiet Pipes l 18" FFR Gasser Wheels l
Build Thread
-
Post Thanks / Like - 1 Thanks, 0 Likes
JohnK thanked for this post
-
09-09-2020, 09:17 PM
#112
Originally Posted by
JohnK
I used
this kit to test each line individually after I assembled them, but I tested the whole system by powering up the fuel pump (Walbro 255lph electric pump on a Pro-M hanger in the tank) after the system was completed. I used one of the fittings from the test kit to cap off the line going to the engine (you can see it in one of the photos above). This effectively created a loop where fuel circulated from the pump, through the filter, to the pressure regulator and back to the tank so I was able to check all the fittings and their connections to hard lines through the whole system.
Thanks for the imformation. Ill moew thannlikely get this tester and some fuel to test my system also. All is connected with the SS flexible fuenlines from breeze also. Thanks again.
-
10-29-2020, 01:28 AM
#113
Originally Posted by
jiriza84641
Thanks for the imformation. Ill moew thannlikely get this tester and some fuel to test my system also. All is connected with the SS flexible fuenlines from breeze also. Thanks again.
did your pressure test and holds steady at 60psi while pumping, had a small leak at the fuel filter but took care of that and good. now, thanks.
-
Post Thanks / Like - 1 Thanks, 0 Likes
JohnK thanked for this post
-
05-12-2021, 11:05 PM
#114
Hey all!
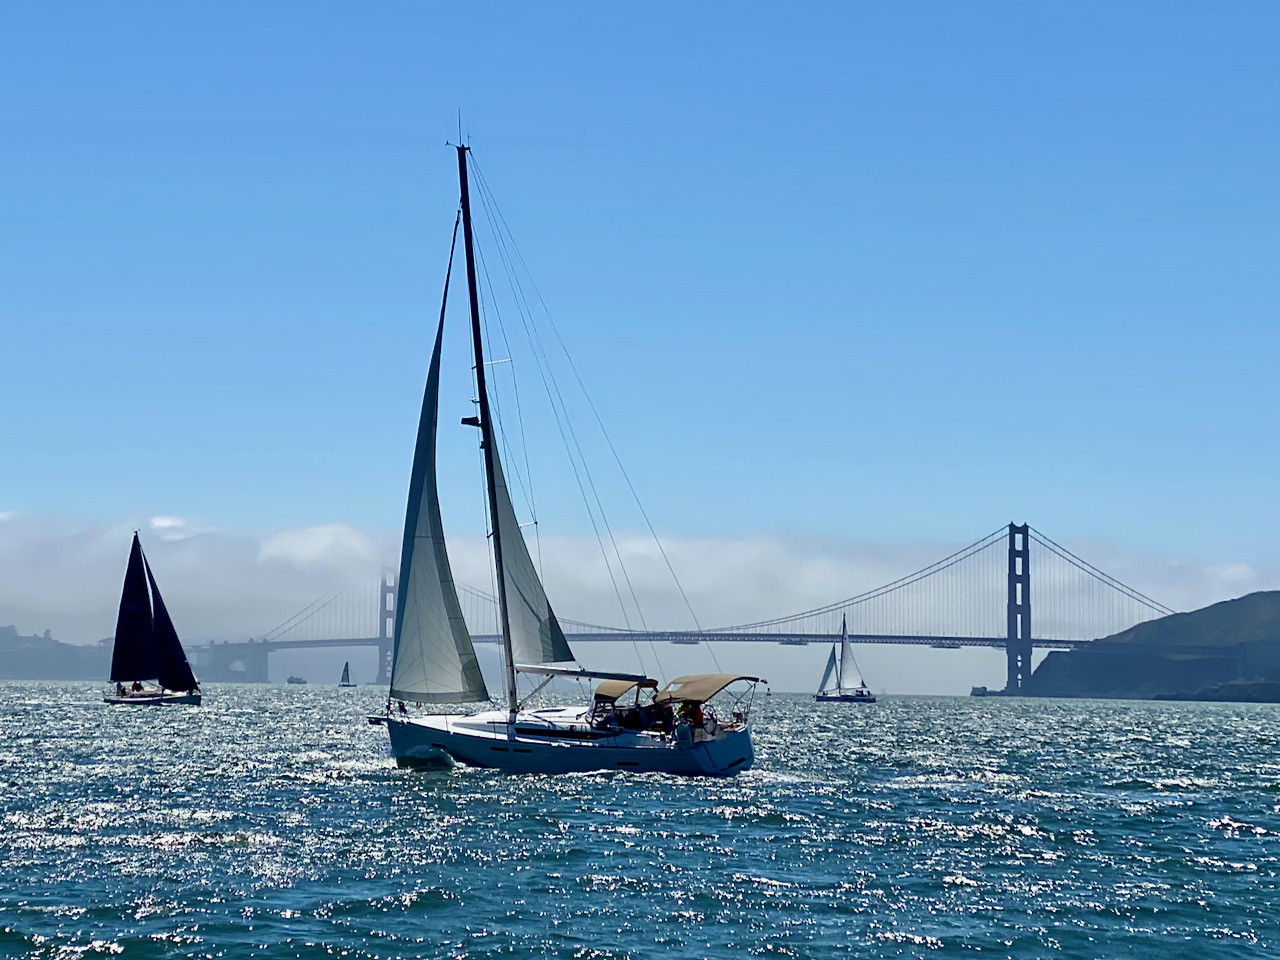
I've been gone for a minute or two, but things have been great and I'm itching to get back to the build. I took a little break to spend some time on other interests like getting back into some more intense triathlon training, as well as getting out and doing a little sailing. I've finally gotten the garage cleaned up and I'm excited to jump back onto the build. I do have a few things to update that I've been working on in the background.
MkIV Roadster build: Gen 2 Coyote, IRS, TKO600. Ordered 10/24/18. Delivered 1/29/19. Engine installed 8/8/21. First start 9/12/21. First go-kart 9/17/21. Off to paint 4/11/22. Back from paint 12/30/22.
Build thread here.
-
Post Thanks / Like - 0 Thanks, 2 Likes
-
05-12-2021, 11:21 PM
#115
Senior Member
Sailing is good for the soul!
MKIV Complete Kit #9822 l BluePrint 347 EFI l TKO600 l Power Steering l Heater/Defrost l
Build Thread
-
Post Thanks / Like - 0 Thanks, 2 Likes
-
05-12-2021, 11:51 PM
#116
Greek Guys' Garage Roadster Build #9509 (dash layout)
The big thing that I've been working on since my last update is the dash layout. I decided I wanted to go with a custom-fabricated dash so I reached out to Nick and Bonni Acton at Acton Customs. Nick can CNC cut custom dashes to any desired gauge/switch layout. After some back and forth via e-mail and phone and exchange of ideas and specs and detailed measurements we arrived at a dash layout, including a glove box, that we both thought would work nicely. The turnaround time was quicker than I thought for a custom cut and formed dash. Unfortunately, when the box arrived it looked like it had been through the proverbial wringer, and opening the box confirmed my fears that the dash had been pretty seriously damaged in transit. Nick very graciously offered to make a new one and deal with the claim against the shipper on his end. I took the opportunity to test fit all the gauges, switches and indicator lights in the damaged dash, and we discovered a few layout problems and some tweaks we both thought would further improve the layout.
Here's the first version of the dash with gauges and switches in it. You can see where the dash is buckled on the left side where it starts to curve. The damage to the right side (not in the photo) is even more pronounced. The billet switch on the far left is the E-Stopp parking brake switch.

Here's the first version of the dash in the car:

Based on the test-fit, we came up with these changes. Not noted in the sketch, we also had to move the oil pressure gauge down so that it wouldn't interfere with the dash hoop, and also deleted one of the LED indicators. We moved the parking brake switch up and moved the headlight switch under it, then moved the horn button over the push-button ignition start button, and moved the four switches on the far right (hazards, wipers, seat heaters) further to the right.

And here's the second version of the dash, which thankfully arrived without damage:
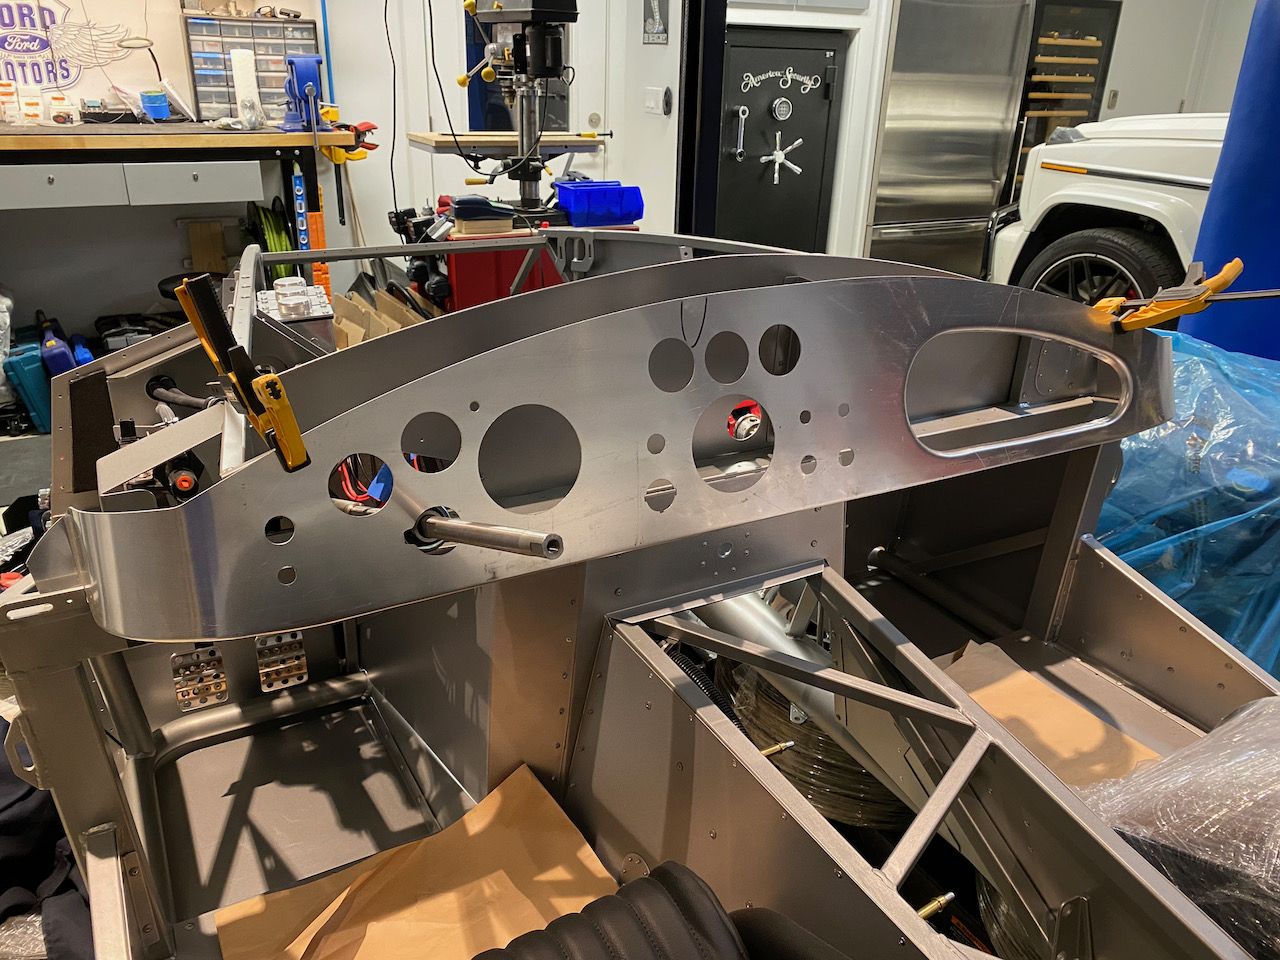
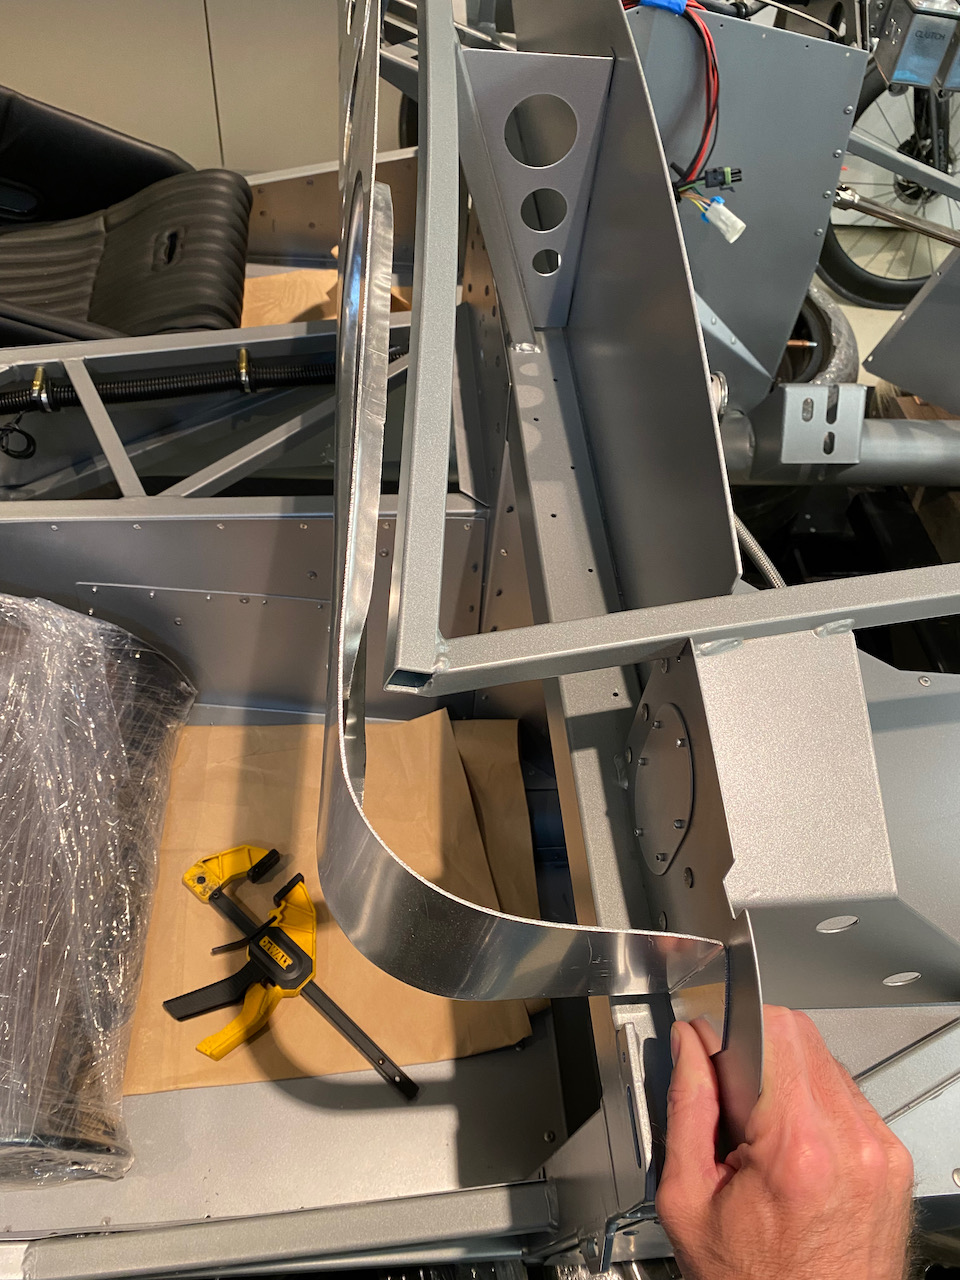
One item that still needs tweaking is that the right side of the dash sticks out away from the dash hoop by about an inch. I'll need to trim that leg shorter, and bend a new mounting flange on it, but that should be pretty straightforward:
Despite the issues we encountered, and the need to fabricate the dash a second time, I'm very happy with how it turned out.
What's not shown clearly in these photos is that the entire dash has a formed lip along its lower edge. I'm planning to install a filler panel that will attach to this lip and close the bottom of the dash back to the 2" square tube. This filler panel will house additional items like the dash gauge programming push-buttons, USB charger ports, OBD2 connector, etc.
MkIV Roadster build: Gen 2 Coyote, IRS, TKO600. Ordered 10/24/18. Delivered 1/29/19. Engine installed 8/8/21. First start 9/12/21. First go-kart 9/17/21. Off to paint 4/11/22. Back from paint 12/30/22.
Build thread here.
-
05-13-2021, 12:11 AM
#117
-
05-13-2021, 10:11 PM
#118
Senior Member
Originally Posted by
JohnK
Hey all!
I've been gone for a minute or two, but things have been great and I'm itching to get back to the build. I took a little break to spend some time on other interests like getting back into some more intense triathlon training, as well as getting out and doing a little sailing. I've finally gotten the garage cleaned up and I'm excited to jump back onto the build. I do have a few things to update that I've been working on in the background.
Triathlon!?! Wow! I already have respect for you as a builder. Triathelete? Double respect. Impressive.
Hey John,
Great to see you're back at your build, and updating your thread. I'm looking forward to reading/seeing more of your creative ideas. I'm in the process of implementing your hole plug idea for my 1/4" brake hoses through the DS FB wall.
Chris
Coupe complete kit delivered: 4/22/24.
Build Thread. Coyote. T-56. IRS w/3.55. Wilwoods. PS. HVAC. Side windows.
MK4 Complete kit.
Build Thread Index. Delivered: 10/15/2020. Legal: 7/25/23. Coyote Gen3. TKO600 (0.64 OD). IRS w/3.55. PS. Wilwoods. Sway bars. This build is dedicated to my son, Benjamin.
Build Thread.
-
05-13-2021, 11:04 PM
#119
Senior Member
Looking good John, glad you are back at it...build on!
-
05-13-2021, 11:26 PM
#120
Thanks guys! I'm glad to be back at it again.
MkIV Roadster build: Gen 2 Coyote, IRS, TKO600. Ordered 10/24/18. Delivered 1/29/19. Engine installed 8/8/21. First start 9/12/21. First go-kart 9/17/21. Off to paint 4/11/22. Back from paint 12/30/22.
Build thread here.


 Thanks:
  Likes:


 Reply With Quote
 :
: