-
Member

Russwood's Coyote Powered Mk IV - Build Progress Updates
Russwood's Coyote Powered Mk IV
So here we go! After following several threads of incredible builds, I've decided to chronicle mine.
I will admit openly that I've made a ton of choices based on what I've seen on this forum. I suppose that's what its supposed to be about, so a huge THANK YOU to all of those that have blazed the trail before me. It has definitely bolstered my confidence, and I've learned tons. Special thanks to EdwardB and his multiple build threads. His details and explanations are excellent, and if you haven't spent a day (or more) going through those, you should. I spent several Saturdays down that rabbit hole, and better for it!
I've always wanted to do a kit car. Growing up in the 70's/80's, I'd stare at the ads in magazines for the latest "supercar" kit that could be mine. I'd bug my dad relentlessly, and he always would just smile and tell me we'd look into it. But at 13 or 14 years old, reality hasn't yet been fully understood, so it always stayed a dream, right up there with playing professional sports or becoming a world champion race car driver (neither happened by the way). Fast forward 35 years or so, and as a 50-something electrical contractor with the means (finally) and the experience to forge into this world, I began the process of finding out just how far the kit car world had come. Along came Factory Five Racing, and I've never looked back.
The biggest problem I had was which one to build! So after months of back and forth in my mind, and a quick conversation on this forum with EdwardB, I chose the Roadster. But still some questions bugged me: Is the body stiff or floppy? Can my big offensive lineman type body fit? How solid is the the car? None could be answered by looking at photos or hours on the website.
Then providence happened. My son-in-law is a big Red Sox fan. I grew up a Braves fan. While eating lunch one day, he texts me that the Braves are playing a 2-game set in Boston, and wouldn't it be cool to go see them play. He's never been to Fenway, and I hadn't been to a Braves game in years, so my mind started to move past "what if...". I did my research, and a few weeks later we had a plan. In May of this year, we all (wife, son, daughter, son-in-law) flew to Boston for 10 days. What a blast! Got to do a tour of Fenway before the game, and had a great time (Sox won  , but the Braves won the World Series, so
  ). But beyond the bucket list event of the Fenway visit, I secretly (not so secretly really) planned a full day to drive from Boston down to Wareham to visit the mother ship. Stupid COVID kept us from a full factory tour, but Mad Dog was awesome and we sat in just about every car in the showroom except for the Joe Legano roadster - I just didn't feel like having the embarrassing moment when the fire department would have to use the jaws of life to get my old fat tail out of it. I did squeeze into the famous blue '65 Coupe in the R&D area, and decided that I needed to lower my goals some after that exercise of amateur yoga. We were also able to visit for a while with Dan Galub and drool over his LSX twin turbo powered Coupe (he even started and revved it for us!). He's such a great source of advice and knowledge - just wish he'd finish his video build series, but he tells me he can't keep a car long enough to get them filmed! Good problem to have.
Came home and promptly ordered my Mark IV. With a November 20 completion date, it's been the longest 6 months of my life. But only days away from being picked up by Stewart Transport, so looking like I'll receive it shortly after Thanksgiving. One more thing to be thankful for.
Ok - enough of the build up.
So here's the plan:
From FFR:
Mark IV Complete Kit
Uncoated Chassis
Hydraulic Clutch
Body Cut-outs
Front Sway Bar
2015 IRS
IRS Sway Bar
12.88" Wilwood Brakes (Front & Rear)
Power Steering Rack
EFI In-Tank Fuel System
Diamond Stitched Seats
Vintage Gauges
Vinyl Dash w/ Glovebox
Wind Wings
Sun Visors
Wipers
Brake Duct Wire Mesh Inserts
Leather Steering Wheel
Trunk Gas Strut Kit
Sourced elsewhere (gotta love the internet!):
Coyote 5.0L Gen 3 Crate Engine from Ford Performance
Billet Polished Aluminum "WRAPTER" Serpentine Belt System from CVF Racing w/ Polished Alternator and Power Steering Pump
Billet Aluminum Valve Covers from MMR
Tremec T56 Manual Transmission
Tilton ST-246 Twin Disc Clutch w/ Matched Billet 164 Tooth Flywheel
Tilton 6100 Series Hydraulic Throw-out Bearing
Quicktime RM-8080 Steel Bellhousing & Backplate
Ford Torsen 3.73 IRS Center Section (gently used from a wrecked 2020 Shelby GT500)
Ford Performance Rear IRS Knuckles & Hubs
GasN Polished Side Pipes
GasN Polished Coyote Long Tube Headers
So I hope you enjoy what I share, and please be generous with your tips and tricks when you see me headed down the wrong path.
Cheers!
Russ
Last edited by Russwood; 11-17-2021 at 06:44 PM.
-
Post Thanks / Like - 0 Thanks, 2 Likes
-
Looks like a great build plan. With D-Day (delivery day) only a few days away now, you must be going crazy with anticipation.
MkIV Roadster build: Gen 2 Coyote, IRS, TKO600. Ordered 10/24/18. Delivered 1/29/19. Engine installed 8/8/21. First start 9/12/21. First go-kart 9/17/21. Off to paint 4/11/22. Back from paint 12/30/22.
Build thread here.
-
Member
It's killing me for sure. My wife has already started referring to herself as the "project widow".
-
Post Thanks / Like - 0 Thanks, 1 Likes
-
Member
Getting started
Need to catch up to the present with what I've already done, so this and a few following updates will do just that.
With the kit ordered (early June) and the summer ahead, I began the process of collecting & preparing for the build. Because my buddy has recently taught me to weld (Grandpa tried, but I was a horrible student back then), along with the investment in a multi-process rig, I've been practicing on small projects and growing my skill set. After getting some confidence, I started the first big project - a shop crane.
First, some back story. I hope this doesn't come across as bragging or anything, but I am truly blessed. My father, who was a machinist and worked at Tinker AFB for most of my life, taught me just about everything I know about cars and mechanics. I became a commercial electrician, and with that training and dad's (and granddad's) weekend lessons, I've learned to do quite a bit of fabrication. Through all of that, we did most of our work either in the driveway or in my grandpa's old garage (it had a big crack in the floor that would flip your creeper over and dump you on the ground). We never had enough light, worked under jack stands, and would be all twisted up at the end of a long day fixing something. Dad always wanted a first class shop with a lift to make things easier, and nearing the end of his life he finally realized that dream. He built the most awesome shop building on his place, which is conveniently next door to my house, with 14' ceilings, a 12' high oversized overhead door, another oversized bay next to it, heating and air conditioning (yep - I'm spoiled), and a loft for storage with permanent stair access. We epoxied the floor, painted stripes on the walls, and being an electrician, I lit it up like Time's Square. We put in a central compressed air piping system, wired for welders, the works. It's got a TV, WIFI, a microwave, fridge (obviously), coffee machine, the works. Shortly after it was finished, my brother and I installed a 10K Eagle two-post lift. We called it the "Race car shop without the race car". He made it so nice, we even have family get-togethers in there for Thanksgiving & Christmas. The saddest part was that he lost his battle with kidney failure and heart disease before it was complete, and he never got to see it in it's final full glory. Our first event was my oldest child's high school graduation party, and we knew we'd be thinking of him every time we used it. Considering having a sign made for mom to put over the door - "Roger's Shop". He would have loved everything we've done in there since he built it, and I know he'd be super excited to help me build this car. Love you Dad - miss you every day.
Here's the lift after we finished:

Here's the shop - looking from my garage:

We tested the limits of the lift right away - had to rewire the big gooseneck trailer from work:

And the completed shop...drumroll...

Here's how we set it up for fellowships & dinners (this was my daughter's graduation party, complete with my mom taking a quick break):

Ok - on to the crane.
-
Post Thanks / Like - 0 Thanks, 2 Likes
-
Member
-
Member
-
Post Thanks / Like - 0 Thanks, 4 Likes
-
Senior Member

FFR Roadster Delivered 9/16/21
Forte 427 Fuel Injected with TKX Transmission
Forte's Axle
-
Post Thanks / Like - 0 Thanks, 1 Likes
-
Member
Rah Oklahoma!
Didn't do so great this past weekend though...
-
Member
IRS Center Section
Now to the actual build!
After we got back from Boston and I placed my order, the urge to do something was killing me. I originally ordered a new center section from FFR with my kit. After reading EdwardB's build thread (I think it was his 20th Anniversary Roadster - could've been his Coupe, can't remember), I caught that Ford Performance wasn't offering the Torsen 3.73 center section any more, and only a few still in stock at places. Since his thread was a little older, when I looked, they were wayyy long gone. Nothing wrong with the clutch style locking version Ford is offering, but it's a 3.55 ratio, and if you can find a Torsen, I'm told it's the way to go. Reading that the 3.73 ratio matches nicely with the T56 gears, I set off to find one. Good old eBay. Found one from a 2020 Shelby GT500 that had under 10K miles for $700. Too good a deal to pass on, so I ordered it. After $125 in shipping, I had it in 2 days. Can't beat that. So even after buying the rear knuckles and hubs from Summit Racing (the FFR option comes with those along with the center section), I'm under the $1499 that the 3.55 would cost me from FFR.
The unit was pretty nasty, which is to be expected coming from a parts farm out of a wrecked (presumably) car. I cracked it open to see what it looked like, and it sure looks like it's not got a lot of miles on it. The ring gear looks nearly new, and the pinion did as well. No chips, wear patterns, nothing. Even so, I planned to replace the bearings and seals just to be 100% sure. Tore it down pretty quickly, and after some time in the blast cabinet to get all the rust off the iron case, I painted it with a few coats of the POR top coat gloss black. Unit looks brand new.
Here's some pics of the process. First few are of the "walk around" after unboxing it, then a look at the ring & pinion gears. Last photo is the iron case after painting.


Last edited by Russwood; 12-22-2021 at 01:50 PM.
-
garage.jpggarage.jpg
Your garage is almost as impressive as the 13ft x 23ft man coffin that I'm building mine in!

-
Member
IRS Center Section continued...
Had to wait for the bearings and seals to show up, so I turned to the cover. This isn't really that visible after installed, but details matter, so I'm trying to decide what to do with this. My first idea was to polish it since it's aluminum. Problem 1 - it's a cast piece, so there's countless tiny pinholes that show up once you start to sand it. It was pretty evident that this was a horrible idea and would take me forever. On to plan B.
I thought about sandblasting it and "shortcutting" the polishing process. Using some 80 grit aluminum oxide media, it cleans up nice and really sparkles. Problem 2 - how to keep it that way. I sprayed it with some Dupli-color ceramic clear engine paint, and it immediately turned gray. Still shiny, but looks like I painted it primer gray then used clear over it. Not at all what I hoped. So I'm back to the beginning, and not really sure what to try next. I may just do some experimentation with some chrome paint or something, but it bothers me that it won't be that true aluminum look. Something will come to me.
So the seals & bearings came in, so after pressing the bottom bearing on the pinion gear, its time to put it all back together. Since the unit was pretty new and I was reusing the original ring and pinion, I used the same shims. All is going well until its time to tighten that pinion nut and set the pre-load on the crush sleeve. Way harder than I expected it to be. Impact wrench wouldn't touch it - wouldn't even take up all the slack. I have to do most things by myself, so how in the world am I going to do this? My uncle tells me "I always did them in the car, so the car holds everything". Problem is that I don't think he ever worked on a IRS version - he's been out of the business for a while. If you don't know what I'm talking about, the IRS center section cover is half of the mounting, so you can't remove it while it's installed. At least I'm not clever enough to figure out how.
My solution was primitive but effective. Back into the scrap metal bin - grabbed a beefy piece of angle and clamped it to the work bench. After notching a spot for my socket to pass through, I bolted the pinion flange to the angle so it was all locked down. Using a breaker bar and a section of pipe for a cheater, I was able to tighten it up and could control the amount in small increments to get the pre-load right. The only flaw is you have to unbolt the thing from the angle to check the pre-load with the torque indicator. After a few tries, got it right in the middle of the zone. Ford says the pre-load for new bearings should be 16-28 lb-in, and I hit it at 23. Good enough.


I installed the new axle bearings and seals, and she's ready. I put the cover back on without any sealant for now - I plan to remove it once I decide on what the finish should look like. No oil in it either until final assembly of the car - sure don't need that stuff all over everything.
On to the Coyote and friends...
-
Member

Originally Posted by
Tbev

garage.jpggarage.jpg
Your garage is almost as impressive as the 13ft x 23ft man coffin that I'm building mine in!
I like your set up. Can't wait to see mine in the shop. The problem with a big shop is that it is really easy to mess up, and then takes forever to clean! In fact, this weekend is pretty much booked to get it all cleaned up and presentable for Thanksgiving. So the fun will have to wait.
-
Member
Coyote and Friend
So, I have to brag on Summit Racing. I know all of you will tell me that they've been doing this for years, but I'm new to buying from them. After shopping around, they had the best price on the engine and transmission. Free shipping on the engine, so after a little back and forth with my bank on the charge (they flagged it as fraud - I suspect my wife may have put them up to it), it shipped the next day. I expected several days since it obviously ships by truck, but I got a call from the freight carrier that it was showing up the very next day along with the transmission. So ordered on Monday, shipped on Tuesday, at my work warehouse on Wednesday. I was blown away. It did help that it came out of the Arlington, TX location and I'm in OKC, but a win is a win.


Had to clear out the truck to get it all home, then had to work out how in the world to get it out of the truck. After some creative problem solving, my handy gantry and chain hoist made quick work.
On the ground and off the pallet. She sure is pretty except for all that plastic.


-
I guess there is one benefit to having such a small space to build in, you have no choice but to keep it clean. Your shop is awesome and will be so user friendly when it comes to your build. Enjoy every minute of it, I sure am!
-
Post Thanks / Like - 0 Thanks, 1 Likes
-
Member
Coyote and Friend Part 2
So, next order of business is to get it up on the stand. The thing about the Coyote is how wide it is with those big heads. It's hard to pick up using the traditional chain method because you have to go around the plastic valve covers to get to something stout, and I'm worried I'll break something. I could make some bracket that would extend it out to clear everything, but then I caught a series of YouTube videos of some guys building a Coupe from a wrecked Mustang. They were using a lifting plate that doubled as a cover for the intake ports made by Motion Raceworks. I found their website and ordered one - about $80. I know chain is cheaper, but not if I break something I can't fix. It also makes a pretty handy work surface while tinkering on the engine. The other clever feature is that the lifting portion has 5 large holes that allow you to pitch the angle and/or balance it once the transmission is installed. It also has tapped holes to store the bolts in when you aren't using it so they don't get lost. More cleverness. I'm sure there's others out there, but I was pleased.

So my first item was to change the flywheel out and get the backplate installed before it went onto the stand. I didn't realize just how heavy that dual-mass flywheel is, and nearly dropped it on my foot when it came off. Oh, and beware if you do one of these - that thing isn't very hard to get off. I expected more resistance after the bolts came out, but it didn't take much at all and she was headed for my toes. Plan ahead - set up something to catch it or get some help. I got lucky and didn't drop it, but my heart jumped for sure.
Old flywheel and pilot bearing:

Removed - you can see the crank position sensor and wheel. No more pilot bearing - it's actually installed in the old flywheel. Hence why FFR tells you to get a new one to go in the end of the crankshaft.

New pilot bearing installed:
All going well...until it wasn't. I opened the Quicktime bellhousing box to get the backplate since it has to go on before the new flywheel. Ask me how I know this. It wasn't because I was paying attention, so I got practice on installing the new flywheel. No laughing. So off with the new flywheel to put the backplate on. Only it wouldn't fit. Color me puzzled, so I check the part number on the box - it's right. RM-8080. Check the bellhousing, same number. I test fit the bellhousing and it fits perfectly. Now I'm really irritated. After a close look at the backplate, I find the part number scribed on it - RM-8080. Took a quick break and grabbed a soda, then back to solve the mystery. Looking closer, the number on the backplate was actually RM-8030. The 3 looked a lot like an 8, so I can see how it happened. Just the wrong backplate packed in the box. I looked up the RM-8030 for curiosity and found that it's for a different Ford motor. Texted customer service at Summit, and they responded in seconds. Shipped out a full replacement kit same day and they arranged for UPS to pick up my wrong one. I packed everything back up and put it on the porch with the instructions written on the box like the robot at customer service said, and UPS took it yesterday. New one is sitting on my porch now according to tracking. Can't beat that speedy Summit service.
So with no backplate, no flywheel. Back in the box it went. On to something else - I'll tackle the oil pan swap!
On to the stand goes the Coyote. One sidebar and another shout out to a cool product. I've never been crazy about the way engine stands attach. I know they are secure enough, but the width and bulk make me nervous about only having 4 bolts on the stand. By accident I came across a billet aluminum plate from ICT Billet made specifically for nervous nancies like me. Apologies for all the name dropping, but I figure someone out there may think the same way. It's a little pricey at $109, but again, when dealing with a motor worth close to $9K, it's cheap insurance. It has two specially milled spacers for the two locations that have the alignment dowel and five others so you get a solid 7 connections to the block. The plate bolts directly to the stand with some beefy hardware. This thing is stout and there's no way it's falling unless a weld breaks.
Here's a pic of the part. The motor is all stripped down for clear coat prep, but its the only one I have at the moment that shows the plate well.

So with the engine on the stand I drained the oil into a new 5 gallon bucket so I can reuse it. After it dripped for a good half hour, I flipped the motor and off comes the plastic oil pan. I've got the Moroso pan and pick up, so this should be straight forward enough. Now for another confession...I had the windage tray/gasket part on my list to buy, but after reading some posts, I kept seeing "just use the old one - it's just fine". So I scratched it off the buy list. I thought, "Hey, I just saved $60". Wrong. All the posts about reusing the old windage tray are motors that have the factory metal oil pan, so basically Gen 1 & Gen 2 versions of the Coyote. Gen 3 has a plastic pan, which has the windage tray and pickup permanently attached, so there's no reusing anything. So now I have the oil pan off, new head bolt with the stud and spacer installed and torqued, and can go no further. So you will see in future pictures what looks like a finished installation of the new oil pan, but it's only hanging there by a few bolts to keep the engine from dripping onto the floor. Got to follow those instructions!! Windage tray and gasket ordered from an online genuine Ford parts outfit (none of the local dealers had one), and it will maybe be here next week. Not holding my breath. Summit doesn't carry it, so I'm stuck with the old and slow method.
Oil into a clean new bucket for use later:

Engine inverted and sans oil pan. Ignore the rubber gasket in the oil pump pickup - it's gone with the Moroso pick up installed.

More to follow...
-
Post Thanks / Like - 0 Thanks, 1 Likes
-
Senior Member

Welcome aboard from a fellow electrical contractor.
Cheers,
Nigel
Mk.4 FFR supplied Right hand drive
Received 12/2012 completed 12/2019
Gen1 Coyote / TKO600 / IRS
Lots of mods to make compliant for Australian design rules
-
Post Thanks / Like - 0 Thanks, 1 Likes
-
Senior Member

Thanks for the shoutouts! Glad my meanderings were helpful. Did mention about needing a pan gasket/windage tray piece for the Gen 3 because of the 1-piece OE plastic pan. But hey. There were a lot of words... Crazy shop. Congratulations. I thought mine was pretty OK. But now feeling a little puny. You're making great progress with your build and very nice writeups. You're adding some interesting parts to your Coyote. I looked at pictures of the front runner system you've picked out. At first was a little concerned about clearance for where the alternator ends up. It's further out and lower than the OE alternator. But I think it will fit. Potential interference is the steering column. Looks nice though.
Just a comment regarding the rear cover on the center section. First I totally get it. You want it to look as nice as possible and meeting your expectations. FWIW, it gets pretty buried when the car is on the ground. The chassis mount covers much of the bottom half. The fuel tank covers most of the whole rear view. I've had guys crawling on the ground trying to look at the rear suspension and admit they can't see much. On the lift, up the air, of course much more visible. Again, FWIW. This is the best picture I could find that shows what I'm talking about. Will be cool when your kit arrives. Hopefully the backorder (POL) situation will leave you room to keep making progress.
Last edited by edwardb; 11-17-2021 at 06:17 PM.
Build 1: Mk3 Roadster #5125. Sold 11/08/2014.
Build 2: Mk4 Roadster #7750. Sold 04/10/2017.
Build Thread
Build 3: Mk4 Roadster 20th Anniversary #8674. Sold 09/07/2020.
Build Thread and
Video.
Build 4: Gen 3 Type 65 Coupe #59. Gen 3 Coyote. Legal 03/04/2020.
Build Thread and
Video
Build 5: 35 Hot Rod Truck #138. LS3 and 4L65E auto. Rcvd 01/05/2021. Legal 04/20/2023.
Build Thread. Sold 11/9/2023.
-
Post Thanks / Like - 0 Thanks, 1 Likes
-
Member
Coyote and Friend Part 3
Almost caught up to the present with these posts. It's actually fun to go back through my pictures and re-live the experiences that get me to today.
So to recap, can't install the flywheel because of the wrong backplate. Can't finish the oil pan swap because I tried to outthink FFR (stupid, I know). What to do...
I moved on to the rest to get ready for the new serpentine system that is due to be here tomorrow. Super excited to see that thing - looks amazing in the photos and videos. I originally planned to paint the engine to something closer to what my frame will be to tie the theme together, which is currently planned to be a metallic graphite silver. But, after I got all the black plastic and other clutter off the thing, the bright shiny aluminum just looks too nice to cover up. I picked up some different colors of engine paint to do some tests on other parts, but I just couldn't get bought in to covering up the aluminum. Finally decided to just clear coat the whole thing and leave it natural. With what I'm putting on the front in that serpentine system and what's on the wish list for machined billet aluminum valve covers, I'm sticking with the bare aluminum look. I'm actually considering some hidden accent lighting for when it's at a show, which should make all that bright aluminum sparkle, but we will see.
After some research, I settled on the same Dupli-Color Ceramic Clear engine paint that I used on the IRS cover. After testing on the back, I was ok with what it did. I guess when aluminum is sandblasted and then coated with clear, it loses its sparkle (see previous post about the IRS center section cover), but if its already bright/shiny, the clear doesn't affect the look, just makes it more shiny. So I taped everything off and put 3 coats of the clear on everything aluminum, and it really looks good (at least to me).


While I watched my Sooners croak at Baylor (and the clear coat flashed off), I started experimenting with painting the plastic valve covers. I don't plan to keep them in the build, but I had some time and all those cans of paint I bought to sample, so one thing led to another. It could have been the paint fumes, but it happened. I started with some VHT paint for plastic that was supposed to mimic raw aluminum. It doesn't. I hated the finished look. So after it dried enough, I went with the Ford red over it. Three light coats and I was ready to call it a day. After flashing and curing some overnight, everything was good enough to reassemble. I read somewhere that this paint needs to actually be cured to work, but the heat cycles of the engine accomplish that. I don't know if that will hold up if the engine doesn't get started for a long time, but its too late now.
I installed the newly painted plastic valve covers stood back to take it in. I'm not in love with the red, but it will do for now. I've emailed the company making the billet covers, MMR, and asked for some photos of the actual product. Currently, they only have a picture of the CAD design, so its not an awesome representation. I do like how the Gen 1 & 2 version looks in the photos they have for that model, so I'm assuming that these will look just as good. They offer several different colors of adonizing, but I'm pretty sure (99%) that I'm going with the bare machined look. If they aren't already coated with a hard clear, I will be doing that. Aluminum is really easy to scratch and then hard to fix, so I think they need something to help with the little bumps and dings that are inevitable.
Anyway, here is the current state of things:
OG black plastic valve covers with all the coils and sensors removed.
Passenger side:

Driver side:

Newly painted red versions, with all the coil packs and sensors reinstalled.
Passenger side:

Driver side:

I guess in retrospect, the red doesn't look that bad. My son-in-law tells me likes the red, but he's only seen it in pictures. One thing for sure, that yellow dipstick will not stand! I ordered what I thought was a chrome replacement, but it's only the ring and actual dipstick, not the dipstick tube. I've turned the internet upside down, and I can't find anything aftermarket to replace the yellow appendage sticking out of the valve cover. My only option may be to paint it and live with it until someone comes out with something better. First world problems, I know.
One other thing off the list was the front coolant plastic tee that sits between the thermostat and water pump. That thing is outta here! Have I mentioned that I loath the black plastic look? Dorman makes a cast aluminum replacement (626-541), and while there's nothing technically wrong with the original, it just comes down to aesthetics for me. Got one from Amazon and three coats of clear later, it's on the thermostat housing. No photo, but you get the idea. I also ordered a billet part from Power By The Hour (part #ACC-1073) that snaps onto the port where the Ford factory top radiator hose connects. This transitions from the o-ring type connection to a standard 1.5" hose connection so I can use a more upgraded stainless braided hose when the time comes. Again, not trying to give free advertising per the forum rules, but the part looks sharp. If you can't find the part I'm talking about, message me and I'll send you the link.
I just realized that I've spent three posts on the engine, and nothing on the friend. If you haven't guessed, that's the Tremec T56 (or Magnum depending on who you are talking to). It's already pretty much good to go, so nothing really to show (and I failed to take any pictures during the process - rookie mistake). I originally planned to paint it like the engine, mostly because the shop that assembled it wrote all over it with paint pens that I had a terrible time getting off. Wound up giving up. Not even lacquer thinner made much difference on them. They are all on what will be the top, so you can't see them once it's installed. The bottom is thankfully clear of graffiti. It also looked really dirty and dingy, but after getting it out of the cardboard crate and blowing it off, it looked better. Guess it was just a lot of dirt & dust from living in a warehouse somewhere. I also scraped some of the gasket maker that had squeezed out and hardened at the seams of the pieces. After that I went over the whole thing with a rag and lacquer thinner, and it looked even better. I know that I want the shifter in a more forward position, so went ahead and flipped it around. Once I get it in the car, if I want to go even farther forward I'll have to get the mid-shifter conversion kit, so not doing anything more with that for now. Since it's dry (no fluid), I mounted it vertically on some blocks of wood and then to a carpet dolly so it's mobile. It also takes up a lot less space like that. Three coats of the same clear as used on the engine, and it's ready to be mounted to the engine when the time comes.
Here's the pair all covered in plastic and staged for their big moment.

Now just need that car...
-
Member
Originally Posted by
edwardb
Thanks for the shoutouts! Glad my meanderings were helpful. Did mention about needing a pan gasket/windage tray piece for the Gen 3 because of the 1-piece OE plastic pan. But hey. There were a lot of words... Crazy shop. Congratulations. I thought mine was pretty OK. But now feeling a little puny. You're making great progress with your build and very nice writeups. You're adding some interesting parts to your Coyote. I looked at pictures of the front runner system you've picked out. At first was a little concerned about clearance for where the alternator ends up. It's further out and lower than the OE alternator. But I
think it will fit. Potential interference is the steering column. Looks nice though.
Just a comment regarding the rear cover on the center section. First I totally get it. You want it to look as nice as possible and meeting your expectations. FWIW, it gets pretty buried when the car is on the ground. The chassis mount covers much of the bottom half. The fuel tank covers most of the whole rear view. I've had guys crawling on the ground trying to look at the rear suspension and admit they can't see much. On the lift, up the air, of course much more visible. Again, FWIW. This is the best picture I could find that shows what I'm talking about. Will be cool when your kit arrives. Hopefully the backorder (POL) situation will leave you room to keep making progress.
Great point about the IRS center section. I know I'm overthinking it a LOT, but OCD is real. I'll likely just give it a fresh coat of aluminum paint and move on. Better things to do and all.
Thanks a ton for the good words. I know I read about that windage tray but it got lost in the noise. Not a big setback, just an annoyance.
I've done as much research as I can without the car on whether the CVF front runner system will fit. The dimensions they publish look ok, but you're right about that alternator location. I did read their return policy (twice), and if I don't install anything and/or scratch anything, they will take it back for a full refund. My plan is to carefully and loosely mount the alternator mount bracket and test fit. If the steering column clears, I think I'm in good shape. If not, then back to the drawing board. I'm not running the electric PS, so hoping everything will clear. Not totally in love with using a 1-wire alternator instead of the Boss 302 kit that connects to the harness, but I don't think it's a huge issue. The Cobra doesn't use some of those features anyway (I think). Could be wrong.
Glad you found my build. You are for sure one of the guys that inspired me, so it's cool to have you checking it out.
Full disclosure, I can only take a small bit of credit for that shop. It's technically mom's. But its literally 80ft from my driveway, so it's like it's mine. I like to pretend anyway.
-
Member
Originally Posted by
Nigel Allen
Welcome aboard from a fellow electrical contractor.
Cheers,
Nigel
Thanks for the welcome! Wow - you are literally on the other side of the world friend! We need to chat about all things 'lectric some day. I used to be a Clipsal dealer when Schneider Electric (Square D) tried to integrate it here in the States, but it really didn't catch on. I know it's big in Australia, or at least used to be.
-
Member
Finally to the present day...
So I've posted a lot today, but probably shouldn't have waited this long to get the build thread started. As I go back and read what I've put out there, I want to take a second and make sure everyone knows that I can't take credit for the incredible shop I am blessed to get to work in. That was my dad's final gift to the family, and the entire family uses it. We've done more oil changes, tire rotations, repairs, and just about everything else that could be done over the past several years. I get the most use because of sheer geography. My brother lives about half an hour away, so most of the time it's not worth driving down to do small things, so he only comes down for big things. I live next door, so yeah me!
We've also started to move the blessing out into new and extended family, and I know that Dad would love that even more. Earlier this year we put a Borla Attack exhaust upgrade on my son-in-law's 2019 Mustang GT, and a couple weeks ago we surprised his dad with an upgrade on his Mach 1. Nothing huge - cut out the resonator and put in a Sneeda H-pipe. Sounds much better. I honestly think there may be a bit of a competition between them on who's 'Stang is louder. Just wait until this Cobra bites them!! Muahaha (diabolical laugh)
Back to the matter at hand.
I've caught up on pretty much everything that I've done so far. Been bugging Sally at FFR for a pic when my kit is complete. Guess what I got in my email yesterday...

It's getting close now!
-
Post Thanks / Like - 0 Thanks, 1 Likes
-
Senior Member

Welcome aboard, Russwood. Your shop is A.M.A.Z.I.N.G!! Did I mention it's amazing? Looks like you are off and running, and bring a valuable skillset to the forum. Looking forward to your contributions. Welcome!
Chris
Coupe complete kit delivered: 4/22/24.
Build Thread. Coyote. T-56. IRS w/3.55. Wilwoods. PS. HVAC. Side windows.
MK4 Complete kit.
Build Thread Index. Delivered: 10/15/2020. Legal: 7/25/23. Coyote Gen3. TKO600 (0.64 OD). IRS w/3.55. PS. Wilwoods. Sway bars. This build is dedicated to my son, Benjamin.
Build Thread.
-
Post Thanks / Like - 1 Thanks, 0 Likes
-
Member
Originally Posted by
460.465USMC
Welcome aboard, Russwood. Your shop is A.M.A.Z.I.N.G!! Did I mention it's amazing? Looks like you are off and running, and bring a valuable skillset to the forum. Looking forward to your contributions. Welcome!
Kind words Chris, and thank you for them. I'm blessed for sure to get to work in Dad's shop. As I've said many times, he would ABSOLUTELY love the project and I wish I hadn't waited so long to move forward. I'm definitely doing this in his memory.
If I read your user name right, then I want to thank you for your service.
Russel
Mk4 Roadster #10204. Gen 3 Coyote, Tremec T56, IRS. Ordered 6/7/21 - Delivered 12/18/21
Build Thread
-
Senior Member
Originally Posted by
Russwood
If I read your user name right, then I want to thank you for your service.
Thanks, Russ! Yes, I was in the Marines for five years--avionics repair. When I joined the forum I quickly created a user name, not giving much thought to where all this would lead--that I would order a kit, write a build thread, and that my user name would appear every time I comment. Though I am very thankful and proud of my Marine heritage, there are so many in the armed forces who sacrificed far, far more than me, and who really deserve our gratitude. I am thankful for good folks--like you--who appreciate and support our military service members!
I'm looking forward to your next build update. I sense a good amount of creativity coming in your build. Thanks for sharing.
Chris
Coupe complete kit delivered: 4/22/24.
Build Thread. Coyote. T-56. IRS w/3.55. Wilwoods. PS. HVAC. Side windows.
MK4 Complete kit.
Build Thread Index. Delivered: 10/15/2020. Legal: 7/25/23. Coyote Gen3. TKO600 (0.64 OD). IRS w/3.55. PS. Wilwoods. Sway bars. This build is dedicated to my son, Benjamin.
Build Thread.
-
Post Thanks / Like - 0 Thanks, 1 Likes
-
Senior Member

Subscribed. Killer shop, seriously completely B.A. and I think that lift will be able to handle the Cobra  That lift is going to make your build so much more enjoyable and easier. Nice build plan, looking forward to watching you on your journey!
-
Post Thanks / Like - 1 Thanks, 1 Likes
-
Member
More Engine Work
So back at it this weekend - running out of stuff to do before the kit arrives. Still haven't heard from Stewart Transport, but I fully expected nothing to happen until after Thanksgiving. My short list is to install the flywheel, install the front pulley system, build the body buck, and finish the frame cart. I'll post those mini-projects on their own as I'm able.
In an earlier update, I mentioned how the Quicktime bellhousing backplate was shipped wrong. The replacement arrived and everything is right, so I can proceed with the installation of the flywheel. I want to get this on so I can use it to help lock the crank during the installation of the front pulley system since the balancer bolt has to be changed to a longer one.
The flywheel went on without drama (this time), so I applied the thread locker and snugged it up:


I stuck the bellhousing on just temporarily so I can use a flywheel holding tool to torque the flywheel and remove/replace the balancer:

Here's the flywheel holding tool - got it from ICT Billet. This is pretty handy for us solo working guys. It bolts up where the starter goes and came with the hardware needed. I've seen these in service bulletins for previous projects, but never actually got one. I know the old pry bar trick works, but this frees up both hands using the torque wrench which is a safer method.

View from inside the bellhousing at the tooth engagement:

Next up is the front pulley system install.
Russel
Mk4 Roadster #10204. Gen 3 Coyote, Tremec T56, IRS. Ordered 6/7/21 - Delivered 12/18/21
Build Thread
-
Member
Serpentine Pulley System
I mentioned in my build plan that I plan to use a single belt serpentine system from CVF Racing. I spent a lot of time considering this, and looked at systems from every maker I could find that offers something for the Coyote. There are definitely cheaper ways to do this, but one of my intentions is to show this car, so this is a good way to add some jewelry along with the accessories I need.
I chose the CVF Racing version over the March Performance for a couple reasons, mostly aesthetics. Both were similarly priced and offered the same options for accessories. CVF is a single belt version with a pulley added to the front of the balancer where the March Performance version is a two-belt system with no balancer pulley. They both add about the same depth to the front of the engine. In the end, I prefer the single belt system and personally liked the look of the CVF pulleys and pulley covers over the March. I have friends who recommended the March, so I know it's a solid system.
After making that decision, I reached out to the manufacturer to verify its fitment for the Gen 3. They don't right out say it doesn't fit the Gen 3, but do say it needs a 4-bolt water pump pulley and a 2017 or older balancer. That means Gen 1 or 2. However, since Ford went back to a two-piece balancer over the original fluid version, I felt good that it would work on the Gen 3. The two-piece is essentially the Gen 2 balancer. The only issue left in my mind, apart from the system's width (which may bite me later if the alternator conflicts with the steering shaft - fingers crossed EdwardB), was the water pump. Ford changed the water pump sometime during the Gen 2's run from a 4-bolt to a 3-bolt pulley, and carried that into the Gen 3's design. I initially considered making an adapter since I have to space the water pump pulley out (see below on why), but after studying what it would require a lot closer, including making some cardboard templates to experiment with, and then consulting with my buddy at work who runs our field crews (he's the best mechanic I've ever known, and that's saying a lot), he suggested just changing the water pump. Well duh, why didn't I think of that? Did a little research and it looks like the two are interchangeable, at least from pictures. I found one for $60 on RockAuto and placed the order. Since these use O-rings instead of gaskets or silicone to seal to the block, it's pretty easy to swap out to make sure. If it's wrong, then back it goes and I'm back to square one. I'll know more later this week when it shows up. Fingers crossed. Last issue would be the steering shaft vs. the alternator, but if there's a conflict, I'll either modify the steering shaft with some knuckles or figure out a modification on the alternator location.
The kit arrived on Thursday, and like Christmas morning, of course I had to open it. Everything is machined from solid billet aluminum, so no cast parts. Very solid and the finish is beautiful. I got the option for the ceramic clear coat finish, so they should stay bright for a long time.
The first order was to install the balancer spacer. It came with a longer crankshaft bolt, but the instructions clearly say this is for an LS balancer. My buddy, who's a big LS guy, says the Ford Coyote balancer looks just like the LS style, so that made sense. The only issue was the shoulder on the CVF part was a little bigger than the balancer pocket, but a few minutes with a file and it fit perfectly. The LS balancer pocket is probably a few thousands bigger.

After I bolted the spacer in, I noticed that it doesn't come all the way to the front of the balancer. This tells me that the Gen 3 balancer is about .28" thicker than the Gen 2. I went ahead and bolted the pulley on, but it's pretty obvious that I need to do something to make this stronger than just bolts. After some test fitting and studying, I determined that everything needs to be moved out about .35". For the balancer, I'll have to machine a piece of aluminum to bring the front out flush so the pulley sits as it was intended.
Here's the two brackets mocked up:

Power steering pump, AC delete pulley, and idlers added:

Chrome alternator, tensioner, and all the pulley covers bolted up for a final measuring. Looks pretty nice:

The water pump pulley is missing from this view - I've got it on the bench to work out the spacer/adapter.
Last - a side view of the chrome alternator. Notice how close it is to the oil filter - just enough.

It's a little funny to me that both the power steering pump and the alternator are GM models, but it should all work. I'll have to make a slight mod to the alternator wiring since the Ford factory plug obviously won't work, but there's lots of stuff out there showing what I'll need to do. The kit came with a billet aluminum remote power steering reservoir, so with custom hoses I'll be able to plumb it all up. The only other issue may be the pressures, so I'll likely have to change the valve to work with the Ford rack, but again, lots of previous builds to steal modifications from.
After I took a couple dozen measurements, I think I have a plan on what spacers & custom parts I need. I won't go into the weeds now until I get it figured out and made. I'll update down the road once I have some pictures to share.
Here's a view from the top showing the difference that I need to correct. The water pump pulley is the top one in the center of the photo - I've just got it on there with one bolt to check the spacing. I used a 2' level as a straight edge to verify everything is aligned and to determine the distance to move out. You can see the balancer pulley is the one sticking out the most:
This "problem" is a perfect excuse to finally buy a mini-lathe. I've ran into several instances where I wished I had one, but with the real possibility of having to experiment with different shapes & thicknesses, this is the time. I could go to a machine shop and try to explain what I need, then likely have to go back one or more times to tweak the design. With this prototype approach, it just made sense to do it myself. After some research on the myriad of different models, I pulled the trigger on a 7" x 14" version. Went with a middle of the road unit from Amazon, just a little step up from the Harbor Freight version. Ordered a tail stock chuck and some C2 and C6 carbide cutters so I can do both soft and harder metals, and will see how things go. Placed an order with McMaster for some 6061 aluminum billet discs to machine the pulley spacers and some solid 3/4" diameter 6061 rod to make the bolt spacers. Once everything is cut, I'll see what bolts need to be replaced with longer versions and get those ordered.
With Thanksgiving this week and no car yet, I should be able to finish my to-do list over the long weekend. The oil pan gasket is tracking to arrive today, and I need to build the body buck and finish my frame cart. I'll share my finished work with some photos this weekend.
Hope everyone has a safe and blessed holiday. God bless!
Last edited by Russwood; 11-24-2021 at 09:02 AM.
Reason: Updated information
Russel
Mk4 Roadster #10204. Gen 3 Coyote, Tremec T56, IRS. Ordered 6/7/21 - Delivered 12/18/21
Build Thread
-
Member
Delivery Day!!
The day has finally arrived. The wait is the worst. I've read on so many threads how it's like Christmas morning as a kid, but to be honest, I don't know if that's even close.
I want to give a huge "atta-boy" to Stewart Transportation. They told me they were picking up on Monday and would be in Oklahoma on Saturday morning, and the driver hit the target time on the dot. He hit some crummy weather on his northern leg (I know - it's wintertime, what do you expect?) so there was concern he might be a couple days late, but the driver called me on Friday evening and said he'd be at my place between 8 and 8:30 Saturday morning. Truck pulled up at 8:10. Can't beat that!
My buddy from work came by with his son to help us with the unload - we had a pretty long and steep driveway to navigate to get to the shop, but we were unloaded and he was on his way in under 30 mins or so.


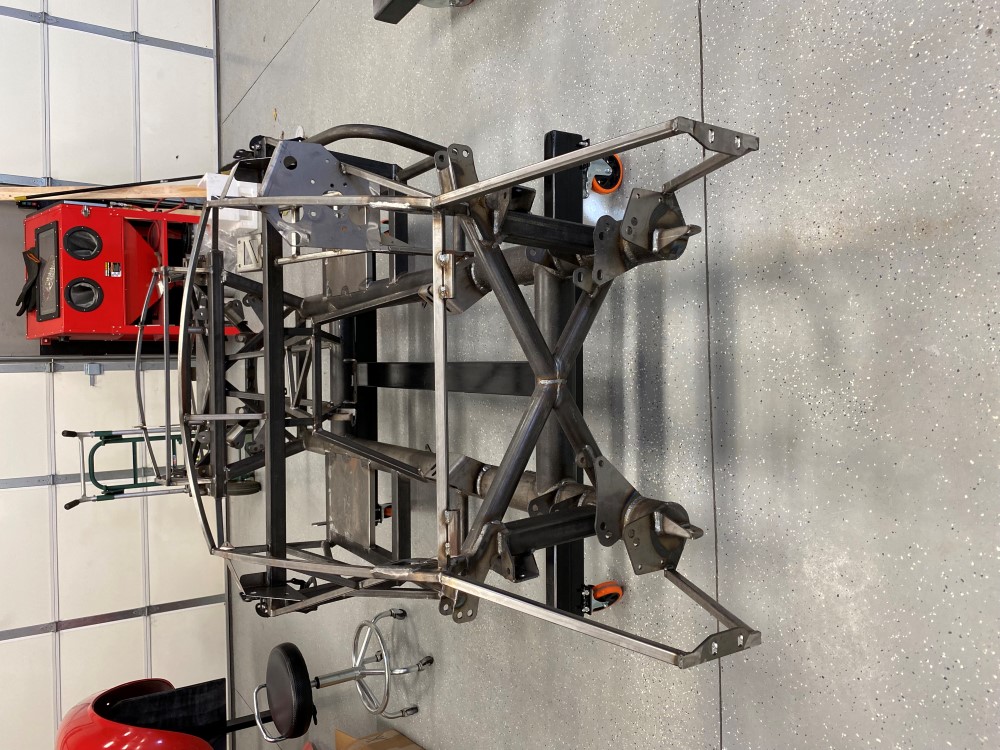
With the help I had, we got the body off the frame and onto the body buck. Marked and removed all the aluminum panels so the frame is ready to start assembly. My frame cart fit perfectly, so I'm really pleased with that. It will make maneuvering the car so much easier, especially when it goes to powdercoat. My build plan is to assemble all the major components, install the body panels with clecos, and get everything fitted/drilled/welded/etc., then tear it all down and paint/powdercoat everything. I'll also take the time after tear-down to grind/wire-brush the frame to it's got a nice foundation for the coatings. They media blast everything before coating to prep the metal, so I'm not too worried about surface rust during the first assembly. The plan is to powdercoat all the underside items (frame, suspension parts, etc.) with a high gloss metallic graphite color similar to the 20th Anniversary cars only darker, so the pre-finished control arms, adjusters, etc. that FFR powdercoated flat black will get re-done. I'm not greasing anything during the first build, so those parts will be easier to prep. Since one of the goals is a show-quality build, I'm being sort of picky on the finishes. I'm still debating the engine/trans colors, but right now they are staying clear-coated. By doing it this way, I can go through and mark all the parts that are visible as to what gets painted, what gets PC'd, and what might get either chromed or polished. It will also help me visualize what doesn't need to be coated, like areas that will get covered in heat shielding or sound dampening. In my mind it's like a pencil sketch before the color goes on. I know it's more work this way, but it also allows me to make any modifications or changes before finished coatings, which should reduce or remove any re-coating or damage to the finishes. If it fit once, it should (in theory) fit the second time. I know holes will need to be chased, but that's easy and minor compared to stressing about scratching an expensive powdercoat job.
I did a close inspection of the frame fit and welds, and everything looks pretty good. Some of the welds weren't the best, but all the ones in the critical load bearing areas look really good. The ones I don't like are in places where strength isn't important, so I'm not concerned. I may do some touch-up on a few to get a little better looking result, but it's more of a picky thing and not a safety issue at all. It's pretty clear that by not paying for the pre-finished frame, I also didn't get the clean-up that gets done prior to coating so there's a lot of grease, spatter, and really sharp points/edges from grinding that I will address before getting too deep in the assembly. A couple of them would leave a pretty nasty scar if not addressed now. There are also some places that will get a foam pool noodle stuck on to keep me from getting hurt - mostly the front bumper mounts. There's nothing worse than walking past and banging into them - the steel is pretty unforgiving to human flesh .

But before we can build, we must inventory.
The POL wasn't too bad all things considered with the supply shortages. I was prepared for a huge list after reading posts on this forum and watching the Facebook Live videos from Dave Smith - so many discussions about waiting on parts. But only two pages, and since the kit was completed back on 11/20/21 and wasn't picked up by Stewart Transportation until 12/13/21, a lot of the parts were already marked off. The major items I expected to be missing - windshield, shocks, bushings for control arms, front spindles, and front hubs were all there, so I was pleasantly surprised.
But (there's always a but), there are a few that I didn't expect to be missing that didn't make it, and they are killers. First were the bushings & pivot sleeves for the upper (rearward) IRS center section mounts, so I can't install that. No idea when they will be here, so I measured the frame tubes that they go into and ordered some from an online source. They may be a little long and a little big (probably less than .050), but that's easily fixed with some sanding. If nothing else, they can work as stand-ins until the correct ones get here from FFR. Also missing is the power steering rack and tie rod ends, so even though I can assemble most of front corners since I got the control arms, shocks, spindles, and hubs, I won't be able to do the initial alignment, so I'm at the mercy of FFR on that one. I could try to order one from another source, but I'm not sure I want to risk getting the wrong one, so I'll wait for the one from FFR.
The other major items I'm short are:
- Radiator
- Coolant overflow tank (not a big deal - I'm using the Moroso aluminum one anyway)
- Silicone elbow for the Coyote intake
- Vintage Gauges
- Short shifter
- All of the aluminum panels that are boxed together (Box #6 didn't make the truck for some reason)
- Fuel pressure gauge
- Various fittings
- Steering wheel center boss & center section
- Door latches
- Hood and trunk gas struts
- Wilwood front and rear brakes - I expected this since they ship directly from Wilwood
The last item to gripe about that is missing is the entire Coyote engine and transmission mount kit. It's on my order, but wasn't packed in any of the boxes, doesn't show up on the POL, and there wasn't a packing list for that option in the packet. I suspect that it's just an oversight on someone's part since it's completely missing, but without it my major mockup activity of the engine/trans is dead in the water. I noticed someone in another thread posted a link to their packing list (I believe it was on a 20th Anniversary build), and the #15440 Coyote engine/trans mount kit is shown to be packed in box 18. I got box 18, but nada. That one is the most frustrating item I'm missing. FFR's website says that no parts are being shipped this week (at least on the online parts store), so I don't think I'm going to see it anytime soon. I emailed FFR with my handful of inventory issues (missing a battery cable, the 7/8" jam nuts for the rear alignment adjusters, and the fuel level sending unit) and highlighted the missing engine mount kit. I've taken some vacation time for next week between Christmas and New Years and planned to get a lot accomplished, but without the engine mounts, I'm probably not going to get as much done as I hoped.
It is what it is. I've seen folks on here with much bigger lists of critical items, so I'll count my blessings and just roll with it.
So after all the inventorying and digging through boxes, my OCD kicked in and I had to get organized. So off to the store for some new plastic bins. Spent a few hours Sunday afternoon organizing the parts into groups, labeled the bags of parts with what system they belong to, and sorted everything into the bins. I've read others have done it this way, and it makes sense to me to do it this way as well. I could have used the cardboard boxes I suppose, but what I learned is that there is a lot of empty space in those boxes for packing padding, so by sorting and consolidating into the bins, the amount of space taken up by the parts is significantly less. The clear bins also make it easy to see what's inside, so even if it's not marked on the outside, it makes searches a little quicker. I'll use the bins when I disassemble to pack the parts in to send to powdercoat so they stay somewhat organized. Whether the coating outfit puts them back organized is another whole thing.
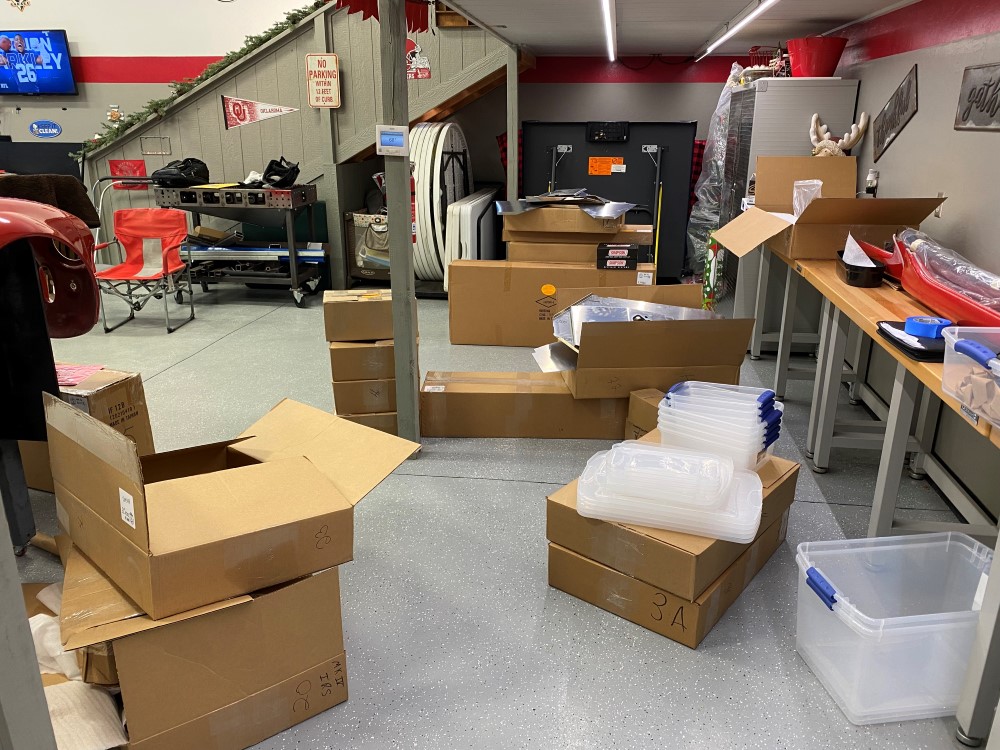
The boxes with the windshield, seats, dash, and carpet all go up to the loft so they are out of the way until needed. It sure is nice having that luxury (not-so-humble brag). I'm probably going to add some boards to the bottom of the body buck to make some shelves to stack the doors, truck lid, and sheet metal panels so they are close at hand but not in danger of being damaged. Keeping them all together seems logical to me. Being such odd shapes, they look like they'd be perfect under the body and not taking up a ton of room on the parts shelves.
And so the odyssey begins...
Russel
Mk4 Roadster #10204. Gen 3 Coyote, Tremec T56, IRS. Ordered 6/7/21 - Delivered 12/18/21
Build Thread
-
Post Thanks / Like - 0 Thanks, 1 Likes
-
Senior Member
G'day Russ,
good to see you back again. You mentioned about banging your legs on the front bumper mounts. I screwed a piece of wood between the two mounts. This protected me and also the radiator. A fellow builder here in Oz crunched his radiator when moving his partially completed car around. Doesen't look so 'race car' with a wooden bumper, but is effective. While you have the grinder out, remove those two mounting points for the radiator and instead mount the upper section of the radiator with SS piano hinge.
Merry Christmas!
Mk.4 FFR supplied Right hand drive
Received 12/2012 completed 12/2019
Gen1 Coyote / TKO600 / IRS
Lots of mods to make compliant for Australian design rules
-
Post Thanks / Like - 0 Thanks, 1 Likes
-
Member
Good suggestions Nigel. I'm seriously considering the Breeze lower radiator support to rest it on, but will for sure take a closer look at the hinge approach. I like the idea of a brace on the bumper horns during assembly - will for sure be doing that.
Have a great Christmas down under!
Russel
Mk4 Roadster #10204. Gen 3 Coyote, Tremec T56, IRS. Ordered 6/7/21 - Delivered 12/18/21
Build Thread
-
Post Thanks / Like - 0 Thanks, 1 Likes
-
Member
Rear Suspension
So given the critical missing parts, I chose to start on the rear suspension. The only parts I'm missing are the IRS center section rear mounting bushings, but I found a set with the pivot sleeves from an online source in Texas, and they will be here in a couple of days. So while I wait for those, I hung the upper and lower control arms along with the toe adjuster bars, then trimmed the spindles and mounted those. I did grind the cut portion flat and then smoothed it out with a die grinder and stages of finer grit discs until it was a nice shine instead of the nasty looking band saw marks. I saw others do that on other posts but would probably have done it anyway since it just makes for a much nicer finished product.
I did cheat a little and used the press at work to swap out the rear wheel studs. The lug nut method works fine, but the press made it super easy and quick. It sure is nice having access to some of those types of tools when you need them. Picked up some cheap lug nuts from a local auto parts store - mostly just to help protect the stud threads during assembly.
Not much to get too excited about yet, but here's a couple shots of the two sides:


I realized that I didn't share a pic of the frame cart that I made, so here's one:

The metal is all repurposed from leftovers from other projects, and the casters were an Amazon deal. I know wood is easier to build with, but I like how solid this is (it was also an excuse to practice my welding), and it will be strong enough to support the finished car should the need arise. I glued some squares of indoor/outdoor carpet that I had in the loft into the angle pieces on top, and it makes a nice, cushioned cradle. That should help keep the coated frame from getting scratched down the road. The center bar is also in a perfect position to help me set the motor/trans if I have to do it alone since I can put a little trolley on it to guide the trans tail as it lowers into place. That's my plan anyway, so it may not work as well in practice as it does in my head, but I'm going to try it anyway when the time comes - just need to sort out how the trolley needs to be configured.
Probably nothing more this week to work on, but plan to get back on it this weekend and have all next week off work, so I hope to make some good progress.
Hope everyone has a great Christmas!
Russel
Mk4 Roadster #10204. Gen 3 Coyote, Tremec T56, IRS. Ordered 6/7/21 - Delivered 12/18/21
Build Thread
-
Senior Member

Originally Posted by
Russwood
It's killing me for sure. My wife has already started referring to herself as the "project widow".
When I head to the garage, my wife asks me if I am going toe the mistress for a ride!
-
Its been said before but, wow! Shop envy for sure. Enjoy the build and thanks for posting your progress.
-Steve.
-
Member
Thanks Steve. All the credit to my late father. I enjoy the journaling I suppose. I tell myself I'm doing this to give my kids something to remember me by, besides the car as an heirloom!
Russel
Mk4 Roadster #10204. Gen 3 Coyote, Tremec T56, IRS. Ordered 6/7/21 - Delivered 12/18/21
Build Thread
-
Member
So true Kmcallahan. She smiles when she says it, but I suspect there's a little bit of jealousy in there.
Russel
Mk4 Roadster #10204. Gen 3 Coyote, Tremec T56, IRS. Ordered 6/7/21 - Delivered 12/18/21
Build Thread
-
Senior Member

That is honestly one of the prettiest Coyote engines I've ever seen on here. It looks great!!!!
MK4 #10008 - Ordered 10/06/20, Delivered 03/03/21, First Start 7/22/21, First Go Kart 7/24/21
Paint by Metal Morphous 5/14/22, Legally registered 6/8/22, Graduated 7/20/22
Build Thread
https://thefactoryfiveforum.com/show...been-delivered
Complete Kit, Ford 306, Sniper/Dual Sync, T5, Hydraulic clutch
-
Post Thanks / Like - 1 Thanks, 0 Likes
-
Member
Originally Posted by
Blitzboy54
That is honestly one of the prettiest Coyote engines I've ever seen on here. It looks great!!!!
You are too kind. Glad you like it. Hope I can keep the quality at this level, but I've got a long way to go!
Russel
Mk4 Roadster #10204. Gen 3 Coyote, Tremec T56, IRS. Ordered 6/7/21 - Delivered 12/18/21
Build Thread
-
Member
IRS & Rear End Mockup
Back at it. Have got the next week+ off work, so in between the holiday gatherings, I hope to make some good progress.
I got the IRS center section in place after several different attempts to rig it with my hoist - the balance isn't great on this thing and as it's been covered by other build threads, it's a dance of angles and contortions to get it up and in place. The trick is to get the nose as high up as possible and then alternate between lifting the entire thing and slightly lowering the pinion end until it's above the mounts and level. After a couple of failed attempts, I found the right place to attach the brackets so they didn't get in the way. With that and some multiple different placements of some straps to help with the pinion end's angle, I got it into position. It would have been a lot easier without the sheet of steel above it that is part of the trunk deck, but I'm sure most lift from below instead of from above. These were for sure some valuable practice runs - this will be super critical to perfect when it's time to do the final assembly to keep from damaging those expensive finishes.


After tightening things up snug (not torquing anything until final assembly), I got the CV axles installed. These would be a lot easier before the spindles (obviously), but because I was missing the IRS top mount bushings until a couple days ago and I was chomping at the bit to start something, I got the cart in front of the horse a bit. Not a huge deal in reality though, just needed to take the toe adjuster loose and then drop the assembly by taking the bottom shock mount loose. After that, there's just enough room to get the hub end in after seating the axle into the center section.


Snugged up the hub nuts and then dropped the frame back onto the cart so I could turn it around to mock up the engine/trans next.
Last edited by Russwood; 12-26-2021 at 12:02 PM.
Russel
Mk4 Roadster #10204. Gen 3 Coyote, Tremec T56, IRS. Ordered 6/7/21 - Delivered 12/18/21
Build Thread
-
Member
Engine/Transmission Mockup
Frame with the rear end installed down on the frame cart - ready for the engine & transmission.

I put the bellhousing on the engine, but no clutch yet. No reason to do that until final assembly, so just line up and bolt the transmission to the bellhousing. It took some doing to find the right hole in the lifting plate to balance it right, but got it right eventually.


This took a couple different steps between lowering the engine/trans, then pushing the trans tail down, then pulling the frame forward. Sort of like using an engine hoist but in reverse since the crane/hoist are stationary (actually could be moved but it takes a couple people). This worked pretty well by myself, which surprised me. I thought it would for sure take a helper, but it went pretty easily. I wound up taking the shifter off since it's probably going to have to move forward to the mid-shifter location. The shifter kept getting caught on the tunnel top framing, so I removed it and taped over the opening for now. This is the Tremec T-56 Magnum, so it's pretty long, but it fits really well, and the transmission A-frame mount works perfectly. I have read others have experienced some issues with it fitting, but so far, the only issue I have is the driveshaft length - which I'll cover in the next post.
Here it all is sitting in position, with the motor mounts fully seated in the frame mounts. One thing that I didn't want to risk was the serpentine pulley system getting damaged during install, so I pulled it all off until the engine is in place. After this first practice run, it's a good thing I did, because the crank pulley just does clear the front X of the frame, so the pulley system would have been in the way. There's room to install after the engine is installed, so that's the sequence I'll follow during final assembly for sure.

I did learn that once the engine/trans is in place, the bottom of the bellhousing hits on the frame cart, so the transmission tail is up off the rear frame. I had to pick the car up with the lift to get the transmission down into position, so I'll need to rig up a spacer for the cart to raise it up a little. That was something I was unsure about when I built it, but now I know...
Russel
Mk4 Roadster #10204. Gen 3 Coyote, Tremec T56, IRS. Ordered 6/7/21 - Delivered 12/18/21
Build Thread
-
Member
Driveshaft Issue
After the engine & transmission install, I wanted to go ahead and install the drive shaft to make sure everything lines up right and also to learn how to get it in place. I've read that there's a sweet spot to doing this after the transmission is in place, but after a look at the tail vs. the pinion flange, there's no way this is fitting.
I did install the transmission mount A-frame, install the spacer/adapter onto the transmission polyurethane mount, and dry fit everything. Can't find the 3/4" spacers that the manual shows to go on the bolts between the adapter to the transmission, but will dig out the inventory sheets and look for the part number - it's probably in a bag somewhere. I've also got a shortage of the larger bolts that attach the A-frame to the chassis, or I'm missing the transmission mount bolts. Probably the latter and I'll find them with the spacers somewhere, LOL.
I installed the pinion flange adapter but had to grind the edges of the socket head bolts down a little - they must have been deformed during manufacturing because they wouldn't fit into the recesses, but it didn't take much. Since these are just zinc coated, now that I've ground off the finish, they will want to rust, so I'll order some stainless replacements for final assembly.
Next comes the drive shaft, and where the issue occurs. Now that both the transmission and pinion flange are in place, the space between them is only a little over 9". The driveshaft from flange to flange is 9-3/4". I went to the box and the part number is #60375, which is the 9.75" for the Coupe. That seemed odd, so I checked the inventory sheets, and I was supposed to have gotten the #60175, which is the 10.5". That would have been a bigger problem than I already have. I'm really not sure how I missed that when I did the inventory, but probably saw drive shaft, had a drive shaft, and stopped looking. Stupid mistake. Regardless, neither would work. I think what I need is the #16038 - 31 Spline Roadster 8.375" version.


I was curious why my inventory showed a driveshaft that wouldn't work to start with, and I've noticed that the kit configuration on the website lists an option for the Coyote with a TKO, but no T-56/Magnum, so as I learned that the TKO is shorter than the T-56, it makes sense that the one that would by default come with the TKO configuration would be too long. I thought I communicated my transmission as a T-56 when I confirmed my order, but that was many months ago, so I'm hoping that I won't have trouble getting them to swap me out.
If FFR is listening, and the 8.375" driveshaft is the right one, please update your configuration to list the 5.0 Coyote with the T-56 (Magnum) for the #16038 so the next guy/gal doesn't have the same lesson to learn. If it's not the right one, or can't be made to work, I guess my only solution will be a custom made one. Man, I hope that's not the case.
I'll place a call tomorrow to FFR to check on the email I sent last week regarding the POL and inventory incorrect items and dig into this issue with them. Hopefully, they have one in stock, but the parts website says they don't. If not, it won't kill me since this is all coming back apart, so there's nothing stopping me from proceeding without a driveshaft in place. At least until it's time to tear down and paint since I want the driveshaft to match the other underside parts.
So, that's all for now. I'll lower the car and see what I can do with the front suspension, and then on to the foot box & fuel tank so I can start running the hard lines for fuel and brakes now that the big parts are in place.
Russel
Mk4 Roadster #10204. Gen 3 Coyote, Tremec T56, IRS. Ordered 6/7/21 - Delivered 12/18/21
Build Thread


 Thanks:
  Likes:


 Reply With Quote


