-
 Administrator

How I polish aluminum panels (just one technique of many)
One of the things I gathered through various posts over time is how to polish the aluminum panels, but I have yet to see a blow-by-blow description of how it's done. This is how I'm doing mine.
The panels that come with the kit are non-clad aluminum. Therefore you are dealing with the alloy, and not a "top-coat" covering that makes it easy to polish. I have come across two companies that specialize in polishing and protecting aluminum, NuVite and Sharkhide Seal. Nuvite makes a multi-stage set of compounds that, with a lot of work, can take your dull, non-clad aluminum and turn it into a panel that is like looking into a mirror. SharkHide makes a single stage product that, when applied, protects the aluminum for 2 years or more without re-polishing. It does this by sealing the aluminum so that it can not interact with oxygen and oxidize. The aluminum uses a bit of it's shine but I've found that it maintaines that shine without oxidizing, making for a much easier to maintain finish.
I'd like to show you the process to take your panels from the factory look to a mirror finish, and protect it so that you are not constantly having to re-polish to maintain an award-winning shine.
Make no mistake, this is a very labor-intensive process. But I feel that the result is definitely worth it.
As they come from the factory, the panels are very dull and have a definite "grain" to them. This grain needs to be worked out and the aluminum needs to be "conditioned" so that has a flat surface is created. Since the aluminum is non-clad, you are working with the pure alloy. This is different than aluminum that has "cladding". Cladding is a covering on top of the aluminum that makes polishing much easier. Unfortunately, FFR aluminum is non-clad. Therefore, in order to make a mirror finish, a multi-stage process must be employed. Here is how I'm doing mine.
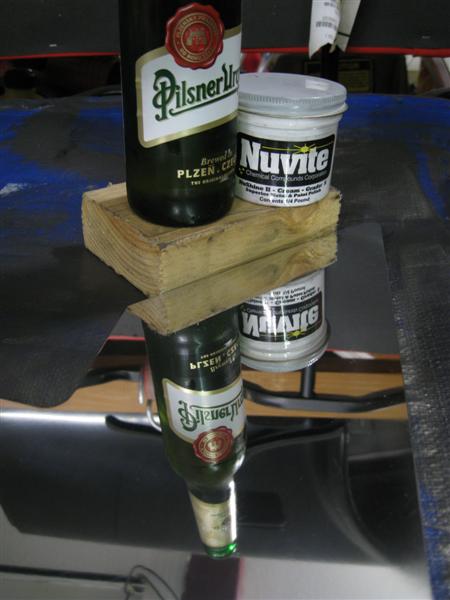
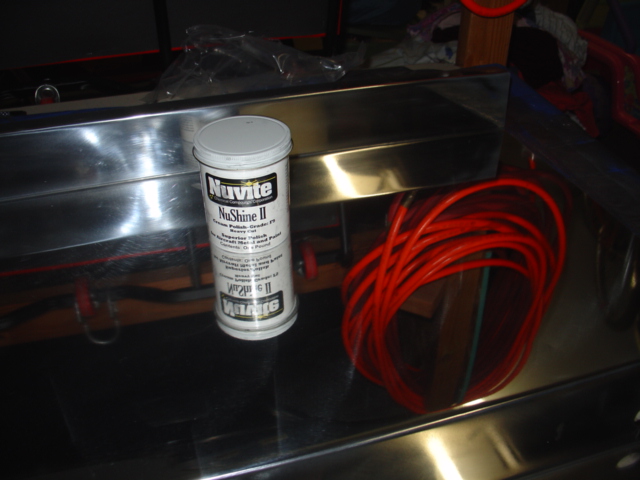
I purchased a multi staged product from Nuvite. I purchased One pound of F9 Grade Heavy cut to work the aluminum to a base reflection. I dabbed a "wet thumb print" every 1-1/2 inches and worked in 1 square foot increments, using a cordless right angle drill with a 7" pad. I've made two passes with this technique and this is how my trunk panels look so far:

This is a vast improvement over the base alloy but it's just a start.
The next step is to apply the Grade C every 3" and work it in with a 7" wool pad.
Continued...
FFR 5369 Pin Drive, IRS, Trigos, Torsen, Wilwoods, FMS BOSS 302 "B" cam , Mass-flo. CA SB100 (SPCN) Registered
Delivered 4/23/06. "Finished" 4/2012 (still not done!)
-
-
Administrator
-
Post Thanks / Like - 1 Thanks, 0 Likes
-
Dave,
That finish looks great. All of the aluminum trim we sell at StreetWorks is raw metal with a machined finish. Some people want a shinier(sp?) look. We'll be sure to let them know about this stuff.
Harvey R.
Watsons StreetWorks
-
Senior Member

-
David,
Having finally decided on Sharkhide for my panels - I have a question. I won't be polishing them but will be creating a final "brushed" finish with either 3M pads or a DA with something around a 200 grit. What should I use to clean them after the abrasive is used and before the Sharkhide is applied?
RJ "A race car exists in only two states: broken or in the process of becoming that way" Road and Track, May 2015
-
Administrator
You can use mineral spirits if you wish but I simply used Windex and clean shop towels to clean the panels before using the SharkHide. Just make sure ALL residue is off before applying.
HTH,

FFR 5369 Pin Drive, IRS, Trigos, Torsen, Wilwoods, FMS BOSS 302 "B" cam , Mass-flo. CA SB100 (SPCN) Registered
Delivered 4/23/06. "Finished" 4/2012 (still not done!)
-
David,
Thanks for posting this, I've been floundering with the polishing of my panels so I've ordered some Nuvite, hopefully I'll come close to your results.
-
Senior Member

I used different products, but the same idea. Like David said - it is VERY labor intensive, hours per panel. Also, once you start, you are committed. Maybe try a small hidden panel if you are not 100% sure.
Be very careful what you put the Sharkhide on with. The recommended thing is cloth baby diapers. They are not that easy to find, or cheap. I got a pack ay Babys-R-Us. I suggest you follow that one. I tried a microfiber cloth and it left a nice sticky trail of fuzz. Lacquer thinner takes Sharkhide off if you need a redo. You basically get one wipe, two if you are fast, with Sharkhide.
-
Administrator

Originally Posted by
Avalanche325

I used different products, but the same idea. Like David said - it is VERY labor intensive, hours per panel. Also, once you start, you are committed. Maybe try a small hidden panel if you are not 100% sure.
Be very careful what you put the Sharkhide on with. The recommended thing is cloth baby diapers. They are not that easy to find, or cheap. I got a pack ay Babys-R-Us. I suggest you follow that one. I tried a microfiber cloth and it left a nice sticky trail of fuzz. Lacquer thinner takes Sharkhide off if you need a redo. You basically get one wipe, two if you are fast, with Sharkhide.
I actually started using the disposable blue "shop towels" (kind of like paper towels, but NOT) you can get at any parts store. I found I was able to do the single swipe and not leave a lint trail, much to my surprise. Remember, SOAK it. Trying it on a test panel is always a good idea!
FFR 5369 Pin Drive, IRS, Trigos, Torsen, Wilwoods, FMS BOSS 302 "B" cam , Mass-flo. CA SB100 (SPCN) Registered
Delivered 4/23/06. "Finished" 4/2012 (still not done!)
-
Top Notch Builder

Amazing!!! What a pro! I’m inspired
-
Post Thanks / Like - 1 Thanks, 0 Likes
-
Senior Member

Looks very nice & I am sure it impresses anyone who see it, but prefer to spend the hours involved driving the thing. 
Last edited by BEAR-AvHistory; 10-03-2018 at 06:21 PM.
-
Sharkhide was originally a Marine product and can be put on almost anything metal. Does a great job on diamond plate like on a trailer. It has to be fairly good to be around salt water and all the abuse boats get.
-
I have found the foam paint brushes are good for applying Sharkhide on small or irregular shaped items. You need a container that will let you wet the width of the brush and about 1/2" min dip. I used it on my radiator tanks, alum bell housing, trans case, etc. I plan on using sound deadner on the carpet side of the alum panels, but Sharkhide the bottoms.
20th Anniversary Mk IV, A50XS Coyote, TKO 600, Trunk Drop Box, Trunk Battery Box, Cubby Hole, Seat Heaters, Radiator hanger and shroud.
-
Senior Member

Nice write up. I'm also a SharkHide fan - I use their polishing compound as well as the sealant. Very happy with the results but as David says, once you start you're committed and it's a LOT of work. This is my passenger footbox. 3,000 miles later and all it needs is an occasional wipe with a damp rag to bring the finish back to this.
When you apply the sealant do make sure it's a well ventilated area - that stuff is NASTY.

FFR6243RD, MkIII, 3.55, IRS, pin-drive width, carb'd 351W, T5, 1/2 dropped butt, Fortes hydraulic clutch, deep dish AC-III wheels by Team III. 9 year build; NY registered 7/18/2016 - "Sweet 16" winner at 2016 Taconic State Nationals 5 days later ... in 'rough as hell' gel coat for the foreseeable future! Build Blog - Leave me a comment!
Register your car with the Factory Five Cars Rule! mobile app available from the app store
-
Top Notch Builder
I spoke to Perfect Polishers owner a Nuvite supplier and he seems to think that F9 would be too aggressive and F7 would be unnecessary for new panels and just start with C and do S after. I feel like if you guys used a particular method why not copy it if you had success. What do you guys think?
-
Seasoned Citizen

Thanks David, great write up. I'll have to get some of that polish and give it a try. I too am a Sharkhide convert and have been using quality micro fiber towels for large areas. Easier to find than the old fashioned diapers.
Dart Little M 406" SBC 800 HP N/A & 1,100 HP on nitrous, 2-spd Powerglide with trans brake, 6,000 RPM stall converter, narrowed Moser 88 3.90:1 spool with 35-spline gun-drilled axles & Torino bearings, custom parallel four-link, custom tube chassis & roll cage NHRA certified for 8.5-sec (only two FFR Hot Rods have this cert).
33 Hot Rod Super Pro Drag Racer Build:
33 HR NHRA Cert Roll Cage Build


 Thanks:
  Likes:


 Reply With Quote