Boig Motorsports

Visit our community sponsor

Thanks Thanks:  29
Likes Likes:  40
Page 11 of 20 FirstFirst ... 910111213 ... LastLast
Results 401 to 440 of 779

Thread: EdwardBs Mk4 #8674 20th Anniversary Build

  1. #401
    Straversi's Avatar
    Join Date
    Nov 2014
    Location
    Palos Verdes, CA
    Posts
    1,278
    Post Thanks / Like
    This thread is so helpful. Thanks.
    I threaded in the 6 drive shaft adapter bolts with the lock tight. Then I threaded in the 4 drive shaft connecting bolts temporarily. I slipped a breaker bar in between 2 opposing drive shaft bolt heads and used that as resistance while I torqued the 6 adapter bolts. It was easier than applying the resistance at the spindle.

  2. #402
    Senior Member
    Join Date
    May 2014
    Location
    Burlington, WI
    Posts
    697
    Post Thanks / Like
    Blog Entries
    1
    Paul,

    Will you send your car to the painter with the windshield, exhaust system and front and rear quick jack bolts removed, or will your painter remove and reinstall them if necessary? As I've only read of body - off painting, I am curious as to how this is handled. Thanks.

  3. #403
    Senior Member edwardb's Avatar
    Join Date
    Feb 2011
    Location
    Lake Orion, Michigan
    Posts
    10,857
    Post Thanks / Like
    Quote Originally Posted by ThickCobra View Post
    Paul, Will you send your car to the painter with the windshield, exhaust system and front and rear quick jack bolts removed, or will your painter remove and reinstall them if necessary? As I've only read of body - off painting, I am curious as to how this is handled. Thanks.
    Windshield off. Side pipes off. (Oh good, more open header running...). Side louvers off. Seats out. Front and rear quick jacks, underside bolts, splash guards, handles and locks all installed. Once the body work is done and all panels level, matched, etc., handles and locks come off, front quick jacks and grommets come off. Underside bolts and rear quick jacks they said they would probably leave on but replace the hardware with something smaller so the paint line is inside the final hardware.

    Their rationale for painting "body on" is they claim it's difficult to get the body back on exactly the same. So the original fitting, gaps, matches, etc. aren't as good. Plus they said they can do a better job exactly matching the stripes from body to panel, etc. Additionally, they claim it's really no more work for masking since all the openings need to be masked anyway to keep paint from the underside. Plus the chassis gives them a built-in body buck and the body is more rigid on the chassis than on the buck.

    I think their concerns are completely manageable since my first two builds were painted body off, and one of them by them and it turned out great. Plus that is how the majority of these are painted. But two years ago they would have preferred to paint #7750 body on. When I brought it to them though, it wasn't ready yet. I still had panels not installed, no underside coating, etc. Plus I was on a pretty tight timeline and wanted the chassis back home so I could finish carpet, etc. while they were painting. They agreed, but would have preferred otherwise.

    This is a custom shop. All they do is high end street rods, custom cars, show cars, etc. I've seen Factory Five's they've painted both ways, and either are top notch.
    Last edited by edwardb; 09-19-2016 at 10:35 AM.
    Build 1: Mk3 Roadster #5125. Sold 11/08/2014. Build 2: Mk4 Roadster #7750. Sold 04/10/2017. Build Thread
    Build 3: Mk4 Roadster 20th Anniversary #8674. Sold 09/07/2020. Build Thread and Video. Build 4: Gen 3 Type 65 Coupe #59. Gen 3 Coyote. Legal 03/04/2020. Build Thread and Video
    Build 5: 35 Hot Rod Truck #138. LS3 and 4L65E auto. Rcvd 01/05/2021. Legal 04/20/2023. Build Thread. Sold 11/9/2023.

  4. #404

    Steve >> aka: GoDadGo
    GoDadGo's Avatar
    Join Date
    Feb 2015
    Location
    Slidell, Louisiana
    Posts
    6,768
    Post Thanks / Like
    Blog Entries
    1
    Hey EdwardB,

    Since I'll be painting my car myself (With Expert Assistance Standing Near) do you think I could simply bag the chassis and then place the body on it?

    I've used Disposable Car Covers for years and planned to "Bag The Car" when I do the body work, but now wonder if it would work for painting too.

    Steve

  5. #405
    Senior Member edwardb's Avatar
    Join Date
    Feb 2011
    Location
    Lake Orion, Michigan
    Posts
    10,857
    Post Thanks / Like
    Quote Originally Posted by GoDadGo View Post
    Hey EdwardB,

    Since I'll be painting my car myself (With Expert Assistance Standing Near) do you think I could simply bag the chassis and then place the body on it?

    I've used Disposable Car Covers for years and planned to "Bag The Car" when I do the body work, but now wonder if it would work for painting too.

    Steve
    I really don't know, or necessarily have an opinion to be honest. I've heard of guys putting a sheet of plastic over the engine compartment and/or cockpit before body on prior to body work. Can't hurt I guess. I would want to make sure a bag could be removed without too much hassle. Could be interesting trapped between the body and bulb seal, etc. No matter what, there's going to be some dust and whatever on the engine, chassis, cockpit, etc. I purposely don't put the carpet in until after paint, and also don't have the seats in it. A couple hours with an air hose and shop vac and all is back to normal in my experience.
    Build 1: Mk3 Roadster #5125. Sold 11/08/2014. Build 2: Mk4 Roadster #7750. Sold 04/10/2017. Build Thread
    Build 3: Mk4 Roadster 20th Anniversary #8674. Sold 09/07/2020. Build Thread and Video. Build 4: Gen 3 Type 65 Coupe #59. Gen 3 Coyote. Legal 03/04/2020. Build Thread and Video
    Build 5: 35 Hot Rod Truck #138. LS3 and 4L65E auto. Rcvd 01/05/2021. Legal 04/20/2023. Build Thread. Sold 11/9/2023.

  6. #406
    Senior Member
    Join Date
    May 2014
    Location
    Burlington, WI
    Posts
    697
    Post Thanks / Like
    Blog Entries
    1
    Paul,

    I have to say you are by far, an outstanding individual. Always helpful and willing to share what you probably learned the hard way. You may not realize how your postings of progress and approach help so many people wanting to achieve a high level of quality in their builds. What you just shared with me regarding the body-on approach to painting is much appreciated.

    I cannot thank you enough.

    Jay

  7. #407
    Straversi's Avatar
    Join Date
    Nov 2014
    Location
    Palos Verdes, CA
    Posts
    1,278
    Post Thanks / Like
    Ah ha! I received these parts with my car but not the tech update. I even called to see if the IRS instructions were up to date and they sent me the link to the same instructions. I have a zip tie around those outer angled mount adapters with note to myself that says "find out where these go". I thought they might be part if the IRS kit for the 33. Mystery solved. Thanks

    Steve

  8. #408
    Straversi's Avatar
    Join Date
    Nov 2014
    Location
    Palos Verdes, CA
    Posts
    1,278
    Post Thanks / Like
    I guess this is why this thread is my daily read. Learn something new every day.
    Thanks

  9. #409
    Senior Member edwardb's Avatar
    Join Date
    Feb 2011
    Location
    Lake Orion, Michigan
    Posts
    10,857
    Post Thanks / Like
    Thanks for the positive comments guys. Much appreciated. Don't be looking for new stuff for a while though. We're up to our eyeballs in packing boxes and my garage and basement shop are officially decommissioned. Next week after our closings things will get even busier. It will be some weeks before the build is back in business. The available slot at the painter worked out perfectly though with our move timing. Should work out well.
    Build 1: Mk3 Roadster #5125. Sold 11/08/2014. Build 2: Mk4 Roadster #7750. Sold 04/10/2017. Build Thread
    Build 3: Mk4 Roadster 20th Anniversary #8674. Sold 09/07/2020. Build Thread and Video. Build 4: Gen 3 Type 65 Coupe #59. Gen 3 Coyote. Legal 03/04/2020. Build Thread and Video
    Build 5: 35 Hot Rod Truck #138. LS3 and 4L65E auto. Rcvd 01/05/2021. Legal 04/20/2023. Build Thread. Sold 11/9/2023.

  10. #410
    Straversi's Avatar
    Join Date
    Nov 2014
    Location
    Palos Verdes, CA
    Posts
    1,278
    Post Thanks / Like
    Good luck with the move and be careful with your back. My back surgeon says if its below your knees or above your head, pay someone else to do it. We have plenty to read and re read while you move.

    Steve

  11. #411
    Junior Member
    Join Date
    Sep 2016
    Posts
    3
    Post Thanks / Like
    Just absolutely outstanding workmanship. I hope when I do one of these I show some attention to detail.

    One small helpful hint. There are adapters for the fasttrax alignment tools for wheels w/o a significant lip. Might make your life a bit easier trying to align everything.

    https://smile.amazon.com/gp/product/...?ie=UTF8&psc=1

  12. #412
    Senior Member edwardb's Avatar
    Join Date
    Feb 2011
    Location
    Lake Orion, Michigan
    Posts
    10,857
    Post Thanks / Like
    Quote Originally Posted by mridge50 View Post
    Just absolutely outstanding workmanship. I hope when I do one of these I show some attention to detail.

    One small helpful hint. There are adapters for the fasttrax alignment tools for wheels w/o a significant lip. Might make your life a bit easier trying to align everything.

    https://smile.amazon.com/gp/product/...?ie=UTF8&psc=1
    Thanks for your comments. Come and join the fun! I do have and did use those FasTrax adapters. Wouldn't be possible on those wheels otherwise.
    Build 1: Mk3 Roadster #5125. Sold 11/08/2014. Build 2: Mk4 Roadster #7750. Sold 04/10/2017. Build Thread
    Build 3: Mk4 Roadster 20th Anniversary #8674. Sold 09/07/2020. Build Thread and Video. Build 4: Gen 3 Type 65 Coupe #59. Gen 3 Coyote. Legal 03/04/2020. Build Thread and Video
    Build 5: 35 Hot Rod Truck #138. LS3 and 4L65E auto. Rcvd 01/05/2021. Legal 04/20/2023. Build Thread. Sold 11/9/2023.

  13. #413
    Senior Member edwardb's Avatar
    Join Date
    Feb 2011
    Location
    Lake Orion, Michigan
    Posts
    10,857
    Post Thanks / Like

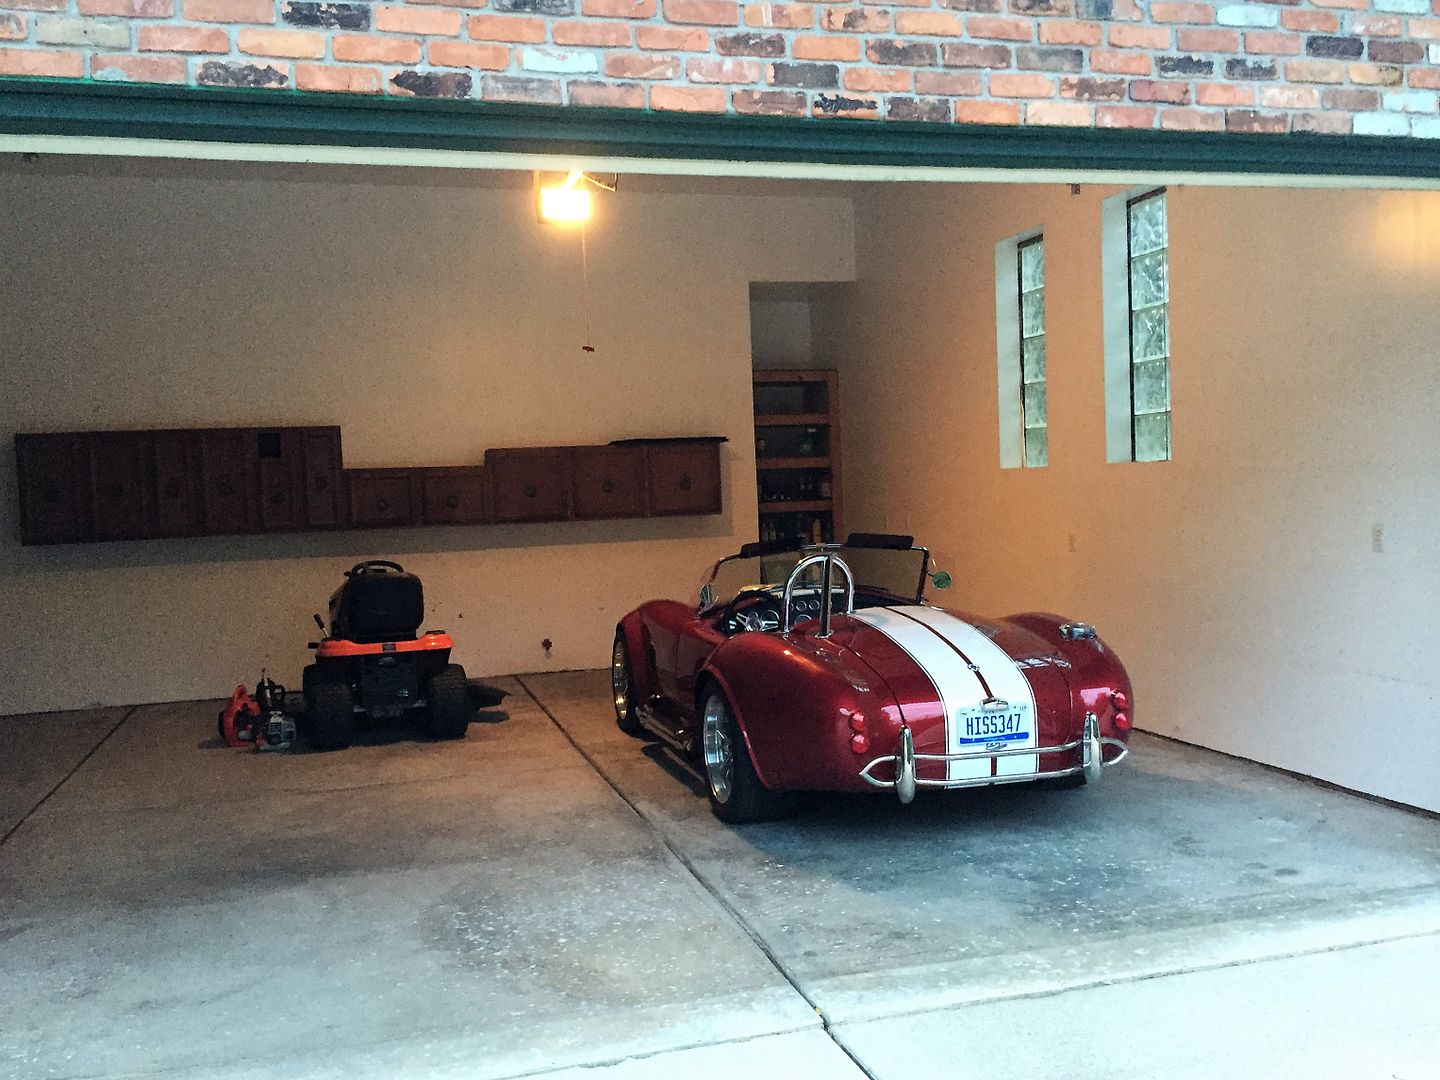
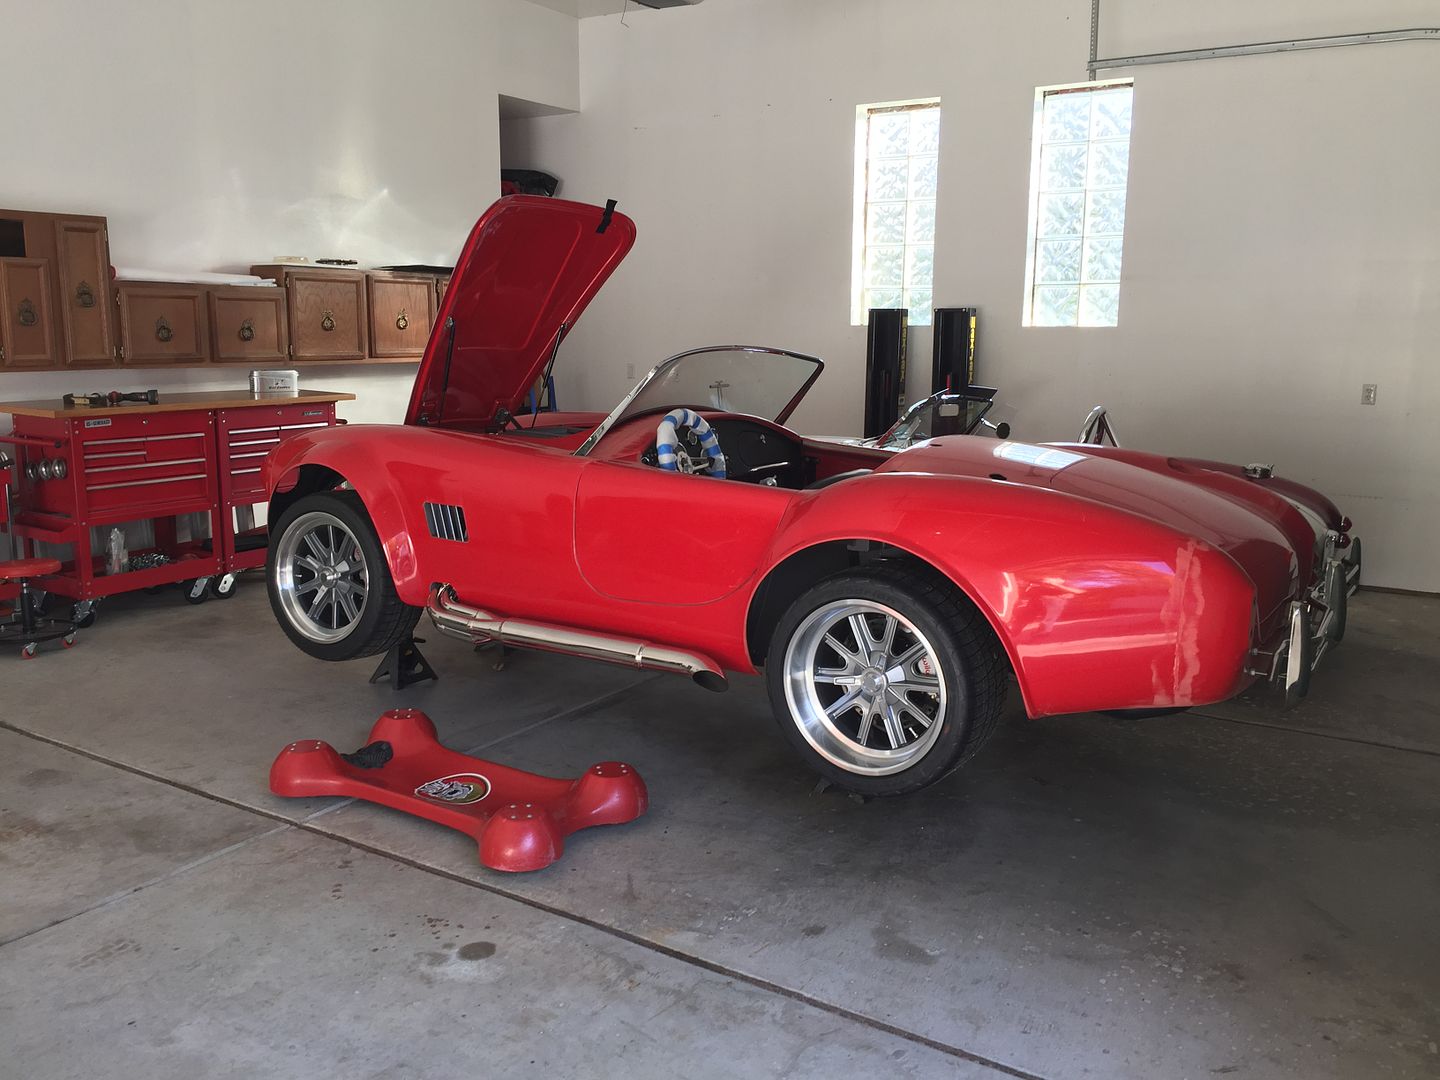
    New House Move Underway

    Yesterday we closed on both houses. All went fine with the sale of our current house. Nice young family relocating to the area and our place should be perfect for them. We closed on our new house with some last minute drama, but it's done. Today I had my first riding lawnmower experience. Went fine just took a little longer than (hopefully) normal because the former owner stopped mowing the lawn a couple weeks ago (grrr...). Today was mainly spent tearing down a bunch of stuff in the garage (won't even try to explain) and getting it cleaned up. While my wife supervised a cleaning company on the inside of the house. Decided to move #7750 over to the new digs so it was out of the traffic path moving stuff over the next days. Looks quite comfortable there. That's half the garage in the pic. I measured it at 968 square feet plus the alcove behind #7750. That plus the tall 14 foot ceilings. This is going to work. I'll get the Anniversary build over there in the next couple days. I'm planning to take down those RV quality cabinets when I get the garage back together. That's my new lawnmower ride next to #7750. Nothing too fancy, but pretty low time and was in the garage when we made the offer to purchase, so included it. They accepted. Basement junk tearout and clean-up tomorrow, then we will finally start moving stuff in.

    Last edited by edwardb; 09-27-2016 at 09:19 PM.
    Build 1: Mk3 Roadster #5125. Sold 11/08/2014. Build 2: Mk4 Roadster #7750. Sold 04/10/2017. Build Thread
    Build 3: Mk4 Roadster 20th Anniversary #8674. Sold 09/07/2020. Build Thread and Video. Build 4: Gen 3 Type 65 Coupe #59. Gen 3 Coyote. Legal 03/04/2020. Build Thread and Video
    Build 5: 35 Hot Rod Truck #138. LS3 and 4L65E auto. Rcvd 01/05/2021. Legal 04/20/2023. Build Thread. Sold 11/9/2023.

  14. #414
    RR20AC's Avatar
    Join Date
    Jul 2015
    Location
    Puyallup/WA
    Posts
    400
    Post Thanks / Like
    Blog Entries
    1
    Nice Paul, with a garage like that you can build two cobras at once. You could take on a build by someone stalled on their build and provide us with even more to read as you go. Thought about this last night at work. I went to the build school, got great information from them. I wish they could have provided support after the class. I guess that is what you do best.
    Last edited by RR20AC; 09-28-2016 at 12:15 PM.
    20th Anniversary MK4 Roadster, #8752, 18 of 20, Delivered 12/03/15, 1st Start 01/28/2017, off to paint 4/13/2017, Forte 351w/ Holley EFI, Forte throttle linkage, TKO 600/Forte Hyd. Clutch, UniSteer Electra Steering, RT's turn Signals, many Breeze parts, Paint by the Jeff Miller. Finished on 10/08/2017. 500 mile inspection on 10/21/2017, 3000 mile inspection on 1/14/19.

  15. #415
    Junior Member
    Join Date
    Sep 2016
    Posts
    3
    Post Thanks / Like
    There is no such thing as "Too much garage space". I have a co-worker that bought 10 acres and built a 160X100 shop along with his new house. It's huge.

    I asked him about it and his reply, "Wished I'd made it bigger". He said by the time he put all his car and motorcycle stuff in there, it didn't seem as huge as he'd thought it would be.

  16. #416
    Senior Member SSNK4US's Avatar
    Join Date
    Jul 2016
    Location
    Bakersfield, CA
    Posts
    393
    Post Thanks / Like
    A blower, a weedeater, a riding lawnmower, and that cobra..... That's all you need... From a movie with Steve Martin lol
    Congrats on everything!! I can't wait to start reading more on the anniversary build.... It, 7750, and you are amazing!
    Can't say thank you enough for it all

    Kurt

  17. #417
    Senior Member edwardb's Avatar
    Join Date
    Feb 2011
    Location
    Lake Orion, Michigan
    Posts
    10,857
    Post Thanks / Like

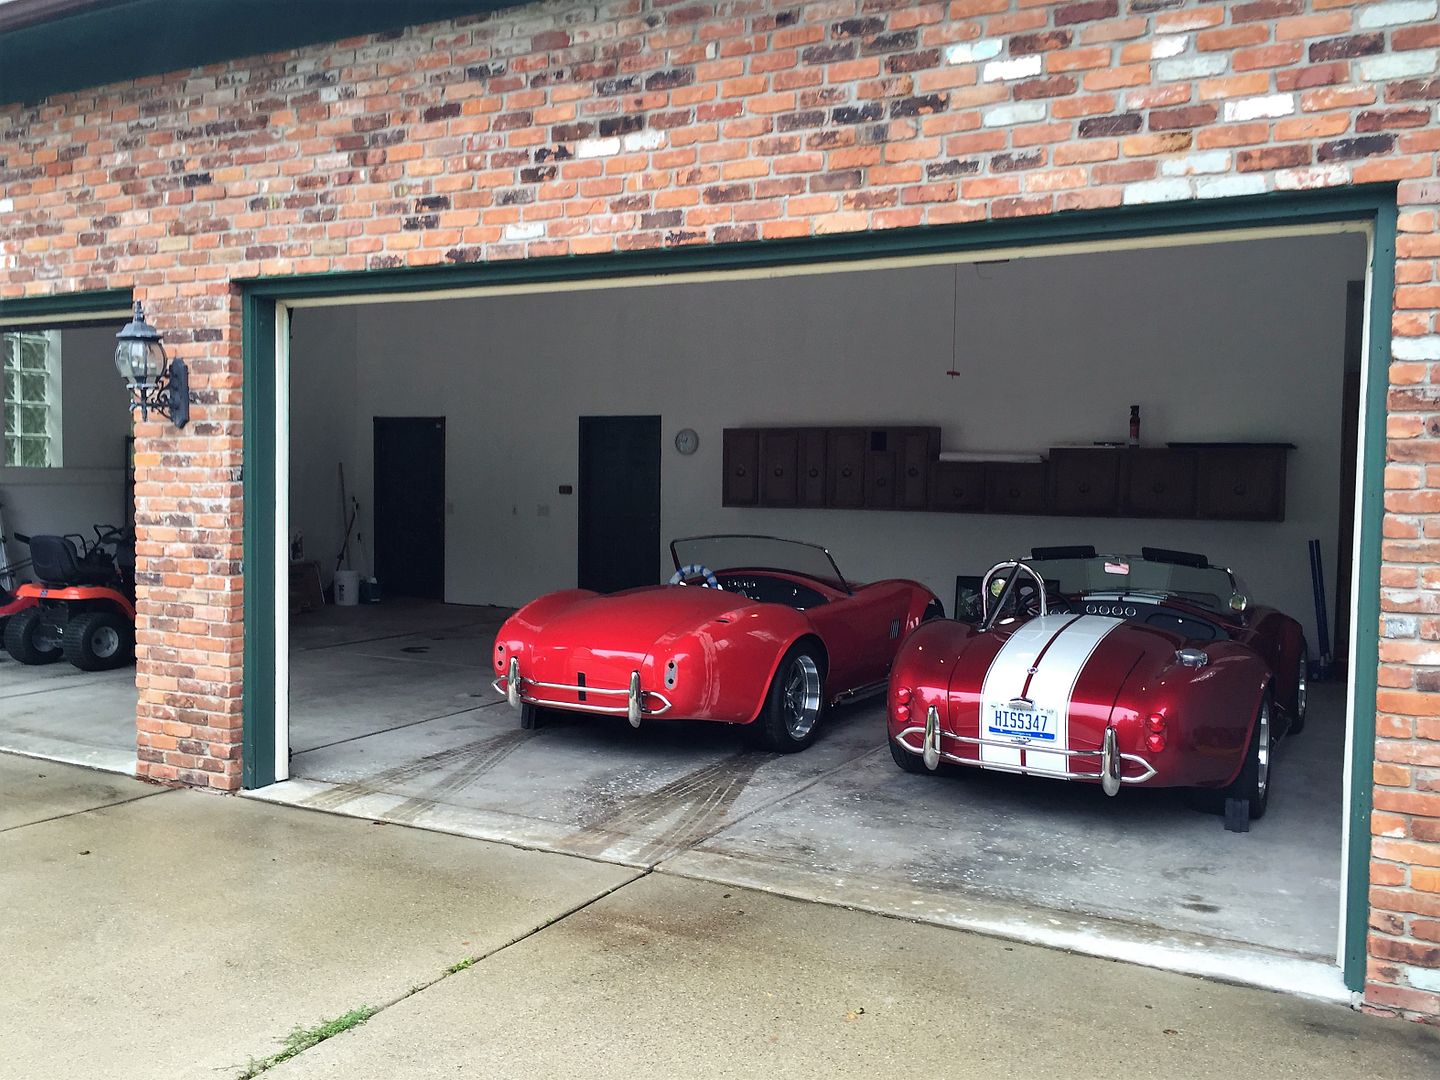
    Two is Better than One

    Thanks for the positive comments while I'm taking my time out from the build for our move. Today I moved the Anniversary build over to the new garage. Used the SE of course because it's not legal, plus another rainy day after monsoons yesterday. Kind of a big day because we also moved out of our storage unit where I've kept the trailer, body buck, chassis cart, and wintered the finished cars while building. Our new place also has a shed, and the body buck and frame cart easily fit into it. Never know when I might need those again. We can park the trailer here on the property. Plenty of space and no restrictive covenants. It's taken a little longer than I expected to get the garage and basement ready for move-in. But today was the last of it so things start going into the house in earnest starting tomorrow.

    Build 1: Mk3 Roadster #5125. Sold 11/08/2014. Build 2: Mk4 Roadster #7750. Sold 04/10/2017. Build Thread
    Build 3: Mk4 Roadster 20th Anniversary #8674. Sold 09/07/2020. Build Thread and Video. Build 4: Gen 3 Type 65 Coupe #59. Gen 3 Coyote. Legal 03/04/2020. Build Thread and Video
    Build 5: 35 Hot Rod Truck #138. LS3 and 4L65E auto. Rcvd 01/05/2021. Legal 04/20/2023. Build Thread. Sold 11/9/2023.

  18. #418
    Senior Member cgundermann's Avatar
    Join Date
    Feb 2011
    Location
    Chino Valley, Arizona
    Posts
    1,077
    Post Thanks / Like
    Going to be a nice shop! Got love the look of those two sitting side by side!

  19. #419
    Senior Member wareaglescott's Avatar
    Join Date
    Apr 2016
    Location
    Auburn, AL
    Posts
    2,147
    Post Thanks / Like
    Paul if someone moved in next to me and had two of the same car I might think they are kind of strange. I'd like to offer to keep 7750 at my place until they get to know you a little better. I am sure you don't want any poor first impressions!
    MK4 #8900 - complete kit - Coyote, TKO600, IRS - Delivered 6/28/16 First Start 10/6/16 Go cart - 10/16/16 Build completed - 4/26/17 - 302 days to build my 302 CI Coyote Cobra - Registered and street legal 5/17/17
    Build Thread http://thefactoryfiveforum.com/showt...e-build-thread
    PHIL 4:13 INSTAGRAM - @scottsrides

  20. #420
    Senior Member edwardb's Avatar
    Join Date
    Feb 2011
    Location
    Lake Orion, Michigan
    Posts
    10,857
    Post Thanks / Like
    Quote Originally Posted by wareaglescott View Post
    Paul if someone moved in next to me and had two of the same car I might think they are kind of strange. I'd like to offer to keep 7750 at my place until they get to know you a little better. I am sure you don't want any poor first impressions!
    Wow, such a generous and considerate offer. Like me think about it... OK, done. NO.

    Nice try though.
    Last edited by edwardb; 09-30-2016 at 08:29 PM.
    Build 1: Mk3 Roadster #5125. Sold 11/08/2014. Build 2: Mk4 Roadster #7750. Sold 04/10/2017. Build Thread
    Build 3: Mk4 Roadster 20th Anniversary #8674. Sold 09/07/2020. Build Thread and Video. Build 4: Gen 3 Type 65 Coupe #59. Gen 3 Coyote. Legal 03/04/2020. Build Thread and Video
    Build 5: 35 Hot Rod Truck #138. LS3 and 4L65E auto. Rcvd 01/05/2021. Legal 04/20/2023. Build Thread. Sold 11/9/2023.

  21. #421
    Senior Member cgundermann's Avatar
    Join Date
    Feb 2011
    Location
    Chino Valley, Arizona
    Posts
    1,077
    Post Thanks / Like
    Paul - have you decided on a color for your anniversary car?

  22. #422
    Senior Member edwardb's Avatar
    Join Date
    Feb 2011
    Location
    Lake Orion, Michigan
    Posts
    10,857
    Post Thanks / Like
    Quote Originally Posted by cgundermann View Post
    Paul - have you decided on a color for your anniversary car?
    Yes, it will be Ford Red Candy 2 like #7750 (love the color) with a slightly different stripe treatment. Let's leave it at that for now. I have to have a little mystery left. It's scheduled to be delivered to the painter in December, and promised for January. Same place that painted #7750. I have to get my shop back up between now and then to get a few things finished.
    Build 1: Mk3 Roadster #5125. Sold 11/08/2014. Build 2: Mk4 Roadster #7750. Sold 04/10/2017. Build Thread
    Build 3: Mk4 Roadster 20th Anniversary #8674. Sold 09/07/2020. Build Thread and Video. Build 4: Gen 3 Type 65 Coupe #59. Gen 3 Coyote. Legal 03/04/2020. Build Thread and Video
    Build 5: 35 Hot Rod Truck #138. LS3 and 4L65E auto. Rcvd 01/05/2021. Legal 04/20/2023. Build Thread. Sold 11/9/2023.

  23. #423
    Senior Member cgundermann's Avatar
    Join Date
    Feb 2011
    Location
    Chino Valley, Arizona
    Posts
    1,077
    Post Thanks / Like
    Nice! Like the mystery...

  24. #424
    Jacob's Avatar
    Join Date
    Jun 2016
    Location
    Rogers, AR
    Posts
    322
    Post Thanks / Like
    Do you recall what the length of your couplers are? Is the length critical? Looks like an easy way to avoid dropping the gas tank! thanks in advance.
    MK IV complete Kit - 1st time builder started Sept 2016
    Levy 306
    T5
    2015 Mustang IRS
    Power steering - Levy setup, Breeze roll bars, Thompson trunk box
    fuel injection, powder coating, sway bars, heater, wipers, 17 in wheels

  25. #425
    Senior Member edwardb's Avatar
    Join Date
    Feb 2011
    Location
    Lake Orion, Michigan
    Posts
    10,857
    Post Thanks / Like
    Quote Originally Posted by Jacob View Post
    Do you recall what the length of your couplers are? Is the length critical? Looks like an easy way to avoid dropping the gas tank! thanks in advance.
    No I don't recall so I looked it up in my build details. My couplers are 1-3/4 inches long and 7/16-20 threads that match my other hardware. Specifically are 90977A190 from McMaster. These are grade 5 steel. The ones in hardware and big box stores are typically not marked, and I suspect not grade 5. Don't know that it's critical, but I feel better using those. Length isn't critical other than to make sure you have plenty of thread engagement for both the attachment bolt and the threaded rod for your quick jacks or bumpers, whatever you're using.
    Build 1: Mk3 Roadster #5125. Sold 11/08/2014. Build 2: Mk4 Roadster #7750. Sold 04/10/2017. Build Thread
    Build 3: Mk4 Roadster 20th Anniversary #8674. Sold 09/07/2020. Build Thread and Video. Build 4: Gen 3 Type 65 Coupe #59. Gen 3 Coyote. Legal 03/04/2020. Build Thread and Video
    Build 5: 35 Hot Rod Truck #138. LS3 and 4L65E auto. Rcvd 01/05/2021. Legal 04/20/2023. Build Thread. Sold 11/9/2023.

  26. Thanks pmastio thanked for this post
  27. #426
    Jacob's Avatar
    Join Date
    Jun 2016
    Location
    Rogers, AR
    Posts
    322
    Post Thanks / Like
    The couplers you added in post #26? Are they standard length? Also, if you add these how do you compensate for the length of the spacers that are used on the rear bumper jacks? Appreciate your help...like others I use your build thread as a guide before I do anything!
    MK IV complete Kit - 1st time builder started Sept 2016
    Levy 306
    T5
    2015 Mustang IRS
    Power steering - Levy setup, Breeze roll bars, Thompson trunk box
    fuel injection, powder coating, sway bars, heater, wipers, 17 in wheels

  28. #427
    Senior Member edwardb's Avatar
    Join Date
    Feb 2011
    Location
    Lake Orion, Michigan
    Posts
    10,857
    Post Thanks / Like
    Quote Originally Posted by Jacob View Post
    The couplers you added in post #26? Are they standard length? Also, if you add these how do you compensate for the length of the spacers that are used on the rear bumper jacks? Appreciate your help...like others I use your build thread as a guide before I do anything!
    The spacers in post #26 are the ones I described in my response to your first question. They are 1-3/4 inches long. They fit well inside the body, so no interference with the rear quick jacks.
    Build 1: Mk3 Roadster #5125. Sold 11/08/2014. Build 2: Mk4 Roadster #7750. Sold 04/10/2017. Build Thread
    Build 3: Mk4 Roadster 20th Anniversary #8674. Sold 09/07/2020. Build Thread and Video. Build 4: Gen 3 Type 65 Coupe #59. Gen 3 Coyote. Legal 03/04/2020. Build Thread and Video
    Build 5: 35 Hot Rod Truck #138. LS3 and 4L65E auto. Rcvd 01/05/2021. Legal 04/20/2023. Build Thread. Sold 11/9/2023.

  29. #428
    Not a waxer Jeff Kleiner's Avatar
    Join Date
    Feb 2011
    Location
    Bloomington, Indiana
    Posts
    8,703
    Post Thanks / Like
    Quote Originally Posted by Jacob View Post
    The couplers you added in post #26? Are they standard length? Also, if you add these how do you compensate for the length of the spacers that are used on the rear bumper jacks? Appreciate your help...like others I use your build thread as a guide before I do anything!
    If you are asking about the spacers inside the trunk the way I do it there are none. This allows for adjustment of the rear valance to trunk lid interface during body fitting. The spacers outside the body remain the same unless you'd like to pull the bumpers/QJs in closer to the body (some of my customers have preferred this look). Here's a post I made describing my method:

    http://thefactoryfiveforum.com/showt...hlight=coupler

    Hope that helps clarify it for you!

    Jeff

  30. #429
    Jacob's Avatar
    Join Date
    Jun 2016
    Location
    Rogers, AR
    Posts
    322
    Post Thanks / Like
    thanks, sorry for being redundant...part of it is learning how to find it and the other is age related! Do appreciate!
    MK IV complete Kit - 1st time builder started Sept 2016
    Levy 306
    T5
    2015 Mustang IRS
    Power steering - Levy setup, Breeze roll bars, Thompson trunk box
    fuel injection, powder coating, sway bars, heater, wipers, 17 in wheels

  31. #430
    Senior Member edwardb's Avatar
    Join Date
    Feb 2011
    Location
    Lake Orion, Michigan
    Posts
    10,857
    Post Thanks / Like

    Getting Close!

    I haven’t posted any updates for some time because there hasn’t been any build progress at all due to our move. Exactly as expected. We needed every minute of the 15 days after closing to get ready for our move. We’ve been in the new place 8 days now, and turned over the keys to the old place last week. So no going back now. We are a long way from done moving in, but making good progress I think. All the boxes we planned to unpack now are done. The added wiring I needed to do in the house is done. The garage shop is fairly organized. Even the DD has its own spot now. The basement shop still has more work to do, but getting close. We still don't have cable or internet (thanks Comcast...) so the hotspot on my phone has been very useful but not very nice to my data plan. Also still chasing mice out of the garage. No surprise with all the junk that was in there and how long it was unoccupied. Living in the country doesn't help either.

    For the first time in several weeks, actually thought about what I need to work on with the build before it goes to paint in December and started making a list. Today I put the build up on jack stands. I don’t have time to mess with installing the lift right now, so back to the old days. I hope to get started again at least a little in the next week or two. Just a few more projects including installing a dishwasher that somehow seems to have higher priority.

    Last edited by edwardb; 10-19-2016 at 09:47 PM.
    Build 1: Mk3 Roadster #5125. Sold 11/08/2014. Build 2: Mk4 Roadster #7750. Sold 04/10/2017. Build Thread
    Build 3: Mk4 Roadster 20th Anniversary #8674. Sold 09/07/2020. Build Thread and Video. Build 4: Gen 3 Type 65 Coupe #59. Gen 3 Coyote. Legal 03/04/2020. Build Thread and Video
    Build 5: 35 Hot Rod Truck #138. LS3 and 4L65E auto. Rcvd 01/05/2021. Legal 04/20/2023. Build Thread. Sold 11/9/2023.

  32. #431
    RR20AC's Avatar
    Join Date
    Jul 2015
    Location
    Puyallup/WA
    Posts
    400
    Post Thanks / Like
    Blog Entries
    1
    Exciting times for Paul, sound excellent.
    20th Anniversary MK4 Roadster, #8752, 18 of 20, Delivered 12/03/15, 1st Start 01/28/2017, off to paint 4/13/2017, Forte 351w/ Holley EFI, Forte throttle linkage, TKO 600/Forte Hyd. Clutch, UniSteer Electra Steering, RT's turn Signals, many Breeze parts, Paint by the Jeff Miller. Finished on 10/08/2017. 500 mile inspection on 10/21/2017, 3000 mile inspection on 1/14/19.

  33. #432
    Senior Member edwardb's Avatar
    Join Date
    Feb 2011
    Location
    Lake Orion, Michigan
    Posts
    10,857
    Post Thanks / Like

    Back At It

    Still plenty of projects related to our move and new house. But we're settled enough I've been able to get back on the build some. Last night I completed a re-plumb of the vacuum lines for the Coyote CMCV system and fuel regulator. This has been an ongoing issue related to P2004 and P2005 DTC's and now finally hopefully figured out. Based on the importance and potential general interest, I just finished a separate thread describing the entire situation and solution. The thread can be found here: http://thefactoryfiveforum.com/showt...-CMCV-Plumbing.

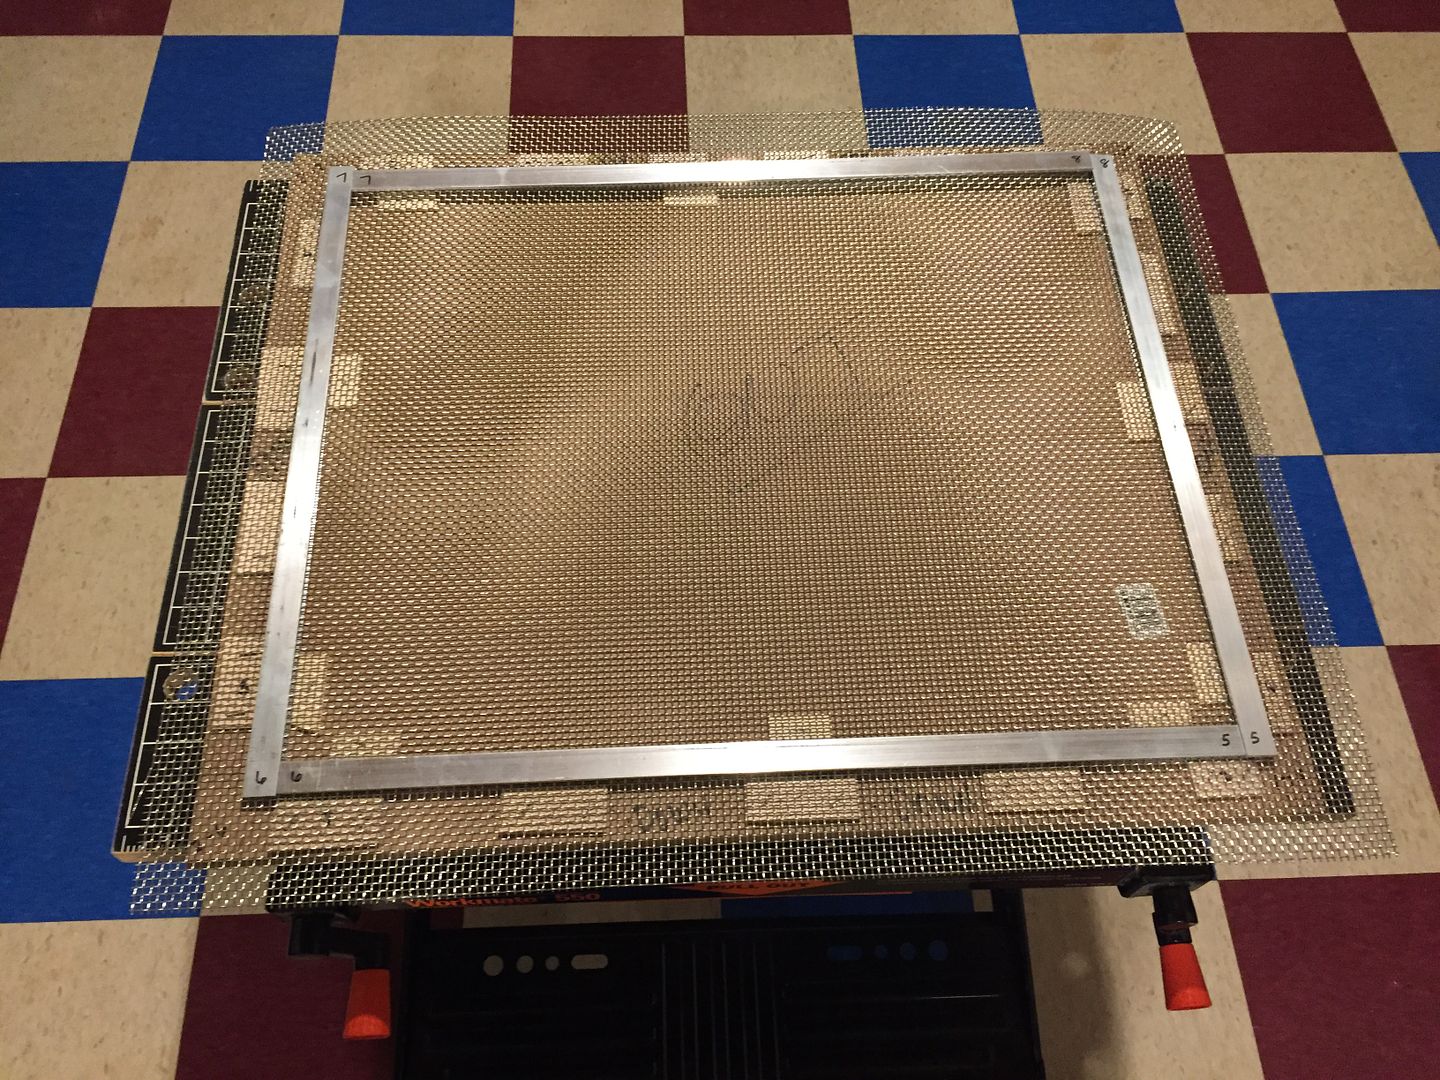
    With that successfully completed, I'm starting down my list of items to complete before going to paint in December. One of those is the radiator surround. Starting with my first build, I was never particularly happy with the supplied surround pieces. I made custom pieces for my first build. Then refined them a little more for #7750 including a protective screen for the radiator. I'm planning to duplicate this exact design for this build. First order of business is the screen. I'm using a 3641-24X36 medium mesh stainless screen, #6 x .035 wire, 24 x 36" sheet, from Pegasus Racing. I'm making a frame out of 1/8 x 3/4 inch aluminum stock from Lowes using a fixture I made during the last build. I'll get this riveted together, trimmed, and then make the bottom and side pieces. More to come.


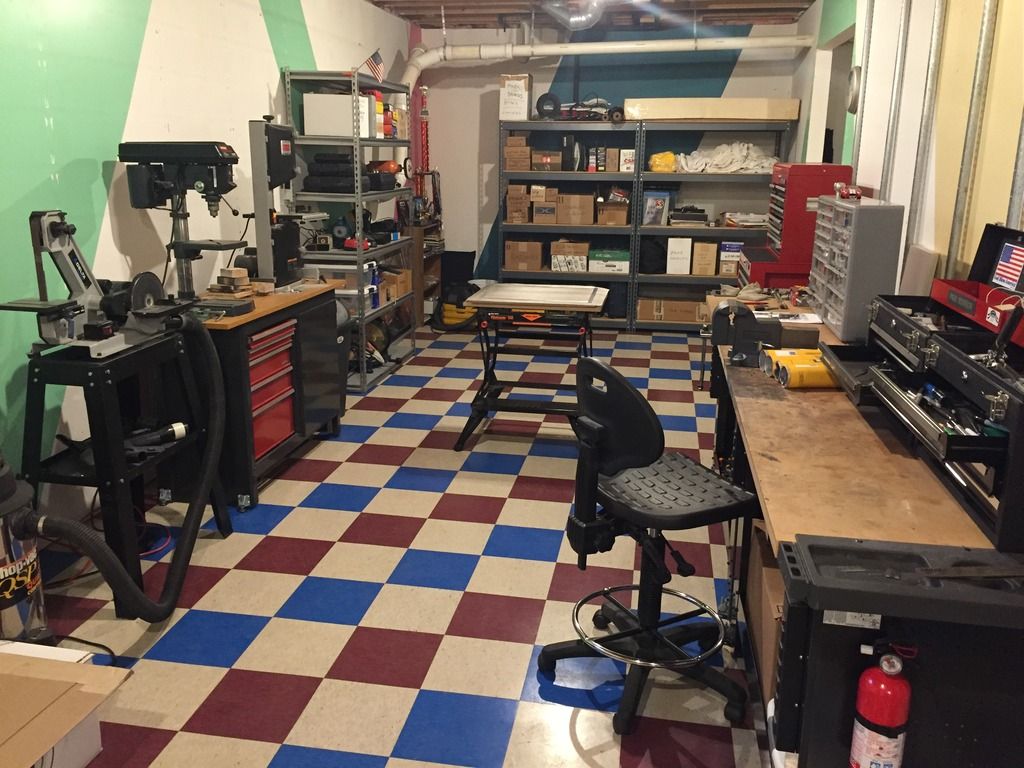
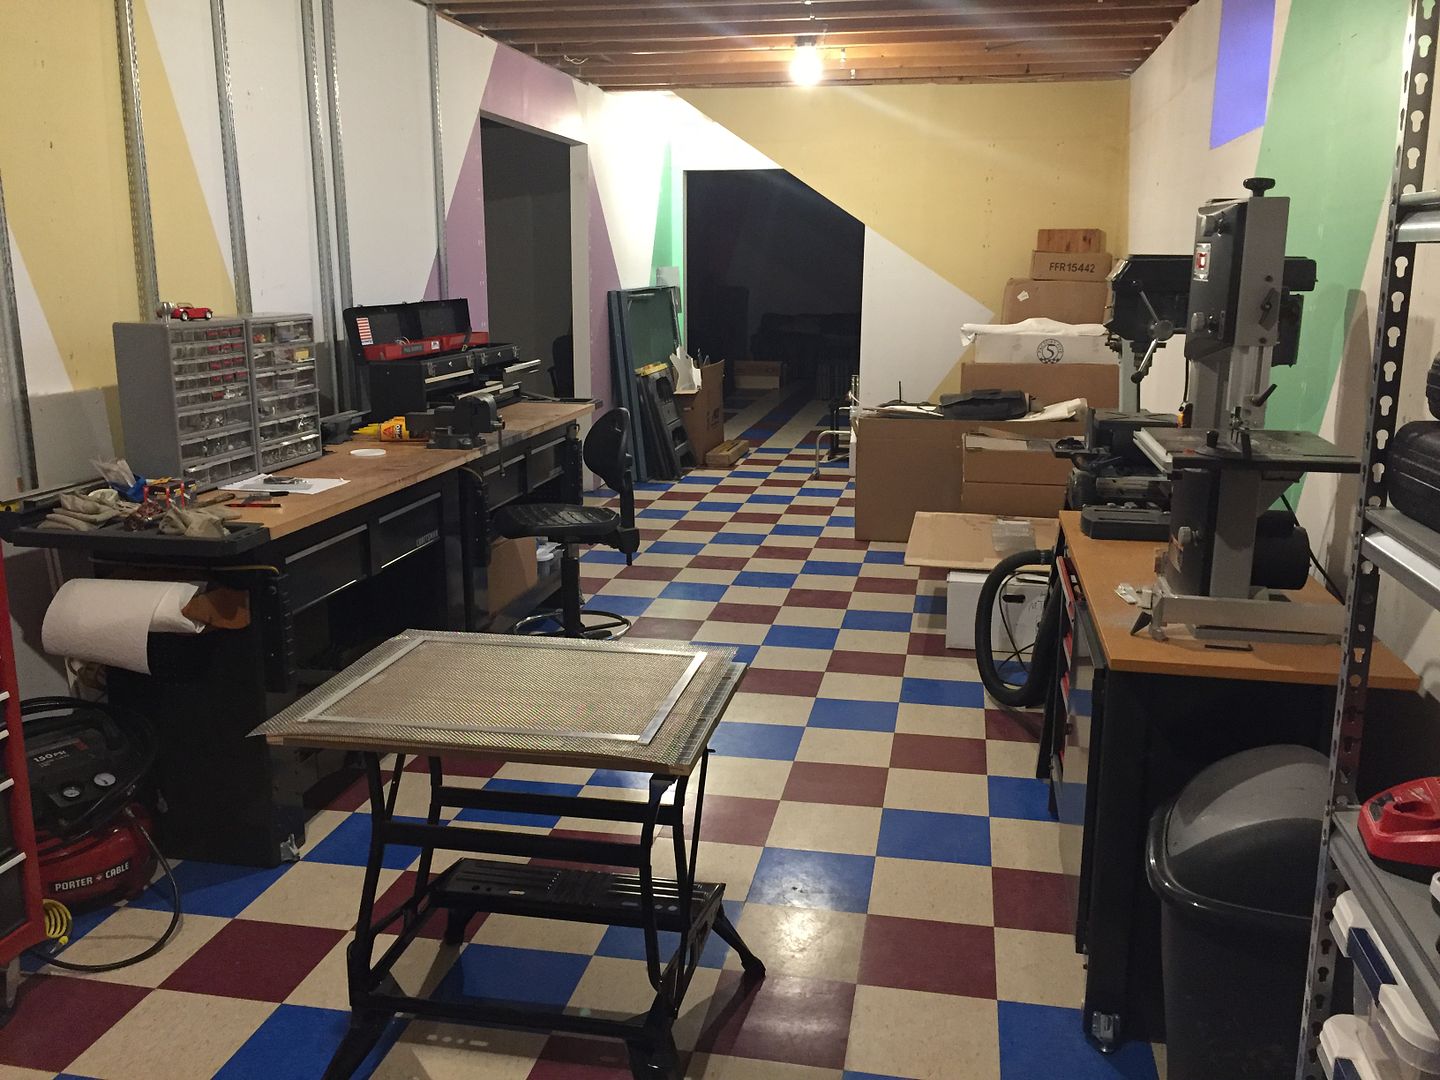
    This picture is in my new basement workshop. Here are some wider views of the workspace. I don't have the layout finalized yet, any shelves or pictures yet, etc. Plus I need to work on some better lighting. But I'm going to get some work done first. It's a short walk up six steps to the garage, so the location is great. The room is narrower than the space I had at the old house. But the entire basement is roughly three times bigger, so overall space certainly isn't a problem. As you can see, the former owner was into some interesting colors and floor designs.


    Last edited by edwardb; 10-30-2016 at 01:46 PM.
    Build 1: Mk3 Roadster #5125. Sold 11/08/2014. Build 2: Mk4 Roadster #7750. Sold 04/10/2017. Build Thread
    Build 3: Mk4 Roadster 20th Anniversary #8674. Sold 09/07/2020. Build Thread and Video. Build 4: Gen 3 Type 65 Coupe #59. Gen 3 Coyote. Legal 03/04/2020. Build Thread and Video
    Build 5: 35 Hot Rod Truck #138. LS3 and 4L65E auto. Rcvd 01/05/2021. Legal 04/20/2023. Build Thread. Sold 11/9/2023.

  34. #433
    Straversi's Avatar
    Join Date
    Nov 2014
    Location
    Palos Verdes, CA
    Posts
    1,278
    Post Thanks / Like
    Quote Originally Posted by edwardb View Post
    Some non-build activity since my last update getting needed things done around the old homestead, plus apparently it was time for my semi-annual back tweak. Barely leaning over to put something in the trash can. Good grief. Don’t get it, but on the mend I think. I’ve gotten another few things off the build list. Some of this stuff is pretty routine, but I know there are first time builders following this thread and have told me repeatedly they like the detail, so here goes.

    The replica door latches have a reputation for not being the best quality. This was one of the last items on my backorder list, and Jay told me FF was buying up supplies everywhere they could find them. I’m pretty sure they all come from the same place, and quality is not getting any better. These were the poorest I’ve had to date. Usually there are three different problems. There is a swaged joint inside that likes to come apart, the little knob can fall off the handle, and the pin doesn’t fit well into the catch. Mine had all three problems, plus a lot of flash and just generally poor workmanship. Returning them and getting a different set might be an option, but there’s a good chance they wouldn’t be any better. The good news is they’re not too hard to fix.

    There is a well-known mod that’s been posted on the forum. Doors, door latches, hinges, FAQ, FFR FAQ. I completed this mod with one slight difference. I used a shim between the pivot and the handle instead of replacing the wavy washer that was originally there. I happened to find just the right size and thickness in one of my washer junk drawers. Makes the handle a little more solid IMO. For the knobs, I drilled and tapped for a 10-32 x 3/8-inch SS button head through the handle and into the knob. Finally, I used stones on a Dremel and die grinder to open up the hole in the catch enough for the pin to seat properly. I don’t know if they don’t allow for the plating or what, but as delivered the pin would barely go in past the initial taper. This in my experience is why guys have trouble getting the doors to latch or the pin gets stuck in the latch.

    Two stories come to mind. The very first time my wife went for a ride in my first build, a Mk3, when we pulled back into the garage her door wouldn’t open. No amount of tugging or banging changed anything. She had to sit there while I removed the cover and took the latch assembly completely off the door in order to get it open. Talk about first impressions! That triggered me to search and do all the mods listed here. Another time I was taking a guy for a ride and helping him strap in. He said this was important to him because the last one he rode in the door flew open around every turn. I assured him that wasn’t going to happen. Just do the mods. Here are pictures of the finished products. Note some guys recommend not replacing the small spring visible here and only using the spring internal to the latching pin. I prefer to use both. Note also the latches come assembled dry with no lubrication. I don't understand that. Use some white lithium or similar when re-assembling. Makes a difference.
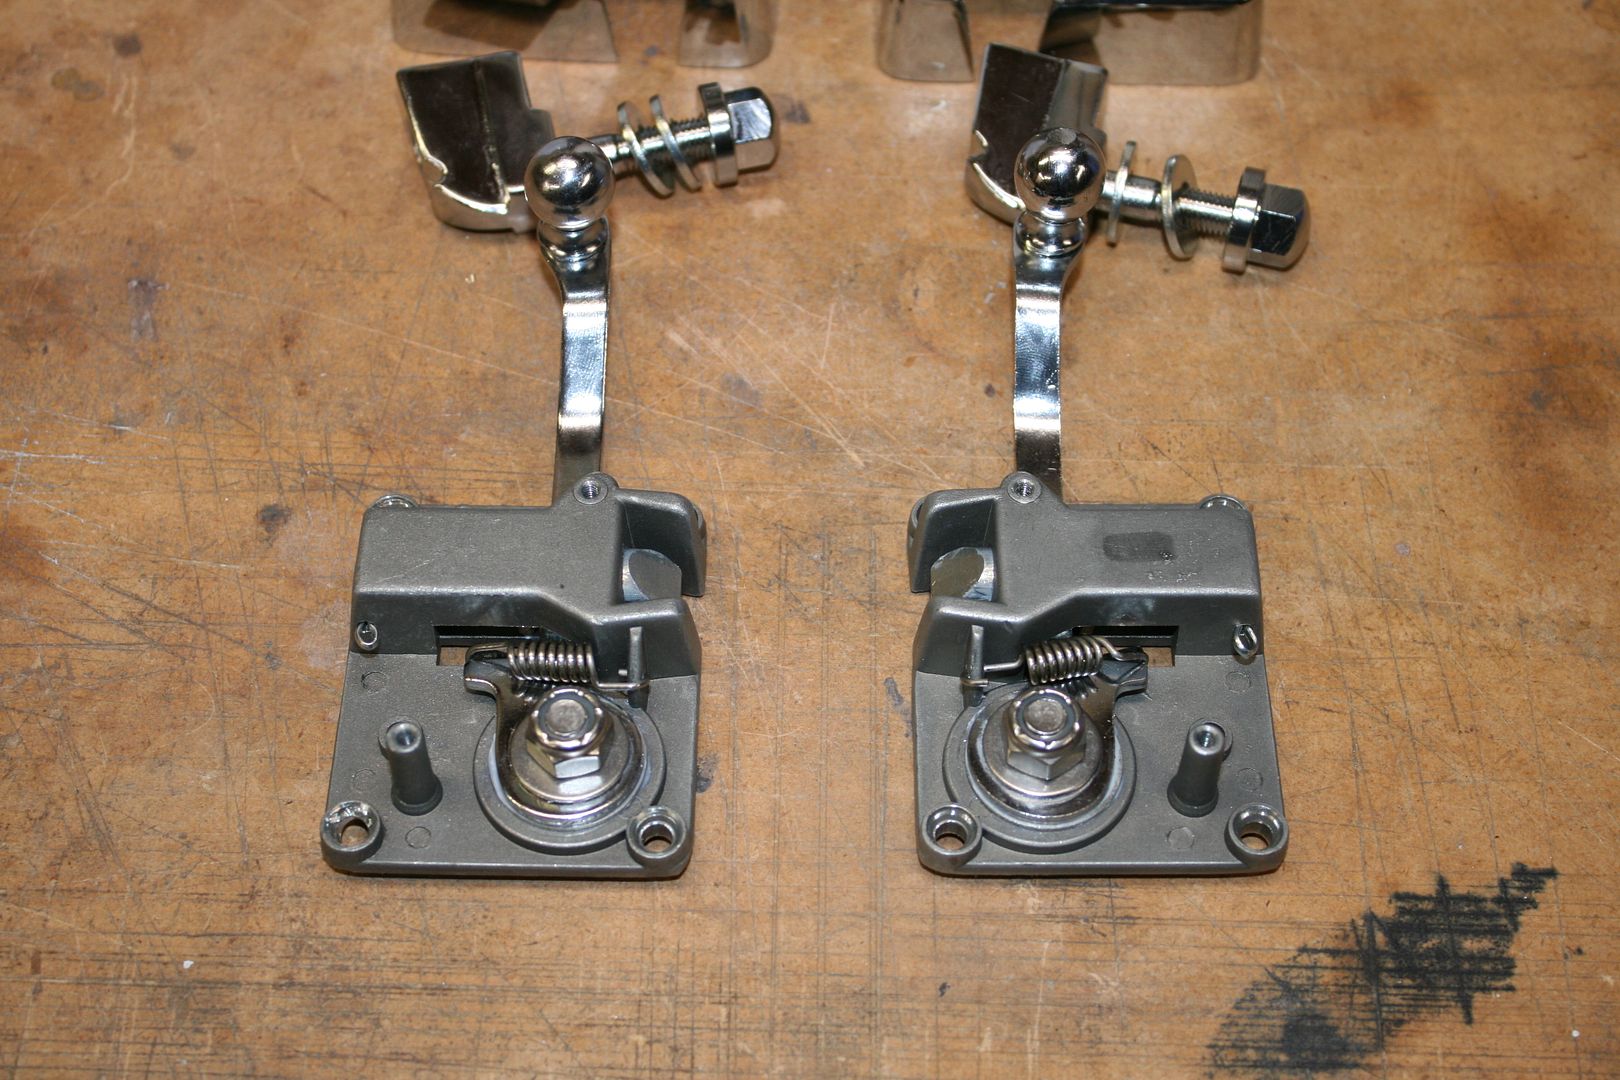
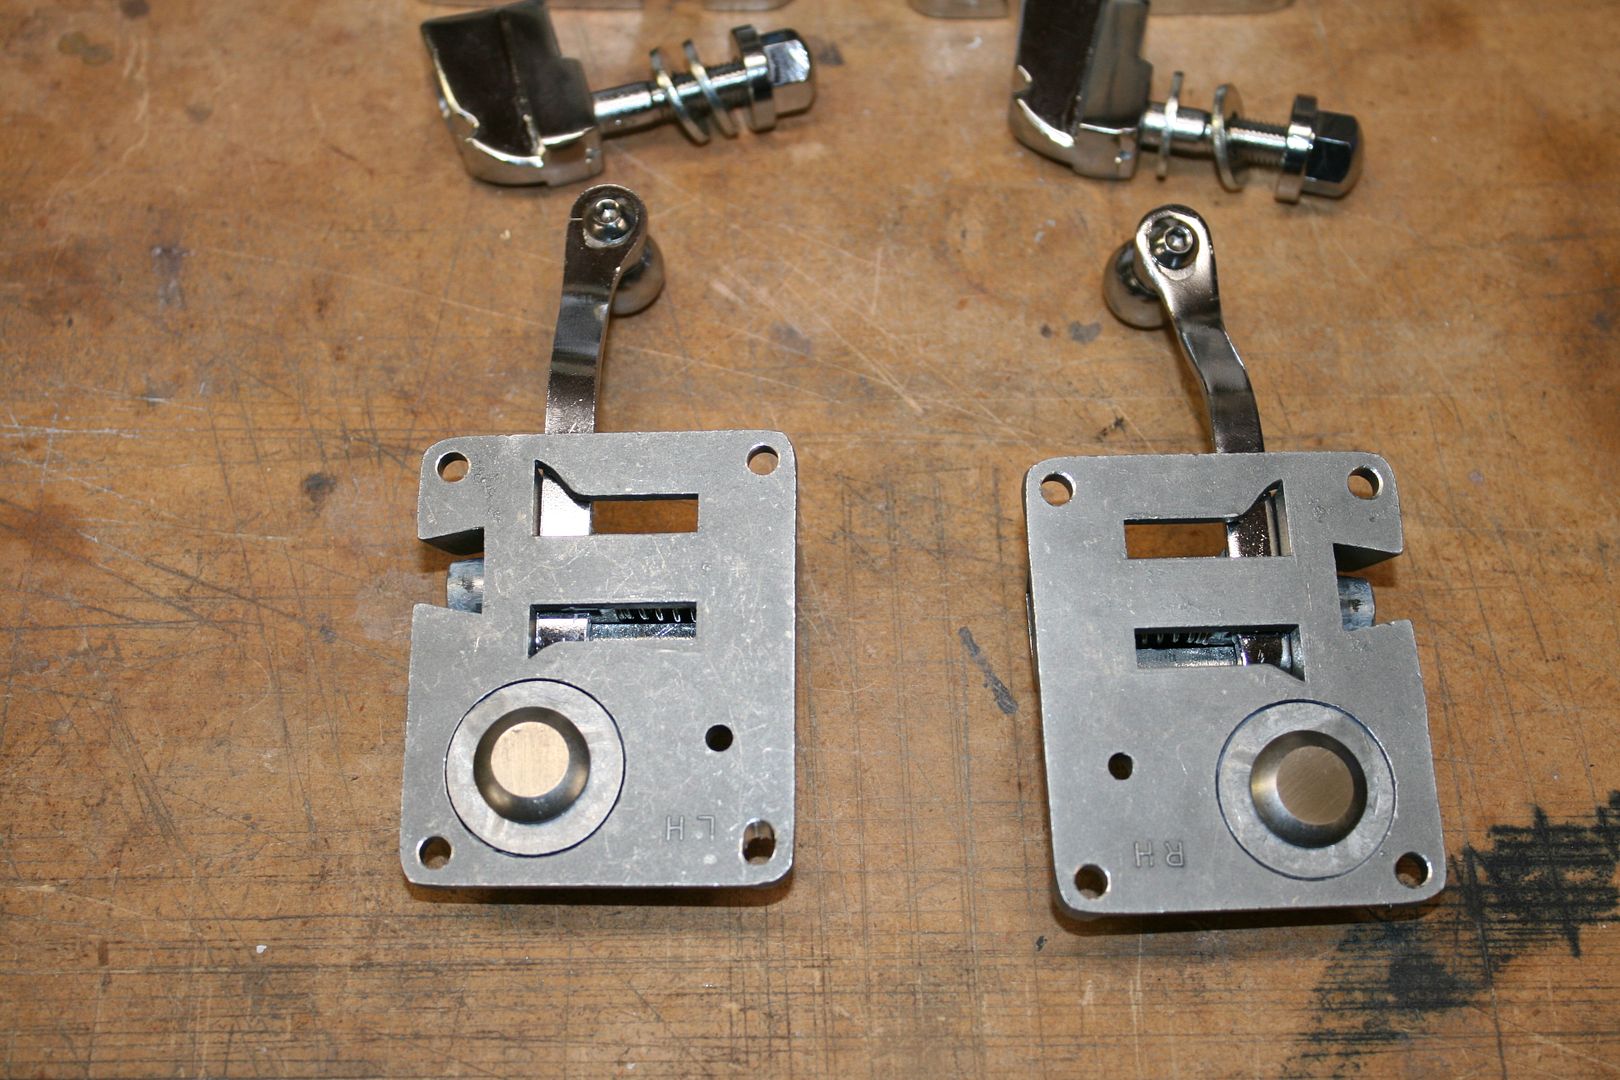


    Next up I worked on the hood scoop. #7750 Mk4 had the fiberglass scoop. This one has the plastic molded version. Certainly less prep and a bit more symmetrical. The main perimeter was in pretty good shape. The lip on the opening needed to be trimmed and sanded. I’m going to bolt the scoop to the hood like #7750 with 10-32 button heads and acorn nuts on the inside. This sort of looks like rivets and is a nice clean way to do it. But all those holes need to be drilled. This spacing closing resembles several originals. Take your time to get them exactly the same distance from the edge all around and the back holes exactly centered side-to-side. If you do stripes, you want the holes to line up with the stripes. Especially the one in the exact center along the back. Don’t just mark the holes and drill them to the final size. Even with a drill press it’s easy for the bit to wander. After marking, I center punch them, and then drill with a pretty small bit. Then check each for alignment to the mark and tweak with a needle file as necessary. Then a bit bigger bit and check again. Adjusting again if needed. Then I drill the final size. Not great pics, but ready to mount:
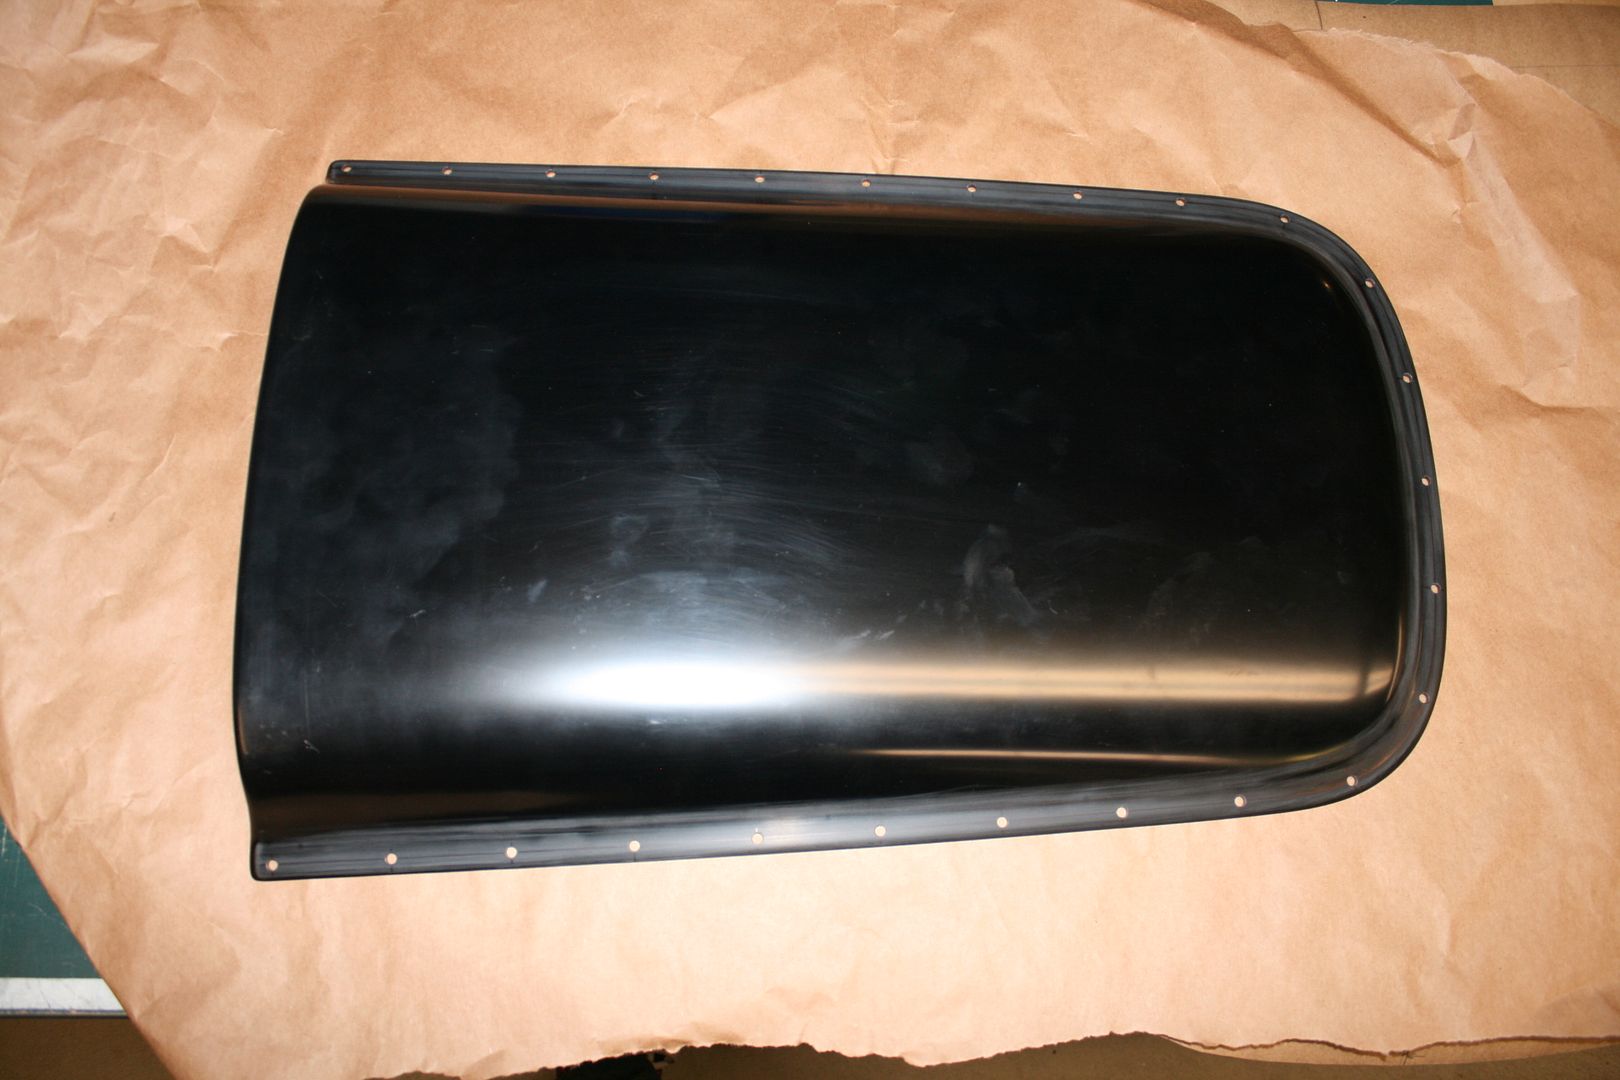
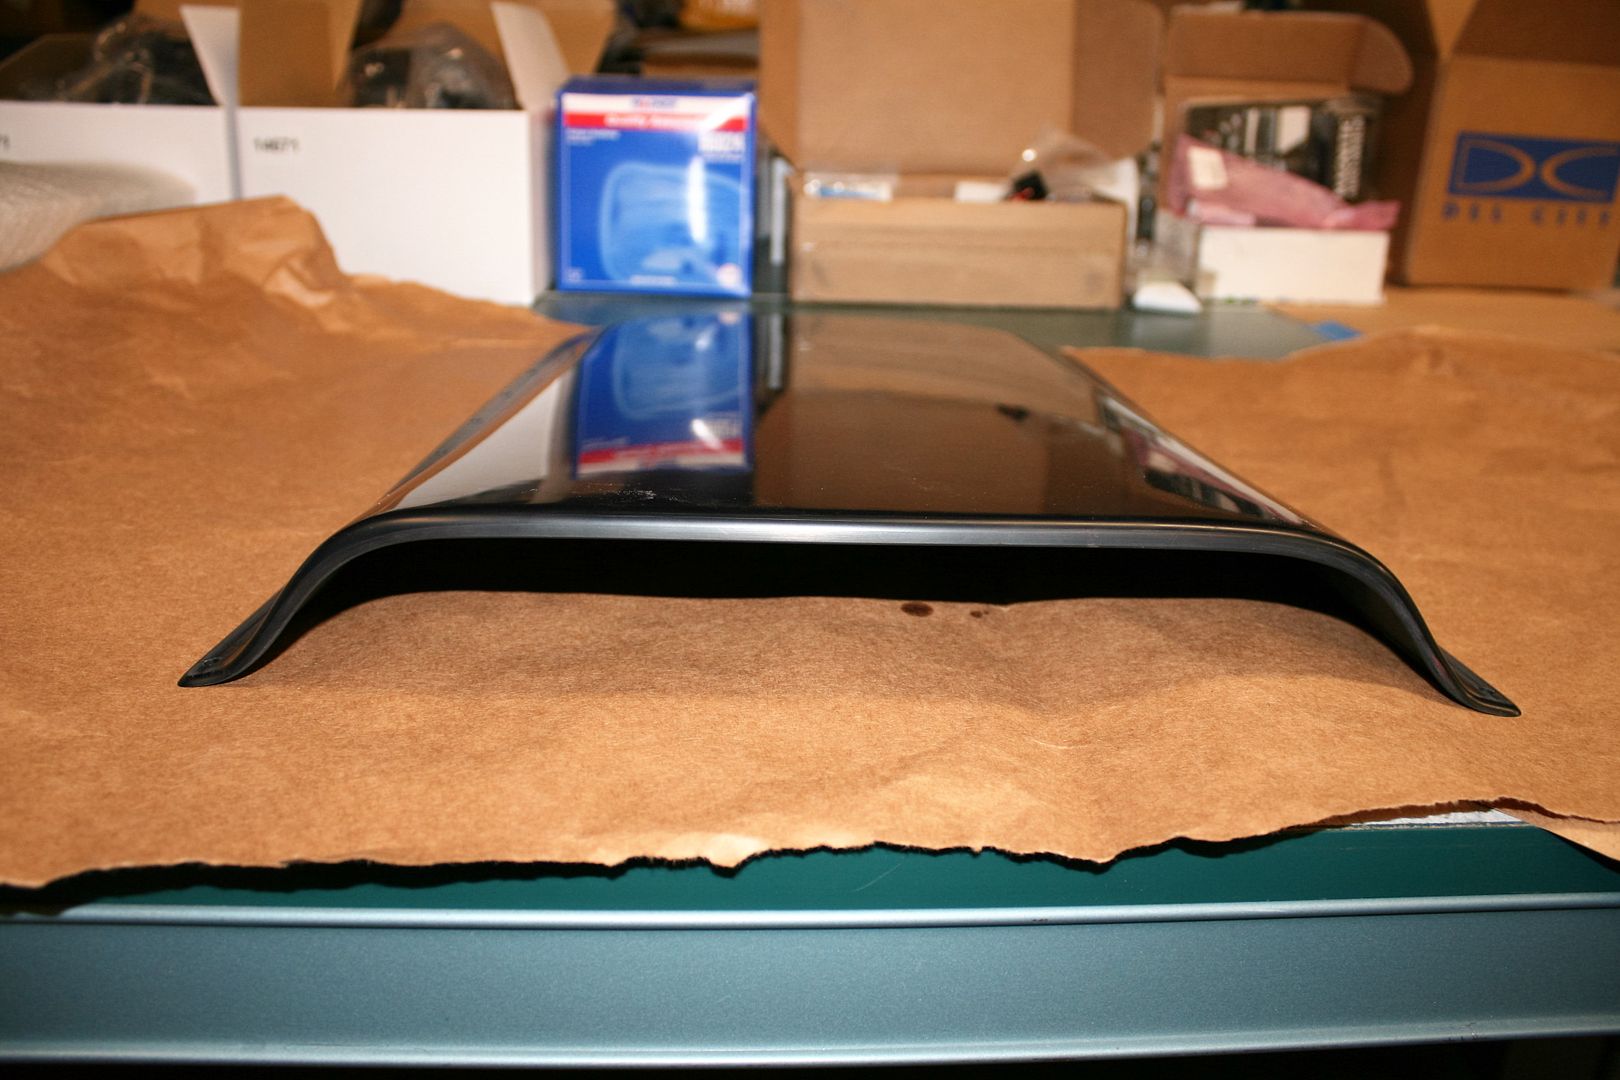


    One other hint about the hood scoop. The FF instructions give dimensions for the hole in the hood, and some guys dive right in and cut the hole based on those dimensions. Some have gotten in trouble doing it this way. There’s a better way IMO. First fit the hood, find the center and where the scoop should be mounted using the provided dimensions, paying attention to the raised areas on the back of the hood. Then drill the holes using the scoop for the layout. Check carefully as you go to keep everything centered. That scoop is pretty flexible. With all the holes drilled, lay out the opening in the hood relative to the holes and following the same curve. Then cut the hole.

    Next up I sanded and filled the cracks and voids along the top of both doors with HSRF. Ready for the next level of body work by my painter.
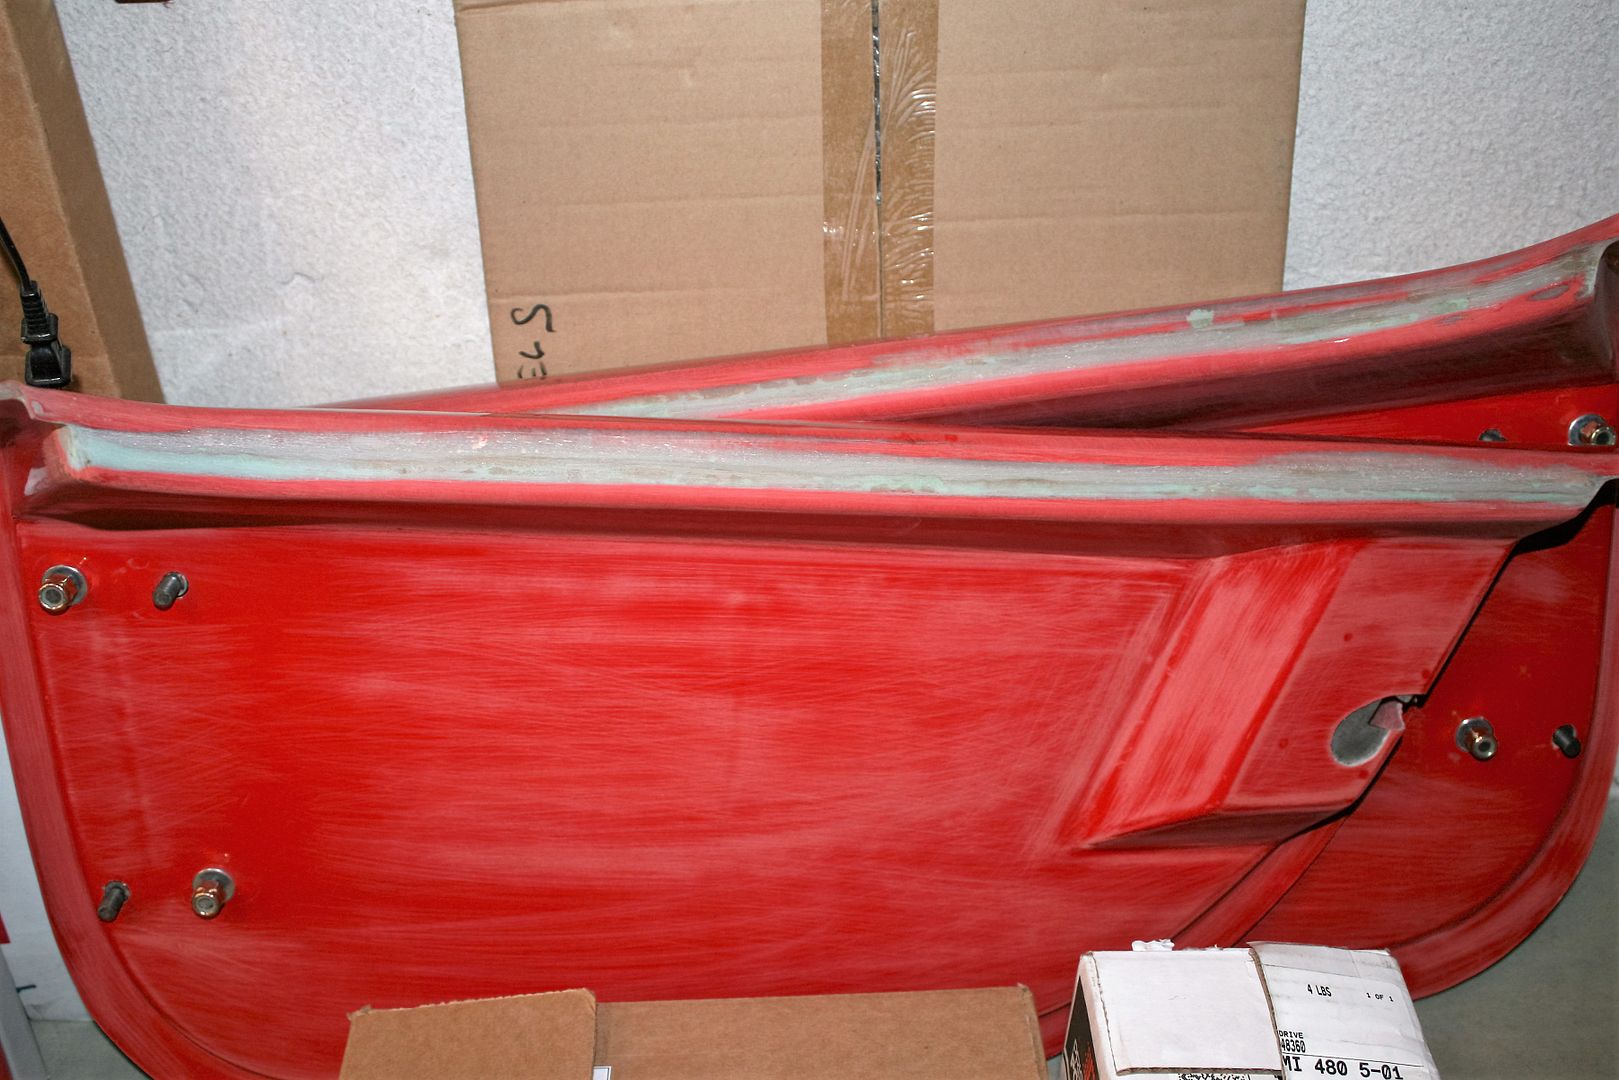


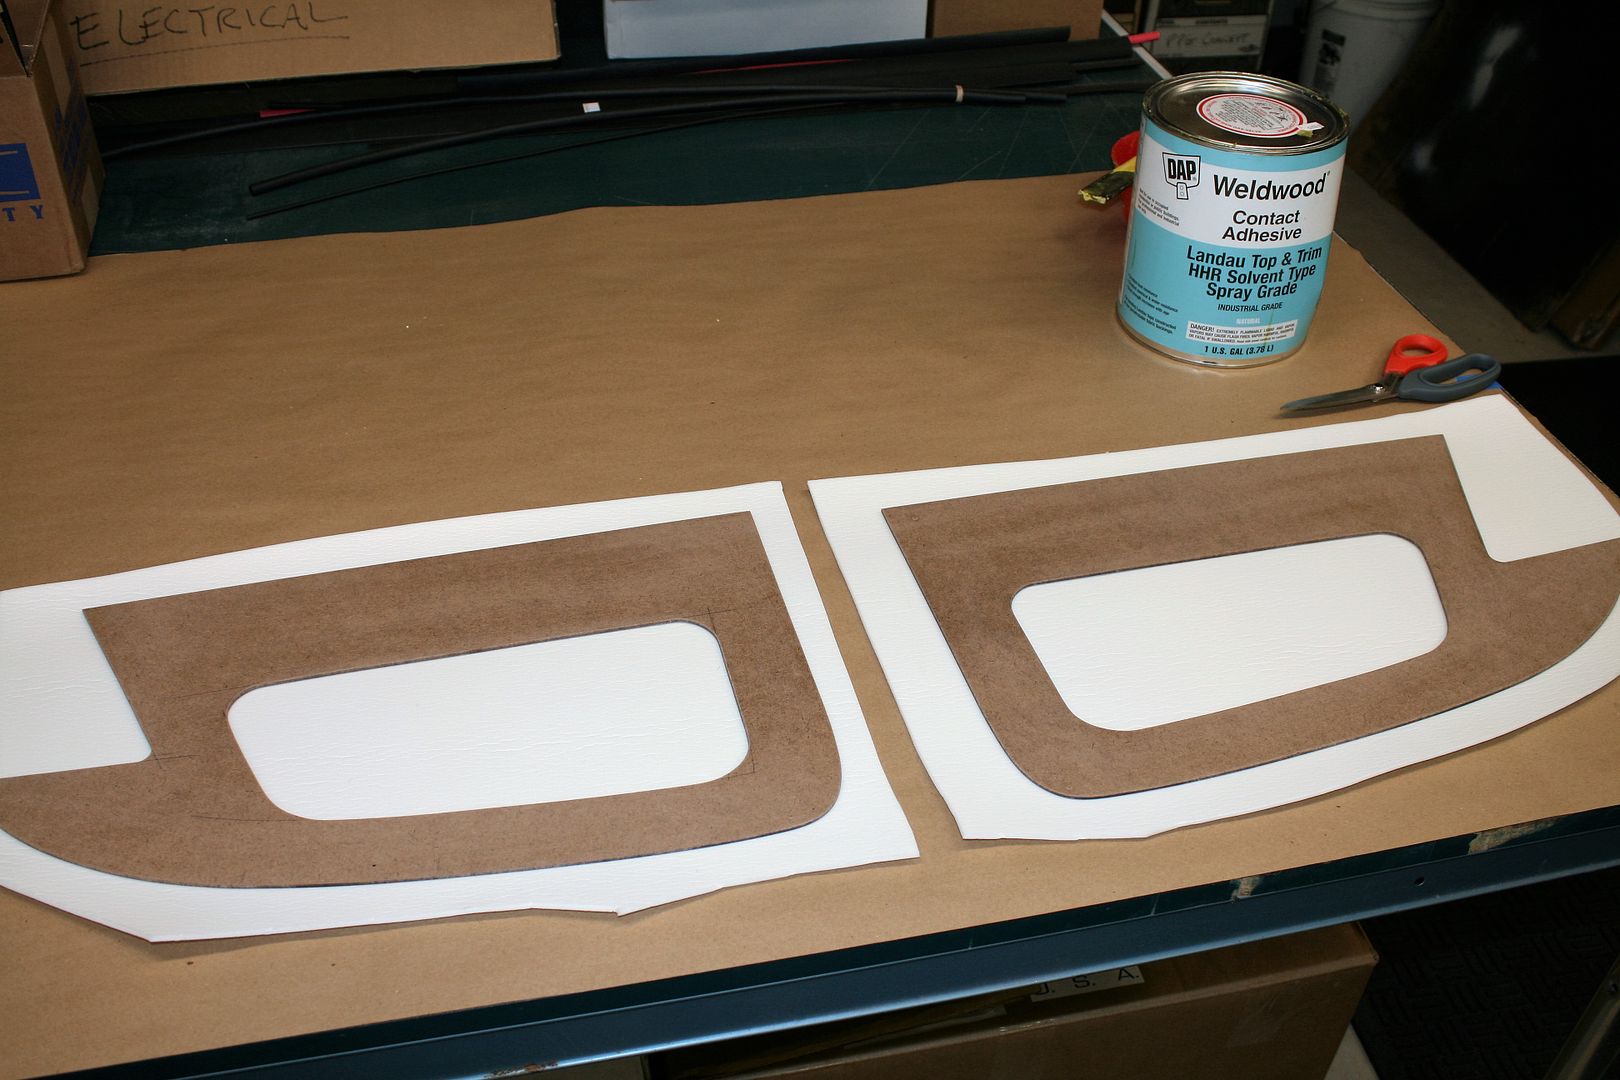
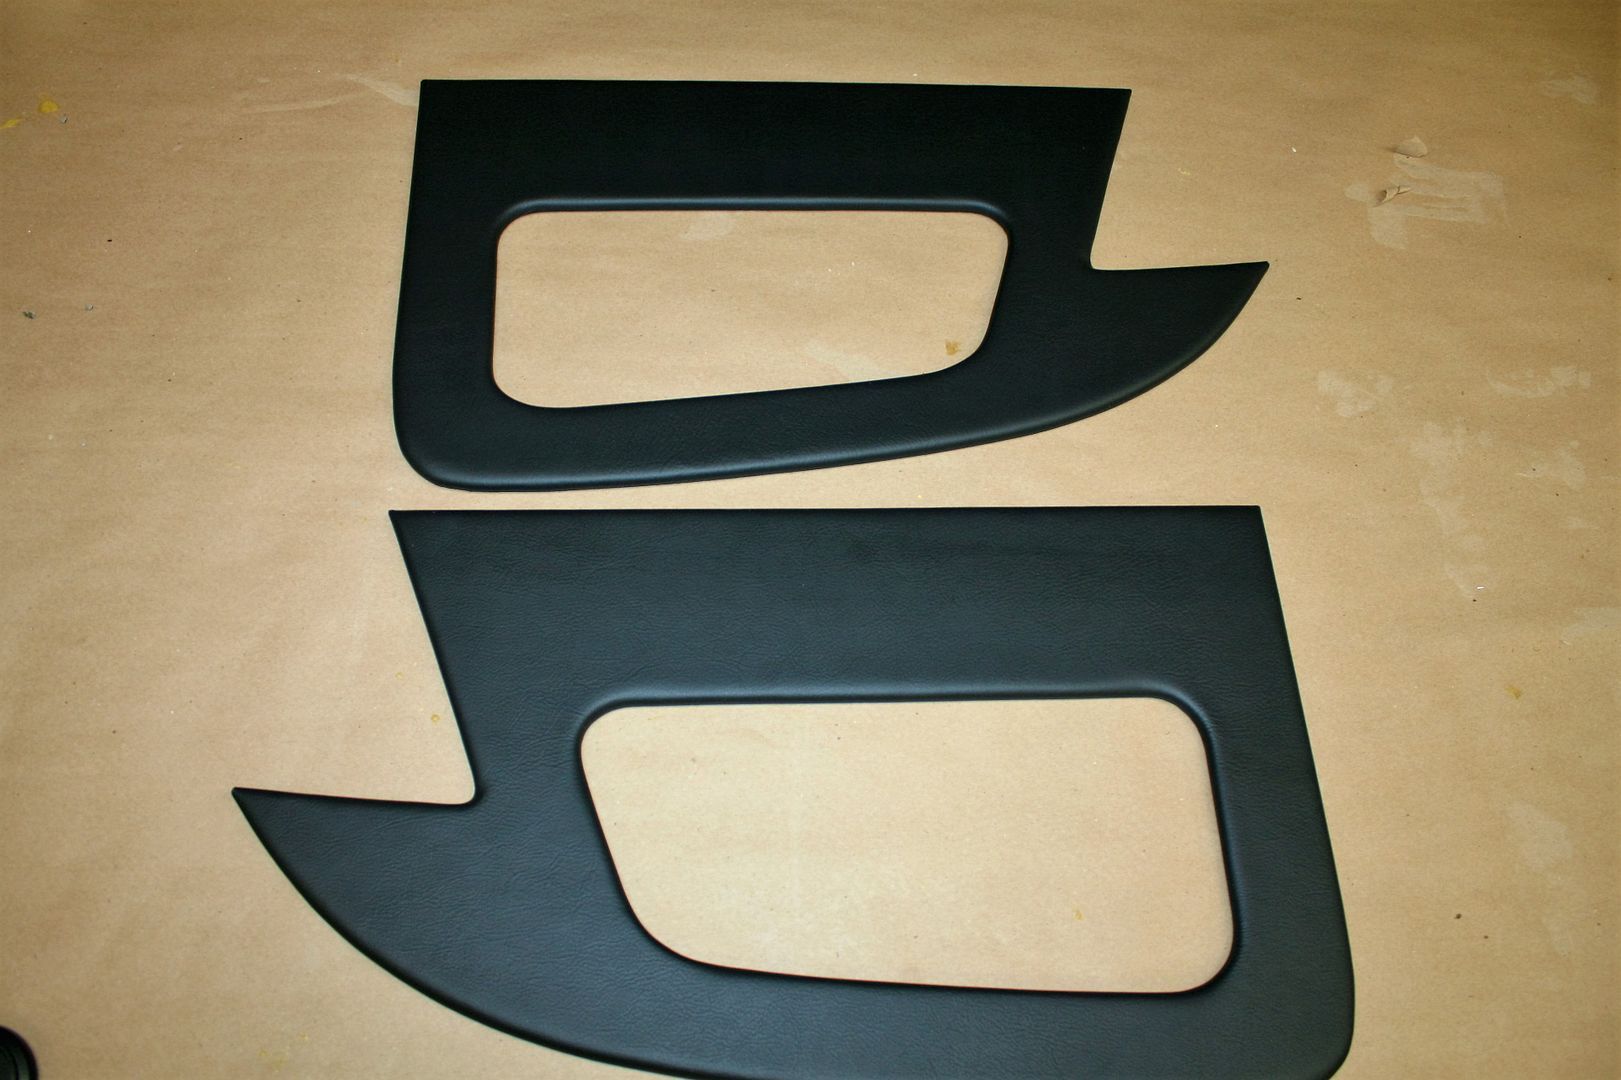
    I’ve used Herb’s door panels on my last builds. The Anniversary edition kit comes with door panels. FF provided the ones from **********. They’re OK. But with the leather seats, leather dash, planned leather covering on the transmission cover, and the big hunk of leather I have left over, decided to do leather door panels. I could have sent the leather to Herb and he would make them. But since I had all the materials (and the time) decided to take a stab at it myself. I’m shamelessly copying Herb’s standard panels with a center pocket. I cut the backing out of 1/8-inch tempered Masonite. Then, using the same 1/8-inch foam, Weldwood Landau adhesive, and leather as my dash, wrapped the panels. The pros use steam to stretch and shrink around pieces like this. I used a lot of pie cuts (and patience) and they turned out pretty good. I have the pocket pieces ready to install, but need one of the pieces stitched, which I’ll have done at an upholstery shop when I get the carpet binding installed. For attaching them to the doors, Herb uses wide Velcro strips and I’ve added a couple of screws. My wife likes to put a water bottle in her pocket and thought I needed the extra strength. I’m trying some 3M Dual Lock Reclosable Fastener material on these and no screws. Similar to Velcro, but supposedly stronger. We’ll see.


    You mentioned that you purchased a hide. Is it a full, half, shoulder? May I ask the thickness or the type of leather. I've looked at a few sources on line and they use different terminology. Don't want to end up with belt leather or something too thin. Don't know if you can mention the source on the forum or not but any help you can offer is always appreciated.

    -Steve
    Mk IV #8901 - Complete kit, Coyote, TKO-600, IRS. Ordered 5/23/16, Delivered 7/14/16, First Start 8/13/17, First Go-Kart 10/22/17, Registered and Completed 10/18/18. Build Thread: http://thefactoryfiveforum.com/showt...V-Coyote-Build Graduation Thread: https://thefactoryfiveforum.com/show...-Roadster-8901

  35. #434
    Senior Member edwardb's Avatar
    Join Date
    Feb 2011
    Location
    Lake Orion, Michigan
    Posts
    10,857
    Post Thanks / Like
    Quote Originally Posted by Straversi View Post
    You mentioned that you purchased a hide. Is it a full, half, shoulder? May I ask the thickness or the type of leather. I've looked at a few sources on line and they use different terminology. Don't want to end up with belt leather or something too thin. Don't know if you can mention the source on the forum or not but any help you can offer is always appreciated.

    -Steve
    I purchased a full hide on eBay. Listed as a leather hide, 42 to 45 Sq. Ft. Color: JET BLACK. Weight: 2.50 - 3.00 oz. per square foot. Since leather thickness is usually measured in ounces, and one ounce equals about 1/64" in thickness, this was 1/32 - 3/64" thick. That's roughly what it was. The seller (textile_specialist) represented this as "automotive leather" and it seemed well suited for this purpose. Since my plan was to do the dash, trans cover, and door cards, I went ahead with the full hide knowing I would have some left over. As it turned out, did have some extra. But I couldn't have gotten away with much was less since there is some variation in thickness and texture. Hope this answers your question.
    Last edited by edwardb; 11-19-2016 at 01:50 AM.
    Build 1: Mk3 Roadster #5125. Sold 11/08/2014. Build 2: Mk4 Roadster #7750. Sold 04/10/2017. Build Thread
    Build 3: Mk4 Roadster 20th Anniversary #8674. Sold 09/07/2020. Build Thread and Video. Build 4: Gen 3 Type 65 Coupe #59. Gen 3 Coyote. Legal 03/04/2020. Build Thread and Video
    Build 5: 35 Hot Rod Truck #138. LS3 and 4L65E auto. Rcvd 01/05/2021. Legal 04/20/2023. Build Thread. Sold 11/9/2023.

  36. #435
    Straversi's Avatar
    Join Date
    Nov 2014
    Location
    Palos Verdes, CA
    Posts
    1,278
    Post Thanks / Like
    Perfect, thank you.
    Mk IV #8901 - Complete kit, Coyote, TKO-600, IRS. Ordered 5/23/16, Delivered 7/14/16, First Start 8/13/17, First Go-Kart 10/22/17, Registered and Completed 10/18/18. Build Thread: http://thefactoryfiveforum.com/showt...V-Coyote-Build Graduation Thread: https://thefactoryfiveforum.com/show...-Roadster-8901

  37. #436
    Straversi's Avatar
    Join Date
    Nov 2014
    Location
    Palos Verdes, CA
    Posts
    1,278
    Post Thanks / Like
    Sorry,
    You also mentioned the felt or foam backing material? Any specifics on that material? The vinyl supplied by FFR has a very thick foam and I've noticed a lot of cars end up with spongy or saggy dashes.
    Mk IV #8901 - Complete kit, Coyote, TKO-600, IRS. Ordered 5/23/16, Delivered 7/14/16, First Start 8/13/17, First Go-Kart 10/22/17, Registered and Completed 10/18/18. Build Thread: http://thefactoryfiveforum.com/showt...V-Coyote-Build Graduation Thread: https://thefactoryfiveforum.com/show...-Roadster-8901

  38. #437
    Senior Member edwardb's Avatar
    Join Date
    Feb 2011
    Location
    Lake Orion, Michigan
    Posts
    10,857
    Post Thanks / Like
    Quote Originally Posted by Straversi View Post
    Sorry,
    You also mentioned the felt or foam backing material? Any specifics on that material? The vinyl supplied by FFR has a very thick foam and I've noticed a lot of cars end up with spongy or saggy dashes.
    I used 1/8" thick Volara Sculpting Foam from YourAutoTrim.com for everything. It's just about the perfect thickness IMO. A little bit of cushion and give, but not puffy.
    Build 1: Mk3 Roadster #5125. Sold 11/08/2014. Build 2: Mk4 Roadster #7750. Sold 04/10/2017. Build Thread
    Build 3: Mk4 Roadster 20th Anniversary #8674. Sold 09/07/2020. Build Thread and Video. Build 4: Gen 3 Type 65 Coupe #59. Gen 3 Coyote. Legal 03/04/2020. Build Thread and Video
    Build 5: 35 Hot Rod Truck #138. LS3 and 4L65E auto. Rcvd 01/05/2021. Legal 04/20/2023. Build Thread. Sold 11/9/2023.

  39. #438
    Senior Member edwardb's Avatar
    Join Date
    Feb 2011
    Location
    Lake Orion, Michigan
    Posts
    10,857
    Post Thanks / Like

    Parts from the New Shop

    For the last few days I’ve been fabricating the last of the parts needed for my build. Not exactly earthshaking, but these are the first parts from the new shop at our new place. Feels good to be back at it. In between house projects of course.

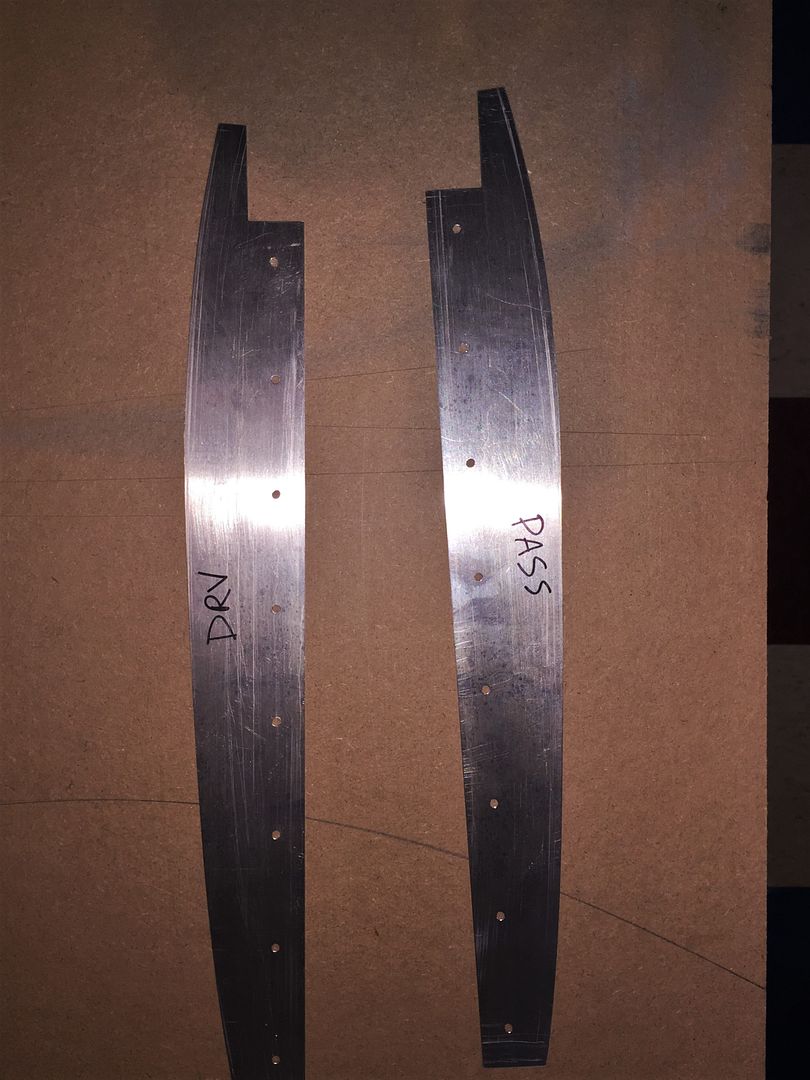
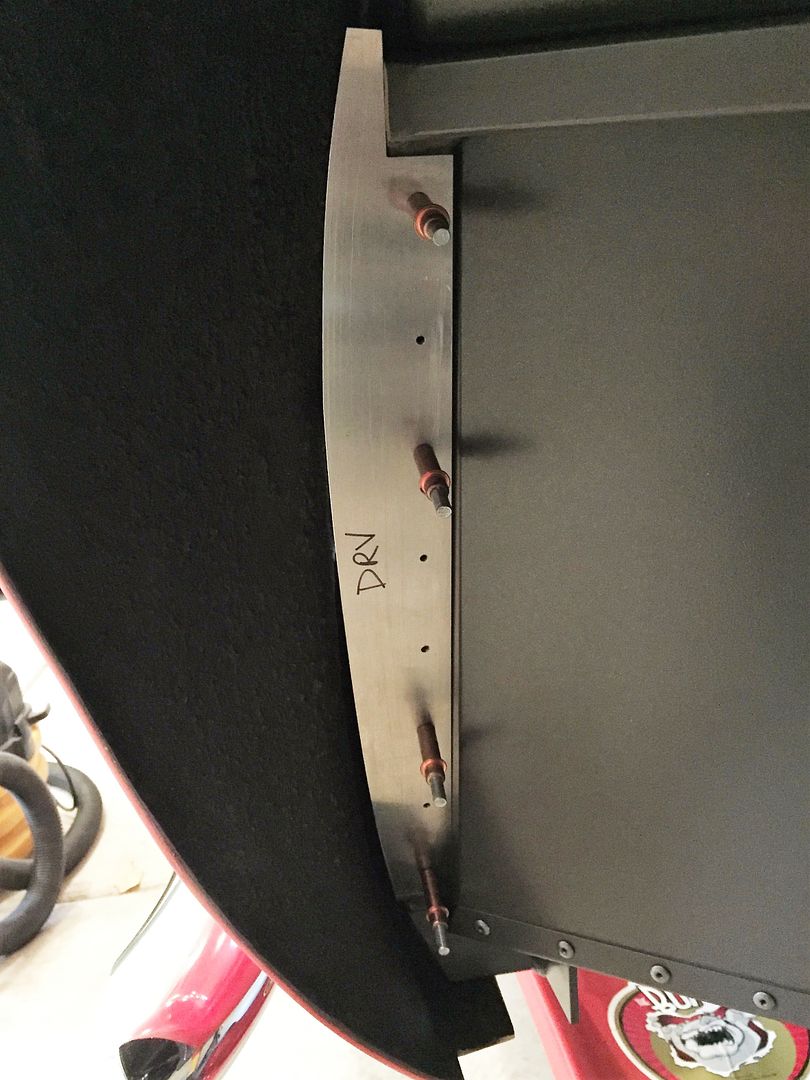
    First up was the filler panels for the front of the rear wheel well. In stock form there’s a pretty big gap between the frame and the body. Carpet and to some extent the door sill aluminum piece fill it. But I prefer an actual panel. Made some patterns out of kraft paper and reproduced in .040 aluminum. They will rivet to the 1-inch tube in the area. The exact shape isn’t super critical, but the DS is slightly wider than the PS because the body is pushed out to improve the door fit. Will get bulb seal along the side where they contact the body when assembled after powder coat.


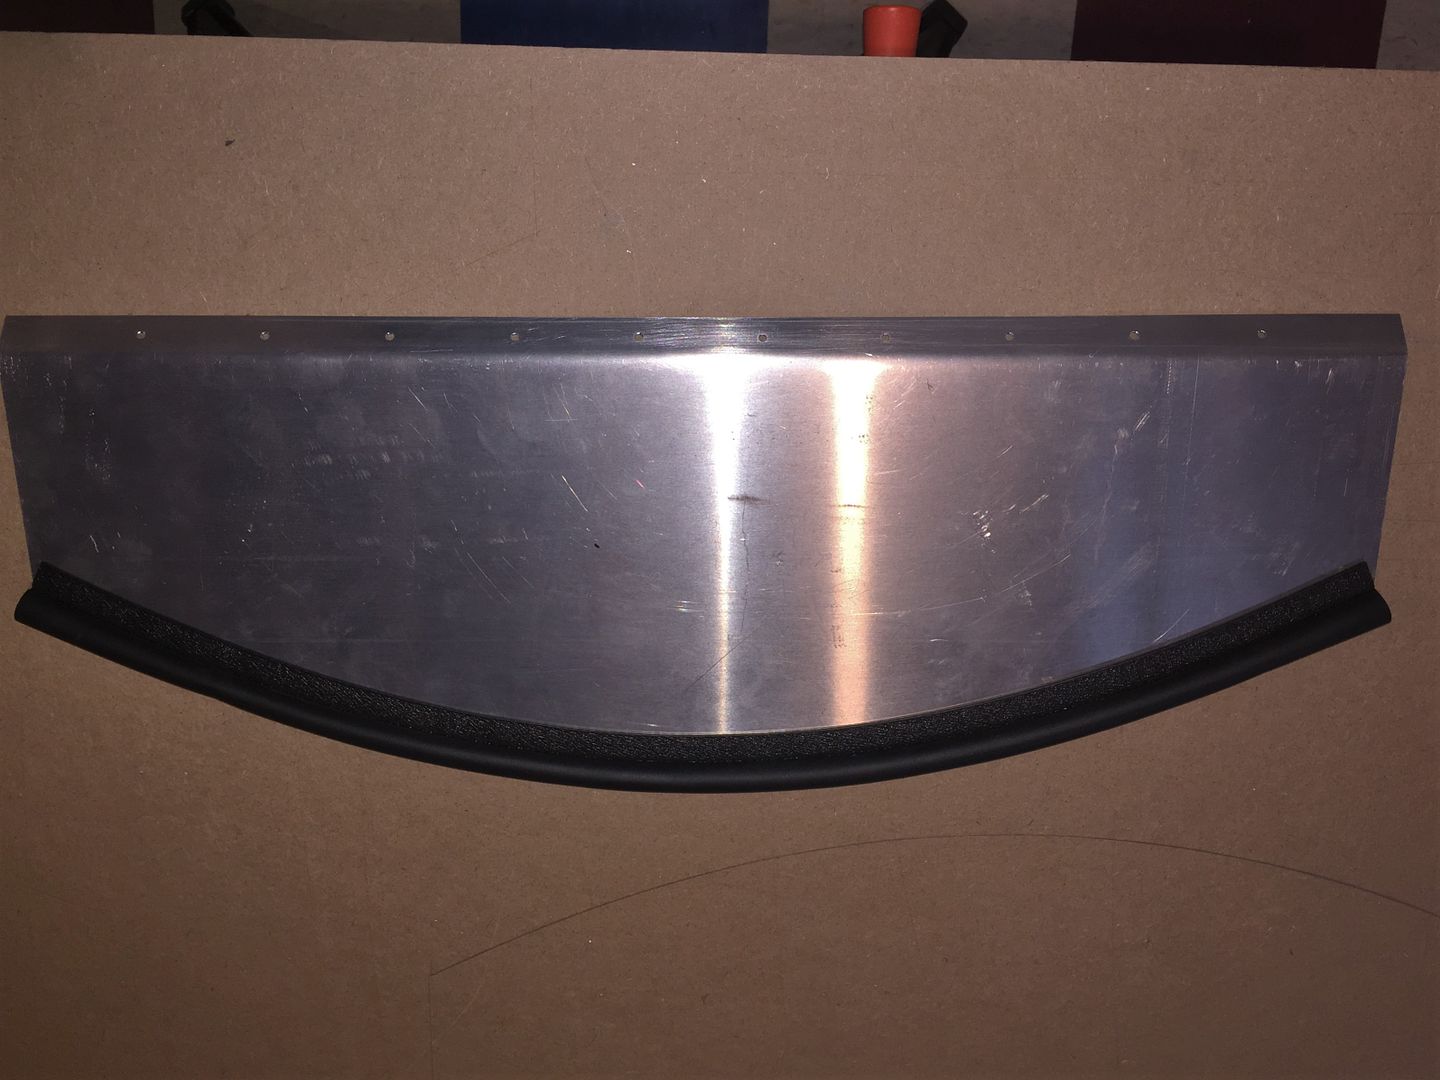
    Next was the cowl cover between the top of the radiator and the front of the hood opening. Helps to make sure the airflow through the radiator opening actually goes through the radiator, plus just looks better. I’ve used the part from Breeze Automotive on my last two builds and it works perfectly. For this one I made my own. Slightly changed, but borrows heavily from the Breeze design. (Sorry Mark) Main reason I made my own was I will get it powder coated to match the Anniversary frame color vs. the standard semi-gloss black from Breeze. I like to put bulb seal along the front edge where it contacts the underside of the body. Gives a tight seal plus prevents any vibration or rattling.


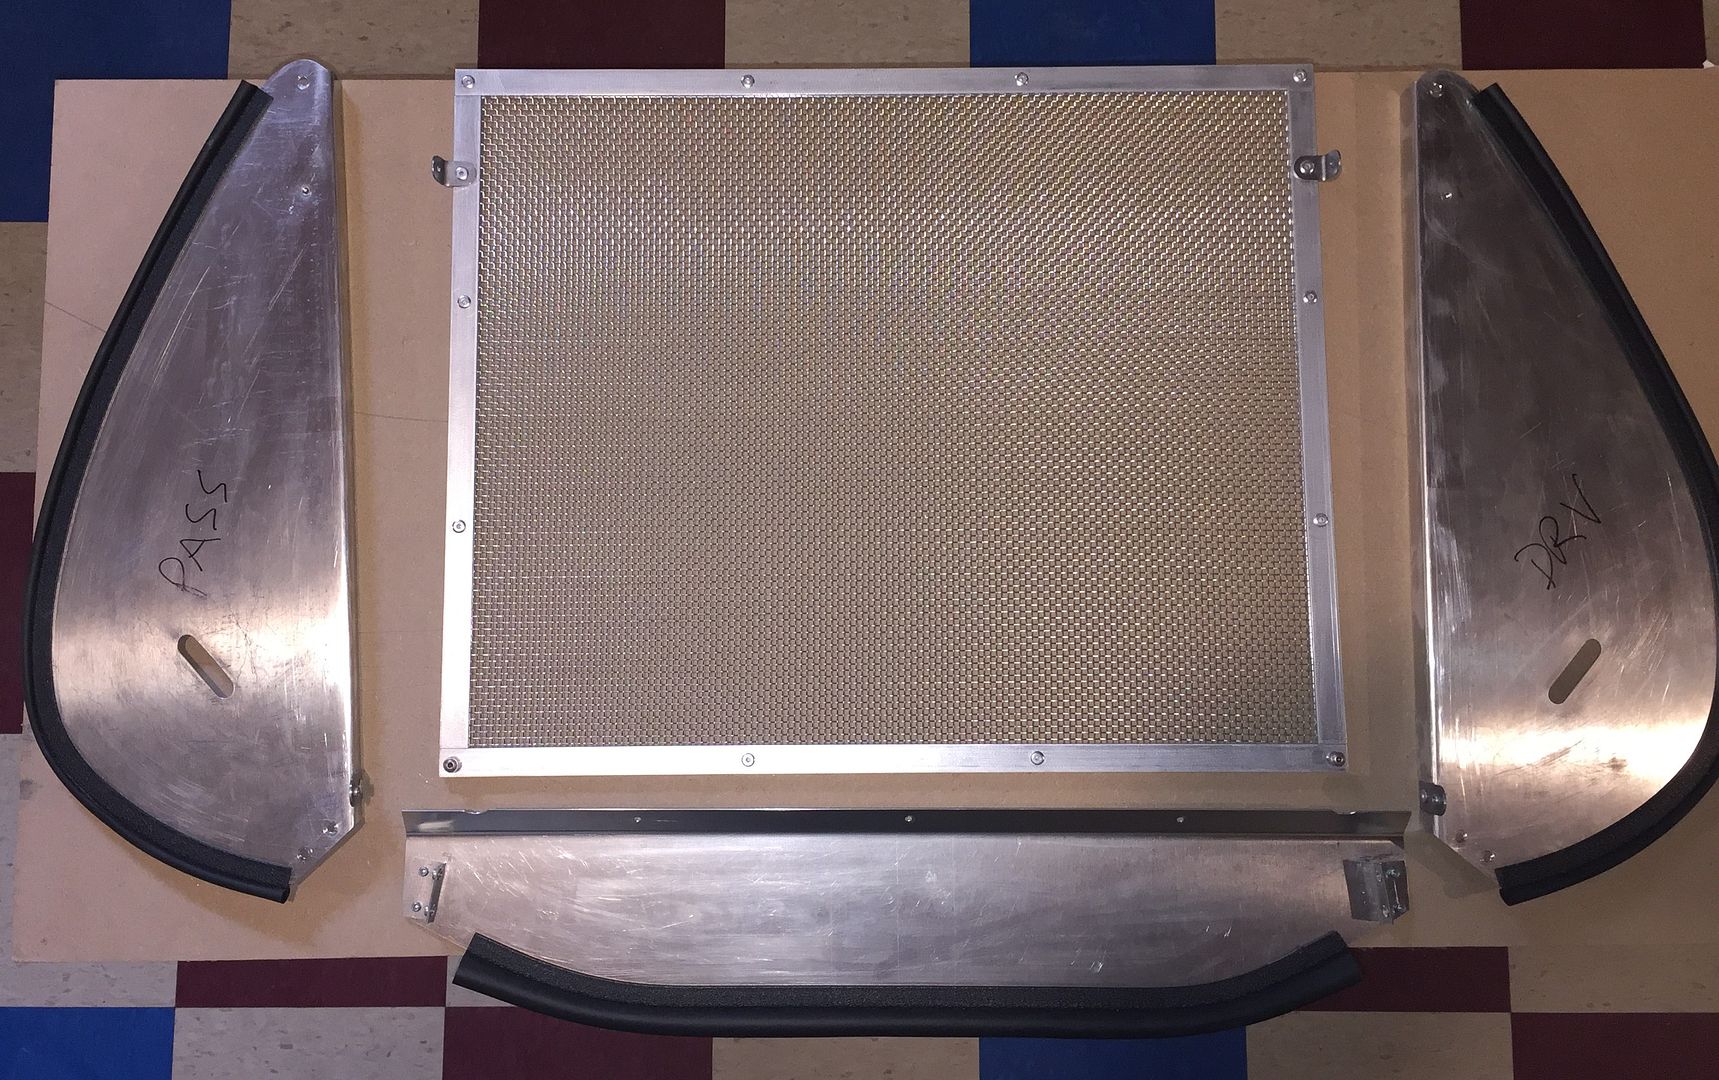
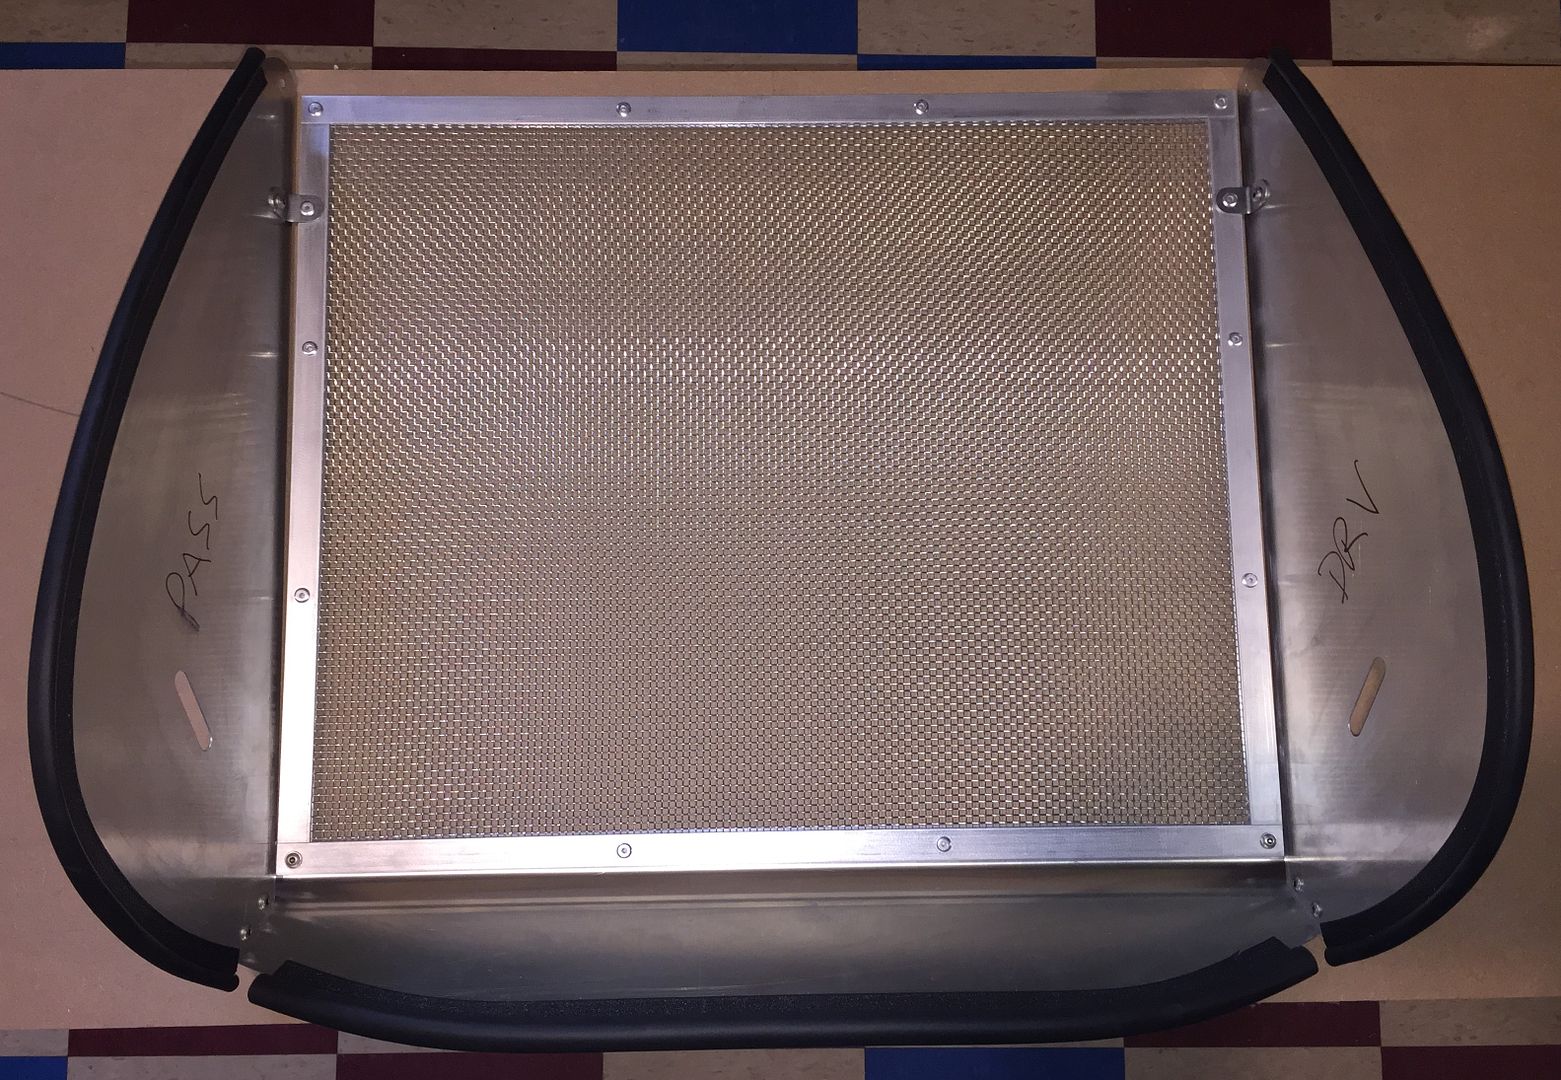
    Last was the front radiator surround. I’ve deviated from the FF supplied pieces on all my builds. On my Mk3, I made new pieces. Front bottom piece with added bulb seal that jammed inside the front of the body rather than riveting through the body, and new side pieces that were bigger and covered the quick jack mounts. Refined that approach quite a bit on the #7750 build and added an SS screen to protect the radiator. Worked out really well and pretty much duplicated that approach this time around. Fortunately I saved the fixture I used to make the SS screen, which I showed in a previous update. Finished that and made the rest of the pieces. To get these to fit really well, it’s kind of a tedious process. I made patterns out of cardboard, adjusting until they fit the body and radiator profile exactly. Then undercut the front edge the thickness of the bulb seal and reproduced in aluminum. My simple little 30-inch Harbor Freight brake does an adequate job on the bends. The back edge of the front piece bolts through the bottom of the radiator and the Breeze lower radiator mount. There is a steel bracket on the ends of the front piece for the sides. The top of the sides mounts to the frame near the upper radiator mount with 10-32 nutserts. I put gasket material along the back 1-inch flange of the side pieces where they contact the radiator tanks. Then added steel tabs to mount the SS screen.

    Disassembled, looks like this:


    Put together, looks like this:


    I’ll clean up the bulb seal and close those gaps during final assembly after powder coat. The slots in the side panels are for the Darkwater splitter I’ll be using. Yes, again same as #7750. I like the look. The write-up I did for #7750 showing the same idea and final product is here: http://www.ffcars.com/forums/17-fact...ally-done.html

    Tomorrow I’m going to drop these parts plus the rear splash guards at the powder coater. That should be it for fabrication and powder coating. We’re gone for 10 days to the left coast starting Friday. Visiting family. Once we get back, I’ll keep working down my to-do list getting ready for paint in December. Sorry for the kind of crummy smart phone pics in this update. I'll get the Canon SLR back out the next time.

    BTW, mouse patrol in the new garage workshop is moving along nicely. Score is me 12, mice 0. Haven't seen any "signs" for some days now. I think the word is out. But I'm still watching.
    Last edited by edwardb; 11-08-2016 at 06:00 PM.
    Build 1: Mk3 Roadster #5125. Sold 11/08/2014. Build 2: Mk4 Roadster #7750. Sold 04/10/2017. Build Thread
    Build 3: Mk4 Roadster 20th Anniversary #8674. Sold 09/07/2020. Build Thread and Video. Build 4: Gen 3 Type 65 Coupe #59. Gen 3 Coyote. Legal 03/04/2020. Build Thread and Video
    Build 5: 35 Hot Rod Truck #138. LS3 and 4L65E auto. Rcvd 01/05/2021. Legal 04/20/2023. Build Thread. Sold 11/9/2023.

  40. #439
    Junior Member
    Join Date
    Apr 2015
    Posts
    4
    Post Thanks / Like
    Paul,
    In post 388 you mention using "wedges" to get the pipes parallel to the body. Can you give more information on the wedges?
    I really appreciate all of the photos and details. Your build thread has been a huge help.
    Thanks,
    Rich

  41. #440
    Senior Member edwardb's Avatar
    Join Date
    Feb 2011
    Location
    Lake Orion, Michigan
    Posts
    10,857
    Post Thanks / Like
    Quote Originally Posted by RP Cobra View Post
    Paul,
    In post 388 you mention using "wedges" to get the pipes parallel to the body. Can you give more information on the wedges?
    I really appreciate all of the photos and details. Your build thread has been a huge help.
    Thanks,
    Rich
    Thanks Rich. Glad the thread has been helpful. The side pipe wedges are from Breeze Automotive. http://www.breezeautomotive.com/search.php?search=wedge
    Build 1: Mk3 Roadster #5125. Sold 11/08/2014. Build 2: Mk4 Roadster #7750. Sold 04/10/2017. Build Thread
    Build 3: Mk4 Roadster 20th Anniversary #8674. Sold 09/07/2020. Build Thread and Video. Build 4: Gen 3 Type 65 Coupe #59. Gen 3 Coyote. Legal 03/04/2020. Build Thread and Video
    Build 5: 35 Hot Rod Truck #138. LS3 and 4L65E auto. Rcvd 01/05/2021. Legal 04/20/2023. Build Thread. Sold 11/9/2023.

Page 11 of 20 FirstFirst ... 910111213 ... LastLast

Posting Permissions

  • You may not post new threads
  • You may not post replies
  • You may not post attachments
  • You may not edit your posts
  •  

Replica Parts

Visit our community sponsor