Boig Motorsports

Visit our community sponsor

Thanks Thanks:  256
Likes Likes:  573
Page 13 of 41 FirstFirst ... 3111213141523 ... LastLast
Results 481 to 520 of 1640

Thread: Papa's MKIV Roadster Build - #9115 (Post Grad) - One million + views!!!

  1. #481
    Straversi's Avatar
    Join Date
    Nov 2014
    Location
    Palos Verdes, CA
    Posts
    1,278
    Post Thanks / Like
    Looking good!
    -Steve
    Mk IV #8901 - Complete kit, Coyote, TKO-600, IRS. Ordered 5/23/16, Delivered 7/14/16, First Start 8/13/17, First Go-Kart 10/22/17, Registered and Completed 10/18/18. Build Thread: http://thefactoryfiveforum.com/showt...V-Coyote-Build Graduation Thread: https://thefactoryfiveforum.com/show...-Roadster-8901

  2. #482
    Senior Member broku518's Avatar
    Join Date
    Sep 2017
    Location
    Jupiter, FL
    Posts
    472
    Post Thanks / Like
    Quote Originally Posted by Papa View Post
    Martin,

    I'm paying close attention to the "Jeffs" on the body fitment advice.

    Link to my initial fitting questions thread: https://thefactoryfiveforum.com/show...ting-Questions

    The following was taken from another thread:


    I hope to pull mine back off and start making the first adjustments over the next week or so.

    Dave
    Thanks Papa!
    Great instructions of our elders! I don't mean by age, rather the years of working on these complex machines
    Life is short, so start living it.
    Build thread: http://thefactoryfiveforum.com/showt...-in-the-garage!
    delivery date: 10/31/2017, first start 2/24/2018, title and registration passed 6/22/2018

  3. #483
    Member Scubasommer's Avatar
    Join Date
    Feb 2018
    Location
    NorthWest Indiana
    Posts
    63
    Post Thanks / Like
    Quote Originally Posted by Papa View Post
    Jimmy,

    The kit comes with brakes for the front axel, but not the rear. I wanted Wilwood brakes, so the upgrade was for the front (eliminates the standard and delivers the Wilwood), and then a matching set for the rear. I ordered them with my kit from FFR. All you have to do is select the color of caliper you want (red or black) and then pick the type of rear axle you have. If you want black calipers and have a solid rear axle, check the following:
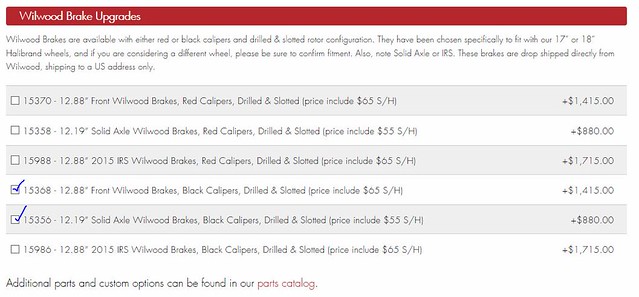


    Note that the Wilwood brakes on the FFR configurator are designed to work with 17" or 18" wheels only. If you plan to run a more vintage 15" wheel and want Wilwood brakes, contact Gordon Levy for options.

    Dave
    Cool Thanks Dave

  4. #484
    Member Scubasommer's Avatar
    Join Date
    Feb 2018
    Location
    NorthWest Indiana
    Posts
    63
    Post Thanks / Like
    [QUOTE=Papa;316724]Before I start making holes to run the seat heater wires into the trans tunnel, I need to have a good idea where my seats are going to sit with the Breeze seat bracket set. So, I fit the bracket to the seat frame and then primed the metal. Once the primer is completely set, I'll paint them with a satin black enamel. I really like the concept of the Breeze seat mounting system. You get a solid mount without drilling huge holes into the floor of the car. You also get a bit of recline and adjustability of about three inches front to back. It also makes mounting the seat pretty simple with the bolts going through the top of the frame into the mounting system.
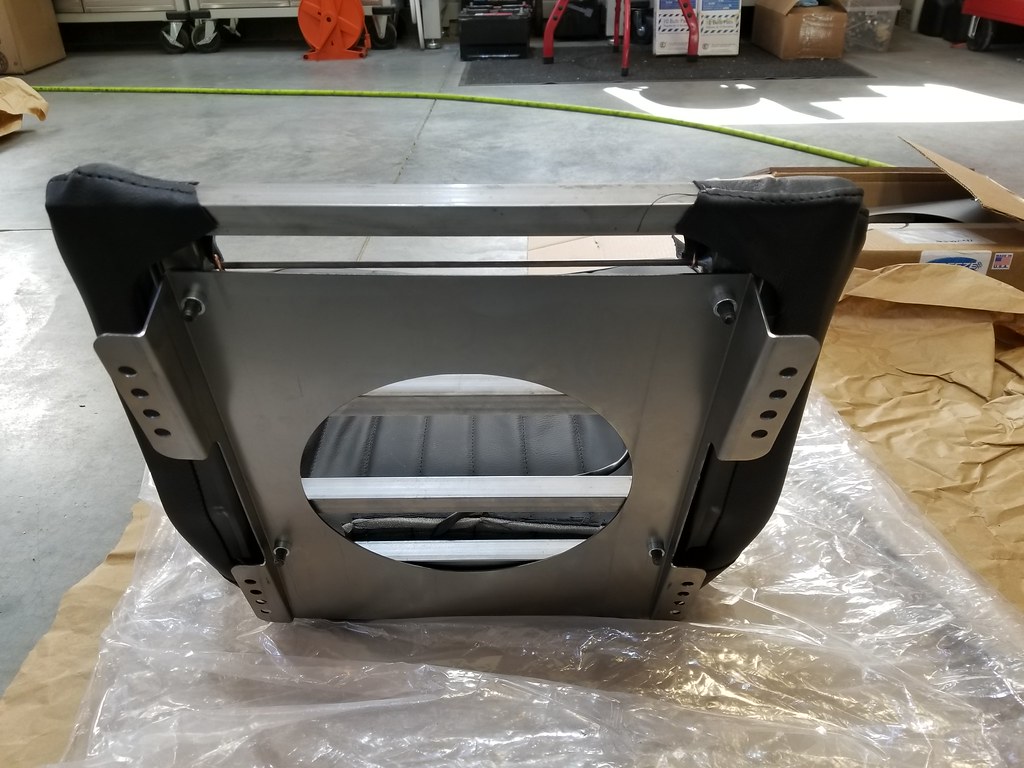
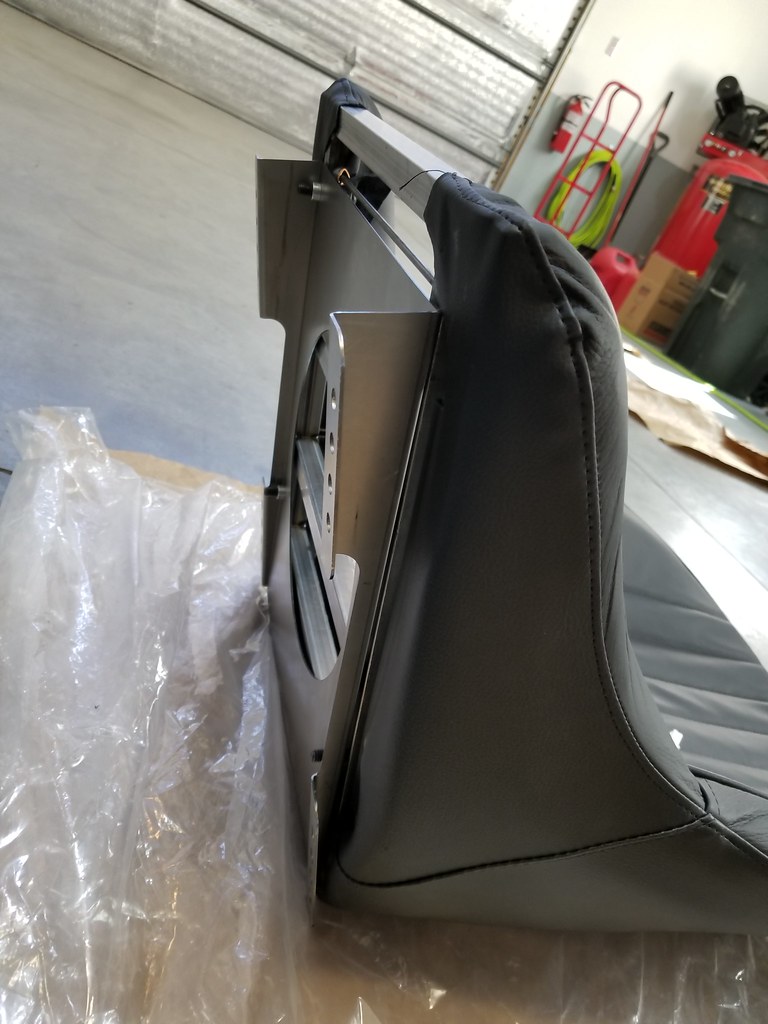


    I'm not going to mount the bracket to the floor until after the body is on, but with the seat in its approximate location I can drill into the tunnel for the seat heater wires.

    Dave

    I like the idea of the Breeze seat brackets...
    Question...are you picking up leg room with the brackets being canted slightly backward???
    I am 6’-2” and looking to pick up leg room.....without shooting my head over the windshield.
    I have on order with my kit the #15599 Leather big and tall version seat set from F5.
    Also is this the item from Breeze...#70602 Installation Kit for New Steel Frame “Classic” Seats

    Thanks for ALL your help
    Jimmy

  5. #485
    Papa's Avatar
    Join Date
    Dec 2016
    Location
    Mexico, MO
    Posts
    5,711
    Post Thanks / Like
    [QUOTE=Scubasommer;319540]
    Quote Originally Posted by Papa View Post
    Before I start making holes to run the seat heater wires into the trans tunnel, I need to have a good idea where my seats are going to sit with the Breeze seat bracket set. So, I fit the bracket to the seat frame and then primed the metal. Once the primer is completely set, I'll paint them with a satin black enamel. I really like the concept of the Breeze seat mounting system. You get a solid mount without drilling huge holes into the floor of the car. You also get a bit of recline and adjustability of about three inches front to back. It also makes mounting the seat pretty simple with the bolts going through the top of the frame into the mounting system.


    I'm not going to mount the bracket to the floor until after the body is on, but with the seat in its approximate location I can drill into the tunnel for the seat heater wires.

    Dave

    I like the idea of the Breeze seat brackets...
    Question...are you picking up leg room with the brackets being canted slightly backward???
    I am 6’-2” and looking to pick up leg room.....without shooting my head over the windshield.
    I have on order with my kit the #15599 Leather big and tall version seat set from F5.
    Also is this the item from Breeze...#70602 Installation Kit for New Steel Frame “Classic” Seats

    Thanks for ALL your help
    Jimmy
    Jimmy,

    I don't see that these will increase leg room, but they incline ~ 7 degrees to help keep a slight bend at the knee which may help. If your seats have the steel frame, these brackets will work. The bolts that go through the seat frame are 11-1/4" center-to-center (left-to-right).

    Dave
    Last edited by Papa; 03-31-2018 at 11:10 AM.
    My Build Thread: http://thefactoryfiveforum.com/showt...ter-Build-9754
    (Most viewed Roadster build thread on this forum!)

    Delivered: 6/17/2017
    First Start: 12/30/2017
    Completed: 12/7/2019
    Legal: 1/30/2020

    Member of the The Gateway Cobra Club
    Dave's Cobra YouTube Channel: https://www.youtube.com/channel/UCbk...npK1UZHj4R-bYQ
    Agora 1:8 Scale Cobra Build: https://thefactoryfiveforum.com/show...l-Build-Thread

  6. #486
    Papa's Avatar
    Join Date
    Dec 2016
    Location
    Mexico, MO
    Posts
    5,711
    Post Thanks / Like
    It's been several weeks since I last updated my build thread, but there simply hasn't been much real progress to talk about. I've been holding off on making any adjustments to the body of the car while I wait for my final set of headers to arrive.

    Today I went out and tried out my new monster torque wrench to check the hub nuts. With my wife applying the brake, I was able to double-check that I had the full 250 ft-lbs. on the nuts.
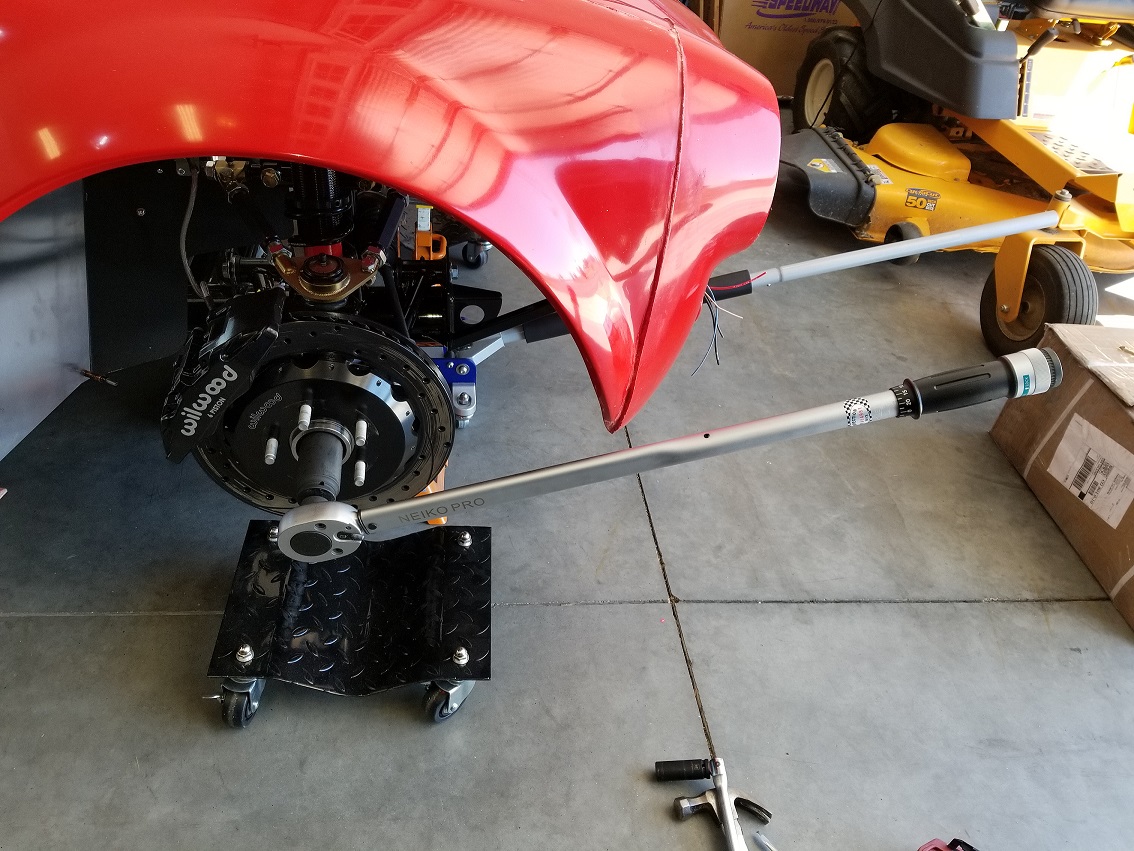


    I hope to get back into the build in the next couple of weeks.
    My Build Thread: http://thefactoryfiveforum.com/showt...ter-Build-9754
    (Most viewed Roadster build thread on this forum!)

    Delivered: 6/17/2017
    First Start: 12/30/2017
    Completed: 12/7/2019
    Legal: 1/30/2020

    Member of the The Gateway Cobra Club
    Dave's Cobra YouTube Channel: https://www.youtube.com/channel/UCbk...npK1UZHj4R-bYQ
    Agora 1:8 Scale Cobra Build: https://thefactoryfiveforum.com/show...l-Build-Thread

  7. #487
    Not a waxer Jeff Kleiner's Avatar
    Join Date
    Feb 2011
    Location
    Bloomington, Indiana
    Posts
    8,751
    Post Thanks / Like
    Quote Originally Posted by Papa View Post
    Today I went out and tried out my new monster torque wrench to check the hub nuts. With my wife applying the brake, I was able to double-check that I had the full 250 ft-lbs. on the nuts.
    Indeed, that is a monster! No need for holding the brakes; that nut acts against the spindle

    Jeff

  8. #488
    Papa's Avatar
    Join Date
    Dec 2016
    Location
    Mexico, MO
    Posts
    5,711
    Post Thanks / Like
    Quote Originally Posted by Jeff Kleiner View Post
    Indeed, that is a monster! No need for holding the brakes; that nut acts against the spindle

    Jeff
    Good point! Regardless, it got my wife involved and behind the wheel for the first time.
    My Build Thread: http://thefactoryfiveforum.com/showt...ter-Build-9754
    (Most viewed Roadster build thread on this forum!)

    Delivered: 6/17/2017
    First Start: 12/30/2017
    Completed: 12/7/2019
    Legal: 1/30/2020

    Member of the The Gateway Cobra Club
    Dave's Cobra YouTube Channel: https://www.youtube.com/channel/UCbk...npK1UZHj4R-bYQ
    Agora 1:8 Scale Cobra Build: https://thefactoryfiveforum.com/show...l-Build-Thread

  9. #489
    Not a waxer Jeff Kleiner's Avatar
    Join Date
    Feb 2011
    Location
    Bloomington, Indiana
    Posts
    8,751
    Post Thanks / Like
    Quote Originally Posted by Papa View Post
    Good point! Regardless, it got my wife involved and behind the wheel for the first time.
    When my wife gets involved she likes for me to refer to her as "my lovely assistant"

    Jeff

  10. #490
    Papa's Avatar
    Join Date
    Dec 2016
    Location
    Mexico, MO
    Posts
    5,711
    Post Thanks / Like
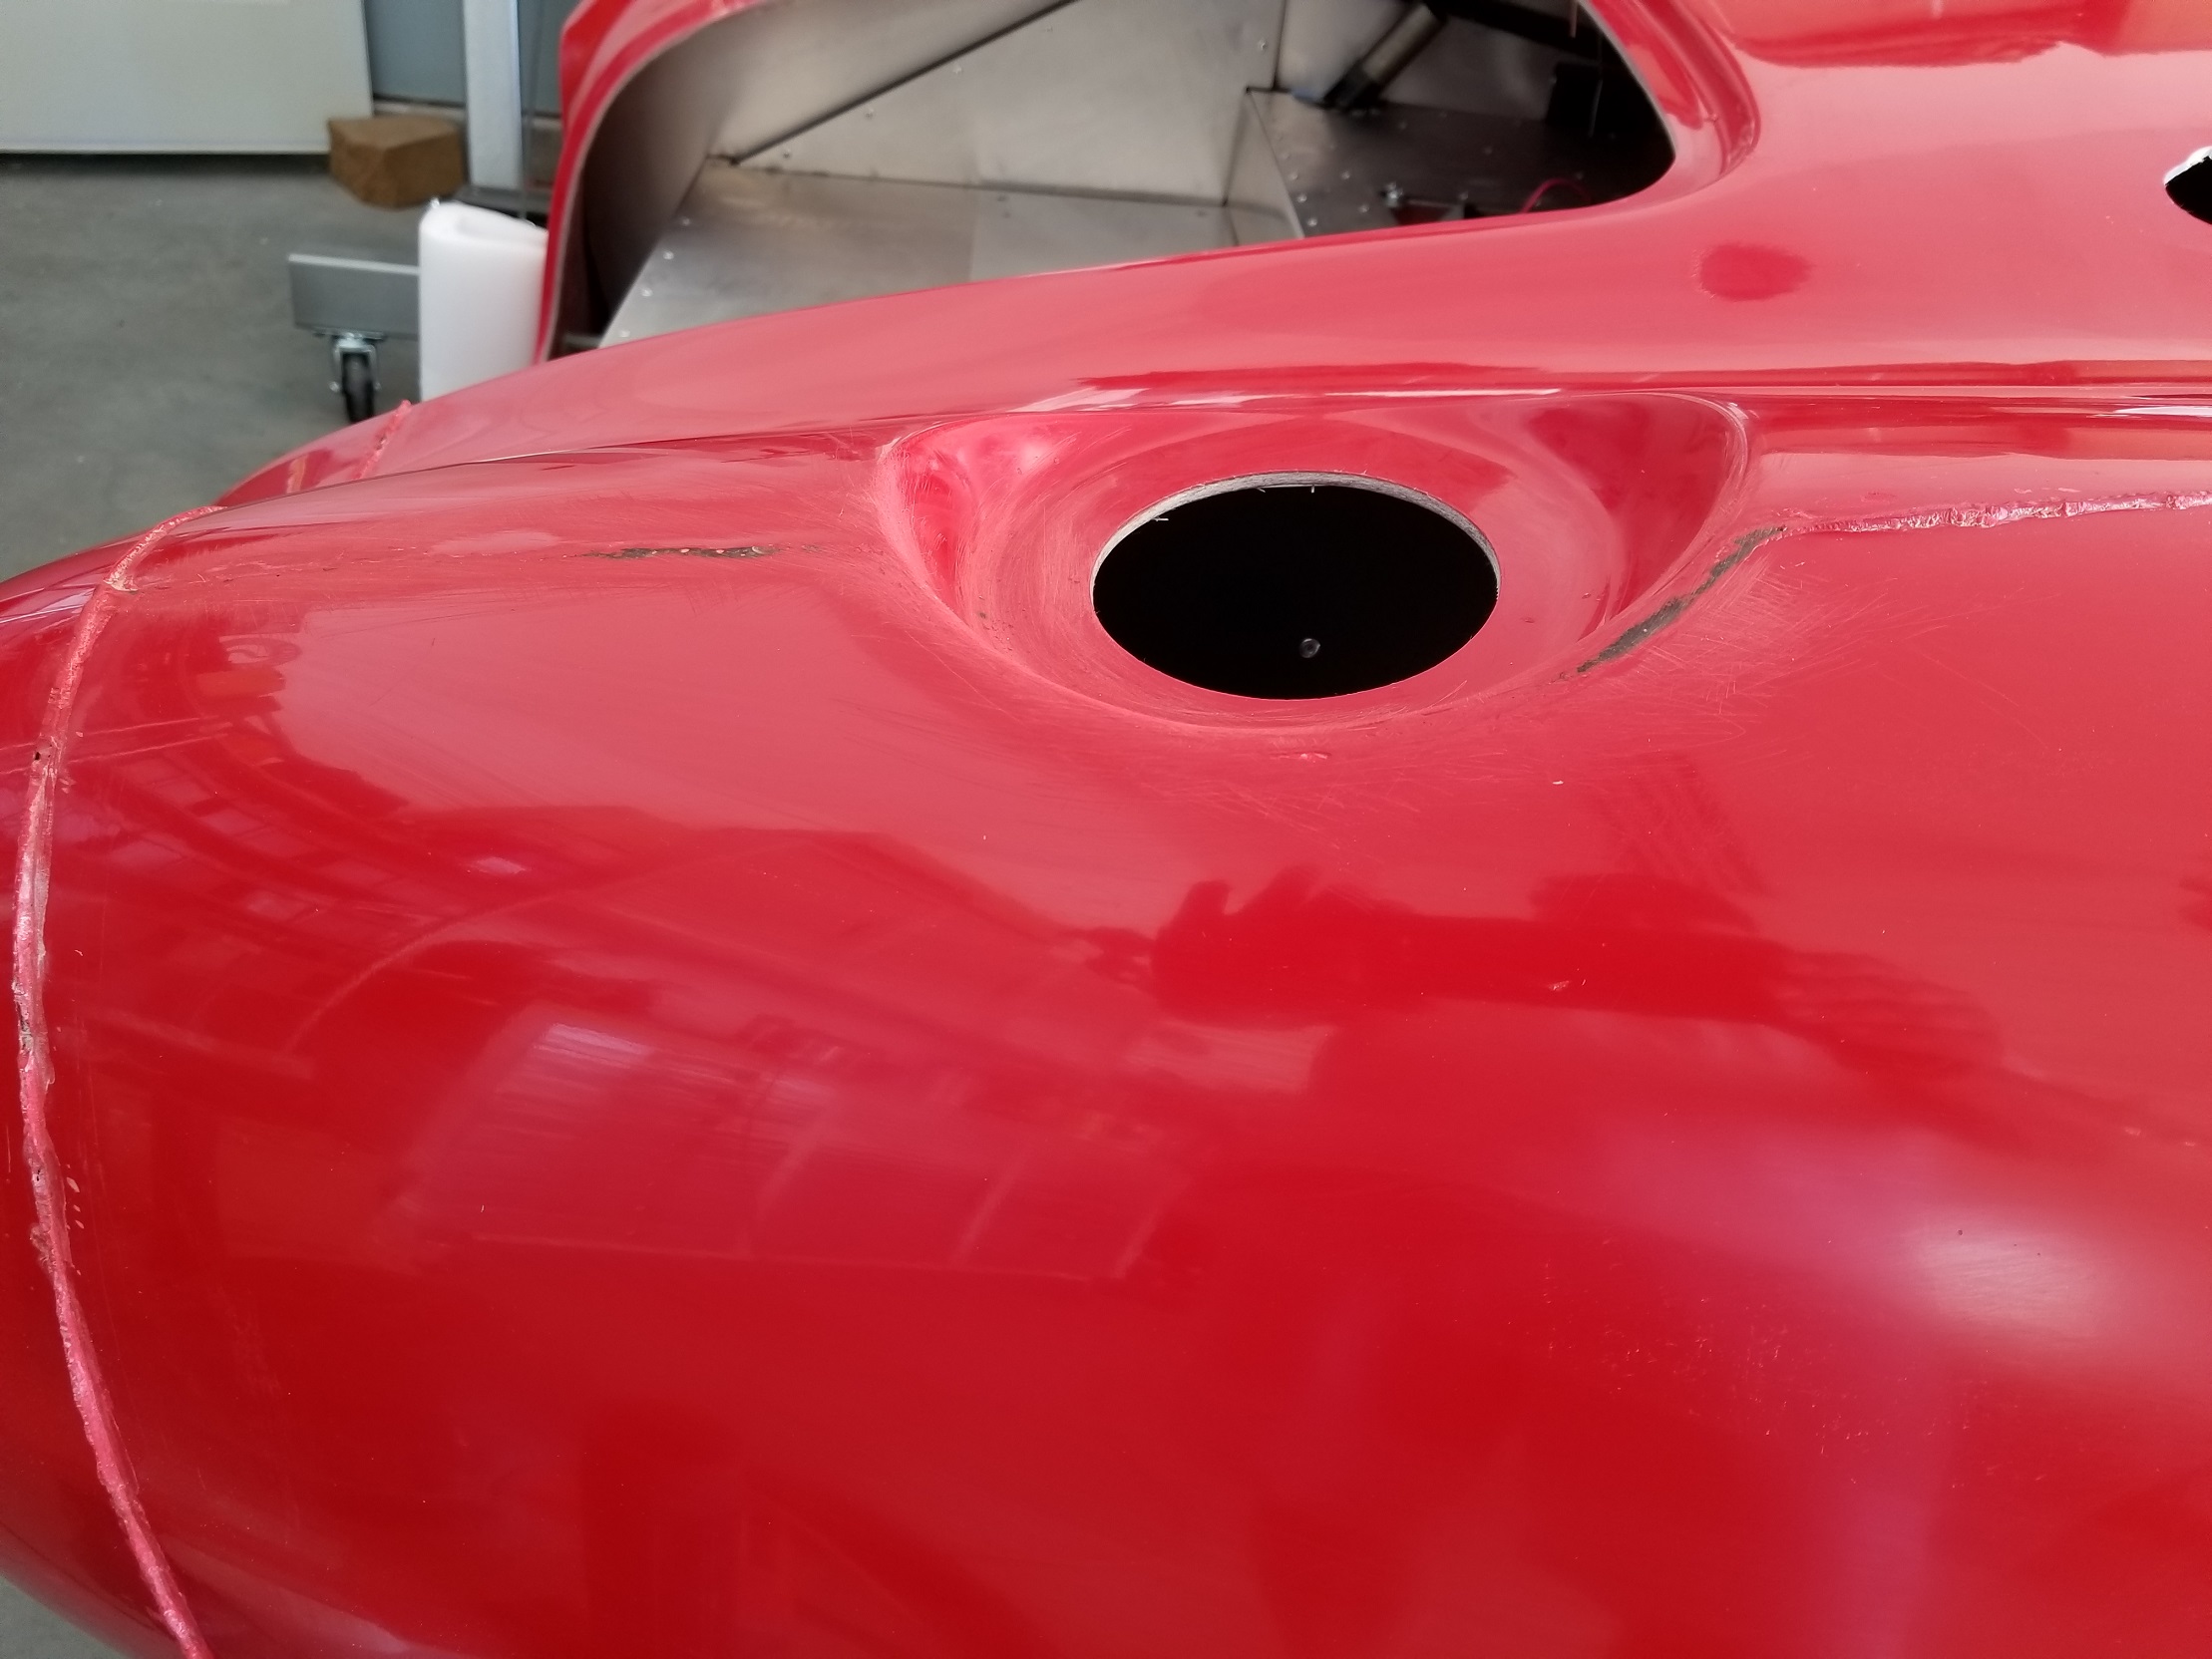
    The GP Headers are back at the manufacturer getting some modifications made to the flange to allow for the plug wires to go on. In the mean time, things are just sitting in a holding pattern. I did start to remove some of the ridges from the mold process today. I did a small area around the fuel filler opening and down the rear of the quarter panel. It sands off pretty easily and I'm just using a small sanding block on the smooth surfaces and loose paper on the tight spots.
    Last edited by Papa; 04-29-2018 at 09:17 AM.
    My Build Thread: http://thefactoryfiveforum.com/showt...ter-Build-9754
    (Most viewed Roadster build thread on this forum!)

    Delivered: 6/17/2017
    First Start: 12/30/2017
    Completed: 12/7/2019
    Legal: 1/30/2020

    Member of the The Gateway Cobra Club
    Dave's Cobra YouTube Channel: https://www.youtube.com/channel/UCbk...npK1UZHj4R-bYQ
    Agora 1:8 Scale Cobra Build: https://thefactoryfiveforum.com/show...l-Build-Thread

  11. #491
    Senior Member broku518's Avatar
    Join Date
    Sep 2017
    Location
    Jupiter, FL
    Posts
    472
    Post Thanks / Like
    Quote Originally Posted by Papa View Post
    The GP Headers are back at the manufacturer getting some modifications made to the flange to allow for the plug wires to go on. In the mean time, things are just sitting in a holding pattern. Id start to remove some of the ridges from the mold process today. I did a small area around the fuel filler opening and down the rear of the quarter panel. It sands off pretty easily and I'm just using a small sanding block on the smooth surfaces and loose paper on the tight spots.

    Hi Dave. I don't even bother with it. I guess I am outsourcing this to Jeff I am scared to venture in body fitting and paint prep area...
    I am considering getting some stickers from Amazon - "Under Construction" and "Student Driver."
    Life is short, so start living it.
    Build thread: http://thefactoryfiveforum.com/showt...-in-the-garage!
    delivery date: 10/31/2017, first start 2/24/2018, title and registration passed 6/22/2018

  12. #492
    Senior Member Paul2STL's Avatar
    Join Date
    Nov 2012
    Location
    Tacoma, WA
    Posts
    260
    Post Thanks / Like
    Dave, your build is coming along nicely. I am right behind you in build progress. Are planning to paint yourself?
    MKIV #9122 Ordered kit 5/24/17 received kit 8/11/17 MK4 Base kit +,First Start 4/7/18, First Go-Cart 4/22/18, In gelcoat, licensed and driving 8/11/18. Coyote gen2, T-56, 2015 IRS 3.31, 17" Halibrand replicas w/Nitto NT555 G2, Withby Motorcars power brake kit W/Wilwood pedals, 04 Cobra front brakes, 15 Mustang rear brakes with mods, power steering. Paint Jeff Miller Da Bat, Lexus Spectra Blue Mica W/Toyota Silver Sky Metallic strips. Build thread: http://thefactoryfiveforum.com/showt...Paul2STL-Build

  13. #493
    Papa's Avatar
    Join Date
    Dec 2016
    Location
    Mexico, MO
    Posts
    5,711
    Post Thanks / Like
    Quote Originally Posted by Paul2STL View Post
    Dave, your build is coming along nicely. I am right behind you in build progress. Are planning to paint yourself?
    I'm definitely not going to paint it myself, but figured I could get some of the initial prep done by knocking down the ridges from the mold. I'll leave the real bodywork to the professionals.
    My Build Thread: http://thefactoryfiveforum.com/showt...ter-Build-9754
    (Most viewed Roadster build thread on this forum!)

    Delivered: 6/17/2017
    First Start: 12/30/2017
    Completed: 12/7/2019
    Legal: 1/30/2020

    Member of the The Gateway Cobra Club
    Dave's Cobra YouTube Channel: https://www.youtube.com/channel/UCbk...npK1UZHj4R-bYQ
    Agora 1:8 Scale Cobra Build: https://thefactoryfiveforum.com/show...l-Build-Thread

  14. #494
    Senior Member Paul2STL's Avatar
    Join Date
    Nov 2012
    Location
    Tacoma, WA
    Posts
    260
    Post Thanks / Like
    Quote Originally Posted by Papa View Post
    I'm definitely not going to paint it myself, but figured I could get some of the initial prep done by knocking down the ridges from the mold. I'll leave the real bodywork to the professionals.
    I agree, also leaving the paint to the professionals myself.
    MKIV #9122 Ordered kit 5/24/17 received kit 8/11/17 MK4 Base kit +,First Start 4/7/18, First Go-Cart 4/22/18, In gelcoat, licensed and driving 8/11/18. Coyote gen2, T-56, 2015 IRS 3.31, 17" Halibrand replicas w/Nitto NT555 G2, Withby Motorcars power brake kit W/Wilwood pedals, 04 Cobra front brakes, 15 Mustang rear brakes with mods, power steering. Paint Jeff Miller Da Bat, Lexus Spectra Blue Mica W/Toyota Silver Sky Metallic strips. Build thread: http://thefactoryfiveforum.com/showt...Paul2STL-Build

  15. #495
    Papa's Avatar
    Join Date
    Dec 2016
    Location
    Mexico, MO
    Posts
    5,711
    Post Thanks / Like
    Progress! I got my headers back from GP Headers with the needed modifications to get my plug wires on. After spending about two hours cleaning off the copper RTV that was used with my first header install, I decided to try some REMFLEX header gaskets along with the Stage-8 header bolts. The headers went on very easily and I remembered to use some anti-seize on the bolts. I tightened them from the center out in three stages with the final torque at ~20 lbs. After I get a couple of heat cycles on them, I'll re-torque and install the locking tabs on the bolts. I also got my O2 sensor installed for the first time and the error codes are gone on the FAST XFI PCM! The side pipes exit very nicely and run parallel to the body with no need for any spacers or wedges. I will need to trim the body where the pipes exit, but that was expected. For now, I'm going to run the raw steel FFR pipes, but have a beautiful set of polished GAS-N pipes ready to install after the car is painted.


    Last edited by Papa; 05-04-2018 at 10:13 PM.
    My Build Thread: http://thefactoryfiveforum.com/showt...ter-Build-9754
    (Most viewed Roadster build thread on this forum!)

    Delivered: 6/17/2017
    First Start: 12/30/2017
    Completed: 12/7/2019
    Legal: 1/30/2020

    Member of the The Gateway Cobra Club
    Dave's Cobra YouTube Channel: https://www.youtube.com/channel/UCbk...npK1UZHj4R-bYQ
    Agora 1:8 Scale Cobra Build: https://thefactoryfiveforum.com/show...l-Build-Thread

  16. #496
    Not a waxer Jeff Kleiner's Avatar
    Join Date
    Feb 2011
    Location
    Bloomington, Indiana
    Posts
    8,751
    Post Thanks / Like
    Good to hear that you finally have a good fit! Nice work on the hanger fabrication

    Jeff

  17. #497
    Papa's Avatar
    Join Date
    Dec 2016
    Location
    Mexico, MO
    Posts
    5,711
    Post Thanks / Like
    Quote Originally Posted by Jeff Kleiner View Post
    Good to hear that you finally have a good fit! Nice work on the hanger fabrication

    Jeff
    You like that? I didn't want to mount the FFR hangers since I'll be installing the GAS-N pipes eventually.
    My Build Thread: http://thefactoryfiveforum.com/showt...ter-Build-9754
    (Most viewed Roadster build thread on this forum!)

    Delivered: 6/17/2017
    First Start: 12/30/2017
    Completed: 12/7/2019
    Legal: 1/30/2020

    Member of the The Gateway Cobra Club
    Dave's Cobra YouTube Channel: https://www.youtube.com/channel/UCbk...npK1UZHj4R-bYQ
    Agora 1:8 Scale Cobra Build: https://thefactoryfiveforum.com/show...l-Build-Thread

  18. #498
    Senior Member
    Join Date
    Feb 2011
    Location
    Myrtle Beach, SC
    Posts
    2,113
    Post Thanks / Like
    Dave-

    I like the hangers too. As a bonus, it will give your passenger something to do!

    Hitting the home stretch now. Keep up the good work!

    Regards,

    Steve

  19. #499
    Senior Member Yama-Bro's Avatar
    Join Date
    Jul 2012
    Location
    Kearney Nebraska
    Posts
    851
    Post Thanks / Like
    Looking good Papa Dave!
    Started dreaming of a Cobra around 1987
    Purchased Complete Kit 6/9/2017, Delivered 9/4/2017, Rolling Chassis 3/30/2018, Engine Dyno'ed 3/4/2022, Engine installed 8/27/2022, First start 6/13/2024, Go Kart 8/19/2024
    Click here for my build thread
    Serial #9158
    Design Engineer at BluePrint Engines

  20. #500
    Papa's Avatar
    Join Date
    Dec 2016
    Location
    Mexico, MO
    Posts
    5,711
    Post Thanks / Like
    Yesterday I spent some time working on body fit. I was able to get the front of the body centered on the hinge mounts. I will need to shave some material to let the body sit naturally around the brake reservoir bracket.


    Once the body was centered, I used tape to mark the larger openings needed for the side pipes to exit without touching the body. I may still be a bit close on the passenger side, but want to get the splash guards in before removing any more material. I'm using a mini-pneumatic belt sander to sand the material down to my new marks. It works great and provides a lot of control; no wandering saw blades!


    Next, I checked the body at the door latch plates and think I'm where Jeff described I should be; just in front of the plate with the edge of the body.


    It's nice to finally be making some forward progress again!
    Last edited by Papa; 05-13-2018 at 02:22 PM.
    My Build Thread: http://thefactoryfiveforum.com/showt...ter-Build-9754
    (Most viewed Roadster build thread on this forum!)

    Delivered: 6/17/2017
    First Start: 12/30/2017
    Completed: 12/7/2019
    Legal: 1/30/2020

    Member of the The Gateway Cobra Club
    Dave's Cobra YouTube Channel: https://www.youtube.com/channel/UCbk...npK1UZHj4R-bYQ
    Agora 1:8 Scale Cobra Build: https://thefactoryfiveforum.com/show...l-Build-Thread

  21. #501
    Papa's Avatar
    Join Date
    Dec 2016
    Location
    Mexico, MO
    Posts
    5,711
    Post Thanks / Like
    Here's a short video walk around with the body on and the car idling right after a cold start.

    Last edited by Papa; 05-14-2018 at 01:04 PM.
    My Build Thread: http://thefactoryfiveforum.com/showt...ter-Build-9754
    (Most viewed Roadster build thread on this forum!)

    Delivered: 6/17/2017
    First Start: 12/30/2017
    Completed: 12/7/2019
    Legal: 1/30/2020

    Member of the The Gateway Cobra Club
    Dave's Cobra YouTube Channel: https://www.youtube.com/channel/UCbk...npK1UZHj4R-bYQ
    Agora 1:8 Scale Cobra Build: https://thefactoryfiveforum.com/show...l-Build-Thread

  22. #502
    Senior Member Clover's Avatar
    Join Date
    Feb 2016
    Location
    Colorado
    Posts
    220
    Post Thanks / Like
    Looking and sounding good Dave.

  23. #503
    Mark Eaton's Avatar
    Join Date
    Apr 2017
    Location
    Medford, Oregon
    Posts
    762
    Post Thanks / Like
    I love the sound Dave!
    MK4 #9130 , complete kit, arrived 8/10/2017, Street Legal 2/14/2020.
    DART SHP 347, EFI, TKO600, IRS
    http://thefactoryfiveforum.com/showt...n-Build-Thread

  24. #504
    Papa's Avatar
    Join Date
    Dec 2016
    Location
    Mexico, MO
    Posts
    5,711
    Post Thanks / Like
    Quote Originally Posted by Clover View Post
    Looking and sounding good Dave.
    Quote Originally Posted by Mark Eaton View Post
    I love the sound Dave!
    Thanks guys! Now that the exhaust is right, the car sounds the way its supposed to.
    My Build Thread: http://thefactoryfiveforum.com/showt...ter-Build-9754
    (Most viewed Roadster build thread on this forum!)

    Delivered: 6/17/2017
    First Start: 12/30/2017
    Completed: 12/7/2019
    Legal: 1/30/2020

    Member of the The Gateway Cobra Club
    Dave's Cobra YouTube Channel: https://www.youtube.com/channel/UCbk...npK1UZHj4R-bYQ
    Agora 1:8 Scale Cobra Build: https://thefactoryfiveforum.com/show...l-Build-Thread

  25. #505
    Member Scubasommer's Avatar
    Join Date
    Feb 2018
    Location
    NorthWest Indiana
    Posts
    63
    Post Thanks / Like
    [QUOTE=Papa;325227]Herr's a short video walk around with the body on and the car idling right after a cold start.

    That’s Sooooo freakin cool Dave!!!!!

  26. #506
    Papa's Avatar
    Join Date
    Dec 2016
    Location
    Mexico, MO
    Posts
    5,711
    Post Thanks / Like
    Work continues with body fitment. I'm going very slowly and removing tiny amounts of material as I go then refitting and so on. Today I worked on the area around my CNC brake reservoir to allow the body to settle over the bracket I installed. I still have some additional work to do around the side pipe exits and it looks like I can start fitting the hood. Based on what it looks like right now, I'm just going to trim about 1/16" off all the way around to see if I can get the hood to rest in the opening. Once it is sitting in the opening I can start to work the gap consistency a bit more.

    Question for the experts is what I should be thinking about for the front wheel openings. I haven't done any ride height adjustments yet and I don't have any of the weather strip in place right now, but had a very slight rub on the right front after a test drive with the body on. Should I need to trim the wheel well at all?
    My Build Thread: http://thefactoryfiveforum.com/showt...ter-Build-9754
    (Most viewed Roadster build thread on this forum!)

    Delivered: 6/17/2017
    First Start: 12/30/2017
    Completed: 12/7/2019
    Legal: 1/30/2020

    Member of the The Gateway Cobra Club
    Dave's Cobra YouTube Channel: https://www.youtube.com/channel/UCbk...npK1UZHj4R-bYQ
    Agora 1:8 Scale Cobra Build: https://thefactoryfiveforum.com/show...l-Build-Thread

  27. #507
    PLATNUM Supporting Member
    wallace18's Avatar
    Join Date
    Apr 2012
    Location
    Trenton, Florida
    Posts
    5,397
    Post Thanks / Like
    You should set ride height and alignment. zi have never had to trim a fender in any of my MK4 builds.

  28. #508
    Papa's Avatar
    Join Date
    Dec 2016
    Location
    Mexico, MO
    Posts
    5,711
    Post Thanks / Like
    Quote Originally Posted by wallace18 View Post
    You should set ride height and alignment. zi have never had to trim a fender in any of my MK4 builds.
    Thank you, sir! That's what I would expect, but just wanted to be sure. The car is sitting very low at the moment, probably 1/2 - 3/4" lower than final ride height and I expect the weather strip to raise the body 1/4" or so.

    Dave
    My Build Thread: http://thefactoryfiveforum.com/showt...ter-Build-9754
    (Most viewed Roadster build thread on this forum!)

    Delivered: 6/17/2017
    First Start: 12/30/2017
    Completed: 12/7/2019
    Legal: 1/30/2020

    Member of the The Gateway Cobra Club
    Dave's Cobra YouTube Channel: https://www.youtube.com/channel/UCbk...npK1UZHj4R-bYQ
    Agora 1:8 Scale Cobra Build: https://thefactoryfiveforum.com/show...l-Build-Thread

  29. #509
    Senior Member
    Join Date
    Mar 2017
    Posts
    307
    Post Thanks / Like
    Sounds great Dave..........nice to see your progress!!! Great Job!!
    Build#1: MKIV Roadster #9320

  30. #510

    Steve >> aka: GoDadGo
    GoDadGo's Avatar
    Join Date
    Feb 2015
    Location
    Slidell, Louisiana
    Posts
    6,790
    Post Thanks / Like
    Blog Entries
    1
    Love Those Chevy Inspired Side Pipe Supports!

    Congratulations!

  31. #511
    Not a waxer Jeff Kleiner's Avatar
    Join Date
    Feb 2011
    Location
    Bloomington, Indiana
    Posts
    8,751
    Post Thanks / Like
    Quote Originally Posted by Papa View Post

    Question for the experts is what I should be thinking about for the front wheel openings. I haven't done any ride height adjustments yet and I don't have any of the weather strip in place right now, but had a very slight rub on the right front after a test drive with the body on. Should I need to trim the wheel well at all?
    "Need" is somewhat dependent on ride height, alignment, spindles used, tire size and wheel specs. Contact at the front is not rare, especially when running in the lower caster ranges but as has been mentioned you really won't know what is absolutely necessary until the body is in it's final position with ride height and alignment reasonably close to their finished settings.

    No matter, I always trim the mold flanges back, not only to assure clearance but simply because I think it looks better and more original/authentic---remember the original bodies had the aluminum skin formed and rolled around 3/16" rods in these areas. I take them from this:


    To something like this with the lips rolled to approximately 1/4" diameter:


    Straight from the molds the forward edge of the front wheel openings have some odd curves, waves and "elbows" (particularly at the nose cap parting line) at the transition from the sides to the lower valance and over the the oil cooler opening that I trim and shape into a smoother more flowing curve like so:


    All that said though if you are not planning to do your own body & paint work just do the minimum necessary for clearance and leave it for your body guy to do the finish work.

    Cheers,
    Jeff

  32. #512
    Papa's Avatar
    Join Date
    Dec 2016
    Location
    Mexico, MO
    Posts
    5,711
    Post Thanks / Like
    Today I wanted to get the hood trimmed enough to lay in the opening, but first things first. It's nearly 90 degrees and barely a wisp of cloud in the sky; I'm going for a ride!

    Last edited by Papa; 05-25-2018 at 01:48 PM.
    My Build Thread: http://thefactoryfiveforum.com/showt...ter-Build-9754
    (Most viewed Roadster build thread on this forum!)

    Delivered: 6/17/2017
    First Start: 12/30/2017
    Completed: 12/7/2019
    Legal: 1/30/2020

    Member of the The Gateway Cobra Club
    Dave's Cobra YouTube Channel: https://www.youtube.com/channel/UCbk...npK1UZHj4R-bYQ
    Agora 1:8 Scale Cobra Build: https://thefactoryfiveforum.com/show...l-Build-Thread

  33. #513
    Papa's Avatar
    Join Date
    Dec 2016
    Location
    Mexico, MO
    Posts
    5,711
    Post Thanks / Like
    Okay, the fun is over and time to get to the day's task. I started by laying the hood over the opening and running a strip of tape to act as a mark to sand to.


    Next I used my mini belt sander to sand off the very small amounts of martial up to the tape.


    I repeated these steps until the hood just barely rested in the opening. I hand sanded the sharp edges just a bit. The gaps will need to be worked, but that I'll leave to the professionals.


    Once that was done, I dug out all the hood hinge parts and realized that I needed to make a trip to the powder coater. I wish I'd done that six months ago. The parts should be done next week.
    My Build Thread: http://thefactoryfiveforum.com/showt...ter-Build-9754
    (Most viewed Roadster build thread on this forum!)

    Delivered: 6/17/2017
    First Start: 12/30/2017
    Completed: 12/7/2019
    Legal: 1/30/2020

    Member of the The Gateway Cobra Club
    Dave's Cobra YouTube Channel: https://www.youtube.com/channel/UCbk...npK1UZHj4R-bYQ
    Agora 1:8 Scale Cobra Build: https://thefactoryfiveforum.com/show...l-Build-Thread

  34. #514
    Senior Member DavidW's Avatar
    Join Date
    Jan 2014
    Location
    Stevensville, MD
    Posts
    377
    Post Thanks / Like
    Wow, thats a nice hood fit. I have to use the closure to pull the hood down in the corners, even then its not all the way down and my gaps are at least 3 times bigger.

  35. #515
    Papa's Avatar
    Join Date
    Dec 2016
    Location
    Mexico, MO
    Posts
    5,711
    Post Thanks / Like
    Quote Originally Posted by DavidW View Post
    Wow, thats a nice hood fit. I have to use the closure to pull the hood down in the corners, even then its not all the way down and my gaps are at least 3 times bigger.
    Thanks, David. It's just sitting there under gravity's influence in that picture. I don't even have any rubber sitting under it. I went tediously slow and worked from side to side until it fit. The tape marker I used was really just eyeballed to mirror the body opening. I think overall, I probably removed just under 1/4" or less material from the sides, less than 1/8" from each side, and maybe 1/16 - 3/32 from the front.
    My Build Thread: http://thefactoryfiveforum.com/showt...ter-Build-9754
    (Most viewed Roadster build thread on this forum!)

    Delivered: 6/17/2017
    First Start: 12/30/2017
    Completed: 12/7/2019
    Legal: 1/30/2020

    Member of the The Gateway Cobra Club
    Dave's Cobra YouTube Channel: https://www.youtube.com/channel/UCbk...npK1UZHj4R-bYQ
    Agora 1:8 Scale Cobra Build: https://thefactoryfiveforum.com/show...l-Build-Thread

  36. #516
    Papa's Avatar
    Join Date
    Dec 2016
    Location
    Mexico, MO
    Posts
    5,711
    Post Thanks / Like
    I got approval from my lovely wife to go ahead and order a lift for my shop! I ended up ordering a Bendpak XPR-10AS-LP two-post lift.
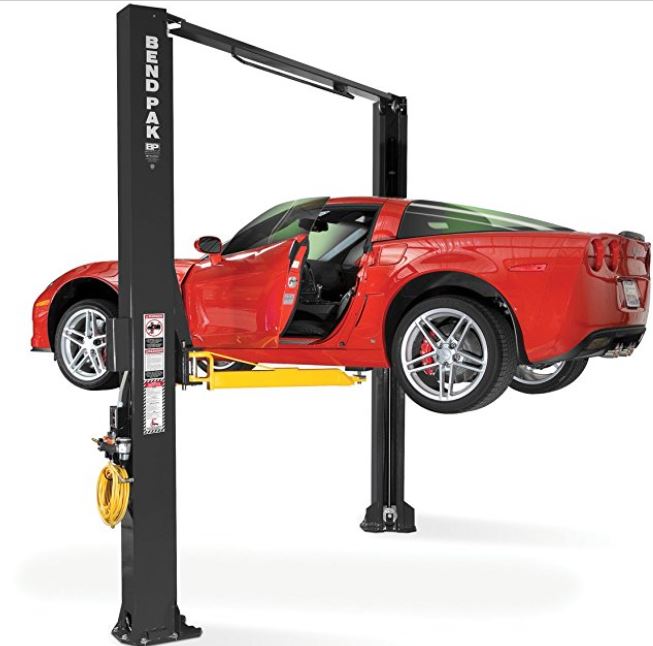


    I found a local installer that I'll have the lift shipped to and then they will bring it to my home and install it. I have an install date of July 10th. In the meantime, I'll need to wire the 220v circuit. Thanks to everyone who provided feedback on their lifts. I was really torn between the Bendpak and Atlas and ultimately decided that I would go with the Bendpak.
    My Build Thread: http://thefactoryfiveforum.com/showt...ter-Build-9754
    (Most viewed Roadster build thread on this forum!)

    Delivered: 6/17/2017
    First Start: 12/30/2017
    Completed: 12/7/2019
    Legal: 1/30/2020

    Member of the The Gateway Cobra Club
    Dave's Cobra YouTube Channel: https://www.youtube.com/channel/UCbk...npK1UZHj4R-bYQ
    Agora 1:8 Scale Cobra Build: https://thefactoryfiveforum.com/show...l-Build-Thread

  37. Likes Aircontroller liked this post
  38. #517
    Papa's Avatar
    Join Date
    Dec 2016
    Location
    Mexico, MO
    Posts
    5,711
    Post Thanks / Like
    I had a request to provide my template that I used to fabricate my floor mounted headlight dimmer switch bracket. I drafted up a quick CAD drawing for anyone that wants to use it.
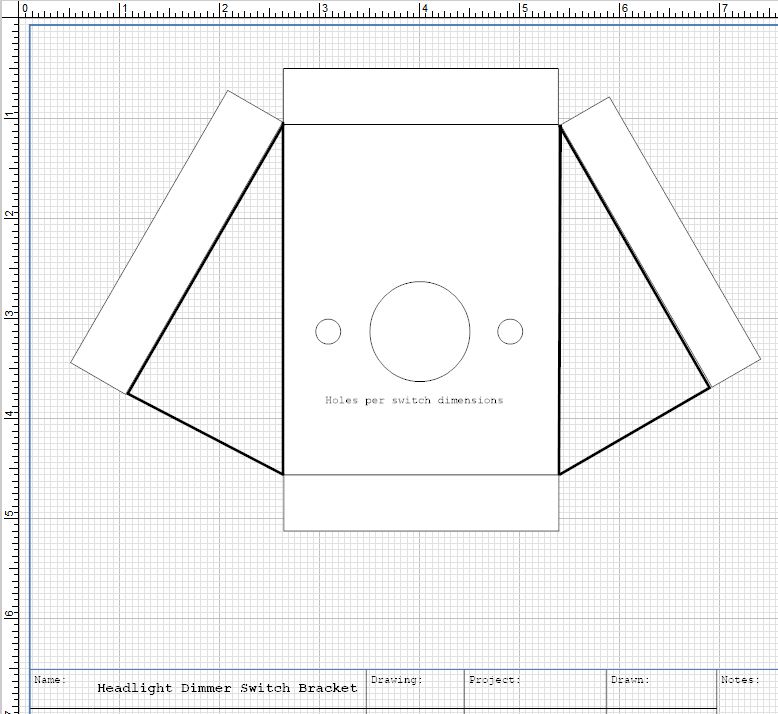


    The scale is 1:1, so you can just print the picture without resizing it as a starting point. Keep in mind that you may need to adjust the dimensions to fit your car.

    Dave
    Last edited by Papa; 06-03-2018 at 11:38 AM.
    My Build Thread: http://thefactoryfiveforum.com/showt...ter-Build-9754
    (Most viewed Roadster build thread on this forum!)

    Delivered: 6/17/2017
    First Start: 12/30/2017
    Completed: 12/7/2019
    Legal: 1/30/2020

    Member of the The Gateway Cobra Club
    Dave's Cobra YouTube Channel: https://www.youtube.com/channel/UCbk...npK1UZHj4R-bYQ
    Agora 1:8 Scale Cobra Build: https://thefactoryfiveforum.com/show...l-Build-Thread

  39. Thanks Aircontroller thanked for this post
    Likes Aircontroller liked this post
  40. #518
    Mark Eaton's Avatar
    Join Date
    Apr 2017
    Location
    Medford, Oregon
    Posts
    762
    Post Thanks / Like
    great news on the lift Dave. I am interested in your CAD drawing for the switch bracket. PM sent
    MK4 #9130 , complete kit, arrived 8/10/2017, Street Legal 2/14/2020.
    DART SHP 347, EFI, TKO600, IRS
    http://thefactoryfiveforum.com/showt...n-Build-Thread

  41. #519
    Papa's Avatar
    Join Date
    Dec 2016
    Location
    Mexico, MO
    Posts
    5,711
    Post Thanks / Like
    Ugh - Still waiting for the powder coater to finish my brackets I dropped off that were promised in three days ten days ago. Oh well, more time to do yard work.
    My Build Thread: http://thefactoryfiveforum.com/showt...ter-Build-9754
    (Most viewed Roadster build thread on this forum!)

    Delivered: 6/17/2017
    First Start: 12/30/2017
    Completed: 12/7/2019
    Legal: 1/30/2020

    Member of the The Gateway Cobra Club
    Dave's Cobra YouTube Channel: https://www.youtube.com/channel/UCbk...npK1UZHj4R-bYQ
    Agora 1:8 Scale Cobra Build: https://thefactoryfiveforum.com/show...l-Build-Thread

  42. #520
    Papa's Avatar
    Join Date
    Dec 2016
    Location
    Mexico, MO
    Posts
    5,711
    Post Thanks / Like
    My powder coating is done on all my hood and trunk brackets. What is the best way to get the coating out of the holes where the bushings need to go without damaging the finish on the bracket? I'm thinking of using an abrasive drum on my die grinder, but I'm open to any recommendations.
    My Build Thread: http://thefactoryfiveforum.com/showt...ter-Build-9754
    (Most viewed Roadster build thread on this forum!)

    Delivered: 6/17/2017
    First Start: 12/30/2017
    Completed: 12/7/2019
    Legal: 1/30/2020

    Member of the The Gateway Cobra Club
    Dave's Cobra YouTube Channel: https://www.youtube.com/channel/UCbk...npK1UZHj4R-bYQ
    Agora 1:8 Scale Cobra Build: https://thefactoryfiveforum.com/show...l-Build-Thread

Page 13 of 41 FirstFirst ... 3111213141523 ... LastLast

Posting Permissions

  • You may not post new threads
  • You may not post replies
  • You may not post attachments
  • You may not edit your posts
  •  

FFMetal

Visit our community sponsor