-
09-09-2018, 08:28 PM
#641

Originally Posted by
Papa

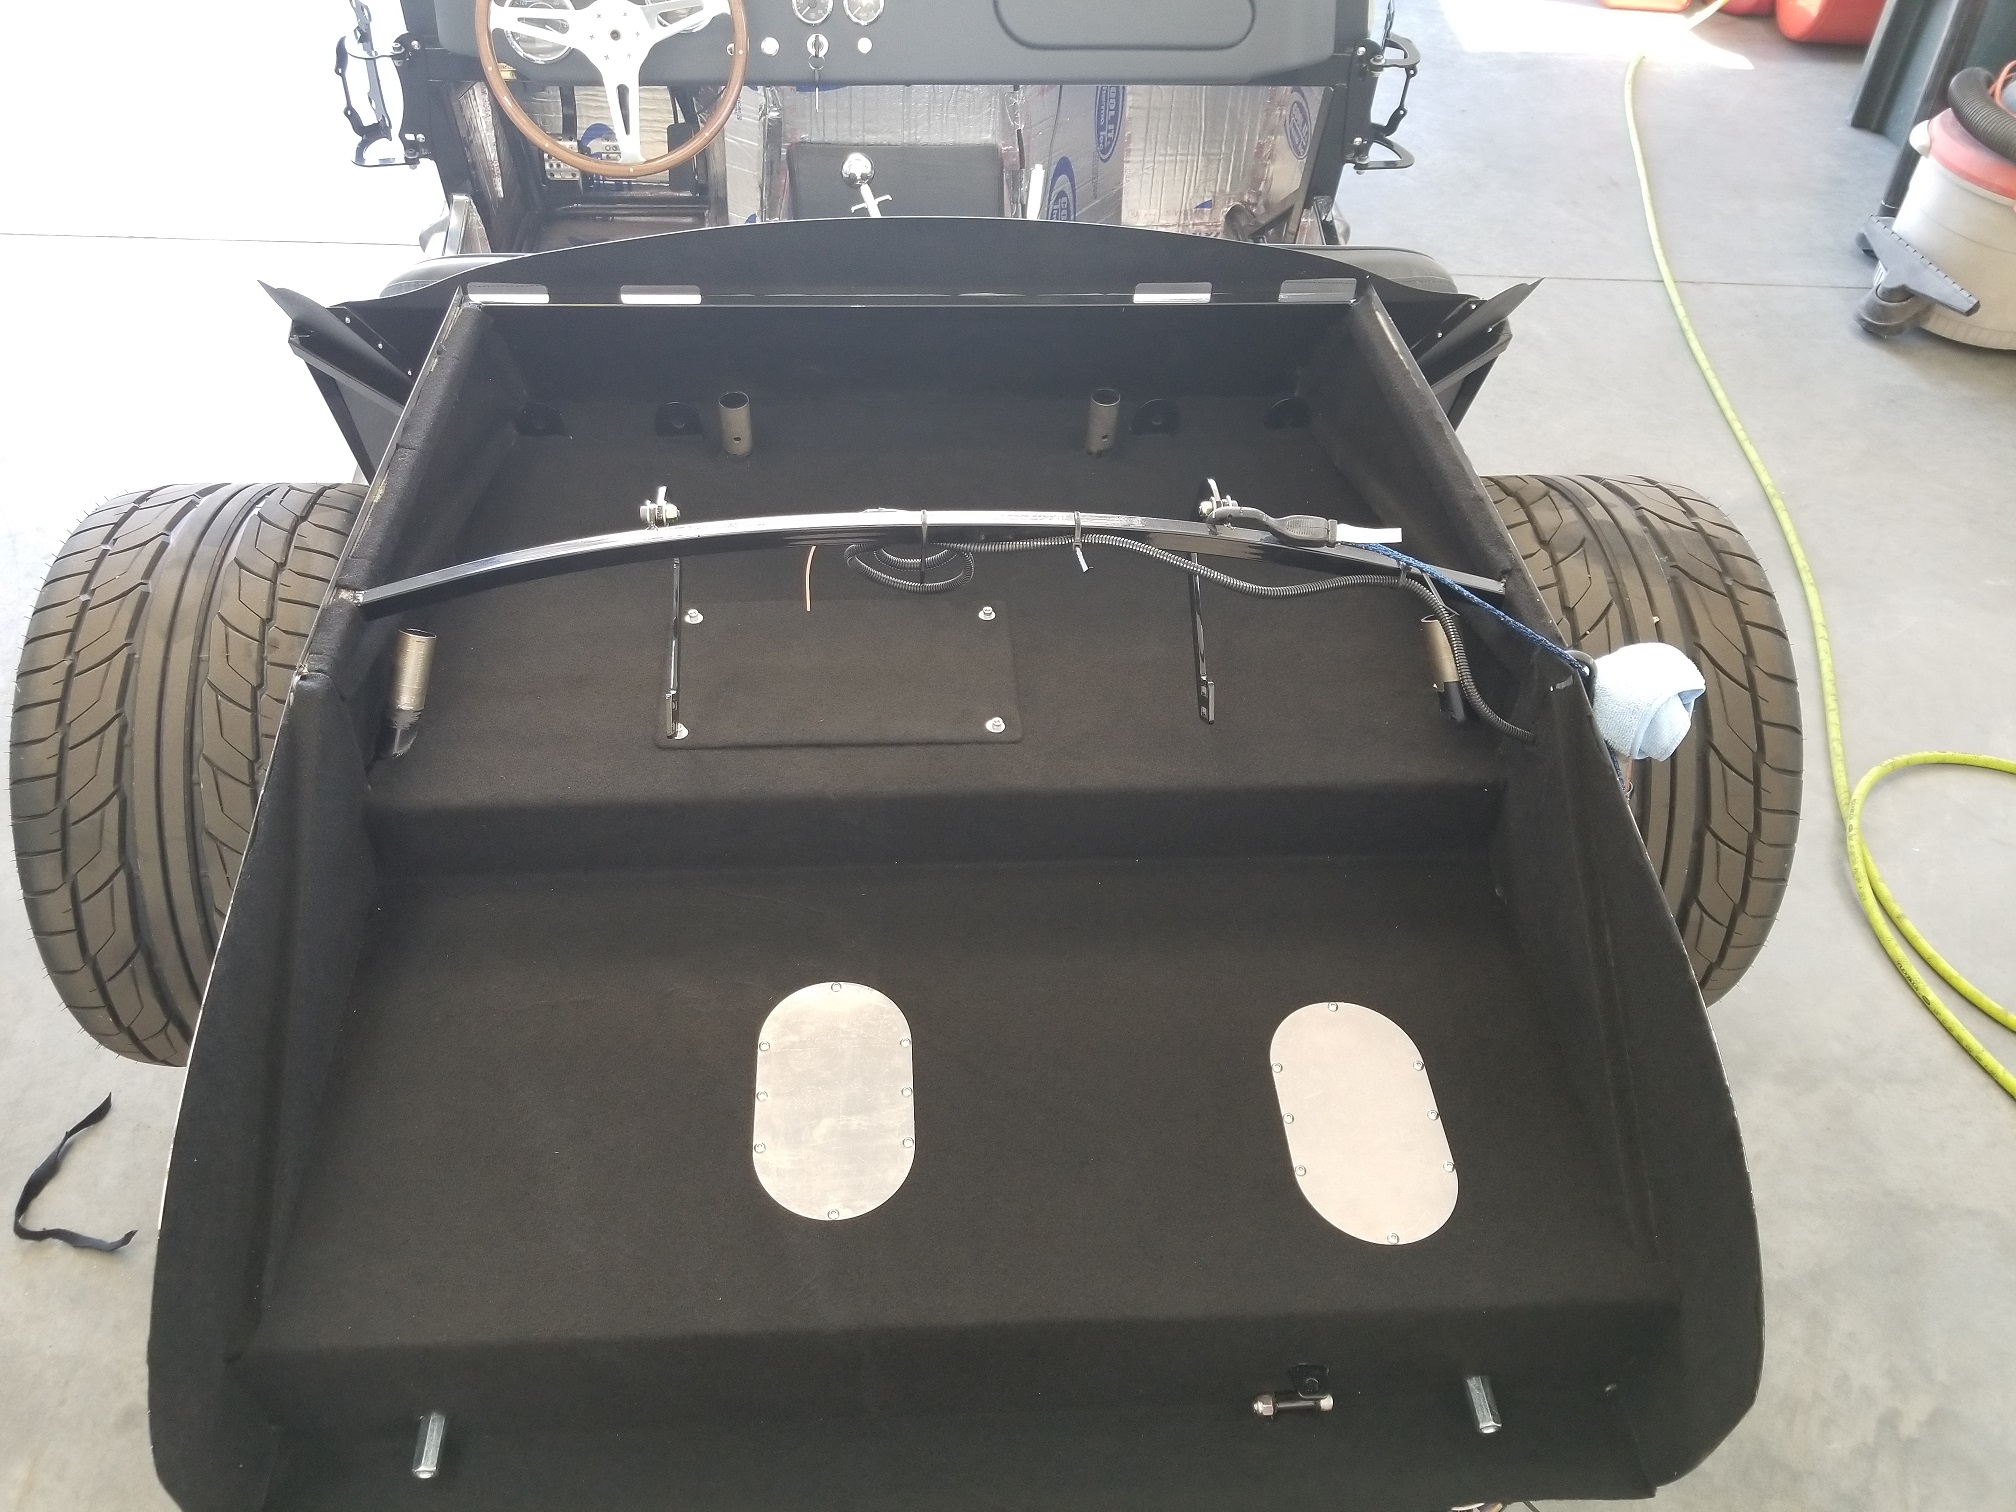
I'm still trying to shake a cold, but made an attempt at carpeting my trunk today. Right now, I'm not thrilled with the result and may start over.
Any tips or tricks to getting this task done and looking good are welcome.
Papa, the photo isn't the greatest, but I really like what you did. I really like the way you have the carpet going around the frame. Almost looks like it is a spray in product of some kind. In fact, having just said that, I wonder what the trunk would look like with a good Rhino Liner coating. Hmmm But seriously to me, that looks good. Hope you feel better soon.
-
09-09-2018, 08:59 PM
#642
Senior Member

Invest the time & materials to make up some upper trunk inside panels. Once carpeted the trunk sidewalls will look like a continuous sheet. I'm doing the Breeze cubby hole conversion, but you'll get the idea from the pics.
BreezeCubby03.jpg BreezeCubby05.jpg
(Is that the "stretchy" speaker box type carpet?)
John D. - Minneapolis 'Burbs
1965 El Camino - LT-1, 4L60e, 4wh discs, SC&C susp.
2013 F-150 Platinum - Twin Turbo 3.5
2018 Mk4 Roadster w/ Coyote - #9365 - Build Thread Delivery 7/3/18, 1st Start 1/4/19, 1st Road Mile 5/5/19, Legal 6/18/19, In Paint 2/25/21, Done (?) 4/2021
-
09-09-2018, 09:12 PM
#643

Originally Posted by
Fixit

Invest the time & materials to make up some upper trunk inside panels. Once carpeted the trunk sidewalls will look like a continuous sheet. I'm doing the Breeze cubby hole conversion, but you'll get the idea from the pics.
BreezeCubby03.jpg BreezeCubby05.jpg
(Is that the "stretchy" speaker box type carpet?)
Great idea to add the inner panels, and yes, the fabric is what you would use to cover a speaker box. I've used it before in an El Camino and like the way you can make it conform to pretty much any shape.
-
09-10-2018, 09:15 AM
#644
Papa,
I think you had mentioned possibly doing the Breeze roll bars. Now would be the time to do that with the body off, much easier. The holes in the body will likely need some adjusting too before paint. Good to see your your fuel issue fixed!
John
John
Gen 3 Coupe #334 received 11/4/21. Coyote, IRS, TKX, Wilwoods
'02 GT donor, 4.6 sohc, Received #5488 on 5/29/06. 3-link, ps, pb. Hoosier Cobra member (Hoosiercobra.com)
-
09-10-2018, 10:14 AM
#645

Originally Posted by
Indy Shu

Papa,
I think you had mentioned possibly doing the Breeze roll bars. Now would be the time to do that with the body off, much easier. The holes in the body will likely need some adjusting too before paint. Good to see your your fuel issue fixed!
John
John,
I have an inquiry in to Breeze about the stainless roll bars. They are currently unavailable due to material costs. We'll see what happens.
Dave
-
09-10-2018, 10:26 PM
#646
Brandon #9196

Just caught up on the build, what was our thinking of going with the sniper over say something like Fitech? Just curious. Glad you got it all worked out, the car is coming along nicely.
-
09-11-2018, 07:56 AM
#647

Originally Posted by
TexasAviator

Just caught up on the build, what was our thinking of going with the sniper over say something like Fitech? Just curious. Glad you got it all worked out, the car is coming along nicely.
Brandon,
The replacement was provided to me as a warranty item by BluePrint.
Dave
-
09-15-2018, 03:56 PM
#648
Today I tackled the rest of the trunk carpeting. It's not perfect, but it turned out good enough that I'm going to go with it. I wasn't sure about carpeting the access covers, but after trying it on the battery cover I think I'll go ahead and do the other two for the fuel tank as well.


As much as I hate doing upholstery work, I also put a new seat bottom cover on my driver's seat in my 2007 F250. The leather was still in great shape, but the vinyl side panel was starting to crack, so I ordered a replacement cover and spent two hours removing the seat from the truck, disassembling the seat (power, heated, lumbar), and replacing the cover. In the process, I shaved a portion of one of my fingers on the razor-sharp metal seat frame. I'm relaxing the rest of the weekend!
-
09-16-2018, 05:32 PM
#649
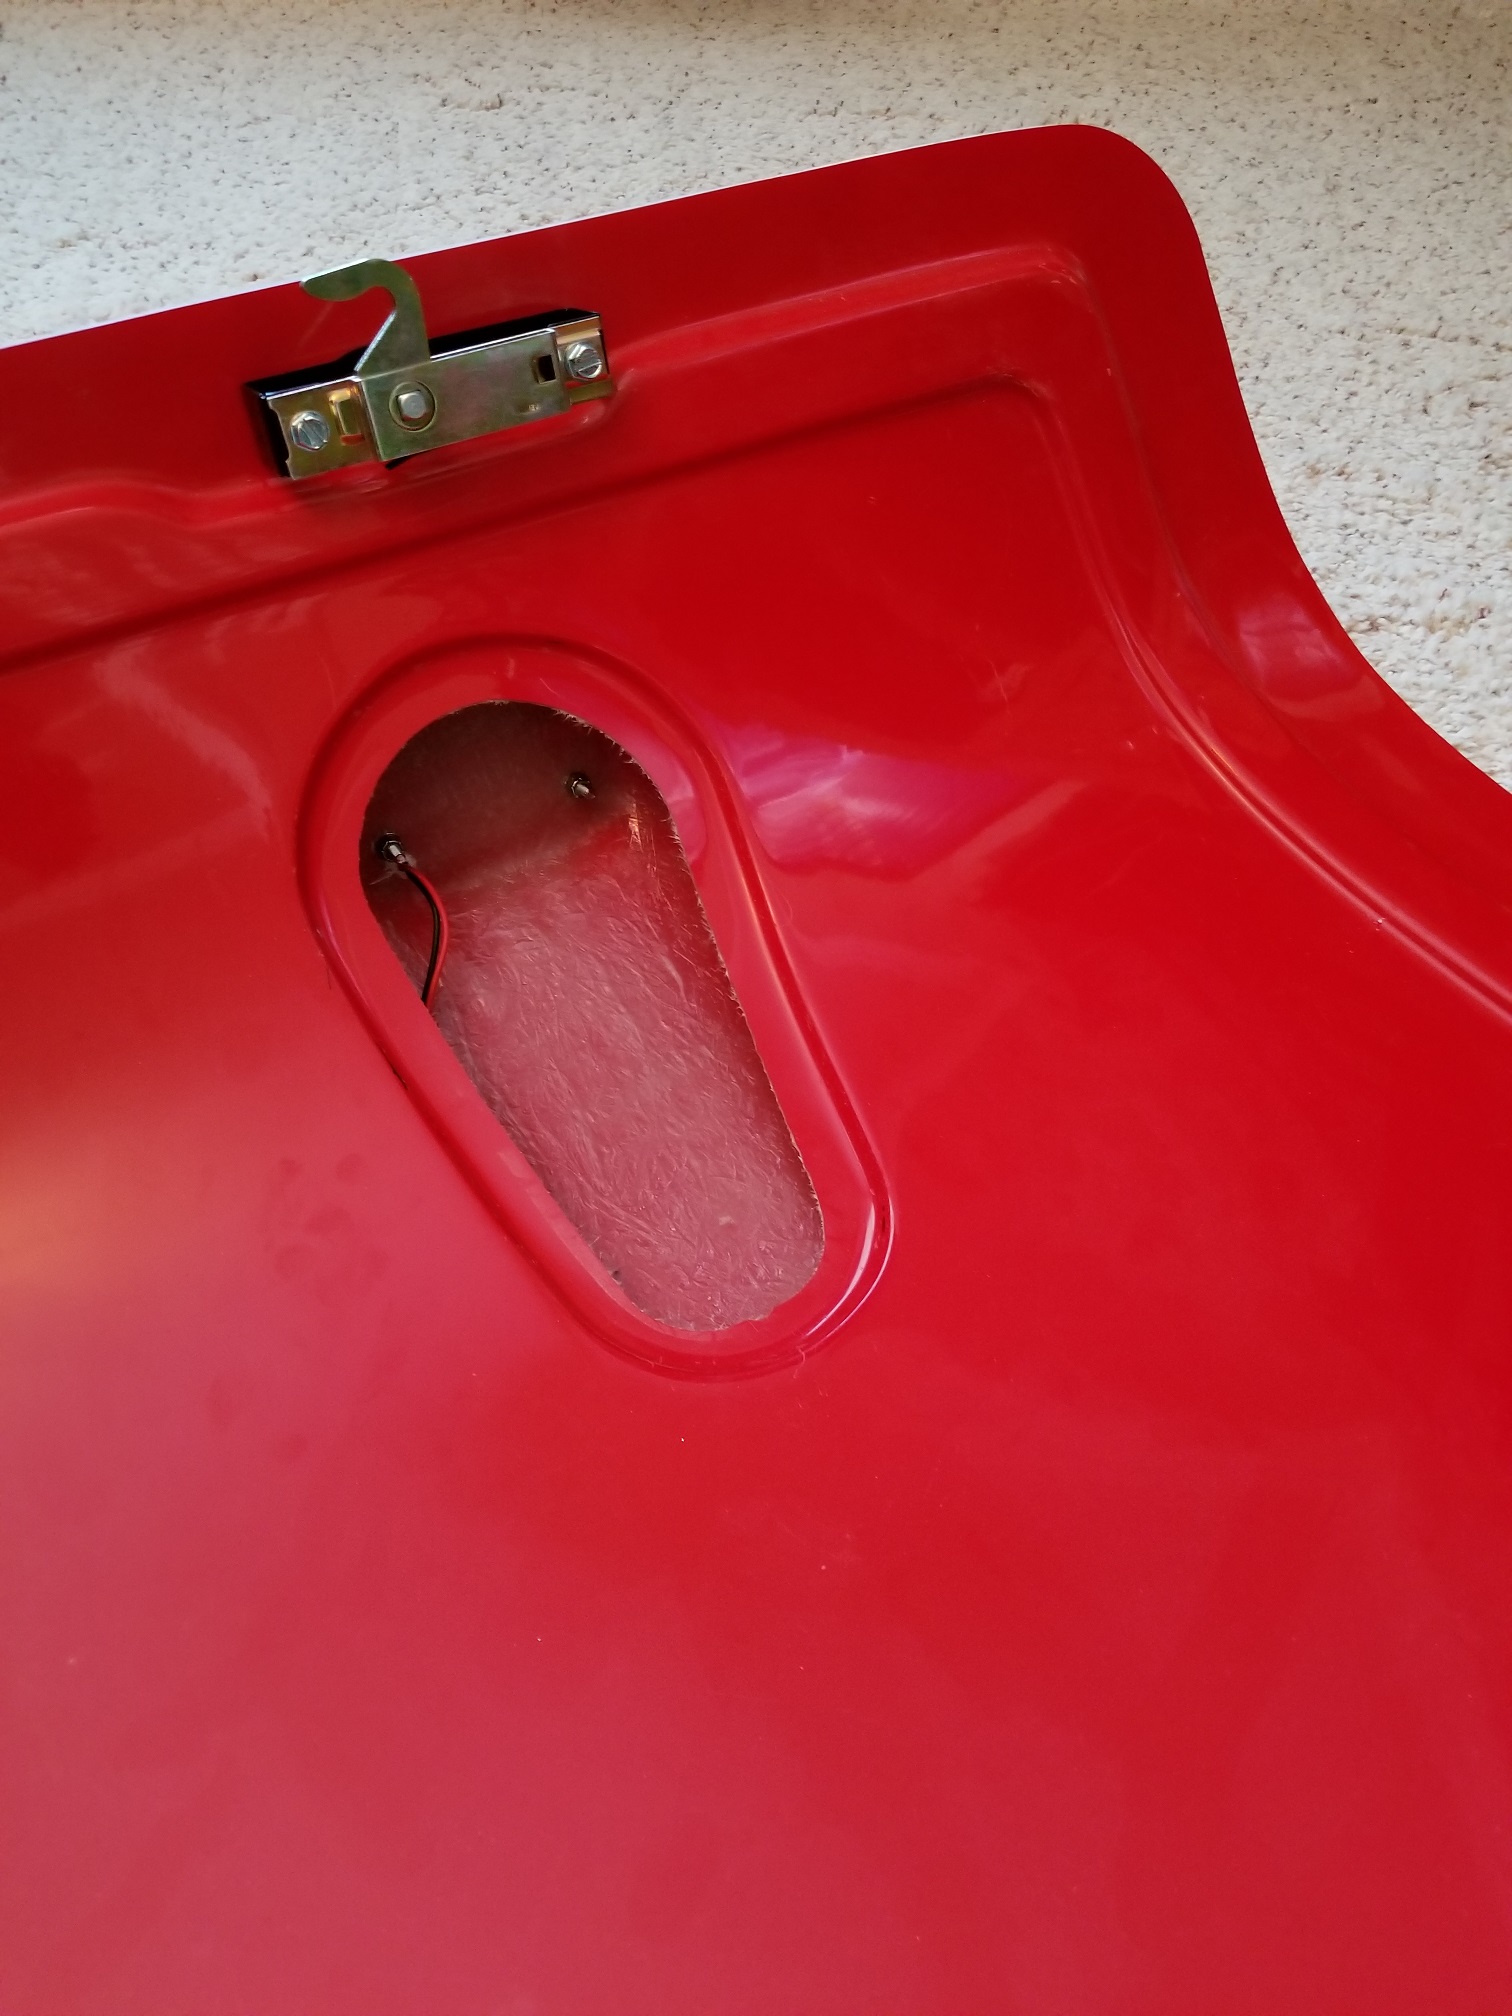
While I'm sitting here watching the Raiders beat up on my Broncos, I decided to work on a task that has been on my list for a while and make a cover for the teardrop opening in the trunk lid.


I have the aluminum rough cut and shaped to fit. After the game I'll go finish the edges up; wife would have a fit if I started filing on a piece of aluminum in my study. I'll be running the wires into the trunk up near the hinge like edwardb's 20th Anniversary build.
-
Post Thanks / Like - 1 Thanks, 0 Likes
-
09-17-2018, 05:40 AM
#650

Steve >> aka: GoDadGo

-
09-17-2018, 06:18 PM
#651

Originally Posted by
GoDadGo

Steve,
It's good to have you back here in full GoDadGo mode!
Dave
-
09-17-2018, 08:30 PM
#652
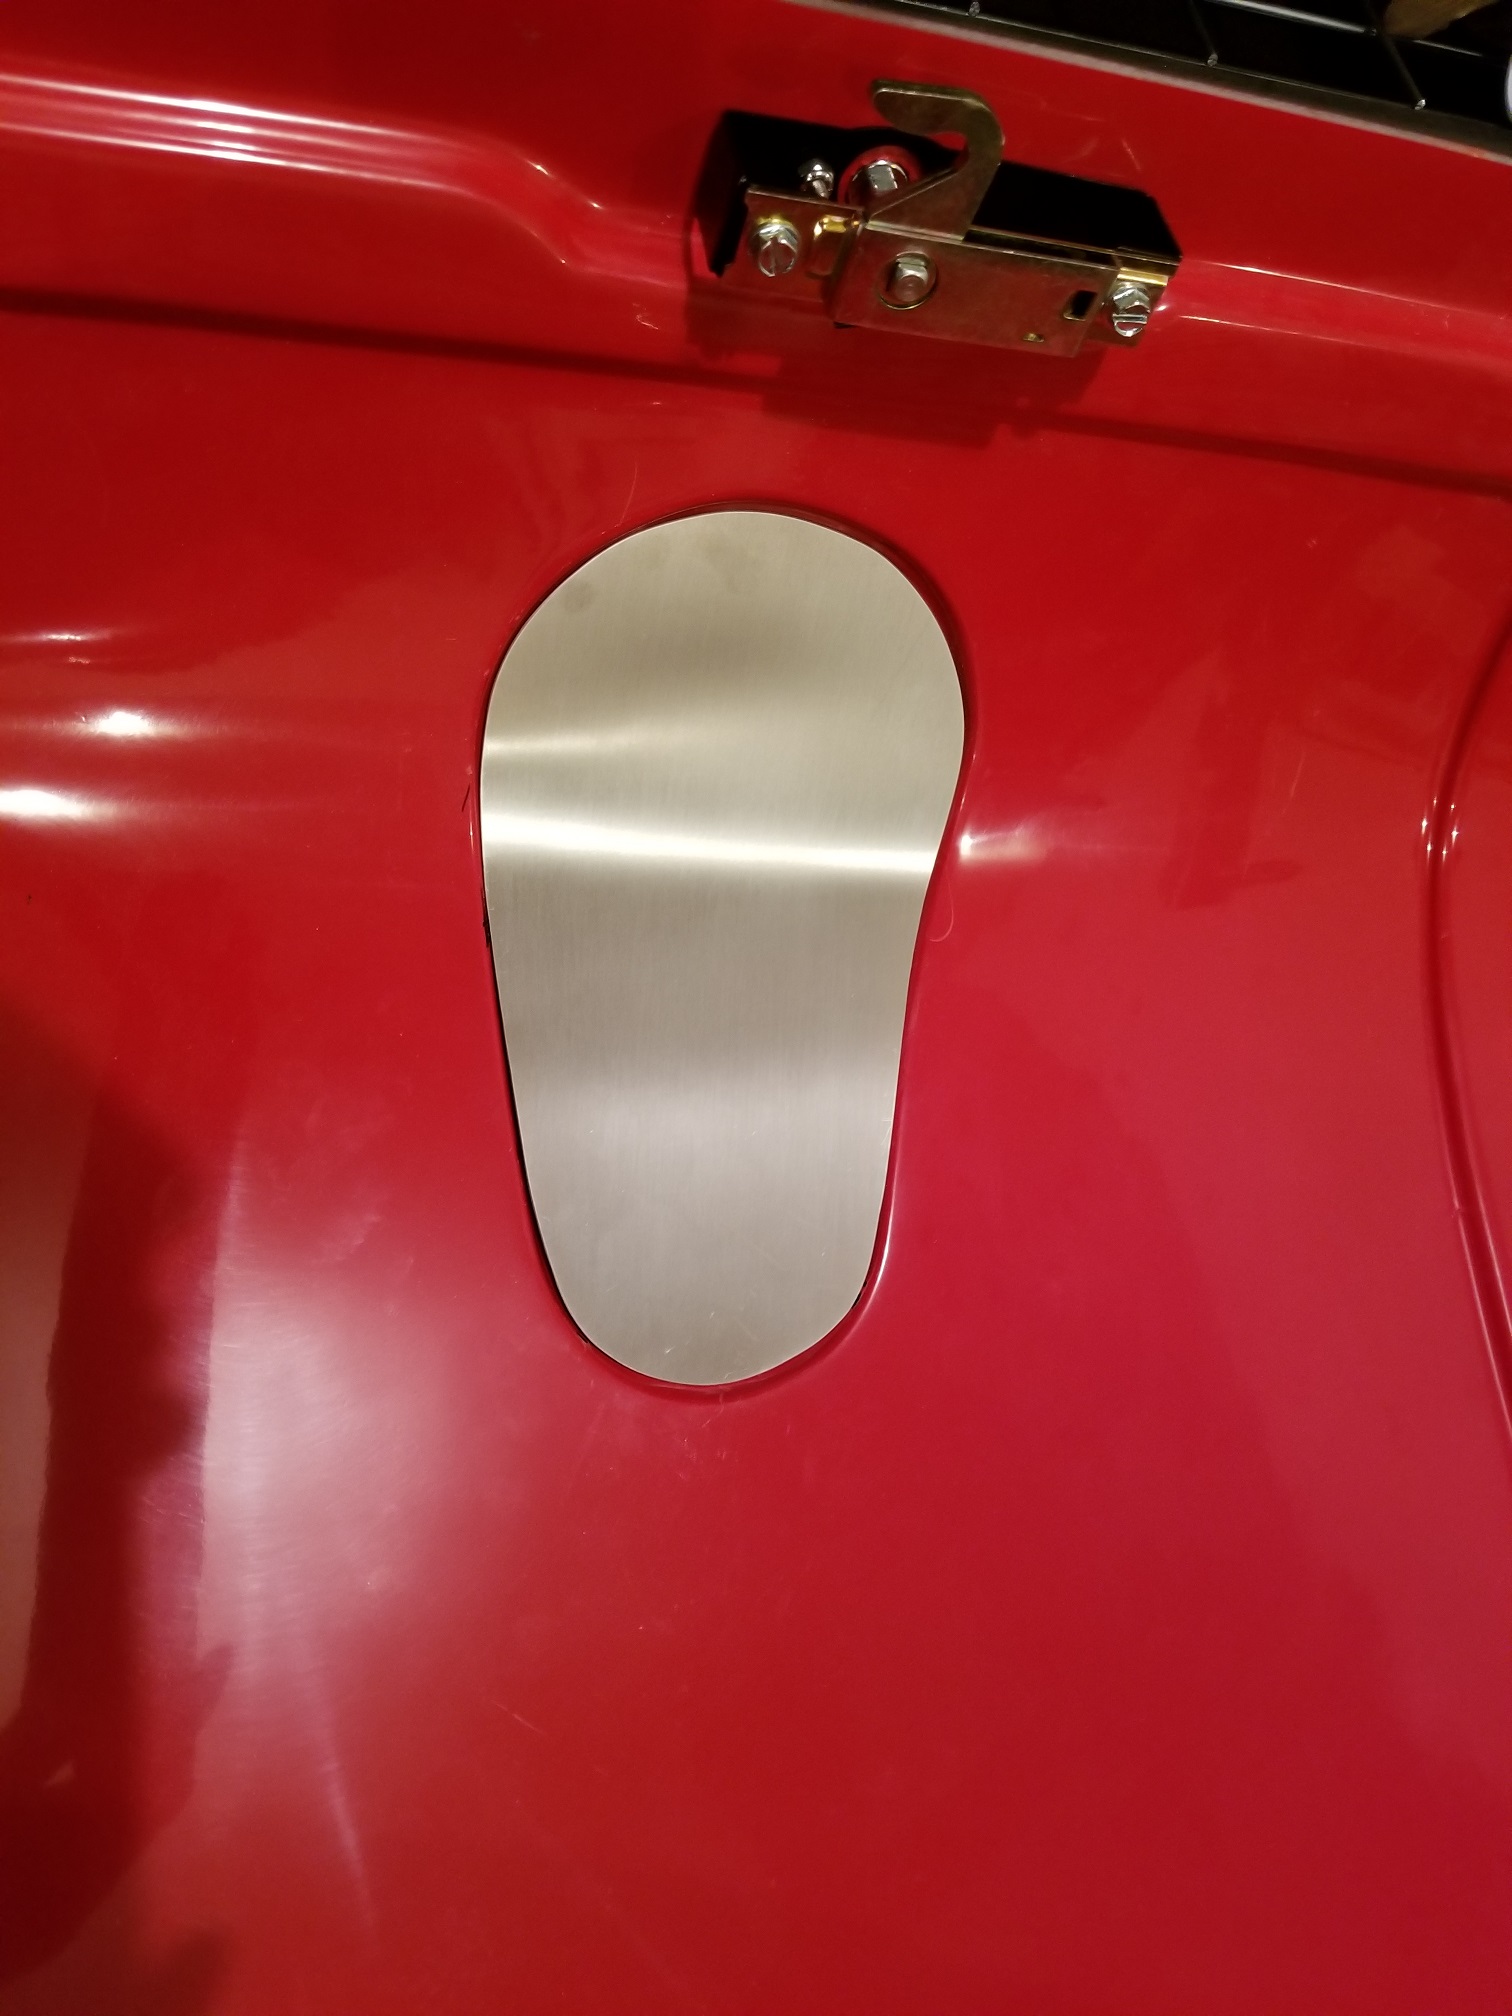
I finished up filing and dressing the cover for the trunk. I think it looks pretty sharp.


-
09-17-2018, 08:41 PM
#653
Senior Member

Looks good Dave, I vote you leave that unpainted as bare aluminum. I think a nice little piece of hand shaped aluminum that you made under there would be cool to see each time you opened it up.
Gen III Type 65 Coupe Delivered 6/26/2018
-
09-17-2018, 09:15 PM
#654

Originally Posted by
Clover

Looks good Dave, I vote you leave that unpainted as bare aluminum. I think a nice little piece of hand shaped aluminum that you made under there would be cool to see each time you opened it up.
Clover,
I'm thinking the same thing. I may just clear it to keep it from smudging and call it good.
Dave
-
09-18-2018, 12:33 AM
#655
Hmm, clearing it would look good, but what about adding a Cobra emblem? :-) https://www.cjponyparts.com/scott-dr...All%20Products
-
09-18-2018, 07:13 AM
#656

Steve >> aka: GoDadGo


Originally Posted by
Papa

Steve,
It's good to have you back here in full GoDadGo mode!
Dave
Thanks Papa Dave!
-
09-18-2018, 08:02 AM
#657

Originally Posted by
stevencj67

I like the concept of embellishing the panel, but maybe doing something with an engraved design?
Dave
Last edited by Papa; 09-18-2018 at 08:17 AM.
-
09-20-2018, 08:05 PM
#658
Senior Member

I'm thinking the same thing. I may just clear it to keep it from smudging and call it good.
I vote for the "less is more".
John D. - Minneapolis 'Burbs
1965 El Camino - LT-1, 4L60e, 4wh discs, SC&C susp.
2013 F-150 Platinum - Twin Turbo 3.5
2018 Mk4 Roadster w/ Coyote - #9365 - Build Thread Delivery 7/3/18, 1st Start 1/4/19, 1st Road Mile 5/5/19, Legal 6/18/19, In Paint 2/25/21, Done (?) 4/2021
-
09-20-2018, 08:14 PM
#659

Originally Posted by
Fixit

I vote for the "less is more".
Yep. After thinking about it I'm staying plain aluminum, but I will countersink the screws to give it more of an aircraft look. I'm laying out the screw pattern right now - going with eight total.
Dave
-
09-21-2018, 05:21 PM
#660
-
09-21-2018, 05:25 PM
#661
Senior Member

John D. - Minneapolis 'Burbs
1965 El Camino - LT-1, 4L60e, 4wh discs, SC&C susp.
2013 F-150 Platinum - Twin Turbo 3.5
2018 Mk4 Roadster w/ Coyote - #9365 - Build Thread Delivery 7/3/18, 1st Start 1/4/19, 1st Road Mile 5/5/19, Legal 6/18/19, In Paint 2/25/21, Done (?) 4/2021
-
09-21-2018, 06:37 PM
#662

Originally Posted by
Papa

Okay, I know my trunk panel isn't the most exciting thing I can be talking about, but here are the final pictures. I drilled and countersank the holes in the panel.

When I attached it to the trunk, all but one screw went in clean. The fiberglass in the flange for the screw at the narrowest portion of the panel (bottom screw in the picture), didn't have anything to bite into.

I'll just use a machine screw in that hole.
Finally, I covered the two fuel tank access covers with carpet and replaced all the screws for the cover plates with black oxide button head screws.

Other than getting the bulb seal on, the trunk is done. I will still need to drill for the back leg of the roll bars, but want to wait until they are permanently installed since I'm using the Tangent hidden bolts and don't know exactly where the tubing will bottom out on the main hoop.
This looks fantastic... great job!!!
-
09-22-2018, 03:25 PM
#663
Dave,
Everything looks fabulous. I finished my trunk panel just as you did and will leave it in natural aluminum. I used #10 nut plates on the underside bonded to the fiberglass with 3M HSRF. Attached with #10 button head machine screws.
Joel
-
09-22-2018, 05:50 PM
#664
-
09-22-2018, 11:59 PM
#665
You are doing such a great job, Papa! It is great to see all the care you have put into each piece. You can be very proud of your creation. I can't wait to see the finished rolling artwork! Keep up the great work and nice documentation. You are truly inspiring others.
-
09-23-2018, 09:02 AM
#666

Originally Posted by
Jazzman

You are doing such a great job, Papa! It is great to see all the care you have put into each piece. You can be very proud of your creation. I can't wait to see the finished rolling artwork! Keep up the great work and nice documentation. You are truly inspiring others.
Thank you. That means a lot. Your build was so far beyond the typical, and I really enjoyed watching yours, too.
Dave
-
09-23-2018, 01:06 PM
#667
I have an afternoon/evening event to attend later today, so just a little time in the shop today. I spent most of it cleaning up all the stuff I had left laying around on my work benches from my previous tasks. I did do one thing on the car. I ran the wires for the license plate light into the trunk lid and installed a Weatherpack connector to allow the trunk to be installed and removed without cutting any wires.


-
Post Thanks / Like - 0 Thanks, 1 Likes
-
09-24-2018, 03:05 PM
#668
Dreaming....


Originally Posted by
Papa

I have an afternoon/evening event to attend later today, so just a little time in the shop today. I spent most of it cleaning up all the stuff I had left laying around on my work benches from my previous tasks. I did do one thing on the car. I ran the wires for the license plate light into the trunk lid and installed a Weatherpack connector to allow the trunk to be installed and removed without cutting any wires.
Where did you get the Weatherpack connectors? Do you need a special tool to make the conncections?
-
09-24-2018, 04:10 PM
#669

Originally Posted by
Duck62

Where did you get the Weatherpack connectors? Do you need a special tool to make the conncections?
I get my connectors from Amazon or eBay in packs of 10 or more pretty cheap. Pay attention to the gauge rating for the plugs you buy and be sure to match them to the circuits you are wiring. You can crimp them without a special crimp tool, but the tool makes perfect connections with ease.
Last edited by Papa; 09-24-2018 at 08:18 PM.
-
Post Thanks / Like - 0 Thanks, 1 Likes
-
09-29-2018, 05:43 PM
#670
I didn't get to work on the car today, but I did spend the day in the garage. I moved my lift to make it easier to get a car on it. Now I can drive straight in with the nose of the car aimed at the corner of the garage. The roadster as well as my daily driver and my wife's SUV are now all able to use the lift. In the narrow configuration my truck is too big, but I can practically sit under it, so no big deal.


-
09-29-2018, 07:57 PM
#671
Dave - Thanks for the pics on the USB Charger. I'll be using it for the same. Must be a great feeling that now that the roadster is just about done and everything is cleaned up and orderly once again. I'm looking forward to that point.
-
09-29-2018, 08:29 PM
#672

Originally Posted by
cv2065

Dave - Thanks for the pics on the USB Charger. I'll be using it for the same. Must be a great feeling that now that the roadster is just about done and everything is cleaned up and orderly once again. I'm looking forward to that point.
I'm glad you liked the USB power point. I had originally planned to include one, but forgot about it. It wasn't until redoing the EFI wiring that I remembered the extra couple of wires I had tucked away. Pretty much all I have left to do is get the carpet in and then put all the weather strip and bulb seals. Once I get the body back on with all that stuff, I'll see if I can get all the splash panels in the wheel wells and work on the radiator aluminum.
-
09-29-2018, 10:13 PM
#673
You keep your work place so nice, me not so much!
-
09-30-2018, 09:46 AM
#674
Dave,
Can you elaborate for me on the type of carpet you used in your trunk? It looks really good, did you glue it in?
Mark
-
09-30-2018, 10:18 AM
#675
Senior Member


Originally Posted by
Mark Eaton

Dave,
Can you elaborate for me on the type of carpet you used in your trunk? It looks really good, did you glue it in?
Mark
Post #643 mentions the type of carpet, I didn't see a mention of how it was glued down......spray adhesive?...
MK4 #11173 picked up 01/20/25
MK4 #11012 picked up 04/16/24
MK4 #10616 picked up 4/10/23 SOLD
MK4 #9759 picked up 4/3/19 SOLD
-
09-30-2018, 11:41 AM
#676

Originally Posted by
HiggyMK4#????

Post #643 mentions the type of carpet, I didn't see a mention of how it was glued down......spray adhesive?...
I used 3M 77. It works really well and isn't so strong that you can't pull the material off down the road if you need to.
-
09-30-2018, 11:48 AM
#677

Originally Posted by
Mark Eaton

Dave,
Can you elaborate for me on the type of carpet you used in your trunk? It looks really good, did you glue it in?
Mark
Here is what I bought: https://www.hifisoundconnection.com/...id/0/SFV/30046
Super easy to work with and not expensive if you happen to make a mistake. I used 3M 77 spray adhesive to glue it in.
-
10-01-2018, 07:03 AM
#678
Thanks for the detailed thread! Keep up the good work!
-
10-03-2018, 09:41 AM
#679
After moving the lift, I tested it out on my wife's SUV. It is so much better now that I can just drive directly in without the 20-point turn.

I'll get the roadster back up on it soon to install a driveline safety hoop.
-
10-03-2018, 10:24 AM
#680
Not a waxer

Change of direction here but I'm envious of your bolt bins! I had a semi organized setup at the old place but when we moved and I built the new shop that kind of went all to hell and it's sort of like a Fastenall store exploded 
Cheers,
Jeff
-
Post Thanks / Like - 0 Thanks, 1 Likes


 Thanks:
  Likes:


 Reply With Quote


