-
01-26-2019, 09:00 PM
#521
Your updates are fantastic. Thank you for taking the time to document the build. It is very helpful.
-
Post Thanks / Like - 1 Thanks, 0 Likes
-
01-26-2019, 09:20 PM
#522
Senior Member


Originally Posted by
GoDadGo

The more work you do on this car, the less likely I feel like I'll ever tackle one.
Great Work As Always & I'm Sure It Will Be A Show Stopper!
Steve
Hey Steve. I must be doing something wrong.  Not that hard really. Actually I don't think any harder than the Roadster. Just more to do if you option it out and overcomplicate it like I tend to do. I enjoy trying new things and learning with each build. Stay inside the lines a little more and you wouldn't have any trouble. Not that you would anyway.
Build 1: Mk3 Roadster #5125. Sold 11/08/2014.
Build 2: Mk4 Roadster #7750. Sold 04/10/2017.
Build Thread
Build 3: Mk4 Roadster 20th Anniversary #8674. Sold 09/07/2020.
Build Thread and
Video.
Build 4: Gen 3 Type 65 Coupe #59. Gen 3 Coyote. Legal 03/04/2020.
Build Thread and
Video
Build 5: 35 Hot Rod Truck #138. LS3 and 4L65E auto. Rcvd 01/05/2021. Legal 04/20/2023.
Build Thread. Sold 11/9/2023.
-
01-27-2019, 07:16 AM
#523
Senior Member

Great update Paul. Looking good. Interesting about the PCM having to go back again.
MK4 #8900 - complete kit - Coyote, TKO600, IRS - Delivered 6/28/16 First Start 10/6/16 Go cart - 10/16/16 Build completed - 4/26/17 - 302 days to build my 302 CI Coyote Cobra - Registered and street legal 5/17/17
Build Thread
http://thefactoryfiveforum.com/showt...e-build-thread
PHIL 4:13 INSTAGRAM - @scottsrides
-
Post Thanks / Like - 1 Thanks, 0 Likes
-
01-29-2019, 10:13 AM
#524
Senior Member
Couple Steps Back
Mentioned in the last update that my KRC PS pump is leaking a bit at the pulley shaft seal. Yesterday removed it and purged all the lines and will get it shipped today. Was harder to remove than it was to install when the engine was sitting uninstalled on the stand, that’s for sure. But no big deal. They’ve been great so far and said it would be repaired or replaced under warranty. At KRC’s suggestion, I’m going to switch to their PS fluid instead of the Honda fluid I’ve used in the past. Nothing else to say about that until it’s back. Not holding up a thing at this point.
With that done, was wrapping up some details in the cockpit and planning to permanently attach the fixed top portion of the footboxes. Note there’s nothing in the instructions about making the top of the footboxes removeable. But with the evaporator and related under the PS, and the master cylinders, wiring, etc. under the DS, highly recommend it. Early on, I decided to split the top covers and make the back part that’s under the body cowl fixed, and the front part removable. Like this, early in the build before powder coat.

While getting things together to rivet the pieces on, noticed a telltale drop of fluid on the floor of the DS footbox. Closer check confirmed brake fluid. Ugh. With a little bit of checking, could see the boot on the front master cylinder (.75 diameter) was wet. Ugh again. Pulled the boot back and it was full of brake fluid. Great. Have to get that fixed, obviously, so out came the master cylinder. Could have done it of course with the fixed portion of the top cover installed. But easier now. I love building things the first time. Not so much tearing things back apart and fixing. Especially with my arch-nemesis brake fluid, brake bleeding, etc. But kept things reasonably neat and it’s out. Fluid was clearly leaking out the front into the boot. It’s all held to together with a single snap ring, so decided to take it apart and see if anything was obviously wrong. Short answer, no. Looks brand new. Which it basically is. As far as I can tell, the front seal apparently failed, was damaged during assembly (even though I can’t see anything), or who knows what else. Maybe either Wilwood or Factory Five would replace it. But it has been over a year and they’re on each coast. The Wilwood part number of the kit including the master cylinder is 260-10372. Little over $80 at Summit. Upon review, they sell a repair kit, 260-10514, that includes literally every single piece except the master cylinder housing itself. The seals themselves, the likely culprit, are already assembled onto the provided new piston, so seems like it would be hard to mess anything up. Without any damage or wear that I can see to the bore of the cylinder, at $24 seems the way to go. So, have it on the way.

I’ll try to make some progress in other areas without taking any more steps back. Crazy cold here now, like much of the country I guess, and just received our largest snow of the season yesterday. But shop stays warm enough so onward.
Last edited by edwardb; 01-29-2019 at 10:16 AM.
Build 1: Mk3 Roadster #5125. Sold 11/08/2014.
Build 2: Mk4 Roadster #7750. Sold 04/10/2017.
Build Thread
Build 3: Mk4 Roadster 20th Anniversary #8674. Sold 09/07/2020.
Build Thread and
Video.
Build 4: Gen 3 Type 65 Coupe #59. Gen 3 Coyote. Legal 03/04/2020.
Build Thread and
Video
Build 5: 35 Hot Rod Truck #138. LS3 and 4L65E auto. Rcvd 01/05/2021. Legal 04/20/2023.
Build Thread. Sold 11/9/2023.
-
01-29-2019, 10:39 AM
#525
Not a waxer

Well darn, none of that is any fun but I guess you have to look for a silver lining and at least be somewhat grateful that the PCM, PS pump and master cylinder issues are all happening simultaneously rather than one after the other. Step away, stay warm and re-energize while you wait for the parts to arrive 
Cheers,
Jeff
-
Post Thanks / Like - 1 Thanks, 0 Likes
-
01-29-2019, 11:52 AM
#526
Top Notch Builder

I'd like to to see if Factory Five or Wilwood would back this up. I would expect that they would. This is clearly a manufacturers defect or workmanship issue. Even if it wasn't expressly in the warranty I'd imagine from a customer service standpoint they would back it up. I had a conversation with Sally about this exact type of scenario a month ago. Factory Five builds are akin to high end hot rods in that they take years to complete. Asking them to warranty it after 10 years might be unreasonable, but you've kept a steady clip going and your efforts show. I think you should hit them up.
-
01-29-2019, 12:46 PM
#527
Senior Member
Originally Posted by
P100DHG
I'd like to to see if Factory Five or Wilwood would back this up. I would expect that they would. This is clearly a manufacturers defect or workmanship issue. Even if it wasn't expressly in the warranty I'd imagine from a customer service standpoint they would back it up. I had a conversation with Sally about this exact type of scenario a month ago. Factory Five builds are akin to high end hot rods in that they take years to complete. Asking them to warranty it after 10 years might be unreasonable, but you've kept a steady clip going and your efforts show. I think you should hit them up.
I hear you. Nothing I said is meant to be negative towards Factory Five or Wilwood. Stuff like this happens, and I suspect Factory Five would have replaced the MC had I asked. My experience with their customer service has always been top notch. Coincidentally, I asked a couple technical questions earlier in the day yesterday and received a quick and professional response. Before discovering the MC issue last night. I've never been accused of being particularly patient. After looking at the repair kit last night, hit the order button and moved on. Decided it would be easier anyway because I don't have to mess with the adapter fitting or cut the pushrod again. It's already on the way and will be here in the morning. I needed some other stuff from Summit anyway.
Last edited by edwardb; 01-29-2019 at 12:51 PM.
Build 1: Mk3 Roadster #5125. Sold 11/08/2014.
Build 2: Mk4 Roadster #7750. Sold 04/10/2017.
Build Thread
Build 3: Mk4 Roadster 20th Anniversary #8674. Sold 09/07/2020.
Build Thread and
Video.
Build 4: Gen 3 Type 65 Coupe #59. Gen 3 Coyote. Legal 03/04/2020.
Build Thread and
Video
Build 5: 35 Hot Rod Truck #138. LS3 and 4L65E auto. Rcvd 01/05/2021. Legal 04/20/2023.
Build Thread. Sold 11/9/2023.
-
02-03-2019, 12:27 PM
#528
Paul, everything you do is just amazing...
-
Post Thanks / Like - 1 Thanks, 0 Likes
-
02-03-2019, 05:18 PM
#529
Senior Member

Too bad about the MC... but a rebuild kit seems to be the way to go.
A couple of tips for reassembly from a guy who has rebuilt more than a few MC's and wheel cylinders:
- Check the edge of the bore. Many times there is a slight burr that gets missed after machining. This will instantly wreck the lip on the piston seals. If you can snag your fingernail on it, it needs attention.
- All parts need to be super-extra clean
- Use only brake fluid as an assembly lube
- No tools sliding the piston in, just fingers working the seal lip in the hole.
John D. - Minneapolis 'Burbs
1965 El Camino - LT-1, 4L60e, 4wh discs, SC&C susp.
2013 F-150 Platinum - Twin Turbo 3.5
2018 Mk4 Roadster w/ Coyote - #9365 - Build Thread Delivery 7/3/18, 1st Start 1/4/19, 1st Road Mile 5/5/19, Legal 6/18/19, In Paint 2/25/21, Done (?) 4/2021
-
02-03-2019, 06:33 PM
#530
Senior Member
Originally Posted by
Fixit
Too bad about the MC... but a rebuild kit seems to be the way to go.
A couple of tips for reassembly from a guy who has rebuilt more than a few MC's and wheel cylinders:
- Check the edge of the bore. Many times there is a slight burr that gets missed after machining. This will instantly wreck the lip on the piston seals. If you can snag your fingernail on it, it needs attention.
- All parts need to be super-extra clean
- Use only brake fluid as an assembly lube
- No tools sliding the piston in, just fingers working the seal lip in the hole.
Thanks for the tips. The MC is all back together couple days ago, installed in the build, bled, and working as it should with no signs of leaking. Obviously I'll keep an eye on it, but I'm optimistic it's fixed. Have done this before too, so did what you described. I cleaned the housing thoroughly, and examined it very carefully including under low magnification. Looked absolutely perfect with not a mark, scratch, or burr anywhere. The rebuild kit contained literally every part except the housing itself. The piston had the front and rear seals already installed. After looking those pieces over carefully and making sure they were clean, assembled with brake fluid and installed the c-clip. I did use the old pushrod since it was already shortened as is typically necessary. Everything else was the new parts. Installation and bleeding was uneventful with a hard pedal and all working as it should.
I spent some time looking at the old parts, focusing on the rear seal on the piston since that was the likely culprit for the leak. The outer surface of the seal, where it contacts the bore of the MC looked fine including a close up view with a jewelers loupe. I removed the seal from the piston and again under very close review did find an area on one of the inside diameter surfaces about 3/8-inch long that was rough with a slight amount of material missing. Like it didn't quite fill the mold when made. Tried to take a picture, but using my iPhone like all the other pictures I've posted, not easy to see. Not an expert on such things (to say the least) but looks like this surface would be providing the seal against the groove in the piston. The rear seal wouldn't have high pressure like the front one, but clearly would have fluid against it as the piston is returning to the rest position against the c-clip. So if not sealing properly, would expect some seepage like I experienced. At this point, I'm thinking this was the problem. Assuming I don't see any more leaks, case closed for me.
Last edited by edwardb; 06-27-2020 at 05:23 AM.
Build 1: Mk3 Roadster #5125. Sold 11/08/2014.
Build 2: Mk4 Roadster #7750. Sold 04/10/2017.
Build Thread
Build 3: Mk4 Roadster 20th Anniversary #8674. Sold 09/07/2020.
Build Thread and
Video.
Build 4: Gen 3 Type 65 Coupe #59. Gen 3 Coyote. Legal 03/04/2020.
Build Thread and
Video
Build 5: 35 Hot Rod Truck #138. LS3 and 4L65E auto. Rcvd 01/05/2021. Legal 04/20/2023.
Build Thread. Sold 11/9/2023.
-
02-03-2019, 07:55 PM
#531
Senior Member
It's always a good feeling when you've discovered the fault... not just "throw parts at it".
John D. - Minneapolis 'Burbs
1965 El Camino - LT-1, 4L60e, 4wh discs, SC&C susp.
2013 F-150 Platinum - Twin Turbo 3.5
2018 Mk4 Roadster w/ Coyote - #9365 - Build Thread Delivery 7/3/18, 1st Start 1/4/19, 1st Road Mile 5/5/19, Legal 6/18/19, In Paint 2/25/21, Done (?) 4/2021
-
02-04-2019, 02:19 PM
#532
Senior Member

https://thefactoryfiveforum.com/show...=Brake+problem
Sounds like a similar issue. Any chance Wilwood is outsourcing off shore?
Last edited by Dave Howard; 02-04-2019 at 02:24 PM.
MkIV #7854, Kit picked up September 2012, Coyote/BOSS 302 intake tuned at 488HP, TKO600, Center Force, Moser 8.8, driveshaft safety hoop, Stainless Header 4x1x4 headers, Gas-N-sidepipes, rad shroud, Wilwoods, NO PS/PB, heater/defroster, heated seats, wipers, Herb door panels, Dynamat Extreme sound/heat dampening, premium Rodtop top, Fast Freddie lexan wind screen, Nitto 555R, drop trunk battery, drop trunk storage,
-
02-04-2019, 02:35 PM
#533
Senior Member
Originally Posted by
Dave Howard
Hard to say. I remember that thread. Was kind of all over the place, but started with the pedal going to the floor. Mine never did that. Just leaked enough to fill the boot over a period of several months. No real fix was identified in that thread other than the MC was replaced. I'm not aware of any outsourcing by Wilwood, but then I'm not in a position to know either. 99% certain my issue was a short shot on the rear seal when it was molded, as I described. Not excusing it because Wilwood is supposed to be a premium brand. But stuff like that happens.
Build 1: Mk3 Roadster #5125. Sold 11/08/2014.
Build 2: Mk4 Roadster #7750. Sold 04/10/2017.
Build Thread
Build 3: Mk4 Roadster 20th Anniversary #8674. Sold 09/07/2020.
Build Thread and
Video.
Build 4: Gen 3 Type 65 Coupe #59. Gen 3 Coyote. Legal 03/04/2020.
Build Thread and
Video
Build 5: 35 Hot Rod Truck #138. LS3 and 4L65E auto. Rcvd 01/05/2021. Legal 04/20/2023.
Build Thread. Sold 11/9/2023.
-
02-04-2019, 02:57 PM
#534
Not a waxer
Originally Posted by
edwardb
...But stuff like that happens.
Yes it does...and it's really inconvenient when it happens during a 3 day build at the SEMA show  Tried to rob one from a display at the Wilwood booth but no luck so had to do a FedEx overnight.
Jeff
-
02-06-2019, 06:45 AM
#535
Senior Member
Originally Posted by
edwardb
But stuff like that happens.
Maybe on a 1972 Ford Pinto. But in this "Make it Great Again " era, I would expect better quality from a company like Wilwood. It would be interesting to hear if anyone else has has a new master cylinder failure.
MkIV #7854, Kit picked up September 2012, Coyote/BOSS 302 intake tuned at 488HP, TKO600, Center Force, Moser 8.8, driveshaft safety hoop, Stainless Header 4x1x4 headers, Gas-N-sidepipes, rad shroud, Wilwoods, NO PS/PB, heater/defroster, heated seats, wipers, Herb door panels, Dynamat Extreme sound/heat dampening, premium Rodtop top, Fast Freddie lexan wind screen, Nitto 555R, drop trunk battery, drop trunk storage,
-
Post Thanks / Like - 0 Thanks, 1 Likes
-
02-06-2019, 09:27 PM
#536
Senior Member
Originally Posted by
Dave Howard
Maybe on a 1972 Ford Pinto. But in this "Make it Great Again" era, I would expect better quality from a company like Wilwood. It would be interesting to hear if anyone else has has a new master cylinder failure.
You get the last word. Feel free to start a new thread if you want to discuss Wilwood further. Now back to the build thread.
Build 1: Mk3 Roadster #5125. Sold 11/08/2014.
Build 2: Mk4 Roadster #7750. Sold 04/10/2017.
Build Thread
Build 3: Mk4 Roadster 20th Anniversary #8674. Sold 09/07/2020.
Build Thread and
Video.
Build 4: Gen 3 Type 65 Coupe #59. Gen 3 Coyote. Legal 03/04/2020.
Build Thread and
Video
Build 5: 35 Hot Rod Truck #138. LS3 and 4L65E auto. Rcvd 01/05/2021. Legal 04/20/2023.
Build Thread. Sold 11/9/2023.
-
02-06-2019, 09:29 PM
#537
Senior Member
Wiring Done, Interior Nearly Done, Body is Next
It’s been a busy week bouncing around finishing up two pages of details prior to starting body fitting. I promise I won’t go through every detail! So far the front master cylinder fix described before is holding. No signs of any leaks. Had a nice talk with the folks at KRC about my power steering pump. They ran it through a series of tests, and it passed with no signs of leaking at the pulley bearing seal. However they did find it was leaking at the top (return) hose connection and explained this was running down and appearing like it was coming from the pulley bearing area. Seems the -6AN male connection on the tank was cross threaded, and likely the connector from my hose wasn’t make a good seal. So mark that one down to user screw-up. They chased the threads and said their connector went on OK and it passed tests without leaking. Received it back today. Quick service and turnaround. I’m impressed. Installed it today, filled with fluid and tested. Needless to say, I was very careful attaching that top hose this time. Best I can tell after extensive running, no leaks. I switched to KRC PS fluid at their recommendation.
Finished the wiring in the cockpit and engine compartment. Now the only thing left really are the lights once the body is installed and put a connector on the wiper wiring when it’s installed. I have the washer bottle mounted and wired. Footwell courtesy lights wired. Tied down all the loose cables and made the last holes through the firewall. Installed the fixed panel on the passenger side footbox. I’m going to wait on the drivers side just a little longer. Installed the drain hoses for the evaporator in the passenger side footbox. Most of the time spent was installing all the hoses for the heat/A-C. I tried multiple arrangements and finally came up with one that fit. In hindsight, I was greedy adding the two center dash louvers plus the glovebox. If I hadn’t installed the wiring the way I did, minimized and tied back as much as possible, never would have fit all those hoses in there. As it was, just made it. There are two outlets on the evaporator. I have the passenger side dash louver and both defrosters on one. The two center and driver’s side dash vent on the other. Wasn't my original plan. But with everything else going on behind the dash, the only combination I could make work. There are no valves anywhere in the system. It’s a simple and basic setup as I’ve described before. But the style louvers provided in the kit, plus I bought two more that matched, https://www.summitracing.com/parts/vta-499193, easily flip open and closed. So this provides a low tech way to control things a little.
With that, completely assembled everything in the cockpit for final checkout and prepared for body fitting. Once I confirm the fit of the instrument panel front to the body, I’ll remove it and the transmission tunnel covers and get them to the interior shop for covering. I’d do them myself, but I want some red stitching to go along with the stitching in the seats. No way for me to do that myself. Just an aside comment FWIW: I’m very happy with how the dash and related turned out. I’m anxious to see the final look with the covering and stitching. But just a warning. Between the wiring, the heat/A-C hoses, my custom switch panel, the glovebox, my desire to have the fasteners all hidden, plus putting the gauge panel behind the dash instead of on the front, it’s labor intensive! A lot of time was spent figuring it out, and while it will come apart in the future if necessary, I really hope it won’t be. If I had to do it over again, I’d probably put the gauge panel on the outside and use the kit provided brow piece. That would eliminate a lot of complexity. I don’t regret what I did. But for those following who might think how I did it is a good idea, that’s fine. Just be prepared to spend way more time. This is a big example of how a 200+ hour kit build turns into much more than that. I have a new appreciation for those who really color outside the lines and completely re-design the dash.
For some pictures, last ones of the cockpit wiring I promise. This is 100% done. You may notice the knobs are missing from my control panel. They’re at Watson’s Streetworks getting icons laser etched into them. I just approved the artwork. Will be a nice touch. Sorry about the bad lighting. It was a sunny day and streaming through the window. For winter in Michigan, it’s a nice change and I’m not complaining.


This is how I installed the drain hoses for the evaporator. I tucked them in a little more than what Factory Five shows in their instructions.

Finally, several pictures of the now complete cockpit, minus wrap and stitching and the glovebox door. I know I've posted pictures similar to this before. But now it's alive and everything works.


One more small thing to do (assuming nothing else leaks!) and then body fitting starts. That should be in my next update.
Last edited by edwardb; 02-06-2019 at 11:21 PM.
Build 1: Mk3 Roadster #5125. Sold 11/08/2014.
Build 2: Mk4 Roadster #7750. Sold 04/10/2017.
Build Thread
Build 3: Mk4 Roadster 20th Anniversary #8674. Sold 09/07/2020.
Build Thread and
Video.
Build 4: Gen 3 Type 65 Coupe #59. Gen 3 Coyote. Legal 03/04/2020.
Build Thread and
Video
Build 5: 35 Hot Rod Truck #138. LS3 and 4L65E auto. Rcvd 01/05/2021. Legal 04/20/2023.
Build Thread. Sold 11/9/2023.
-
Post Thanks / Like - 0 Thanks, 3 Likes
-
02-06-2019, 09:44 PM
#538
She's looking great, Paul. I can't wait to see the body go on!
Dave
-
Post Thanks / Like - 0 Thanks, 1 Likes
-
02-07-2019, 08:01 AM
#539
Senior Member

CVOBill
MK2 #???? Delivered 11/2002, Finished and Titled 6/2003 5.0, T-5, 4-Link, Sold 3/2005
Hot Rod #304 purchased 5/28/2017 from original owner Unassembled . Titled and plated 8/24/2017 Coyote,
TKO, 3-Link, Heat, A/C, Electric Power Steering, Convertible top
MK4 #9524 Picked up 1/18/19 306 Blueprint, T-5, 4-Link, Gas-N Pipes, Heater
-
Post Thanks / Like - 0 Thanks, 1 Likes
-
02-07-2019, 08:38 AM
#540
Senior Member

MK4#? Ordered 11/30/24
MK4 #11012 picked up 04/16/24
MK4 #10616 picked up 4/10/23 SOLD
MK4 #9759 picked up 4/3/19 SOLD
-
Post Thanks / Like - 0 Thanks, 1 Likes
-
02-07-2019, 05:41 PM
#541
Senior Member

Great job as always. Man you take that over to Vanguard Motors when you are done they'll sell it for 200k I'm sure, after seeing what they want for that SEMA build LOL. That guy had some interesting comments to say the least. You are doing a awesome job of posting details just like your other builds.
MKIV #9122 Ordered kit 5/24/17 received kit 8/11/17 MK4 Base kit +,First Start 4/7/18, First Go-Cart 4/22/18, In gelcoat, licensed and driving 8/11/18. Coyote gen2, T-56, 2015 IRS 3.31, 17" Halibrand replicas w/Nitto NT555 G2, Withby Motorcars power brake kit W/Wilwood pedals, 04 Cobra front brakes, 15 Mustang rear brakes with mods, power steering. Paint Jeff Miller Da Bat, Lexus Spectra Blue Mica W/Toyota Silver Sky Metallic strips. Build thread:
http://thefactoryfiveforum.com/showt...Paul2STL-Build
-
Post Thanks / Like - 0 Thanks, 1 Likes
-
02-07-2019, 06:14 PM
#542
Senior Member

Gen3 Coupe - SOLD Arrival:
6/21/18 SOLD: 4/12/2019
Current Vehicle: 2014 SRT Viper (modded to the moon), 2022 TRX, 2022 RS6, E46 LS3 M3
Current Projects: Superlite/RCR GTR ***FOR SALE***
@madd_wrapps on IG or
www.maddwrapps.com
-
Post Thanks / Like - 0 Thanks, 1 Likes
-
02-07-2019, 07:57 PM
#543
Top Notch Builder
Love the glove box. Carries the dash over to the passenger side and really helps out that blank space. Beautiful.
-
Post Thanks / Like - 0 Thanks, 1 Likes
-
02-09-2019, 11:53 AM
#544
Senior Member

Paul, As my 20th Ann Roadster is still with the painter, I had to some time to read through your build post. Your quality and attention to detail is really first rate. You're 20th Ann build thread was a massive help with my current build... This will only inspire me to think about another! Congrats and Thanks again.
-
Post Thanks / Like - 0 Thanks, 1 Likes
-
02-12-2019, 11:44 PM
#545
Senior Member
Initial Alignment
I said the next update would be with the body on. I guess I lied. Decided before I did that to complete my first alignment. Although not as much the case with the Coupe as it is for the Roadster, easier to do the alignment with the body off versus on. At least the first time when large adjustments are typically needed. Plus doing the alignment helps to make sure the wheels are sitting in the wheel openings properly. First up was taking it off the lift and having on the ground for basically the first time. Ran the engine and drove it back and forth in the garage several times. Probably 8 feet or so each way. Engine is running good. Nothing leaking (finally). The Tilton HRB feels great. Nice smooth and predictable clutch release. Brakes work. T-56 shifts easily. All good, so feeling happy about that. With solid ice and snow outside, and still plenty of winter to go no matter what the groundhog says, does this qualify as my go-kart drive? I’m guessing not.
As an aside comment, also have some motivation to move things around. Ford Performance asked if they could display my Roadster in their booth at the Detroit Autorama in a couple weeks. I had it at Autorama two years ago right after it was finished. But wasn’t planning to go again until the Coupe is done. But it’s a nice opportunity and nothing to do other than show up with the car. No display to set up, carpet, stanchions, etc. So need to get it detailed a bit plus will take the chance to do winter maintenance. Plus we're planning to go to the Texas show in April, so need to be ready for that too. Haven’t touched it since it was parked at the end of the driving season. So put the Roadster up on the lift and moved the Coupe over one bay. Plus got the back half of the body out of where I was storing it and completed final prep prior to fitting.

First up for the alignment was ride height. The instruction manual says to start with 4-1/2 inches front and back. That strikes me as high and I already know from a little mocking up that leaves a fairly large gap between the top of the wheels and the body. After some experimentation, I’m starting at a little over 3-1/2 in the front and 4 in the back. See how that looks with the body on plus will watch how much it settles. Easy enough to adjust further as needed. Looks low and sinister now.

Next up was the actual alignment. I’ve been doing my own alignments since my first build. My go-to tool was mainly my SPC Performance FasTrax camber caster gauge. Used strings for my first alignment and then later added Heidts TA-003 alignment plates. Used a couple layers of trash bags for turns plates. Several months ago, decided to sell the FasTrax and picked up a Longacre 78298 caster camber gauge. It’s digital and all around a much more substantial tool. Comes with a hard case as well. While shopping for that, saw the Longacre 78318 chassis height checker, and decided I needed that too. Beats the wood blocks I’ve been using. About halfway through the alignment on the Coupe, decided it was finally time to retire my trash bags and get some real turn plates. Decided on QuickTrick 60004 turn plates, which arrived today. It just didn’t make sense to be splitting hairs with the digital gauge and estimating the caster turn out/turn in with a protractor. Was a good decision. The Longacre instructions say getting the angles wrong while measuring caster can affect the accuracy quite a bit. I could see that on the digital gauge as I was turning the wheel. Stopping right on the exact mark makes a difference. I feel like I now have a quality set of tools to do a reasonably precise alignment. I know I spent the last hour splitting the tenths of a degree the Longacre digital gauge shows. The precision is there and seems very repeatable.
For those that don't know, doing your own alignment isn't hard. The tools I've added make it easier and I think a bit more accurate. But simple tools are quite acceptable. There is a learning curve though and it can be a little frustrating. The settings all interact to some degree. So especially at first when large changes are needed things change a lot. Change the camber, the caster changes. Change the caster, the toe-in changes. And so on. You have to keep going around and around checking each measurement. Eventually they start getting close and the interaction is much less. But it can be frustrating and it's not a quick process. A full 4-wheel alignment isn't cheap at a shop, and there's a reason. Even with the equipment they have. That's assuming you can find a place that's familiar with these and that you trust. I'm happy doing it myself and the equipment pays for itself IMO.
Couple pics. The caster/camber gauge. The Factory Five rims aren’t real friendly to mount the gauge. The FasTrax was the same way. I put dots of Gorilla tape where it contacts the rims and held in place with a bungee cord. Worked well actually. The turn plate is also visible in this pic.

This is one of the toe plates. Starting to look a little rusty, but still work fine. I use a Bosch laser level instead of strings to make sure the alignment is parallel to the frame.

This is the chassis height checker. Cool little tool and not very expensive. Reach it under the chassis, slide the button, and read the measurement. Nice.

Started with the rear suspension and thought I had it done until I realized I had set the PS with positive camber instead of negative. I was reading the gauge wrong. Duh. Fixed that and everything else went fine. Final alignment numbers: Rear -0.6 camber, 1/8 total toe-in. Front +8 caster, -0.5 camber, 3/32 total toe-in. I didn’t have to modify the adjuster sleeve to get the +8 caster. In fact, a few threads are showing on each end. I wonder if Factory Five changed the Gen 3 Coupe a little since power steering is more common now? I don’t know, but I checked it multiple times to make sure I had it right. I’ll be watching the ride height and alignment as the build finishes up. But should go pretty quickly to tweak it as needed versus the time necessary for the first time.
That’s it. Next update really will be with body fitting underway.
Last edited by edwardb; 02-13-2019 at 07:34 AM.
Build 1: Mk3 Roadster #5125. Sold 11/08/2014.
Build 2: Mk4 Roadster #7750. Sold 04/10/2017.
Build Thread
Build 3: Mk4 Roadster 20th Anniversary #8674. Sold 09/07/2020.
Build Thread and
Video.
Build 4: Gen 3 Type 65 Coupe #59. Gen 3 Coyote. Legal 03/04/2020.
Build Thread and
Video
Build 5: 35 Hot Rod Truck #138. LS3 and 4L65E auto. Rcvd 01/05/2021. Legal 04/20/2023.
Build Thread. Sold 11/9/2023.
-
02-15-2019, 12:26 PM
#546
Senior Member
Body On and Fitting Underway
Couple buddies dropped over the other night, and around an hour plus of shop talk, spent the five minutes needed to drop the front and rear body pieces onto the chassis. Both pieces slide into place easily, but extra hands are pretty important. Hard to say too much about the fit at this point as I’m just getting started. But looks decent. The instructions say to not have these aluminum pieces in place when dropping on the main body section: Rear outside cockpit corners, hatch area side walls, and hatch area rear wall. Agree with two of them. But didn’t see any reason why the hatch area side walls couldn’t be in place before setting the body on. Only have them cleco’d just in case, but they don’t get in the way at all. In fact, makes it easier IMO because gives the rear part of the body something to rest on. Would be a pain if it was just flopping around. Your experience may vary but take a look at that.
I studied the Factory Five body installation instructions very carefully, plus several build threads and posts where this was discussed on the forums. The takeaway for me, which I’m following, is place the rear body section as Factory Five describes. But fit the nose, doors, and check the glass before locking anything down. Everything must work together. So I’m just getting started. What I can see is that the lower edge of the body wraps around the LH side a bit more than the RH side. Other build pictures seem to show the same. Doesn’t matter and isn’t visible. But need to make sure that works everywhere else.
Probably the biggest issue I’m seeing at this point is the front hinge brackets for the nose don’t fit well. They’re basically square, but there’s an angle where they mount. Mentioned this earlier in the build thread. Also I’m finding that the rod ends that attach to the chassis and pivot in the brackets are too short. Maybe I don’t have things located right yet, so the jury is still out. But sure looks like it at this point. So bottom line, some work to do on the front hinges.
One thing that I was very interested in learning about once the body was together was to measure the length and width to see how it will fit (or not…) in my 14-foot Serpent Express trailer. With the Roadster right next to it, easy to compare. Results: Coupe is 174-inches long, nose to tail. Roadster 162-inches, including the bumpers and overriders. So exactly one foot longer. Coupe is 73-inches wide at the widest part, Roadster is also 73-inches wide including the side pipes. So exactly the same. Conclusion? The Coupe will fit but stick out the back 6-8 inches, which is kind of what I expected. I also don’t see any choice but to add a winch to take it in and out. I don’t see any way I can get the doors open enough to get in and out through the SE side door. It’s hard enough without obstacles. See what happens with all of this. No decisions for now.
For some pics, here’s the body pieces sitting in place. Starting to look like something now.

With the Roadster hogging the lift while I’m doing annual maintenance and getting it ready for Autorama, put the Coupe up on jack stands and took the wheels off. Easier to reach everything underneath.

Setting the rear height per the instructions. As mentioned, with the hatch side walls in place, easy to do and almost exactly at the right height. Visible in other pics, but especially here, I did have a number of voids and some clay in the parting lines. I dug it all out and cleaned things up as needed. Then filled with HSRF. Knocked most of the flash off the parting lines. Also had to do a little repair around the side window/vent areas. Again with with HSRF. Total of just a few hours, so not a big deal. I'll let the painter do the rest, but it's a start. In general, the body is decent. Assuming I can get everything to fit well, I'm hoping there won't be a ton of prep work for the painter. We'll see.

I checked the fit of the rear glass. Mainly that the opening was square and matched up. It’s perfect. Also checked the windshield (not pictured) and it’s OK.

That’s as far as I am for now. I expect to invest some time to get everything the way I want it. J. Miller said it takes him 40 hours to get everything all set. That being the case, I’ll be at this awhile.
On another front, received my laser etched dash knobs from Watsons Streetworks today. That’s the final touch for my switch panel and the entire dash for that matter. Not the best pic, but you get the idea.
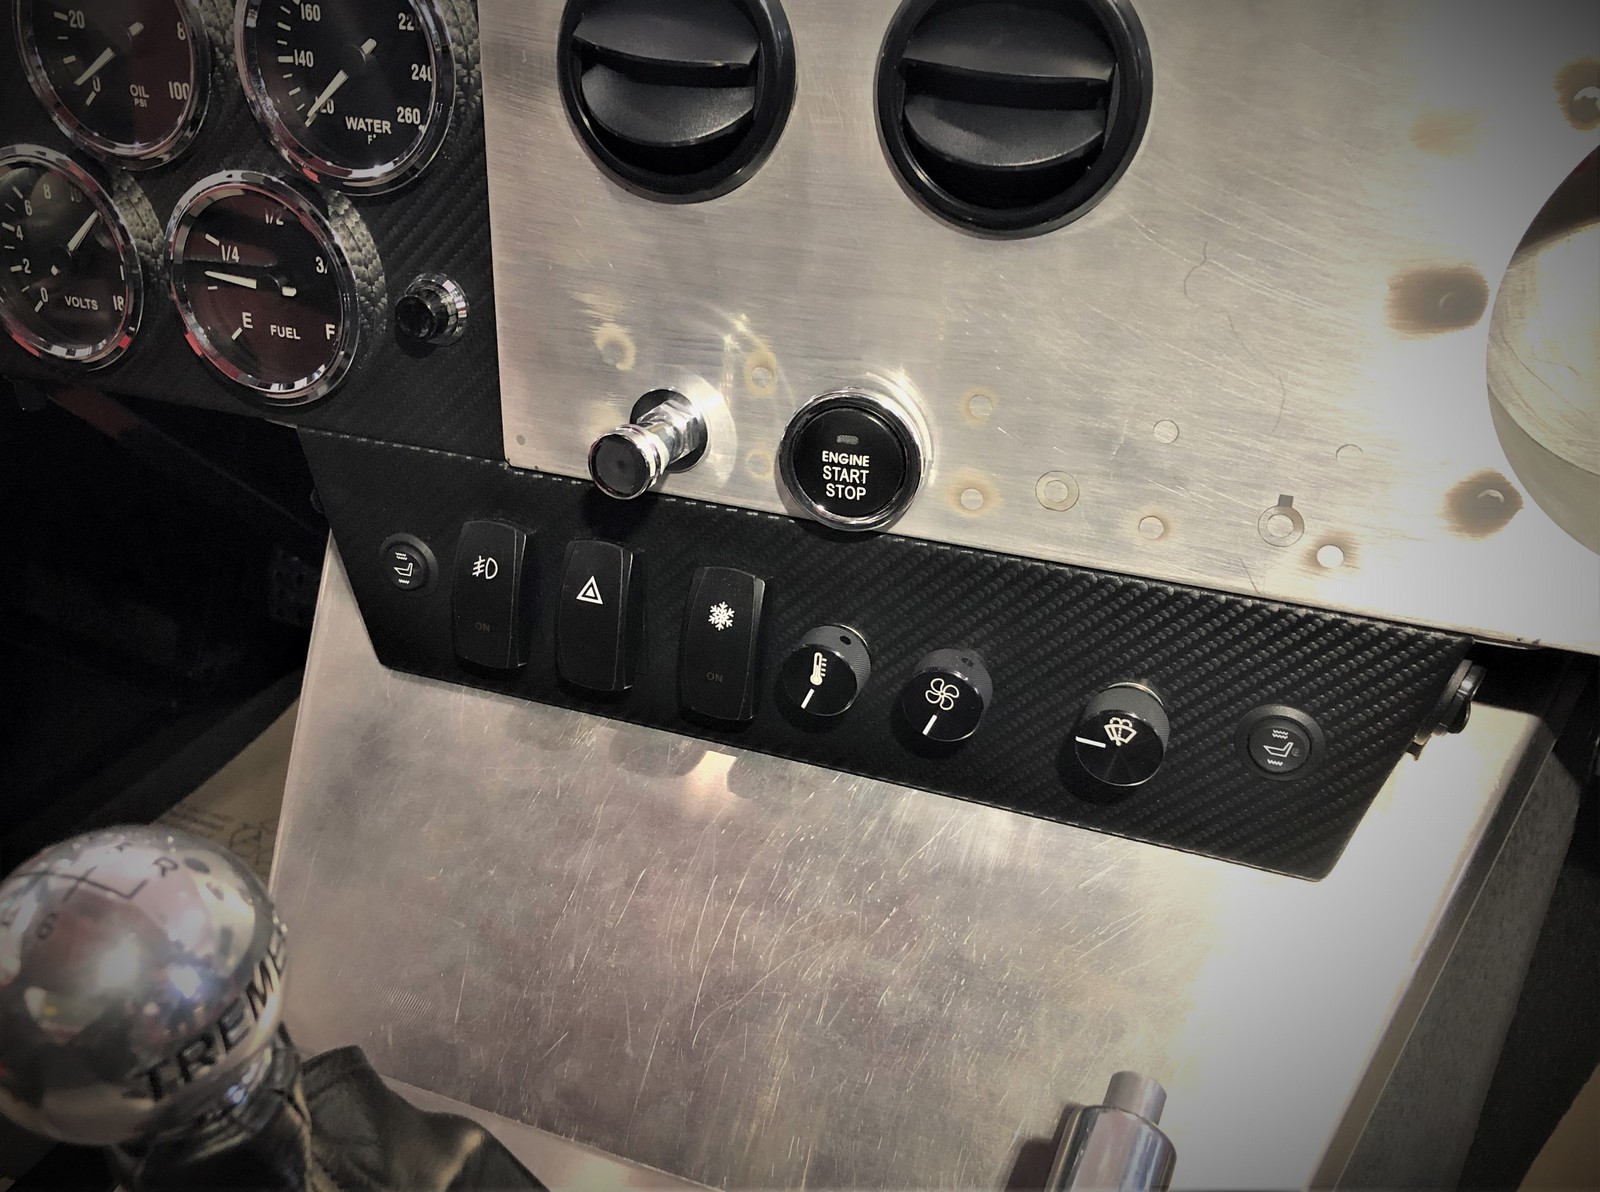
To recap, left to right (including the ends) I have a USB aux outlet, DS seat heater, fog lights, hazards, A/C, temp, fan, wiper/washer, PS seat heater, and regular aux outlet. The three rocker switches are custom from New Vintage USA, which is local for me. They have backlighting with the dash gauges, and an indicator light when on. The A/C, temp and fan controls are the same as provided in the separate panel Factory Five supplies with the heat/A-C kit. The knobs are also the ones provided. Integrated the controls here instead. Also, I wired the large aux outlet to be a battery circuit. So it’s always on. Useful for some applications, but mainly so I can plug my C-Tek battery trickle charger there versus clipping to the battery which isn’t very convenient where it’s located.
Managed to tweak my back yesterday. Must be from working on the car on jack stands instead of the lift. (You can all feel sorry for me now.) But actually, that’s something that I manage to do a couple times a year, usually for no reason it seems. So slowing me down a bit, but plan to keep making progress on the body fit-up.
Last edited by edwardb; 02-15-2019 at 02:30 PM.
Build 1: Mk3 Roadster #5125. Sold 11/08/2014.
Build 2: Mk4 Roadster #7750. Sold 04/10/2017.
Build Thread
Build 3: Mk4 Roadster 20th Anniversary #8674. Sold 09/07/2020.
Build Thread and
Video.
Build 4: Gen 3 Type 65 Coupe #59. Gen 3 Coyote. Legal 03/04/2020.
Build Thread and
Video
Build 5: 35 Hot Rod Truck #138. LS3 and 4L65E auto. Rcvd 01/05/2021. Legal 04/20/2023.
Build Thread. Sold 11/9/2023.
-
Post Thanks / Like - 0 Thanks, 2 Likes
-
02-15-2019, 02:39 PM
#547
Hsrf ???
Hi, What does HSRF stand for.
thankyou
Nelson
-
02-15-2019, 04:32 PM
#548
Senior Member
Originally Posted by
Automan
Hi, What does HSRF stand for.
thankyou
Nelson
Sorry about that. Throw out acronyms and forget not everyone always recognizes them. 3M High Strength Repair Filler. A vinyl ester based product (same material as the body) that's glass filled and very strong. Comes in various sizes. I typically get the one pint size. Amazon has the best price I've found and arrives quickly. Not cheap (what's new) but the best I've found. Cures rock hard. If the surface is clean and roughed up, the bond or repair is basically permanent. Learned about it quite a few years ago here on the forum and many others use it as well. More info here: https://www.3m.com/3M/en_US/company-...8743661&rt=rud
Last edited by edwardb; 02-15-2019 at 08:36 PM.
Build 1: Mk3 Roadster #5125. Sold 11/08/2014.
Build 2: Mk4 Roadster #7750. Sold 04/10/2017.
Build Thread
Build 3: Mk4 Roadster 20th Anniversary #8674. Sold 09/07/2020.
Build Thread and
Video.
Build 4: Gen 3 Type 65 Coupe #59. Gen 3 Coyote. Legal 03/04/2020.
Build Thread and
Video
Build 5: 35 Hot Rod Truck #138. LS3 and 4L65E auto. Rcvd 01/05/2021. Legal 04/20/2023.
Build Thread. Sold 11/9/2023.
-
02-15-2019, 05:14 PM
#549
Looking good, I spent several weeks getting the doors and hood trimmed and fitted. I found the hood hinge did not have enough adjustment to move the hood back to line up with the front edge of the pontoons so there will be some fiberglas filler on mine. The lower edge on my hood curled in too much so the body guy did a small modification to reset the profile on the left side, looks like yours is similar. Play around with the hinges to get the hood to open up as much as you can, I had to cut about an inch off the lower front section of the hood to clear the AC condenser/rad and I also cut a section off one of the hinges. The old saying measure many times, cut once applies here.
Hope the back heals up OK
David W
Mkll 4874 built in 2004
Gen 3 coupe #16 registered 2018 painted 2019
-
Post Thanks / Like - 1 Thanks, 0 Likes
-
02-16-2019, 10:52 AM
#550
Great Build! Thanks for the update
1972 Corvette Stingray 350 c.i. Manual Steering & Brakes
2003 H-D Softail Deuce 88 c.i. TwinCam
Gen 3 Coupe Dreamer
-
Post Thanks / Like - 1 Thanks, 0 Likes
-
02-20-2019, 03:05 PM
#551
Originally Posted by
edwardb
Sorry about that. Throw out acronyms and forget not everyone always recognizes them. 3M
High
Strength
Repair
Filler. A vinyl ester based product (same material as the body) that's glass filled and very strong. Comes in various sizes. I typically get the one pint size. Amazon has the best price I've found and arrives quickly. Not cheap (what's new) but the best I've found. Cures rock hard. If the surface is clean and roughed up, the bond or repair is basically permanent. Learned about it quite a few years ago here on the forum and many others use it as well. More info here:
https://www.3m.com/3M/en_US/company-...8743661&rt=rud
Thankyou so much. So you use it to fill in the open voids?
-
02-20-2019, 03:14 PM
#552
I just searched it. I found it starting with Marine.
-
02-20-2019, 04:24 PM
#553
Senior Member
Originally Posted by
Automan
Thank you so much. So you use it to fill in the open voids?
Short answer, yes. But need to use a little judgement and use it only for larger voids and certain kinds of repairs. Also works great for bonding things to the body. Maybe not so common with the Coupe build that I've found so far. But have used it several times on the Roadster. Like the side louver mounts. But don't think of it like body filler, e.g. Rage Gold or whatever. It cures very hard. And while it can be sanded (sort of...) you want to tool it on to where it requires as little sanding as possible. Maybe none. It doesn't blend out like body filler. My paint guy doesn't mind me using it. But you might want to check with yours. Often paint shops don't want the customer putting any product on the body. Especially if it's going to cause more work.
Originally Posted by
Automan
I just searched it. I found it starting with Marine.
Right. I left that out explaining what the acronym stood for. The 3M link I provided gave the complete name.
Last edited by edwardb; 02-21-2019 at 07:26 AM.
Build 1: Mk3 Roadster #5125. Sold 11/08/2014.
Build 2: Mk4 Roadster #7750. Sold 04/10/2017.
Build Thread
Build 3: Mk4 Roadster 20th Anniversary #8674. Sold 09/07/2020.
Build Thread and
Video.
Build 4: Gen 3 Type 65 Coupe #59. Gen 3 Coyote. Legal 03/04/2020.
Build Thread and
Video
Build 5: 35 Hot Rod Truck #138. LS3 and 4L65E auto. Rcvd 01/05/2021. Legal 04/20/2023.
Build Thread. Sold 11/9/2023.
-
02-22-2019, 03:51 PM
#554
Senior Member
Body Fitting Continues
Pretty intense work since the last update getting the body fitted. It’s what I expected and exactly what others have recommended. In other words, don’t do anything in isolation. There are a lot of moving pieces and interactions. Changing one thing affects something else almost in all cases. I’m happy with where I’m at, but still have a ways to go.
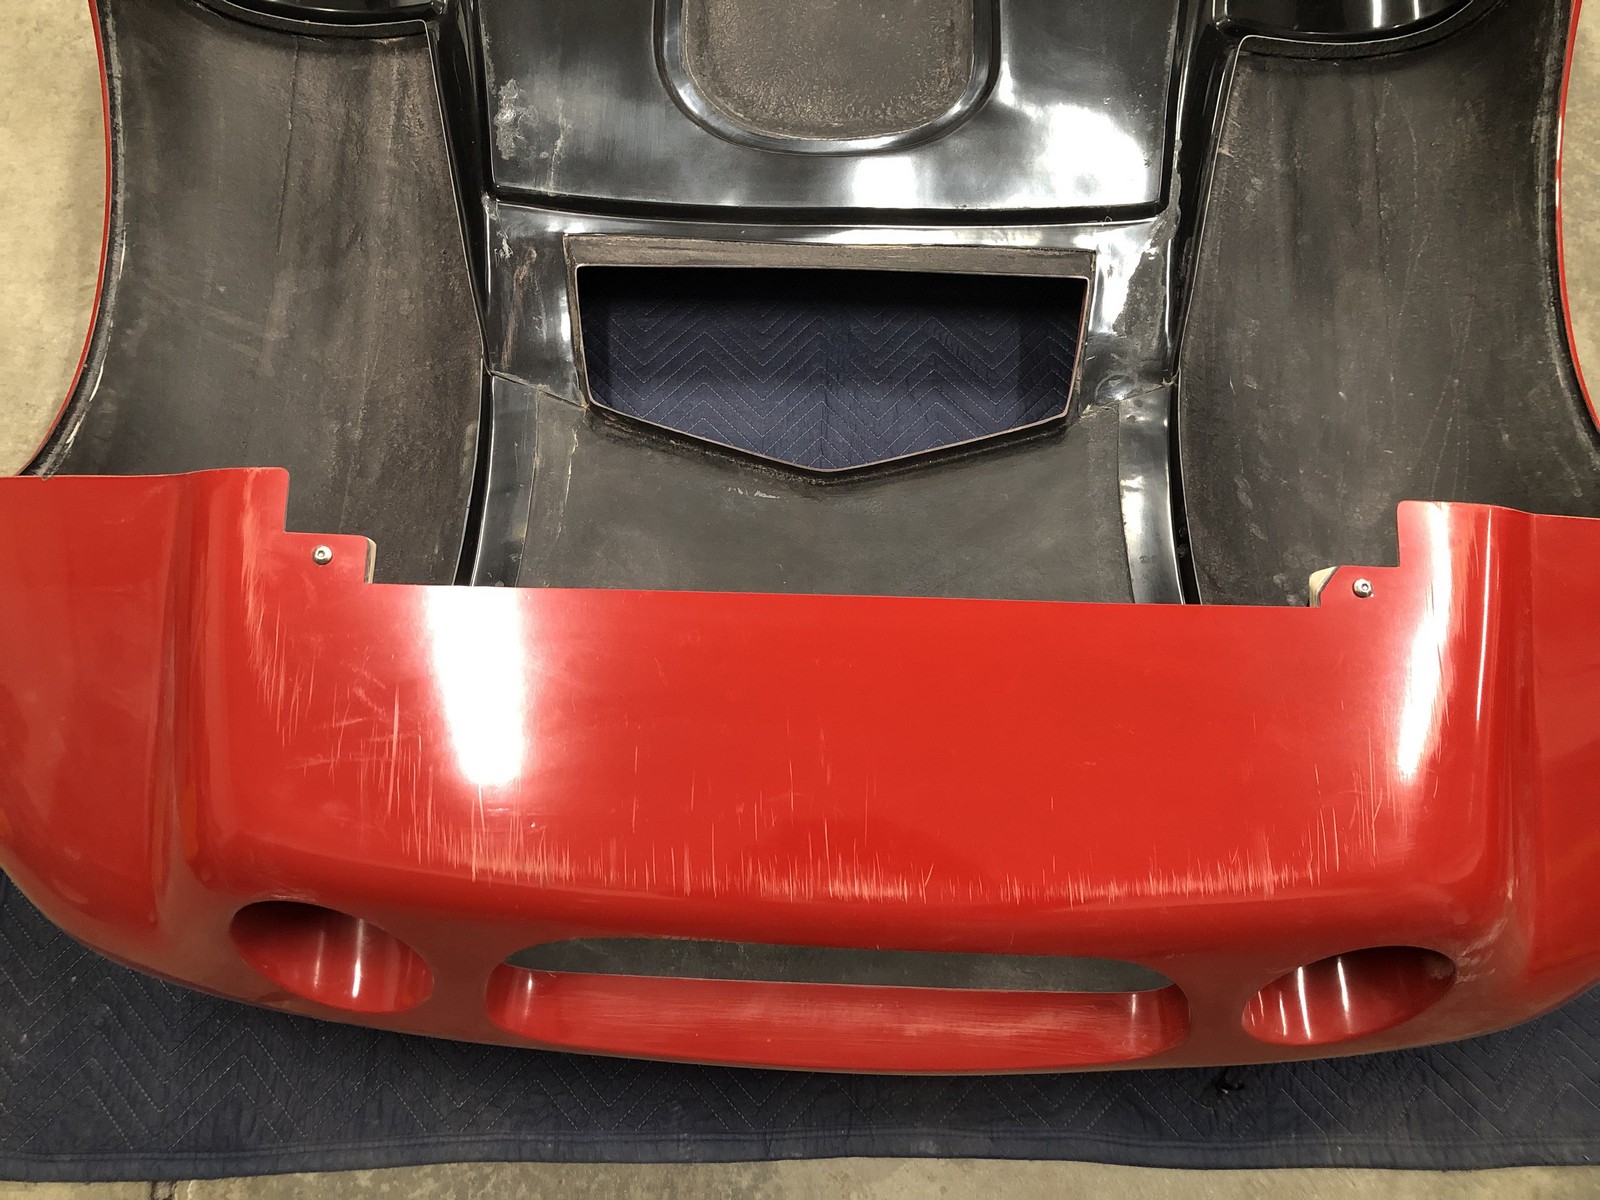
As I showed in the last update, I set the rear part of the body onto the chassis like Factory Five shows in the instructions. Then worked on fitting the nose. Once I felt everything was a close as it was going to get, after trimming the back edge of the nose and messing with everything for a couple days, locked down the rear body mounts on the rear section. It ended up with the exact dimensions they show above the rear hatch floor, centered very closely on the rear suspension, and approximately 1/4-inch from the posts at the front of the door. So good job there Factory Five. Made a couple of minor changes. I liked the rear body mounts on the inside of the chassis brackets better than the outside. Centered the bolts a little better in the vents. Also instead of trimming the body to fit around the tubes in front of the rear wheels, I found if I trimmed the chassis tubes just slightly the body slid over them without cutting. Didn’t take enough metal to affect the strength in any way. Just a sharper angle. Maybe 1/4-inch or so at the bottom angling to zero at the top. Also I’m going to use 1/4-inch nutserts to hold the body along the door opening rather than just the smaller self-tapping screws suggested. Going to use three. One at each end and one in the middle. Right now I just have it cleco’d in case I need to make any final adjustments for the door fitting. The supplied carpet wraps over that edge and covers them. I test fit the rear splash guards. Looks like they're almost perfect. Fit the body contour very well. The tab at the bottom is a little off. But that's an easy adjustment.
With that moved to the nose. I found it helped a lot to install the lower front splash shields, so drilled and cleco’d those in place. Helps to hold the pontoons more in their final location. Some discussion about whether to put the shield on the inside or outside of the front of the pontoon. They’re designed to go on the inside, and I think I’m going to leave them there. The paint on the front of the pontoon will be exposed. Maybe try some protective film or just paint with undercoat. We’ll see.

With the nose located the best I could, started working on getting the hinges installed. I noted earlier in this build thread that the angle of the hinges (basically 90 degrees) isn't the same angle as where they’re installed in the body. Plus I was afraid they would hit the sheet metal when hinged open. More on that later. After thinking about several options, threw back to my woodworking days and made some wedges that filled the angle. I removed the powder coat off the bottom of the hinges and bonded a piece of 3/4-inch plywood to the bottom. Good old JB Weld of course. With that cured, cut the angle on the bottom using my bandsaw. The gap is 1/2-inch at the back going to zero at the front. I cut them leaving 5/8-inch at the back and 1/8-inch at the front. This also helped to locate the rod ends better. The threads on the top nut didn’t go all the way through. With this wedge, the hinges fit perfectly between the back of the fog light buckets and the bottom of the cowl. Located and drilled the mounting holes with the bolts and spacers in the rod end on the chassis. Then I took a step that not everyone will agree with and maybe I don’t even recommend. But I decided to bond the hinges to the body. So roughed up the mounting locations, mixed up some HSRF, and bolted the hinges in place. They won’t be coming out again. These hinges are obviously critical since they hold the entire nose in place, plus wanting to maximize my plywood wedge “fix” decided this gave me a little more margin. Note that I still have up/down and front/back adjustment. It’s just side/side that’s now fixed. But I’m confident I have it centered as best as it can be. Also note I'm going to be finishing the inside of the nose. Details TBD still, but the visible edges of my wood pieces will be finished and unseen.
With the hinges now fitted and attached, tested the tilt nose function in preparation to install the gas struts. What happened was exactly what I expected based on other build threads. The nose only tilted up this much before hitting the A/C condenser. Not far behind would have been the radiator.

Like I say, wasn’t surprised about this. But am a little surprised this isn’t mentioned in the build manual. At least not anywhere that I’ve found. After cutting enough to clear the condenser and then the radiator, still was not all the way open and hit the aluminum panels from the radiator tunnel that extend below the frame in that area. Also not a surprise based on my earlier review of the nose hinges. So off came the nose again, and I trimmed and touched up the sheet metal on each side. I took the sheet metal back to the same depth as the face of the radiator and then also along the frame at the top. It would be possible cut less, e.g. just enough to clear where it interferes when the nose opens. But IMO this looks a little more sanitary and the missing sheet metal in that area doesn’t hurt anything. I cut it back on both sides like this pic from the right side:

With a couple more tweaks (I’m getting good at lifting that nose on and off…) finally had it opening as far as it was supposed to. Cuts along the bottom of the body nose look like this. The angle on the one side is to clear the lower hose connection for the condenser.
It’s a pretty big cut, but with the nose closed and the car on the ground, completely unseen. With it opening properly, proceeded to mount the gas struts. Here too I made a couple small changes. The instructions show putting the frame ball socket mount on the inside of the rail. This routed the strut very close to the corner of the chassis, to the point of possibly interfering. I had previously noted that Ron E mounted them on the outside of the frame rail on his SEMA build. Did the same and worked perfectly. Also, for the ball socket mount in the nose itself, I made matching steel plates and used high strength rivets to mount, sandwiching the glass between. Also threw in a little HSRF since they won't be coming out again. I felt better about this than using screws and bolts. Again, probably would have been fine. But you know… Looks like this now with the gas struts working.

The nose opens and closes very nicely. So happy about that, and the struts clear everything inside when closed. One thing I did notice is that when closed the struts pushed the gap between the nose and body open some. I’ll adjust the hinges and that should be fine. Put the wheels back on the car and off the jack stands. Like what I’m seeing.

Last edited by edwardb; 02-23-2019 at 06:21 AM.
Build 1: Mk3 Roadster #5125. Sold 11/08/2014.
Build 2: Mk4 Roadster #7750. Sold 04/10/2017.
Build Thread
Build 3: Mk4 Roadster 20th Anniversary #8674. Sold 09/07/2020.
Build Thread and
Video.
Build 4: Gen 3 Type 65 Coupe #59. Gen 3 Coyote. Legal 03/04/2020.
Build Thread and
Video
Build 5: 35 Hot Rod Truck #138. LS3 and 4L65E auto. Rcvd 01/05/2021. Legal 04/20/2023.
Build Thread. Sold 11/9/2023.
-
Post Thanks / Like - 0 Thanks, 1 Likes
-
02-22-2019, 03:51 PM
#555
Senior Member
Body Fitting Continues (continued)
I have the doors about 90% fitted. My approach is to trim them just enough to fit into the opening, e.g. with little/no gaps. Then get the hinges installed and adjusted. Then set the gap all around. I have the first part done. Next will be the hinges. I’m very happy with how the doors fit. No major issues there at all. The match to the body is very good. Also, I need to get the nose fitting completed, the latches installed, and then by adjusting the thickness of the bumpers, get the nose to body match completed. I’m happy with how that’s turning out as well. As far as I can tell now, I have only one issue remaining with the body fitment, and that’s the pontoon on the right (passenger) side. The gap is good at the back, but basically a friction fit at the front. With all my massaging of everything, that’s the one thing I just couldn’t get out. The left side is perfect and parallel. I might be able to get the required clearance with some sanding. But I kind of doubt it. May require some minor glass work. We’ll see. The other general comment I’ll make about body fitting, after spending the last week at it, is that much like the Roadster the Coupe body is not completely symmetrical. There are differences, I would say especially the nose from side to side. Nothing that will be visible or noticeable once it’s done. But when you measure, you’ll find what I mean. I always tell people this is part of the charm of these cars.  Just stay with it and find the locations that provide the best overall fit.
One other general comment about the body on the Coupe. It's pretty clear that once the main body is installed, would be very difficult and basically impractical to remove. I've mentioned before about how some of the sheet metal isn't installed until after the body is on. Then there's carpet over that. Plus a glued in windshield. Probably other factors. Don't think it's an issue. And it would be easy enough to take the nose off. But the main body looks to me like it's one time and done. After paint of course.
In conclusion, yet another tool shout out. For my previous builds, when I needed to cut fiber glass I used my Dremel. Lightweight I know but did the job. With quite a bit more on this build, plus wanting to upgrade, added the Milwaukee 2522 M12 Fuel 3-inch Compact Cut Off Tool to my collection. I guess I won’t be happy until I have the whole M12 collection. Getting close I think… This thing is awesome for cutting fiberglass and I’m sure will use it for metal and more in the future. Think of it like a Dremel on max steroids and much improved ergonomics. I was hoping the base and vacuum adapter would help keep dust down in the shop while cutting. It does, but had trouble seeing the cut lines. So did most of my work without it. But still highly recommended. The brushless motors they’re using now along with the lithium batteries are pretty amazing.

With that, the Coupe build is going into a bit of a pause. Need to finish getting the Roadster ready, get the trailer out and serviced, and then to Autorama next weekend. Always enjoy that. All good timing, because then the Roadster and trailer will be ready for the trek to the Texas meet just a few weeks from now. Looking forward to that plus a break from the winter cold.
Last edited by edwardb; 02-22-2019 at 07:58 PM.
Build 1: Mk3 Roadster #5125. Sold 11/08/2014.
Build 2: Mk4 Roadster #7750. Sold 04/10/2017.
Build Thread
Build 3: Mk4 Roadster 20th Anniversary #8674. Sold 09/07/2020.
Build Thread and
Video.
Build 4: Gen 3 Type 65 Coupe #59. Gen 3 Coyote. Legal 03/04/2020.
Build Thread and
Video
Build 5: 35 Hot Rod Truck #138. LS3 and 4L65E auto. Rcvd 01/05/2021. Legal 04/20/2023.
Build Thread. Sold 11/9/2023.
-
02-22-2019, 04:35 PM
#556
Not a waxer
Good stuff Paul! You're right, the latches will come into play to a great extent as far as the nose to body interface goes. You mentioned the doors and their hinges so I gotta' tell you an amusing anecdote from when we were building the Coupe at SEMA---Jesper was installing and adjusting the hinge on the passenger side and losing the battle. He finally stepped away in frustration (well, as frustrated as he gets which is only about a #2 on most of our scales) and said to no one in particular "Who's the idiot that designed this P.O.S. part anyway?" 
Enjoy Autorama next week!
Jeff
-
Post Thanks / Like - 0 Thanks, 1 Likes
-
02-22-2019, 04:52 PM
#557
East Coast Speed Machines

FWIW...
the front splash guard ... I know the manual shows it behind the Pontoon ... I can tell you that in just at 2000 miles on the clock that are get BEAT UP! I put my aluminum on the front of the pontoon. I actually have a full piece over the pontoon and then double stacked the splash guard on top of that and then applied bed liner on it for extra measure... still gets beat up but it is an easy repair. Also the area right below the side pipe exit and a bit forward where the curve move toward the front... this area too gets quite a bit of impacts... right now I don't have any protection there at all but I will add some 3m clear before spring. While we are there since the pontoon suck in toward the front and the side pipes are also somewhat tucked in comparison to the roadster... yep... the front of the pipes are getting blasted... it might not be as bad with the double barrel exhaust... but my single side exhaust is seeing what I would call a fair amount of wear already at 2000 miles....
something to keep in mind... I can certainly take some pics and post these areas for your inspection.
FFR 1879, Blown DSS 306,REDLINE management, VeryCoolParts Tuned 460RWHP
FFR 818S, The Flash, Chassis #5, 2.0L, LSD, Electromotive TEC-S, VCP Tuned, 278RWHP 265 RWTQ
FFR 6651, Green Lantern, 408W Crate, Hellion 66mm Turbo, JGS Waste gate / Blowoff valve, Tec-GT management, VCP Tuned, 575 RWHP, 690 RWTQ
FFR 8335, Black Mamba, 289 FIA CSX 2001 tribute car, 347, 48 IDA webers, VCP Tuned, 311 RWHP 386 RWTQ, 3-link, Trigo's
FFR 0004, Gen 3 , Hawk Coupe, Coyote twin turbo, 683 RWHP 559 RWTQ, IRS, VCP Tuned. "not too shabby"
US ARMY Maintenance Test Pilot (CW4 Retired)
-
Post Thanks / Like - 1 Thanks, 0 Likes
-
02-22-2019, 07:16 PM
#558
Senior Member
Jeff -- I find backing away is usually the best thing to do when I get frustrated. Too funny hearing Jesper does the same thing with his own parts.
Erik -- Thanks for the post and detailed explanations. Your build thread is one that I've studied closely and have seen how you handled the splash guards. I may regret it. But right now I'm focused on fitment and one of the pontoons is where I have what looks like my biggest challenge. I'm going to stay with the splash guard on the inside because it helps. I'll add whatever is necessary to protect the outside later. Adding another piece you you did is a good idea. Yes I will have double barrel pipes. I'll check the other areas you mention.
Build 1: Mk3 Roadster #5125. Sold 11/08/2014.
Build 2: Mk4 Roadster #7750. Sold 04/10/2017.
Build Thread
Build 3: Mk4 Roadster 20th Anniversary #8674. Sold 09/07/2020.
Build Thread and
Video.
Build 4: Gen 3 Type 65 Coupe #59. Gen 3 Coyote. Legal 03/04/2020.
Build Thread and
Video
Build 5: 35 Hot Rod Truck #138. LS3 and 4L65E auto. Rcvd 01/05/2021. Legal 04/20/2023.
Build Thread. Sold 11/9/2023.
-
02-23-2019, 05:16 AM
#559
Junior Member

Outstanding Build Thread .......... And perfect work ..........
John
-
Post Thanks / Like - 1 Thanks, 0 Likes
-
03-05-2019, 08:08 AM
#560
Hi Paul. Please list the dimensions of the cut-out you made to clear the radiator and A/C hose connections. I'd like to piggy back on the work you did lifting the cowl on and off.
Thanks, fred


 Thanks:
  Likes:


 Reply With Quote


