-
07-09-2020, 06:59 PM
#121
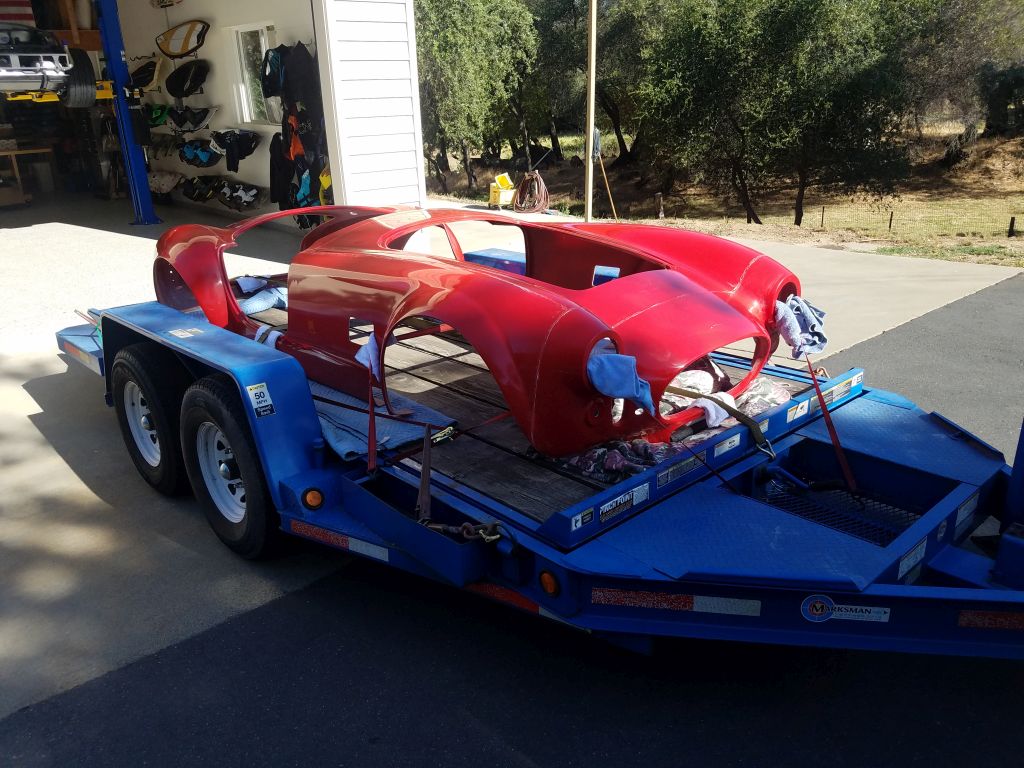
I am happy with the color match. Here is an outdoor and indoor photo
-
07-11-2020, 11:18 AM
#122
Senior Member

Thanks for the careful and thorough documentation, Fman--just read the e-brake pulley Mod (thanks again, Edwardb!). I'm really enjoying your build thread. Including the links to the sources of some of the Mod parts is especially helpful to me. Also, hadn't heard of the Sunshine garage yet, so thanks for the link on that one as well. I have many notes and tips written down for consideration once my build gets underway--ordered complete kit last week, but don't expect to have my hands on it until late Sept/early Oct. Great build!
Chris
Coupe complete kit delivered: 4/22/24.
Build Thread. Coyote. T-56. IRS w/3.55. Wilwoods. PS. HVAC. Side windows.
MK4 Complete kit.
Build Thread Index. Delivered: 10/15/2020. Legal: 7/25/23. Coyote Gen3. TKO600 (0.64 OD). IRS w/3.55. PS. Wilwoods. Sway bars. This build is dedicated to my son, Benjamin.
Build Thread.
-
Post Thanks / Like - 0 Thanks, 1 Likes
 Fman
Fman liked this post
-
07-11-2020, 01:37 PM
#123
Senior Member


Originally Posted by
460.465USMC

Thanks for the careful and thorough documentation, Fman--just read the e-brake pulley Mod (thanks again, Edwardb!). I'm really enjoying your build thread. Including the links to the sources of some of the Mod parts is especially helpful to me. Also, hadn't heard of the Sunshine garage yet, so thanks for the link on that one as well. I have many notes and tips written down for consideration once my build gets underway--ordered complete kit last week, but don't expect to have my hands on it until late Sept/early Oct. Great build!
Thank you, your words are good motivation for me... I am learning as I go also reading other builds on the forum to help me keep chugging along!
Congratulations on your order, I will be looking for your delivery pics! That for sure is a fun day
Last edited by Fman; 07-12-2020 at 11:05 PM.
-
07-11-2020, 02:13 PM
#124
Senior Member
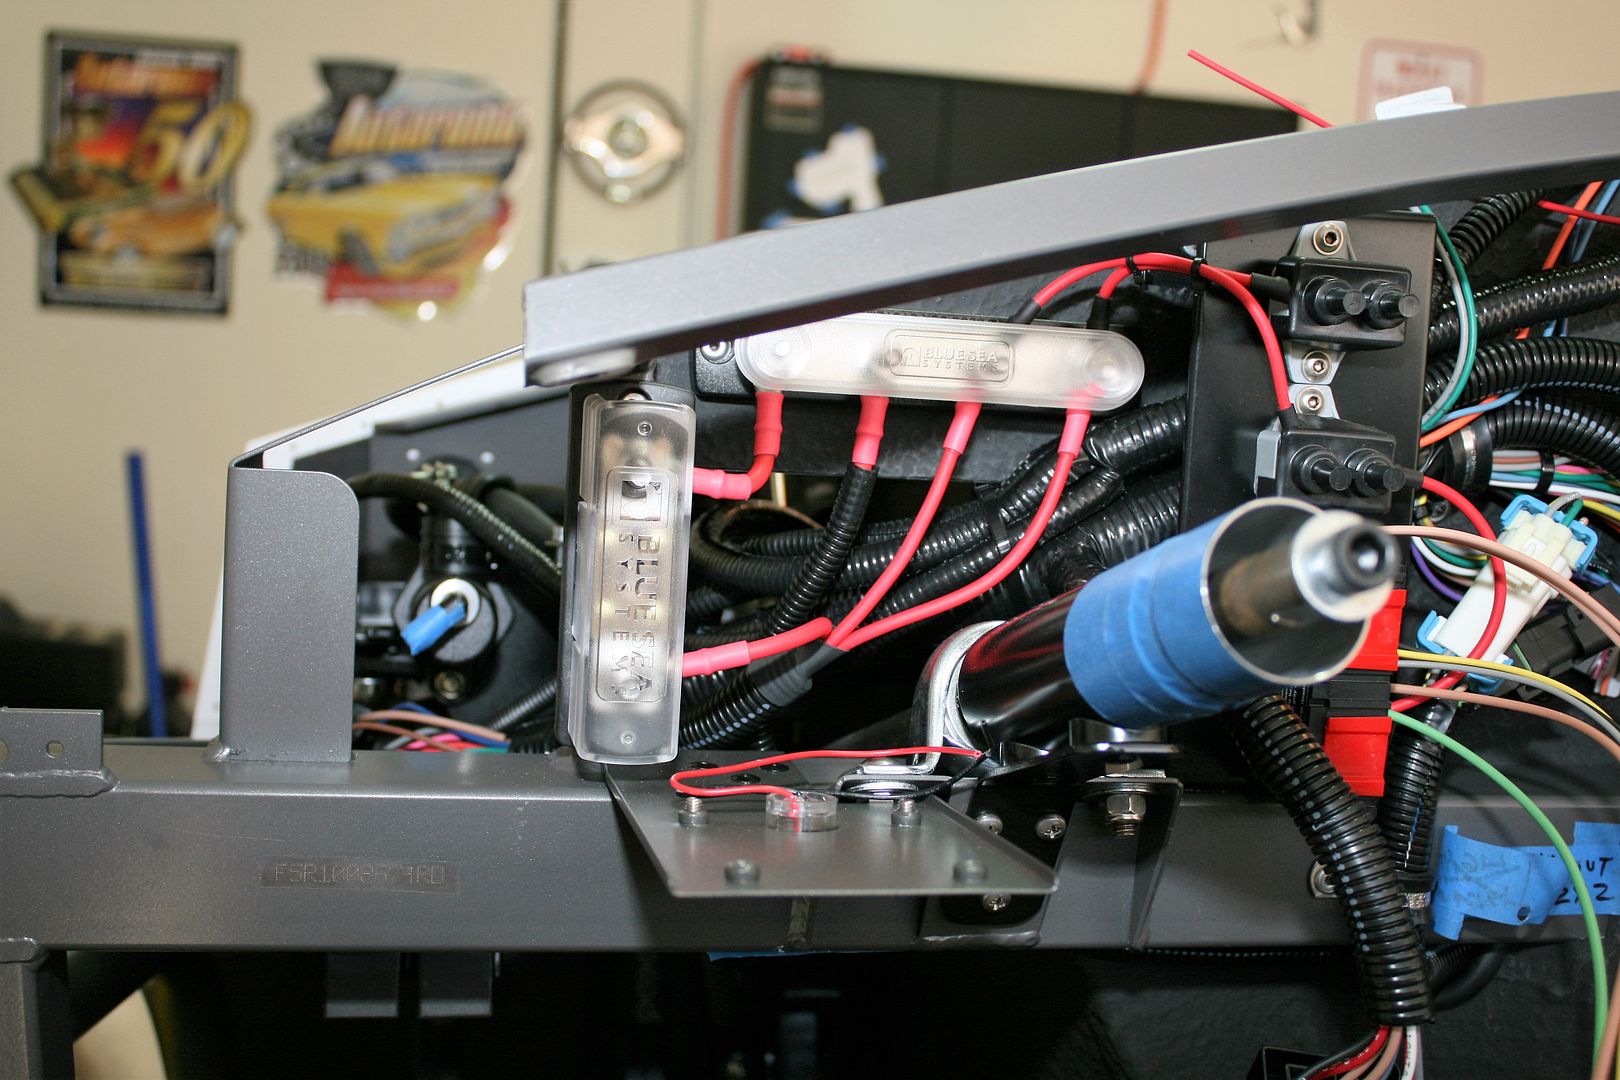
Rear power stop brake rotors, fuse panel
Too many hours at work and demands of life has not given me much time to work on the Cobra lately. I did get a few small tasks completed on it, I installed the rear power stop brake rotors and pads, new fuse panel bracket cut out and came up with possibly a solution for potential leaks having the clutch MC right above the fuse panel.
Power stop rear disc rotor kit, this is for the 13" rear brakes with the 87-88 Thunderbird calipers
https://www.summitracing.com/parts/PWR-AR-85160XPR
Ceramic pads
https://www.autozone.com/brakes-and-...76_420698_3773

New fuse panel bracket, thicker material (.040) The Ron Francis bracket is very thin aluminum, this adds a little more stability and it is also powder coated.
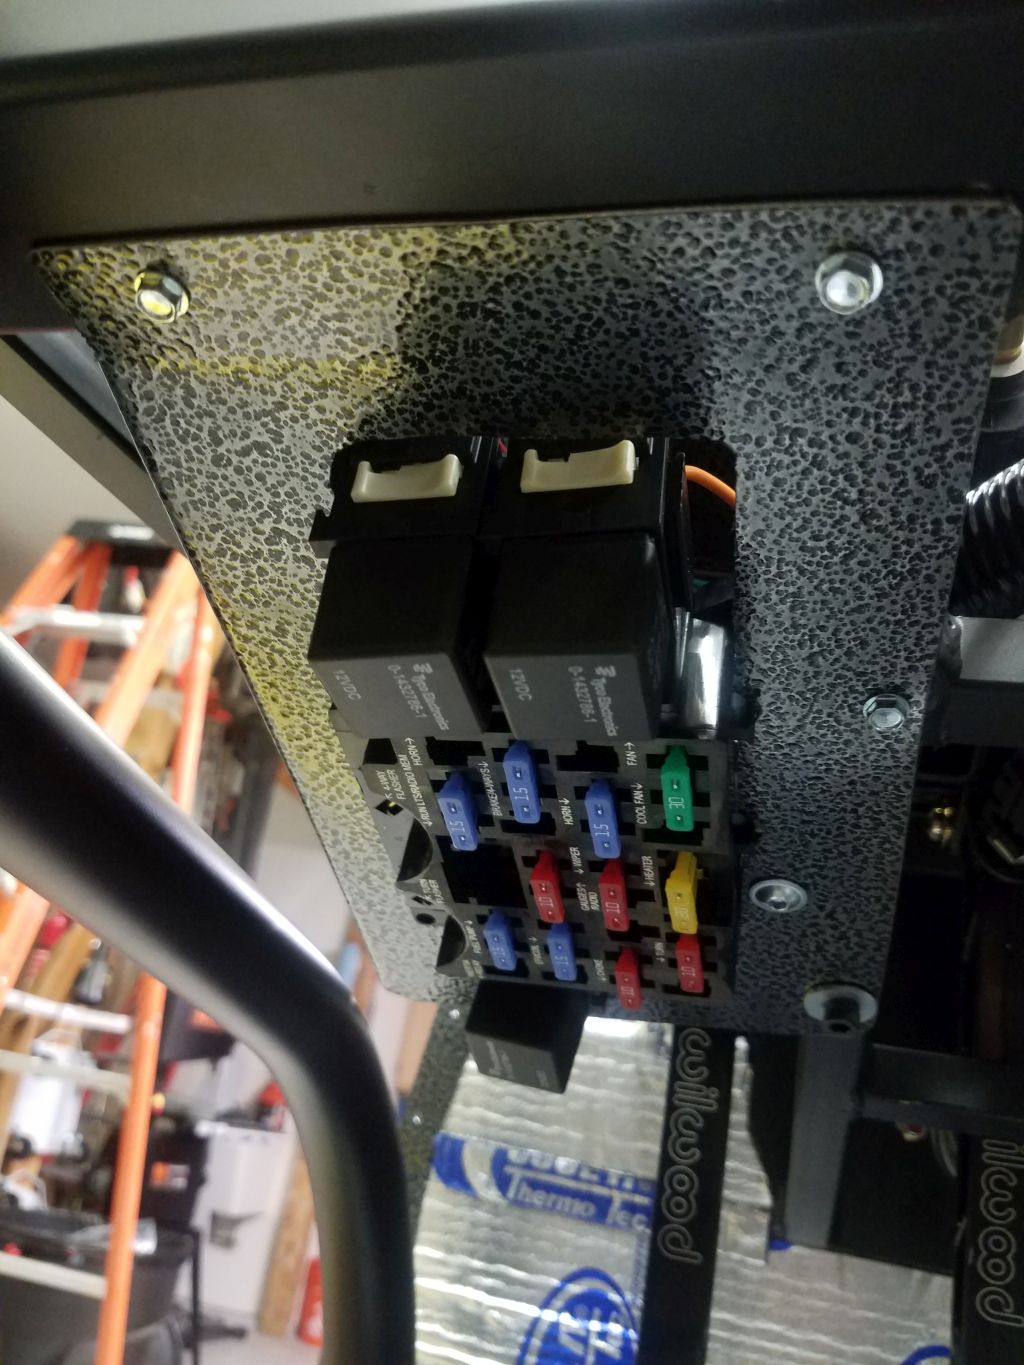
Drip guard, this will help eliminate any brake fluid from MC or water leaking through windshield channel coming in on the fuse panel. I can only assume fluids/water leaking down on an exposed fuse panel would not be a good outcome. I currently have it velcro'd in place, I wanted to make this easily removable just in case it ever needed to be pulled out. I am also not 100% sure there needs to be access in that area to install the windshield. For time being I will leave the velcro which seems to be holding fine seeing as the guard is very light weight not supporting anything. I was planning on adding a couple sheet metal screws once I confirm this piece will not be in the way for windshield install.


I was also able to drop off my body, hood, doors and trunk to my painter to start prepping the body before fitment. My painter will be fitting everything for me, he said he could start sanding and prepping which would help expedite the paint process down the road once I am ready to go. I took him up on the offer seeing as my body was just sitting in the garage collecting dust.
For anyone needing to transport the body only the flatbed seemed to work well. I did secure blankets and foam padding under the body where it touched the trailer. I also used multiple strap points to eliminate the body shimmering from the wind while in transport. All went well it survived a 45 minute drive on the freeway
Last edited by Fman; 07-11-2020 at 06:46 PM.
-
07-11-2020, 04:12 PM
#125
Senior Member

Applaud your effort on the guard over the fuse panel. Tried to do something similar on my #7750 build. Haven't bothered on the builds since then. Guess I'm used the idea of the fuse panel location plus haven't experienced any problems. Yours doesn't hurt but you don't want brake fluid leaking in any situation. I think in general the Wilwood MC's are pretty reliable. I did have one on my Coupe that dripped slightly not longer after installed and first bled. Just enough to fill the rubber boot over time. Was a brand new MC and found a slightly defective seal. Other than that, I've had no issues with three cars and three MC's in that spot on each. Haven't heard a lot from others. For the water on the windshield post, what you want to do there is after final assemble seal the underside of where the post goes into the body. A good bead of silicone all around the post and pushed into the joint will keep water out. And yes I do think that's going to make your windshield bolts a little cumbersome to access and tighten. Maybe you have it so it can be moved out of the way temporarily?
Build 1: Mk3 Roadster #5125. Sold 11/08/2014.
Build 2: Mk4 Roadster #7750. Sold 04/10/2017.
Build Thread
Build 3: Mk4 Roadster 20th Anniversary #8674. Sold 09/07/2020.
Build Thread and
Video.
Build 4: Gen 3 Type 65 Coupe #59. Gen 3 Coyote. Legal 03/04/2020.
Build Thread and
Video
Build 5: 35 Hot Rod Truck #138. LS3 and 4L65E auto. Rcvd 01/05/2021. Legal 04/20/2023.
Build Thread. Sold 11/9/2023.
-
07-11-2020, 06:41 PM
#126
Senior Member
Originally Posted by
edwardb
Applaud your effort on the guard over the fuse panel. Tried to do something similar on my #7750 build. Haven't bothered on the builds since then. Guess I'm used the idea of the fuse panel location plus haven't experienced any problems. Yours doesn't hurt but you don't want brake fluid leaking in any situation. I think in general the Wilwood MC's are pretty reliable. I did have one on my Coupe that dripped slightly not longer after installed and first bled. Just enough to fill the rubber boot over time. Was a brand new MC and found a slightly defective seal. Other than that, I've had no issues with three cars and three MC's in that spot on each. Haven't heard a lot from others. For the water on the windshield post, what you want to do there is after final assemble seal the underside of where the post goes into the body. A good bead of silicone all around the post and pushed into the joint will keep water out. And yes I do think that's going to make your windshield bolts a little cumbersome to access and tighten. Maybe you have it so it can be moved out of the way temporarily?
Paul, thanks for the input, I was afraid that plate might get in the way for the windshield install. When I dropped my body off the painter mentioned not to permanently affix the fuse panel because he needs to drop it down in order to mount the windshield. The plate is only held on with velcro right now so it can easily be taken out. I might just leave it this way and see if it can be re-affixed after the windshield is mounted. Good to hear about the Wilwood MC's not having any leaking problems does not look like a fun project swapping one of those out once the body is on. I figured the plate is some cheap insurance just in case, hopefully I will be able to keep it mounted once the windshield is installed. If not it goes back into the scrap pile
-
07-12-2020, 06:45 AM
#127
Senior Member
Originally Posted by
Fman
When I dropped my body off the painter mentioned not to permanently affix the fuse panel because he needs to drop it down in order to mount the windshield...
As long as you keep the area above the 2-inch tube and just to the right of the windshield mounting bracket clear, it's possible to reach in there to install and tighten the windshield bolts. Not necessary to drop the fuse panel in that case in my experience. Block that area (I did on my #7750 build unfotunately...) and yes, dropping the fuse panel is the only option. This picture is early in the wiring of #8674 and the area I'm describing is open.
Build 1: Mk3 Roadster #5125. Sold 11/08/2014.
Build 2: Mk4 Roadster #7750. Sold 04/10/2017.
Build Thread
Build 3: Mk4 Roadster 20th Anniversary #8674. Sold 09/07/2020.
Build Thread and
Video.
Build 4: Gen 3 Type 65 Coupe #59. Gen 3 Coyote. Legal 03/04/2020.
Build Thread and
Video
Build 5: 35 Hot Rod Truck #138. LS3 and 4L65E auto. Rcvd 01/05/2021. Legal 04/20/2023.
Build Thread. Sold 11/9/2023.
-
Post Thanks / Like - 0 Thanks, 1 Likes
Fman liked this post
-
07-12-2020, 05:22 PM
#128
Senior Member
-
07-12-2020, 08:41 PM
#129
Senior Member
Dash begins, "Dazed and confused"
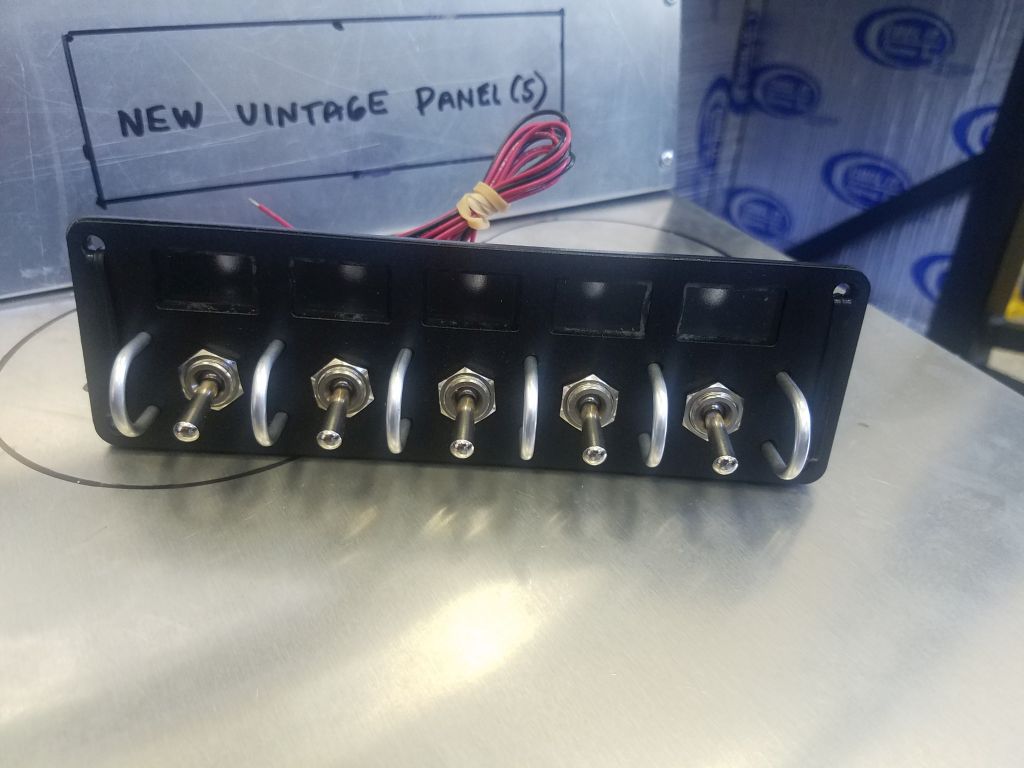
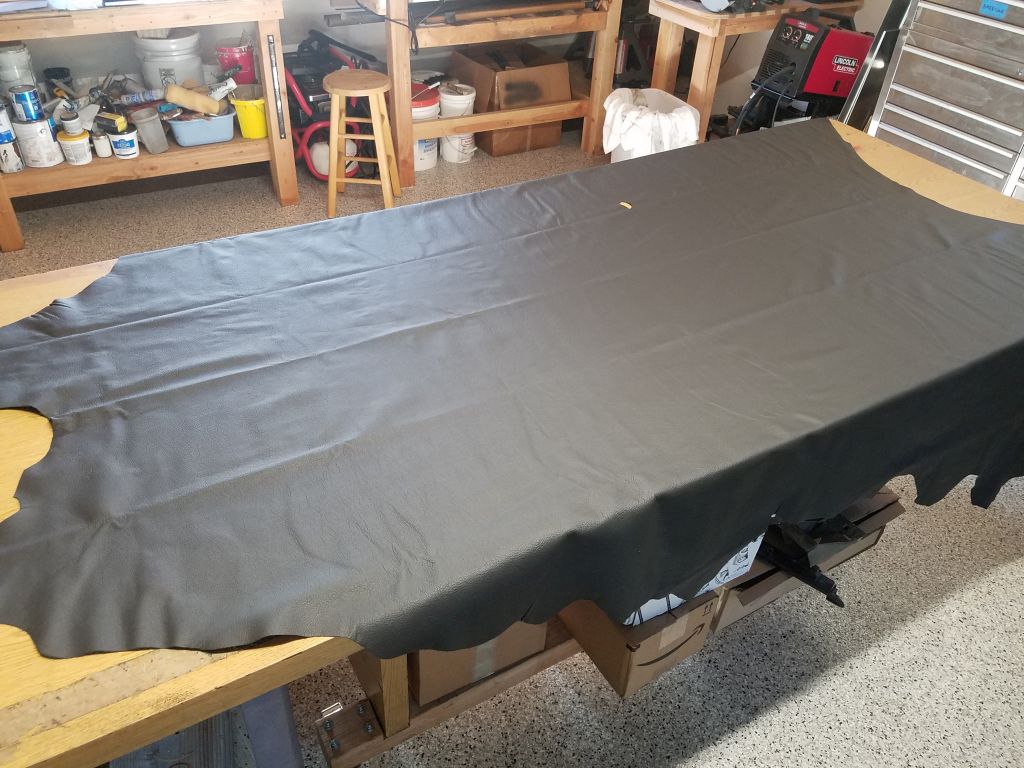
I started to plot out my dash today, this is definitely a slow going process. I found myself staring at the dash with really no clue what I should do, then slowly the wheels started turning and I began to come up with a plan. My plan is to keep the dash simple with a modified comp layout, I ordered a New vintage switch panel for my toggle switches. It will be simple and functional for headlights, hazards, footbox blowers, and whatever else I want to wire into the switch. I also ordered some automotive leather hide to cover the dash that Mark Eaton recommended (thanks again Mark), looking forward to seeing this arrive later in the week.
After going through all the FFR parts they supplied I realized I wont be using anything they sent me other than the ignition switch and gauges. The indicator lights, toggle switches and dash covering do not seem to be of good quality I was hoping for so I am going to source out from different vendors.
Here are some links:
New vintage toggle switch panels:
https://www.summitracing.com/parts/NVU-21101-01
https://www.summitracing.com/parts/NVU-21310-01
Automotive leather hide:
https://vod.ebay.com/vod/FetchOrderD...&ul_noapp=true
I do have a few questions I was hoping to get some guidance on before I start cutting any holes. Any input would be appreciated or any tips I might be missing with the dash install.
The Russ Thompson turn signal, I am assuming I would want to install this before I cover the dash with leather?
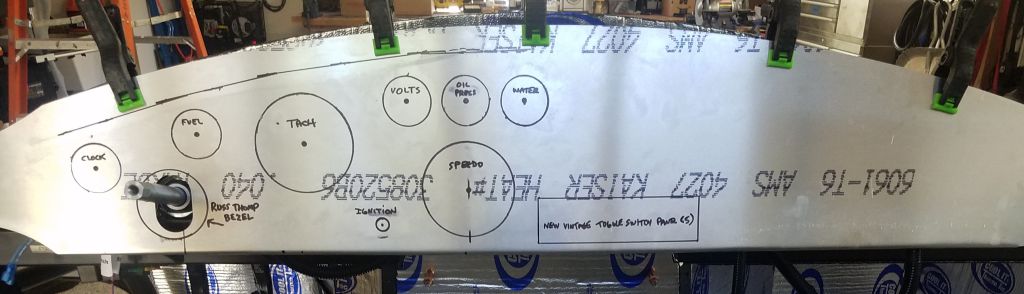
The lower drivers side corner I want to confirm the body wont be covering up any of the gauge in the corner?
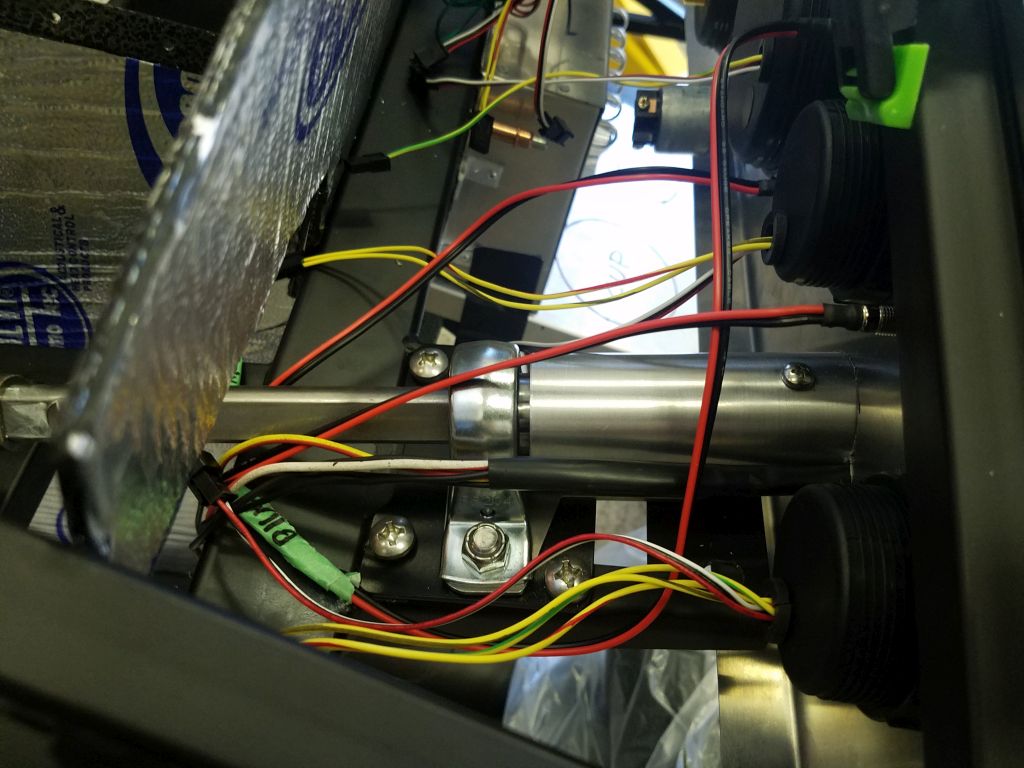
Does the steering shaft need to be aligned anywhere in particular inside the collar cut out? This is where it landed after I centered and leveled out the dash.
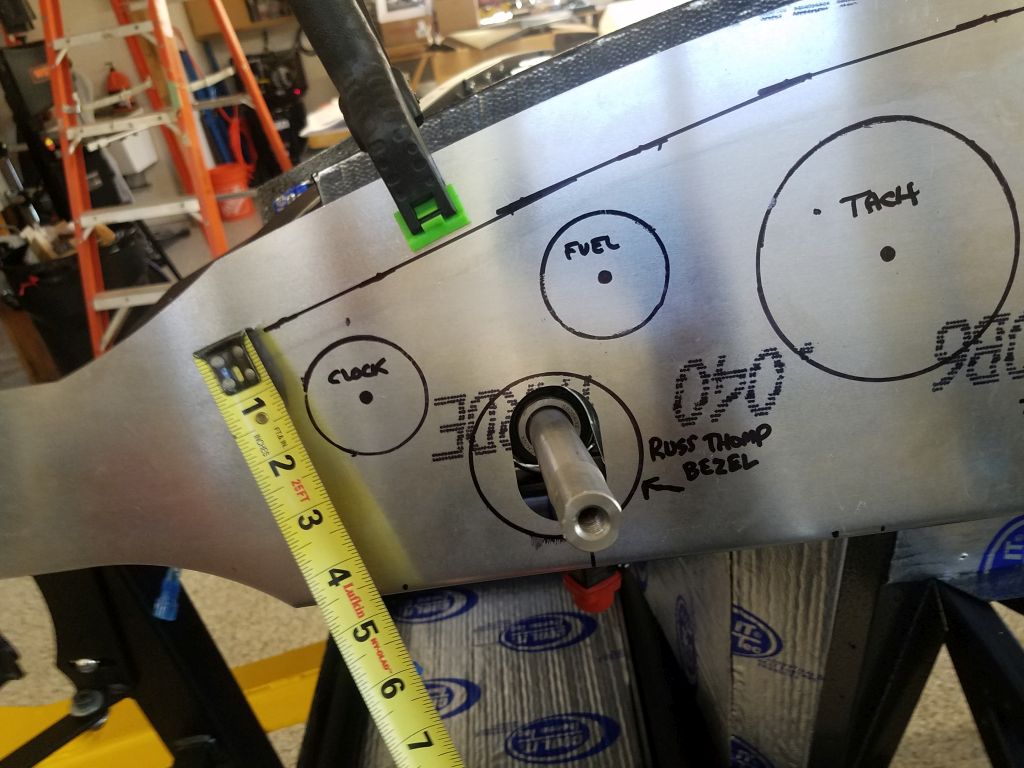
When aligning the dash center the dash level with the center cross bar leaving the 3/8-1/2" overlay at the ends?
-
07-12-2020, 10:32 PM
#130
Senior Member
Some comments on your recent post, some editorial in nature:
- For the Russ Thompson turn signal assembly, first center the dash L-R in the steering column cutout. Once you have the height, then determine the cutout required. I allow enough space to pull the covering through and pie cut and glue on the back side. The bezel on the front will make sure the covering stays put. The bezel that works with the RT turn signal is from Mike Everson (Replicaparts) not RT. Unless he's offering them now, which is new to me.
- I personally would relocate some of your gauges. Your engine health gauges should be in front of you. So as you regularly sweep your gauges while driving, they're in your direct vision. I would definitely move oil pressure and water temp to where you have the clock and fuel gauge. In order of importance (at last my opinon): Oil pressure, water temp (maybe a tie between those two), voltage, fuel, clock.
- I agree the switches and indicator lights are kind of a mixed bag because mainly they don't all match. But quality wise I think they're fine. Many have used them. But count me as one who's changed some of them. But for appearance only. Not because I didn't think they would do the job.
- For the headlight switch, I hope you realize you're kind of jumping into the deep end of the pool by replacing that with a toggle switch panel. Have you looked at a schematic of the provided headlight switch and are ready to duplicate what it does? Controls running lights, headlights, gauge lights, courtesy lights, and dimming of the gauge lights although that doesn't work if you have Speedhut gauges. It gets direct battery power via the ignition switch. All but the headlights route through the fuse panel. For the headlights, the switch has its own internal re-settable circuit breaker which would need to be duplicated. None of it's rocket science. But just want to confirm you're OK with it. IMO, the nice chrome plated pull knob that controls everything is pretty clean and works well. BTW, those New Vintage switch panels are nice. That's a local company for me and did the custom switches for my Coupe build. Turned out great.
Last edited by edwardb; 07-12-2020 at 10:35 PM.
Build 1: Mk3 Roadster #5125. Sold 11/08/2014.
Build 2: Mk4 Roadster #7750. Sold 04/10/2017.
Build Thread
Build 3: Mk4 Roadster 20th Anniversary #8674. Sold 09/07/2020.
Build Thread and
Video.
Build 4: Gen 3 Type 65 Coupe #59. Gen 3 Coyote. Legal 03/04/2020.
Build Thread and
Video
Build 5: 35 Hot Rod Truck #138. LS3 and 4L65E auto. Rcvd 01/05/2021. Legal 04/20/2023.
Build Thread. Sold 11/9/2023.
-
07-12-2020, 10:58 PM
#131
Senior Member
Originally Posted by
edwardb
Some comments on your recent post, some editorial in nature:
- For the Russ Thompson turn signal assembly, first center the dash L-R in the steering column cutout. Once you have the height, then determine the cutout required. I allow enough space to pull the covering through and pie cut and glue on the back side. The bezel on the front will make sure the covering stays put. The bezel that works with the RT turn signal is from Mike Everson (Replicaparts) not RT. Unless he's offering them now, which is new to me.
- I personally would relocate some of your gauges. Your engine health gauges should be in front of you. So as you regularly sweep your gauges while driving, they're in your direct vision. I would definitely move oil pressure and water temp to where you have the clock and fuel gauge. In order of importance (at last my opinon): Oil pressure, water temp (maybe a tie between those two), voltage, fuel, clock.
- I agree the switches and indicator lights are kind of a mixed bag because mainly they don't all match. But quality wise I think they're fine. Many have used them. But count me as one who's changed some of them. But for appearance only. Not because I didn't think they would do the job.
- For the headlight switch, I hope you realize you're kind of jumping into the deep end of the pool by replacing that with a toggle switch panel. Have you looked at a schematic of the provided headlight switch and are ready to duplicate what it does? Controls running lights, headlights, gauge lights, courtesy lights, and dimming of the gauge lights although that doesn't work if you have Speedhut gauges. It gets direct battery power via the ignition switch. All but the headlights route through the fuse panel. For the headlights, the switch has its own internal re-settable circuit breaker which would need to be duplicated. None of it's rocket science. But just want to confirm you're OK with it. IMO, the nice chrome plated pull knob that controls everything is pretty clean and works well. BTW, those New Vintage switch panels are nice. That's a local company for me and did the custom switches for my Coupe build. Turned out great.
This definitely clarifies a lot, as always Paul I appreciate the info...
All my gauges are roughed in right now, subject to change location along with how I am going to run the Vintage switch panel. I was not aware of the complexity of the headlight switch, so I might have to use the supplied pull switch for headlights and the New vintage for my other accessories. I am sure some of the layout will be changing once I get all the parts in my hand and can start visualizing everything. Today was definitely a "get the ball rolling" day...
I did order RT bezel from Mike Everson back when I ordered the RT turn signal, Russ actually recommended it so hopefully it does the job, looks like a nice piece.
-
07-13-2020, 06:54 AM
#132

Steve >> aka: GoDadGo

Question:
Will you be able to get your hands in there, near the fuse block, to install the windshield?
-
07-13-2020, 11:43 AM
#133
Senior Member
Originally Posted by
GoDadGo
Question:
Will you be able to get your hands in there, near the fuse block, to install the windshield?
More than likely not, going to have to come up with a Gen 2 revision or toss out the idea.
-
07-19-2020, 10:44 PM
#134
Senior Member
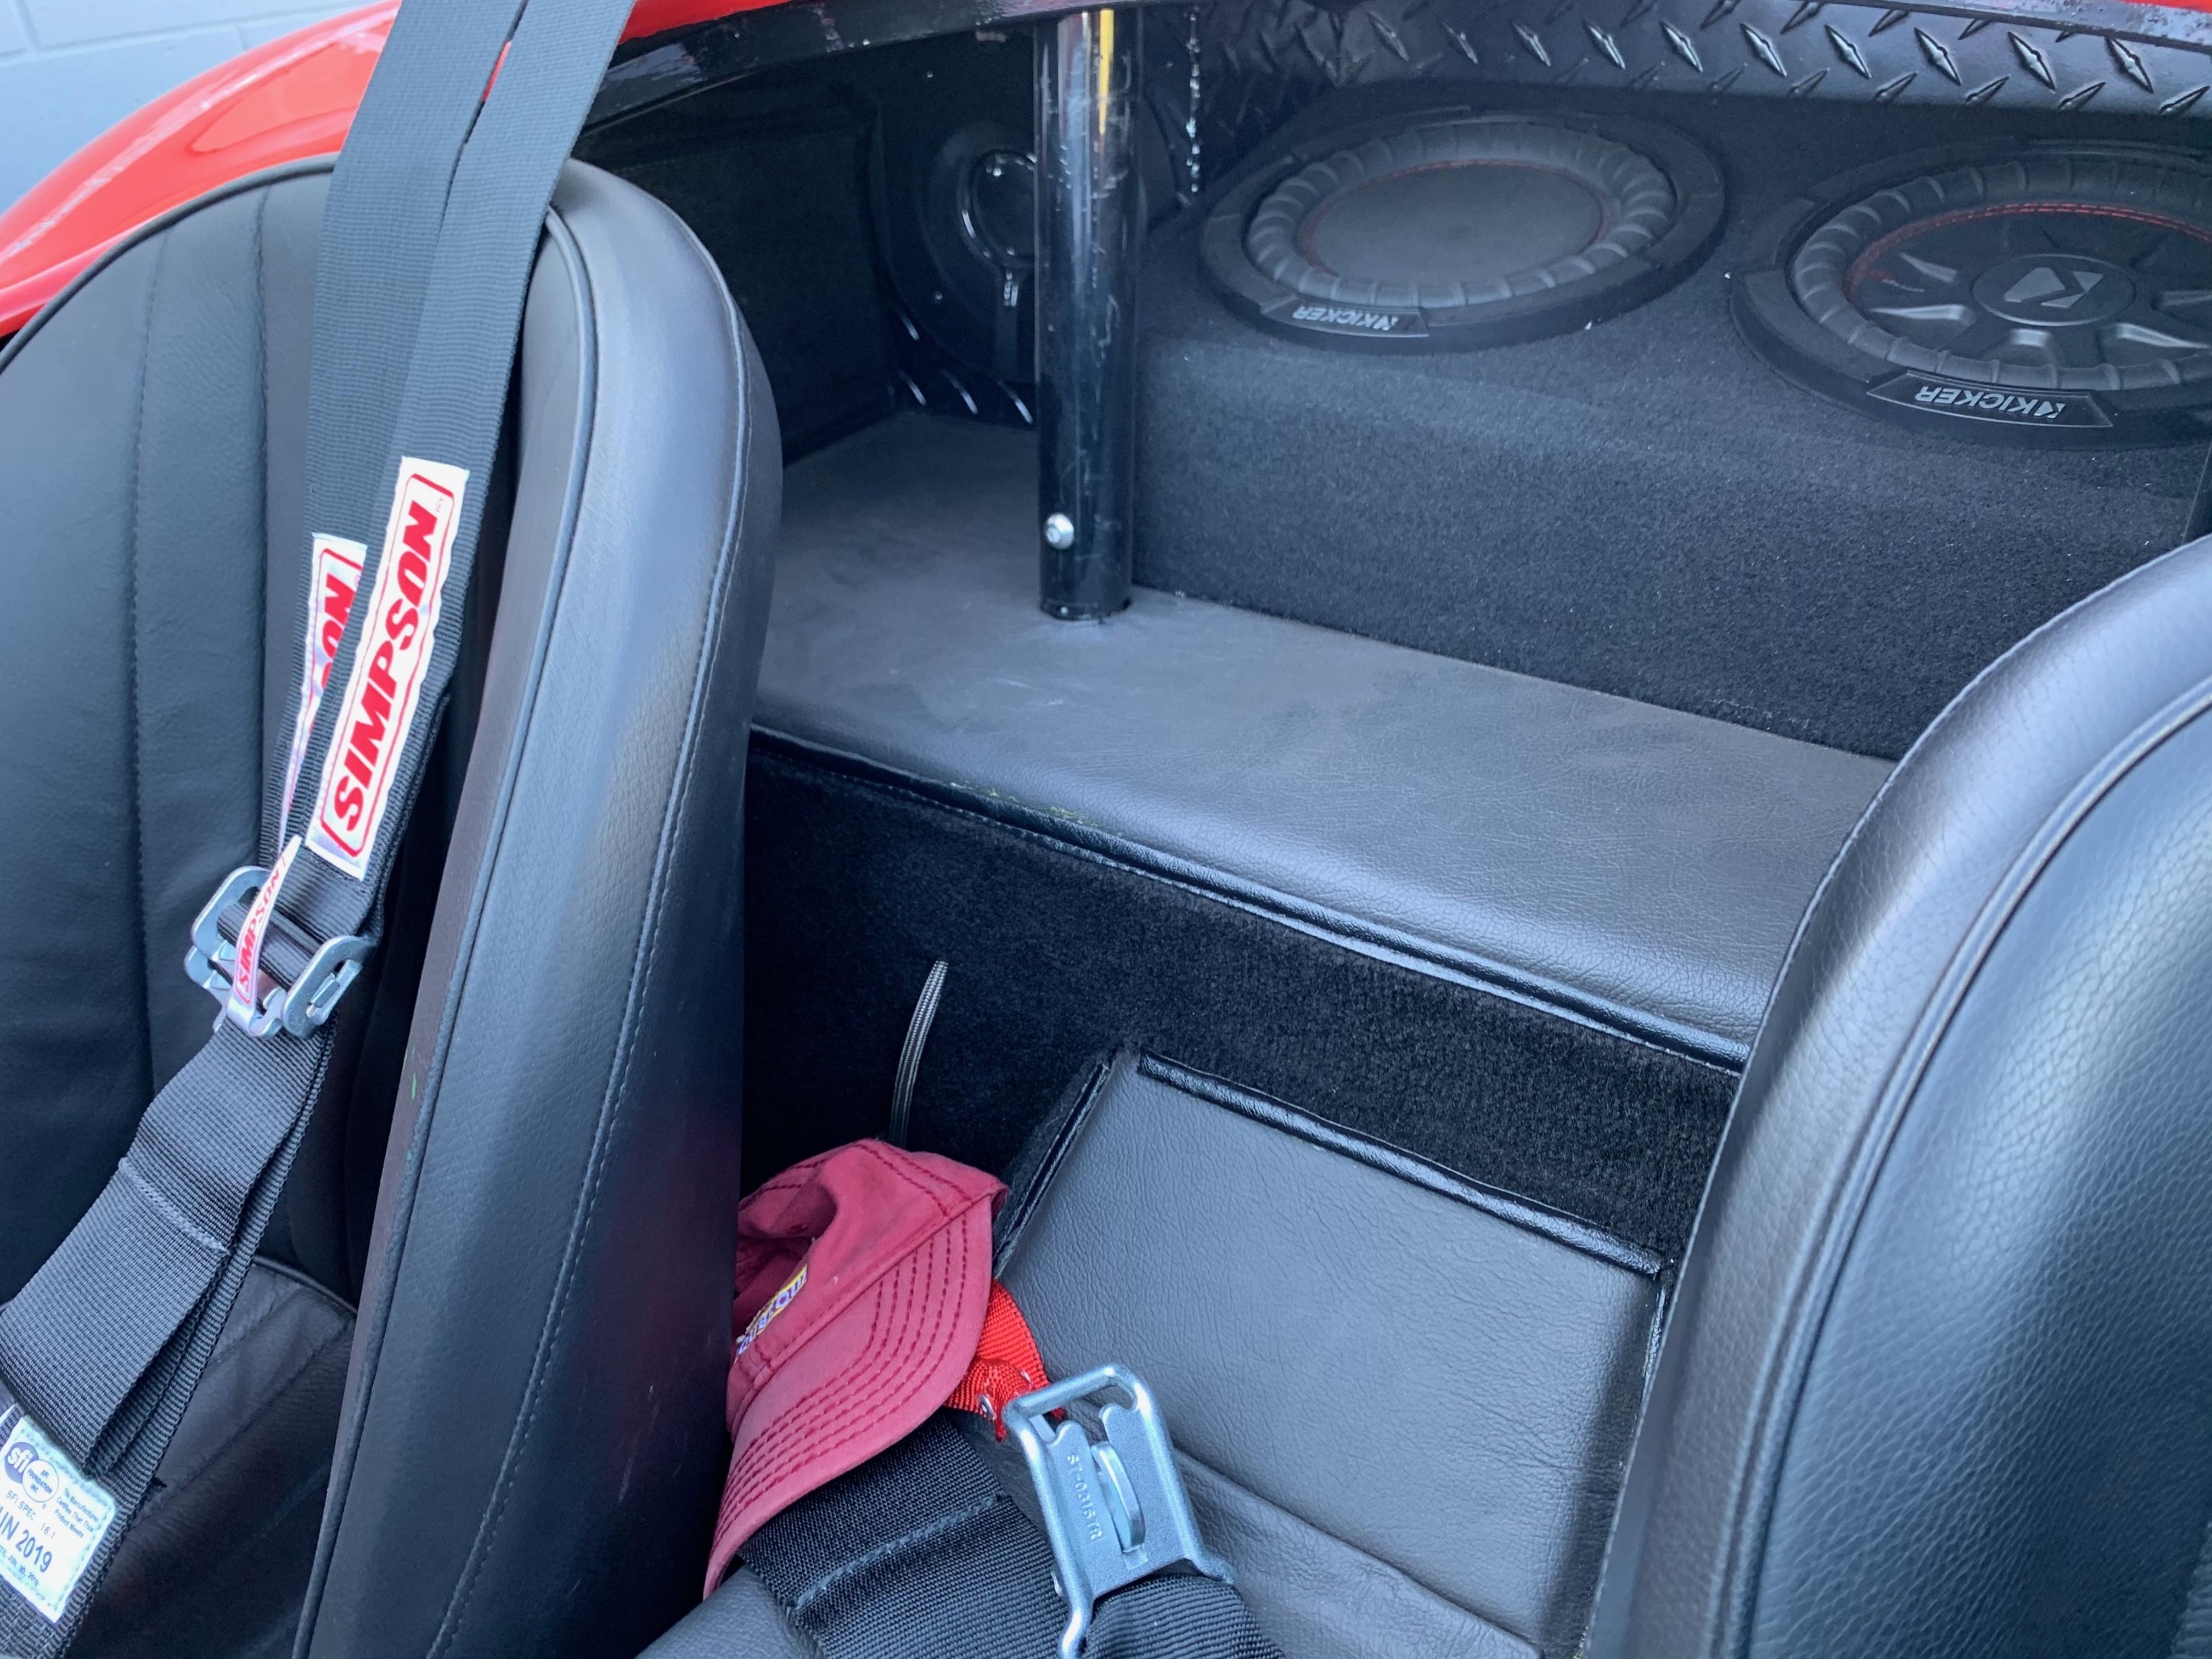
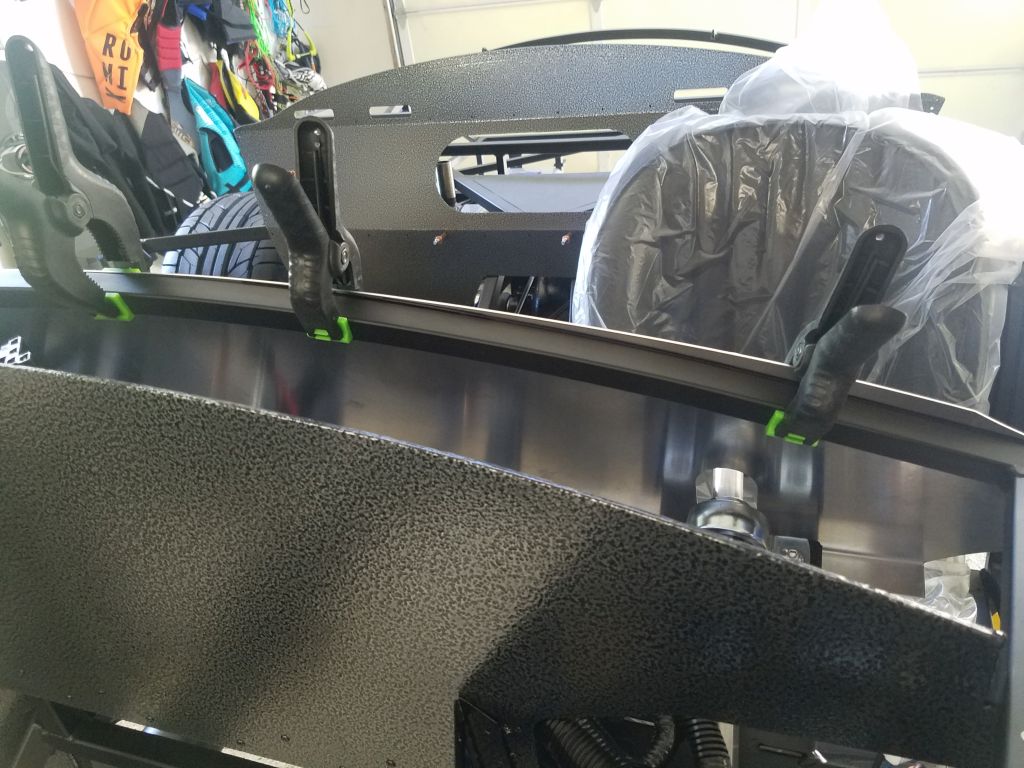
Fab-tabulous day
Have had very limited amount of time on the build lately, just a busy month. However, I had made some progress on my dash, so far the dash is my favorite part of this build - I like how you can customize it and fabricate some alum sheet metal for it. Definitely feels like a custom part of the build and so far I am glad I went with a blank dash to create my own vision. I am enjoying the metal work, the .040 sheets I bought are perfect for the lower dash box.
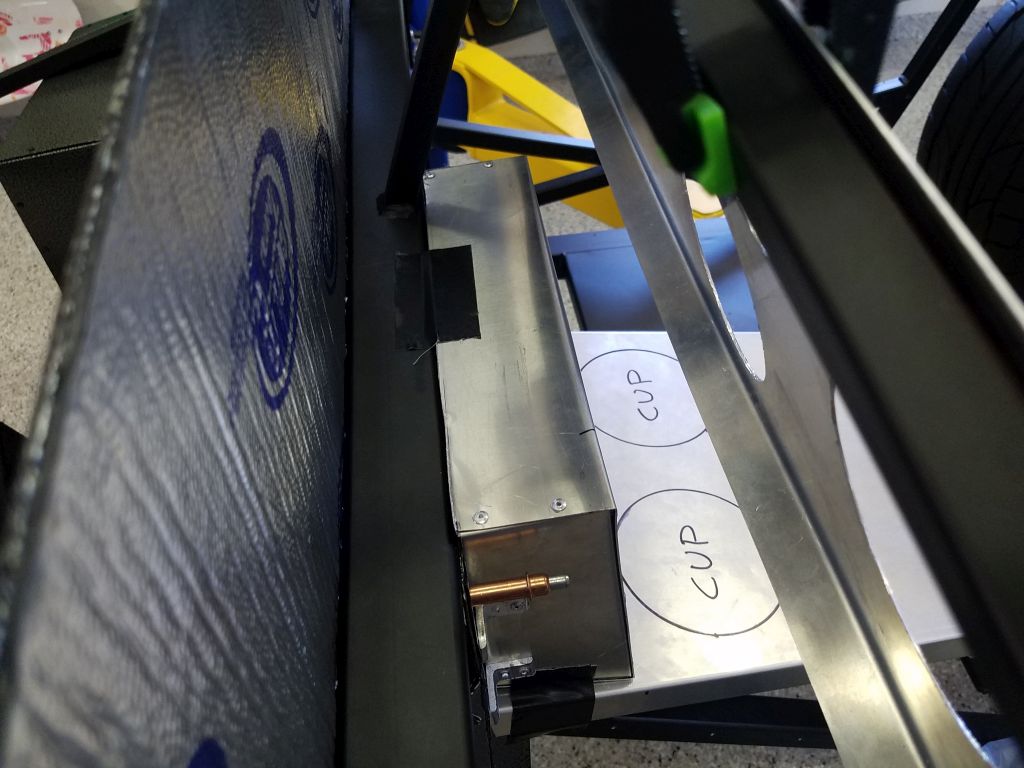
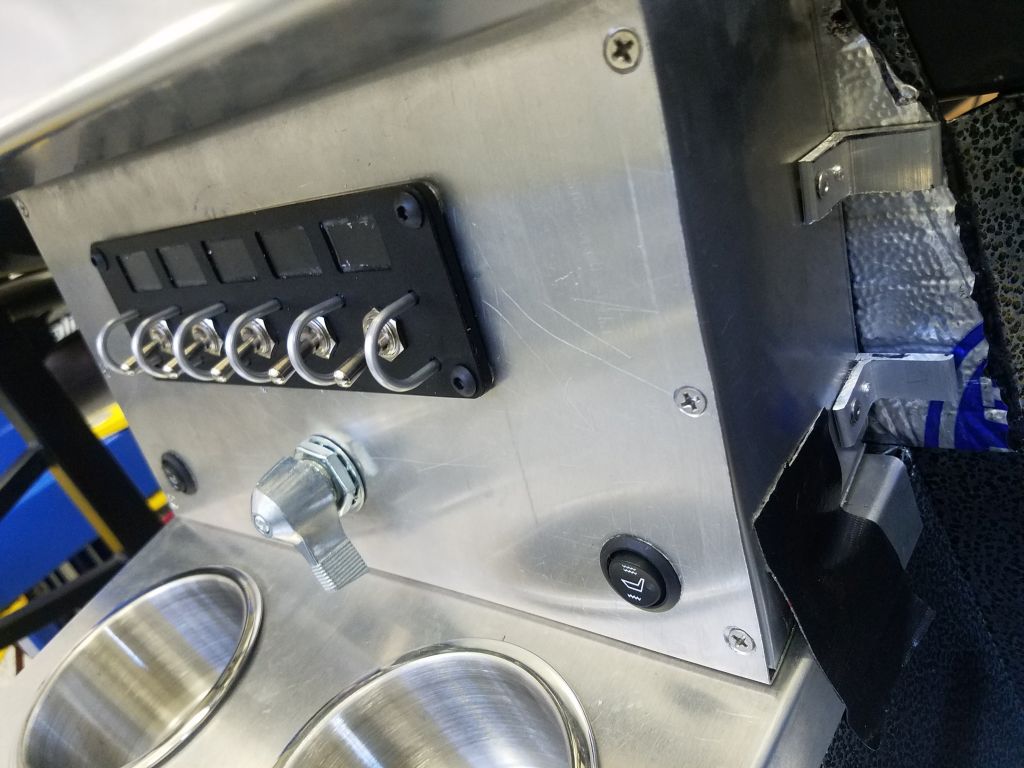
I did manage to cut all the gauge holes, and fabricate my lower dash panel box. My goal is to have the least amount of toggle switches possible on the main dash panel. I will only have ignition, horn and headlight switch on my main dash. The lower panel box will house the New Vintage toggle switch panel and Ron Francis battery shut off. I also wanted to be able to have my cup holders in front of the panel box which I was able to accomplish.
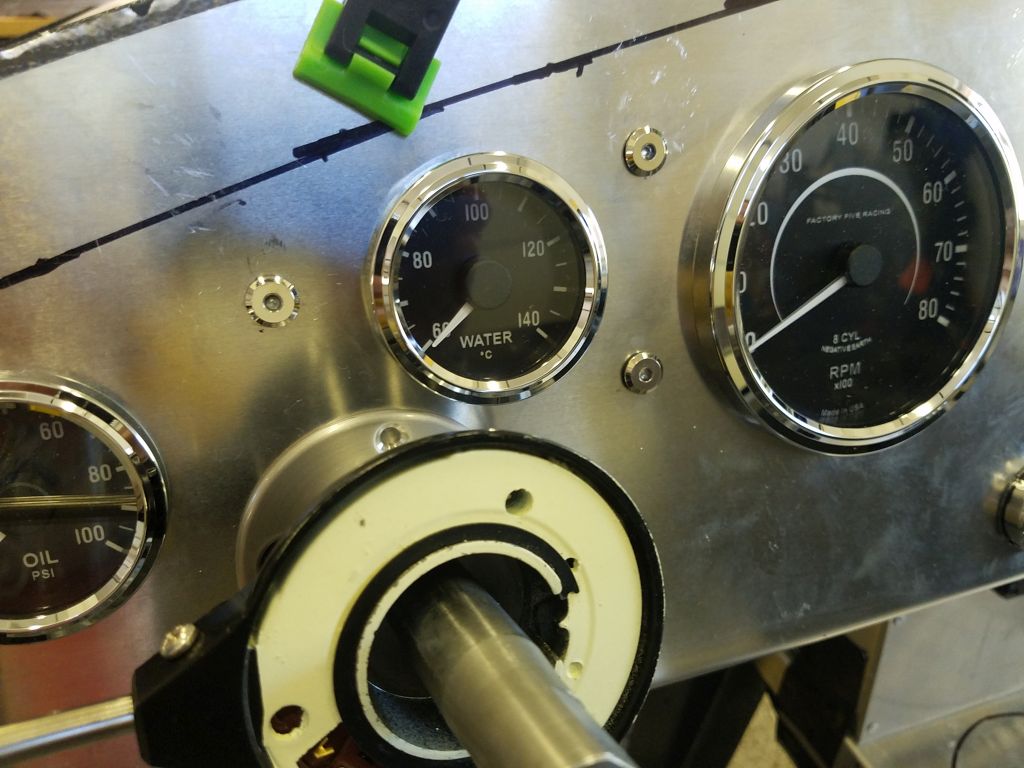
Dash gauge holes cut out, I am also adding a 10" grab bar for passenger and ordered the street works LED indicator lights for turn signals and high beam Edward B used on his build. I feel like this dash is just about what I was hoping for, there might be some little tweaks coming but overall I am liking the layout.
https://watsons-streetworks.com/prod...sh-indicators/
https://www.amazon.com/gp/product/B0...?ie=UTF8&psc=1
I used 2 1/16" and 4" hole saw for the gauge holes with a WEN drill press. These size holes seem about perfect once the dash is wrapped in leather. The WEN is a decent drill press for weekend warrior, multi speed and worked great for cutting the dash gauge holes.
https://www.amazon.com/WEN-4208-5-Sp...5215826&sr=8-3
https://www.amazon.com/gp/product/B0...?ie=UTF8&psc=1
https://www.amazon.com/gp/product/B0...?ie=UTF8&psc=1
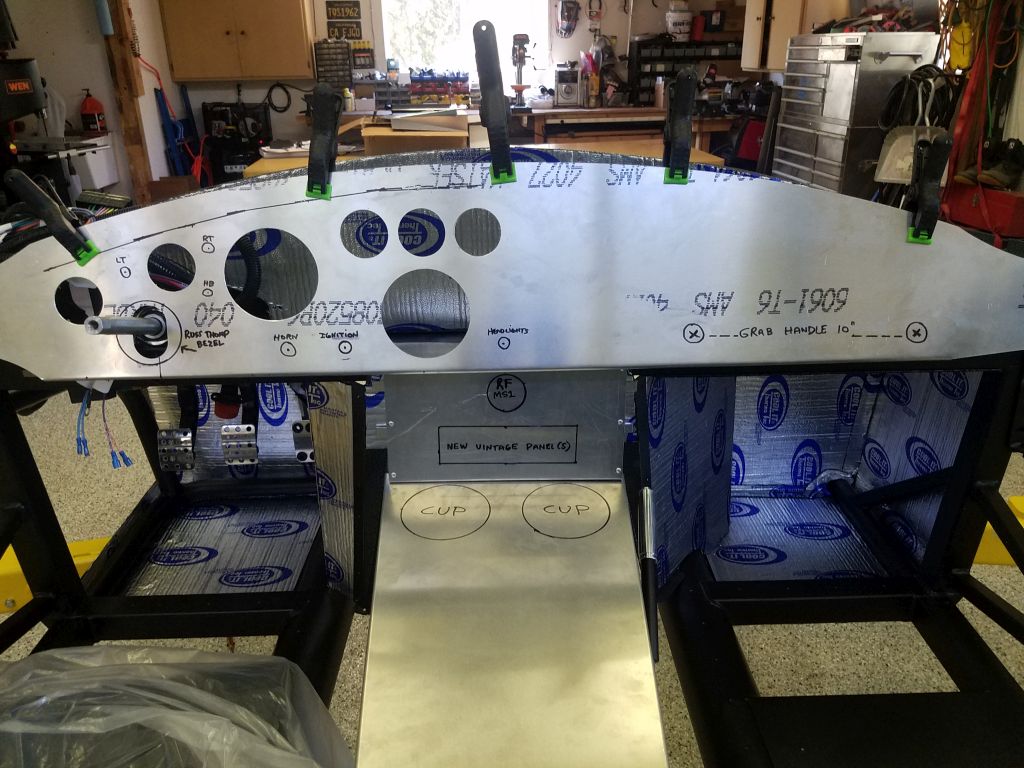
Lower dash box which will house the RF MS1 switch and new vintage toggle panel. When finished it will be covered in black leather. I added two L brackets on each side to secure it and be able to easily remove if needed. Will use some rivnuts for final assembly. I am still debating if I will run the NV panel on top and RF MS1 on bottom, or even moving the RF MS1 to the top of the box, still not completely sure on this yet.
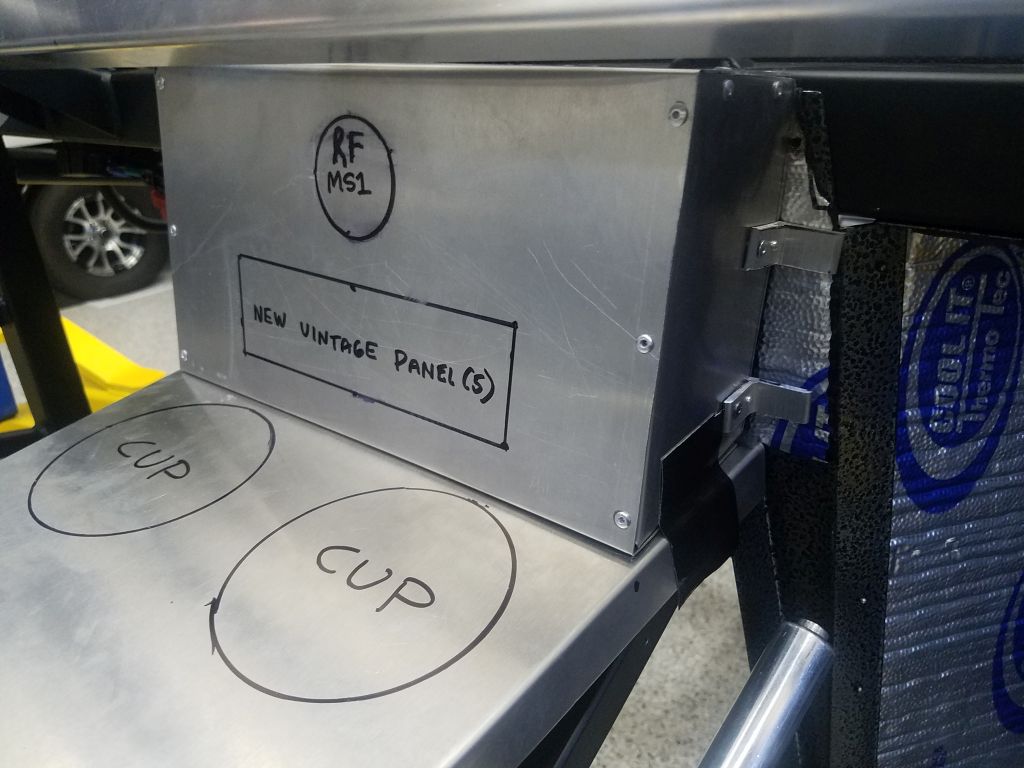
Top shot of panel box, it tapers from approx 3 3/4" bottom to around 2 3/4" at the top.
This showed up today while I was working in the shop, the NV panel is a very nice piece! seems to be very high quality and was exactly what I was hoping for.
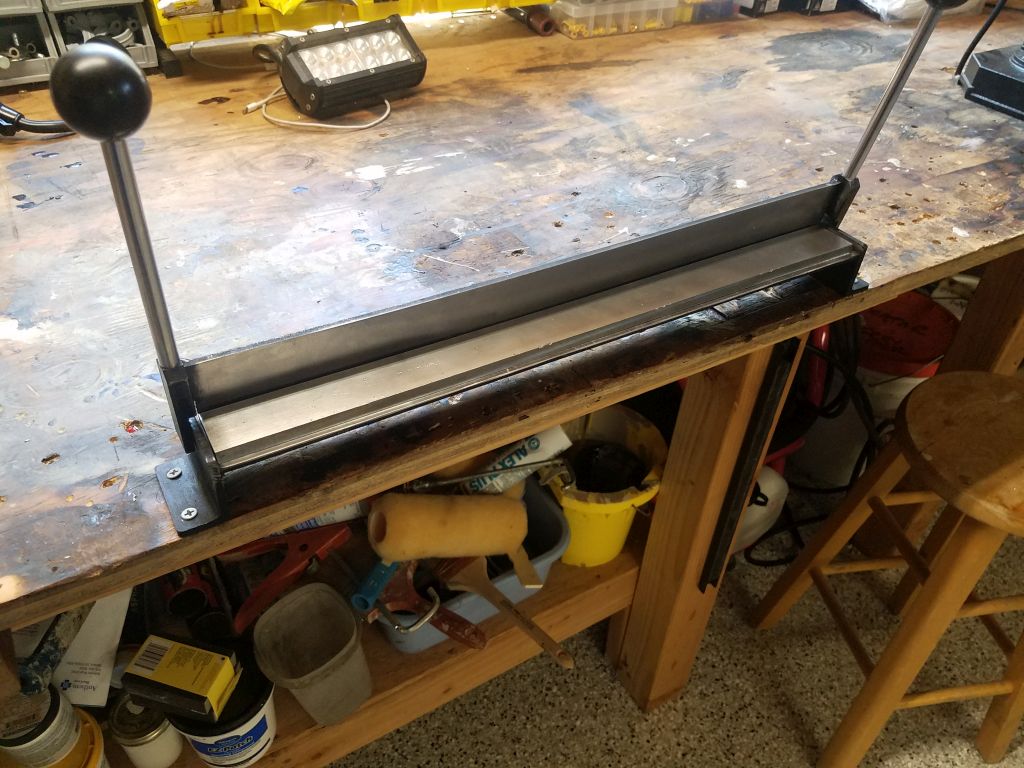
I also picked up this 18" Bender brake from harbor freight, it has been working great for bending the alum sheet metal.
https://www.harborfreight.com/18-inc...ake-39103.html
Last edited by Fman; 07-20-2020 at 01:48 PM.
-
Post Thanks / Like - 0 Thanks, 1 Likes
-
07-23-2020, 01:31 PM
#135
Senior Member
Hope everyone is doing well...
Made a little more progress on my dash, I just about have the dash layout completed and got my Russ Thompson turn signal mounted. I am going to more than likely run my headlight switch under the dash out of sight. I also am liking the grab handle I ordered, its beefy and comfortable to put your hands around. I do have a question about the Russ Thompson turn signal (please see attached pic) that maybe someone can answer for me?
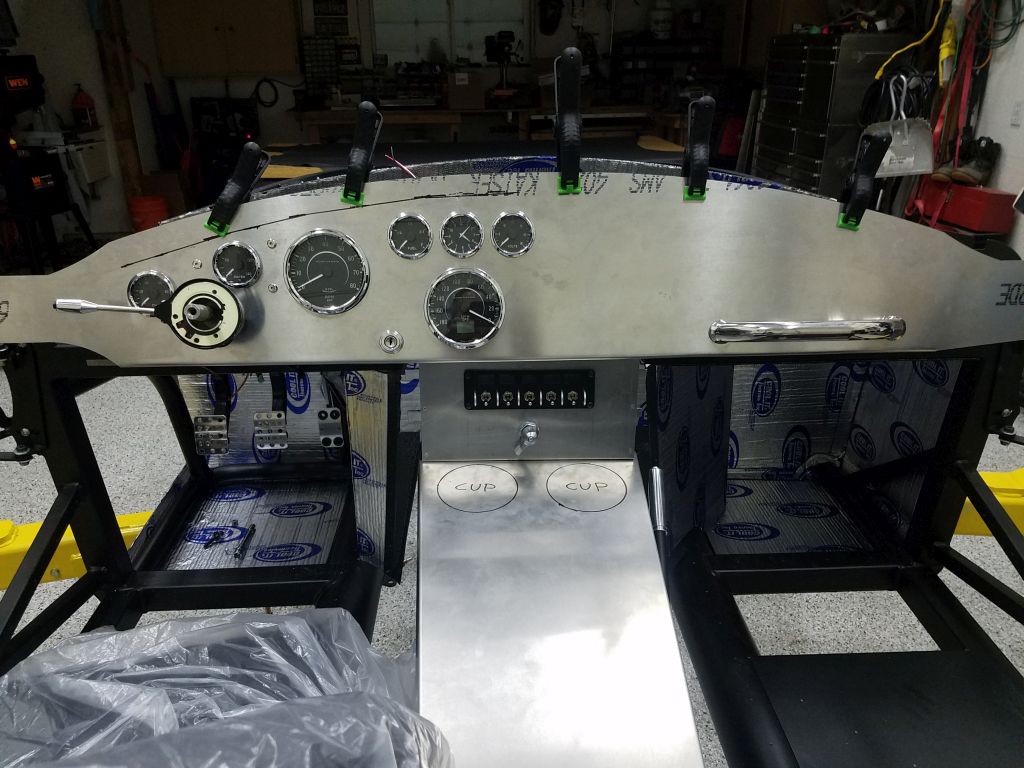
I ended up putting the RF SW1 battery switch on bottom and the NV panel on top, the NVP is held on with rivnuts for easy removal if needed. I also ended up purchasing some flush mounted blind rivets from McMaster car that are flat and hopefully wont protrude through the leather when wrapped. Here is the link on them. And thanks again EdwardB for the rivet recommendation, they are going to work out great.
https://www.mcmaster.com/catalog/126/3518
10" grab handle, still need to make a few brackets to re-inforce under the dash

Street works LED indicator lights, recommended by EdwardB, looks like a nice quality part!
Russ Thompson turn signal, I do have a question about this. I have heard people are cutting this down to bring the wheel closer to the dash? Does this look like the correct distance from the dash? I have not done any modification to this yet.

My leather hyde also arrived, this stuff looks great! Thanks again to Mark Eaton for the recommendation, I will have plenty to do my dash, lower console box and center shift console. I am going to leave it for a few days to let it relax and flatten as much as possible.
-
Post Thanks / Like - 0 Thanks, 2 Likes
-
07-23-2020, 01:37 PM
#136
Senior Member
Techna fit brake lines
One other item I was able to get wrapped up was my rear brake lines, I was having issues with the supplied FFR lines rubbing on my rear tires and suspension components. I called Techna Fit and they made me a pair of custom lines, they now fit perfect with no rubbing issues. Techna fit is excellent to work with and will make you any custom brake or PS line you need.
I can now move forward and get my brake system bled out.
https://www.techna-fit.com/
Here was the original line

Techa line installed

Last edited by Fman; 07-23-2020 at 01:40 PM.
-
Post Thanks / Like - 0 Thanks, 1 Likes
-
08-03-2020, 11:43 PM
#137
Senior Member
-
Post Thanks / Like - 0 Thanks, 1 Likes
-
08-04-2020, 02:16 PM
#138
25th Anniversary #9772

looks great!
just an idea, I wonder if you could put some aluminum tape over your flat head rivets to smooth the transition further?
-
08-04-2020, 03:33 PM
#139
Senior Member
Originally Posted by
toadster
looks great!
just an idea, I wonder if you could put some aluminum tape over your flat head rivets to smooth the transition further?
Thanks Todd, work in progress... that tape definitely might be an option....
I think I am going to have to go with a countersunk head and taper the hole. Looking back I wish I would have went with a thicker dash, it would make it much easier to countersink a hole with more material to work with. I will be disappointed if you can see any of the rivet/screw head once the dash is covered. Starting over at this point would be my last resort I have at least a couple full days of work into my dash. I've enjoyed the process but it definitely has been very time consuming and slow going.
If anyone has an idea for a good countersunk screw head please post it up. I am going to order a few of these that Edwardb recommended and see if I can make them work.
https://www.mcmaster.com/90729A112/
Last edited by Fman; 08-04-2020 at 04:44 PM.
-
08-04-2020, 03:58 PM
#140
Senior Member
Originally Posted by
Fman
That tape definitely might be an option....
I think I am going to have to go with a countersunk head and taper the hole. Looking back I wish I would have went with a .090 thicker dash, it would make it much easier to countersink a hole with more material to work with. I will be disappointed if you can see any of the rivet/screw head once the dash is covered. Starting over at this point would be my last resort I have at least a couple full days of work into my dash. I've enjoyed the process but it definitely has been very time consuming and slow going.
If anyone has an idea for a good countersunk screw head please post it up. I am going to order a few of these that Edwardb recommended and see if I can make them work.
https://www.mcmaster.com/90729A112/
As I said in my PM, anything other than dead flat will show through. Tape may spread it out, but it will still show. Don't do it. Those 6-32's will work. So would 4-40's. Surprised you didn't find them at your local hardware. Mine has those sizes all day long. I also like these: https://www.mcmaster.com/97530A097/. I also routinely use plane old solid aluminum rivets and pound them with a hammer against a solid surface like a small anvil. Low tech but works really well. The aluminum is quite soft and bucks easily. https://www.mcmaster.com/97483A075/. The thickness of the material is fine. Don't feel like you have to bury the head of the screw (or rivet). Do the best you can. As long as it's holding against the tapered countersink, it's not going anywhere. One installed, whatever remains above file or sand flush. Those brackets are mainly holding in shear (up/down) versus normal stress. With three per and 6 brackets (!!!) you will be OK with a reasonable mechanical attachment.
Last edited by edwardb; 08-04-2020 at 04:03 PM.
Build 1: Mk3 Roadster #5125. Sold 11/08/2014.
Build 2: Mk4 Roadster #7750. Sold 04/10/2017.
Build Thread
Build 3: Mk4 Roadster 20th Anniversary #8674. Sold 09/07/2020.
Build Thread and
Video.
Build 4: Gen 3 Type 65 Coupe #59. Gen 3 Coyote. Legal 03/04/2020.
Build Thread and
Video
Build 5: 35 Hot Rod Truck #138. LS3 and 4L65E auto. Rcvd 01/05/2021. Legal 04/20/2023.
Build Thread. Sold 11/9/2023.
-
Post Thanks / Like - 0 Thanks, 1 Likes
Fman liked this post
-
08-04-2020, 04:47 PM
#141
I didn’t use a thicker dash and was still able to get enough countersink with the hardware Paul (Edwardb) is recommending. If any of the head still protrudes, just grind it flush.
-Steve
-
Post Thanks / Like - 1 Thanks, 1 Likes
 Fman
Fman thanked for this post
Fman liked this post
-
08-05-2020, 01:30 AM
#142
Senior Member
Originally Posted by
edwardb
As I said in my PM, anything other than
dead flat will show through. Tape may spread it out, but it will still show. Don't do it. Those 6-32's will work. So would 4-40's. Surprised you didn't find them at your local hardware. Mine has those sizes all day long. I also like these:
https://www.mcmaster.com/97530A097/. I also routinely use plane old solid aluminum rivets and pound them with a hammer against a solid surface like a small anvil. Low tech but works really well. The aluminum is quite soft and bucks easily.
https://www.mcmaster.com/97483A075/. The thickness of the material is fine. Don't feel like you have to bury the head of the screw (or rivet). Do the best you can. As long as it's holding against the tapered countersink, it's not going anywhere. One installed, whatever remains above file or sand flush. Those brackets are mainly holding in shear (up/down) versus normal stress. With three per and 6 brackets (!!!) you will be OK with a reasonable mechanical attachment.
Copy that, I added a couple more brackets on the passenger side to help support the grab handle with no glove box they are easily accessible. I def could have missed those 6-32/4-40's at my local ace, will make another run by there this week. They are starting to get to know me by first name there, I feel like Norm on Cheers I make a couple stops per week there since I started building this car.
-
08-05-2020, 05:45 AM
#143
Senior Member
Originally Posted by
Fman
Copy that, I added a couple more brackets on the passenger side to help support the grab handle with no glove box they are easily accessible. I def could have missed those 6-32/4-40's at my local ace, will make another run by there this week. They are starting to get to know me by first name there, I feel like Norm on Cheers
I make a couple stops per week there since I started building this car.
I haven't progressed to first name basis at my local Ace. But I don't get the "Can I help you?" greeting any more. They just wave at me as I head to the hardware aisle. 
Build 1: Mk3 Roadster #5125. Sold 11/08/2014.
Build 2: Mk4 Roadster #7750. Sold 04/10/2017.
Build Thread
Build 3: Mk4 Roadster 20th Anniversary #8674. Sold 09/07/2020.
Build Thread and
Video.
Build 4: Gen 3 Type 65 Coupe #59. Gen 3 Coyote. Legal 03/04/2020.
Build Thread and
Video
Build 5: 35 Hot Rod Truck #138. LS3 and 4L65E auto. Rcvd 01/05/2021. Legal 04/20/2023.
Build Thread. Sold 11/9/2023.
-
Post Thanks / Like - 0 Thanks, 1 Likes
Fman liked this post
-
08-05-2020, 06:00 PM
#144
Nice layout Travis Looks Great Switch panel is awesome
Just a thought for your rivet dilemma. TIG weld your brackets on the back side. It will turn the front side alittle blue from the heat but you are covering it anyway.
I'd offer to do it but waiting on a new torch and have to get a bottle of gas.
-
Post Thanks / Like - 0 Thanks, 1 Likes
Fman liked this post
-
08-07-2020, 12:27 PM
#145
Senior Member
I was able to pick up some 6-32 recessed stainless screws and got them down into the dash, hopefully this will do the job to not have them exposed once the dash is covered. I also ended up replacing the rivets on the lower control box front panel. I was concerned about removing alum with the holes being tapered but they still seem to plenty strong.
I think I am finally just about done with the dash and ready to have it covered.

Last edited by Fman; 08-07-2020 at 03:59 PM.
-
08-07-2020, 12:32 PM
#146
Looks good! As a final precaution, you might want to consider filling the heads with some body filler or JB Weld and sanding them flat to ensure that you don't get any unevenness telegraphing through the dash cover.
MkIV Roadster build: Gen 2 Coyote, IRS, TKO600. Ordered 10/24/18. Delivered 1/29/19. Engine installed 8/8/21. First start 9/12/21. First go-kart 9/17/21. Off to paint 4/11/22. Back from paint 12/30/22.
Build thread here.
-
08-07-2020, 04:04 PM
#147
Senior Member
Originally Posted by
JohnK
Looks good! As a final precaution, you might want to consider filling the heads with some body filler or JB Weld and sanding them flat to ensure that you don't get any unevenness telegraphing through the dash cover.
John, good idea, I have some bondo filler I could use that I think would work well for this application.
-
08-09-2020, 11:31 AM
#148
Senior Member
-
Post Thanks / Like - 0 Thanks, 3 Likes
-
08-09-2020, 04:23 PM
#149
25th Anniversary #9772
-
08-09-2020, 07:57 PM
#150
Looking good Travis! But you need to get another steering wheel.
build thread:
http://thefactoryfiveforum.com/showt...-USRRC-vspeeds
Build School: July 14-16, 2017
Kit purchased: July 25, 2017
Kit delivered: September 13, 2017
First Start: December 22, 2018
Body painted and kit completed and drivable: July 2019 (but still not done)
CA SB100 Registration: January 2020
Mk4 - 289 USRRC Roadster kit, Roush 427SR with Schneider Racing custom camshaft, Fitech EFI, TKO600 (.64-5th gear), 15" wheels, stock brake calipers, under car exhaust with Spintech 7000 muffler, no roll bar, Russ Thompson turn signal, removable steering wheel, and many other small upgrades and modifications
-
Post Thanks / Like - 1 Thanks, 1 Likes
Fman thanked for this post
Fman liked this post
-
08-09-2020, 10:04 PM
#151
Senior Member
Originally Posted by
Vspeeds
Looking good Travis! But you need to get another steering wheel.
Thanks Eddie...
Haha! That is FFRs new "Mad max" version they are now offering! driving gloves required
FFR still has no steering wheels to send out so they made me a sample wheel for fitting. Nice of them to send it to me, hopeful I will see a wheel by the end of the month.
-
Post Thanks / Like - 0 Thanks, 1 Likes
-
08-10-2020, 09:17 PM
#152
Senior Member

Ha ha! I'm impressed with your "Mad max" steering wheel. I'm also waiting for my FFR steering wheel, and I'm tired of using a big crescent wrench to exercise the steering rack. Well done, Fman!
MKIV Complete Kit #9822 l BluePrint 347 EFI l TKO600 l Power Steering l Heater/Defrost l
Build Thread
-
Post Thanks / Like - 1 Thanks, 1 Likes
Fman thanked for this post
Fman liked this post
-
08-10-2020, 10:23 PM
#153
Nice Travis
Quality work you do
-
Post Thanks / Like - 1 Thanks, 1 Likes
Fman thanked for this post
Fman liked this post
-
08-25-2020, 11:55 PM
#154
Senior Member
-
08-26-2020, 12:46 AM
#155
25th Anniversary #9772
good choice on the filter  i'm jealous now!
awesome job! coming together nicely!
-
08-26-2020, 01:59 AM
#156
Senior Member

Really, really nice work. Building the dash and doing the brake and fuel lines were some of my favourite bits. Day or night, those instruments always look great.
Cheers,
Nigel
-
Post Thanks / Like - 1 Thanks, 0 Likes
Fman thanked for this post
-
08-26-2020, 06:44 AM
#157
Senior Member
Well done! The dash looks great.
MKIV Complete Kit #9822 l BluePrint 347 EFI l TKO600 l Power Steering l Heater/Defrost l
Build Thread
-
Post Thanks / Like - 1 Thanks, 0 Likes
Fman thanked for this post
-
08-26-2020, 09:22 AM
#158
Looks awesome! The dash turned out amazing.
MkIV Roadster build: Gen 2 Coyote, IRS, TKO600. Ordered 10/24/18. Delivered 1/29/19. Engine installed 8/8/21. First start 9/12/21. First go-kart 9/17/21. Off to paint 4/11/22. Back from paint 12/30/22.
Build thread here.
-
Post Thanks / Like - 1 Thanks, 0 Likes
Fman thanked for this post
-
08-26-2020, 09:43 AM
#159
Senior Member
Originally Posted by
toadster
good choice on the filter
i'm jealous now!
awesome job! coming together nicely!
Some cool guy I met on the forum recommended this filter.... just took his advice! 
It is a nice setup, should be pretty simple to swap out a filter. For anyone interested in the filter - Aeromotive #12317
-
Post Thanks / Like - 0 Thanks, 2 Likes
-
08-26-2020, 12:49 PM
#160
Senior Member

The clutch pedal stop is nice too, is that a hardware store item?
Bradley
Build thread - Mk4, Coyote, IRS, Wilwood brakes, old-style soft top and accessories.
The distance between "finished" and finished is literally infinite.
-
Post Thanks / Like - 1 Thanks, 0 Likes
Fman thanked for this post


 Thanks:
  Likes:


 Reply With Quote

