-
12-22-2021, 03:40 PM
#601
Senior Member

This is awesome. I have become a big fan of powder coating in general. I may copy some of what you did to make a larger oven. Thanks for documenting and an early Semper Fi to your son.
-
Post Thanks / Like - 0 Thanks, 1 Likes
-
12-22-2021, 03:46 PM
#602
Senior Member

Very cool, GT! This would be a very useful item in my build. I'm doing the small toaster oven thing for my small pieces. This would be a huge improvement.
Chris
Coupe complete kit delivered: 4/22/24.
Build Thread. Coyote. T-56. IRS w/3.55. Wilwoods. PS. HVAC. Side windows.
MK4 Complete kit.
Build Thread Index. Delivered: 10/15/2020. Legal: 7/25/23. Coyote Gen3. TKO600 (0.64 OD). IRS w/3.55. PS. Wilwoods. Sway bars. This build is dedicated to my son, Benjamin.
Build Thread.
-
12-22-2021, 03:57 PM
#603
Senior Member

Thanks, guys. It's an investment to get started, but so much better for curing time, durability, environment, health and finish quality than the spray paints...I can't believe we can get such a quality finish without having a pro do it. I wish I had used it for the clear on my inner body panels.
Bradley
Build thread - Mk4, Coyote, IRS, Wilwood brakes, old-style soft top and accessories.
The distance between "finished" and finished is literally infinite.
-
12-22-2021, 04:47 PM
#604
I've been thinking about a DIY oven myself - grabbing a cheap or free range off of marketplace and ripping it apart. I considered propane but I would think the moisture biproduct of burning propane might impact the finish. Are you using a heat exchanger?
-
12-22-2021, 05:24 PM
#605
Senior Member

No, but I thought about it. You could rip one out of an old furnace, put it in a separate fire box and add a fan. Some loss there, but a little extra propane would overcome that. I just decided to try it this way first and it doesn’t hurt that our humidity levels in the winter are single digits to 20%.
There is a youtube video where the guy cuts the bottom out of the upper and the top out of the lower double oven to make one big one. That way he has all the automatic controls and electric.
What should I look for in the finish?
Last edited by GTBradley; 12-22-2021 at 05:31 PM.
Bradley
Build thread - Mk4, Coyote, IRS, Wilwood brakes, old-style soft top and accessories.
The distance between "finished" and finished is literally infinite.
-
Post Thanks / Like - 0 Thanks, 1 Likes
-
12-22-2021, 05:35 PM
#606
I might be easier to build by putting the insulation on the outside of the cabinet.
-
12-22-2021, 06:25 PM
#607
Senior Member

It would if you had full size panels, I on the other hand had to patchwork this Frankenstien's Monster together with many, many pieces. I used channel aluminum to support panels here and there.
Bradley
Build thread - Mk4, Coyote, IRS, Wilwood brakes, old-style soft top and accessories.
The distance between "finished" and finished is literally infinite.
-
12-22-2021, 06:34 PM
#608
I have no experience with PC so not sure what to look for or if it would even impact it. I just know my heater in my work shop can fog up the windows pretty fast but I also live on the east coast about 5min from the ocean… so even in winter it can still be 80%.. I’m sure in CO you’re probably fine.
-
03-18-2022, 10:39 AM
#609
Senior Member

Forte's Front Anti-sway Bar
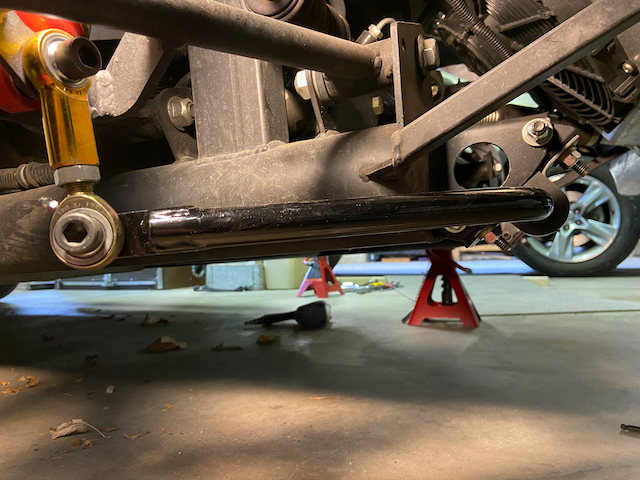
After some experience with autocross last year I have decided to add an anti-sway bar to the front. Oversteer was never a problem, except for too heavy braking too late into a turn, and oversteer was ever present, both for throttle induced and steady state turns. From all indications that means I need a front bar. The AX guys will tell you an adjustable bar is the way to go but the one I got from Mike Forte is $189 and the adjustable one from Breeze is $495, so I'll give Mike's a try first.
The bar from Mike's, IMO, is better than the one from FFR in that it attaches to the chassis at a lower point providing a level orientation to the ground rather than angled. BTW, I learned most of what I know about ASBs from ASB threads on this forum.
Mike Forte supplies everything you need to install the ASB, but modification of the included mount brackets and drilling holes in the tie down points on the car's frame is required. I modified the brackets to make them fit, but I also saw that nucjd19 had a post suggesting that the tie down holes could be maintained by modifying a little more.
UnmodifiedIMG_9954.jpeg Modified to fit IMG_9956.jpeg Modified to preserve tie down holeIMG_9957.jpeg IMG_9958.jpeg Powder coated IMG_9962.jpeg
Installed


Bradley
Build thread - Mk4, Coyote, IRS, Wilwood brakes, old-style soft top and accessories.
The distance between "finished" and finished is literally infinite.
-
03-18-2022, 10:39 AM
#610
Senior Member

I did have a little trouble with the fit in that the right side did not line up perfectly with the attachment hardware. IMG_9963.jpg. I was able to push them together enough to get the bolt through there. I can only hope this doesn't put undue stress on the components.
What limited driving I've done so far feels very good, AX season doesn't start until April.
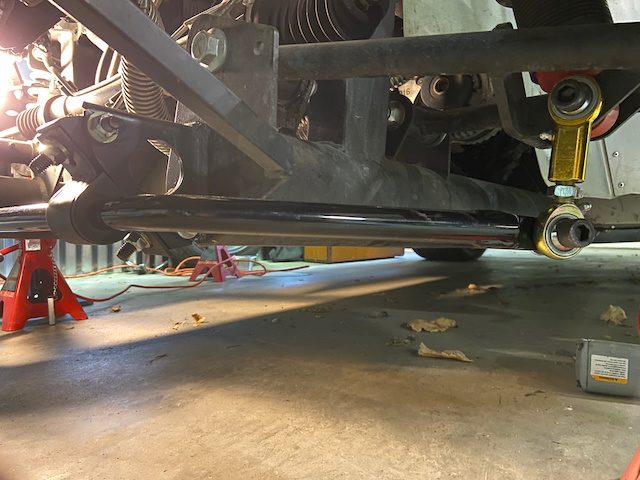
The bar does prevent me from jacking the front of the car up from the center, even with a low profile jack, but as it turns out, I can pick up both wheels from either 4" frame tube, so I've been doing that when I need to but the front on jack stands.
Here's another picture showing that the bar doesn't reduce ground clearance.
Last edited by GTBradley; 03-18-2022 at 10:56 AM.
Bradley
Build thread - Mk4, Coyote, IRS, Wilwood brakes, old-style soft top and accessories.
The distance between "finished" and finished is literally infinite.
-
Post Thanks / Like - 0 Thanks, 1 Likes
-
03-18-2022, 11:05 AM
#611
I do not see any grease oozzing out from the bushings? Good job!
20th Anniversary Mk IV, A50XS Coyote, TKO 600, Trunk Drop Box, Trunk Battery Box, Cubby Hole, Seat Heaters, Radiator hanger and shroud.
-
Post Thanks / Like - 1 Thanks, 0 Likes
-
03-18-2022, 11:13 AM
#612
Senior Member

AX Wheels and Tires
Next up was some autocross tires so I don't wear out my Nitto tires which I like for daily driving.
I bought Nankang AR-1 tires and a spare set of wheels from Craigslist 
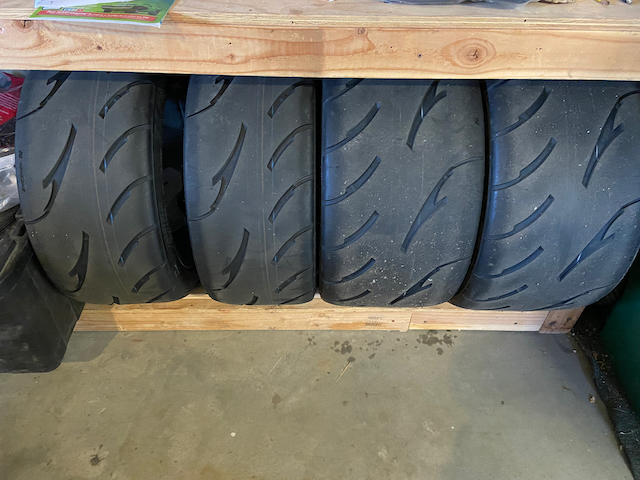
The wheels are originally from Wheel Replica and are for the 94-04 Mustang. I got them used, in excellent condition, for $500 and that's a bit expensive, but finding the right size is difficult and it did save $300 over new.
For the center caps my friend Terry (TMartinLVNV) from the forums told me about 3D Car Stickers and they made me the exact size I needed. Unfortunately, they took 4 weeks to arrive, but this company is located in Rivne, Ukraine and we all know the trouble they are having to deal with.

I did have a little trouble with the fit of the rear wheels in that the brake calipers were too tall and rubbed the wheel. I sanded it down to clear, but I'm hearing that I should have a least 2-3mm of clearance, so I may take off some more before I powder coat the exposed metal.
Last edited by GTBradley; 03-23-2022 at 01:37 PM.
Bradley
Build thread - Mk4, Coyote, IRS, Wilwood brakes, old-style soft top and accessories.
The distance between "finished" and finished is literally infinite.
-
03-18-2022, 02:35 PM
#613
Senior Member


Originally Posted by
Railroad

I do not see any grease oozzing out from the bushings? Good job!
Definitely applied though, just after the pictures. Thanks for the heads-up.
Bradley
Build thread - Mk4, Coyote, IRS, Wilwood brakes, old-style soft top and accessories.
The distance between "finished" and finished is literally infinite.
-
03-23-2022, 02:06 PM
#614
Senior Member

Autocross Improvements
It's been a long, cold and dark winter off-season, but I stayed busy in the garage. My powder coating project was a success, as was my addition of the windscreen washers and intermittent wipers. But once those things were done I turned to autocross prep. I'm still not convinced I'll become a real competitor in the sport, but I do enjoy it. Especially, being outside and playing with the roadster.
So, you don't technically need anything other than a car and a helmet to do autocross, but I still wanted to improve my car’s handling and have a set of tires that were dedicated to the activity - rather than prematurely wear out my all weather/summer tires. Here is a list of what I've done:
- Front Anti-sway bar
- Spare wheels and autocross tires
- Kirkey low back racing seat
- Power steering cooler and higher flow valve
- PC'd FFR spare side pipes with sound suppressor installed (there are sound limits at SCCA AX events - 100 decibels at 50 feet for my events.)
- Removed the street bumpers front and back and installed quick jacks (I used the JK method so I can switch back easily)
- Vinyl roundel numbers and vintage decals
- I previously installed a throttle foot support to facilitate even throttle application. I also fixed an issue where the MAF tube with air cleaner would fall off.
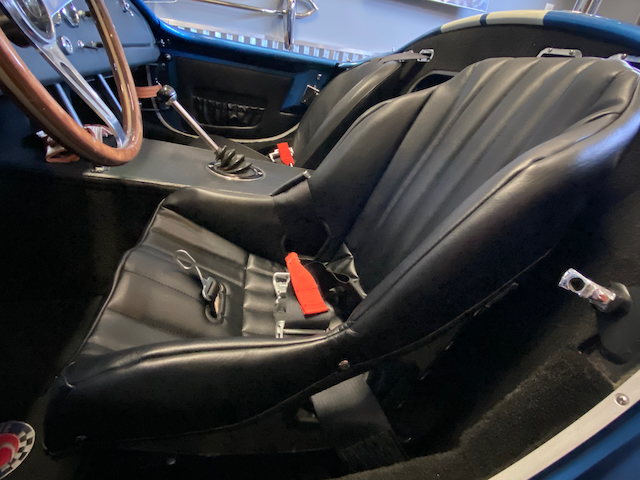
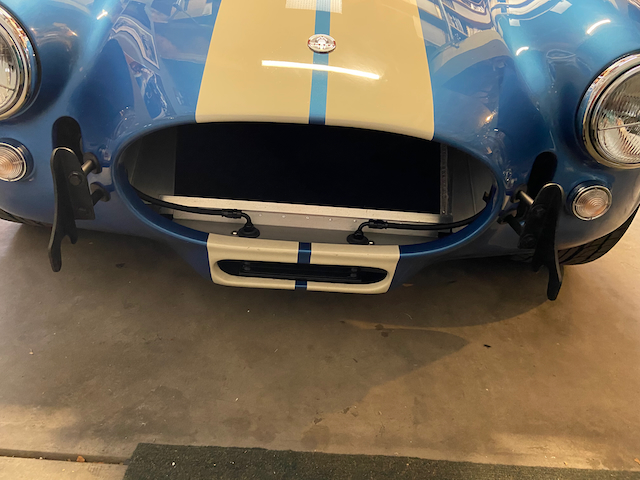
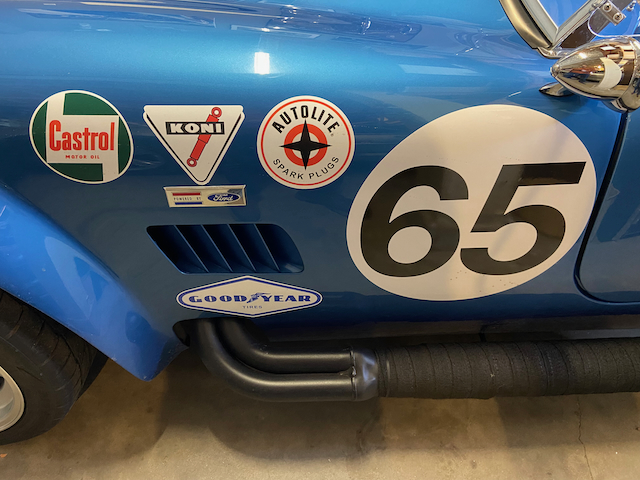
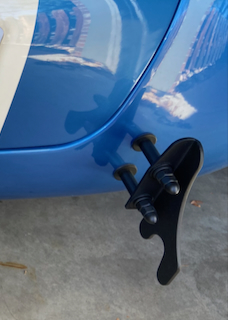

My main issues last season were traction, noise, sloppy throttle application, MAF/air cleaner falling off and me sliding around in the seat. The other improvements are just nice to have and/or cosmetic.
Last edited by GTBradley; 03-24-2022 at 12:25 AM.
Bradley
Build thread - Mk4, Coyote, IRS, Wilwood brakes, old-style soft top and accessories.
The distance between "finished" and finished is literally infinite.
-
Post Thanks / Like - 0 Thanks, 4 Likes
-
03-23-2022, 03:00 PM
#615
Senior Member

Side Pipe Sound Suppressing Inserts
The FFR side pipes were way too loud for my taste and I didn't want to be kicked out of an AX event for excessive noise, so I went ahead and bought the Car Chemistry two-disc inserts and added some stainless steel wool I bought from the grocery store. The end of the inserts have to shortened so they can be pounded in through the end of the pipe, otherwise they are too long. The steel wool is really handy in that it is springy and round so it fits over the inserts in front of both discs and stays in place while you install the insert. I also used the end cap supplied with the inserts that has the medium size hole in it.
iu.jpeg Car Chemistry insert.jpg without insert IMG_0013.jpeg with insert IMG_0039.jpeg
I'm pleased with the sound and it doesn't feel to me that the power has changed at all. I'll still be swapping out my pipes when not AXing with the GASNs.
Last edited by GTBradley; 03-23-2022 at 03:47 PM.
Bradley
Build thread - Mk4, Coyote, IRS, Wilwood brakes, old-style soft top and accessories.
The distance between "finished" and finished is literally infinite.
-
03-23-2022, 03:27 PM
#616
Not a waxer


When is your first event? We have both days this weekend...the car hasn't moved since October...rain Saturday...a high of 40 on Sunday...Nah, not that dedicated...I'm taking a pass and just going to go work timing 
Jeff
-
03-23-2022, 03:40 PM
#617
Senior Member


Originally Posted by
Jeff Kleiner


When is your first event? We have both days this weekend...the car hasn't moved since October...rain Saturday...a high of 40 on Sunday...Nah, not that dedicated...I'm taking a pass and just going to go work timing

Jeff
I just added this weekend as we just cancelled a trip to Kansas. Going to Pikes Peak Int'l Raceway on Saturday. There are already 70 entries and the weather forecast couldn't look better!
BTW, you timers have a tough job, I appreciate what you do. Me? I just work the cones...on both sides of the steering wheel
Last edited by GTBradley; 03-23-2022 at 03:44 PM.
Bradley
Build thread - Mk4, Coyote, IRS, Wilwood brakes, old-style soft top and accessories.
The distance between "finished" and finished is literally infinite.
-
03-23-2022, 04:04 PM
#618
Not a waxer


Originally Posted by
GTBradley

I just added this weekend as we just cancelled a trip to Kansas. Going to
Pikes Peak Int'l Raceway on Saturday. There are already 70 entries and the weather forecast couldn't look better!
BTW, you timers have a tough job, I appreciate what you do. Me? I just work the cones...on both sides of the steering wheel

I look forward to hearing your impression of your changes!
Most times I work as starter or keeping the grid in order but the club is short on timing help this weekend so I'll do it---although it's not something I especially like.
Good luck!
Jeff
-
Post Thanks / Like - 1 Thanks, 1 Likes
-
04-24-2022, 08:08 PM
#619
Hi Bradley, figured I'd post here for the benefit of all.
I know we chatted about the vents you added to the footwells and how impactful they might or might not have been. My question is if you think they made an impact on highway driving? And I guess more to the point, when driving on the highway before adding the fresh air ducting were things cooking by your feet on hot days?
Most of my commute is highway and I'd like to think that even on a hot day I'd be excited to take the Cobra out.
Cheers!
Juan
-
04-24-2022, 08:46 PM
#620
Senior Member

Hey Juan, yes the fresh air on the highway is a benefit. My feet were not very hot to begin with, but it’s just nice to have air moving through the foot wells. When you come to a stop the fan is a benefit. Where it all becomes of little added value is on a really hot day in stop and go traffic. The air is pulled from the brake duct openings, so it’s pavement heated air that then gets heated again in the header area. Insulation on the ducts in the header area helps and a heat shield would do some more, but the air is always going to be warmer than ambient in those conditions.
The vents become necessary in a very specific circumstance - when traveling in rain with the top on you need them to cancel out the condensation on the windows. I can’t use the heater fan in that situation because it gets it’s air from the engine bay and it is too warm.
Bradley
Build thread - Mk4, Coyote, IRS, Wilwood brakes, old-style soft top and accessories.
The distance between "finished" and finished is literally infinite.
-
04-25-2022, 06:14 AM
#621

Originally Posted by
GTBradley

Hey Juan, yes the fresh air on the highway is a benefit. My feet were not very hot to begin with, but it’s just nice to have air moving through the foot wells. When you come to a stop the fan is a benefit. Where it all becomes of little added value is on a really hot day in stop and go traffic. The air is pulled from the brake duct openings, so it’s pavement heated air that then gets heated again in the header area. Insulation on the ducts in the header area helps and a heat shield would do some more, but the air is always going to be warmer than ambient in those conditions.
The vents become necessary in a very specific circumstance - when traveling in rain with the top on you need them to cancel out the condensation on the windows. I can’t use the heater fan in that situation because it gets it’s air from the engine bay and it is too warm.
You've got me wondering now about this. I had pretty much decided to not do it since most of the opinions are it really doesn't make much difference but it sounds like you appreciate having them. I wonder if theres enough room to squeeze some sort of duct from the rear of the car maybe up the side between the door X brace and the body up to the footwell?
MK4 Complete Kit #10315 / Coyote G3 / TKX / 427 HardTop
Build Thread Production Date: 2/26/22, Registered 5/19/22, Graduated 3/1/2023
-
04-25-2022, 08:36 AM
#622
Senior Member


Originally Posted by
JeffP

You've got me wondering now about this. I had pretty much decided to not do it since most of the opinions are it really doesn't make much difference but it sounds like you appreciate having them. I wonder if theres enough room to squeeze some sort of duct from the rear of the car maybe up the side between the door X brace and the body up to the footwell?
Let’s put it this way, if I had it to do it all over again I would definitely still do the vents and fans. What I think it comes down to is the type of use. I don’t hesitate to drive long distances at night or in rainy weather. If your use is in say Dallas for example, to and from car shows and a little cruising in the hot months, well, you might be looking into AC at that point, but you get the idea.
As far as alternative routing goes, I say go for it. It’s just the easiest route when using the brake ducts. Ideally, the vent in front of the windscreen, like the MGs had, would be the best spot to get cool air and a Cobra does have room there, but that would mean breaking from the historical look of the car.
Last edited by GTBradley; 04-25-2022 at 08:39 AM.
Bradley
Build thread - Mk4, Coyote, IRS, Wilwood brakes, old-style soft top and accessories.
The distance between "finished" and finished is literally infinite.
-
05-04-2022, 06:08 PM
#623
Senior Member

Side pipe sound mod
I've been experimenting with the sound on my Gas-N side pipes lately. The problem is that they are too loud on longer drives with my wife, but are the perfect volume and note for things like car shows. I was considering getting some of the touring side pipes that Gas-N makes and switch back and forth based on need. So I tried it out with my old FFR standard pipes. I added some baffling (as detailed above) to them and it does work, but it's still too much work to switch out the two sets of pipes easily and potentially hard on the body over time.
So, instead, I decided to cut the tips off of the Gas-Ns and try different configurations of baffling that could easily be removed whenever I want.
The cut was easy to make straight with a band saw. I found a pair of band clamps that were polished stainless for $24 on Amazon and they match the pipes really well.
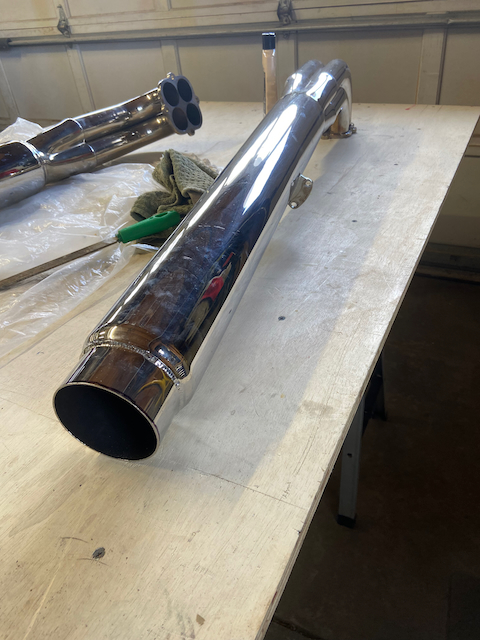
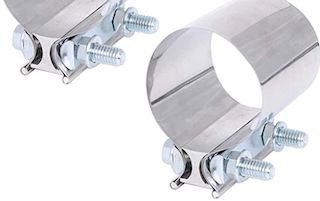
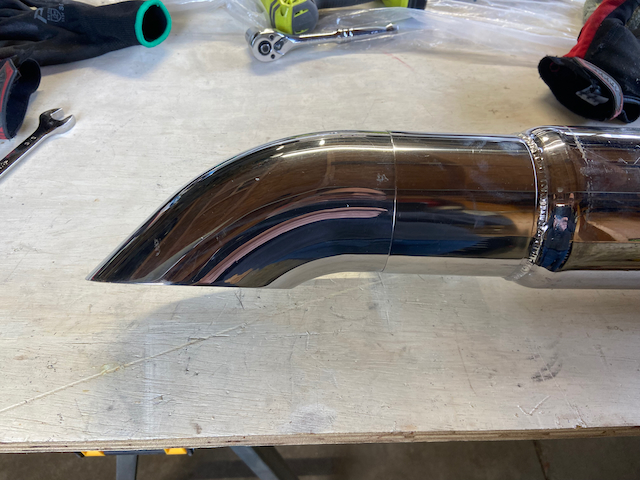
The band has some pretty hefty hardware to tighten it down and holds very securely. I can hide it on the bottom of the pipe and behind the heat shields.

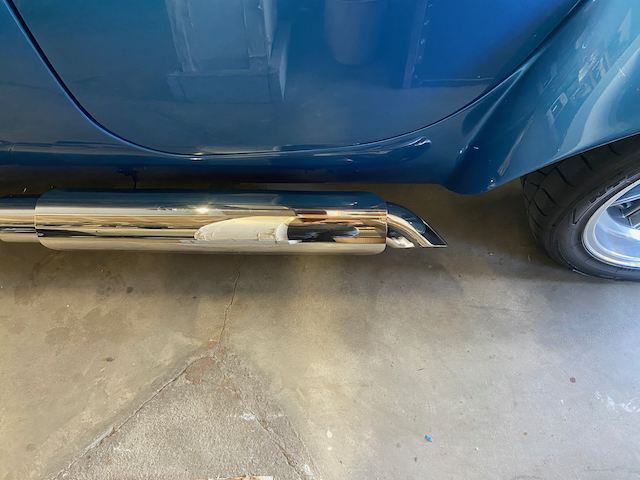
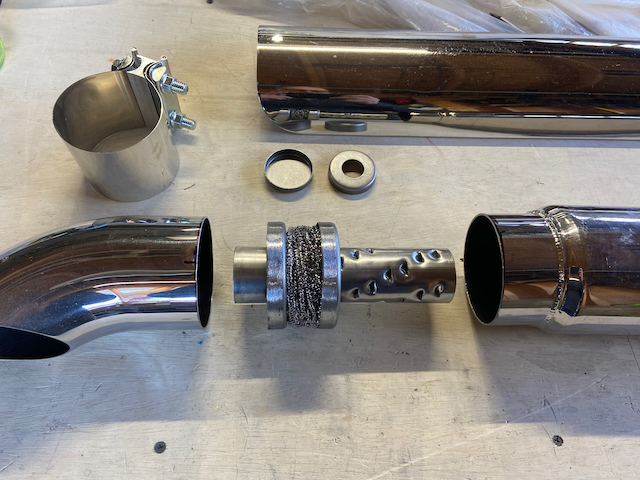
So, with the cosmetics figured out I started experimenting with different baffle inserts and combinations of SS wool and glass pack material. For the most part all of the different inserts I tried quietened down the exhaust enough. The problem became one of quality of sound. In all but one configuration I would get this 'shishing' sound. I think part of the problem there is that these inserts all have to go at the end of the pipe and not in the middle where that part of the sound might be lost before the exiting at the tip.
I bought the auger style inserts and, again, they worked but added a little bit of extra I didn't like listening to. I bought the Car Chemistry inserts and they are very modifiable with SS wool and caps at both ends but always with this added faint "sishing" sound.

Last edited by GTBradley; 05-04-2022 at 07:47 PM.
Bradley
Build thread - Mk4, Coyote, IRS, Wilwood brakes, old-style soft top and accessories.
The distance between "finished" and finished is literally infinite.
-
Post Thanks / Like - 2 Thanks, 3 Likes
-
05-04-2022, 06:09 PM
#624
Senior Member

I got to thinking that it was the holes in the baffles and coarse SS wool that was causing the sound. I could have ordered some finer SS wool but landed instead on some glass pack material for motorcycles. One package is plenty and only cost $12, so I tried it out by wrapping the CC insert with two layers in all the areas that would hold it.
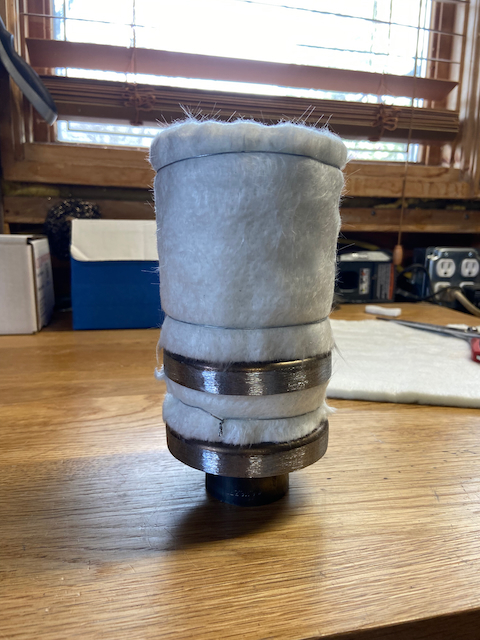
That still didn't do it and was too much restriction I think. I tried various other combinations, but for my last attempt before getting the fine SS wool I wrapped just the small section between the baffles with two layers and added the provided cap with at the hole in it to the front of the insert tube.

Voilà! I think I've found something that both sounds good, is not too loud, and is easy to remove so I can use the pipes as originally designed. The roadster still makes haste, but that's a moot point as my wife won't allow it anyway.
Cheers!
Edit: I have continued to play with the combinations of materials and have returned to the SS wool on both sides of the baffle and no end cap. The best part of this mod is that you can tune it to your liking.
Last edited by GTBradley; 12-14-2022 at 11:19 AM.
Bradley
Build thread - Mk4, Coyote, IRS, Wilwood brakes, old-style soft top and accessories.
The distance between "finished" and finished is literally infinite.
-
Post Thanks / Like - 1 Thanks, 5 Likes
 GWL
GWL thanked for this post
-
06-21-2022, 10:47 AM
#625
Senior Member

-
06-21-2022, 11:30 AM
#626
Senior Member

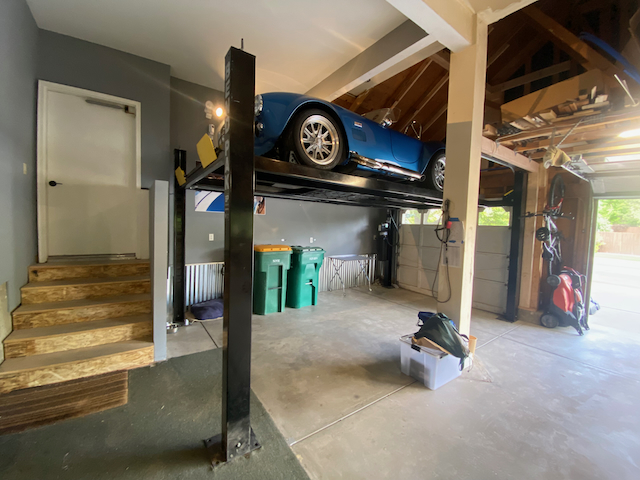
I've been wanting to buy a lift for the longest time, but really didn't want to shell out the bucks for a brand new four post lift. I also needed to modify the garage to take advantage of a high lift as I wasn't going to accept one that I couldn't walk under. My garage door is still an issue as an overhead style but I did raise it some buy cutting sections of tack off the ends and and adding them back to the vertical portions. This at least allows the door to clear the front two posts of the lift.
The truss for roof support was in the way but modifying that was relatively easy by adding 2x6 supports directly to the roof.
Before: 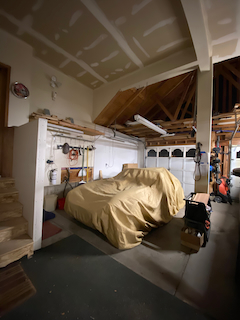


After: 
My intention is to change the door to a true carriage style that swings out. That way I can stop worrying about the door position when raising the car and I won't have the unsightly door tracks anymore. Ultimately, I'll add drywall and paint the whole section and fortunately, the lift will act as my scaffolding for that project.
Bradley
Build thread - Mk4, Coyote, IRS, Wilwood brakes, old-style soft top and accessories.
The distance between "finished" and finished is literally infinite.
-
06-21-2022, 11:35 AM
#627
Hey Bradley,
Have you considered a roll up door?
Dave
-
Post Thanks / Like - 0 Thanks, 1 Likes
-
06-21-2022, 11:53 AM
#628
Senior Member

Four post lift
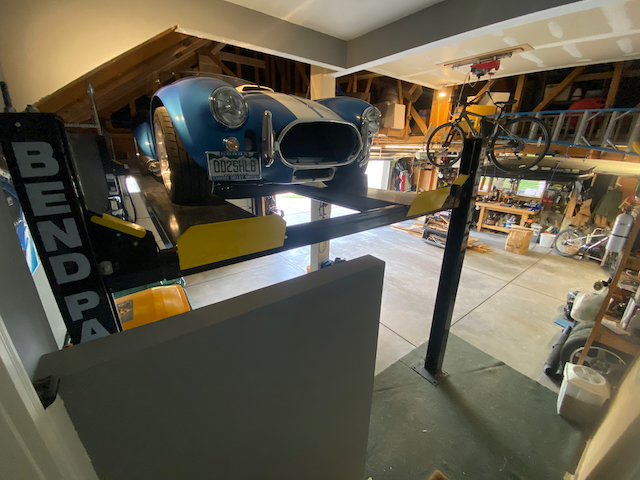
I got lucky recently when a guy posted on our local Cobra club that he was moving and was selling his high lift Bendpak. It was already sold by the time I responded but the buyer eventually backed out and I got it for half price. It's a HD-9XW and can lift to 6' 10" under the ramps. I'm lucky enough to still have my son here before boot camp so we dismantled the lift ourselves and trailered it about 5 miles home. Once the garage mods were done, setup was relatively easy.
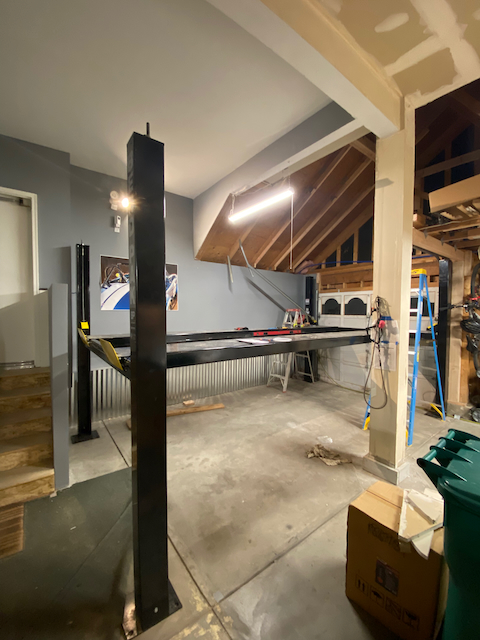
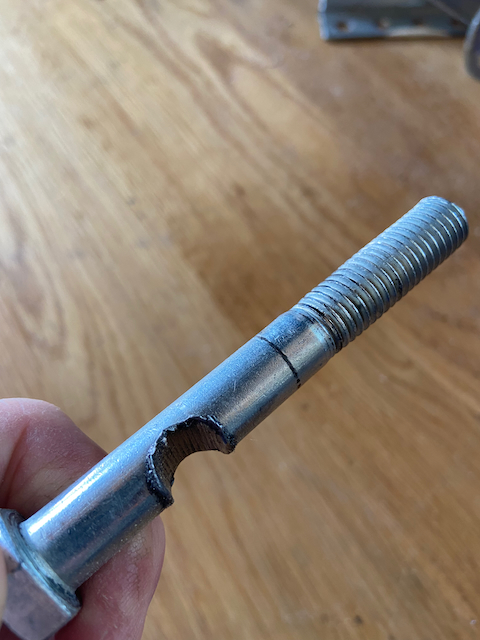
The thing to watch for when setting up these Bendpak lifts is that your cables do not travel over the ramp-to-crossbar bolts. The previous owner had the lift professionally installed and never knew that the bolts were being sawn through by the cables. In four years of use two bolts were cut half way through.
Last edited by GTBradley; 06-21-2022 at 01:22 PM.
Bradley
Build thread - Mk4, Coyote, IRS, Wilwood brakes, old-style soft top and accessories.
The distance between "finished" and finished is literally infinite.
-
Post Thanks / Like - 0 Thanks, 1 Likes
 Fman
Fman liked this post
-
06-21-2022, 11:57 AM
#629
Senior Member


Originally Posted by
Papa

Hey Bradley,
Have you considered a roll up door?
Dave
I haven't looked at them yet, I assumed they wouldn't work for the HOA requirements. I'm pretty sure I can have a custom built carriage door that matches the overhead double door. They both need to be replaced anyway, so I'll be working on that next and I'll look at what's available in the way of roll ups. Thanks.
Last edited by GTBradley; 06-21-2022 at 12:06 PM.
Bradley
Build thread - Mk4, Coyote, IRS, Wilwood brakes, old-style soft top and accessories.
The distance between "finished" and finished is literally infinite.
-
06-21-2022, 02:45 PM
#630
Senior Member


Originally Posted by
GTBradley

It's been a pretty busy Spring what with autocross and graduation events for my son. He's headed to Marines boot camp in less than a week so we've been doing loads of family things together. I even got him into the roadster at autocross. Now he knows what it's like to spin out in a high-horsepower, short-wheelbase car!
The Marines recruiting center put on a family day recently and brought in real Drill Instructors. I'm sure they held back a bit for the parents sake, but they gave those kids a taste of what's to come:
Congrats on your son's graduation, Bradley! He made the best choice in choosing his branch of service!  A young Leatherneck in the making. He's in for a few surprises when his feet hit the yellow footprints at MCRD San Diego next week. The worst part may have been the proximity to the airport...freedom was only a really big jump over a high wall and a sprint across the flight line to freedom. I'm sure he'll do great and come out the other side a new man. Most do.
One of my goals is to check out autocross when I eventually finish my build. It's been fun to read about and see your experience.

Originally Posted by
GTBradley

I got lucky recently when a guy posted on our local Cobra club that he was moving and was selling his high lift Bendpak. It was already sold by the time I responded but the buyer eventually backed out and I got it for half price. It's a HD-9XW and can lift to 6' 10" under the ramps.
The thing to watch for when setting up these Bendpak lifts is that your cables do not travel over the ramp-to-crossbar bolts. The previous owner had the lift professionally installed and never knew that the bolts were being sawn through by the cables. In four years of use two bolts were cut half way through.
Congrats on your Bendpak. I also have the HD-9, but I think it's standard width. I've had it since 2016, and have assembled it twice (second time because we moved). Those ramps are crazy heavy--that was the most difficult part of the assembly for me. Thanks for the tip on the cable-saw bolt issue. I'll triple-dog-check mine to be certain I didn't do the same when I last assembled it. It doesn't take too long to get used to standing (or sitting) underneath to work on the Cobra. Oil changes on DDs are a pleasure as well. Enjoy!
Chris
Coupe complete kit delivered: 4/22/24.
Build Thread. Coyote. T-56. IRS w/3.55. Wilwoods. PS. HVAC. Side windows.
MK4 Complete kit.
Build Thread Index. Delivered: 10/15/2020. Legal: 7/25/23. Coyote Gen3. TKO600 (0.64 OD). IRS w/3.55. PS. Wilwoods. Sway bars. This build is dedicated to my son, Benjamin.
Build Thread.
-
Post Thanks / Like - 1 Thanks, 1 Likes
-
06-21-2022, 03:01 PM
#631
Senior Member

Thanks, Chris, I think the hardest part for him will be training me on all the acronyms you guys use
You can inspect the bolts with a scope tool through the ends of the cross members. It's easy to have those cables go over the bolts when threading the cable as you are blind to how they go through. I did it and had to pull one bolt out and put it back in.
Good luck on the autocross and don't hesitate to ask questions, I'll help where I can.
Last edited by GTBradley; 06-21-2022 at 03:55 PM.
Bradley
Build thread - Mk4, Coyote, IRS, Wilwood brakes, old-style soft top and accessories.
The distance between "finished" and finished is literally infinite.
-
06-22-2022, 04:30 AM
#632
Senior Member

Congrats on the lift! I've already made mine earn it's keep with two oil changes the other day.
From the looks of those bolts I would do a serious inspection of the entire mechanism. (So much for "professional installation"!) Wear some heavy leather gloves and check the cables... if they've sawn through a #5 bolt, they've probably seen some damage themselves.
Also be prepared to go through the entire leveling, lock system, and cable adjustment procedure a few more times in the next months. Since it's been disassembled, moved, re-assembled, etc. the machine will settle in again. I got mine installed on Saturday afternoon. We did the full procedure and it worked great - it was dead-nuts on the money for adjustment. Come Monday morning (after +/- 48hrs of having 4000 lbs on it) the locks didn't release properly, and the initial "take up" on the cables was wonky. Things had settled and moved around a tad.
John D. - Minneapolis 'Burbs
1965 El Camino - LT-1, 4L60e, 4wh discs, SC&C susp.
2013 F-150 Platinum - Twin Turbo 3.5
2018 Mk4 Roadster w/ Coyote - #9365 - Build Thread Delivery 7/3/18, 1st Start 1/4/19, 1st Road Mile 5/5/19, Legal 6/18/19, In Paint 2/25/21, Done (?) 4/2021
-
06-22-2022, 10:25 AM
#633
Senior Member

Thanks for the advice, we think the same. I put on some gloves and oiled every inch of the cabling and it all looked and felt fine. I think what was happening was the cable was melting the bolt rather than sawing on it. Since the cable was traveling the whole time it was heating up the bolt and no single point of the cable felt the heat long enough to damage it. Kind of like a band saw blade but with pressure and heat. I did go through everything else including the emergency locks, plus greased the eight grease zirks, which were kind of dry.
I did notice a change the other day in that the top notches can't be reached. I don't need them as it's plenty high enough to walk under as is, but it does indicate that the cables stretch a bit over the days after initial adjustment.
I was on vacation last week in Kaua'i and thought of you, believe it or not, Weird, I know but while t-shirt shopping I saw this and had to laugh.
Screen Shot 2022-06-22 at 9.15.21 AM.png
BTW, Kaua'i was fantastic!
DSC_0350.jpegDSC_0348.jpeg
Last edited by GTBradley; 06-22-2022 at 10:29 AM.
Bradley
Build thread - Mk4, Coyote, IRS, Wilwood brakes, old-style soft top and accessories.
The distance between "finished" and finished is literally infinite.
-
Post Thanks / Like - 1 Thanks, 0 Likes
-
06-22-2022, 10:41 AM
#634
Senior Member

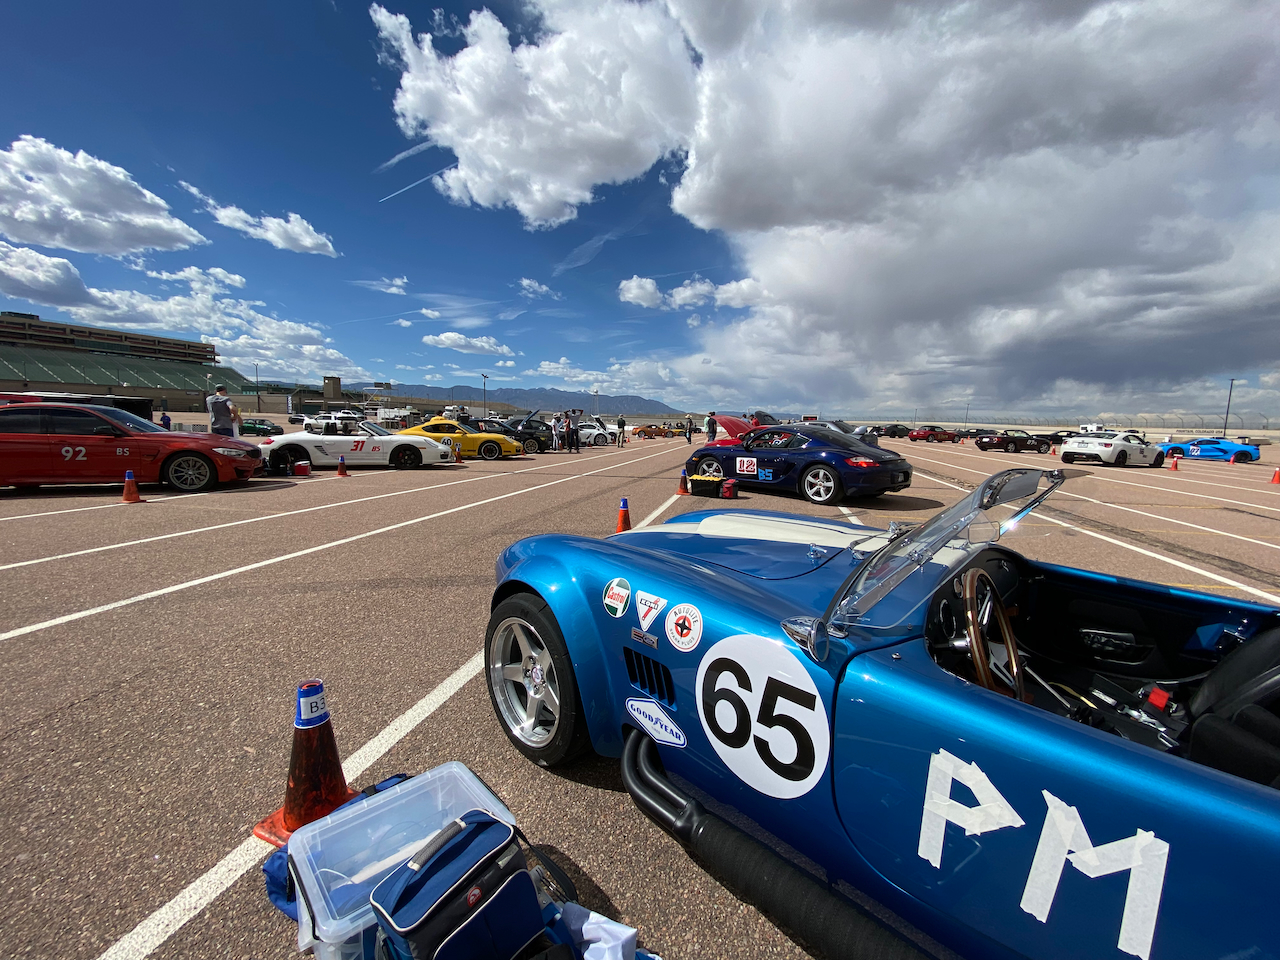
I was asked recently where I got the decals and I would very much like to give a shout out to Bonni Acton. They really went out of their way to fix a mistake for me on the cling on decals.
The retro decals came from Acton Custom Enterprises and they are nice because you just clean the spot, spray with water, position the decal and squeegee. They peel right off too. The meatball I got from another place, but it uses a mild adhesive and I don't like it as much, as it picks up dirt and I can't get the dirt off very well. The people at Acton are super helpful and said they make the meatballs too.
Bradley
Build thread - Mk4, Coyote, IRS, Wilwood brakes, old-style soft top and accessories.
The distance between "finished" and finished is literally infinite.
-
Post Thanks / Like - 0 Thanks, 1 Likes
-
07-06-2022, 04:07 PM
#635


Originally Posted by
GTBradley

Thanks for the advice, we think the same. I put on some gloves and oiled every inch of the cabling and it all looked and felt fine. I think what was happening was the cable was melting the bolt rather than sawing on it. Since the cable was traveling the whole time it was heating up the bolt and no single point of the cable felt the heat long enough to damage it. Kind of like a band saw blade but with pressure and heat. I did go through everything else including the emergency locks, plus greased the eight grease zirks, which were kind of dry.
I did notice a change the other day in that the top notches can't be reached. I don't need them as it's plenty high enough to walk under as is, but it does indicate that the cables stretch a bit over the days after initial adjustment.
I was on vacation last week in Kaua'i and thought of you, believe it or not, Weird, I know but while t-shirt shopping I saw this and had to laugh.
Screen Shot 2022-06-22 at 9.15.21 AM.png
BTW, Kaua'i was fantastic!
DSC_0350.jpegDSC_0348.jpeg
Kaua'i is beautiful. Here is a picture from the Pride of America cruise we've done several times and will be doing again next year as the ship sailed along the Napali Coast.

Last edited by Papa; 07-10-2022 at 03:41 PM.
-
Post Thanks / Like - 0 Thanks, 1 Likes
-
07-10-2022, 01:41 PM
#636
Whoa! Caught a couple bolts on my bendpak with the same issue. Glad to catch it early!PXL_20220710_182000516.jpgPXL_20220710_181813906.jpg
-
07-10-2022, 01:59 PM
#637
Senior Member

Nice. Is yours a 120 volt version like mine? Mine is pretty slow, but routing the cables correctly should reduce the load and speed it up some.
Bradley
Build thread - Mk4, Coyote, IRS, Wilwood brakes, old-style soft top and accessories.
The distance between "finished" and finished is literally infinite.
-
07-10-2022, 02:01 PM
#638
Senior Member


Originally Posted by
Papa

Kaua'i is beautiful. Here is a picture from the Pride of America cruise we've done several times and will be doing again next year as the ship sailed along the Napoli Coast.
My favorite spot in the world!
Bradley
Build thread - Mk4, Coyote, IRS, Wilwood brakes, old-style soft top and accessories.
The distance between "finished" and finished is literally infinite.
-
10-19-2022, 12:39 PM
#639
Senior Member

Heat deflectors for the vent tubes
My trips this summer took me through some seriously hot locations, like Kansas and Utah. The Kansas trip was a steady 99°F and high humidity and the Grand Junction, Colorado and Moab, Utah trip was in the mid 90s with some serious sun exposure. One of my past mods to help with cooling in the cockpit was the vent tubes and fans, though it was discovered that the heat from the headers is a serious issue. To combat that I insulated the tubes with foam tape and reflective HVAC tape over that. It did help, but would heat soak when sitting in traffic too long.
When I decided that the majority of the problem was coming from radiant heat from the headers rather than hot air in the engine bay, I set out to make a deflector.
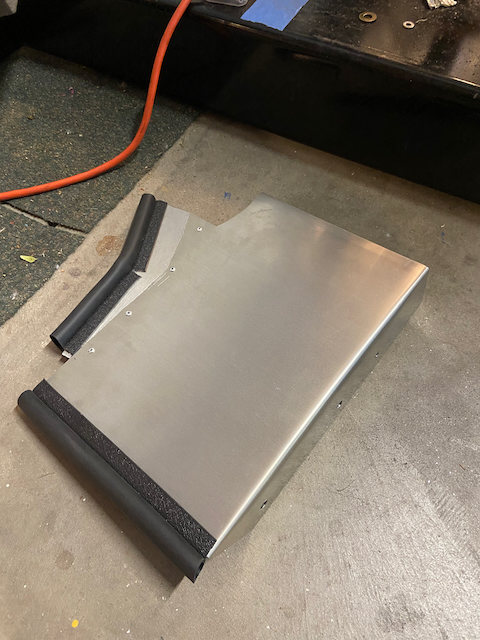
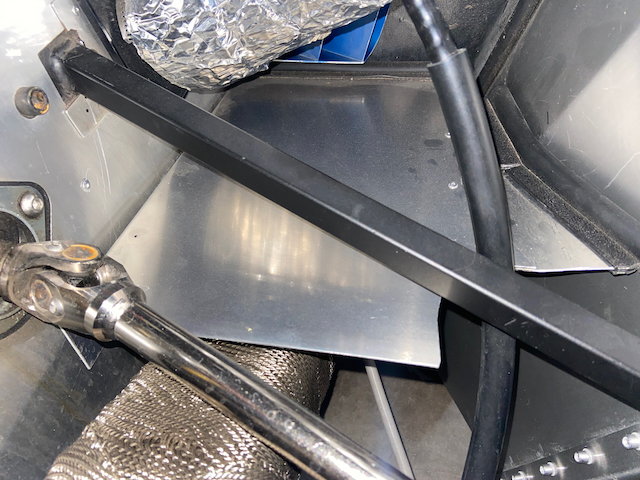
This was the answer! The vent air temps dropped about 7°F and the air is actually helpful in cooling my feet on hot days.
It's a bit of labor, but the vent tubes and fans combined with tube insulation and a heat deflector finally makes the footwell more comfortable.
EDIT: By the way, I forgot to mention that the rubber bulb seal is there just to keep the deflector from vibrating, as I used rivnuts to attach it at the firewall only.
Last edited by GTBradley; 10-20-2022 at 10:33 AM.
Bradley
Build thread - Mk4, Coyote, IRS, Wilwood brakes, old-style soft top and accessories.
The distance between "finished" and finished is literally infinite.
-
Post Thanks / Like - 1 Thanks, 1 Likes
-
10-19-2022, 01:57 PM
#640
25th Anniversary #9772


Originally Posted by
GTBradley

My trips this summer took me through some seriously hot locations, like Kansas and Utah. The Kansas trip was a steady 99°F and high humidity and the Grand Junction, Colorado and Moab, Utah trip was in the mid 90s with some serious sun exposure. One of my past mods to help with cooling in the cockpit was the
vent tubes and fans, though it was discovered that the heat from the headers is a serious issue. To combat that I insulated the tubes with foam tape and reflective HVAC tape over that. It did help, but would heat soak when sitting in traffic too long.
When I decided that the majority of the problem was coming from radiant heat from the headers rather than hot air in the engine bay, I set out to make a deflector.


This was the answer! The vent air temps dropped about 7°F and the air is actually helpful in cooling my feet on hot days.
It's a bit of labor, but the vent tubes and fans combined with tube insulation and a heat deflector finally makes the footwell more comfortable.
I haven't seen a design like that - pretty slick! you may even want to try a 2nd panel spaced out from your panel by 1/4" with some risers, it would airgap insulate a bit more as well
Awesome idea! Great job! Looks great!
-
Post Thanks / Like - 0 Thanks, 1 Likes


 Thanks:
  Likes:


 Reply With Quote


 A young Leatherneck in the making. He's in for a few surprises when his feet hit the yellow footprints at MCRD San Diego next week. The worst part may have been the proximity to the airport...freedom was only a really big jump over a high wall and a sprint across the flight line to freedom. I'm sure he'll do great and come out the other side a new man. Most do.

