-
10-18-2022, 10:13 PM
#561
Black Forest, Colorado


Originally Posted by
GT_Rich

Thanks for the reply. I follow your logic and my logic has been similar. However, my kit arrived without the cockpit corner panels. Apparently FFR installs those after the body is mounted and on mine they forgot. Had to ship them separately. So, I guess just something to be aware of. Maybe seasoned veterans will chime in.
My kit also arrived without the cockpit corner panels.
-
10-19-2022, 08:12 PM
#562
Junior Member

In the build manual, it says the 3 sheet metal parts that go on AFTER the body are the 2 cockpit corners (the pieces that tuck into the outer corners behind the seats with the pointy tops) and the vertical tail fin at the back of the trunk. The side panels that go along the trunk can be riveted in before the body goes on.
I'm also using a TXK (paired to a 302) and also cut away the cross-brace so I could mount the shifter in the rear. I'm making my own gear lever that will angle forward like the old Cobras. I dislike the short vertical shifter in the Daytonas.
-
Post Thanks / Like - 1 Thanks, 0 Likes
-
10-19-2022, 08:55 PM
#563
Senior Member


Originally Posted by
MetalManiac

In the build manual, it says the 3 sheet metal parts that go on AFTER the body are the 2 cockpit corners (the pieces that tuck into the outer corners behind the seats with the pointy tops) and the vertical tail fin at the back of the trunk. The side panels that go along the trunk can be riveted in before the body goes on...
Actually, there are a bunch more parts than that added after the body goes on. So many I made a list along with the page number in the manual. My manual is REVISION 4B, which is a couple years old. Suspect there's a newer one now. Maybe they changed the sequence on those side panels. A number of builders have commented they can be installed before the body is put on. I didn't try and it was easy enough to add them later. Builder's choice.
19. Hatch side aluminum (with bulb seal) lower flange goes under the floor aluminum, side panel touches the side of the floor (480)
20. Firewall extension (with bulb seal) (486)
21. Inner firewall extension (with bulb seal) (487)
22. Cockpit outside corners (with bulb seal) (488)
23. Outside nose mount cover (489)
24. Inside shock tower cover (490)
25. Fuel tank access covers (491)
26. Hatch area rear wall (with bulb seal) (492)
27. Aluminum Splash guards Front wheel, rear inside (512)
28. Front wheel rear (514)
29. Front upper splash panels (with bulb seal) (514)
30. Rear wheel splash panels rear (with bulb seal) (515)
31. Rear wheel splash panels front (with bulb seal) (not in manual, added part)
Build 1: Mk3 Roadster #5125. Sold 11/08/2014.
Build 2: Mk4 Roadster #7750. Sold 04/10/2017.
Build Thread
Build 3: Mk4 Roadster 20th Anniversary #8674. Sold 09/07/2020.
Build Thread and
Video.
Build 4: Gen 3 Type 65 Coupe #59. Gen 3 Coyote. Legal 03/04/2020.
Build Thread and
Video
Build 5: 35 Hot Rod Truck #138. LS3 and 4L65E auto. Rcvd 01/05/2021. Legal 04/20/2023.
Build Thread. Sold 11/9/2023.
-
Post Thanks / Like - 1 Thanks, 1 Likes
-
10-19-2022, 10:11 PM
#564


Originally Posted by
edwardb

Actually, there are a bunch more parts than that added after the body goes on. So many I made a list along with the page number in the manual. My manual is REVISION 4B, which is a couple years old. Suspect there's a newer one now. Maybe they changed the sequence on those side panels. A number of builders have commented they can be installed before the body is put on. I didn't try and it was easy enough to add them later. Builder's choice.
19. Hatch side aluminum (with bulb seal) lower flange goes under the floor aluminum, side panel touches the side of the floor (480)
20. Firewall extension (with bulb seal) (486)
21. Inner firewall extension (with bulb seal) (487)
22. Cockpit outside corners (with bulb seal) (488)
23. Outside nose mount cover (489)
24. Inside shock tower cover (490)
25. Fuel tank access covers (491)
26. Hatch area rear wall (with bulb seal) (492)
27. Aluminum Splash guards Front wheel, rear inside (512)
28. Front wheel rear (514)
29. Front upper splash panels (with bulb seal) (514)
30. Rear wheel splash panels rear (with bulb seal) (515)
31. Rear wheel splash panels front (with bulb seal) (not in manual, added part)
The list is almost the same in my manual it just starts on page 507. (Revision 4R April 2021)
-
10-20-2022, 09:23 AM
#565
Black Forest, Colorado


Originally Posted by
Namrups

The list is almost the same in my manual it just starts on page 507. (Revision 4R April 2021)
I have manual Revision 4Q, October 2020 and these parts start on page 512.
-
10-20-2022, 10:20 AM
#566
Black Forest, Colorado

I ordered a digital copy of the Coupe manual on 11/27/2021 and received Revision 4R, April 2021. When I received my kit on 8/15/2022 it came with the older version, Revision 4Q, October 2020. I suppose they had a bunch of them already printed up so I got the older version (4R), even though it had been updated with a newer version (4Q) 18 months prior.
Of course, you probably wouldn't want a manual that is a lot newer than your kit since things change with the kit (this is the opposite of my situation). I imagine they update the digital copy more often than the paper copy, which is logical.
Just to make sure I have the latest version I just purchased the digital version again just now and received the same Revision 4R that I purchased back on 11/27/2021. I will do a comparison of 4Q and 4R to make sure I am following instructions more appropriate for my kit.
-
10-20-2022, 04:16 PM
#567

Originally Posted by
benives

I ordered a digital copy of the Coupe manual on 11/27/2021 and received Revision 4R, April 2021. When I received my kit on 8/15/2022 it came with the older version, Revision 4Q, October 2020. I suppose they had a bunch of them already printed up so I got the older version (4R), even though it had been updated with a newer version (4Q) 18 months prior.
Of course, you probably wouldn't want a manual that is a lot newer than your kit since things change with the kit (this is the opposite of my situation). I imagine they update the digital copy more often than the paper copy, which is logical.
Just to make sure I have the latest version I just purchased the digital version again just now and received the same Revision 4R that I purchased back on 11/27/2021. I will do a comparison of 4Q and 4R to make sure I am following instructions more appropriate for my kit.
Anything to make things more confusion than they already are! Keeps us first timers on our toes!
-
10-20-2022, 05:56 PM
#568
Senior Member

Manual revision 4Q is an abbreviation for F*** you where I come from. I wonder if it was printed April 1st?
Mk.4 FFR supplied Right hand drive
Received 12/2012 completed 12/2019
Gen1 Coyote / TKO600 / IRS
Lots of mods to make compliant for Australian design rules
-
10-20-2022, 06:09 PM
#569

Originally Posted by
Nigel Allen

Manual revision 4Q is an abbreviation for F*** you where I come from. I wonder if it was printed April 1st?
It is what it is .... I knew this going in. Still, as a first time builder I couldn't do it with out it. Hell, part of the fun is figuring **** out.
-
Post Thanks / Like - 0 Thanks, 1 Likes
-
10-21-2022, 10:31 PM
#570
Black Forest, Colorado


Originally Posted by
Namrups

It is what it is .... I knew this going in. Still, as a first time builder I couldn't do it with out it. Hell, part of the fun is figuring **** out.

I actually think the manual is pretty good and have been following it closely. Currently on page 202.
-
10-27-2022, 02:34 PM
#571
Quick question about reverse lights.
I have a TKX transmission. I am planning on using LED backup lights. I will be purchasing the backup harness that attaches to the transmission. Am I correct that I need to power either side of the TKS reverse switch. From there to the backup light(s) then to chassis ground. Because I'm going to use LED do I have to add anything to the circuit?
-
10-27-2022, 05:05 PM
#572
Check the input voltage for the backup lights. If they are 12V, then the lights already have a ballast resistor in the path. If the voltage is less than 12V, you will need to install a ballast resistor.
Pretty sure aftermarket LED systems used in the automotive field already have a built-in ballast resistor, but if the ones you are using do not, then you will need to calculate the ohms for the ballast resistor and install it. For that you will need the voltage and current requirements of the LED. Use the following formula to calculate the correct resistor value.
Where:
V = supply voltage.
VL = LED voltage requirement.
I = LED current requirement.
R = ballast resistor value.
R = (V - VL)/I
If a ballast resistor of the above calculated size is not available, use the next largest resistor size. Do not use a smaller resistor or you will cut the life of the LED by a substantial amount.
Last edited by Skuzzy; 10-27-2022 at 05:08 PM.
My Type 65 Coupe: Ordered May 27, 2021. Arrived November 19, 2021.
I would like to treat my gas pedal as a binary operator. It would be nice to get the cooperation of everyone in front of me. 
-
10-27-2022, 07:33 PM
#573


Originally Posted by
Skuzzy

Check the input voltage for the backup lights. If they are 12V, then the lights already have a ballast resistor in the path. If the voltage is less than 12V, you will need to install a ballast resistor.
Pretty sure aftermarket LED systems used in the automotive field already have a built-in ballast resistor, but if the ones you are using do not, then you will need to calculate the ohms for the ballast resistor and install it. For that you will need the voltage and current requirements of the LED. Use the following formula to calculate the correct resistor value.
Where:
V = supply voltage.
VL = LED voltage requirement.
I = LED current requirement.
R = ballast resistor value.
R = (V - VL)/I
If a ballast resistor of the above calculated size is not available, use the next largest resistor size. Do not use a smaller resistor or you will cut the life of the LED by a substantial amount.
Thanks for that explanation! If the resister is required should it go between the fuse box and the transmission or between the transmission and the lights? Does it matter? Does it matter if there are two lights (That's the plan)?
-
10-27-2022, 10:46 PM
#574
Senior Member


Originally Posted by
Namrups

Quick question about reverse lights.
I have a TKX transmission. I am planning on using LED backup lights. I will be purchasing the backup harness that attaches to the transmission. Am I correct that I need to power either side of the TKS reverse switch. From there to the backup light(s) then to chassis ground. Because I'm going to use LED do I have to add anything to the circuit?
You need to confirm your LED backup lights are rated for 12V input (likely). If so, no resistors required. You should also confirm the current draw. As per most LED's, likely very low so nothing really special required to wire. I have two Watsons Streetworks L96WCL white LED backup lights (Maxxima brand) on my Coupe and power them with the RF panel 10 amp radio circuit. They only draw a fraction of that. The switch on the TKX appears to be the same one as on my T56. Closed when the transmission is in reverse. Open the rest of the time. I extended the ignition switched and fused +12V radio circuit wire to one side of the switch. Extended the other side to the back where it's connected to the plus side of the two LED lights. The other sides grounded. Circuit is closed when in reverse which switches on the lights. Simple and has worked fine for the several years it's been on the road.
I didn't find then -- and can't find now -- any description of the current limits for the switch in the trans. You could put a relay in the circuit. The GM automatic transmission in my truck build very specifically said not to power the backup lights through the switch and that a relay was required. Which is what I did. But don't think that's necessary in this case with LED's. Some also switch the ground side. That's possible too. But suggest keeping it simple as I described. It works.
Last edited by edwardb; 10-28-2022 at 05:25 AM.
Build 1: Mk3 Roadster #5125. Sold 11/08/2014.
Build 2: Mk4 Roadster #7750. Sold 04/10/2017.
Build Thread
Build 3: Mk4 Roadster 20th Anniversary #8674. Sold 09/07/2020.
Build Thread and
Video.
Build 4: Gen 3 Type 65 Coupe #59. Gen 3 Coyote. Legal 03/04/2020.
Build Thread and
Video
Build 5: 35 Hot Rod Truck #138. LS3 and 4L65E auto. Rcvd 01/05/2021. Legal 04/20/2023.
Build Thread. Sold 11/9/2023.
-
10-28-2022, 06:46 AM
#575

Originally Posted by
Namrups

Thanks for that explanation! If the resister is required should it go between the fuse box and the transmission or between the transmission and the lights? Does it matter? Does it matter if there are two lights (That's the plan)?
If the ballast is needed it should go in between the lights and any path to the lights. Each light would have its own ballast resistor.
My Type 65 Coupe: Ordered May 27, 2021. Arrived November 19, 2021.
I would like to treat my gas pedal as a binary operator. It would be nice to get the cooperation of everyone in front of me. 
-
Post Thanks / Like - 1 Thanks, 0 Likes
-
10-28-2022, 11:52 AM
#576


Originally Posted by
edwardb

You need to confirm your LED backup lights are rated for 12V input (likely). If so, no resistors required. You should also confirm the current draw. As per most LED's, likely very low so nothing really special required to wire. I have two Watsons Streetworks L96WCL white LED backup lights (Maxxima brand) on my Coupe and power them with the RF panel 10 amp radio circuit. They only draw a fraction of that. The switch on the TKX appears to be the same one as on my T56. Closed when the transmission is in reverse. Open the rest of the time. I extended the ignition switched and fused +12V radio circuit wire to one side of the switch. Extended the other side to the back where it's connected to the plus side of the two LED lights. The other sides grounded. Circuit is closed when in reverse which switches on the lights. Simple and has worked fine for the several years it's been on the road.
I didn't find then -- and can't find now -- any description of the current limits for the switch in the trans. You could put a relay in the circuit. The GM automatic transmission in my truck build very specifically said not to power the backup lights through the switch and that a relay was required. Which is what I did. But don't think that's necessary in this case with LED's. Some also switch the ground side. That's possible too. But suggest keeping it simple as I described. It works.
Thanks Paul!
-
10-28-2022, 08:31 PM
#577

Originally Posted by
Namrups

Quick question about reverse lights.
I have a TKX transmission. I am planning on using LED backup lights. I will be purchasing the backup harness that attaches to the transmission. Am I correct that I need to power either side of the TKS reverse switch. From there to the backup light(s) then to chassis ground. Because I'm going to use LED do I have to add anything to the circuit?
What are you using for your reverse lights? I am curious to see what others are using.
-
10-29-2022, 09:20 AM
#578
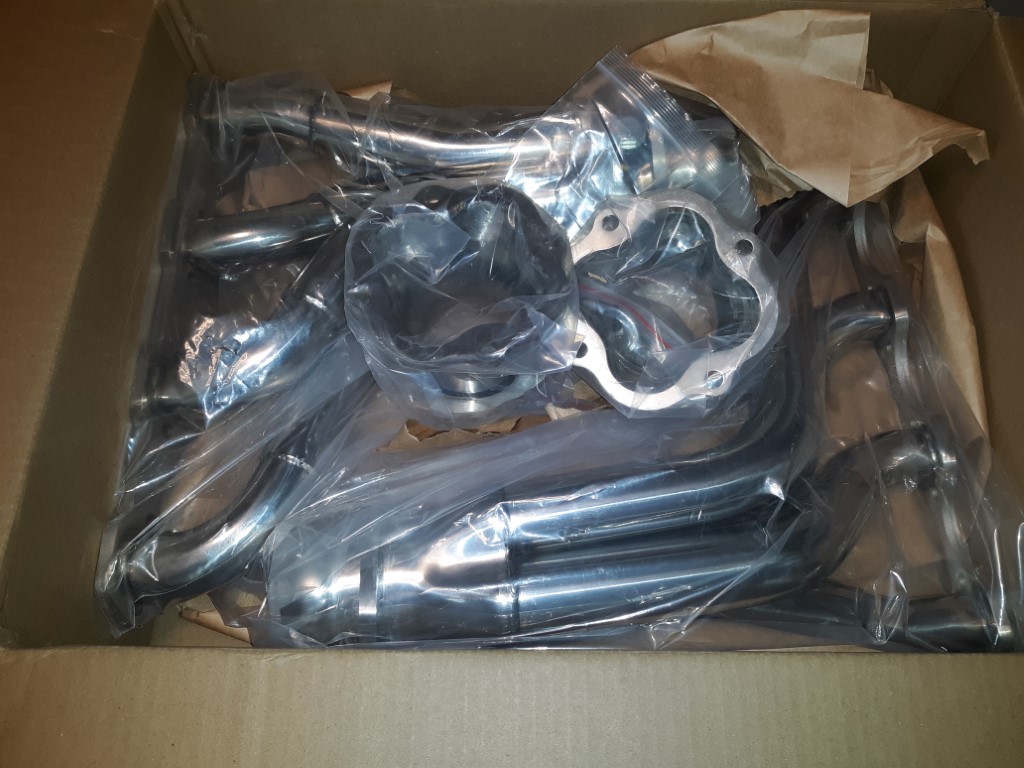
Had a delivery form FF today!!
-
Post Thanks / Like - 0 Thanks, 1 Likes
-
10-29-2022, 04:47 PM
#579
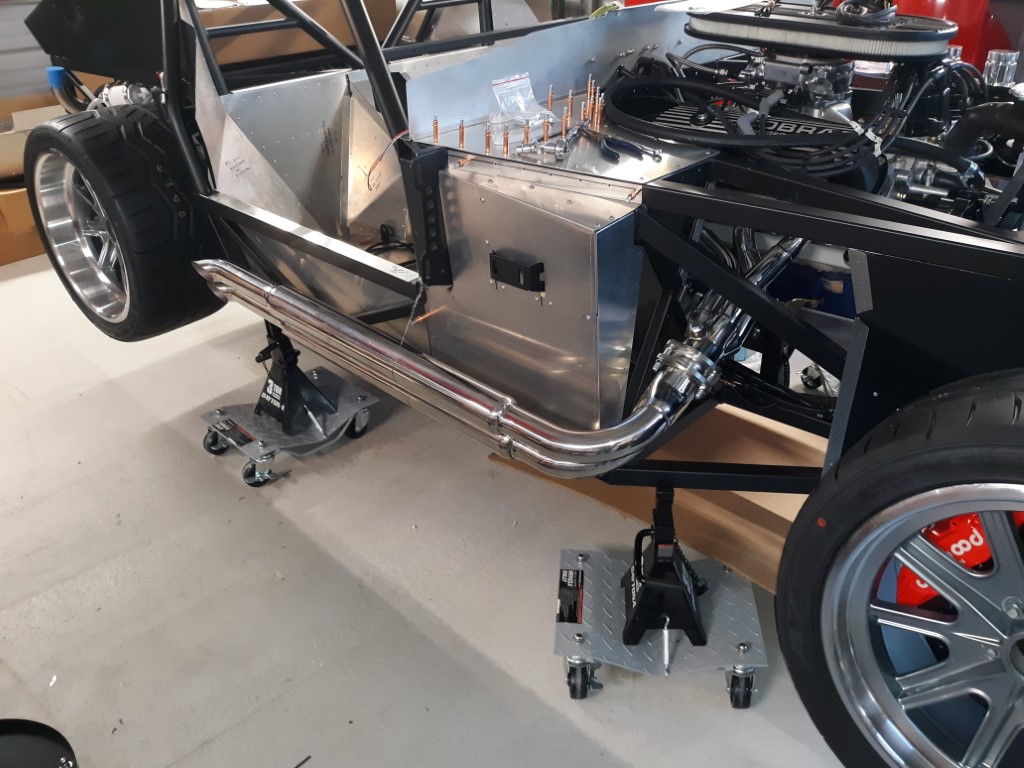
Nice! I have a package due tomorrow. I bet it's the same thing. I wonder why they ship those with 4 bolt flange adapters.
-
10-29-2022, 05:24 PM
#580

Originally Posted by
burchfieldb

What are you using for your reverse lights? I am curious to see what others are using.
I have a pair of Maxxima 4" low profile leds. (pt# m42365) Not sure if I'm going to use them. They look a little big. May try to find the same ones that Paul is using.
-
10-29-2022, 05:26 PM
#581

Originally Posted by
GT_Rich

Nice! I have a package due tomorrow. I bet it's the same thing. I wonder why they ship those with 4 bolt flange adapters.
I had the same question. They do look great on the car though!
-
11-05-2022, 12:02 PM
#582
Day 135
Been working all week to prepare for first start. Verified the Sniper is live and controlling both the fuel pump and the fan. Verified that the engine will turn over when the key is turned to the start position. Plumed and filled radiator. Plumed and filled power steering. Added 5 gallons of gas to tank. No leaks so far. 50-60 PSI of fuel pressure at the Sniper inlet. Clutch safety switch works. Using the keyed ignition switch for now. Will switch to the DGD later. No go-kart as I'm waiting for my throttle linkage. Due next week maybe. A number of Upstate Cobra Club members will be joining me today. Big day!!
Had our own car show today!
-
11-05-2022, 12:11 PM
#583
First Start try 1
FAILED!!! The engine turned over but we had no spark. After testing a number of connections and numerous discussions we realized that the coil had no power going to the positive terminal. That's on me as a newbe. I don't know what I don't know. There was nothing in the Sniper installation manual nor the RF manual that stated a power wire needed to be attached to the positive side of the coil. We attached a jumper wire from the orange ignition wire on the key switch to the positive side of the coil.
First Start try 2
How sweet it is. Two small water leaks that stopped themselves. Brought the temp to 195 and the fan kicked in and the temp came right back down. Milestone accomplished!! Thanks to the group for their aid is making this happen!!
-
Post Thanks / Like - 0 Thanks, 4 Likes
-
11-05-2022, 01:12 PM
#584
Not a waxer

My slow internet connection won’t let me see the video but I believe ya’ when you say it ran! Big time congratulations on the milestone Scott 
Jeff
-
11-05-2022, 01:21 PM
#585

Originally Posted by
Jeff Kleiner

My slow internet connection won’t let me see the video but I believe ya’ when you say it ran! Big time congratulations on the milestone Scott

Jeff
Thanks Jeff! Next step is go-kart.
-
11-05-2022, 04:37 PM
#586
Senior Member

Very nice! Congratulations.
Build 1: Mk3 Roadster #5125. Sold 11/08/2014.
Build 2: Mk4 Roadster #7750. Sold 04/10/2017.
Build Thread
Build 3: Mk4 Roadster 20th Anniversary #8674. Sold 09/07/2020.
Build Thread and
Video.
Build 4: Gen 3 Type 65 Coupe #59. Gen 3 Coyote. Legal 03/04/2020.
Build Thread and
Video
Build 5: 35 Hot Rod Truck #138. LS3 and 4L65E auto. Rcvd 01/05/2021. Legal 04/20/2023.
Build Thread. Sold 11/9/2023.
-
11-05-2022, 05:54 PM
#587
Looks and sounds amazing, congratulations! I can't wait to get mine to that stage, you are way ahead of me. I just got my hardware pack and have not been able to really do anything but sheet metal.
-
11-05-2022, 08:55 PM
#588
Senior Member

Sounds and looks great Scott! Congratulations!
-
11-05-2022, 09:04 PM
#589

Originally Posted by
edwardb

Very nice! Congratulations.
Thank you Sir!! You have been a big part of this! Thanks for all of your help!
-
Post Thanks / Like - 1 Thanks, 0 Likes
-
11-05-2022, 09:05 PM
#590

Originally Posted by
rhk118

Sounds and looks great Scott! Congratulations!
Thank you! Sent chills up my spine when it kicked off. A dream I have always had closer to reality!
-
Post Thanks / Like - 0 Thanks, 1 Likes
-
11-06-2022, 04:30 PM
#591
Senior Member

Congrats, Scott! That's music to my ears. Big milestone reached.
Chris
Coupe complete kit. Index. Delivered: 4/22/24.
Build Thread. Coyote Gen 4X. T-56. IRS w/3.55. Wilwoods. PS. HVAC. Side windows.
MK4 Complete kit.
Build Thread Index. Delivered: 10/15/2020. Legal: 7/25/23. Coyote Gen3. TKO600 (0.64 OD). IRS w/3.55. PS. Wilwoods. Sway bars. This build is dedicated to my son, Benjamin.
Build Thread.
-
11-06-2022, 04:48 PM
#592

Originally Posted by
460.465USMC

Congrats, Scott! That's music to my ears. Big milestone reached.
Thanks Chris! Big step.
-
11-06-2022, 07:40 PM
#593
Congratulations! During a build there are always moments of satisfaction, but I do not think anything compares to the first successful firing up of the engine. Well done Sir, well done.
Last edited by Skuzzy; 11-07-2022 at 08:14 AM.
Reason: Bad grammer...otherwise known as too much beer.
My Type 65 Coupe: Ordered May 27, 2021. Arrived November 19, 2021.
I would like to treat my gas pedal as a binary operator. It would be nice to get the cooperation of everyone in front of me. 
-
11-06-2022, 09:10 PM
#594

Originally Posted by
Skuzzy

Congratulations! During a build there are always moments of satisfaction, but I do not think anything compares to when you first successful firing up of the engine. Well done Sir, well done.
Thank you Sir! You are correct. I went into this not knowing if I would be able to accomplish it or end up having it sit in my garage unfinished because it was beyond me. Hearing that engine start gave me such pride in myself and gave me the confidence that I will complete this build.
I had a local coupe builder stop by to check out the progress and his posted comment was "Had a chance to get out for a while today. Stopped by Scott's. All I can say is WOW. I've seen a bunch of builds but this one is world class. No expense spared. all the bells and whistles, all meticulously assembled." To hear that kind of praise is so very satisfying and very humbling.
-
Post Thanks / Like - 0 Thanks, 2 Likes
-
11-07-2022, 12:03 PM
#595
This will be project #43 for me and my first Factory Five, as well as the third personal project. I can tell you that first engine start still feels like it did when I did the first project. I thought this would be my last project, but Factory Five went and stretched the 35 Truck, and the Wife is not going to rest until I get that built for her. So #44 will be the last.
At nearly 70 years old, it is time to enjoy the fruits of my labor.
My Type 65 Coupe: Ordered May 27, 2021. Arrived November 19, 2021.
I would like to treat my gas pedal as a binary operator. It would be nice to get the cooperation of everyone in front of me. 
-
Post Thanks / Like - 0 Thanks, 2 Likes
-
11-08-2022, 08:55 AM
#596
Courtesy Lights
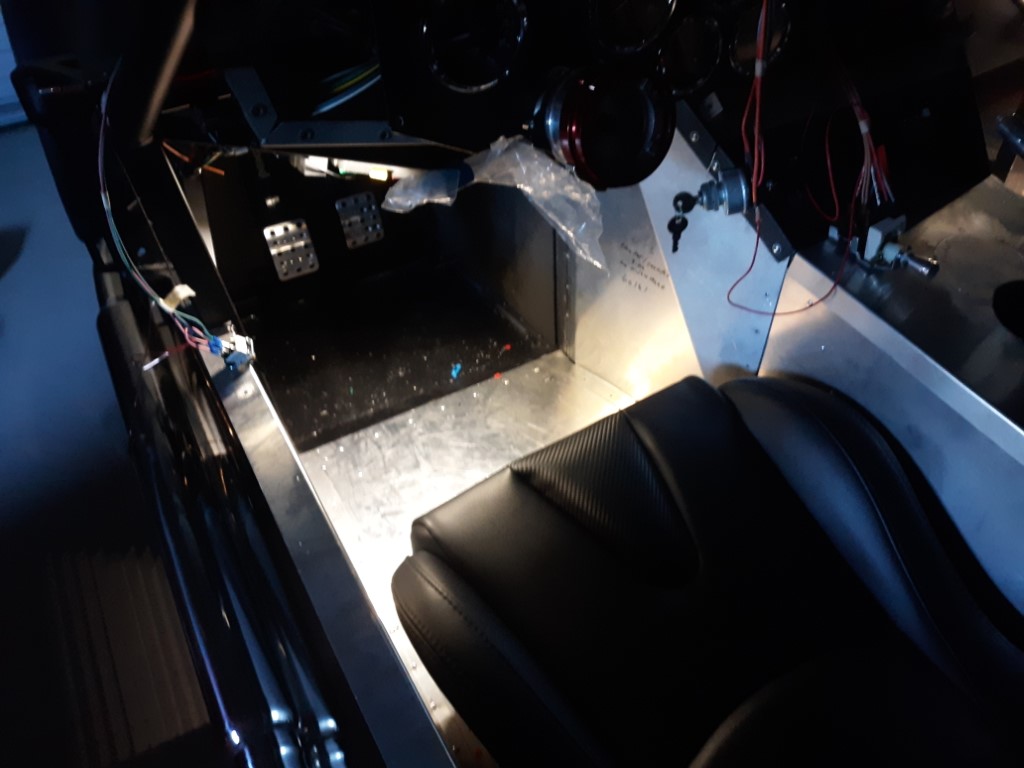
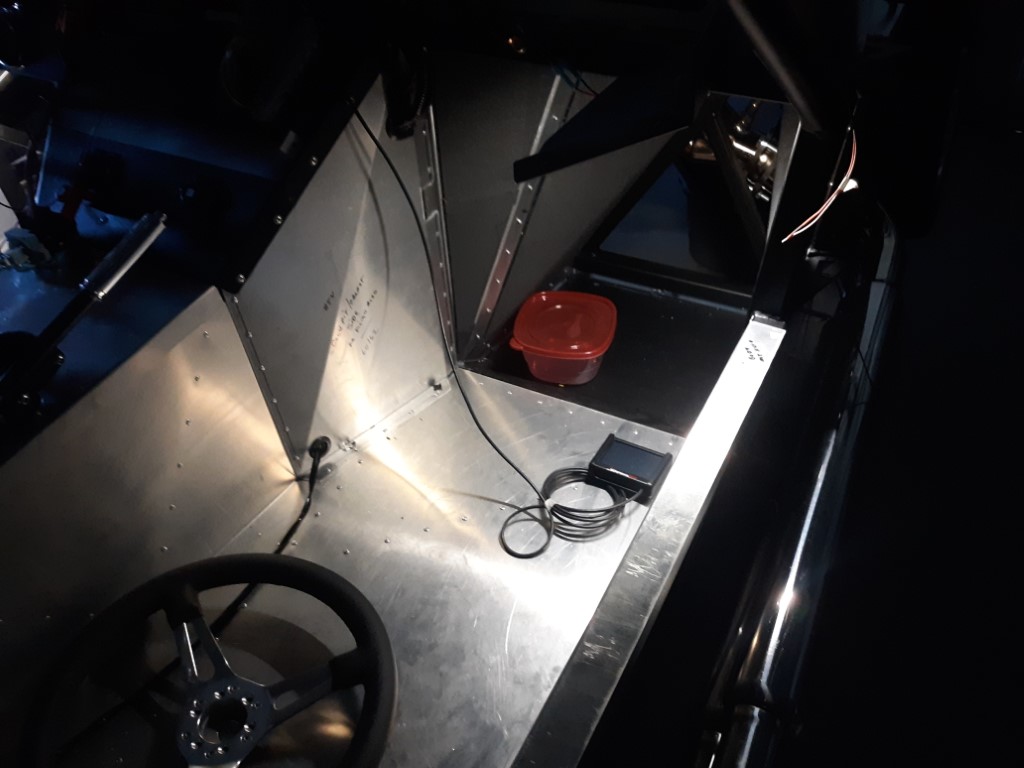
Continuing my wiring brings me to my courtesy lights. I pulled out the FF supplied LED strip and was not very impressed at first glance. I have been looking at what others have used but until I get the A/C - heater installed I'm not sure where to mount anything. Decided to cut the FF strip in half and to mount it figuring I can replace it at a later time. I have to say I am very surprised and impressed at the amount of light given off by this small strip. May just leave it!
DS
PS
-
Post Thanks / Like - 0 Thanks, 1 Likes
-
11-08-2022, 04:53 PM
#597
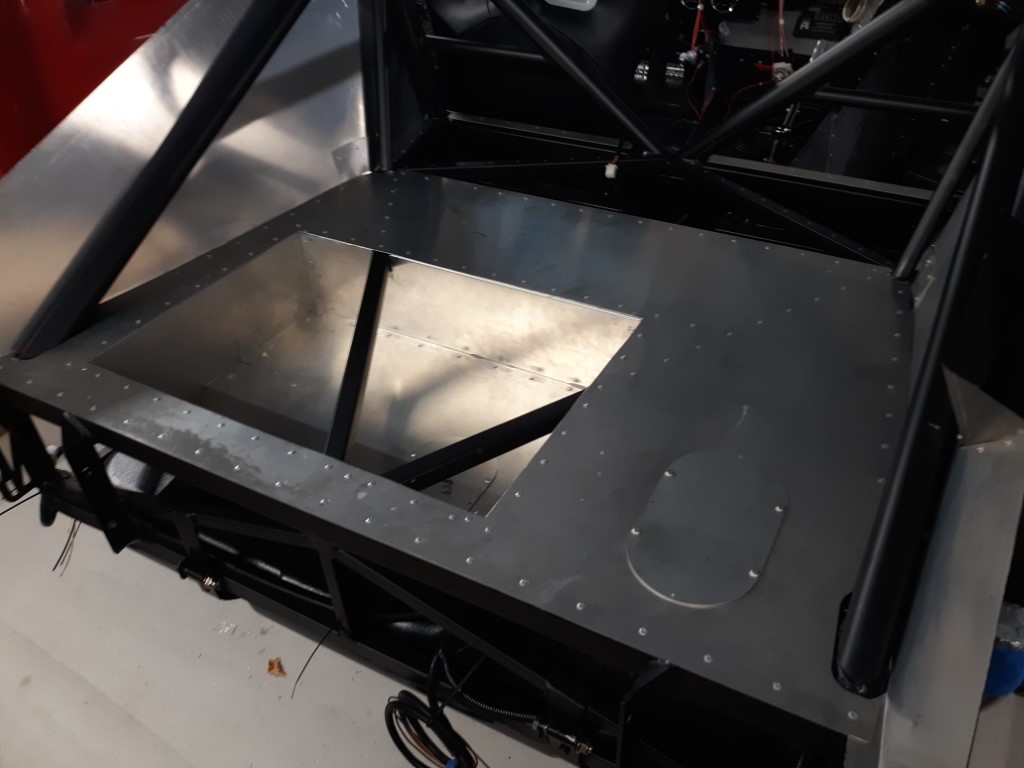
Decided to mount the trunk panel today. Siliconed all surfaces and laid the panel in place. Grabbed the Milwaukee M12 battery riveter (that's less than a year old). After a hand full of rivets the battery went dead. Grabbed the fresh battery from the charger and lo and behold it was also dead. No lights on the charger. Nothing. Have no idea what happened to the charger. Ran to the local Ace and bought a Channel Lock hand riveter. Worked fine except for the arthritis in my hands.
-
11-09-2022, 10:23 AM
#598
Senior Member

Scott, do you need an M12 charger? I have an extra, happy to send it. Save those thumb joints brother.
-
11-09-2022, 10:59 AM
#599

Originally Posted by
rhk118

Scott, do you need an M12 charger? I have an extra, happy to send it. Save those thumb joints brother.
PM'd you
-
11-09-2022, 12:24 PM
#600
One for the electrical experts
The RF electrical installation manual shows cutting the relay wire for the fuel pump if using EFI.

I have not done this. As seen in my recent first start video the engine started and ran fine. Is cutting this wire a requirement and if I don't cut it what do I risk?


 Thanks:
  Likes:


 Reply With Quote


