-
11-30-2024, 08:25 AM
#121
Not a waxer

Hopefully the Weize is better than an Optima...but if not at least it was only half price 
Jeff
-
11-30-2024, 12:48 PM
#122
Senior Member


Originally Posted by
Jeff Kleiner

Hopefully the Weize is better than an Optima...but if not at least it was only half price
Jeff
Haha, my thoughts exactly. And if I ever get it down to you for paint, I'll be sure to bring the charger
-
12-07-2024, 06:21 PM
#123
Senior Member
-
Post Thanks / Like - 0 Thanks, 1 Likes
-
12-07-2024, 06:27 PM
#124
Senior Member

Looks great. I like the little diff vent - can you please share where you got it?
-
Post Thanks / Like - 1 Thanks, 0 Likes
-
12-07-2024, 06:34 PM
#125
-
Post Thanks / Like - 1 Thanks, 0 Likes
-
12-07-2024, 06:51 PM
#126
Senior Member
-
Post Thanks / Like - 0 Thanks, 2 Likes
-
12-07-2024, 07:10 PM
#127
Senior Member
-
12-07-2024, 07:55 PM
#128
Senior Member
Pretty clever combo, thanks for the info.
-
12-07-2024, 09:31 PM
#129
Senior Member

Congrats on your SS hard lines, Jim! They look great.
Being able to PC your larger panels will be really handy. Looking forward to seeing your oven up and running.
Do you happen to have the info on the boat latch and strut for your trunk box? I like your setup and considering something similar.
Chris
Coupe complete kit. Index. Delivered: 4/22/24.
Build Thread. Coyote Gen 4X. T-56. IRS w/3.55. Wilwoods. PS. HVAC. Side windows.
MK4 Complete kit.
Build Thread Index. Delivered: 10/15/2020. Legal: 7/25/23. Coyote Gen3. TKO600 (0.64 OD). IRS w/3.55. PS. Wilwoods. Sway bars. This build is dedicated to my son, Benjamin.
Build Thread.
-
Post Thanks / Like - 1 Thanks, 0 Likes
-
12-07-2024, 09:40 PM
#130
Senior Member
Originally Posted by
460.465USMC
Congrats on your SS hard lines, Jim! They look great.
Being able to PC your larger panels will be really handy. Looking forward to seeing your oven up and running.
Do you happen to have the info on the boat latch and strut for your trunk box? I like your setup and considering something similar.
Thanks Chris
Here's the latch I used
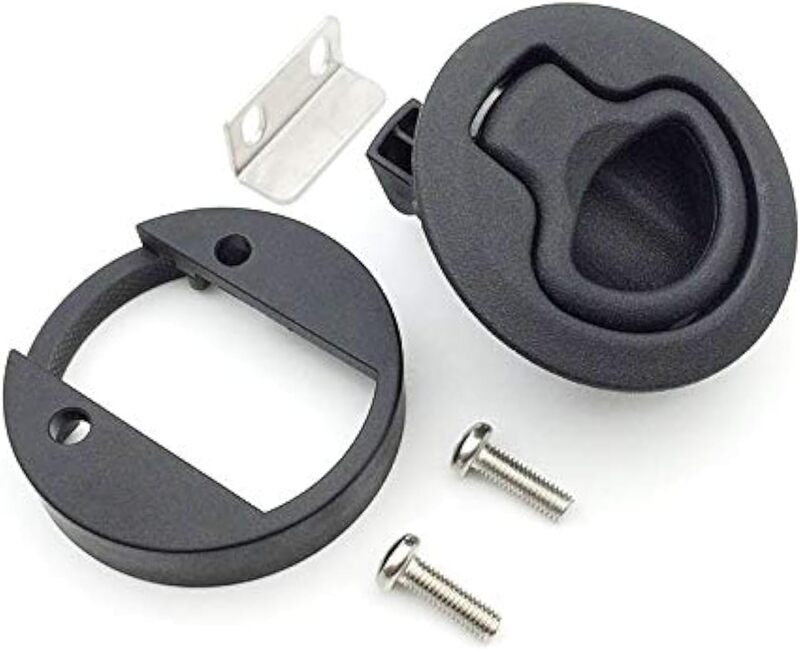
https://www.amazon.com/gp/product/B0...e?ie=UTF8&th=1
And the strut
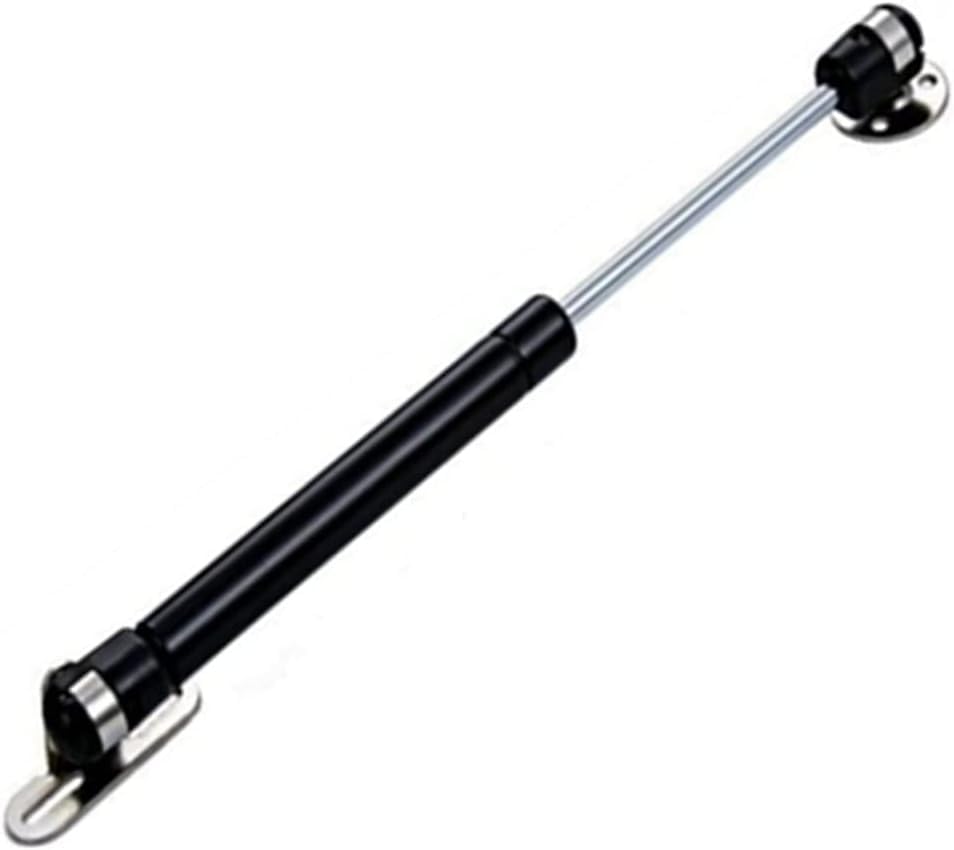
https://www.amazon.com/gp/aw/d/B0CY2...b_b_asin_image
Less than $20 combined
Last edited by JimStone; 12-08-2024 at 11:16 PM.
-
12-24-2024, 01:42 AM
#131
Senior Member
I finished my powder coat oven, which ended up being a pretty fun side-project. And, shockingly, it all worked the first time I plugged it in.
I based the design on this DIY tutorial: https://www.powdercoatguide.com/2014...ting-oven.html
But I simplified a few things, because I'm not looking to make a business out of this or anything. I just wanted to have the ability to powder coat my own panels and Cerakote the exhaust at my own pace. It'll probably end up being a wash cost-wise for the Coupe, but I'll come out ahead if I do subsequent projects.
My oven ended up being 4' x 3' x 6.5' outside dimensions. The interior oven is about 3.5' x 2.5' x 6', so about 90 cubic ft. Big enough to fit the largest aluminum panels and the side pipes.
Materials List:
Structure:
3-5/8" galvanized steel framing studs (20 gauge, 10 ft) x 14-15
Galvanized steel stud track, 10 ft, x 10
9 sheets of 4x7' aluminum sheeting
16 gauge steel sheet for floor
1/8" and 3/16" steel rivets x 800+ (probably overdid it)
Door:
24 inch stainless piano hinges x 2
Door clamps x 2
Single gate caster wheel with spring
Insulation/sealing:
R-19 unfaced fiberglass insulation x 3 rolls
Aluminum high temp sealing tape
High temp RTV silicone
Tadpole gasket for door
Oven bake element x 3 (3500W apiece)
High temperature spade connectors for bake elements
Centrifugal blower fan for a wood furnace - 196 CFU
Controller box / electrical:
PID temperature controller
40A solid state relays x 2
10AWG THHN wire x 50 feet
11AWG high temp wire
Large electrical junction box
PID temperature controller
40A solid state relays x 2
Volt/amp meter
240v rotary switches x 2
Fan motor rheostat
DIN rail components
Cylindrical fuse holder x 2, with 0.5A and 5A cylindrical fuses (for PID controller and fan)
40A circuit beaker (for oven elements)
120v Extension cord - 20 ft
50A, 240v appliance power cord - 10 ft
1/2 and 3/4" EMT conduit, fittings, and 2x junction boxes
Miscellaneous:
Set of 4 casters with brakes
Got pretty much everything from Amazon, except the framing supplies and sheet metal.

I had never used steel framing studs and tracks before, but they're very easy to use
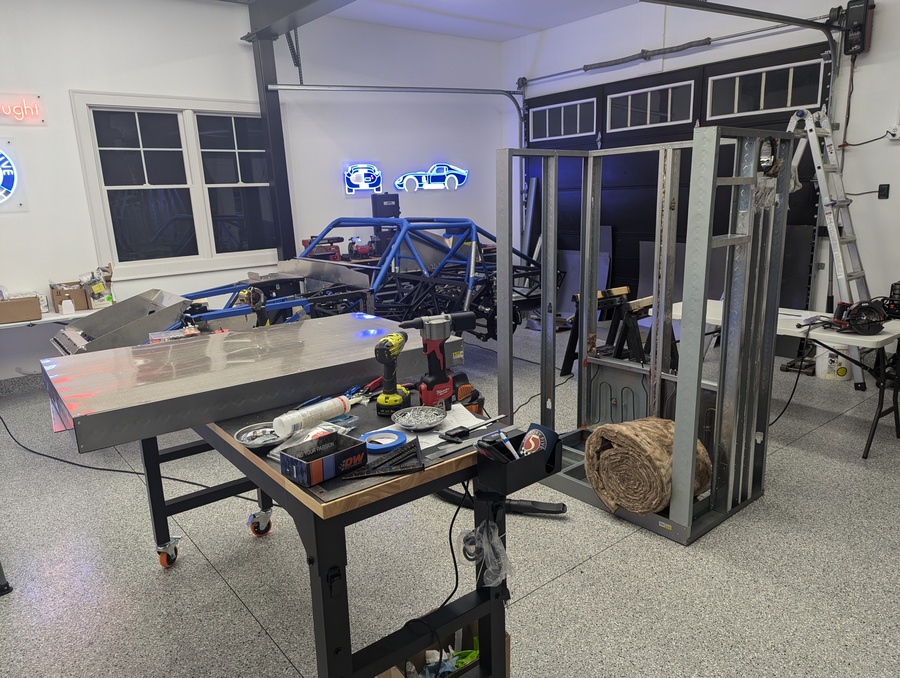
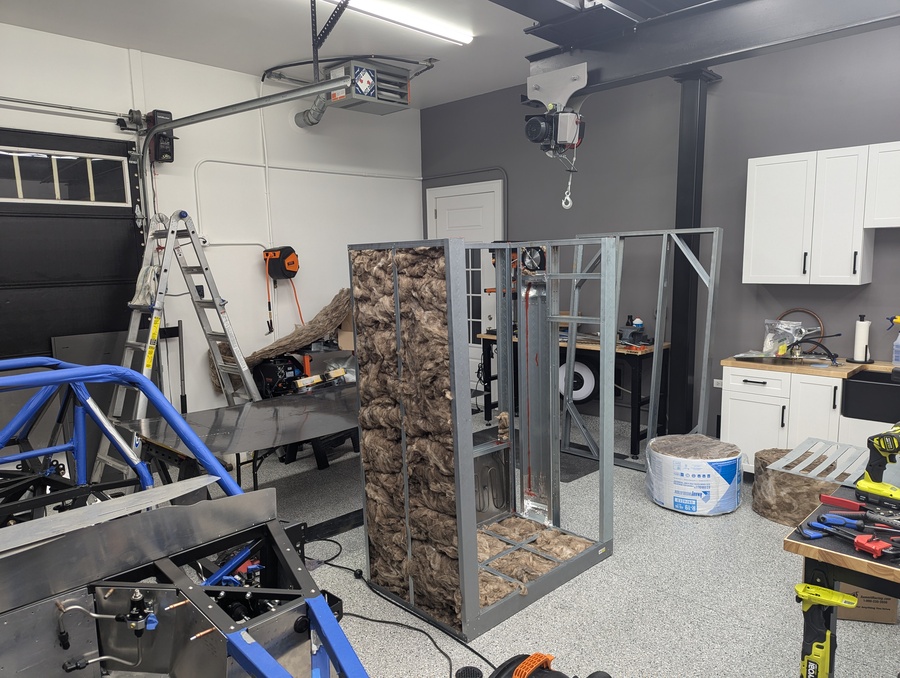
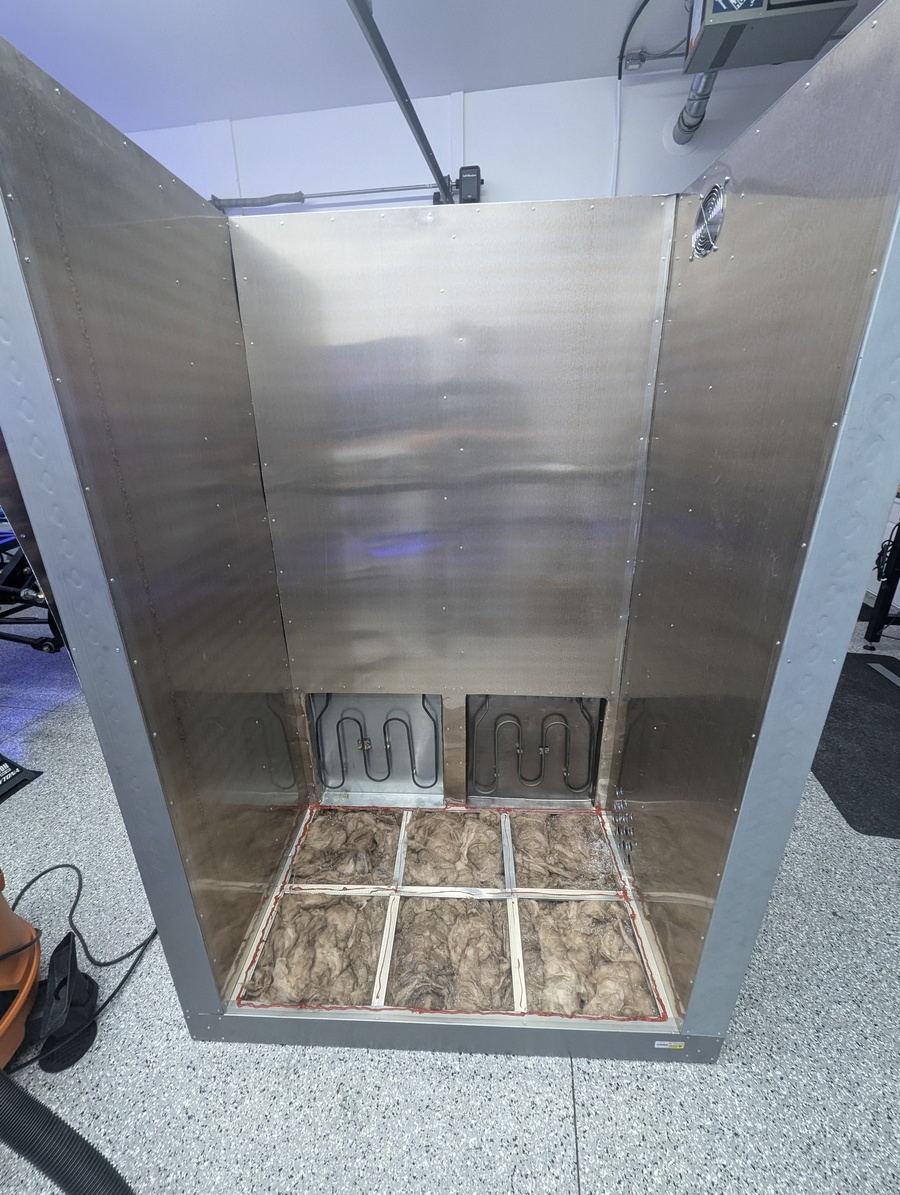
Wool insulation is recommended, but would have been an extra $100 or more, so I went with fiberglass. Is good enough.
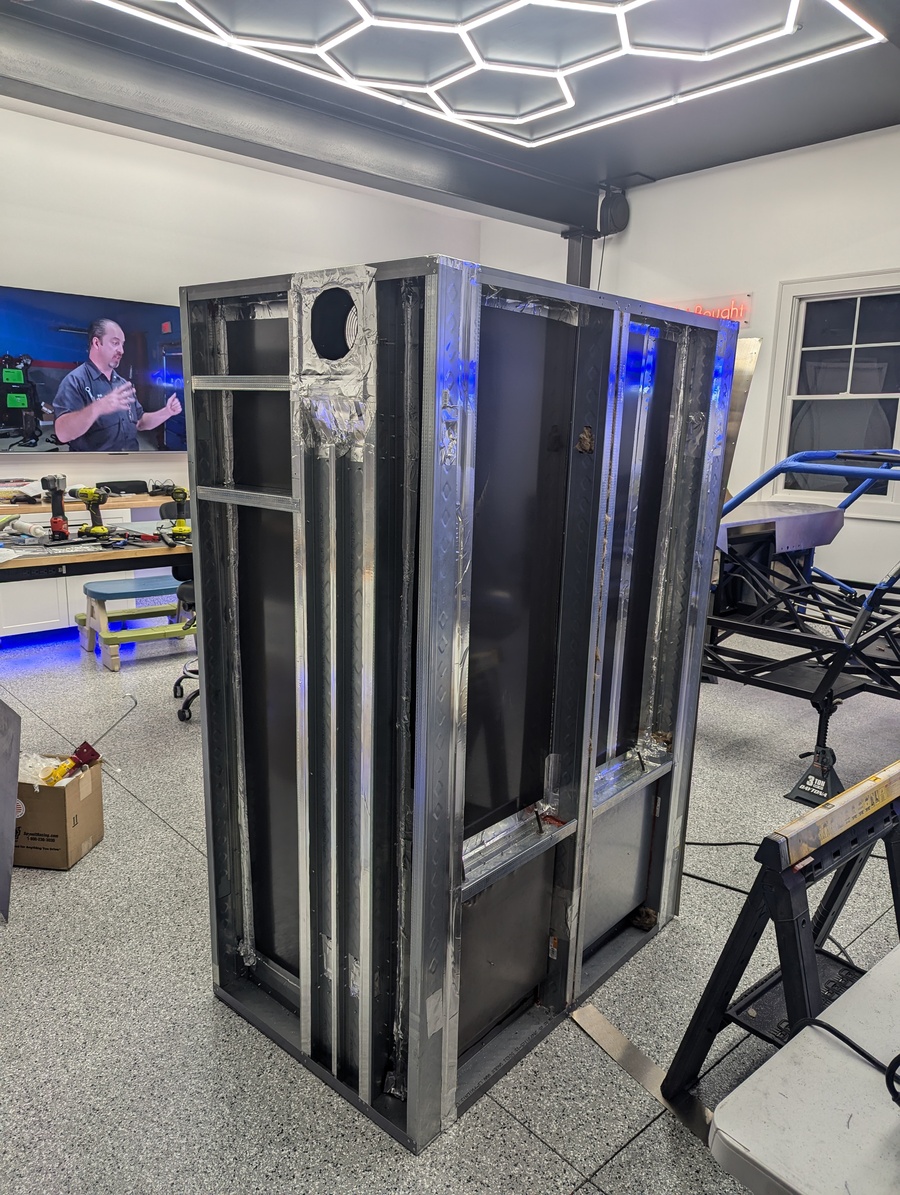
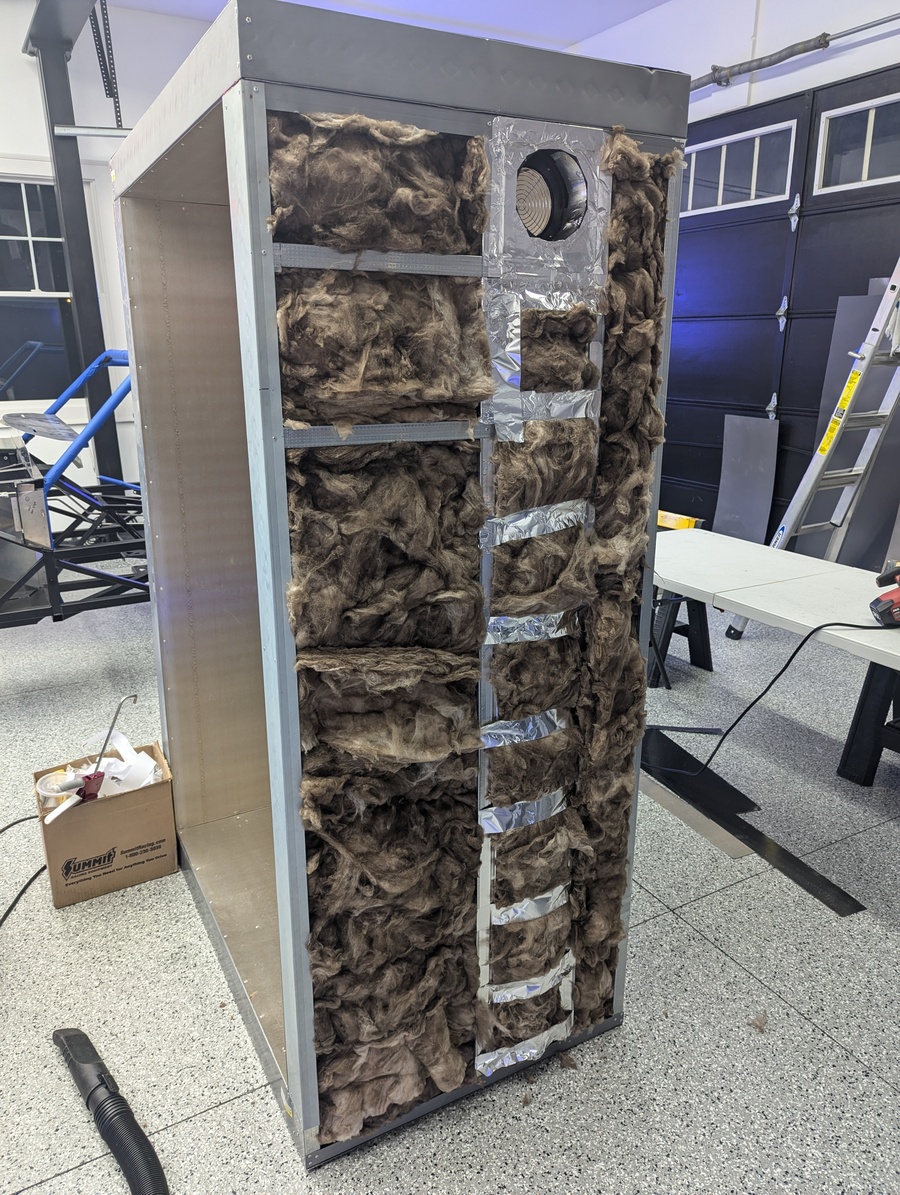
This last pictures show the recirculating vent and where the fan will go. The vent helps redistribute the hot air at the top back to the bottom, because otherwise the top of the oven can be 50-75 degrees different and not good for the coating
Last edited by JimStone; 12-24-2024 at 02:00 AM.
-
12-24-2024, 01:57 AM
#132
Senior Member
-
Post Thanks / Like - 0 Thanks, 1 Likes
-
12-24-2024, 06:23 AM
#133
Senior Member

That turned out sweet! Keep us posted on how it works.
Happy Holidays!
Higgy
MK4 #11173 picked up 01/20/25
MK4 #11012 picked up 04/16/24
MK4 #10616 picked up 4/10/23 SOLD
MK4 #9759 picked up 4/3/19 SOLD
-
Post Thanks / Like - 1 Thanks, 0 Likes
-
12-24-2024, 07:11 AM
#134
That turned out really nice! That will be super handy to have on site.
-
Post Thanks / Like - 1 Thanks, 0 Likes
-
12-24-2024, 11:56 AM
#135
Senior Member
Nice work, Jim! Very cool project. Thanks for posting.
Chris
Coupe complete kit. Index. Delivered: 4/22/24.
Build Thread. Coyote Gen 4X. T-56. IRS w/3.55. Wilwoods. PS. HVAC. Side windows.
MK4 Complete kit.
Build Thread Index. Delivered: 10/15/2020. Legal: 7/25/23. Coyote Gen3. TKO600 (0.64 OD). IRS w/3.55. PS. Wilwoods. Sway bars. This build is dedicated to my son, Benjamin.
Build Thread.
-
Post Thanks / Like - 1 Thanks, 0 Likes
-
12-25-2024, 11:24 AM
#136
Senior Member
Man, I love DIY stuff like this! Merry Christmas to you! I will enjoy watching how well it works and seeing the professional results.
-
Post Thanks / Like - 1 Thanks, 0 Likes
-
12-25-2024, 12:44 PM
#137
Senior Member
Thanks guys!
I got it up to 550F, so it gets plenty hot.
The aluminum panels inside expand in the heat (another reason not to use aluminum), causing some warping , but it still keeps temp.
-
02-14-2025, 12:03 AM
#138
Senior Member
Well, progress really seemed to slow down for a while: The powder coat oven side project, the Holidays, nasty Flu bug, then vacation.
But I've been chipping away. Mostly working on getting the dash and controls mocked up. Custom stuff sure does take forever.
For the dash, I went with custom Speedhut gauges. GPS speedo, the typical gauges, but I also added a few extra gauges like oil temp, fuel pressure, manifold vacuum. I had an Air:Fuel gauge, but I realized I bought the wrong one (accidently bought the one that only works with AiM units, which I don't have) so that's on hold.
Controls are all push buttons from Billet Automotive Buttons out of Australia, who make real nice stuff. What's cool is they're 16 amp switches so I won't have to use relays for most of them.
The only kit supplied controls that I'll be using are the twist-knob controls for the AC (fan and temp control). I also have a twist-knob control for windshield wiper speed from the Specialty Power Windows kit. But, I got different knobs so they all match.
First, a few pics of how it all turned out, then some of the details. This is still sort of a rough draft at this point:
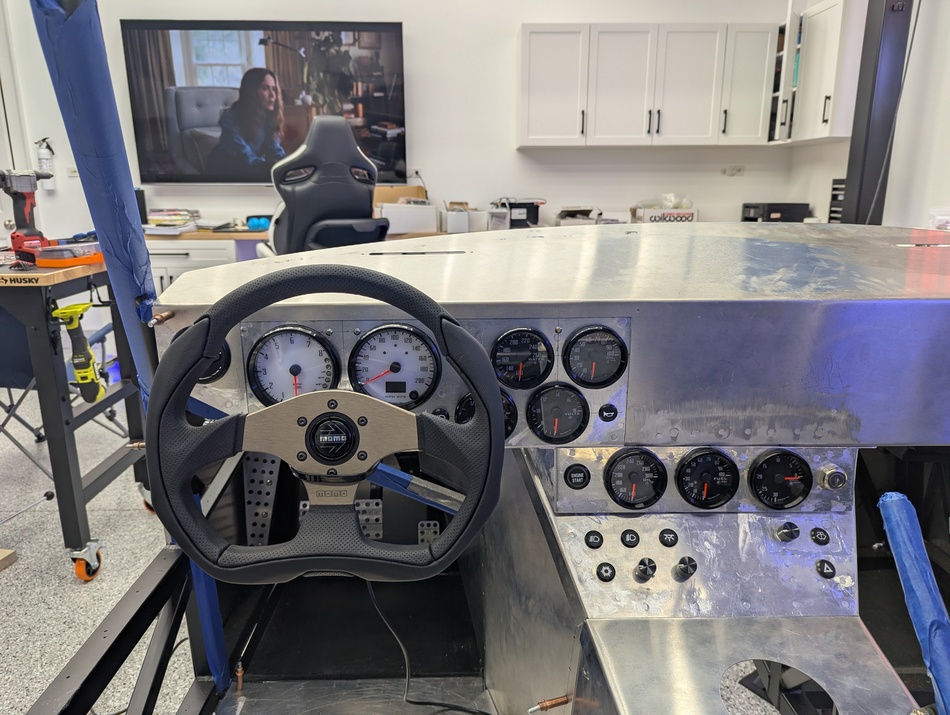

Putting the button switches directly on the trans cover panel ended up being a real PITA. First of all, there is a diagonal frame member under it, so you can't put buttons in the middle. Then the backside of the buttons and wires are exposed, so I had to make enclosures that would fit between the frame rails with extensions so the wires can make their ways up behind the dash. I modified the heck out of that panel.


Looks so ridiculous underneath. But whatever, no one will see it. I'll have some work getting everything water tight.
Last edited by JimStone; 02-14-2025 at 12:05 AM.
-
02-14-2025, 12:27 AM
#139
Senior Member
-
02-14-2025, 11:53 AM
#140
Senior Member
Looks good Jim. Nothing wrong with a little Frankenaluminum if it works. I have looked at the Microflex as well since I think the RT unit is dead at this point (really a shame in my opinion). I may be mistaken but I thought during the FF Mark V reveal they spoke of producing a turn signal unit. I am curious if you happened to have reached out to them re: one of their units? Regardless, the Microflex is a really streamlined and good looking unit. I have also contemplated the Ididit shorty steering unit which incorporates everything but it requires quite a bit of fabrication and is expensive to boot. Carry on!
-
02-15-2025, 10:40 AM
#141
Looking good Jim, you are making some serious headway. For what it's worth, I made some panels that mount under the transmission tunnel, below the switch area, to seal off from water and add some more room to stuff wires and ducts.
20231112_113251.jpg20231112_162716.jpg
-
02-15-2025, 11:48 AM
#142
Originally Posted by
JimStone
Thanks guys!
I got it up to 550F, so it gets plenty hot.
The aluminum panels inside expand in the heat (another reason not to use aluminum), causing some warping , but it still keeps temp.
Very nice.
I am thinking of doing the same, It's good to know it will hold 550F with only 2 elements.
I would want mine on casters to make it mobile, although that would probably require a more substantial floor frame.
-
02-15-2025, 02:08 PM
#143
Senior Member
Originally Posted by
PNWTim
Looks good Jim. Nothing wrong with a little Frankenaluminum if it works. I have looked at the Microflex as well since I think the RT unit is dead at this point (really a shame in my opinion). I may be mistaken but I thought during the FF Mark V reveal they spoke of producing a turn signal unit. I am curious if you happened to have reached out to them re: one of their units? Regardless, the Microflex is a really streamlined and good looking unit. I have also contemplated the Ididit shorty steering unit which incorporates everything but it requires quite a bit of fabrication and is expensive to boot. Carry on!
Thanks Tim
I didn't know FFR was making a turn signal unit. Frankly, it's about time they did that. Seems like a no-brainer option to offer.
I'm pretty excited about the Microflex, but it is a bit of a risk since there's not a volume of experience out there with it. There's no moving parts, so I'm hoping it will have longevity.
-
02-15-2025, 02:13 PM
#144
Senior Member
Originally Posted by
burchfieldb
Looking good Jim, you are making some serious headway. For what it's worth, I made some panels that mount under the transmission tunnel, below the switch area, to seal off from water and add some more room to stuff wires and ducts.
20231112_113251.jpg20231112_162716.jpg
Aww dang it!!! That's way better than what I did. Much sleeker and easier to waterproof.
I'm probably going to add some panels now
-
02-15-2025, 02:16 PM
#145
Senior Member
Originally Posted by
Smiley
Very nice.
I am thinking of doing the same, It's good to know it will hold 550F with only 2 elements.
I would want mine on casters to make it mobile, although that would probably require a more substantial floor frame.
I put casters on mine. For the bottom of the oven, I used a 16 gauge steel plate, so it's more sturdy than the thin aluminum walls. But overall the structure is very rigid when all riveted together.
https://www.amazon.com/WEIBIDA-Caste...t_ba_s_5_cp_sc
Last edited by JimStone; 02-15-2025 at 02:19 PM.
-
Post Thanks / Like - 1 Thanks, 1 Likes
-
02-18-2025, 01:02 PM
#146
Originally Posted by
JimStone
Good to know, thanks Jim.
-
02-18-2025, 05:05 PM
#147
Senior Member

Very cool progress Jim. Love the powder coat oven!!! I want to cercoke my side pipes too. Open to a 2fer? I'm not that far from ya!
The dash is coming out great. I too was going to do the white background so thanks for sharing cause it looks great! I'll use the speedhut gauges tho.
I'll DM you my personal info-
Last edited by nuhale; 02-18-2025 at 05:13 PM.
Build 1: MKIV #7275 Gen 2 Coyote TK600, IRS 3.55 2020 Graduated
Build 2: Gen3 65 Coupe: Arrived June 2024. Gen 2 Coyote, T56, IRS 3.55
-
02-18-2025, 11:17 PM
#148
Senior Member
Originally Posted by
nuhale
Very cool progress Jim. Love the powder coat oven!!! I want to cercoke my side pipes too. Open to a 2fer? I'm not that far from ya!
The dash is coming out great. I too was going to do the white background so thanks for sharing cause it looks great! I'll use the speedhut gauges tho.
I'll DM you my personal info-
I would be happy to ruin, I mean Cerakote your side pipes! All seriousness, if mine turn out okay I'd be happy to have you over and we can knock it out in a few hours
I'll be doing mine in "Cobra Black", which is the darkest black of the 1800 F capable Cerakote coatings
-
02-19-2025, 03:17 PM
#149
Senior Member
Originally Posted by
JimStone
Thanks Tim
I didn't know FFR was making a turn signal unit. Frankly, it's about time they did that. Seems like a no-brainer option to offer.
I'm pretty excited about the Microflex, but it is a bit of a risk since there's not a volume of experience out there with it. There's no moving parts, so I'm hoping it will have longevity.
FYI: I recently contacted F5 and Dan G. said the turn signal is only available with the MK5 kit, but they are considering adapting it to others (i.e. Coupe). I'm a ways out, but going to keep a close eye on this option.
Chris
Coupe complete kit. Index. Delivered: 4/22/24.
Build Thread. Coyote Gen 4X. T-56. IRS w/3.55. Wilwoods. PS. HVAC. Side windows.
MK4 Complete kit.
Build Thread Index. Delivered: 10/15/2020. Legal: 7/25/23. Coyote Gen3. TKO600 (0.64 OD). IRS w/3.55. PS. Wilwoods. Sway bars. This build is dedicated to my son, Benjamin.
Build Thread.
-
Post Thanks / Like - 0 Thanks, 2 Likes
-
02-19-2025, 08:58 PM
#150
Originally Posted by
JimStone
I would be happy to ruin, I mean Cerakote your side pipes! All seriousness, if mine turn out okay I'd be happy to have you over and we can knock it out in a few hours
I'll be doing mine in "Cobra Black", which is the darkest black of the 1800 F capable Cerakote coatings
Jim,
If you have never sprayed Cerakote, do lots of practice pieces. It took me a while to get the hang of it. Measurement for the mix ratios are also really important, as they can really effect the finish.
Brent
-
02-19-2025, 10:39 PM
#151
Senior Member
Originally Posted by
burchfieldb
Jim,
If you have never sprayed Cerakote, do lots of practice pieces. It took me a while to get the hang of it. Measurement for the mix ratios are also really important, as they can really effect the finish.
Brent
I have not done any Cerkote before, so thanks for the heads up Brent. I'll make sure to do a bunch of practice pieces. I'd be pretty upset to ruin my pipes


 Thanks:
  Likes:


 Reply With Quote

