-
08-23-2022, 08:31 PM
#121
-
08-24-2022, 03:47 PM
#122
Senior Member

They sit low indeed. Just wait until you go-kart. I still can't get over how low these sit.
Chris
Coupe complete kit delivered: 4/22/24.
Build Thread. Coyote. T-56. IRS w/3.55. Wilwoods. PS. HVAC. Side windows.
MK4 Complete kit.
Build Thread Index. Delivered: 10/15/2020. Legal: 7/25/23. Coyote Gen3. TKO600 (0.64 OD). IRS w/3.55. PS. Wilwoods. Sway bars. This build is dedicated to my son, Benjamin.
Build Thread.
-
08-27-2022, 06:10 PM
#123
Senior Member

-
Post Thanks / Like - 0 Thanks, 4 Likes
-
08-27-2022, 06:25 PM
#124
Senior Member

That looks amazing! quick work you have made of this and it is a quality job all around!
-
08-29-2022, 08:15 AM
#125
That engine is a thing of beauty. Congrats!
FFR MKIV 8309, FMS 306 Crate w/Edelbrock EFI, T5, 3.55 Three Link, Wilwood Brakes
-
Post Thanks / Like - 1 Thanks, 0 Likes
-
08-29-2022, 09:45 AM
#126
Senior Member

That is a good lookin' engine. Big milestone.
Jack
289 Roadster complete kit ordered 8/2/21. Delivered 3/14/2022. Chassis #10306. 17"x9" Halibrands, 3.55 IRS, PS, Wilwood brakes, BPE 306 with EFI and close ratio TKX. First start 7/20/2023. First Movement 9/24/2023. First go-kart 9/25/2023.
Build thread -
https://thefactoryfiveforum.com/show...rida-289-Build
-
Post Thanks / Like - 1 Thanks, 0 Likes
-
08-29-2022, 08:43 PM
#127
Only 3 months since kit delivery...WOW! Can't wait to see the rest of your build, very impressive!
-
08-29-2022, 09:20 PM
#128
Senior Member

You are building way faster than me. LOL. Engine looks amazing! nice work!
Started dreaming of a Cobra around 1987
Purchased Complete Kit 6/9/2017, Delivered 9/4/2017, Rolling Chassis 3/30/2018, Engine Dyno'ed 3/4/2022, Engine installed 8/27/2022, First start 6/13/2024
Click here for my build thread
Serial #9158
Design Engineer at BluePrint Engines
-
08-30-2022, 09:29 AM
#129
Senior Member

Originally Posted by
Yama-Bro

You are building way faster than me. LOL. Engine looks amazing! nice work!
Thanks for that. As I was typing that I was surprised it had only been 3 months. It's been so hot here in Texas this year and since I'm older than dirt I haven't really been able to put in the hours like I would have in the past. I think what helped keep me moving along is I had a lot of prep work done like the engine built and rear end ready, my POL list was not bad at all, and I know enough about building cars that I can skip around instead of strictly following the manual. I'm really hoping in a couple of months to have it ready to ship off to Ken Pike for paint.
-
08-30-2022, 10:54 AM
#130
Originally Posted by
Yama-Bro
You are building way faster than me. LOL. Engine looks amazing! nice work!
The pictures really don't do it justice. I've seen Mike's work in-person a few times, and it's meticulous.
-
08-30-2022, 11:33 AM
#131
Senior Member

you're working too fast. before you know it, you'll be needing another project 
-
08-30-2022, 11:51 AM
#132
Senior Member
Originally Posted by
egchewy79
you're working too fast. before you know it, you'll be needing another project
I do like the GTM Supercar from FFR.......
-
Post Thanks / Like - 1 Thanks, 0 Likes
-
09-11-2022, 12:29 PM
#133
Senior Member
-
09-11-2022, 12:31 PM
#134
Senior Member
-
09-11-2022, 12:32 PM
#135
Senior Member
-
09-23-2022, 08:10 PM
#136
Senior Member
-
Post Thanks / Like - 0 Thanks, 1 Likes
 Fman
Fman liked this post
-
09-26-2022, 10:39 AM
#137
Mike - great progress. Very clean and methodical.
Just a note, gas will melt that red plastic cup on your filler neck pretty much instantly. Ask me how I know...
FFR MKIV 8309, FMS 306 Crate w/Edelbrock EFI, T5, 3.55 Three Link, Wilwood Brakes
-
09-27-2022, 10:23 AM
#138
Senior Member
Originally Posted by
Chopper
Mike - great progress. Very clean and methodical.
Just a note, gas will melt that red plastic cup on your filler neck pretty much instantly. Ask me how I know...
Same way I know? LOL
-
09-28-2022, 11:12 AM
#139
Senior Member
Had a setback. Just about to the point of cranking the engine and going for a go kart when I noticed a couple of drops of coolant under the car. Not so bad until I realized it's coming out of the back of the engine. This block has screw in core plugs and I can see a couple of others seeping also. As they were already installed when I got the block I never thought to check them. Obviously there's no sealant on the threads. Fortunately as most of you know the engine isn't all that difficult to get out of one of these cars. Just bummed though about going backwards.
Definitely one or both of these are seeping.

-
09-29-2022, 04:29 PM
#140
-
Post Thanks / Like - 0 Thanks, 1 Likes
-
09-30-2022, 07:34 AM
#141
Senior Member

Originally Posted by
Mike.Bray
Had a setback. Just about to the point of cranking the engine and going for a go kart when I noticed a couple of drops of coolant under the car. Not so bad until I realized it's coming out of the back of the engine. This block has screw in core plugs and I can see a couple of others seeping also. As they were already installed when I got the block I never thought to check them. Obviously there's no sealant on the threads. Fortunately as most of you know the engine isn't all that difficult to get out of one of these cars. Just bummed though about going backwards.
Definitely one or both of these are seeping.
Ugh. That's disappointing.....
------------------------------
Jeff
-
09-30-2022, 08:32 AM
#142
Senior Member
Pulled the engine out yesterday to have a look at the seeping core plugs. My helper (wife) was busy so ended up doing it by myself but wasn't too bad.

All of the O-Rings on the core plugs looked like this.

The plugs were tight. I suspect the problem came from the machinist not removing the plugs when he hot tanked the block (twice). Anyway it is what it is, new O-Rings are installed, lubed, and the core plugs reinstalled in the block. I filled the engine with coolant and let it set overnight and so far no seepage. Hopefully problem solved.
Today the goal is to get the engine/clutch/transmission put back together and drop it back into the car.
-
Post Thanks / Like - 0 Thanks, 1 Likes
-
09-30-2022, 08:43 AM
#143
Senior Member
Originally Posted by
Mike.Bray
Pulled the engine out yesterday to have a look at the seeping core plugs. My helper (wife) was busy so ended up doing it by myself but wasn't too bad.
All of the O-Rings on the core plugs looked like this.
The plugs were tight. I suspect the problem came from the machinist not removing the plugs when he hot tanked the block (twice). Anyway it is what it is, new O-Rings are installed, lubed, and the core plugs reinstalled in the block. I filled the engine with coolant and let it set overnight and so far no seepage. Hopefully problem solved.
Today the goal is to get the engine/clutch/transmission put back together and drop it back into the car.
I was able to get to mine w/o pulling the engine. I actually didn't recognize that these were needed until I started filling my cooling system and heard a bunch of antifreeze hitting the ground. I thought they were ground points, and actually tried putting my ground strap to one of these holes, but couldn't find the right sized bolt to fit (I think they're NPT sizes).
-
09-30-2022, 09:16 AM
#144
Senior Member
Originally Posted by
egchewy79
I was able to get to mine w/o pulling the engine. I actually didn't recognize that these were needed until I started filling my cooling system and heard a bunch of antifreeze hitting the ground. I thought they were ground points, and actually tried putting my ground strap to one of these holes, but couldn't find the right sized bolt to fit (I think they're NPT sizes).
There's two kinds of screw in core plugs, NPT tapered pipe thread and straight thread w/O-Ring. Ford NPT plugs are 1 1/4" NPT https://www.summitracing.com/parts/f...BoCOW0QAvD_BwE
The other plugs are 1 5/16" straight threads (AN -16) and use an O-Ring for sealing like these: https://www.holley.com/products/plum...ts/AT981316ERL
There are two in the rear of the block that I couldn't get to without pulling the engine
-
10-03-2022, 08:51 AM
#145
Senior Member
I feel I should pass on some learning from my last adventure with the engine.
The first time I installed the engine/transmission I knew I needed a leveler so I bought this one from Northern Tool. It had good reviews and I certainly trust Northern Tool over HF. https://www.northerntool.com/shop/to...0936_200640936
It turned out to be a real bear to use, mostly due to the extreme angle required to get the transmission into the tunnel and the oil pan to clear the top radiator support bar. With weight on it and the angle required it was very difficult to adjust and the handle interfered with the chains. I spent more time fooling with the leveler than actually installing the engine.
When I needed to remove the engine to replace the core plugs I did a little research and settled on this one. https://www.summitracing.com/parts/WMR-W41036
A little more expensive than the Northern Tool one but not too bad. The difference was night and day! The threaded rod is a more conventional thread and it turns with easy when loaded, even by hand. The handle can be removed and a socked used on the hex that's on the end of the adjusting rod. I used a speedhandle with a socket for adjusting although you could also use a cordless drill. With it I was able to remove the engine/transmission and later reinstall it alone.
If anyone is interested in the old one trash day is Wednesday.
-
Post Thanks / Like - 0 Thanks, 1 Likes
-
10-03-2022, 08:25 PM
#146
I have found out that if the handle on a load leveler is removed and then replaced with a double nut.... Ideally on both ends of the screw shaft.....Then.....
The leveler can be manipulated very easy with a rachet or an impact wrench without having your
knuckles or the chains being in the way. even if the angle is extreme.
I have used a HF leveler for 20 years with no issue, but some models of levelers the handle cannot be removed.
MK2 #3319.... On the road since 2002 with a lot of upgrades
-
10-03-2022, 08:57 PM
#147
A good leveler is worth its weight in gold and a bad one is just an exercise in frustration. The HF leveler I bought was used exactly once, caused immense heartache, and went straight into the recycling bin.
MkIV Roadster build: Gen 2 Coyote, IRS, TKO600. Ordered 10/24/18. Delivered 1/29/19. Engine installed 8/8/21. First start 9/12/21. First go-kart 9/17/21. Off to paint 4/11/22. Back from paint 12/30/22.
Build thread here.
-
Post Thanks / Like - 0 Thanks, 1 Likes
-
10-15-2022, 12:18 PM
#148
Senior Member
Been kind of busy the past few days but this morning got a chance to get back into the garage and try to start the engine. To my huge surprise it started! Oil pressure is good, all of the EFI parameters are acceptable for now, nothing running on the floor (yet), so far so good. Tach is reading wrong but I know what I did. No water temp reading so have to troubleshoot that.
-
Post Thanks / Like - 0 Thanks, 3 Likes
-
10-15-2022, 12:49 PM
#149
Congratulations, Mike! On the water temp, the gauge won't register until the water temp comes up a bit. Low temp on the gauge is 60 degrees C (140 degrees F). Depending on the location of the sensor, the T-stat may have to open before you get a reading.
Last edited by Papa; 10-15-2022 at 01:01 PM.
-
10-15-2022, 01:05 PM
#150
Senior Member

Way to go Mike, great to see particularly after your setback with the plugs. And quick recovery, by the way.
MK4 #7838: IRS 3.55 TrueTrac T5z Dart 347
The drawing is from ~7th grade, mid-1970s
Meandering, leisurely build thread is
here
-
10-15-2022, 04:38 PM
#151
Senior Member
Originally Posted by
Papa
Congratulations, Mike! On the water temp, the gauge won't register until the water temp comes up a bit. Low temp on the gauge is 60 degrees C (140 degrees F). Depending on the location of the sensor, the T-stat may have to open before you get a reading.
Awww, now I see the C on the gauge! Duh. I probably only got to about 140F so probably good. The sensor is right next to the sensor for the ECU and it's got a good reading.
Thanks!
-
10-17-2022, 08:25 AM
#152
Senior Member
Had a minor wiring issue, the switched 12V to the MSD box was coming from an accessory circuit making it difficult to start. Moved it over to the EFI/Coil circuit and all good now. Spent yesterday tuning the engine a little, got the throttle bodies close to balanced and the timing in the ballpark. She's running a lot smoother now with a nice throaty sound.
-
Post Thanks / Like - 0 Thanks, 2 Likes
-
10-17-2022, 06:05 PM
#153
Senior Member
Had an interesting problem with the tach, it didn't look like it was working. I noticed at rest the needle wasn't on "0" but I didn't really pay much attention to it while it I revved the engine.

Turns out the stops for the needle can be adjusted and for some reason they were off on my tach. The chrome bezel unscrews and the lens can be removed. From there just move the needle to move the stops. Took less than 5 minutes and all is good now.
Here's a video on changing the needle but the process is similar.
-
10-23-2022, 11:56 AM
#154
Senior Member
Started running the engine more, set the timing, and tuning the ECU. I noticed the engine temperature was acting strange, like it had a steam pocket trapped or something. I added some more coolant and thought this is too much, better stop and check some things before running it anymore. Pulled the dipstick and spotted some coolant in the oil. UGH!
Pulled the intake and saw coolant in the lifter valley. Flipped the intake upside down and immediately say the issue, wrong intake gaskets! When I ordered the Stack system from Borla I asked for a recommendation for the intake gasket and they gave me Fel-Pro number so that's what I used. Aww, but the Borla intake is not like a standard Ford intake and I never noticed.

It's a little hard to see but the design of the Borla intake with standard gaskets creates a path for coolant to get to the lifter valley.
Got the correct (and special) Roush Racing gaskets, much better.

Drained the old oil/coolant and cleaned as much of the lifter valley and valvetrain area as I could. Put some standard oil in and used my oil pump primer to circulate . Drained and cleaned everything good and started reassembling.
Actually removing and reinstalling the intake wasn't that big of a job, it helps that all of the electrical is on plugs and the fuel lines are AN fittings. Reinstalled the distributor (had everything marked) and filled with fresh Comp Cams break in oil. It cranked right up and the timing was spot on. Oil pressure is good so topped off the coolant and the engine temperature is now acting normal. Whew!
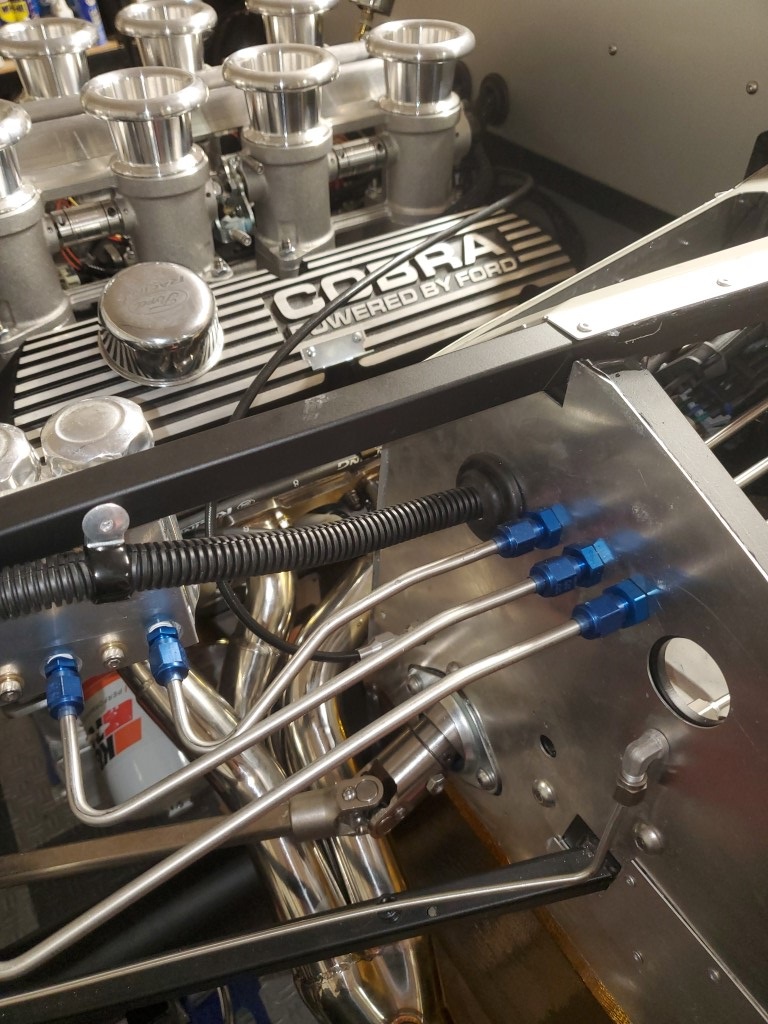
While I was having fun I decided to redo the throttle cable as I wasn't happy with it. The Borla (and Ingeles) stack EFI system are things of beauty but are certainly not designed for ease of service. The fuel rails are mounted on the inside of the throttle bodies so accessing the wiring, IAC, MAP sensor, or linkage is damn near impossible. To get the new throttle cable threaded into the fitting in the linkage I ended up removing one side of throttle bodies.

When I reinstalled the throttle bodies I managed to nick one of the O-rings in the fuel rail block.

Fuel spraying out at 43 PSI is very exciting! LOL
Fortunately it's a standard O-ring so I was able to replace it easily and get back to running and tuning. With just the small amount of tuning and balancing I've done so far it's starting to sound really good.
-
Post Thanks / Like - 0 Thanks, 1 Likes
Papa liked this post
-
10-23-2022, 06:16 PM
#155
Great job on the repair. Better now than later, the Fel Pro papers would have let you down without the mismatch opening.
20th Anniversary Mk IV, A50XS Coyote, TKO 600, Trunk Drop Box, Trunk Battery Box, Cubby Hole, Seat Heaters, Radiator hanger and shroud.
-
10-25-2022, 12:24 PM
#156
Senior Member
Now that everything is back together, the coolant is staying away from the oil, and the fuel rails aren't spraying all over the garage it was time to do a little more tuning in preparation for go kart. After a few minutes of running/tuning I noticed some fresh oil from the back of the engine on the floor sending me into a full blown panic. Rear main? Cam plug? Oil pan? I was extremely meticulous building this engine so I was having trouble trying to figure out where it was coming from. I got underneath the car with the engine running and with the most powerful flashlight I have to have a look and was able to spot it. A clear case of dummy on my part. I only had the valve covers sitting on the heads as I wanted to run the valves again. Oil was coming out from the valve covers and running down the back of the block. Not a lot but enough to scare the crap out of me. At least it was an easy fix lol
The tuning is to a point it's ready to go for a drive. I really like this Fast Sportsman ECU, stack EFI can be temperamental but it dialed right in. Just need to button a couple of things up and go kart time!
-
Post Thanks / Like - 1 Thanks, 3 Likes
-
10-27-2022, 06:08 PM
#157
Senior Member
-
Post Thanks / Like - 0 Thanks, 2 Likes
-
11-03-2022, 06:36 PM
#158
Senior Member
I wanted to get the front end aligned somewhat close before going out for a drive. After a few runs around the block she should be settled some and I can dial it in closer.
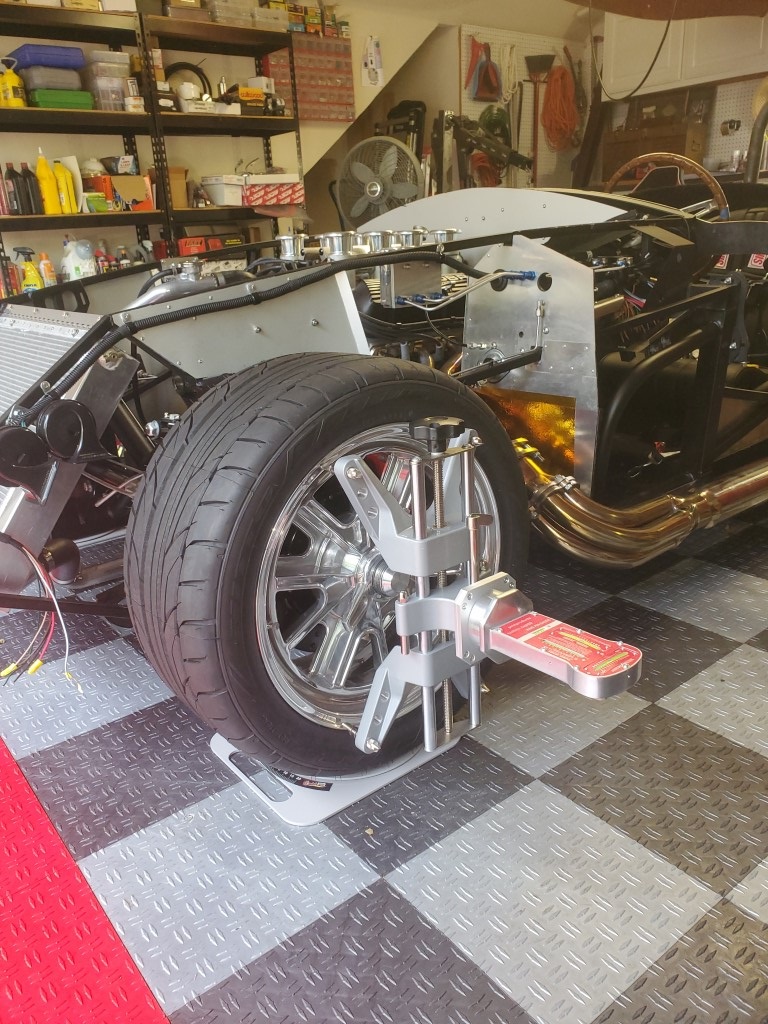
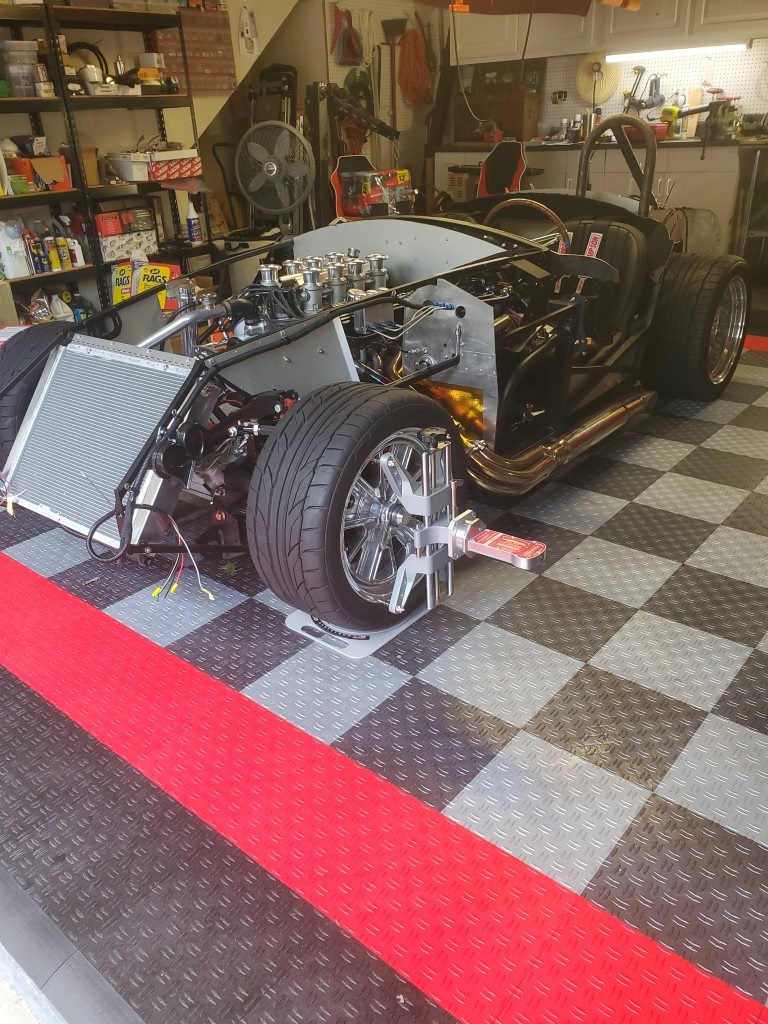
If it doesn't rain in the next couple of days it's time to go. Wish me luck!
-
Post Thanks / Like - 0 Thanks, 1 Likes
-
11-11-2022, 10:05 AM
#159
Senior Member

Really nice job Mike! I go carted ten years ago and still remember it as a personal high point. Good Luck.
FFR 5385 MKIII. 302, 3-Link. All legal in MA 1/7/2012.
-
11-11-2022, 12:30 PM
#160
Looks amazing my friend! Can't wait to see it move! I thought I was moving fast.... WOW!
Ted
#10333 Complete Kit, Carbed 427w, TKX, IRS and many other upgrades
- Order Date: September 11, 2021 - 20th Anniversary of 9/11
- Delivery Day: April 1, 2022 - April Fool's Day
- First Start and Go-Kart: January 20th, 2023
- Graduation Date: July 4th, 2023 - Independence Day!!
- Legal Registration Date: October 4, 2023 - My Birthday!!
Visit my MKIV Build Thread (#10333)


 Thanks:
  Likes:


 Reply With Quote