
Visit our community sponsor

Thanks:
9

Likes:
27
-
08-28-2016, 06:38 PM
#161
Senior Member

Hate to say it, but no that doesn't look right. The yoke should go in further and much less should show once installed. This is mine, with the same exact engine, trans and IRS setup as yours:
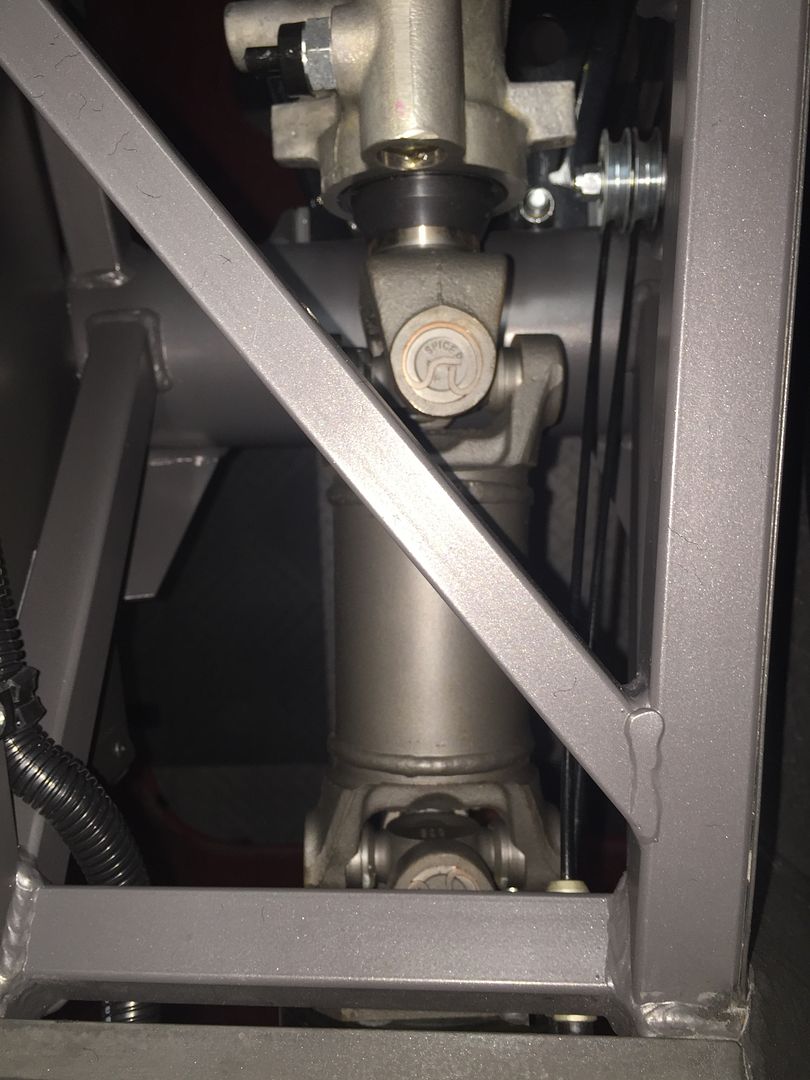
Looks like you were sent the wrong driveshaft. Grrr.... You can see the one they sent me is longer. And yes that part of the e-brake cable moves and probably best it's not contacting the drive shaft loop. I'm just full of good news. 
Last edited by edwardb; 08-28-2016 at 06:41 PM.
Build 1: Mk3 Roadster #5125. Sold 11/08/2014.
Build 2: Mk4 Roadster #7750. Sold 04/10/2017.
Build Thread
Build 3: Mk4 Roadster 20th Anniversary #8674. Sold 09/07/2020.
Build Thread and
Video.
Build 4: Gen 3 Type 65 Coupe #59. Gen 3 Coyote. Legal 03/04/2020.
Build Thread and
Video
Build 5: 35 Hot Rod Truck #138. LS3 and 4L65E auto. Rcvd 01/05/2021. Legal 04/20/2023.
Build Thread. Sold 11/9/2023.
-
08-28-2016, 07:14 PM
#162
Not a waxer

I'm with edwardb on both counts.
Jeff
-
08-28-2016, 07:34 PM
#163
Senior Member

Well I am beyond disgusted they can not send the correct parts. These bolts have red thread lock on them. I can not budge them to loosen and take the incorrect one out. Extremely discouraged at this point. Can someone offer suggestions on what to do here with these locked down bolts? They are hex head and I can barely even get the allen wrench in there without the other parts of the linkage getting in the way. Certainly can not get good enough leverage on it to turn without completely stripping out the bolt head.
MK4 #8900 - complete kit - Coyote, TKO600, IRS - Delivered 6/28/16 First Start 10/6/16 Go cart - 10/16/16 Build completed - 4/26/17 - 302 days to build my 302 CI Coyote Cobra - Registered and street legal 5/17/17
Build Thread
http://thefactoryfiveforum.com/showt...e-build-thread
PHIL 4:13 INSTAGRAM - @scottsrides
-
08-29-2016, 05:39 AM
#164
Senior Member
Well thanks to Paul and Jeff for the input on those issues. With a lot of heat I was able to get those bolts removed and the driveshaft back out. I have confirmed FFR sent me the wrong one. There are a couple on the order form. I inquired via email with them prior to ordering which one I needed for a coyote/tko600/irs setup and they indicated part 16038. Turns out this was not correct. It should have been 15955. I am glad I saved the email so I had proof this was not my error. I expect they will correct this mistake no problem. It is disappointing there have been a handful of mistakes with my order. To their credit they have fixed every one in a very timely manner. I have never had any complaints with their customer service in that regard.
Now that the driveshaft is removed it will at least make it easier to go back and do the Ebrake cable mod since I have a little more room to work in that area. Hopefully that mod will provide sufficient clearance between the driveshaft safety loop and the cables.
I don't like taking steps backwards but at least I have this forum to verify when things are right or wrong. I appreciate all the great help that can be found on almost any topic. Yesterday marked two months since I received my kit so I am still quite pleased with my progress.
MK4 #8900 - complete kit - Coyote, TKO600, IRS - Delivered 6/28/16 First Start 10/6/16 Go cart - 10/16/16 Build completed - 4/26/17 - 302 days to build my 302 CI Coyote Cobra - Registered and street legal 5/17/17
Build Thread
http://thefactoryfiveforum.com/showt...e-build-thread
PHIL 4:13 INSTAGRAM - @scottsrides
-
08-29-2016, 12:09 PM
#165
Scott-
Even though you already have the answer and solved the problem, I wanted to say that heating the thread locked bolts, you should be able to remove them.
I just needed to feel like I helped -- even though I am late to the party! It's a weakness!!
Sorry about the driveshaft issue. I know it's frustrating, but Factory Five is great about fixing this kind of stuff. Now you will be expert at installation and removal of the driveshaft! Small consolation I know, but it's something!
Thanks for the build thread; I have enjoyed following along!
Regards,
Steve
-
09-01-2016, 02:52 PM
#166
Senior Member
Ebrake cable mod/ driveshaft
If you plan on doing the Ebrake cable mod that routes them above the lower frame tube then don't be a moron like me and wait until after the transmission is installed. What a pain in the rear with the limited space to work!! Initially I was not going to do it. After I installed the driveshaft safety loop I saw I had a conflict with the cables hitting the safety loop and decided to do it.
I ordered the parts mentioned in EdwardBs thread and got to work following his instructions. My first issue was I could not get a drill on the 3/4" tube where he placed his pulley because of the transmission. I moved it back to the tube just aft of that. This worked out ok and I think it slightly helped the angle of getting the cables away from the safety loop.


Now that it is complete the safety loop does not conflict as much. When the brake is released it is loose against it. When it is pulled tight it does snug up on it. That is the best I am going to be able to do and still have the safety loop installed. I will just have to monitor it periodically for wear. It is better than it was without the cable mod.

I previously mentioned in the thread and it was confirmed I was sent the wrong driveshaft. I received the new (longer one) today. It fits great. I am having an issue in that it hits the Ebrake cable mounting bracket and can only turn about 1/5 a turn. I am going to address that tomorrow. SEC football starts tonight and that is big in this part of the world. Called it a day and ready to watch some games in a couple hours.


MK4 #8900 - complete kit - Coyote, TKO600, IRS - Delivered 6/28/16 First Start 10/6/16 Go cart - 10/16/16 Build completed - 4/26/17 - 302 days to build my 302 CI Coyote Cobra - Registered and street legal 5/17/17
Build Thread
http://thefactoryfiveforum.com/showt...e-build-thread
PHIL 4:13 INSTAGRAM - @scottsrides
-
09-01-2016, 04:25 PM
#167
Senior Member

Hi Scott,
I'm just a lurker at this point... Hopefully ordering a MKIV at the beginning of the year, so I'm reading EVERYBODIES builds and soaking up everything I can like the big sponge I am.
Sounds like your done with you're e-brake mod and ok with the contact with the loop? If so maybe you should protect the cable a little? Maybe a couple of short pieces of 1/8" vacuum line... Slice it open the long way and slip it over the cables.
Close it back up with something like gasket cinch or rubber cement. Or if you don't mind the look, couple of zip ties? So
when you "monitor" it periodically you can just say... Oh I better replace that piece of hose... Instead of UH OH lol
Just a thought from the lurker gallery.
Kurt
Oh and speaking of football, and I'm sure David will appreciate it.... FIGHT ON!
-
09-01-2016, 06:52 PM
#168
Senior Member

Originally Posted by
SSNK4US

Hi Scott,
I'm just a lurker at this point... Hopefully ordering a MKIV at the beginning of the year, so I'm reading EVERYBODIES builds and soaking up everything I can like the big sponge I am.
Sounds like your done with you're e-brake mod and ok with the contact with the loop? If so maybe you should protect the cable a little? Maybe a couple of short pieces of 1/8" vacuum line... Slice it open the long way and slip it over the cables.
Close it back up with something like gasket cinch or rubber cement. Or if you don't mind the look, couple of zip ties? So
when you "monitor" it periodically you can just say... Oh I better replace that piece of hose... Instead of UH OH lol
Just a thought from the lurker gallery.
Kurt
Oh and speaking of football, and I'm sure David will appreciate it.... FIGHT ON!
Good idea. I was thinking about that as well. Will have to look into that.
The only thing that would make me as happy as an Auburn win Saturday would be a USC win!
MK4 #8900 - complete kit - Coyote, TKO600, IRS - Delivered 6/28/16 First Start 10/6/16 Go cart - 10/16/16 Build completed - 4/26/17 - 302 days to build my 302 CI Coyote Cobra - Registered and street legal 5/17/17
Build Thread
http://thefactoryfiveforum.com/showt...e-build-thread
PHIL 4:13 INSTAGRAM - @scottsrides
-
09-01-2016, 07:25 PM
#169
Senior Member
Lol
Sorry off topic... My next door neighbor was the starting QB for the last few years for USC
Just got drafted by Cleveland 
-
09-02-2016, 12:59 PM
#170
Senior Member
Driveshaft in and a new issue
I was able to grind away the brake cable bracket and get the needed clearance for the driveshaft to spin freely.
The driveshaft safety loop still infringes on the brake cables just a bit. It works just fine. I was concerned about the rubbing. Based on a suggestion and something I was thinking about I took some leftover fuel line and put it around the lines and zip tied it to stay in position. It would take a lot of wear to actually damage the brake cable now. I will just have to monitor that periodically and replace the insulation pieces as needed.
Now I have a new concern. The safety loop is mighty close to the spinning mass of the driveshaft.

In fact if I take my finger I can push the loop to make contact with the shaft. This is how it mounts from the bottom.
So there is a little flex in the area that comes under the 4 inch tube. Now I have no idea under normal driving how much this thing would be flexing and if it could possibly be enough that it would make contact with the driveshaft?? It certainly concerns me though. Do others with safety loops have this issue?
I am thinking of making a bracket that I would mount to the top of the loop and attach it to something in the transmission tunnel, probably a 3/4" cross brace piece in the area. This bracket would restrict the movement and make it impossible for the loop to contact the driveshaft. Of course there is some flex designed into this piece and I can only assume there may be a reason I don't know about for the flex. So good or bad idea to take the flex capability away?
After I finished that I added the transmission fluid. The directions I saw indicated you should remove the side fill plug (TKO600) and fill it until it came out that hole. I could not get that fill plug to budge. Even had my big torque wrench on it so I could get a long lever arm and it stayed put. I wondered if I could just take one of the top pieces off and pour it in there. That would be much easier and neater anyways. I called Tremec tech support and they indicated this was just fine. So that is what I did. Finally something is easy!!

Since I would not have the luxury of knowing when it was full by it coming out the fill hole I wanted to ensure I had the right amount so I could put a known quantity in. I asked tech support and he said 4-5 quarts. Previously I had read it is just under 3 quarts! I questioned him and he was like yes 4-5 quarts at which point I told him I had seen different elsewhere and asked him to double check. He didn't seem to pleased with me but put me on hold and came back and told me the proper amount is 5.31 pints which is 2.655 quarts. Geez you cant even trust factory tech support to give the right info sometimes! Glad I knew to ask.
MK4 #8900 - complete kit - Coyote, TKO600, IRS - Delivered 6/28/16 First Start 10/6/16 Go cart - 10/16/16 Build completed - 4/26/17 - 302 days to build my 302 CI Coyote Cobra - Registered and street legal 5/17/17
Build Thread
http://thefactoryfiveforum.com/showt...e-build-thread
PHIL 4:13 INSTAGRAM - @scottsrides
-
09-02-2016, 07:19 PM
#171
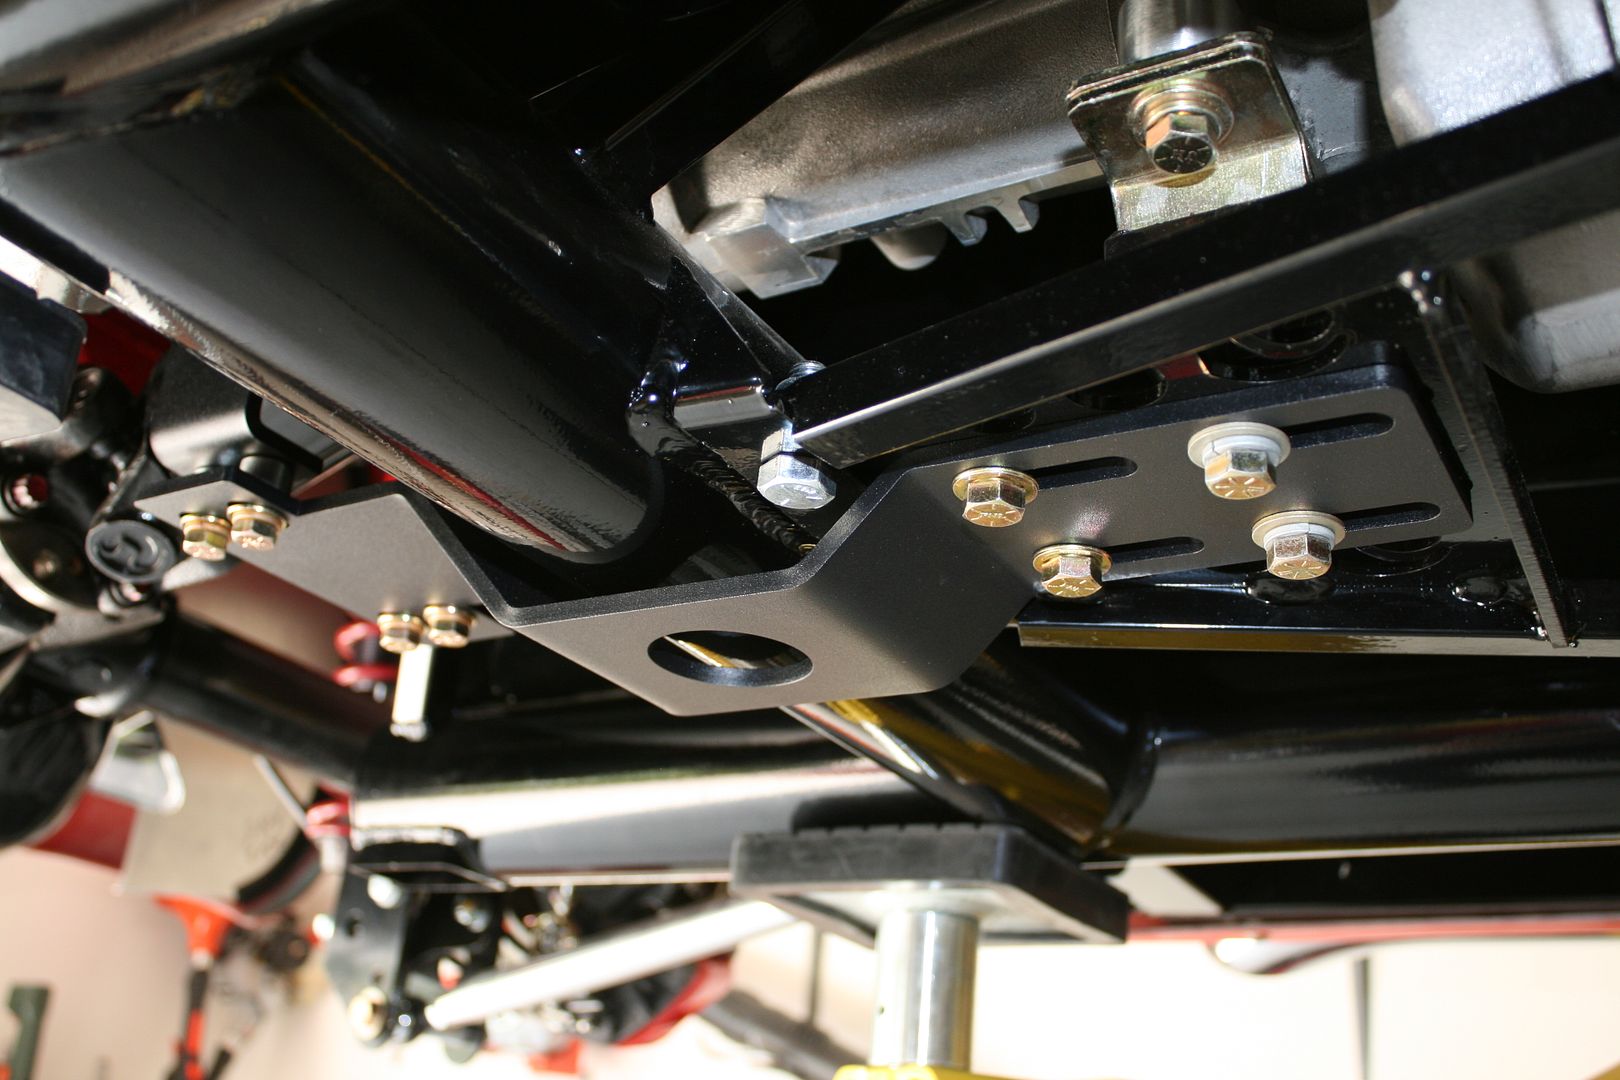
Senior Member
All the talk about the e-brake cable bracket inspired me to clip the corner on mine today. Doubled the clearance I had previously. One less thing to worry about. For that driveshaft loop, an easy fix would be to add spacers between the bracket and the loop. I had to do that on my last build where I used the Metco piece. I think they were 1/2-inch long steel spacers from Ace. I seem to recall that was mentioned in the instructions as a possibility, but I'm not positive. You can just see them in the picture I've posted before. I would recommend this approach over some kind of bracket. You need to get it further away from the driveshaft IMO.
Build 1: Mk3 Roadster #5125. Sold 11/08/2014.
Build 2: Mk4 Roadster #7750. Sold 04/10/2017.
Build Thread
Build 3: Mk4 Roadster 20th Anniversary #8674. Sold 09/07/2020.
Build Thread and
Video.
Build 4: Gen 3 Type 65 Coupe #59. Gen 3 Coyote. Legal 03/04/2020.
Build Thread and
Video
Build 5: 35 Hot Rod Truck #138. LS3 and 4L65E auto. Rcvd 01/05/2021. Legal 04/20/2023.
Build Thread. Sold 11/9/2023.
-
09-02-2016, 09:26 PM
#172
Senior Member
Originally Posted by
edwardb
All the talk about the e-brake cable bracket inspired me to clip the corner on mine today. Doubled the clearance I had previously. One less thing to worry about. For that driveshaft loop, an easy fix would be to add spacers between the bracket and the loop. I had to do that on my last build where I used the Metco piece. I think they were 1/2-inch long steel spacers from Ace. I seem to recall that was mentioned in the instructions as a possibility, but I'm not positive. You can just see them in the picture I've posted before. I would recommend this approach over some kind of bracket. You need to get it further away from the driveshaft IMO.
Spacers! Brilliant. Thanks Paul
I got all put of order taking that in and out dealing with the Ebrake bracket. Didn't finish with the directions and catch that. Glad you mentioned it.
Last edited by wareaglescott; 09-02-2016 at 09:28 PM.
MK4 #8900 - complete kit - Coyote, TKO600, IRS - Delivered 6/28/16 First Start 10/6/16 Go cart - 10/16/16 Build completed - 4/26/17 - 302 days to build my 302 CI Coyote Cobra - Registered and street legal 5/17/17
Build Thread
http://thefactoryfiveforum.com/showt...e-build-thread
PHIL 4:13 INSTAGRAM - @scottsrides
-
09-03-2016, 11:15 AM
#173
Senior Member
Quick update : I installed the recommended spacers and the driveshaft safety loop now has plenty of clearance all around. Another great forum tip! I added 1/2"
Also received my 3rd power steering rack from FFR because the first 2 had a bent line on them and they could not replace the line so they sent an entirely new rack. I took the good line off of rack #3 and installed it on the original rack that was already installed. Now I have 2 extra brand new racks sitting around missing a line!
Here are the spacers. Originally the bolts just threaded into the upper piece. I went ahead and added nuts as well.

MK4 #8900 - complete kit - Coyote, TKO600, IRS - Delivered 6/28/16 First Start 10/6/16 Go cart - 10/16/16 Build completed - 4/26/17 - 302 days to build my 302 CI Coyote Cobra - Registered and street legal 5/17/17
Build Thread
http://thefactoryfiveforum.com/showt...e-build-thread
PHIL 4:13 INSTAGRAM - @scottsrides
-
09-06-2016, 03:40 PM
#174
Senior Member
steering set screws and stick shift
Last week I had posted a thread asking about the steering set screws. I took the opportunity to mock up the steering wheel and get everything straight and lined up and the set screws tightened. The car still needs to be aligned but everything is pretty close and small adjustments will be easier. Turns out I had the steering shaft onto the steering rack quite a bit out of whack when I put the wheel on. That was easy to correct while the car is still sitting on the wheel dollies.
Since I have the pedals in and the wheel was in place I decided to get the seat out and see how I fit in there. At 6'3" and 210 pounds I am pleased with the amount of room the high back kirkeys provide me. I think mounting them all the way back and on the floor will give me a couple extra inches of leg room over even the big and tall seats.

(still wearing my Auburn shirt even though we have the stupidest coach in America but I digress!)
I am now wondering if a removable steering wheel would be a good idea for me? With my long legs it is a little tricky getting in and out. Any cons to a removable wheel?
I am also working on the wiring harness. This is going to be the toughest part of the build for me. I just don't get it! I am sure with research and help with answers from my build mentor I will get it figured out eventually though.
Also today I was thinking about my intent to use my dads old Air Force fighter stick from the 60s as a gear shifter. I found a good stick position and came up with a plan for a linkage part. Honestly I am not sure how well it would work. Mechanically I don't know if this sort of lever arm would work all that well. Anyone have any thoughts on the design pictured below? Essentially a 5" piece that bolts onto the part coming out of the transmission and has a circular adapter that mates up with the control stick.
Basically I want to be able to have the stock shifter bolt in place or unbolt it and bolt my stick in place using the existing mount location for the shifter. I would have two complete units I could swap out. Here is a crude drawing of what I am thinking and the positioning I am thinking. Sitting in the drivers seat this was a position that felt good to me.


MK4 #8900 - complete kit - Coyote, TKO600, IRS - Delivered 6/28/16 First Start 10/6/16 Go cart - 10/16/16 Build completed - 4/26/17 - 302 days to build my 302 CI Coyote Cobra - Registered and street legal 5/17/17
Build Thread
http://thefactoryfiveforum.com/showt...e-build-thread
PHIL 4:13 INSTAGRAM - @scottsrides
-
09-09-2016, 05:05 PM
#175
Senior Member
coyote computer/ front footbox cover plates
I mounted the coyote computer today and ran the harness to it. FFR had sent me the newly designed computer bracket that mounts to the frame rails above and just forward of the passenger side footbox. Curiously the pre-drilled holes that they were nice enough to make did not even come close to lining up. Don't really understand that! You could use 2 of the 4. I decided to use the upper two and drill new ones for the lower two. I ended up putting a piece of my heat insulation between the bracket and the computer. Also the coyote instructions indicate you should have 4 bolts to mount the computer. They were not on my pack list. I called FFR and Dan indicated they should have come with the control pack. They did not. Another trip to Home Depot!

I hooked up the harness at the computer and ran the part that goes into the cockpit through the hole. I will have to figure out where it all goes another day. Here is the location of my hole.

In retrospect it would have been smart to mount all the parts associated with the harness before putting the engine in. It is going to be tight working behind the motor attaching stuff to the firewall area. I should have followed EdwardBs advice and done that first. Next build I will really have the bugs worked out!
Another forum member King was kind enough to make and send a cover plate for the hole in the drivers front footbox. I continue to be so impressed with the generosity and willingness to help from forum members. I put a hole in it and ran the front wiring harness through it. In fact he was kind enough to send me two. Amazingly I got it right the first time and as a result have one left over. I would be happy to pass on his good will and send it along if anyone needs it. Once that was done I decided I needed to drill a hole in my previously covered front area to run the hydraulic lines from the master cylinders to the triple reservoir just forward of the footbox. I ended up with one hole. I put a piece of fuel tubing around each hose as protection and then used electrical tape to hold it in a nice package. Fills the hole nicely and with the tape and fuel tubing as protection I have no worries of any chaffing on the fluid lines. Excited to have that all hooked up and am now ready to put fluid in the system and hope I don't have any leaks.

MK4 #8900 - complete kit - Coyote, TKO600, IRS - Delivered 6/28/16 First Start 10/6/16 Go cart - 10/16/16 Build completed - 4/26/17 - 302 days to build my 302 CI Coyote Cobra - Registered and street legal 5/17/17
Build Thread
http://thefactoryfiveforum.com/showt...e-build-thread
PHIL 4:13 INSTAGRAM - @scottsrides
-
09-12-2016, 08:57 PM
#176
Senior Member
Fighter stick shift!
I am really excited about this update.
I had previously mentioned my intentions to use a control stick out of an Air Force fighter my dad flew in 1968 as my shifter. My dad was a pilot and so am I. He passed away earlier this year. This stick sat in his office my entire life and I remember playing with the buttons and trigger as a little kid. My mom gave me the stick after he passed and I have had it in my office since. I thought it would make a cool gear shifter but was unsure how I would accomplish getting it installed. The stick has a ton of sentimental value to me and I wanted to have something from Dad in the build. My requirements to use it where that I was not willing to modify the stick in any way and I wanted it to be easily removable so I could swap it out with a traditional shifter if I ever decide to get rid of the car or just wanted to be able to use a normal shifter.
Once again I am so thankful for the helpful folks on this forum. I had noticed forum member 2BKing was quite the fabricator in his build thread so I messaged him asking if he had any ideas. His help on this was amazing. I needed a way to link the stick up to the shifter. I gave King the measurements and what I had in mind for positioning. His first step was to computer model it and fine tune the design.


Then he produced the part for me and sent it my way. He even powder coated it!

All I had to do was attach the stick to the linkage King produced and bolt it to the transmission. It works perfectly. I have a video of me going through the gears but I do not know how to post videos. Here it is installed.


It won't suit everyones taste but it is special to me. The personal touches are what makes every build unique and I sure am glad to have this in the car. After sitting on the shelf for the last 48 years it will be neat for the old stick to get some use again! I am extremely grateful to King for his help. The fabrication of this part was way beyond my abilities and this is a part of the car I will be very proud off and enjoy being able to tell others about where it came from.
MK4 #8900 - complete kit - Coyote, TKO600, IRS - Delivered 6/28/16 First Start 10/6/16 Go cart - 10/16/16 Build completed - 4/26/17 - 302 days to build my 302 CI Coyote Cobra - Registered and street legal 5/17/17
Build Thread
http://thefactoryfiveforum.com/showt...e-build-thread
PHIL 4:13 INSTAGRAM - @scottsrides
-
09-12-2016, 09:20 PM
#177
Member

That is so awesome. I am glad you got to use the stick in your build. It is amazing how helpful and generous the Factory Five community is with other builders.
-
09-12-2016, 09:39 PM
#178
Senior Member
One of the coolest mods I've seen in a long time. Not just for what it is but the story and sentiment behind it. Way to go.
Awesome work by King to help you make it happen. 
Build 1: Mk3 Roadster #5125. Sold 11/08/2014.
Build 2: Mk4 Roadster #7750. Sold 04/10/2017.
Build Thread
Build 3: Mk4 Roadster 20th Anniversary #8674. Sold 09/07/2020.
Build Thread and
Video.
Build 4: Gen 3 Type 65 Coupe #59. Gen 3 Coyote. Legal 03/04/2020.
Build Thread and
Video
Build 5: 35 Hot Rod Truck #138. LS3 and 4L65E auto. Rcvd 01/05/2021. Legal 04/20/2023.
Build Thread. Sold 11/9/2023.
-
09-12-2016, 10:12 PM
#179
Senior Member

We've made quite a few of a very similar grip to that into retirement presents over the years. Awesome to see your Dad's put to use in your car.
...and if you ever wanted to make any of the buttons functional, I know a fella that's repaired/rewired and replaced switches in quite a few of those.
Last edited by Misterfubar; 09-12-2016 at 10:20 PM.
-
09-13-2016, 05:11 AM
#180
Senior Member
Originally Posted by
Misterfubar
We've made quite a few of a very similar grip to that into retirement presents over the years. Awesome to see your Dad's put to use in your car.
...and if you ever wanted to make any of the buttons functional, I know a fella that's repaired/rewired and replaced switches in quite a few of those.
Thanks! I had thought about trying to make some stuff functional. Like the gun trigger the horn and the pipper on the top the turn signals. I decided against it because I imagine at some point I will sell the car and the stick will definitely not be sold with it and I don't want to have to rewire anything. I like that all I have to do is take two bolts out and put the standard shifter back in.
MK4 #8900 - complete kit - Coyote, TKO600, IRS - Delivered 6/28/16 First Start 10/6/16 Go cart - 10/16/16 Build completed - 4/26/17 - 302 days to build my 302 CI Coyote Cobra - Registered and street legal 5/17/17
Build Thread
http://thefactoryfiveforum.com/showt...e-build-thread
PHIL 4:13 INSTAGRAM - @scottsrides
-
09-13-2016, 03:40 PM
#181
Originally Posted by
Misterfubar
...and if you ever wanted to make any of the buttons functional, I know a fella that's repaired/rewired and replaced switches in quite a few of those.
Excellent work! 2BKing is one of the great ones!! I see your point on not wanting to have to rewire in the event that you sell the car. Of course, it would be exceptionally cool to have working buttons on that stick . . . ") Perhaps dual switches? permanent ones, and active ones on the stick?
Perhaps dual switches? permanent ones, and active ones on the stick?
-
09-13-2016, 03:56 PM
#182
Member

That has to one of the coolest posts I've read so far on the forum.
That would be awesome to see those buttons work.
-
09-13-2016, 04:32 PM
#183
Senior Member
Oh man everyone wants the buttons to work! haha
The thing is that stick came out of the jet in 1968. It was probably 5-10 years old at that point. That puts it at 50+ years old currently. I cant imagine what sort of wiring is up in it. Not to mention the reason it came out of the jet in the first place is because something did not work. Dad had to put down and they replaced the stick with an operable one and that is how he ended up with it. All you can see looking into it is a multi pin connector near the base. If it was just a stick I bought off of Ebay or something I would be all about tearing into it. Being that it is my favorite thing I have left from my dad I am just not willing to attempt to modify it. Y'all do have me thinking of looking for an alternate stick though...
MK4 #8900 - complete kit - Coyote, TKO600, IRS - Delivered 6/28/16 First Start 10/6/16 Go cart - 10/16/16 Build completed - 4/26/17 - 302 days to build my 302 CI Coyote Cobra - Registered and street legal 5/17/17
Build Thread
http://thefactoryfiveforum.com/showt...e-build-thread
PHIL 4:13 INSTAGRAM - @scottsrides
-
09-13-2016, 04:49 PM
#184
Senior Member
Brake bleeding
Today I figured it would be a pretty simple task of bleeding the brakes...should of been but I have another error due to inexperience. I had everything hooked up. Had a pressure cap bleeder to make things simple and got started on the rear brakes. Poured the fluid in the reservoir and put the pressure cap on and hooked up the air hose with about 10psi. Next thing I know fluid is pouring out the top of the master cylinder and all over my footbox. Thank goodness I had the fuse box covered and none got close to that.
Once I started investigating and looking at the wilwood expanded diagram I realized there should have been an O-ring in there. It was not. IN fact when I received my kit for some reason I was sent 4 master cylinders. 2 of each size. None of the 4 had the O-ring. I called FFR and they indicated they were aware a batch had been sent out that was missing the O-rings. Now I guess it must be obvious to most an O ring should have gone in there. Looking back at it now it sure is. With my lack of experience I figured when I assembled the hookup as the directions showed and I had no parts leftover I was good to go. It is concerning to me FFR knew that some had gone out missing O-rings and did not take action to correct it. At a minimum they could post on their website to look or post on the forum about the issue. Hopefully everyone is smarter than me and knows to look. I am concerned about my coyote throttle unit that got some fluid on it. Hopefully it did not damage it. Not sure how to test it.
I had ordered the hydraulic clutch from Forte. His MC had the O-ring as pictured below. This picture is the clutch and front brake MC, the third one for the rear brakes is covered.

FFR did take the corrective action to send me 2 O-rings. While I wait I took the one of the clutch MC and used it and there was another one in the Forte box that came on the plastic reservoir I will not use. So I was able to use those two and get the brake master cylinders properly connected.
That allowed me to complete the brake bleeding. No problems with that. No leaks in the lines and the brakes seem to work. I will bleed the hydraulic clutch when the new O-rings show up.
Another lesson and resulting mess learned the hard way! I am going to have to build a second roadster just to put into practice all the stuff I have learned as a newbie! Enjoying learning all this. My knowledge level is certainly increasing since the start of this project.
Can someone give me a tip on how I can test the coyote throttle unit for any damage?
MK4 #8900 - complete kit - Coyote, TKO600, IRS - Delivered 6/28/16 First Start 10/6/16 Go cart - 10/16/16 Build completed - 4/26/17 - 302 days to build my 302 CI Coyote Cobra - Registered and street legal 5/17/17
Build Thread
http://thefactoryfiveforum.com/showt...e-build-thread
PHIL 4:13 INSTAGRAM - @scottsrides
-
09-13-2016, 06:39 PM
#185
Senior Member
Congrats on getting the brakes bled and working! That's a huge step. Especially for a beginner. Sorry to hear about the o-rings. So many details, aren't there? I suspect many of us take a lot of this for granted. But these things are marketed as "anyone can do it" so little things like this can sure trip up a beginner. Way to power through it though.
Nothing that I know of to test the DBW unit now. It's reasonably well sealed, so if you got all the fluid wiped right off, probably it's OK. Once you get your Coyote wiring in place and power to the PCM, then you can test it. When you turn the key on, you hear it kind of chirp as it initializes. Than moving the pedal moves the throttle body. You can hear it moving up there, if the motor isn't running of course. I'm betting it works. Those things are pretty robust since they're a safety item.
Build 1: Mk3 Roadster #5125. Sold 11/08/2014.
Build 2: Mk4 Roadster #7750. Sold 04/10/2017.
Build Thread
Build 3: Mk4 Roadster 20th Anniversary #8674. Sold 09/07/2020.
Build Thread and
Video.
Build 4: Gen 3 Type 65 Coupe #59. Gen 3 Coyote. Legal 03/04/2020.
Build Thread and
Video
Build 5: 35 Hot Rod Truck #138. LS3 and 4L65E auto. Rcvd 01/05/2021. Legal 04/20/2023.
Build Thread. Sold 11/9/2023.
-
09-14-2016, 12:55 PM
#186
Member
You know maybe contacting Thrustmaster who make an authentic HOTAS Warthog replica. Might be a longshot but they might be able to help you get your stick operational.
http://www.thrustmaster.com/en_US/pr.../hotas-warthog
-
09-14-2016, 03:19 PM
#187
Senior Member
rear harness/ trunk and cockpit aluminum/ clutch bled
Got a lot accomplished today. I sure like putting the aluminum panels back on for the final time. Makes it look like I really accomplished a lot in one work session. haha
I had previously run the rear harness and had it held in place with zip ties per the instruction manual. I ended up adding some padded clamps riveted in and I like that better than the zip ties. I also read a good tip from EdwardB and that was to put zip ties on the two plugs attaching to the fuel tank. Holds them in place a little extra just in case.

After that I installed the panels in the trunk and rear cockpit wall. Read on the forum many times to install the trunk floor prior to the rear cockpit wall so the rivets were easily accessible. That is a good tip. I like the black powder coat in the trunk. Looks nice. I am not even sure if I will carpet it. Maybe some sort of black no slip material or something will work good. I will have to consider that more later.


I received my missing O-rings from yesterday from FFR. I have had a LOT of shipping errors on their part. I will say they have been very good about correcting the mistakes. This time they were even nice enough to overnight the O-rings so I much appreciated that. Once I put the O-ring in place on the clutch master cylinder since I stole one from there yesterday to bleed the brakes I was able to bleed my hydraulic clutch. That was quite easy with just the one short run. I am quite pleased to now have fully functioning brakes and clutch.
After laying out the wiring harnesses previously I have been doing about all I can to avoid dealing with them more. That part of the build is intimidating me. I am about out of side projects and will have to jump into that soon it seems. I did however receive my alignment tools I ordered and my quick disconnect steering wheel kit so I can probably mess with those for a few more days! haha
MK4 #8900 - complete kit - Coyote, TKO600, IRS - Delivered 6/28/16 First Start 10/6/16 Go cart - 10/16/16 Build completed - 4/26/17 - 302 days to build my 302 CI Coyote Cobra - Registered and street legal 5/17/17
Build Thread
http://thefactoryfiveforum.com/showt...e-build-thread
PHIL 4:13 INSTAGRAM - @scottsrides
-
09-14-2016, 03:21 PM
#188
Senior Member
Originally Posted by
M3ichael
Thanks for the link. Another thing I like about my stick is it is about the same vintage as the original Cobras. Those new sticks look really cool but I would not want them in the car. As I said I am not willing to modify mine. However if I come across another old one I might see what can be done.
MK4 #8900 - complete kit - Coyote, TKO600, IRS - Delivered 6/28/16 First Start 10/6/16 Go cart - 10/16/16 Build completed - 4/26/17 - 302 days to build my 302 CI Coyote Cobra - Registered and street legal 5/17/17
Build Thread
http://thefactoryfiveforum.com/showt...e-build-thread
PHIL 4:13 INSTAGRAM - @scottsrides
-
09-15-2016, 05:38 AM
#189
Man, I know it feels like you are not moving that fast but, from my perspective you are moving really quickly. I'm new to the forum which I joined in an attempt to gain momentum towards a build. I'm currently in the throws of a 5.3 LS powered 1959 Chevy Truck and, once it's complete, I have plans to join the MK4 ranks! Don't be stingy with the pictures. I'm going to need them one day. dug
-
09-15-2016, 09:46 AM
#190
Member
Really like the black powder coated panels but also like Jazzman's hammered looking panels.
How durable are the black ones?
-
09-15-2016, 09:55 AM
#191
Senior Member
Originally Posted by
M3ichael
Really like the black powder coated panels but also like Jazzman's hammered looking panels.
How durable are the black ones?
The finish is durable but keeping them looking shiny and clean is another story. I think from a practical use standpoint Jazzman's will work out a little better. I guess it is like a black car, when it is clean it looks beautiful, keeping it that way is the trick!
MK4 #8900 - complete kit - Coyote, TKO600, IRS - Delivered 6/28/16 First Start 10/6/16 Go cart - 10/16/16 Build completed - 4/26/17 - 302 days to build my 302 CI Coyote Cobra - Registered and street legal 5/17/17
Build Thread
http://thefactoryfiveforum.com/showt...e-build-thread
PHIL 4:13 INSTAGRAM - @scottsrides
-
09-15-2016, 02:41 PM
#192
Senior Member

Originally Posted by
wareaglescott
Oh man everyone wants the buttons to work! haha
The thing is that stick came out of the jet in 1968. It was probably 5-10 years old at that point. That puts it at 50+ years old currently. I cant imagine what sort of wiring is up in it. Not to mention the reason it came out of the jet in the first place is because something did not work. Dad had to put down and they replaced the stick with an operable one and that is how he ended up with it. All you can see looking into it is a multi pin connector near the base. If it was just a stick I bought off of Ebay or something I would be all about tearing into it. Being that it is my favorite thing I have left from my dad I am just not willing to attempt to modify it. Y'all do have me thinking of looking for an alternate stick though...
You could probably make it work, the connectors are common, but the pin configs are not. Your best bet would be to ignore the connector, as it is usually the cause of problems. Try to see if you can take it apart, pull the connector off the bottom, there should be enough slack in the wires to come out enough to de-solder the wires. You can use relays to trigger once you get to the wires.
-
09-15-2016, 04:36 PM
#193
Senior Member
Breeze quick disconnect steering wheel
When I put my shifter in the other day I had the seat and steering wheel in position to get a feel for the room in the cockpit. I determined with my long legs and the high sides to the kirkey seats that getting in and out was going to be tight. I decided I wanted a removable steering wheel. I ordered the kit from Breeze and worked on that today. I must say Mark provides some superior directions. This is the 4th or 5th kit/part I have purchased from him and the directions are top notch and he is also super helpful on the phone answering my questions.
The first thing that needed to be done was to weld the collar to the steering shaft. I do not weld. I cut about an inch off the end of the steering shaft as directed and went to a local welder. Cost me $50 for them to tig weld it. I think they did a very nice job. I ended up painting the part that will be visible in front of the dash black and clearing it as well. (After determining I might have overpaid for powder coating if I got ripped off on the weld job just keep it to yourself! haha I am impatient so same day service was probably worth $50)

I should say when I ordered my kit I selected the optional leather steering wheel. For whatever reason when it came they sent me both wheels. Not sure if that was an oversight or not. I assumed when I selected the leather it would replace the wood. Anyways I have both so decided to make them both usable. I ordered a second steering wheel adapter from Breeze. I also ordered a 2nd center finish piece from FFR so now I will be able to switch them out as the mood hits me. I'll be the guy carrying my steering wheel and shifter around the grocery store so nobody steals them! ha
When you get the adapter it is universal to many steering wheels so you have to drill and tap your own holes. Again great directions on getting this accomplished. Since I have two here is a sort of before and after. Still had to thread the last two holes on the one that is partly done.

Once you get the adapter drilled and tapped you attach it to the black piece that has the on/off pull to release feature and attach all that to the wheel. Since I have two complete units I went ahead and installed the finish piece and badge. Wont need to take it apart again.
Then you just reinstall the upper steering shaft and you are ready to go. Here it is temporarily in position. Need to get to work on that dash now! Still love seeing that shifter in the pics. I need to swap it back out for the standard one for the remainder of the build but haven't stopped admiring it yet!


MK4 #8900 - complete kit - Coyote, TKO600, IRS - Delivered 6/28/16 First Start 10/6/16 Go cart - 10/16/16 Build completed - 4/26/17 - 302 days to build my 302 CI Coyote Cobra - Registered and street legal 5/17/17
Build Thread
http://thefactoryfiveforum.com/showt...e-build-thread
PHIL 4:13 INSTAGRAM - @scottsrides
-
09-15-2016, 08:17 PM
#194
Member
Man you are moving quick. The car is looking really good. I am currently stuck in inventory mode and my build class is this weekend.
-
09-16-2016, 04:49 AM
#195
Senior Member
Originally Posted by
unrealmach1
Man you are moving quick. The car is looking really good. I am currently stuck in inventory mode and my build class is this weekend.
My work schedule is variable so I can get some stretches when I can get a lot of concentrated project time. It helps it go faster. I think ultimately I will be go carting and have to wait a couple months for the body and paint to be finished.
My first day of inventory I was having a blast. Day 2 I just wanted to be done so I could get to work! Haha. Have fun at build school. I did not go. Looking back I think it would have been useful and minimized some of my cluelessness along the way!
MK4 #8900 - complete kit - Coyote, TKO600, IRS - Delivered 6/28/16 First Start 10/6/16 Go cart - 10/16/16 Build completed - 4/26/17 - 302 days to build my 302 CI Coyote Cobra - Registered and street legal 5/17/17
Build Thread
http://thefactoryfiveforum.com/showt...e-build-thread
PHIL 4:13 INSTAGRAM - @scottsrides
-
09-16-2016, 06:34 AM
#196
Senior Member
Seeing if I can figure out how to post a video.
Fighter shifter:
https://youtu.be/vaj7l1tmDoU
Removable wheel:
https://youtu.be/ZzeoJgfNGtQ
MK4 #8900 - complete kit - Coyote, TKO600, IRS - Delivered 6/28/16 First Start 10/6/16 Go cart - 10/16/16 Build completed - 4/26/17 - 302 days to build my 302 CI Coyote Cobra - Registered and street legal 5/17/17
Build Thread
http://thefactoryfiveforum.com/showt...e-build-thread
PHIL 4:13 INSTAGRAM - @scottsrides
-
09-16-2016, 09:48 AM
#197
Originally Posted by
M3ichael
Really like the black powder coated panels but also like Jazzman's hammered looking panels.
How durable are the black ones?
Thanks for the compliment. I do too!!
-
09-16-2016, 09:52 AM
#198
Hey, WarEagle, slow down, enjoy the build . . . you are passing me!! It looks great. You are really doing a nice job. Love the seats and the quick disconnect wheel. Nice touch. Keep up the good work my friend!!
-
09-16-2016, 10:48 AM
#199
Senior Member
Originally Posted by
Jazzman
Hey, WarEagle, slow down, enjoy the build . . . you are passing me!! It looks great. You are really doing a nice job. Love the seats and the quick disconnect wheel. Nice touch. Keep up the good work my friend!!
Thanks Kevin. I am working hard to find every small project I can to avoid wiring! ha
MK4 #8900 - complete kit - Coyote, TKO600, IRS - Delivered 6/28/16 First Start 10/6/16 Go cart - 10/16/16 Build completed - 4/26/17 - 302 days to build my 302 CI Coyote Cobra - Registered and street legal 5/17/17
Build Thread
http://thefactoryfiveforum.com/showt...e-build-thread
PHIL 4:13 INSTAGRAM - @scottsrides
-
09-16-2016, 03:20 PM
#200
Senior Member
Power steering hookup
Hooked up the power steering lines today. Not real pleased with the results. I purchased the coyote power steering setup from FFR with my kit. Pump and rack went in no problems. When i got to the lines today I had some issues. The bends in my supplied lines did not match the pictures in the directions and routing them the way FFR did in the directions was not an option for me. I called and talked to Dan and then later called back with more questions and talked to Tony. Both of them basically said install them any way you can get them to work and "bend them with your hands if you need to you won't kink them." That may be the case but I was not real comfortable experimenting with the only line I had that I already had an initial delay getting because they were backordered.
The first issue was the line that goes from the pump to the rack. Here it is how I installed it. Looking down from the top:
The FFR instructions show it basically laying down on the rack and running over towards the low point in the Xtube and then coming over the top. With the metal part on mine my only option had it sticking pretty much straight up. It worked out ok but I have concerns when I get the radiator hoses and engine air inlet tube in place it is going to be in the way. Guess I will find out. Also it barely clears the radiator fan shroud. Should that be a problem?
Next I had the hookup that runs from the reservoir to the rack. I mounted the reservoir on the PS F panel. That seemed to be a good spot for it. Again on this hose the formed tube part that goes into the rack was having a space conflict with the steering rack. I routed this one up also and away from the other one. This also concerns me about a potential conflict with air inlet later on.
Here you can see where the two hoses are running. I have a temporary zip tie holding the reservoir to rack hose. Once I determine if I have any space conflicts with everything else installed I will make this more permanent.

Here is another shot of how the two hoses come off of the rack.

At this point I am not very happy with how this worked out. From a functionality stand point I believe it should be fine. I just don't have a great feeling about how it all looks vs the nice tidy installation pictured in the FFR instructions.
Any input is appreciated.
MK4 #8900 - complete kit - Coyote, TKO600, IRS - Delivered 6/28/16 First Start 10/6/16 Go cart - 10/16/16 Build completed - 4/26/17 - 302 days to build my 302 CI Coyote Cobra - Registered and street legal 5/17/17
Build Thread
http://thefactoryfiveforum.com/showt...e-build-thread
PHIL 4:13 INSTAGRAM - @scottsrides
 Posting Permissions
- You may not post new threads
- You may not post replies
- You may not post attachments
- You may not edit your posts
-
Forum Rules

Visit our community sponsor


 Reply With Quote
