-


Papa's MKIV Roadster Build - #9115 (Post Grad) - One million + views!!!
I've decided to do a build thread and hope this provides some return to the community on the help that I've already received and know I'll need as my build progresses. My experience with working on cars is pretty limited. I've done normal maintenance and some basic customization and mechanical repairs, but that's about it. So, this build, much like wareaglescott's build, will be from the perspective of the novice builder willing to learn as I go and humbled by the knowledge that is available from the many gracious gurus that are so willing to share their time and experience with us beginners.
My build will be based on a complete kit, now sitting in my shop along with some Factory Five upgrades and a few modifications to the basic "by the book" build. My car will use a Moser 8.8 3-link rear axle with Wilwood brake upgrade front and back. I plan to use BluePrint Engines for the powertrain, having selected their 347 c.i. with EFI and the Tremec TKO 600 transmission.
I will be using my roadster exclusively on the street, no racing. I live in Colorado, and can't wait to someday drive the roadster into the Rocky Mountains for a day trip to Breckenridge or Estes Park (Rocky Mountain National Park) with my lovely wife of nearly 32 years by my side.

Build Thread Table of Contents
| Topic |
Post Number(s) |
| Delivery |
1 |
| Rear Axle |
8 |
| Body & Aluminum Removal |
12 |
| Assembly Begins |
13 |
| Front Suspension & Brakes |
23 |
| Rear Suspension |
32 |
| Firewall |
42 |
| Pedal Box Assembly |
42 |
| Fuel Tank |
49 |
| Passenger Footbox |
62 |
| Passenger Floor |
70 |
| Driver’s Floor & Foot Box |
81 |
| Rear Cockpit Aluminum |
85 |
| Steering |
86 |
| Brake Reservoir |
98 |
| FFMetal Battery Box |
98 |
| Brake Lines |
107 |
| Rolling Chassis |
137 |
| Trunk Aluminum |
139 |
| Wiring Harness Install |
140 |
| Dash Install (Initial) |
174 |
| Engine Uncrate |
179 |
| Foot Operated Headlight Dimmer Mod |
196,517 |
| Electrical Switches |
203 |
| E-Brake Cable Install |
207 |
| E-Brake Handle |
216, 226 |
| Fuel Filter Mount |
224 |
| Fuel Lines |
233 |
| Wiper Motor Install |
249 |
| Engine Install |
255 |
| Heater Bypass |
280 |
| Seat Heaters |
297 |
| Power Steering Lines |
306 |
| Electrical Buss Bar |
335 |
| Boig Cool Tubes |
342 |
| Throttle Cable Mounts |
352 |
| Fan & Horn Wiring |
356 |
| First Start |
357 |
| Drilling Roll Bars |
387 |
| Mounting Dash (Final) |
418 |
| First Go-Kart |
430 |
| Coupler Mod (Retrofit) |
454 |
| Trans Tunnel Cover Upholstery |
457 |
| Breeze Seat Mounts |
466, 664 |
| Body Fit (Rough) |
480 |
| Hood Fit (Rough) |
513 |
| Hood Hinges/Latches |
524 |
| Trunk Lid & Door Fit (Rough) |
541 |
| Le Mans Gas Filler |
544 |
| License Plate Bracket |
561 |
| Tail Light Wiring |
582 |
| Headlights |
585 |
| EFI Swap from FAST XFI Street to Holley Sniper |
618 |
| Side Louvers |
639, 687, 731-735 |
| Trunk Carpet |
640, 662 |
| Trunk Lid Access Cover |
649 |
| 12v Power Point |
664 |
| Trunk Lid Wiring |
667 |
| Driveline Safety Hoop |
682 |
| Premium Soft Top |
688, 776, 1119 |
| Carpet |
693 |
| Body Under Coating |
702 |
| Splash Guards |
715 |
| Door Strap & Seatbelt Pad Leather Dye |
743 |
| Breeze Upper Radiator Panel |
755 |
| Door Latches |
770 |
| Gap Filler Panels |
784 |
| Radiator Aluminum |
785 |
| Trunk Gas Struts from Relicaparts (Mike Everson) |
796 |
| SDC Self-Cancelling Turn Signals |
807 |
| Door Sill Aluminum |
826 |
| Gas-N Side Pipes |
828 |
| O-Ring Mod for Wheel Spinners |
834 |
| Getting Ready to Ship To Jeff Kleiner For Paint |
846 |
| At Jeff Kleiner’s For Paint |
872, 895, 922, 929, 942, 954, 979, 986 |
| Headed Home After Paint |
1007, 1014 |
| Final Assembly |
1029, 1044, 1056, 1061, 1067, 1075, 1114, 1118 |
| Getting Legal |
1129, 1143, 1183 |
| Ride Height Adjustment |
1131 |
| Finished! |
1170 |
| Russ Thompson Turn Signal Retrofit |
1277 |
| Radiator Replacement and Addition of Breeze Upper Mount |
1361 |
| EFI Upgrade - Inglese 8-Stack |
1371, 1411 |
| Wheel Spinner Hub Retainers |
1394 |
| Inglese 8-Stack and Terminator X EFI Upgrade |
1407 |
| Fuel System Contamination Cleanup |
1423 |
Last edited by Papa; 06-03-2022 at 10:13 AM.
-
Post Thanks / Like - 2 Thanks, 5 Likes
-
Woohoo! Lookin forward to following. Congratulations and get to work!
-
Senior Member

The start of my build is still off in the future, so I envy you guys that made the commitment. Hope it turns out to be everything you wanted and more.
-
Post Thanks / Like - 1 Thanks, 0 Likes
-
That drive from Denver to Breckenridge is what roadsters are made for. Welcome and congratulations.
-Steve
-
Steve >> aka: GoDadGo

Papa,
Being an Electrical Engineer gives you a huge advantage over a lot of us.
To give you an example, it took me 40 hours to wire my dash.
That's why you never give a wrench to a banker.
Looks Like A Great Combination To Me!
Steve
-

Originally Posted by
GoDadGo

Papa,
Being an Electrical Engineer gives you a huge advantage over a lot of us.
To give you an example, it took me 40 hours to wire my dash.
That's why you never give a wrench to a banker.
Looks Like A Great Combination To Me!
Steve
Wiring doesn't bother me as long as I have a readable schematic to work from. When I tackled the dash replacement on my 1970 El Camino, I didn't have much to go on, but got it done.
Last edited by Papa; 07-08-2017 at 09:20 AM.
-
Senior Member

Look forward to following along!
Wow I am envious of that potential drive in the rockies. Sounds amazing!
My Grandparents and Aunts/Uncles are from the Westminster and Lakewood areas. Spent a ton of time in Denver growing up. Would be amazing to drive the Cobra up in the mountains.
MK4 #8900 - complete kit - Coyote, TKO600, IRS - Delivered 6/28/16 First Start 10/6/16 Go cart - 10/16/16 Build completed - 4/26/17 - 302 days to build my 302 CI Coyote Cobra - Registered and street legal 5/17/17
Build Thread
http://thefactoryfiveforum.com/showt...e-build-thread
PHIL 4:13 INSTAGRAM - @scottsrides
-
Senior Member

Good Luck! I'm excited to watch your build progress. You'll have a few months head start on me.
Started dreaming of a Cobra around 1987
Purchased Complete Kit 6/9/2017, Delivered 9/4/2017, Rolling Chassis 3/30/2018, Engine Dyno'ed 3/4/2022, Engine installed 8/27/2022
Click here for my build thread
Serial #9158
Design Engineer at BluePrint Engines
-
Post Thanks / Like - 1 Thanks, 0 Likes
-
-
#9160

May I ask where you purchased the axle from? Thx, BB
-
Originally Posted by
BB767
May I ask where you purchased the axle from? Thx, BB
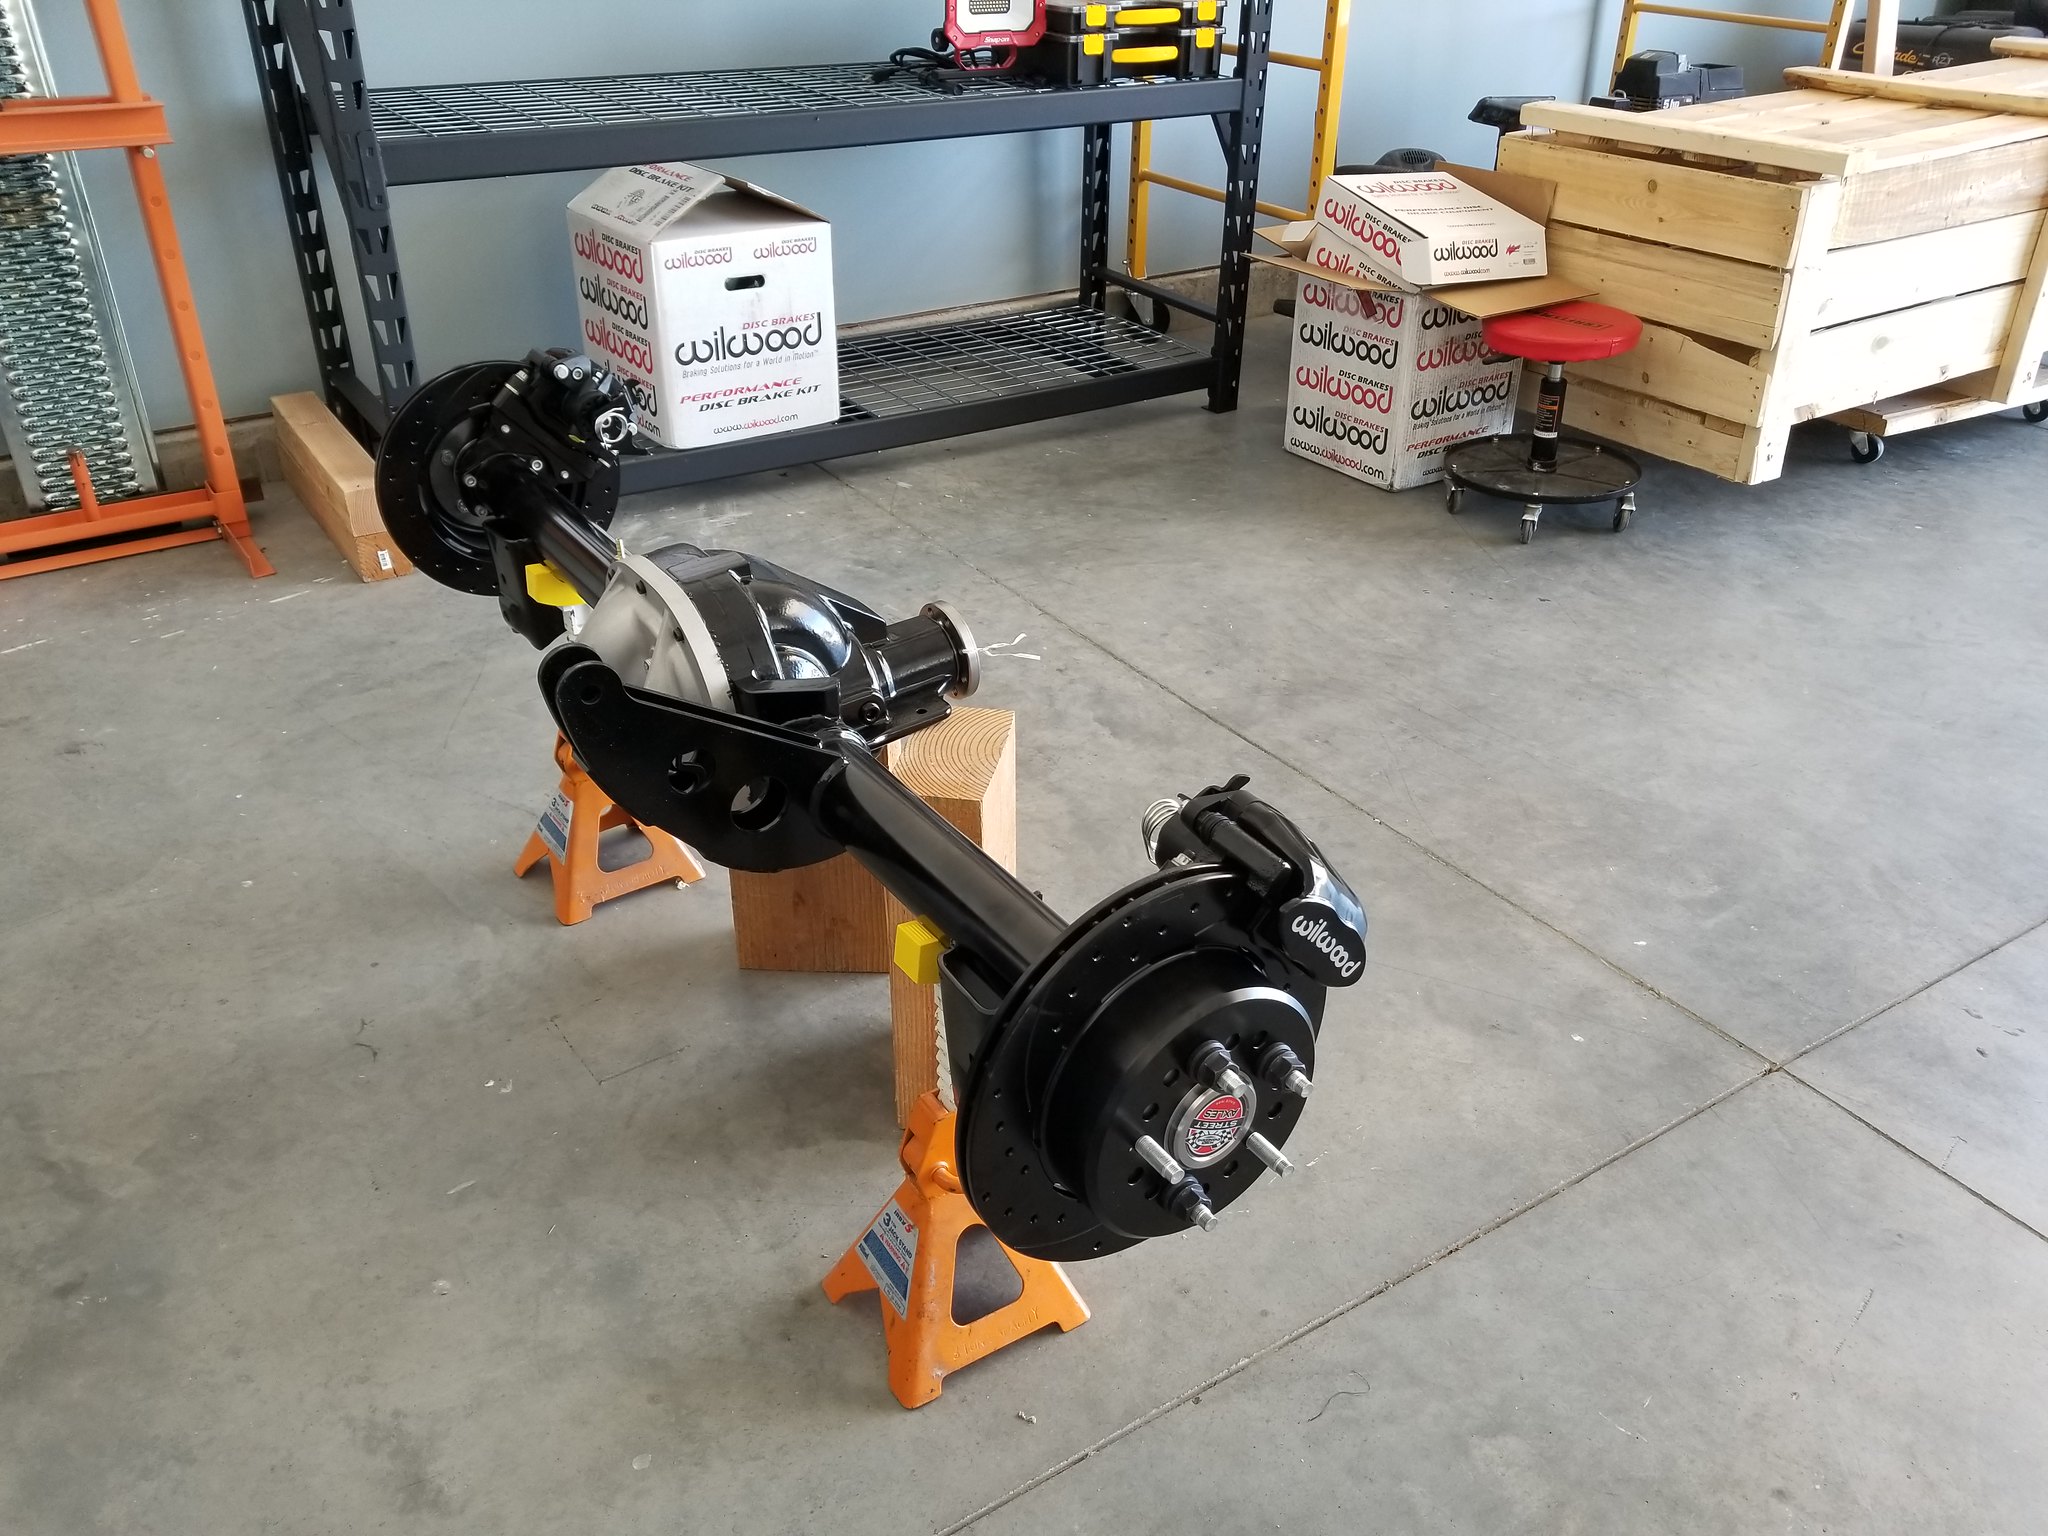
I ordered it with my kit from Factory Five. It was shipped direct from Moser Engineering. I swapped out the stock chrome diff cover for the cast one shown in the pictures.
-
Post Thanks / Like - 1 Thanks, 0 Likes
 TBull
TBull thanked for this post
-
#9160
-
Steve >> aka: GoDadGo
Originally Posted by
Papa
I ordered it with my kit from Factory Five. It was shipped direct from Moser Engineering. I swapped out the stock chrome diff cover for the cast one shown in the pictures.
Hey Papa,
Great idea ditching the chrome differential cover and going with the cast piece.
While things like that may look nice at a car show, oil pans included, we all know that they store heat much like a nice shiny silver teapot.
None of us need any extra heat if we intend to really drive our cars so Bravo on ditching that particular piece of chrome.
Steve
PS: I have a Moser Rear as well (TSD-500) because neither F-5 nor Moser were offering the 8.8 units at the time of my order.
Last edited by GoDadGo; 06-25-2017 at 06:22 AM.
-
Senior Member

Originally Posted by
Papa
I ordered it with my kit from Factory Five. It was shipped direct from Moser Engineering. I swapped out the stock chrome diff cover for the cast one shown in the pictures.
I have the same Moser diff and installed a similar aluminum cover. Here again, I swopped the black cap screws for stainless. There's just something about rust clashing with aluminum that doesn't do it for me. One other consideration. I found the allen head adjustment bolts for the "bearing backers" would wick gear oil from the diff and look terrible. This was solved by removing the jam nut, cleaning the bolts with solvent, and applying a small amount of silicone sealant to the base of the bolt before replacing the jam nut. Not a drop in the 3 years since.
-
Post Thanks / Like - 0 Thanks, 1 Likes
-
Originally Posted by
Papa
I ordered it with my kit from Factory Five. It was shipped direct from Moser Engineering. I swapped out the stock chrome diff cover for the cast one shown in the pictures.
Papa
Back from Post#16, where did you get the cast diff cover? I didn't see it on their website.
Thanks
Eddie
-
Member

Originally Posted by
Papa
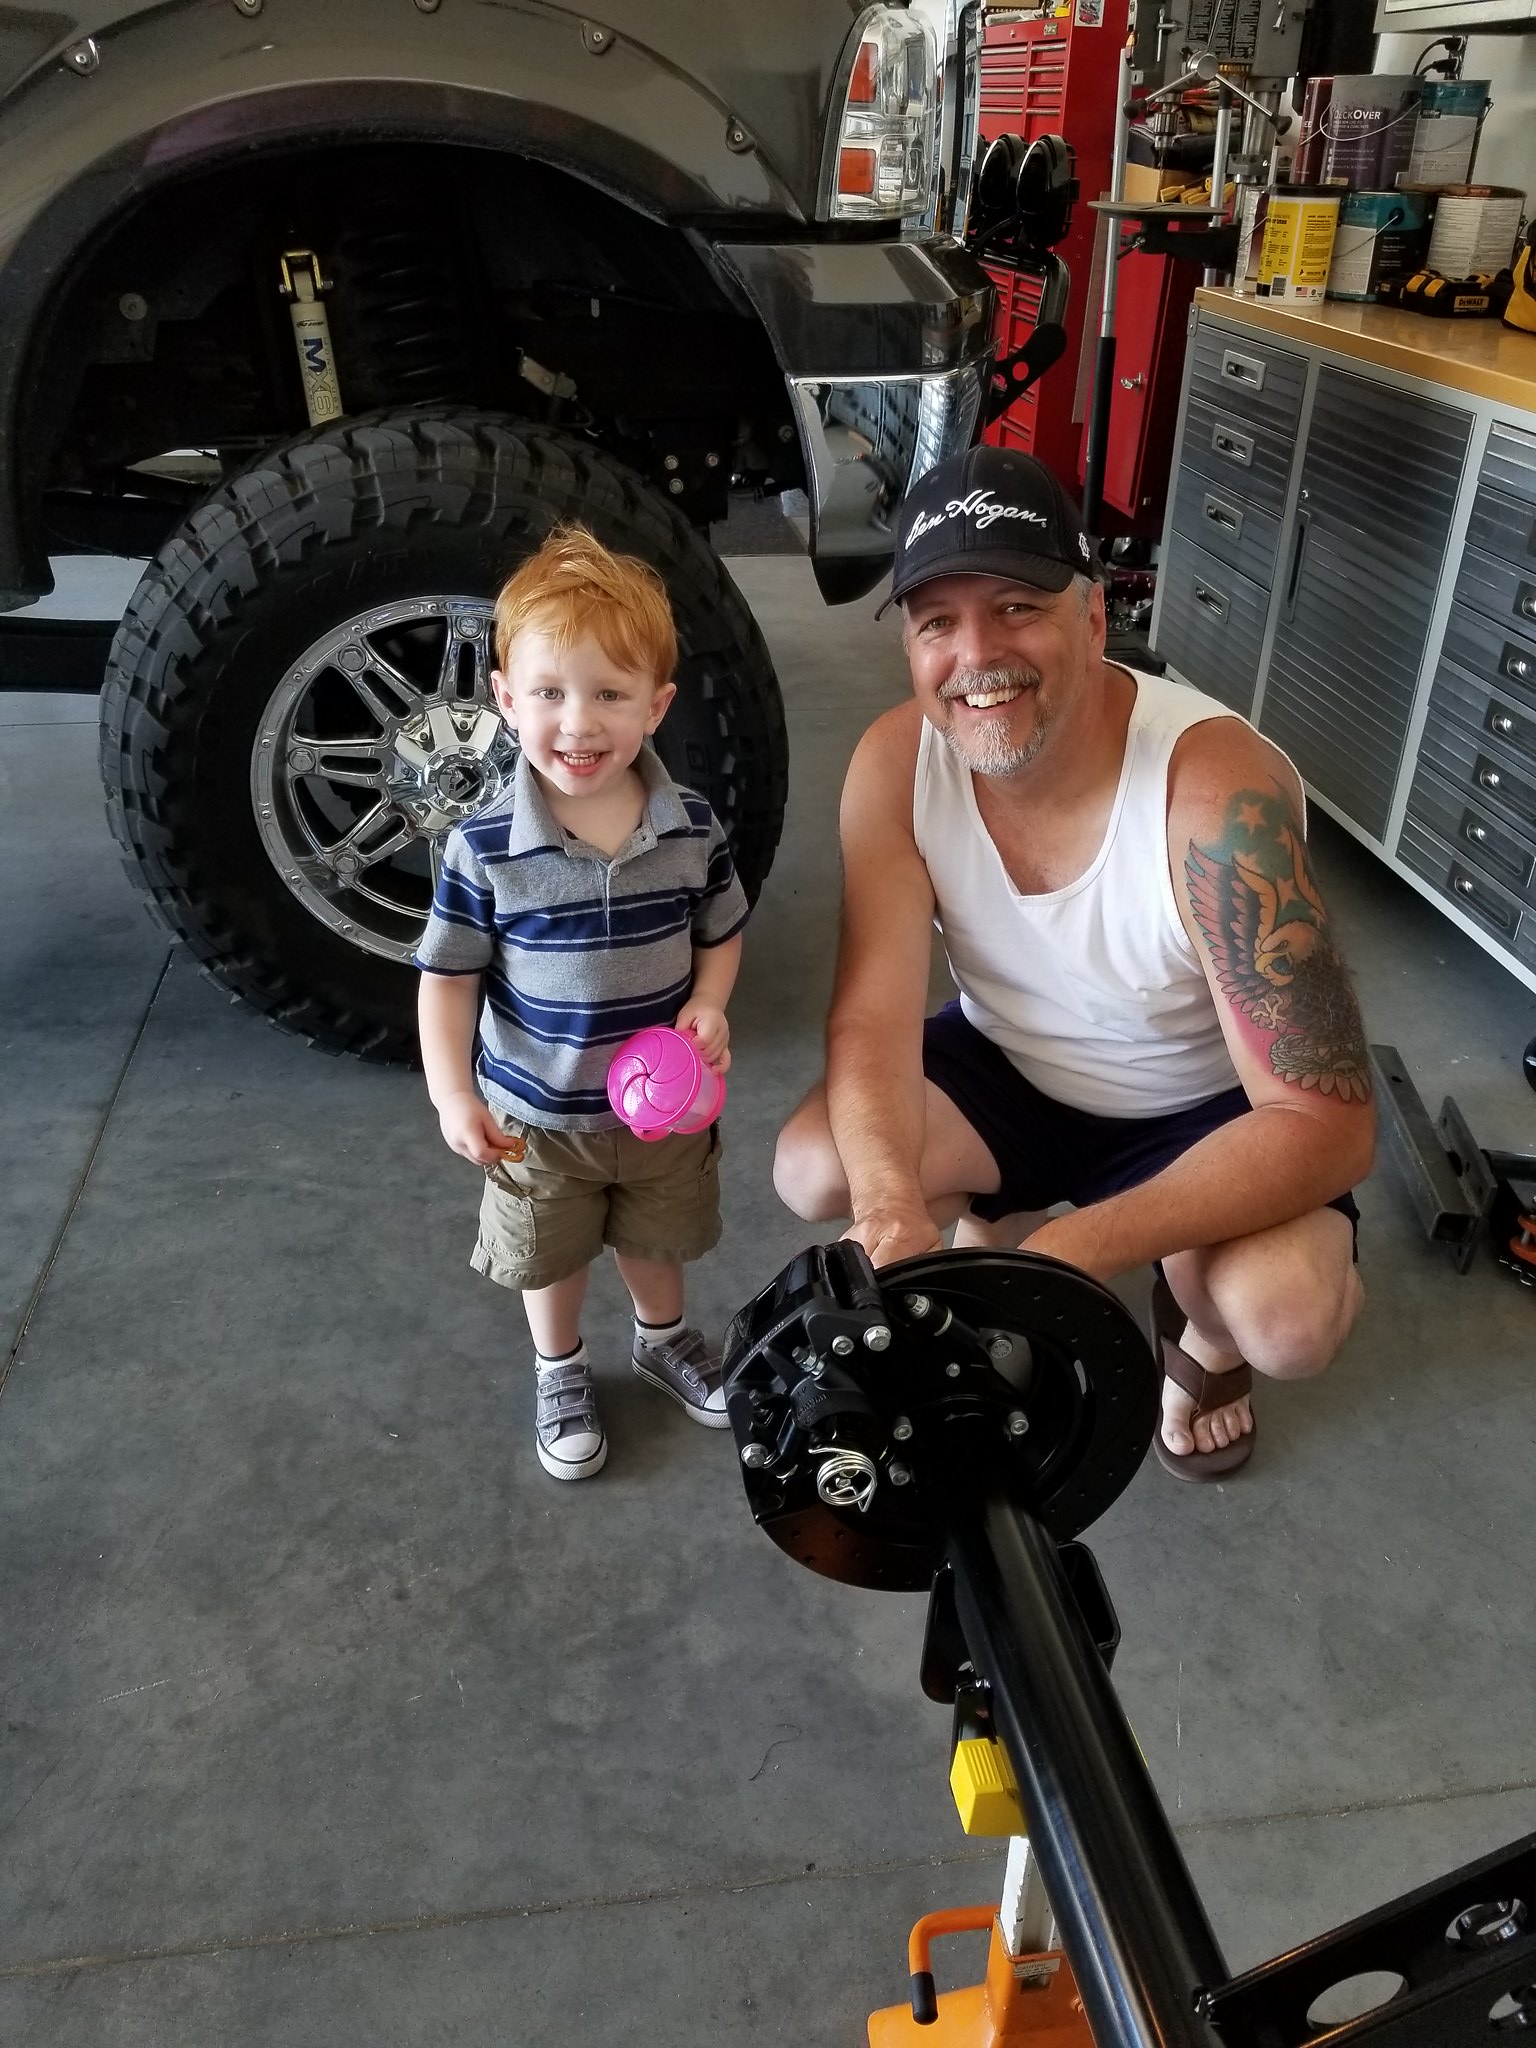
Thank you all for the kind words of encouragement! So, to catch this new thread up, I received my rear axle and Wilwood brakes a couple of weeks ago. I installed the brakes on the axle and replaced the chrome diff cover with the cast cover.

I also had my grandson "help" me. He installed a lug nut for me and was so proud of himself!
Last Saturday, the bulk of the kit arrived and my wife and I spent about six hours doing inventory. I found a few missing items and e-mailed Courtnie. She was right on getting the parts ordered for me. I also have several back ordered parts that should hopefully start arriving soon. Today, I got a shipping notification for two boxes coming from FFR.
Papa
In your first post you stated My car will use a Moser 8.8 3-link rear axle with Wilwood brake upgrade front and back.
Did you upgrade the brakes through Factory Five and what did you upgrade them to????
I purposely delayed my kit order a couple months cause I was undecided on a few things ( this being one).
Thanks and have a great day
Jimmy
-
Post Thanks / Like - 0 Thanks, 1 Likes
-
Originally Posted by
Scubasommer
Papa
In your first post you stated “My car will use a Moser 8.8 3-link rear axle with Wilwood brake upgrade front and back.”
Did you upgrade the brakes through Factory Five and what did you upgrade them to????
I purposely delayed my kit order a couple months cause I was undecided on a few things ( this being one).
Thanks and have a great day
Jimmy
Jimmy,
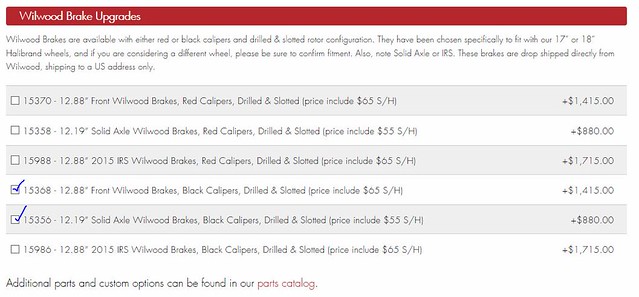
The kit comes with brakes for the front axel, but not the rear. I wanted Wilwood brakes, so the upgrade was for the front (eliminates the standard and delivers the Wilwood), and then a matching set for the rear. I ordered them with my kit from FFR. All you have to do is select the color of caliper you want (red or black) and then pick the type of rear axle you have. If you want black calipers and have a solid rear axle, check the following:

Note that the Wilwood brakes on the FFR configurator are designed to work with 17" or 18" wheels only. If you plan to run a more vintage 15" wheel and want Wilwood brakes, contact Gordon Levy for options.
Dave
Last edited by Papa; 04-22-2018 at 08:01 PM.
-
Member
Originally Posted by
Papa
Jimmy,
The kit comes with brakes for the front axel, but not the rear. I wanted Wilwood brakes, so the upgrade was for the front (eliminates the standard and delivers the Wilwood), and then a matching set for the rear. I ordered them with my kit from FFR. All you have to do is select the color of caliper you want (red or black) and then pick the type of rear axle you have. If you want black calipers and have a solid rear axle, check the following:
Note that the Wilwood brakes on the FFR configurator are designed to work with 17" or 18" wheels only. If you plan to run a more vintage 15" wheel and want Wilwood brakes, contact Gordon Levy for options.
Dave
Cool Thanks Dave
-
Papa-
Little man looks pretty pleased with himself! Where did that red hair come from? Handsome fell right there.
Congrats on starting the build. You are really going to love it. It is both enjoyable and rewarding, and I think you will have a terrific time.
I look forward to following along with your build thread.
Regards,
Steve
-
Originally Posted by
WIS89
Papa-
Little man looks pretty pleased with himself! Where did that red hair come from? Handsome fell right there.
Congrats on starting the build. You are really going to love it. It is both enjoyable and rewarding, and I think you will have a terrific time.
I look forward to following along with your build thread.
Regards,
Steve
My mother, wife, and two daughters are all redheads (Lord help me)! Today I will be removing the hood, doors, and trunk and marking the aluminum in preparation to remove the body.
-
Senior Member

Very nice! Ah, your garge is too clean. 
Kyle
Complete Kit pickup 09/05/2015, 351w, QF680, 3.55, 3-Link, 15" Halibrands with MT's, Painted Viking blue with Wimbledon white stripes on 03/15/2017. Sold in 08/2018 and totally regret it.
-
Post Thanks / Like - 1 Thanks, 0 Likes
Fman thanked for this post
-
-
Senior Member

Originally Posted by
Papa
Lots of progress today! I got the body off the chassis and onto the buck and into the eventual parking space for the finished car.
Originally Posted by
Papa
Thanks Paul. I'll have to see what makes sense and I may have to create my own access panel as I don't believe I saw anything like that when disassembling the car.
The DS footbox access panel hole is visible in this picture you posted previously of your delivery. Just under the rear left corner of the hood opening. The actual cover is somewhere in your box of loose aluminum panels. This is a standard feature FF has had on the Roadster for several years now. That delivery picture also shows how the footbox top panel is nearly covered by the body.
Build 1: Mk3 Roadster #5125. Sold 11/08/2014.
Build 2: Mk4 Roadster #7750. Sold 04/10/2017.
Build Thread
Build 3: Mk4 Roadster 20th Anniversary #8674. Sold 09/07/2020.
Build Thread and
Video.
Build 4: Gen 3 Type 65 Coupe #59. Gen 3 Coyote. Legal 03/04/2020.
Build Thread and
Video
Build 5: 35 Hot Rod Truck #138. LS3 and 4L65E auto. Rcvd 01/05/2021. Legal 04/20/2023.
Build Thread. Sold 11/9/2023.
-
Originally Posted by
edwardb
The DS footbox access panel hole is visible in this picture you posted previously of your delivery. Just under the rear left corner of the hood opening. The actual cover is somewhere in your box of loose aluminum panels. This is a standard feature FF has had on the Roadster for several years now. That delivery picture also shows how the footbox top panel is nearly covered by the body.
Thanks Paul. That helps a lot. I'll plan to rivnut that panel in place when the time comes, but as you said, not much room even with that opening.
Last edited by Papa; 07-15-2017 at 06:29 PM.
-
I found your build thread and hope to learn a lot from it. Looks like your doing great. I'm about to make the plunge in to building one myself. Did you build the buck yourself? Did FF provide you plans for it?
-
Originally Posted by
Tom Welch
I found your build thread and hope to learn a lot from it. Looks like your doing great. I'm about to make the plunge in to building one myself. Did you build the buck yourself? Did FF provide you plans for it?
Tom,
Thanks! The FFR manual includes plans for building the buck. You can order an electronic version of the manual from FFR for $10. It's worth having even with the printed manual as you can search it!
http://www.factoryfiveparts.com/1507...ital-copy-pdf/
Dave
-
Senior Member

Congrats! Welcome to the madness
-
Post Thanks / Like - 1 Thanks, 0 Likes
-
Senior Member
I'm thinking the reason the F-panel riveting shows up very early in the manual has to do with lack of familiarity. It's much more likely a foreign process to most that tackle the assembly. As to permanent or not the picture shows some mounting slots that might not be so easily accessible after the rivets are in, so I say no rush.
-
Senior Member
Looking good. You're off to a great start. One suggestion: For the upper control arms, I'd recommend flipping those attachment bolts. Wherever possible, it's good build practice to always put the head of the bolt on top and the nut on the bottom. In the unlikely event that a nut were to work loose and fall off, the bolt is more likely to stay in the hole and help limit potential damage.
Hopefully also you used Loctite in those upper ball joints. They look pretty clean so thought I would ask. Some have had trouble with them backing out once driving. In addition to Loctite, good practice to put some paint marks on the ball joint side and upper control arm so you can visually monitor if they've moved or not as part of ongoing maintenance.
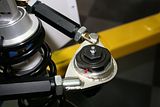
Last edited by edwardb; 06-27-2017 at 06:40 AM.
Build 1: Mk3 Roadster #5125. Sold 11/08/2014.
Build 2: Mk4 Roadster #7750. Sold 04/10/2017.
Build Thread
Build 3: Mk4 Roadster 20th Anniversary #8674. Sold 09/07/2020.
Build Thread and
Video.
Build 4: Gen 3 Type 65 Coupe #59. Gen 3 Coyote. Legal 03/04/2020.
Build Thread and
Video
Build 5: 35 Hot Rod Truck #138. LS3 and 4L65E auto. Rcvd 01/05/2021. Legal 04/20/2023.
Build Thread. Sold 11/9/2023.
-
Originally Posted by
edwardb
Looking good. You're off to a great start. One suggestion: For the upper control arms, I'd recommend flipping those attachment bolts. Wherever possible, it's good build practice to always put the head of the bolt on top and the nut on the bottom. In the unlikely event that a nut were to work loose and fall off, the bolt is more likely to stay in the hole and help limit potential damage.
Hopefully also you used Loctite in those upper ball joints. They look pretty clean so thought I would ask. Some have had trouble with them backing out once driving. In addition to Loctite, good practice to put some paint marks on the ball joint side and upper control arm so you can visually monitor if they've moved or not as part of ongoing maintenance.
Thank you for the tips. I did use blue thread locker on the upper ball joints. I ran three or four beads on each before threading them in. I will definitely flip the pivot bolts over as you suggest. I hadn't thought about it, but it makes a lot of sense. They are all still just finger tight right now until I get the spindles mounted. I'll also make sure to put some paint marks in the ball joints to keep track of any movement down the road.
-
Today I received a good number of backordered and missing parts. So far, I'm very impressed with the responsiveness from FFR. Courtnie has been great to work with through the entire process.
-
-
Post Thanks / Like - 0 Thanks, 1 Likes
 JMD
JMD liked this post
-
Steve >> aka: GoDadGo
Looking Good!
Here are some of the assembly videos in case you haven't seen them.
https://youtu.be/oBJ5dKLrhoU
https://youtu.be/B5zGnHExZuA
https://youtu.be/H_n5ZJJHrjE
https://youtu.be/BHA_zGXUtok
It's all pretty straight forward stuff so Wrench On Papa, Wrench On!
Steve
Last edited by GoDadGo; 07-01-2017 at 02:01 PM.
-
Member
[QUOTE=Papa;285442]Completed the front suspension and brakes today!
Used the two 35mm bolts supplied by FFR to mount the caliper brackets to the spindles. The Wilwood supplied bolts are 40mm.

Dave
I am knee deep in my build and I purchased the Wilwood brakes all around that you were digging ( same gig but red calipers)
In your post you used the 35mm bolts supplied by FF instead on the 40mm from Wilwood, What made you decide to do this? And did you put a washer on the back of the FF 35mm boots like Wilwood said to do with their 40’s or just run them in straight....?
Thanks Brother your build is looking AWESOME by the way!
Jimmy
-
[QUOTE=Scubasommer;355162]
Originally Posted by
Papa
Completed the front suspension and brakes today!
Used the two 35mm bolts supplied by FFR to mount the caliper brackets to the spindles. The Wilwood supplied bolts are 40mm.
Dave
I am knee deep in my build and I purchased the Wilwood brakes all around that you were digging ( same gig but red calipers)
In your post you used the 35mm bolts supplied by FF instead on the 40mm from Wilwood, What made you decide to do this? And did you put a washer on the back of the FF 35mm boots like Wilwood said to do with their 40’s or just run them in straight....?
Thanks Brother your build is looking AWESOME by the way!
Jimmy
Jimmy,
It's been quite some time since I installed those. I don't recall what drove me to use the FFR provided bolts over the longer ones from Wilwood. The 5mm difference is less than 3/16". I don't recall if I used a washer, but can take a look when I get home this evening. I believe those bolts also got some red thread lock on them, but can't remember for sure.
Dave
-
Senior Member
Hey Papa. Good luck with the build. My 2012 build was similar to yours except I used a Coyote power plant. I used to live in the Canadian Rockies and my experience with the Coyote at elevations from sea level to above the tree line has bee fantastic. 87 octane pump gas and ran like a top.
-
Originally Posted by
Dave Howard
Hey Papa. Good luck with the build. My 2012 build was similar to yours except I used a Coyote power plant. I used to live in the Canadian Rockies and my experience with the Coyote at elevations from sea level to above the tree line has bee fantastic. 87 octane pump gas and ran like a top.
Yep -- EFI is a must-have at altitude! My home is at 6,100 feet and we get up over 11,000 feet going to Breckenridge.
-
-
Post Thanks / Like - 0 Thanks, 1 Likes
-
Steve >> aka: GoDadGo
I don't know if they changed anything since my kit was shipped (2015) but I think you've got your rear shocks upside down.
Also, I've got the Moser TSD-500 rear and I had to clearance the brackets a bit, but that is because my pinion angle is different because of how my engine sits.
Hope this helps.
Last edited by GoDadGo; 07-05-2017 at 01:59 PM.
-
Originally Posted by
GoDadGo
I don't know if they changed anything since my kit was shipped (2015) but I think you've got your rear shocks upside down.
Also, I've got the Moser TSD-500 rear and I had to clearance the brackets a bit, but that is because my pinion angle is different because of how my engine sits.
Hope this helps.
Steve,
The manual specifically states that the shock body goes up unless using the double-adjustable shocks. I will wait and see what it does when it's on the ground with some weight on the rear.
Dave
Last edited by Papa; 07-15-2017 at 09:58 PM.


 Thanks:
  Likes:


 Reply With Quote

