-
09-28-2022, 09:08 PM
#481

Originally Posted by
460.465USMC

Still plugging away on carpet. Have the rear cockpit wall, rear corners, and transmission tunnel sides in so far. The trunk is mostly done, except for the Breeze cubby wall, and the upper trunk inside panels I made. Will cover those once the extra carpet I ordered from F5 arrives.
How many clamps does it take to glue in the piece beneath the driver's side door? Four. The front edge of this piece does three 90* bends around the 2" square tube. I want to end up with crisp corners in the carpet. I've used clamps on some other sections where there are tight bends or other obstacles. This approach definitely holds the carpet down for a nice contour around the bend. Just costs me time.

I'll be glad when the carpet install is over. Not my favorite part of the build so far. But, it sure does a lot to bring the project forward in terms of finish.
That trick to get the corners just right is really neat! I'll be "borrowing" that :P
-
Post Thanks / Like - 1 Thanks, 1 Likes
-
10-02-2022, 12:06 PM
#482
Senior Member

Trans Tunnel Cover | Dead Pedal
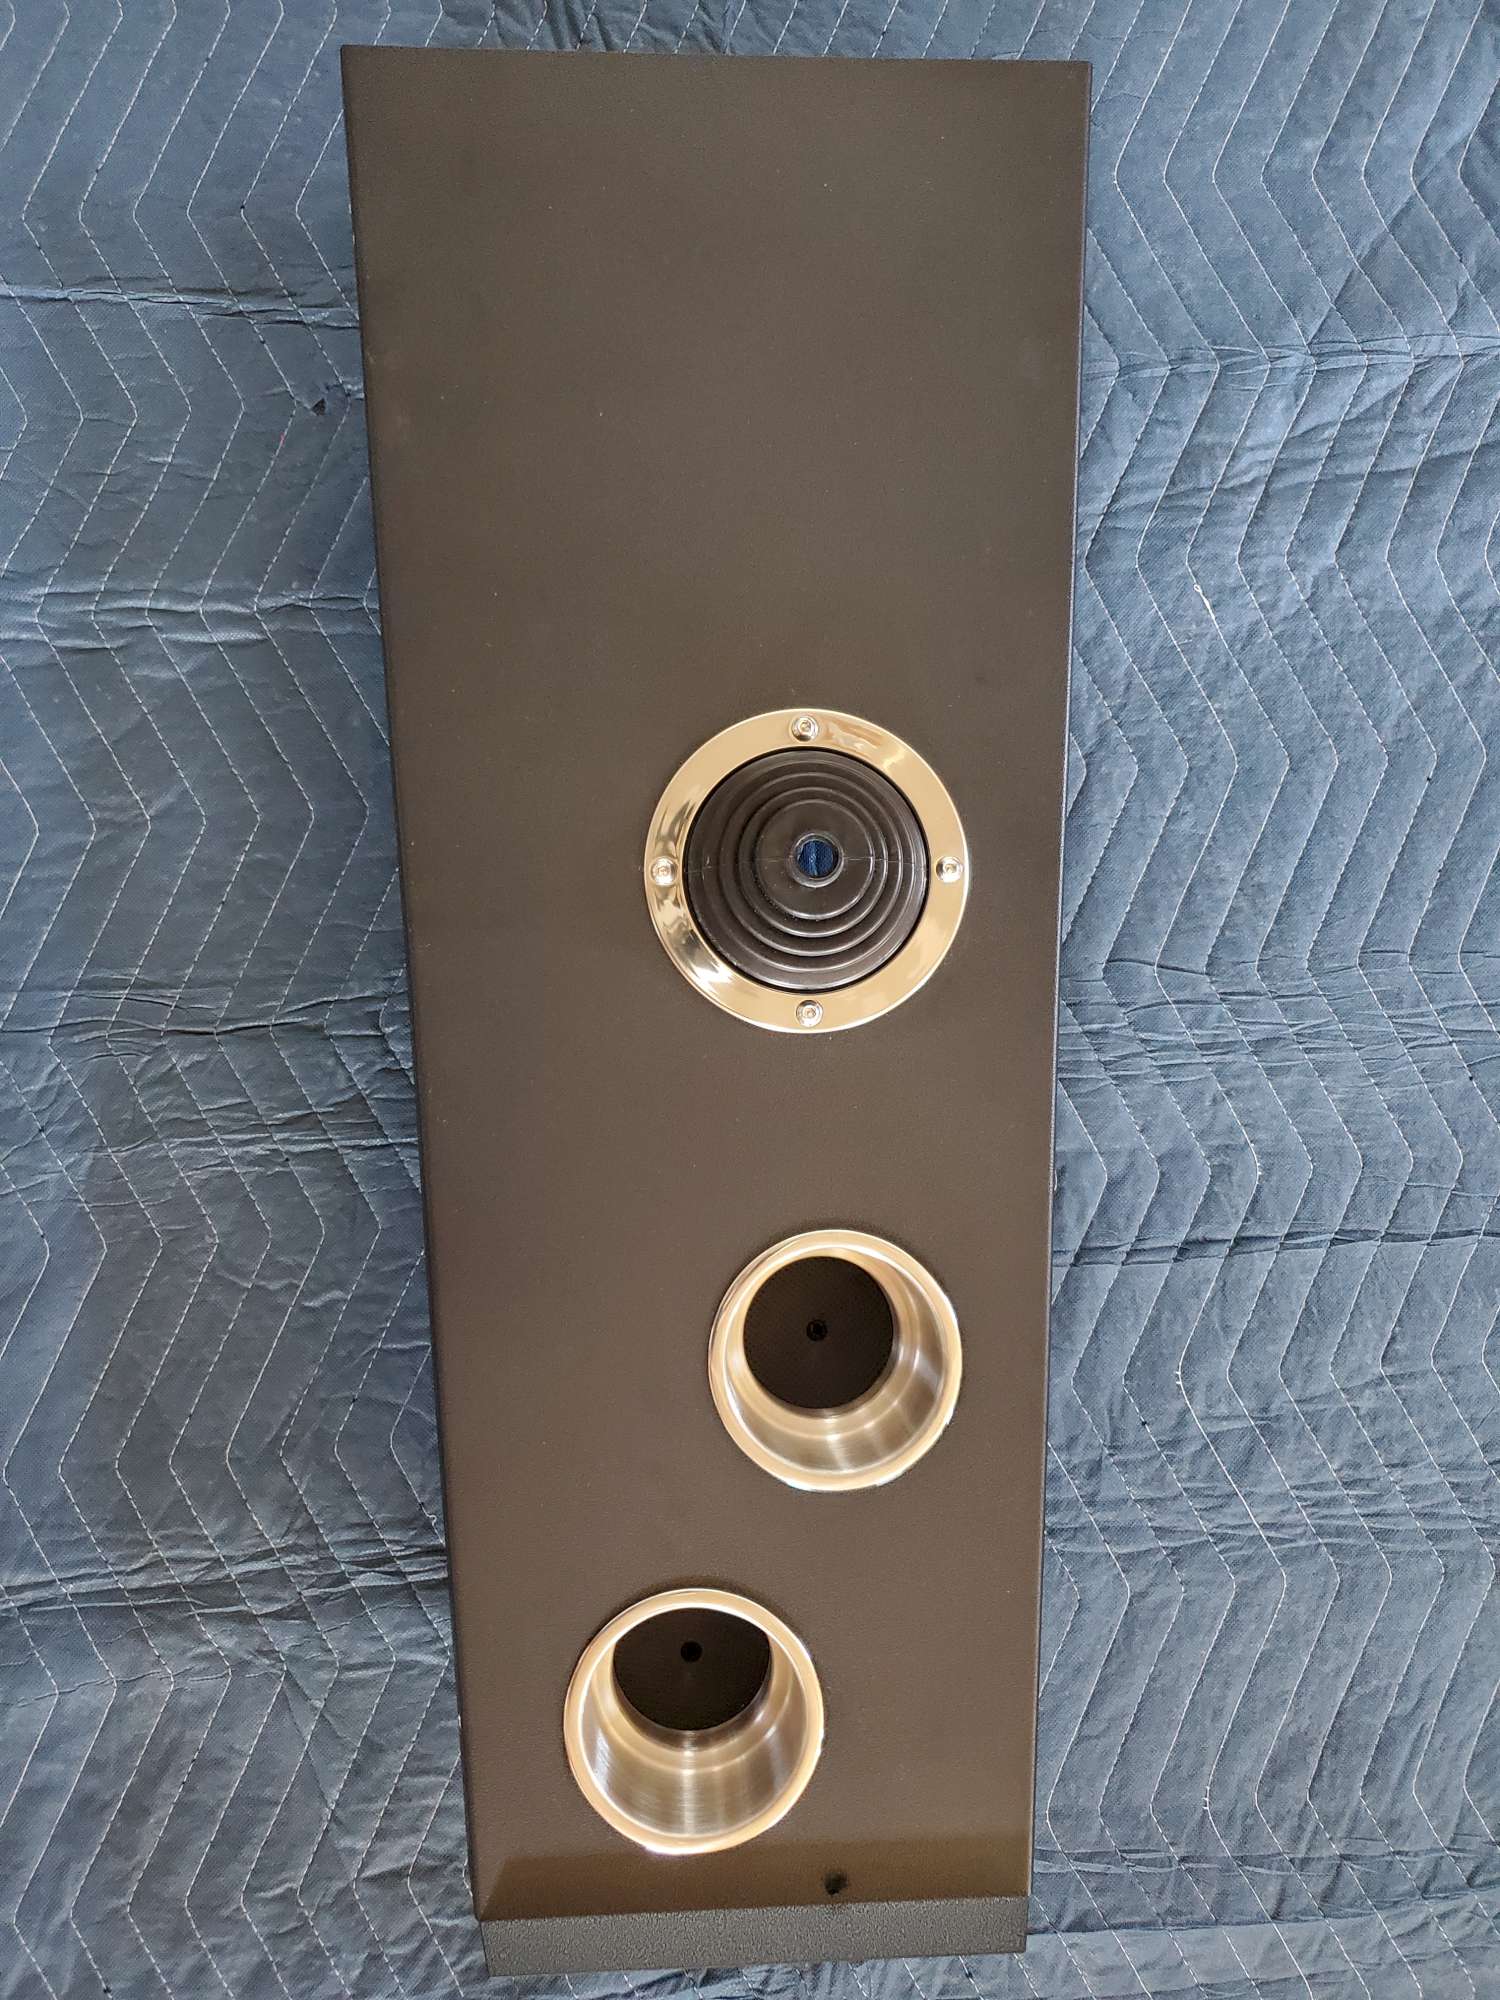
Transmission Tunnel Cover
The trans tunnel cover came back from powder coater a couple weeks ago. I had it coated to match the dash. They did a great job.
The extra width from the ThermoTec + carpet is too wide for the FFMetal cover. So, I removed 1/2" - 3/4" strip along the top. Also needed to shave the carpet pyle for clearance where it contacts the rear bend. Now the cover slips over the tunnel and fits snugly against the carpet.
I wanted the cover to be removable, so I added 10-32 rivnuts. Two per side, about 3" from the front and rear--will show in future update.
Applied ThermoTec to the bottom of the cover. Used Gorilla tape to cover the shiny foil on the ThermoTec. Not the most elegant solution, but I didn't want to leave the ThermoTec exposed so it would be seen from below (when I have it on the lift).

I put a bead of silicone on the underside of the lips of the cup holders to secure them to the tunnel. I also added hose clamps--not shown--to further secure them from popping out from the air pressure when driving at speed.
Top side view.
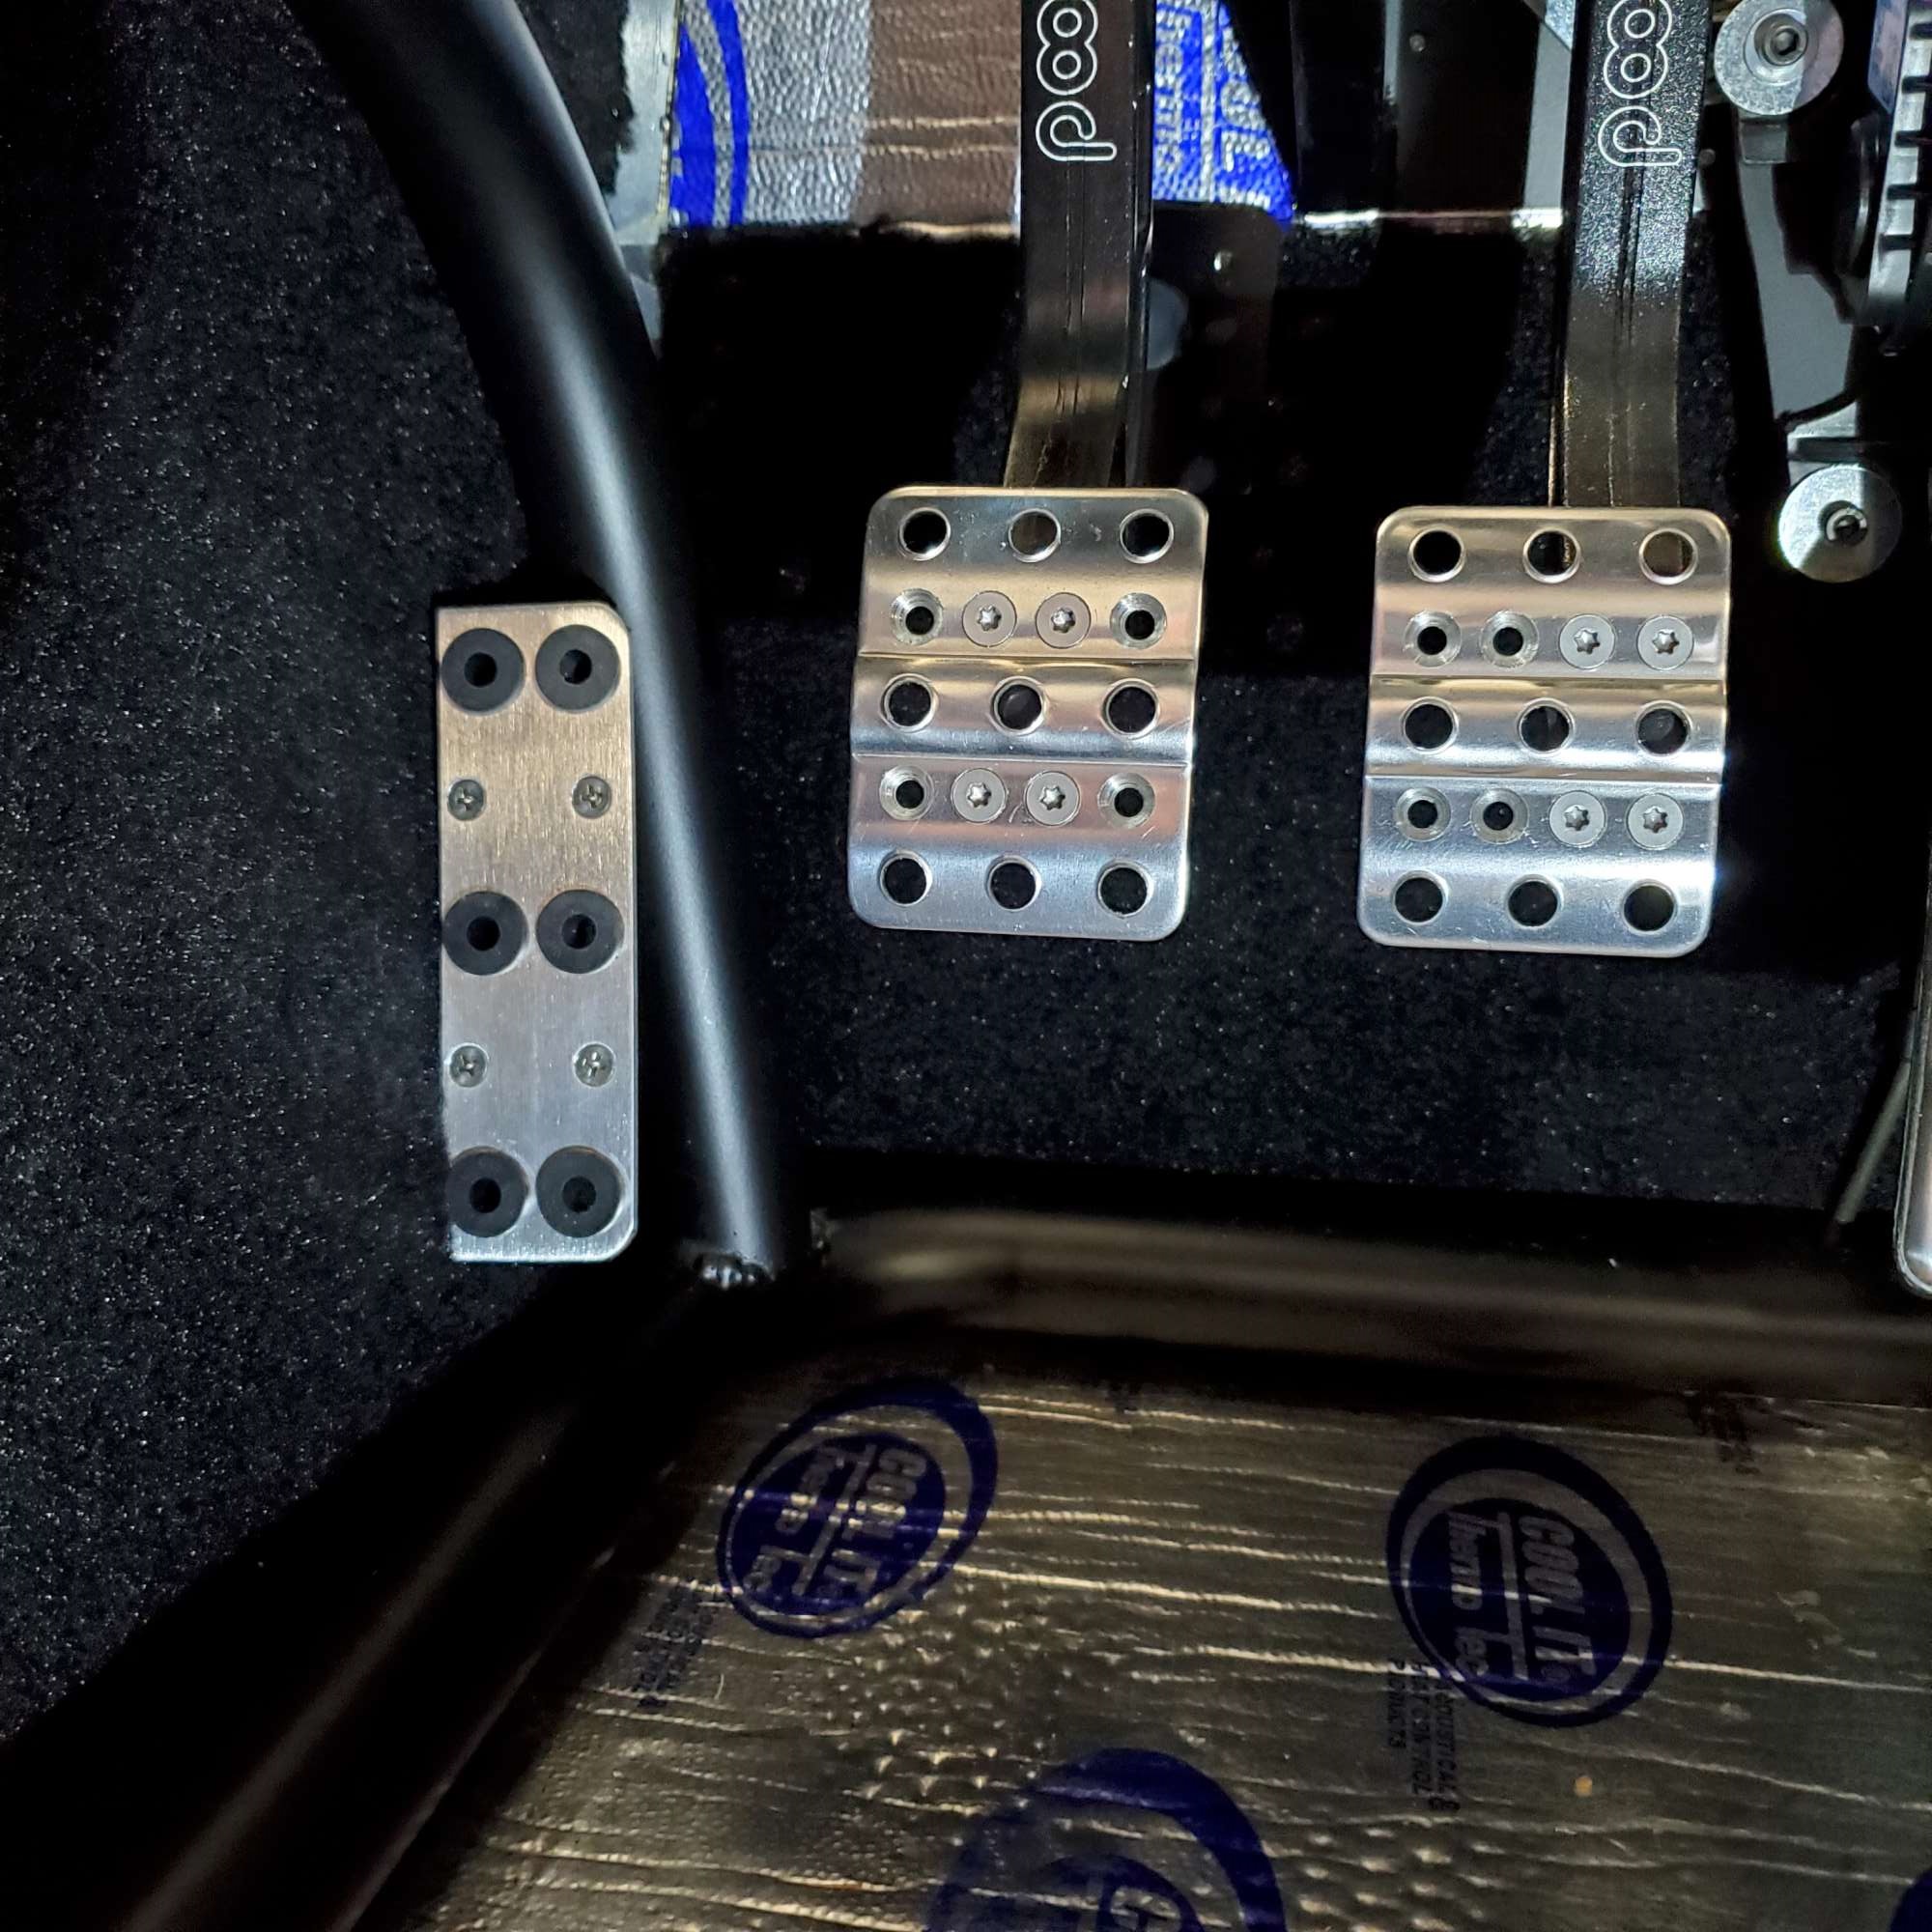
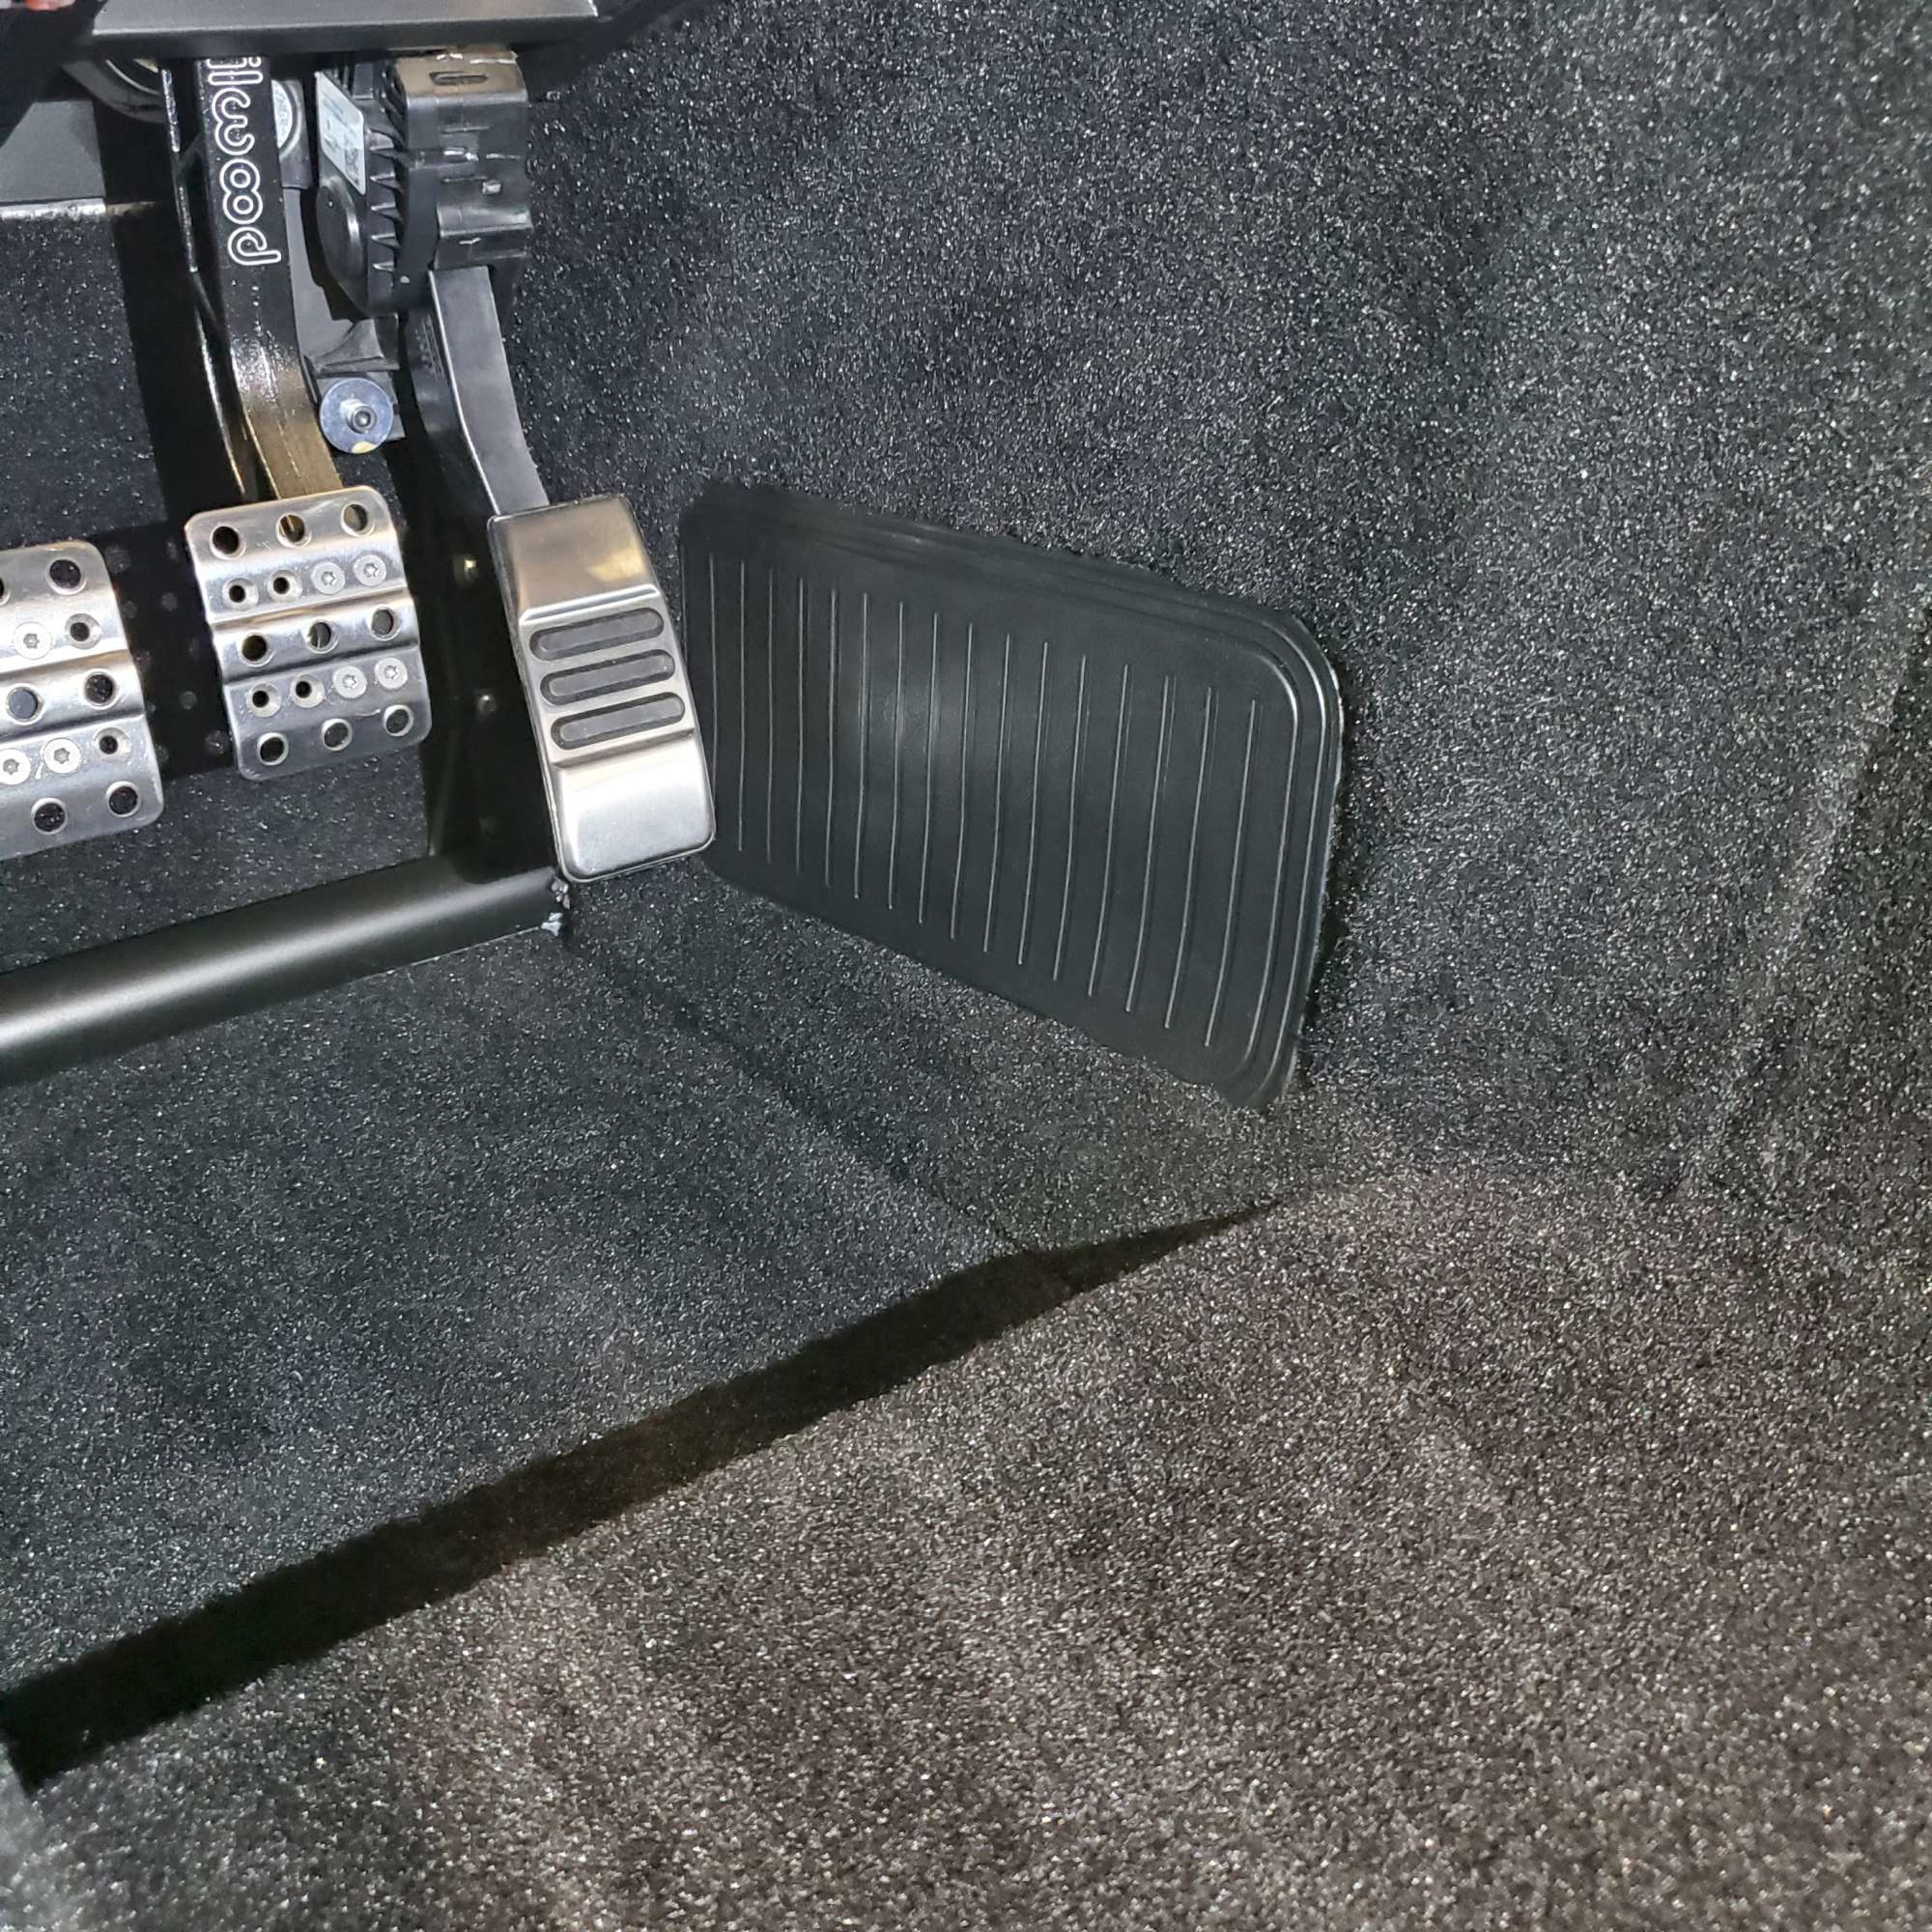
Dead pedal
I planned on copying fellow forum builder John Ibele's dead pedal design. But when I went to the F5 open house in June, I was looking for a couple items I could pick up in-person from local forum vendors. I had the opportunity to see Breeze's setup, and bought the Russ Thompson dead pedal. Mark was very gracious, and showed me his Roadster build as well. Being in the far west away from most of the forum vendors, it was pretty cool to "swing by" Mark's place. Guess I hit the Easy Button on this one.
I measured the distance on a couple daily drivers to get an idea of where I wanted to put it. The distance behind the clutch pedal on my SS is about 3", and about 2.75" behind the brake pedal on the Civic. The location seen in the pictures below is in the range of 3" behind the clutch pedal.
Installation is pretty quick: drill four 1/4" holes, and remove carpet from the area where the two L brackets attach. Mark includes the bolts, washers, and nylon lock nuts. Here's the sideview:

It's a quality piece. I think it matches up pretty well to the Wilwood pedals. Although it's hard to tell from this picture, the face of the dead pedal is about even with the kick-out F5 now puts in the outer wall of the FB.
Last night I finished installing the final pieces of carpet in the cockpit. I'm still waiting on the additional carpet I ordered from F5 for the Breeze cubby panel, upper trunk sides, and bottom of RT drop trunk. I should have just enough glue left in the one gallon container to complete the final pieces. Will be glad once the final piece of carpet is installed. Not my favorite part of the build. Although it's very satisfying to see the carpet in place, it's also nerve wracking knowing any mistakes I make will be highly visible. Once I get those trunk pieces in place, I'll update with pictures of the overall carpet install.
Last edited by 460.465USMC; 10-02-2022 at 12:12 PM.
Chris
Coupe complete kit delivered: 4/22/24.
Build Thread. Coyote. T-56. IRS w/3.55. Wilwoods. PS. HVAC. Side windows.
MK4 Complete kit.
Build Thread Index. Delivered: 10/15/2020. Legal: 7/25/23. Coyote Gen3. TKO600 (0.64 OD). IRS w/3.55. PS. Wilwoods. Sway bars. This build is dedicated to my son, Benjamin.
Build Thread.
-
Post Thanks / Like - 0 Thanks, 1 Likes
 Fman
Fman liked this post
-
10-05-2022, 02:30 PM
#483
Senior Member

Looks great Chris! She's really coming along.
MK4 #10008 - Ordered 10/06/20, Delivered 03/03/21, First Start 7/22/21, First Go Kart 7/24/21
Paint by Metal Morphous 5/14/22, Legally registered 6/8/22, Graduated 7/20/22
Build Thread
https://thefactoryfiveforum.com/show...been-delivered
Complete Kit, Ford 306, Sniper/Dual Sync, T5, Hydraulic clutch
-
Post Thanks / Like - 1 Thanks, 0 Likes
-
10-05-2022, 05:38 PM
#484
I can appreciate someone who thinks about what something will look like from below, when it’s on a lift. Lots of OCD behavior on this forum. You are amongst friends.
-Steve
-
Post Thanks / Like - 0 Thanks, 2 Likes
-
10-05-2022, 07:44 PM
#485
Originally Posted by
460.465USMC
Hi Chopper. Thanks!
It's pretty crowded on top of the FB, but here's a picture of the connection using the Tilton 90 deg. adapter. I don't know how else to cleanly make the attachment, so I coughed up the $94 for that little guy.
Not a great picture, but about the best I could get to look through all of the plumbing.


Hey Chris, for the 90 degree adapter, did you have to enlarge the cable side hole? From reading build threads it sounds like everyone just threaded it in and tightened the set screw. I'm trying to figure out if I bought the wrong thing or did people just not mentioning it.
-
10-05-2022, 07:46 PM
#486
Dan - I had to enlarge the hole in the one I bought.
MkIV Roadster build: Gen 2 Coyote, IRS, TKO600. Ordered 10/24/18. Delivered 1/29/19. Engine installed 8/8/21. First start 9/12/21. First go-kart 9/17/21. Off to paint 4/11/22. Back from paint 12/30/22.
Build thread here.
-
Post Thanks / Like - 1 Thanks, 1 Likes
-
10-05-2022, 09:54 PM
#487
Senior Member
Originally Posted by
facultyofmusic
Hey Chris, for the 90 degree adapter, did you have to enlarge the cable side hole? From reading build threads it sounds like everyone just threaded it in and tightened the set screw. I'm trying to figure out if I bought the wrong thing or did people just not mentioning it.
Originally Posted by
JohnK
Dan - I had to enlarge the hole in the one I bought.
X2 on enlarging the hole, Dan. It's soft metal (aluminum?), so go slow with the drill.
Chris
Coupe complete kit delivered: 4/22/24.
Build Thread. Coyote. T-56. IRS w/3.55. Wilwoods. PS. HVAC. Side windows.
MK4 Complete kit.
Build Thread Index. Delivered: 10/15/2020. Legal: 7/25/23. Coyote Gen3. TKO600 (0.64 OD). IRS w/3.55. PS. Wilwoods. Sway bars. This build is dedicated to my son, Benjamin.
Build Thread.
-
Post Thanks / Like - 1 Thanks, 0 Likes
-
10-05-2022, 09:58 PM
#488
Senior Member
Originally Posted by
Straversi
I can appreciate someone who thinks about what something will look like from below, when it’s on a lift. Lots of OCD behavior on this forum. You are amongst friends.
-Steve
Thanks, Steve. I guess these are the types of choices we make when we build it to our liking.
Thanks for checking in, and thanks for providing the 7,000 mile update on your build. Good to hear you're still enjoying it!
Chris
Coupe complete kit delivered: 4/22/24.
Build Thread. Coyote. T-56. IRS w/3.55. Wilwoods. PS. HVAC. Side windows.
MK4 Complete kit.
Build Thread Index. Delivered: 10/15/2020. Legal: 7/25/23. Coyote Gen3. TKO600 (0.64 OD). IRS w/3.55. PS. Wilwoods. Sway bars. This build is dedicated to my son, Benjamin.
Build Thread.
-
10-05-2022, 11:38 PM
#489
Senior Member

Great work on the dead pedal! As you know I am a big fan of the dead pedal, use it all the time.... everything you are doing is really coming together nicely.
-
Post Thanks / Like - 1 Thanks, 0 Likes
-
10-06-2022, 01:00 PM
#490
Senior Member
Originally Posted by
Fman
Great work on the dead pedal! As you know I am a big fan of the dead pedal, use it all the time.... everything you are doing is really coming together nicely.
Thanks, Travis! I use the dead pedal ALL THE TIME in my daily drivers. Lots of support from the forum as well, so figured it would be a good option.
I'm playing around with brake and clutch pedal position. I have a set of Forte's AC pedals, but not sure I can make those work given their limited mounting options (one set of holes v. Wilwood's three-position) and the size of my shoes (11).
Chris
Coupe complete kit delivered: 4/22/24.
Build Thread. Coyote. T-56. IRS w/3.55. Wilwoods. PS. HVAC. Side windows.
MK4 Complete kit.
Build Thread Index. Delivered: 10/15/2020. Legal: 7/25/23. Coyote Gen3. TKO600 (0.64 OD). IRS w/3.55. PS. Wilwoods. Sway bars. This build is dedicated to my son, Benjamin.
Build Thread.
-
10-10-2022, 10:00 PM
#491
Senior Member
Underbody Coating (Bedliner)
I've read about the pros of underbody coating in many other build threads. It seems like a relatively cheap way to protect against paint damage from a rock or other road debris. Plus, I've also read small glimpses of the underbody can be seen from underneath. My Roadster body has been suspended in my garage for about two years. Boy, did it collect a lot of dust while hanging up there. I was able to drop the body down by myself by using the ratcheting pulleys. Rolled it onto the driveway using furniture dollies for prep/sanding.
I don't mind putting in some elbow grease on a task, but the thought of hand sanding the underbody doesn't register on my fun meter. Armed with a gift card from my #2 son, I picked up a DeWalt 5" orbital sander. I also ordered a variety pack of Dura Gold 5" discs, which included coarse grits down to 80 and 60 grit.
Started off sanding with 80 grit, but it didn't seem to rough up the fiberglass to my liking. Especially where the resin is pooled. So, I switched to 60 grit. That improved things. But, even that was not roughing up the surface as I expected. I went to pick up 40 grit discs, but the store only carried 36 grit. Close enough. The 36 grit did a better job, and sped up my sanding progress. I spent about three hours sanding. To clean up, I blew off the dust with my leaf blower, then sprayed it down with water. Finally, I hit it with a scrub brush and gave it a final rinse. Then let it dry overnight. The next day I wiped everything down with mineral spirits to grab as much residue as I could.
Sanding done!

I put painter's tape on the outside of all the holes (headlight, side vents, roll bars, etc). Then, I applied two coats of Dupli-color bedliner. This is the same product I used on the road-facing side of the horizontal aluminum panels. I let the first coat dry overnight. I left a gap around the wheel wells per forum recommendation. Also left a gap around the side vent openings, as I haven't attached the studs yet that will hold the vent louvers. I still have a little bit of bedliner left over, which will be handy for touch-up of panels, and the underbody. This stuff stores really well: I bought the gallon two years ago. It's been inside the house since then, and it stirred up no problem.
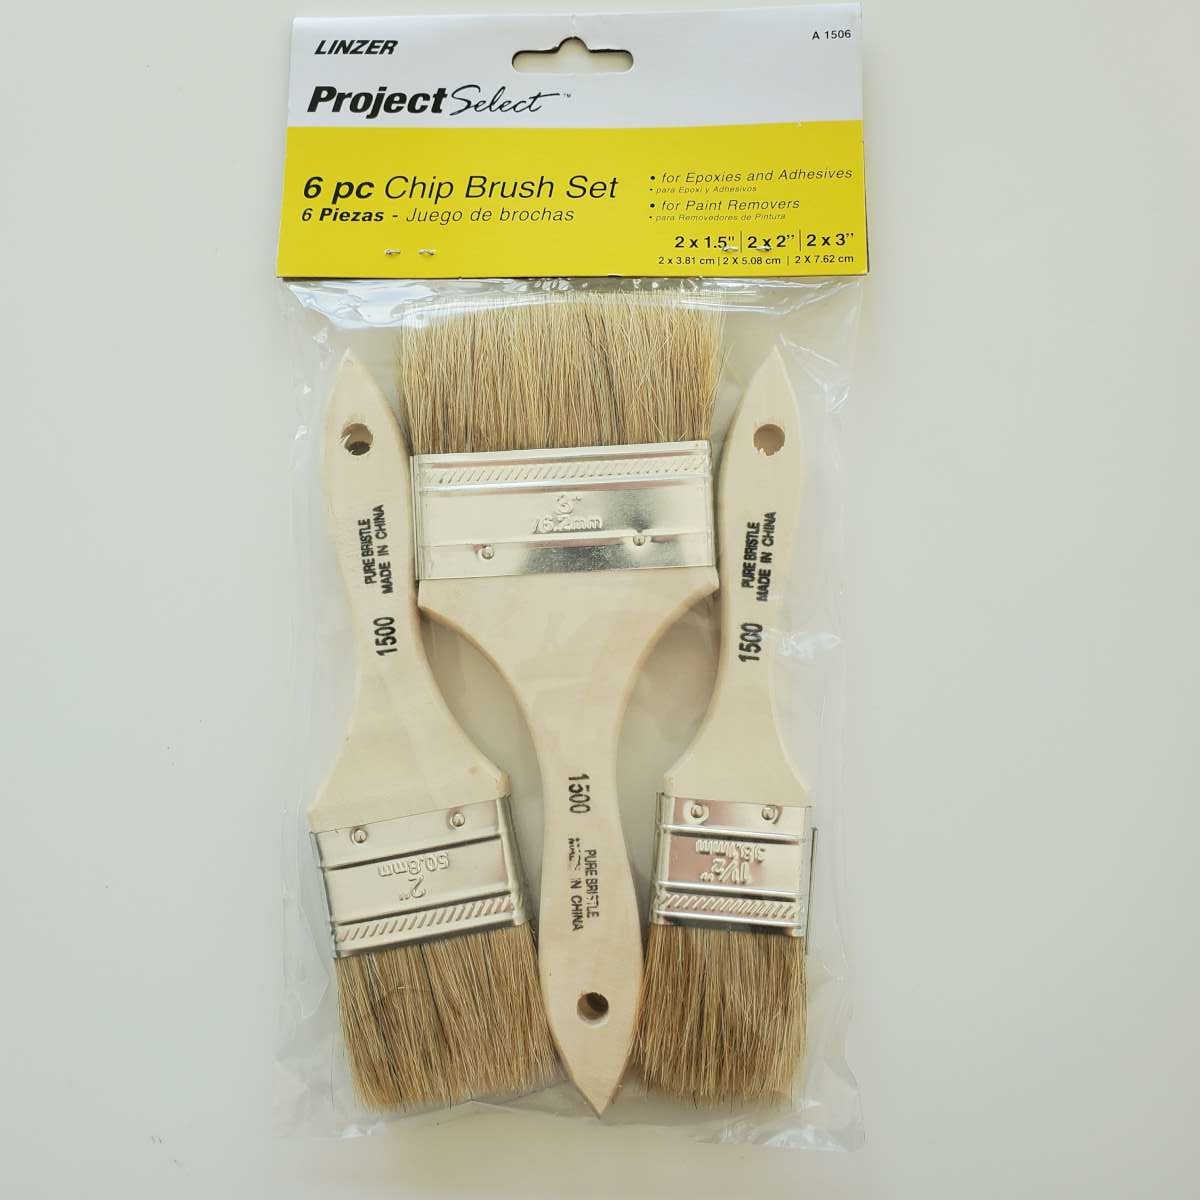
Application note: The Dupli-color comes as a kit with a 4" roller with a special knap, 4" paint tray, and scuffing pad. Because so much of the underside of the body has dips, valleys, and curves the 4" roller wasn't very effective for me. I picked up a chip brush kit. For the second coat I used the 3" chip brush. It easily navigated the terrain, and made it easier to apply a thicker, more even coat. Combined with the smaller 1" brush for tighter spots and edges, this was better than the roller. The roller is fine for flatter terrain.
Paid about $5 for this chip brush kit at Ace.
Bedliner applied. I don't usually track my hours, but put in about eight hours between the sanding, prep, and bedliner. I also trimmed about 1/4" of the curved lip that covers the top of the dash so it doesn't scratch the powder coat.

Would really like to finish up my last few pieces of carpeting in the trunk. Ordered carpet from F5 about a month ago, but it still hasn't shipped. Patience.
While I'm waiting for the carpet to arrive, I'll probably start troubleshooting low fuel pressure. On my last go-kart the engine started to hesitate, especially at low engine speed (<2K). Fuel pressure gauge showed only 20 PSI. Not good. The set screw that controls fuel pressure on the Aeromotive regulator is tight. I removed my fuel pump access panel (making it accessible is already paying off) and made sure the electrical connector is seated. It is.
The sound of the pump has changed: it sounds like air or fuel is spraying in the tank. Going to bypass the wiring harness with my PowerProbe next to rule out the wiring. I'm not looking forward to pulling apart the fuel lines/pump/and/or tank, but I'm guessing that will be necessary assuming my wiring and RF fuse panel is not the issue. I have the Coyote PCM controlling the fuel pump through the RF fuel circuit per the F5 instructions.
Chris
Coupe complete kit delivered: 4/22/24.
Build Thread. Coyote. T-56. IRS w/3.55. Wilwoods. PS. HVAC. Side windows.
MK4 Complete kit.
Build Thread Index. Delivered: 10/15/2020. Legal: 7/25/23. Coyote Gen3. TKO600 (0.64 OD). IRS w/3.55. PS. Wilwoods. Sway bars. This build is dedicated to my son, Benjamin.
Build Thread.
-
10-10-2022, 10:03 PM
#492
Nice work Chris! That looks great. I'm sure all that sanding of fiberglass was a load of fun. 
MkIV Roadster build: Gen 2 Coyote, IRS, TKO600. Ordered 10/24/18. Delivered 1/29/19. Engine installed 8/8/21. First start 9/12/21. First go-kart 9/17/21. Off to paint 4/11/22. Back from paint 12/30/22.
Build thread here.
-
Post Thanks / Like - 1 Thanks, 0 Likes
-
10-10-2022, 10:09 PM
#493
Senior Member
Originally Posted by
JohnK
Nice work Chris! That looks great. I'm sure all that sanding of fiberglass was a load of fun.
Probably about as much fun as you had! I appreciate your tip on trimming a bit of the lip to protect dash. Now was a good time to do it.
Chris
Coupe complete kit delivered: 4/22/24.
Build Thread. Coyote. T-56. IRS w/3.55. Wilwoods. PS. HVAC. Side windows.
MK4 Complete kit.
Build Thread Index. Delivered: 10/15/2020. Legal: 7/25/23. Coyote Gen3. TKO600 (0.64 OD). IRS w/3.55. PS. Wilwoods. Sway bars. This build is dedicated to my son, Benjamin.
Build Thread.
-
10-15-2022, 09:15 PM
#494
Senior Member
Low Fuel Pressure Resolved!
I was able to get back out to the garage today. Time to troubleshoot low the fuel pressure (~20 PSI) issue. I had previously checked the most obvious things I could think of like making sure the two-prong connector was still tight on the fuel pump, etc.
Figured I should rule out my wiring as my first step. Broke out the Power Probe and confirmed wiring is okay. Phew! As I mentioned in my last update, the sound of the fuel pump had changed: now I was hearing a second spraying sound in addition to the hum of the pump. Disconnected the power at the master cutoff switch, loosened the pump retainer on the outside of the tank, and pulled the pump up a bit. Since the pressure was so low in the fuel line, I didn't have to deal with much fuel spill or mess when I disconnected the fuel line.
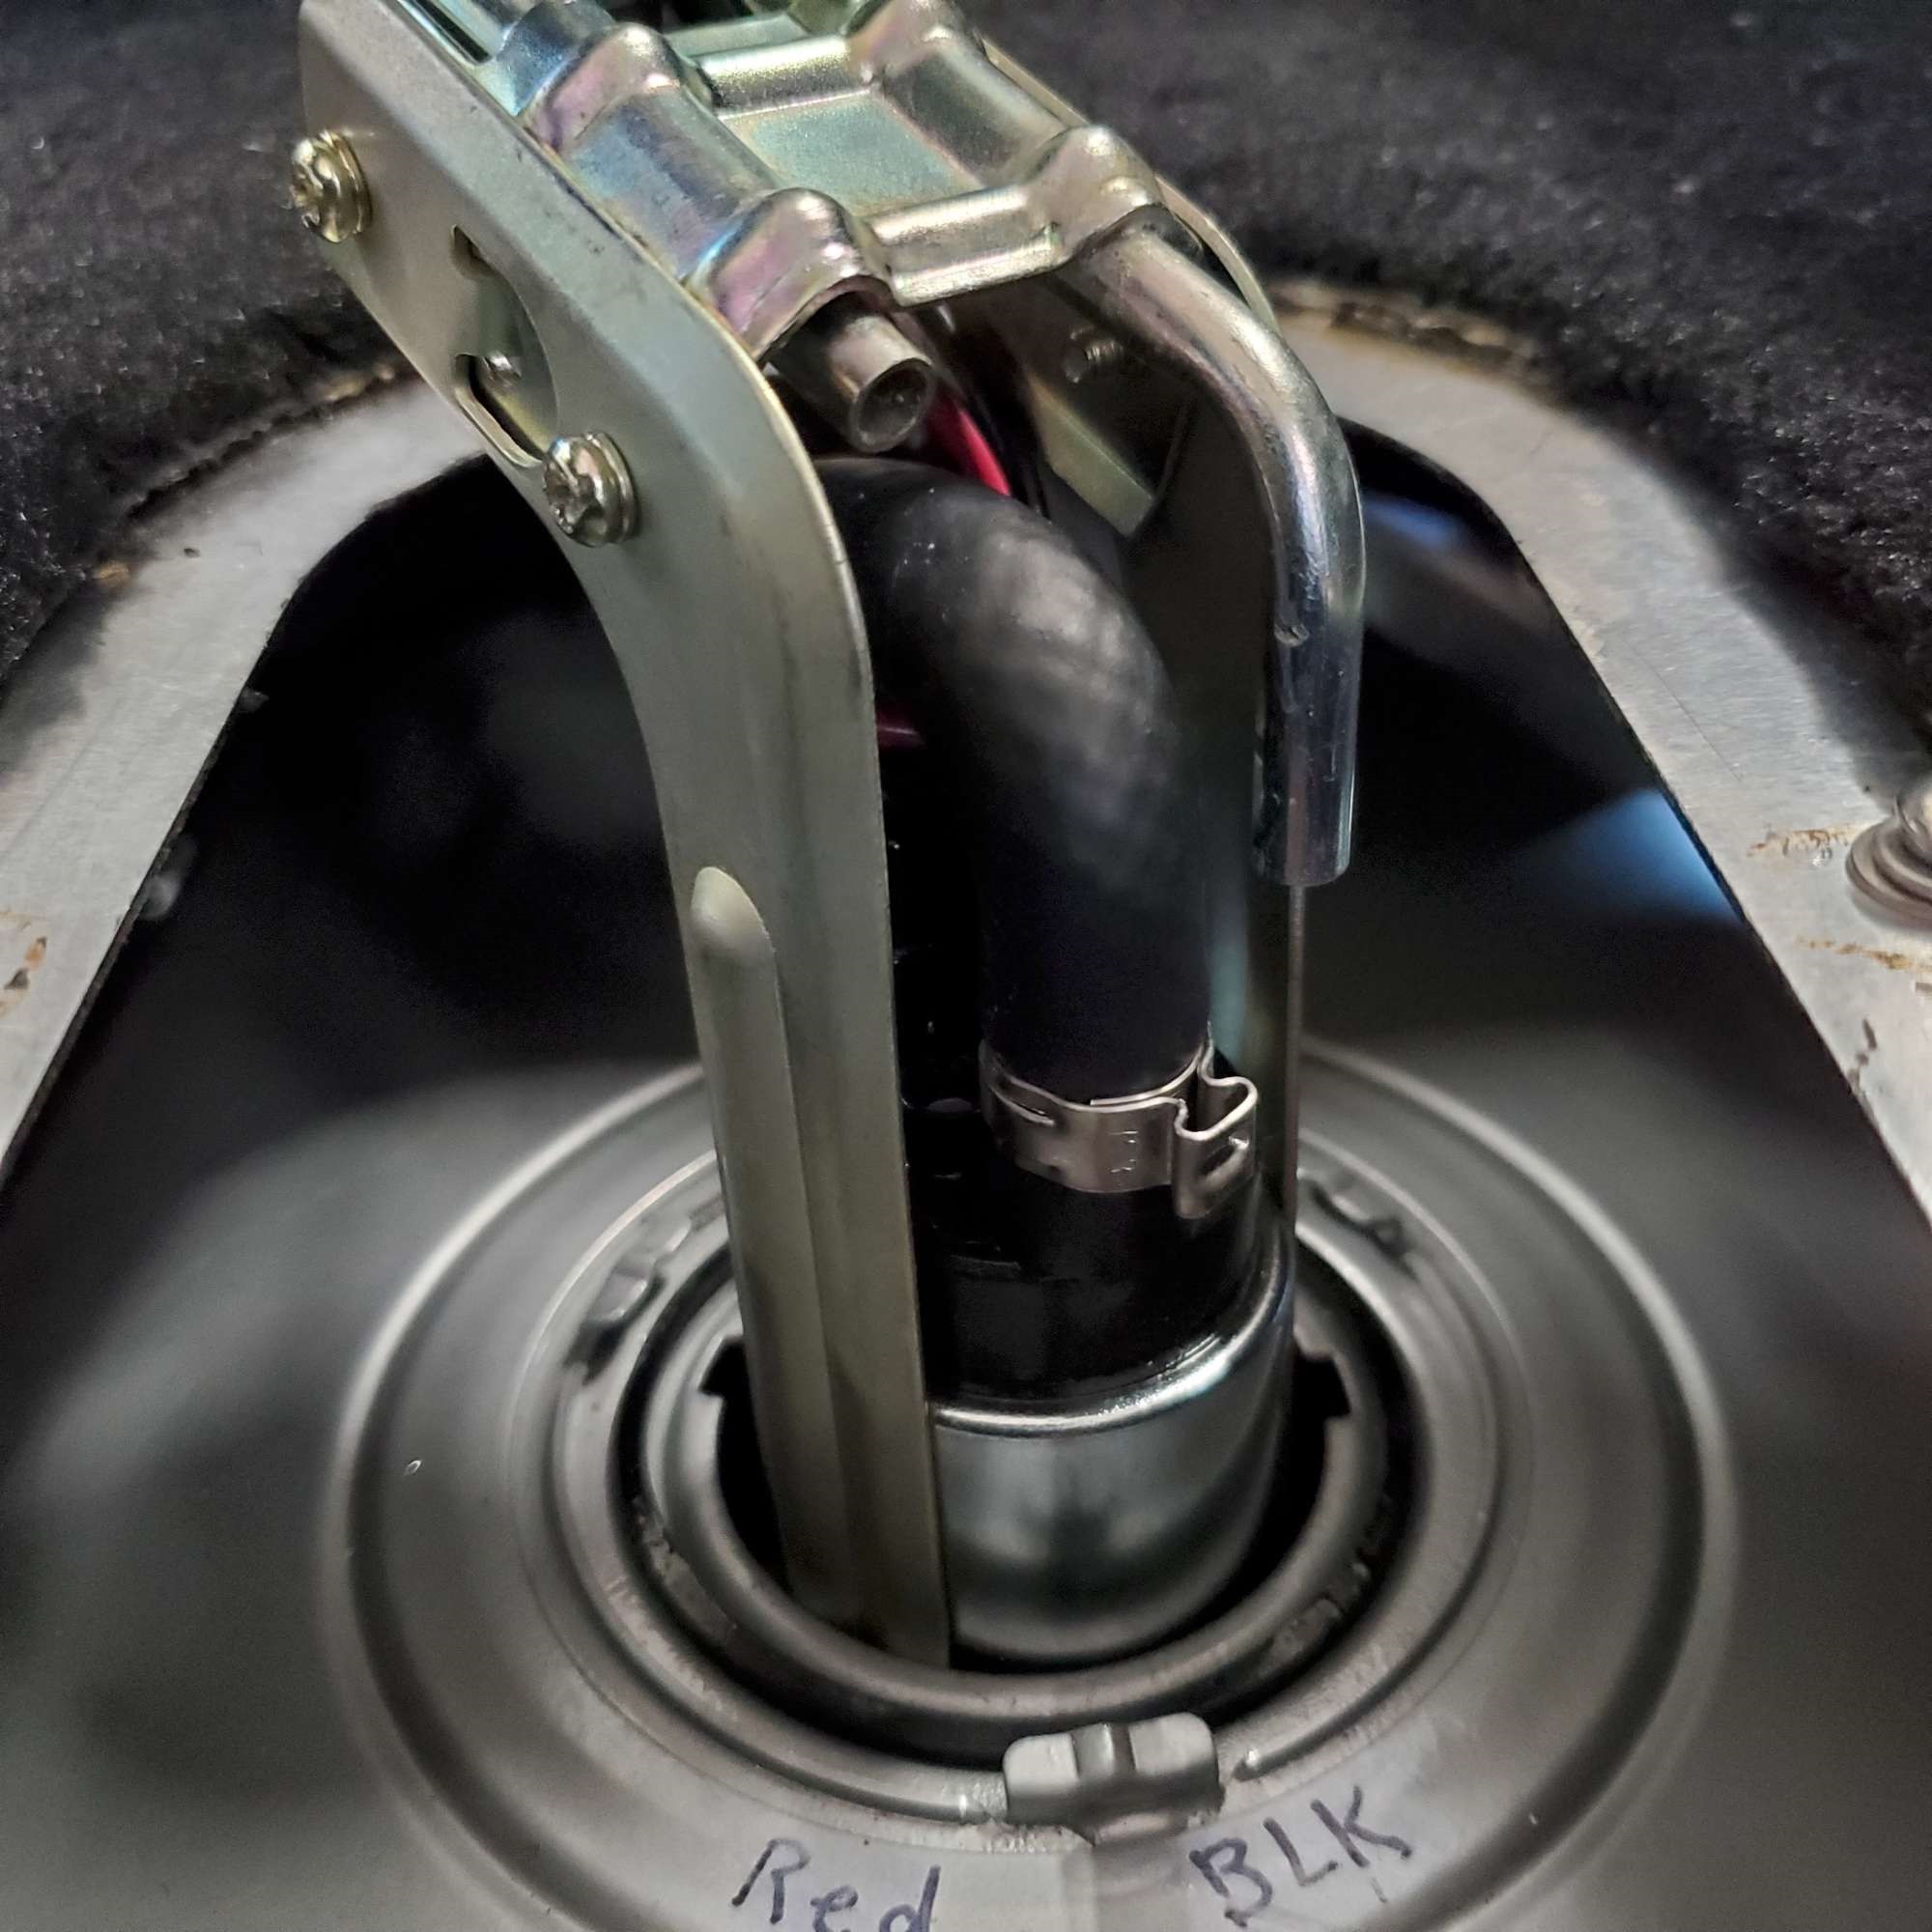
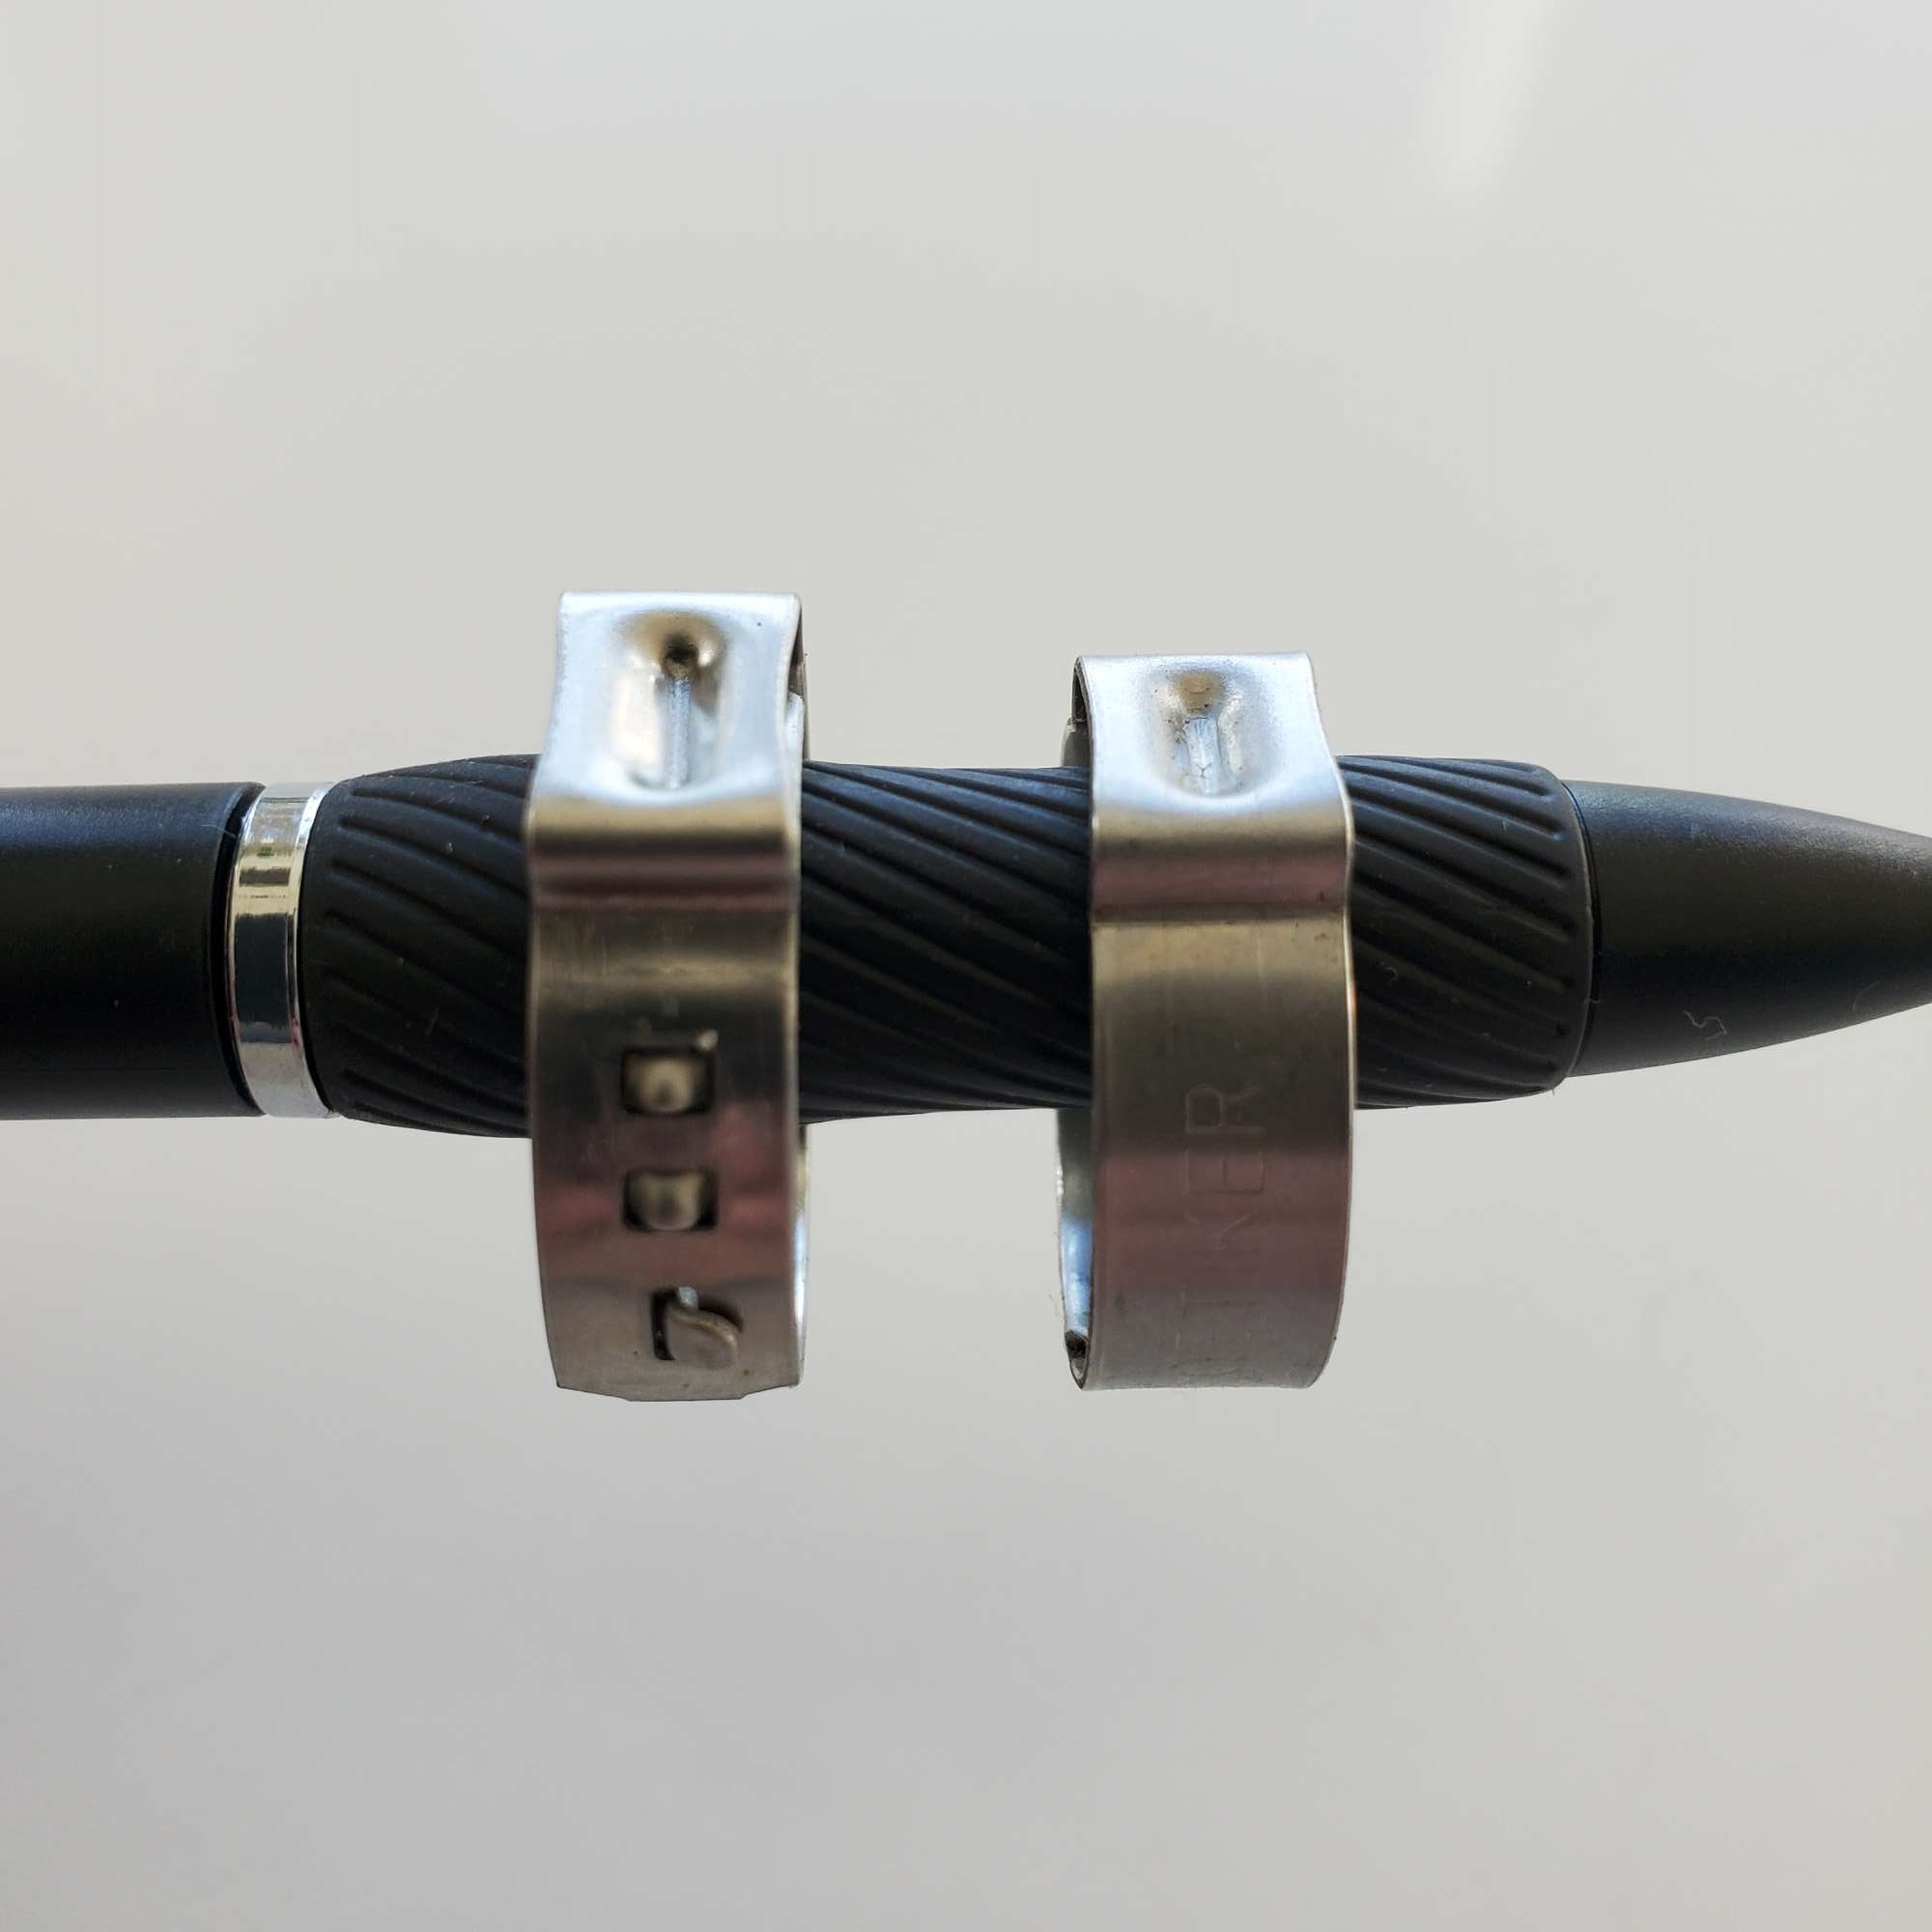
Lifted the pump up just a couple inches and could immediately see the 3/8" rubber fuel hose that connects to the hard line at the top had slid down about 1/2". This is shown as the gap between red lines in the picture below. The worm-drive clamp had loosened just enough for the fuel hose to slide down. This explained the spraying sound in the tank, as well as the low fuel pressure.
Here's the culprit: top clamp that connects the hose to the hard line at the top of the pump assembly.

Removed the worm-drive clamp and replaced with a stainless pinch clamp.

Replaced the bottom clamp with the same while I was at it.
As I was moving the pump out and then back in, I was careful to avoid knocking off the fuel filter "sock" attached to the bottom of the pump. Back when I originally installed the fuel pump in the tank, I knocked the sock off a time or two. Really wanted to avoid repeating that with fuel in the tank.
Buttoned everything back up and tested the pump without starting the motor. Success! Started the motor and let it run for a bit to monitor fuel pressure, and re-checked for leaks. Fuel pressure is back at 65 PSI. All good.
Glad to have this behind me. Now I can get back to making forward progress on the build!
Last edited by 460.465USMC; 10-24-2022 at 12:23 PM.
Chris
Coupe complete kit delivered: 4/22/24.
Build Thread. Coyote. T-56. IRS w/3.55. Wilwoods. PS. HVAC. Side windows.
MK4 Complete kit.
Build Thread Index. Delivered: 10/15/2020. Legal: 7/25/23. Coyote Gen3. TKO600 (0.64 OD). IRS w/3.55. PS. Wilwoods. Sway bars. This build is dedicated to my son, Benjamin.
Build Thread.
-
Post Thanks / Like - 1 Thanks, 5 Likes
-
10-15-2022, 09:47 PM
#495
Senior Member

Would be a good place for an Oetiker clamp. I would replace the screw clamp as a minimum unless you suspect you did not tighten it. Once they come loose on their own, likely have screw damage that allowed them to loosen up. Oops, I see it looks like that is what you have done, did not notice that.
-
10-16-2022, 01:35 AM
#496
Good work finding that loose clamp! Sounds like it could have taken much longer but luck was on our side. 
-
Post Thanks / Like - 1 Thanks, 0 Likes
-
10-16-2022, 08:31 AM
#497
Senior Member

Originally Posted by
460.465USMC
Lifted the pump up just a couple inches and could immediately see the 3/8" rubber fuel hose that connects to the hard line at the top had slid down about 1/2". This is shown as the gap between red lines in the picture below. The worm-drive clamp had loosened just enough for the fuel hose to slide down. This explained the spraying sound in the tank, as well as the low fuel pressure.
Here's the culprit: top clamp that connects the hose to the hard line at the top of the pump assembly.
Removed the worm-drive clamp and replaced with a stainless pinch clamp.
Replaced the bottom clamp with the same while I was at it...
Good find. I had a sneaking suspicion the problem was something with that S tube when you described it. (Really! ") ) But didn't post. The symptoms exactly described it as either loose or failed. Which they also sometimes do. Although they're not as serviceable (e.g. one-time use) those squeeze Oetiker style clamps are generally more reliable than worm drive clamps for smaller diameter tubing. I use them on all my builds. I've gathered a collection of the various range sizes and the special pinzer tool. Not particularly expensive and haven't had one fail yet.
) But didn't post. The symptoms exactly described it as either loose or failed. Which they also sometimes do. Although they're not as serviceable (e.g. one-time use) those squeeze Oetiker style clamps are generally more reliable than worm drive clamps for smaller diameter tubing. I use them on all my builds. I've gathered a collection of the various range sizes and the special pinzer tool. Not particularly expensive and haven't had one fail yet.
Build 1: Mk3 Roadster #5125. Sold 11/08/2014.
Build 2: Mk4 Roadster #7750. Sold 04/10/2017.
Build Thread
Build 3: Mk4 Roadster 20th Anniversary #8674. Sold 09/07/2020.
Build Thread and
Video.
Build 4: Gen 3 Type 65 Coupe #59. Gen 3 Coyote. Legal 03/04/2020.
Build Thread and
Video
Build 5: 35 Hot Rod Truck #138. LS3 and 4L65E auto. Rcvd 01/05/2021. Legal 04/20/2023.
Build Thread. Sold 11/9/2023.
-
Post Thanks / Like - 1 Thanks, 1 Likes
-
10-16-2022, 11:38 AM
#498
Senior Member
Originally Posted by
facultyofmusic
Good work finding that loose clamp! Sounds like it could have taken much longer but luck was on our side.
Thanks, Dan. Yeah, I was not looking forward to getting deep into a fuel system disassembly so soon in my build. Glad I was able to access and fix the issue without dropping the tank (again!). I don't recall if I checked those worm-drive clamps for tightness before installing. The bottom one was still pretty tight.
Originally Posted by
edwardb
Good find. I had a sneaking suspicion the problem was something with that S tube when you described it. (Really!
) But didn't post. The symptoms exactly described it as either loose or failed. Which they also sometimes do. Although they're not as serviceable (e.g. one-time use) those squeeze Oetiker style clamps are generally more reliable than worm drive clamps for smaller diameter tubing. I use them on all my builds. I've gathered a collection of the various range sizes and the special pinzer tool. Not particularly expensive and haven't had one fail yet.
Thanks, Paul. After eliminating my electrical work, my head went right to failed pump. Glad I was wrong.
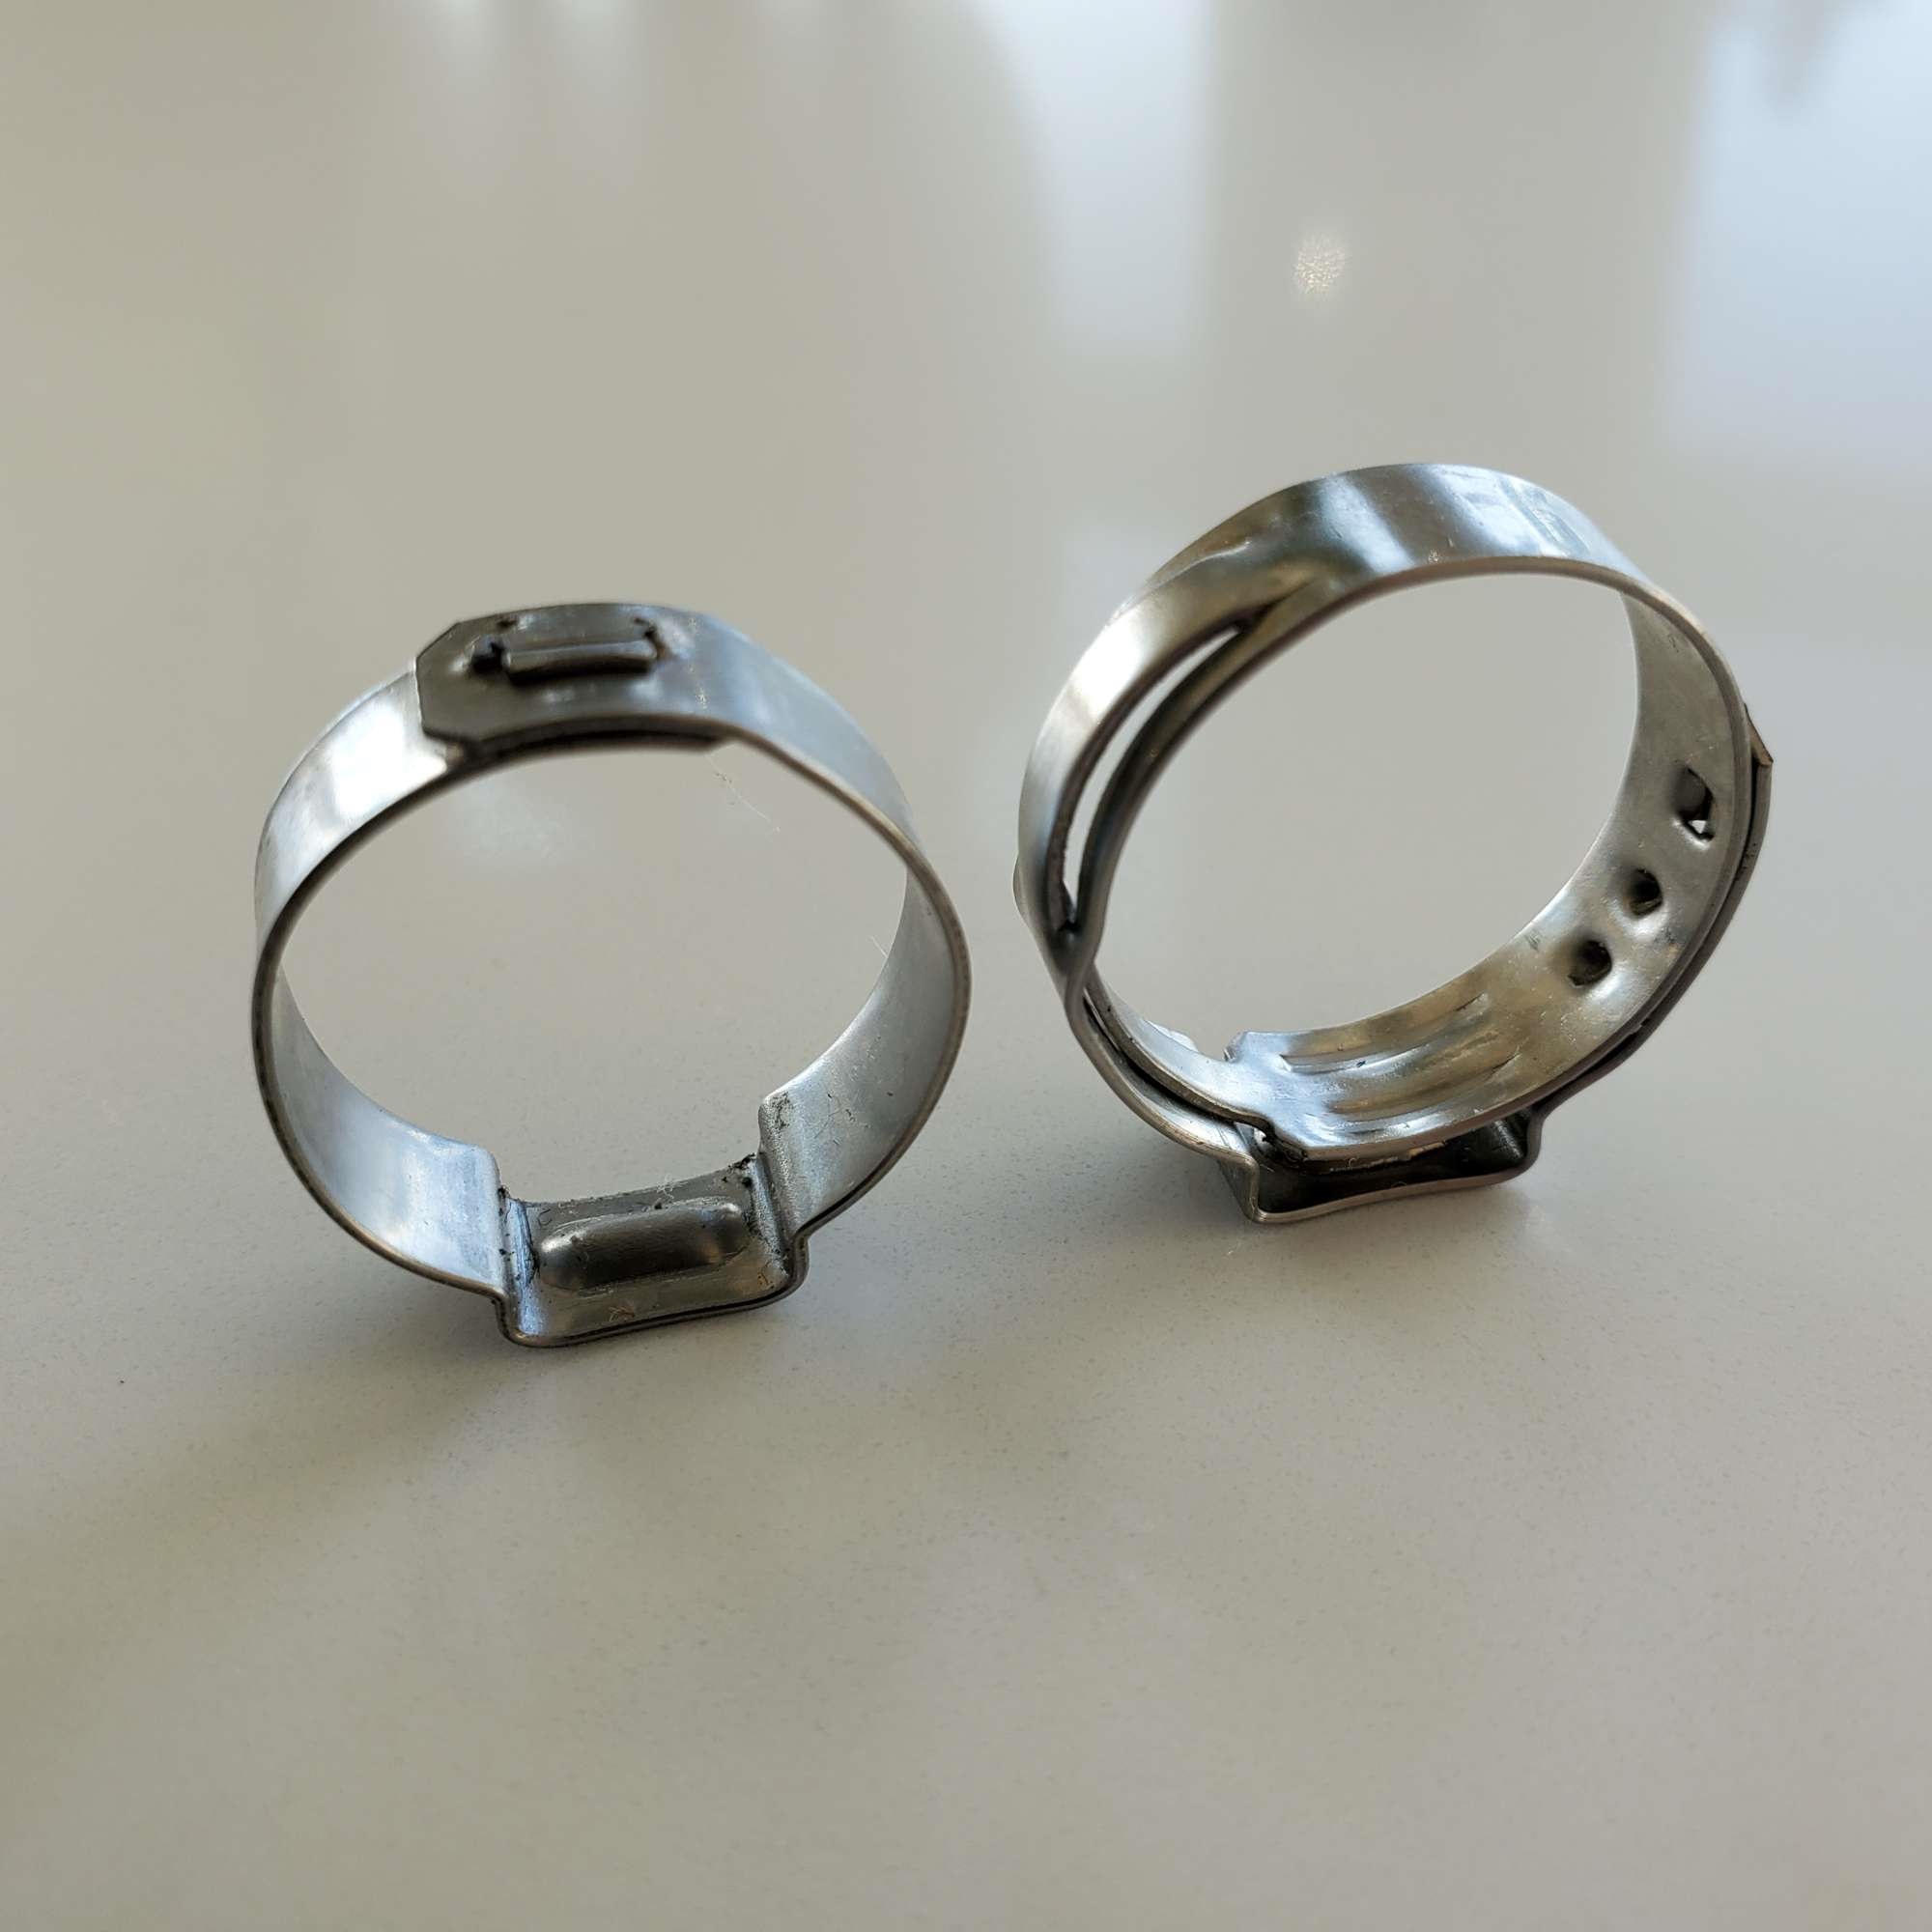
I've done my own underground sprinkler maintenance over the years, so was familiar with pinch clamps for that application (and had the special tool on-hand). I didn't know they could be used in automotive applications until I saw them on your build. Then, I noticed other builders were using them as well. I bought an assortment of 304 stainless, and noticed they have slots compared to the sprinkler version. I assume these slots help "lock-in" the smaller circumference once it's pinched.
Here's a couple comparison photos showing the differences between the slotted type that came in my assorted kit with the version I use for sprinkler maintenance.
Chris
Coupe complete kit delivered: 4/22/24.
Build Thread. Coyote. T-56. IRS w/3.55. Wilwoods. PS. HVAC. Side windows.
MK4 Complete kit.
Build Thread Index. Delivered: 10/15/2020. Legal: 7/25/23. Coyote Gen3. TKO600 (0.64 OD). IRS w/3.55. PS. Wilwoods. Sway bars. This build is dedicated to my son, Benjamin.
Build Thread.
-
10-17-2022, 08:29 AM
#499
Senior Member
Nice find Chris! still boggles my mind there is electric fuel pump inside a fuel tank.... what could possibly go wrong I still hold my breath every time I turn the key to my roadster!
Glad you are back up and running... do you have a painter lined up yet?
-
Post Thanks / Like - 1 Thanks, 1 Likes
-
10-17-2022, 12:34 PM
#500
Senior Member
You haven't really built a roadster until you've had to troubleshoot something. So congrats on getting past that milestone.
MK4 #10008 - Ordered 10/06/20, Delivered 03/03/21, First Start 7/22/21, First Go Kart 7/24/21
Paint by Metal Morphous 5/14/22, Legally registered 6/8/22, Graduated 7/20/22
Build Thread
https://thefactoryfiveforum.com/show...been-delivered
Complete Kit, Ford 306, Sniper/Dual Sync, T5, Hydraulic clutch
-
Post Thanks / Like - 0 Thanks, 1 Likes
-
10-17-2022, 03:26 PM
#501
Senior Member
Originally Posted by
Fman
Nice find Chris! still boggles my mind there is electric fuel pump inside a fuel tank.... what could possibly go wrong
I still hold my breath every time I turn the key to my roadster!
Glad you are back up and running... do you have a painter lined up yet?
No kidding! Doesn't seem intuitive to me either. I wonder if the first engineer who hatched the idea years ago got any ribbing for it?
Of course, I had to go-kart yesterday afternoon just to be sure the fix was for real.
Painter? Good question. I need to step-up my research to see who has a good reputation locally, and is reasonably priced. It would be great to take it to one of the highly recommended Roadster body/paint vendors in California. But, I think I will stay local due to transportation cost, ability to check-in during the process, and in case (unlikely) there is an issue afterward.
I plan to drive it in gel-coat for about a year or so. I like the idea of being able to shake out any bugs for a while without worrying about damaging the paint. And, it gives me some time to replenish my Roadster fund for the body work and paint.
Originally Posted by
Blitzboy54
You haven't really built a roadster until you've had to troubleshoot something. So congrats on getting past that milestone.
So true! Well said!
Chris
Coupe complete kit delivered: 4/22/24.
Build Thread. Coyote. T-56. IRS w/3.55. Wilwoods. PS. HVAC. Side windows.
MK4 Complete kit.
Build Thread Index. Delivered: 10/15/2020. Legal: 7/25/23. Coyote Gen3. TKO600 (0.64 OD). IRS w/3.55. PS. Wilwoods. Sway bars. This build is dedicated to my son, Benjamin.
Build Thread.
-
Post Thanks / Like - 0 Thanks, 1 Likes
Fman liked this post
-
10-24-2022, 03:32 PM
#502
Senior Member
Carpet. Is. Done.
Over the last couple of months I've been pecking away at the carpet installation. Well, it's finally done! Almost. Eventually, I'll need to decide whether to install the two remaining pieces over the door sills. Or, just go with the exposed panel look. I had those powder coated at the same time as my trans tunnel, so they will match the dash if I leave them exposed.
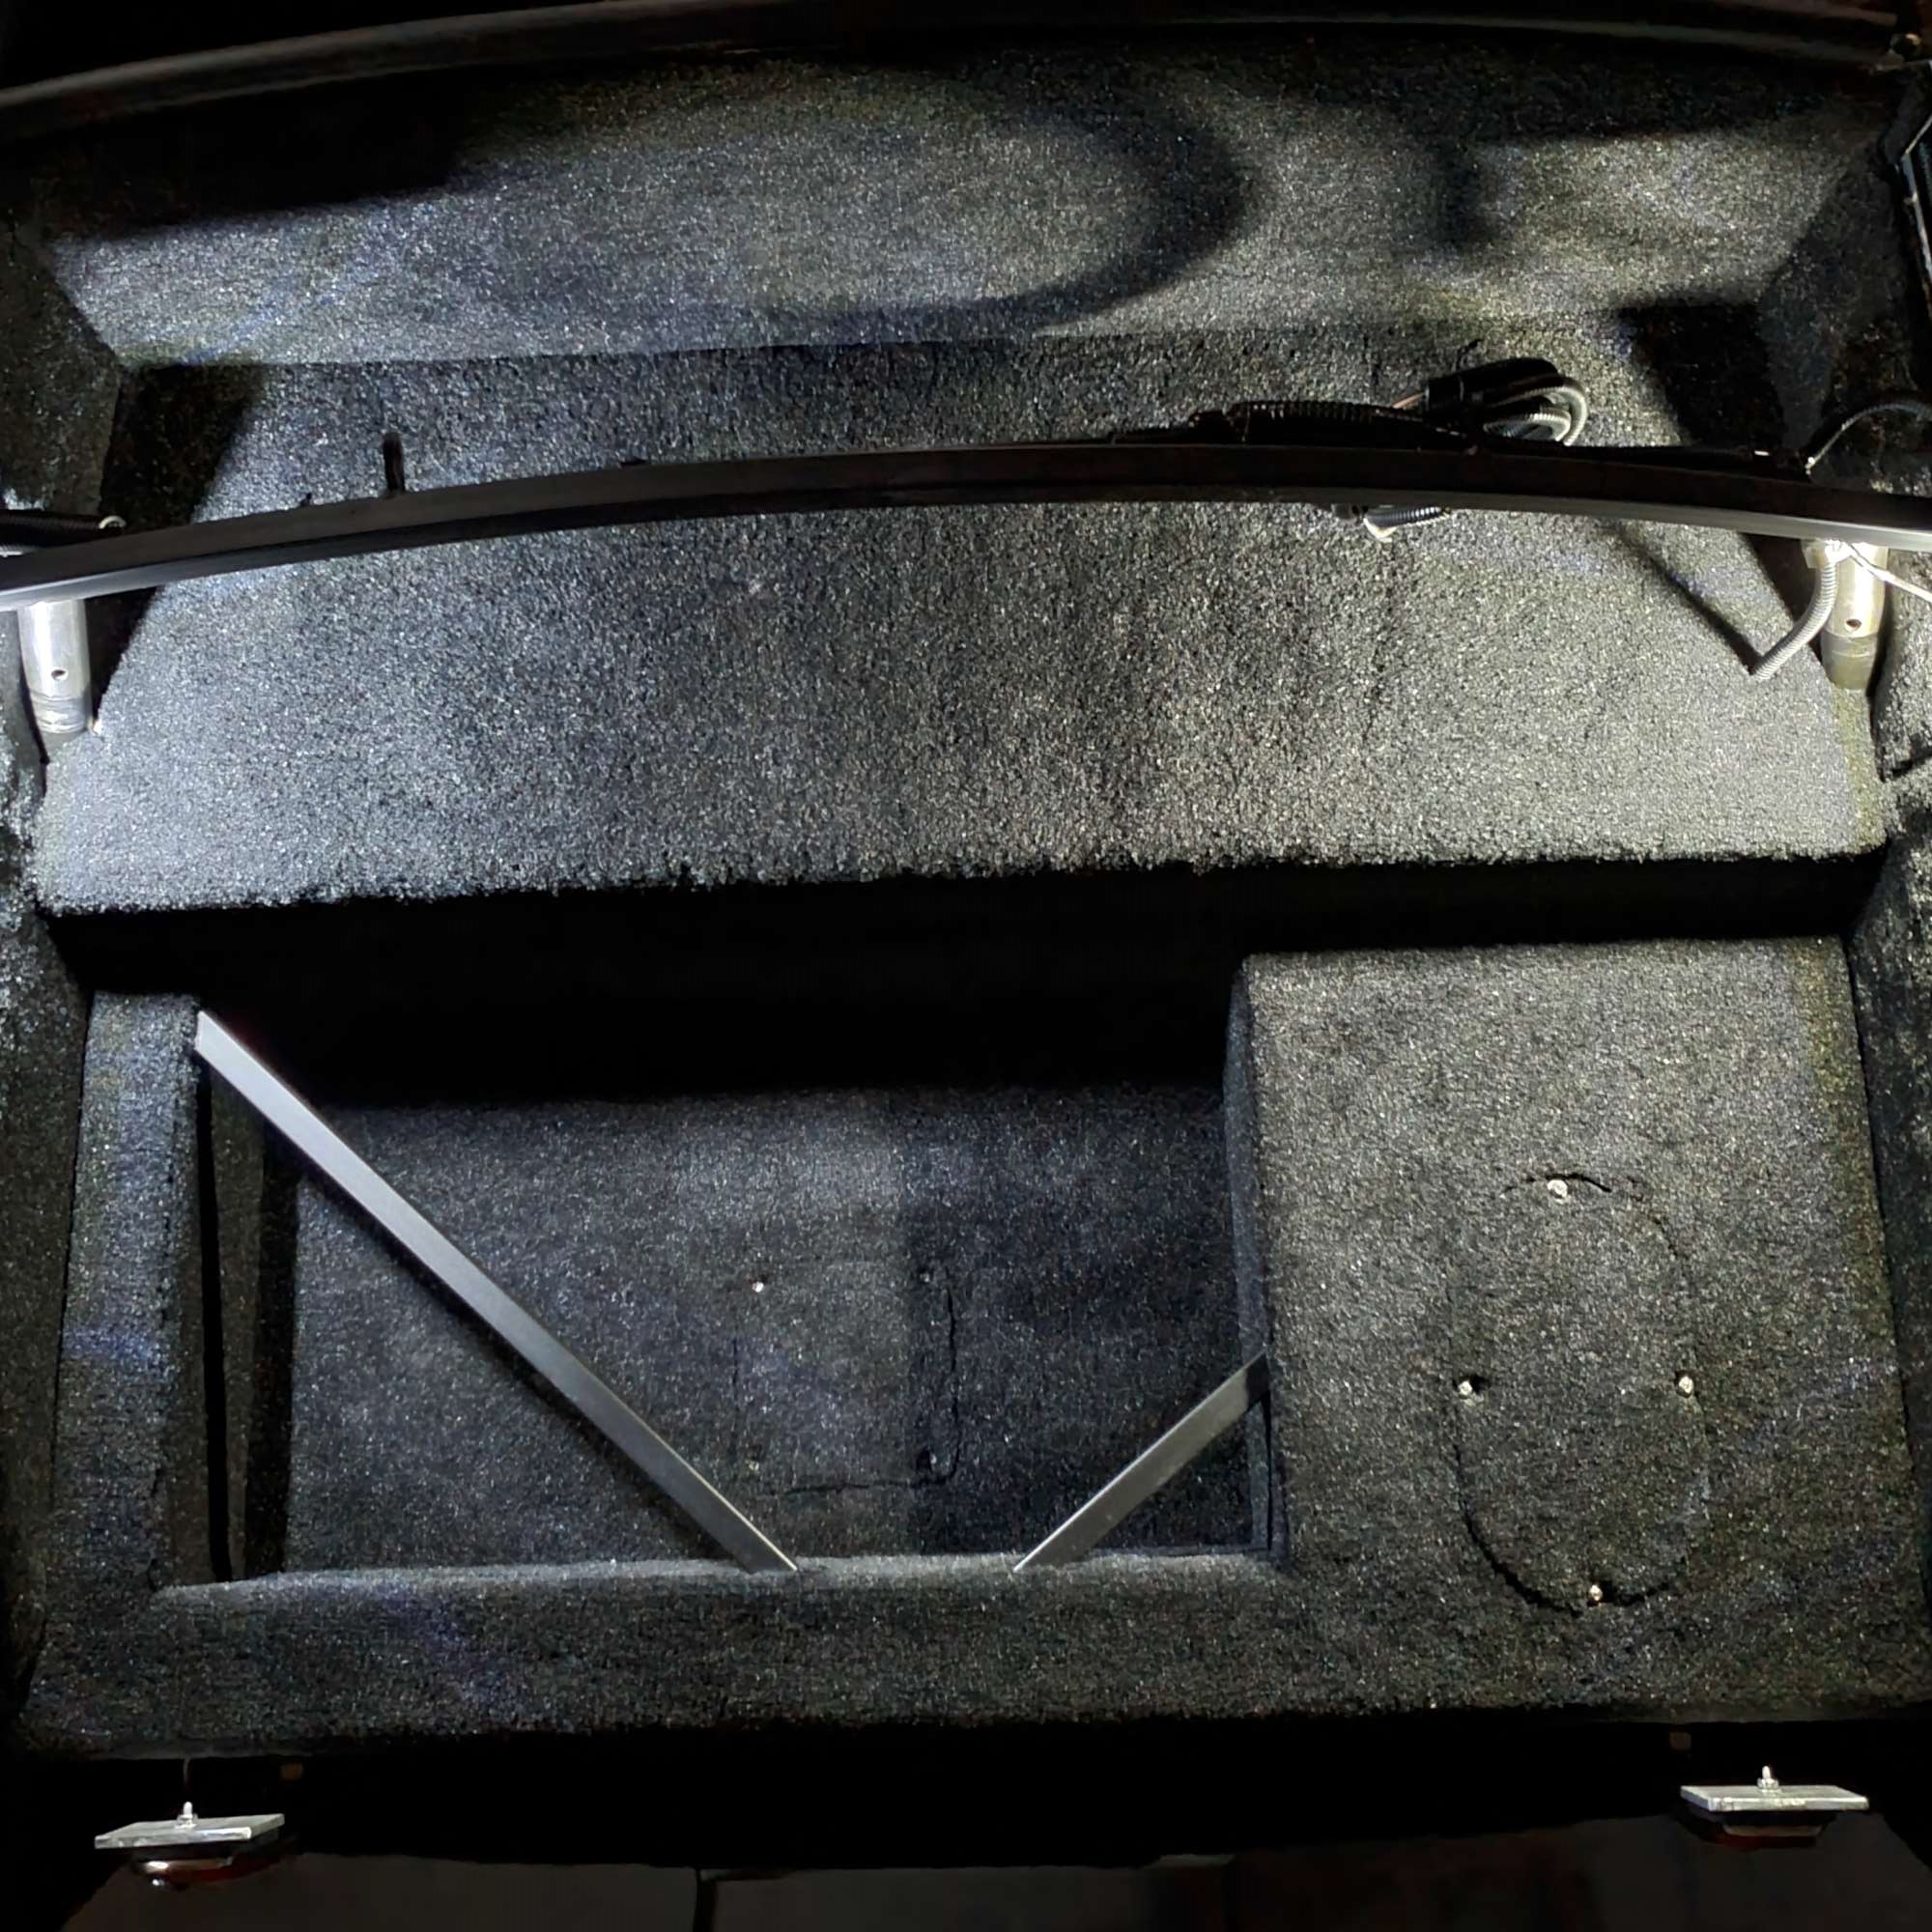
Like many other builders, I made aluminum panels for the upper trunk sides, so it's easier to carpet this area. The complete kit does not include carpet for these pieces, so I ordered a couple yards from F5. Extra carpet was also needed to cover the drop trunk, and both sides of the Breeze cubby wall. Since I didn't need the carpet for the trans tunnel cover (top) I used that carpet to cover the "ceiling" of the PS FB.
Starting from the trunk. Lots of corners and angles to work around. The four button head screws for the covers over the fuel gauge sender and the fuel pump are visible in this picture. I wanted to keep these accessible. The coiled split loom in this view is the license plate light wiring.
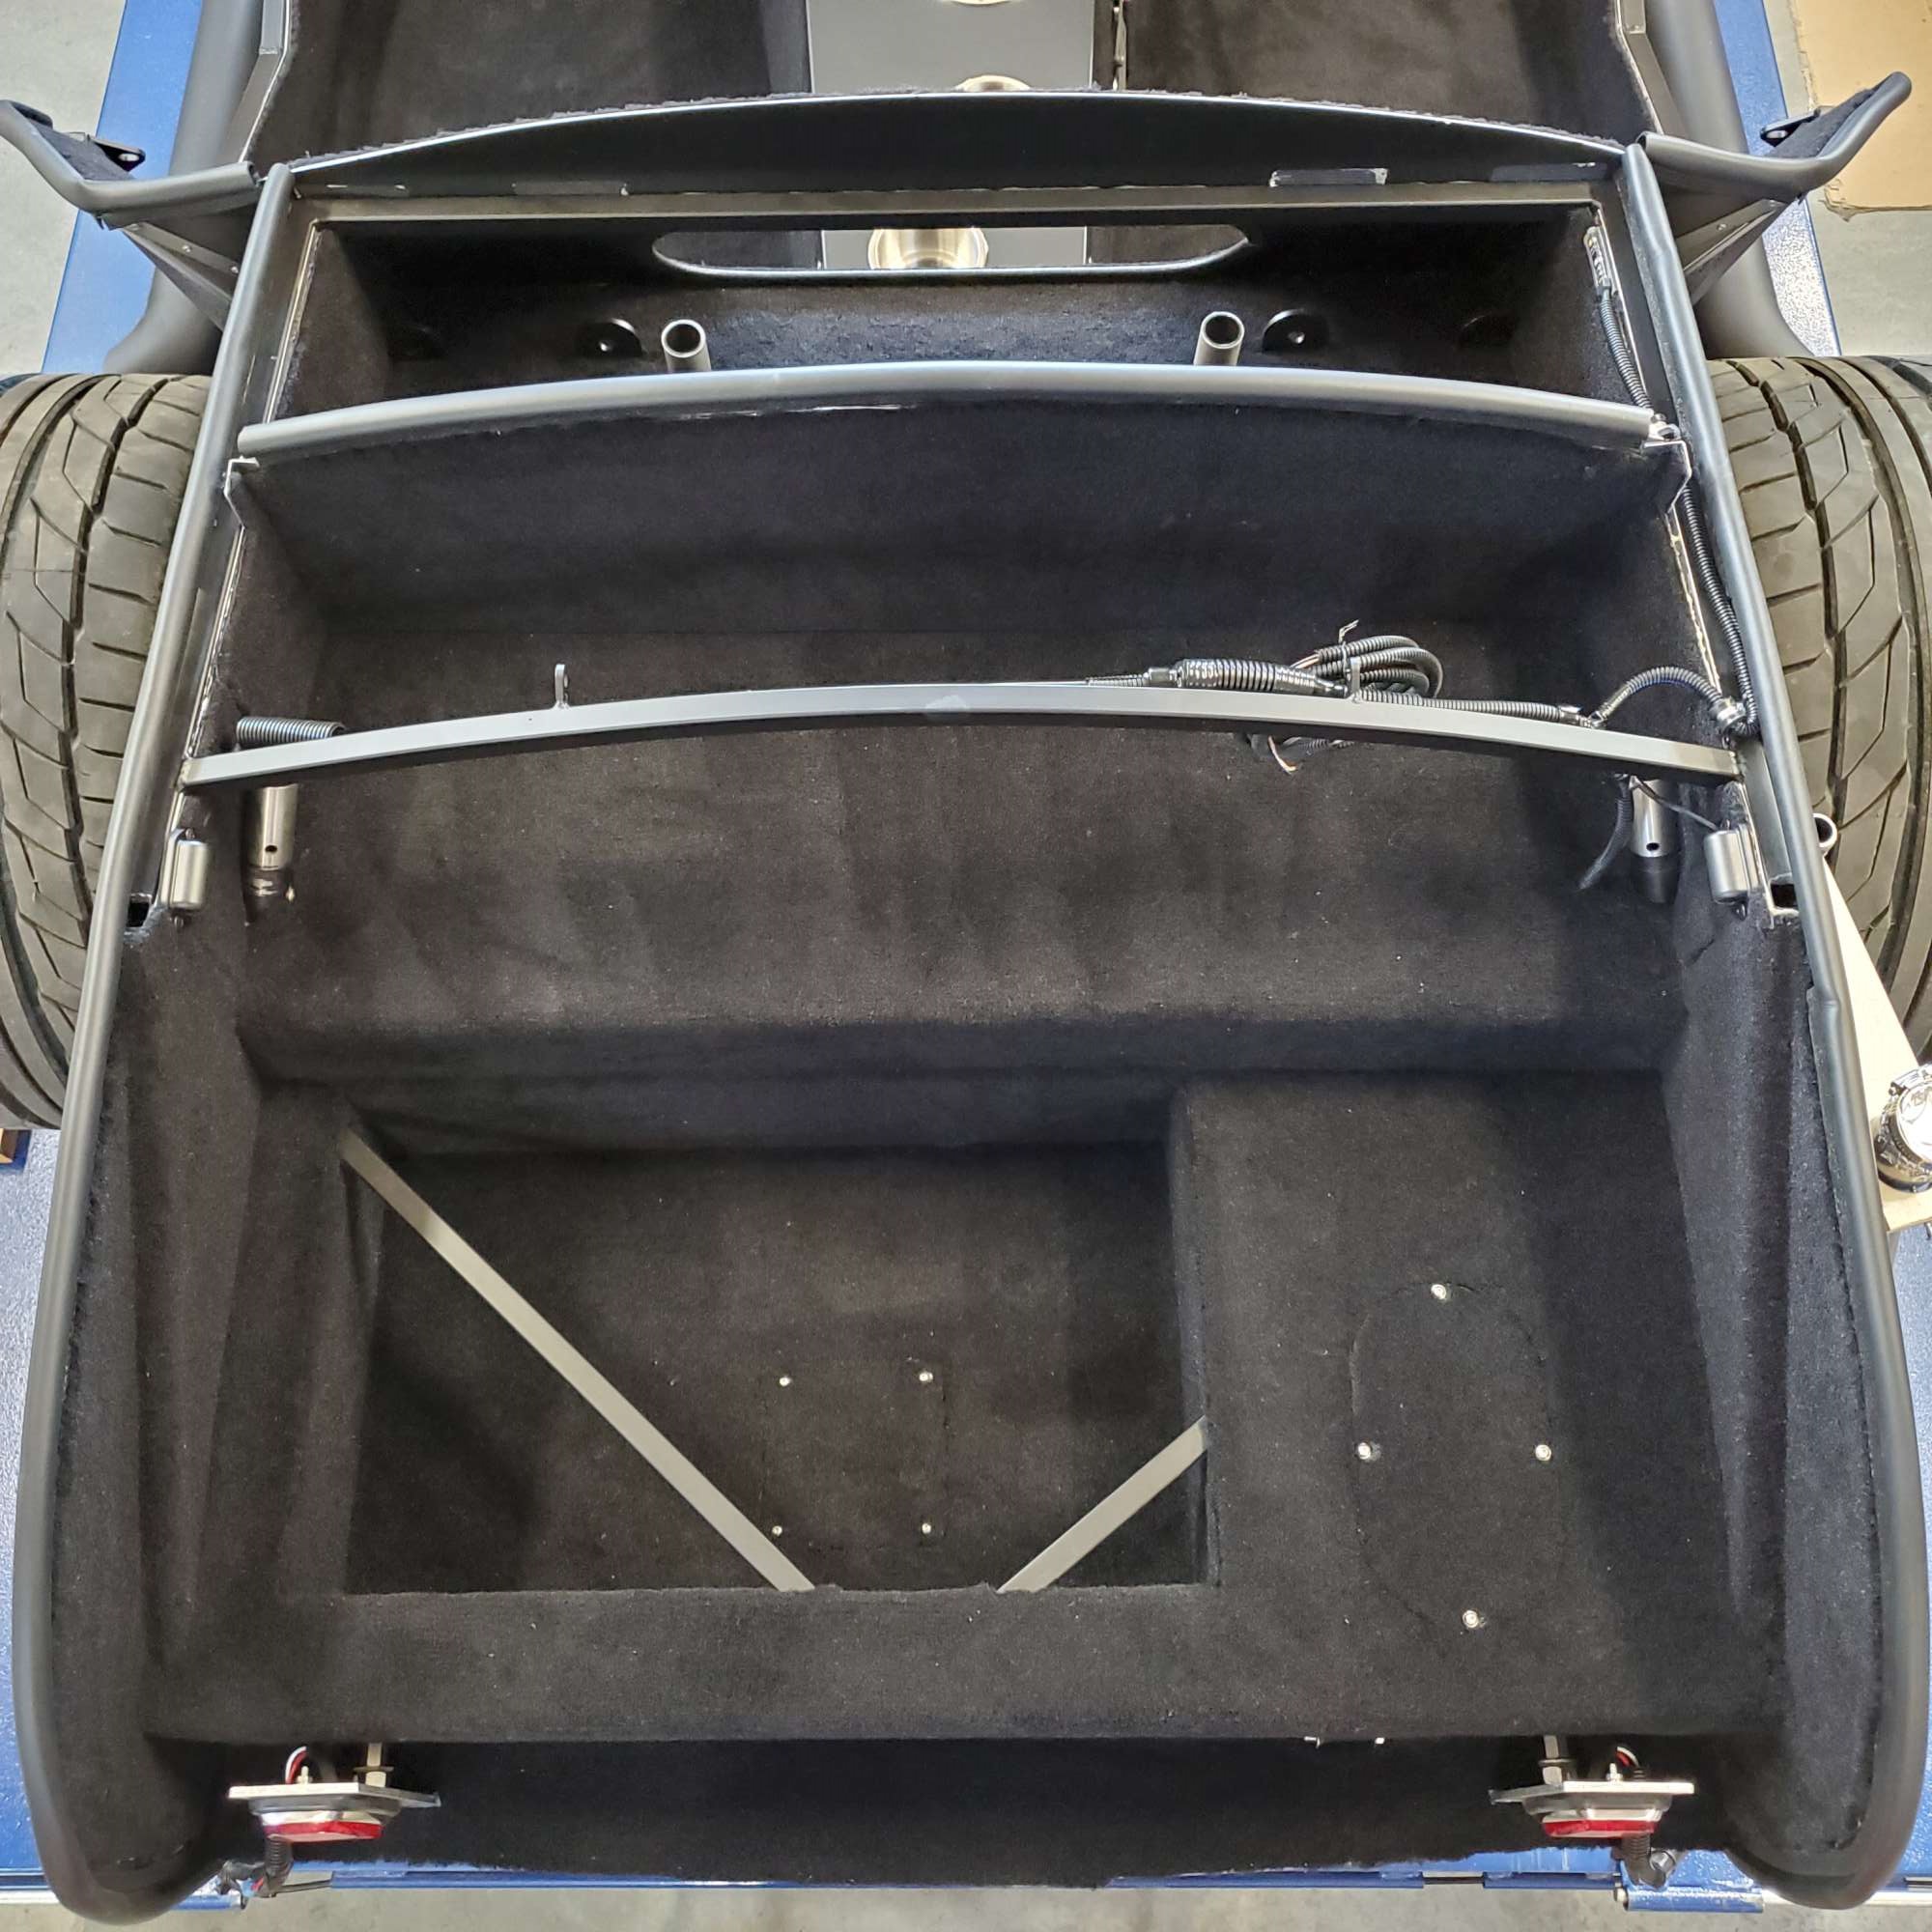
Had a couple seams in the trunk I'm not too proud of, but the others turned out well.

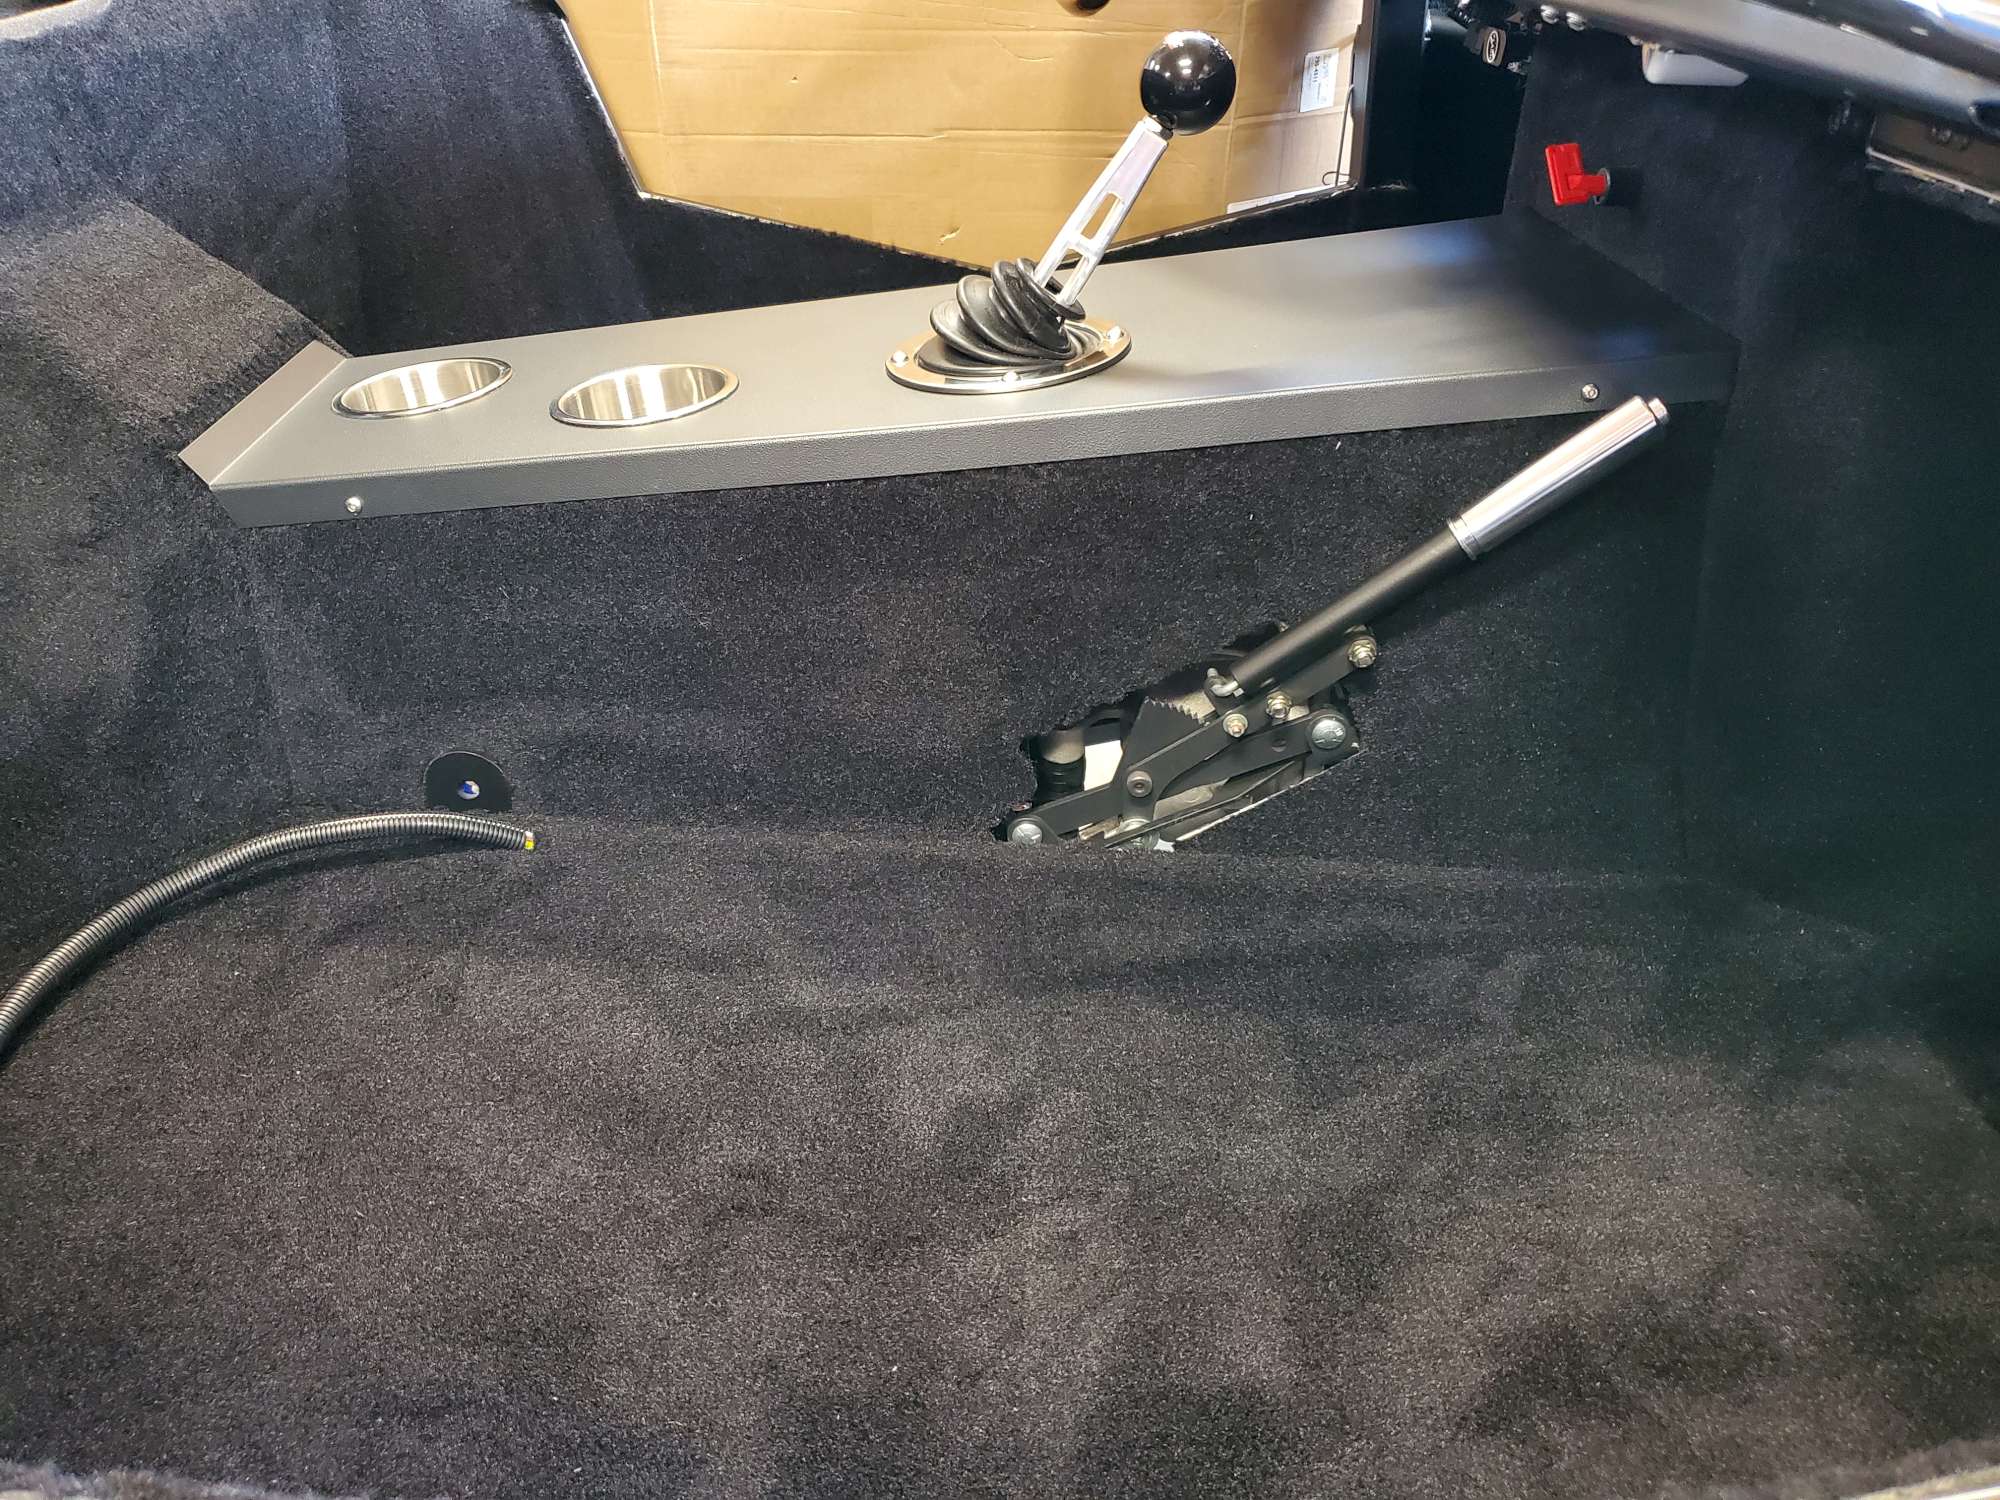
Moving forward into the cockpit with view from above.

The split loom contains the seat heater wiring. Trans tunnel is removable via 10-32 button head screws--two per side visible below.
Carpeted the "ceiling" of the PS FB. Not required, but once I had it in my mind's eye, I knew it would bother me in the long-term. The ceiling has a diagonal piece that raises up where the 3/4" tube runs diagonally. That along with the angles involved made this piece a bit challenging. I made a template out of cardboard first, which really helped me get the carpet trimmed to match. I was concerned whether the Roberts glue would win over gravity. It did. It held well enough from initial tack until it cured. It's not going anywhere.

I ordered the "Small" heel pad (6.25"x13") from heelpadwarehouse.com. It was a little too long. The "mini" would have been a closer fit at 5.75"x11". No big deal as it's easy enough to trim. At $2.76 each (+ shipping) I ordered two in case I messed up the install. Following a tip I read in Edwardb's truck build, I used a pair of carpet scissors designed for trimming the length of the pyle. (Thanks to my oldest son for lending them to me)! I was able to shave down the pyle to give the glue a more suitable surface to bond.
Lesson learned: after spreading the Roberts 6700 carpet glue with the v-notch trowel, I would let the glue setup a bit (15+ minutes). This increased the tackiness, yet still allowed me to move it around to get the position just right. This was especially helpful on the vertical pieces.
Last edited by 460.465USMC; 10-24-2022 at 08:05 PM.
Chris
Coupe complete kit delivered: 4/22/24.
Build Thread. Coyote. T-56. IRS w/3.55. Wilwoods. PS. HVAC. Side windows.
MK4 Complete kit.
Build Thread Index. Delivered: 10/15/2020. Legal: 7/25/23. Coyote Gen3. TKO600 (0.64 OD). IRS w/3.55. PS. Wilwoods. Sway bars. This build is dedicated to my son, Benjamin.
Build Thread.
-
Post Thanks / Like - 1 Thanks, 1 Likes
 Moniz
Moniz thanked for this post
Papa liked this post
-
10-24-2022, 04:12 PM
#503
Senior Member

Wow, that's fantastic, Chris! It really looks crisp and clean. I like the trunk lights. I used those for courtesy lights under the dash, and hadn't thought of using those in the trunk area as well. I may borrow that idea. Happy for you that your carpeting days are behind you
MK4 #7838: IRS 3.55 TrueTrac T5z Dart 347
The drawing is from ~7th grade, mid-1970s
Meandering, leisurely build thread is
here
-
Post Thanks / Like - 1 Thanks, 0 Likes
-
10-24-2022, 04:22 PM
#504
Beautiful job! Nice work Chris.
MkIV Roadster build: Gen 2 Coyote, IRS, TKO600. Ordered 10/24/18. Delivered 1/29/19. Engine installed 8/8/21. First start 9/12/21. First go-kart 9/17/21. Off to paint 4/11/22. Back from paint 12/30/22.
Build thread here.
-
Post Thanks / Like - 1 Thanks, 0 Likes
-
10-24-2022, 05:51 PM
#505
Originally Posted by
460.465USMC
Lesson learned: after spreading the Roberts 6700 carpet glue with the v-notch trowel, I would let the glue setup a bit (15+ minutes). This increased the tackiness, yet still allowed me to move it around to get the position just right. This was especially helpful on the vertical pieces.
Sage advice Chris! Also I didn't know you could just order more carpet from FFR. Was wondering how to find matching carpet lol. Thank you for sharing!
-
Post Thanks / Like - 0 Thanks, 1 Likes
-
10-24-2022, 06:28 PM
#506
Senior Member

Awesome!!
Carpet is the one thing I’m NOT looking forward to
-
Post Thanks / Like - 1 Thanks, 0 Likes
-
10-24-2022, 06:48 PM
#507
Senior Member
Phenomenal job Chris. Looks fantastic. You honestly don’t give yourself enough credit as a craftsman. Really first class work.
MK4 #10008 - Ordered 10/06/20, Delivered 03/03/21, First Start 7/22/21, First Go Kart 7/24/21
Paint by Metal Morphous 5/14/22, Legally registered 6/8/22, Graduated 7/20/22
Build Thread
https://thefactoryfiveforum.com/show...been-delivered
Complete Kit, Ford 306, Sniper/Dual Sync, T5, Hydraulic clutch
-
Post Thanks / Like - 1 Thanks, 0 Likes
-
10-24-2022, 07:26 PM
#508
Senior Member
Originally Posted by
John Ibele
Wow, that's fantastic, Chris! It really looks crisp and clean. I like the trunk lights. I used those for courtesy lights under the dash, and hadn't thought of using those in the trunk area as well. I may borrow that idea. Happy for you that your carpeting days are behind you
Thanks, John! Lots of clamps on the corners/transitions to try and get them crisp.
You have a keen eye to catch those LED trunk lights.  I'll snap and share a couple photos this week with the lights out to give you an idea of how well (or not) they light up the trunk.
Originally Posted by
JohnK
Beautiful job! Nice work Chris.
Lots of work to get here, but made it. Phew. Thanks for the encouragement, John.
Originally Posted by
facultyofmusic
Sage advice Chris! Also I didn't know you could just order more carpet from FFR. Was wondering how to find matching carpet lol. Thank you for sharing!
Guess where I learned about ordering extra carpet from F5? Yep, Mr. Edwardb. In hindsight I probably should have searched locally, as the shipping cost was painful.
Originally Posted by
mmklaxer
Awesome!!
Carpet is the one thing Im NOT looking forward to
Thanks! Definitely wasn't the most enjoyable task for me, but sneaking in a couple go-karts throughout helped keep me going. Stepping back now and seeing the carpet installed gives me visions of a finished Roadster. I'm okay with that. 
Originally Posted by
Blitzboy54
Phenomenal job Chris. Looks fantastic. You honestly dont give yourself enough credit as a craftsman. Really first class work.
Hey Jesse. Thanks so much for the kind words. I'm indebted to many great builds and ideas to draw from here on the forum. Hope your driving season isn't over yet up there in the northeast.
Chris
Coupe complete kit delivered: 4/22/24.
Build Thread. Coyote. T-56. IRS w/3.55. Wilwoods. PS. HVAC. Side windows.
MK4 Complete kit.
Build Thread Index. Delivered: 10/15/2020. Legal: 7/25/23. Coyote Gen3. TKO600 (0.64 OD). IRS w/3.55. PS. Wilwoods. Sway bars. This build is dedicated to my son, Benjamin.
Build Thread.
-
10-28-2022, 01:50 PM
#509
Senior Member
Cubby/Trunk/Footwell Lighting Installed
A minor update to post. I finished all my courtesy lighting, which includes lighting in the trunk, cubby, and footwells. Everything is connected to the courtesy light circuit, and turned on by twisting the headlight switch counterclockwise.
My original plan was to use a tilt switch from Watson Streetworks for the trunk lighting (a la Edwardb). However, in my wiring phase I just plain forgot to run a separate constant +12V for this purpose. I did, however, extend the courtesy light circuit into the trunk. Decided to use that instead.
Since I purchased the Watson Streetworks LED trunk/hood light kit (#L03) quite some time ago, I went ahead and used it to illuminate the Breeze cubby area. Obviously, the tilt switch was not used, so it goes into the spare parts bin.
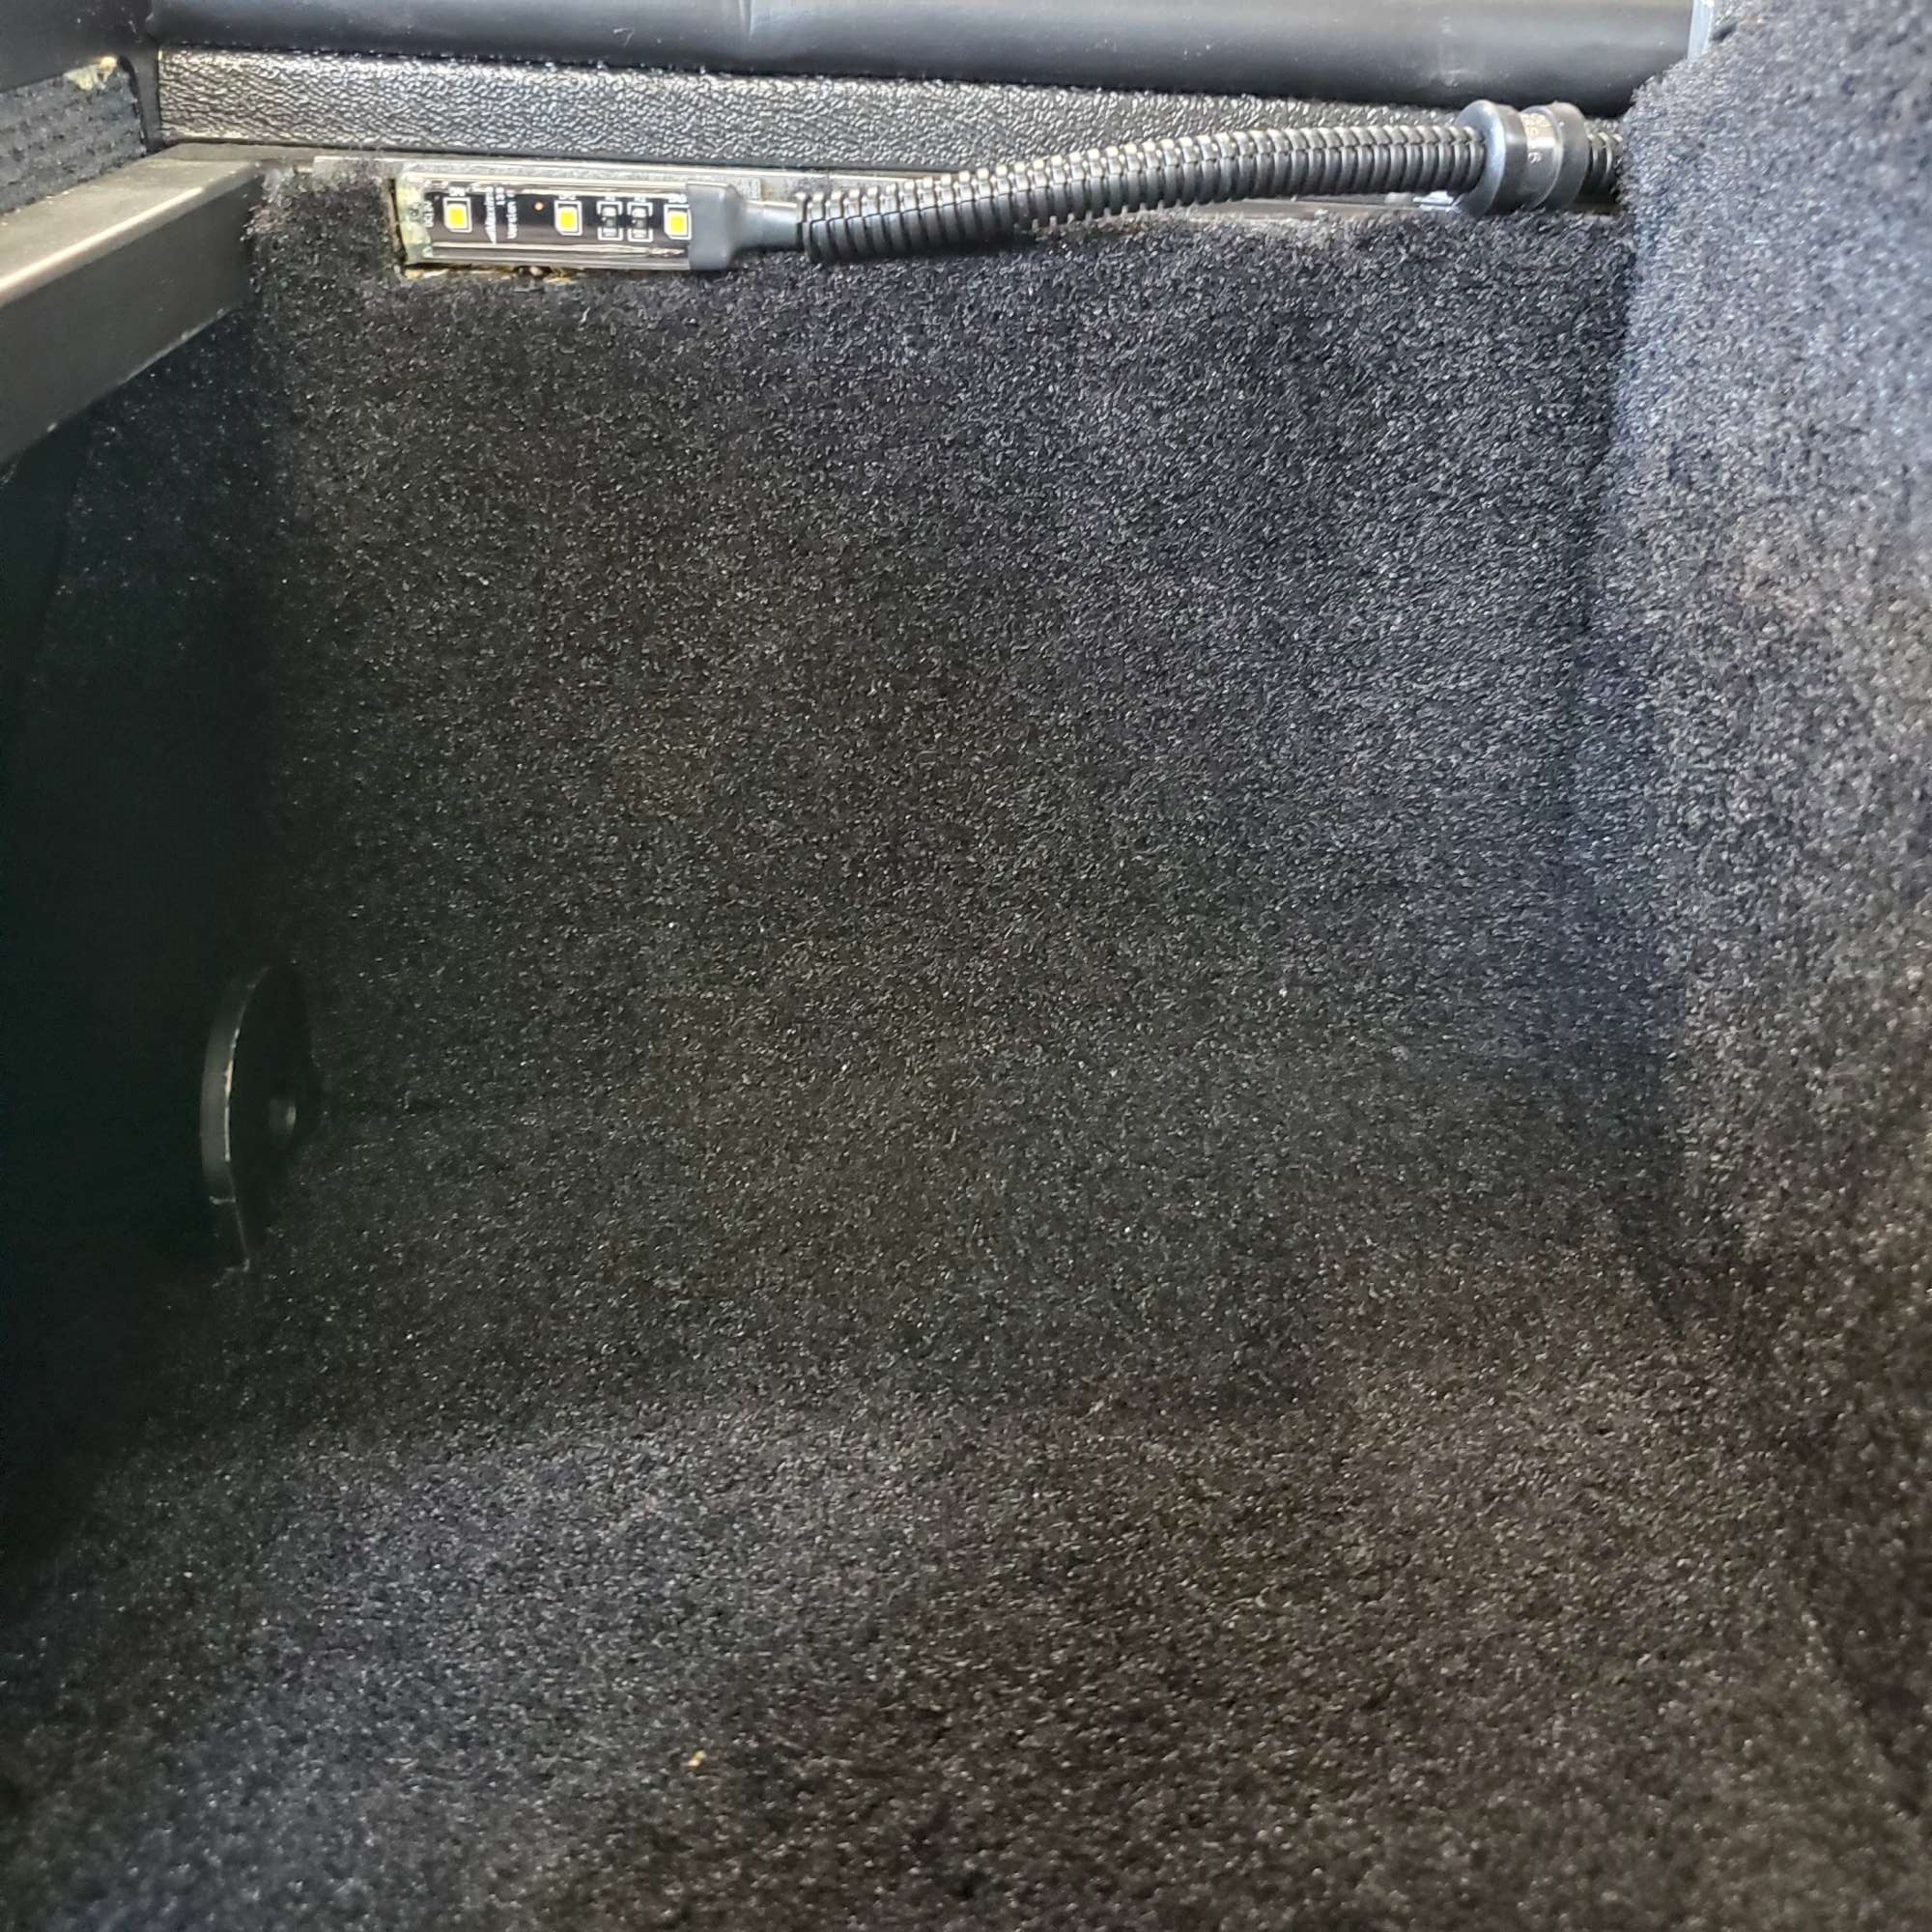
I removed the carpet and ThermoTec, and stuck it to the aluminum side panel using double-sided 3M tape. It does a great job lighting the Breeze cubby area.

For the trunk and footwell lighting I used these LED License plate lights (four pack for $12.49) from Amazon. They aren't the most rugged units I've ever seen, but the price is good and they emit plenty of light for my purposes. (For some cheap insurance I bought a two pack [~$8] in case one fails).
I think these are the first self-tapping screws I've used on the build so far. Just seemed like a good way to attach them to the upper 3/4" tube of the outer trunk wall. Placed one LED light on each side of the trunk.
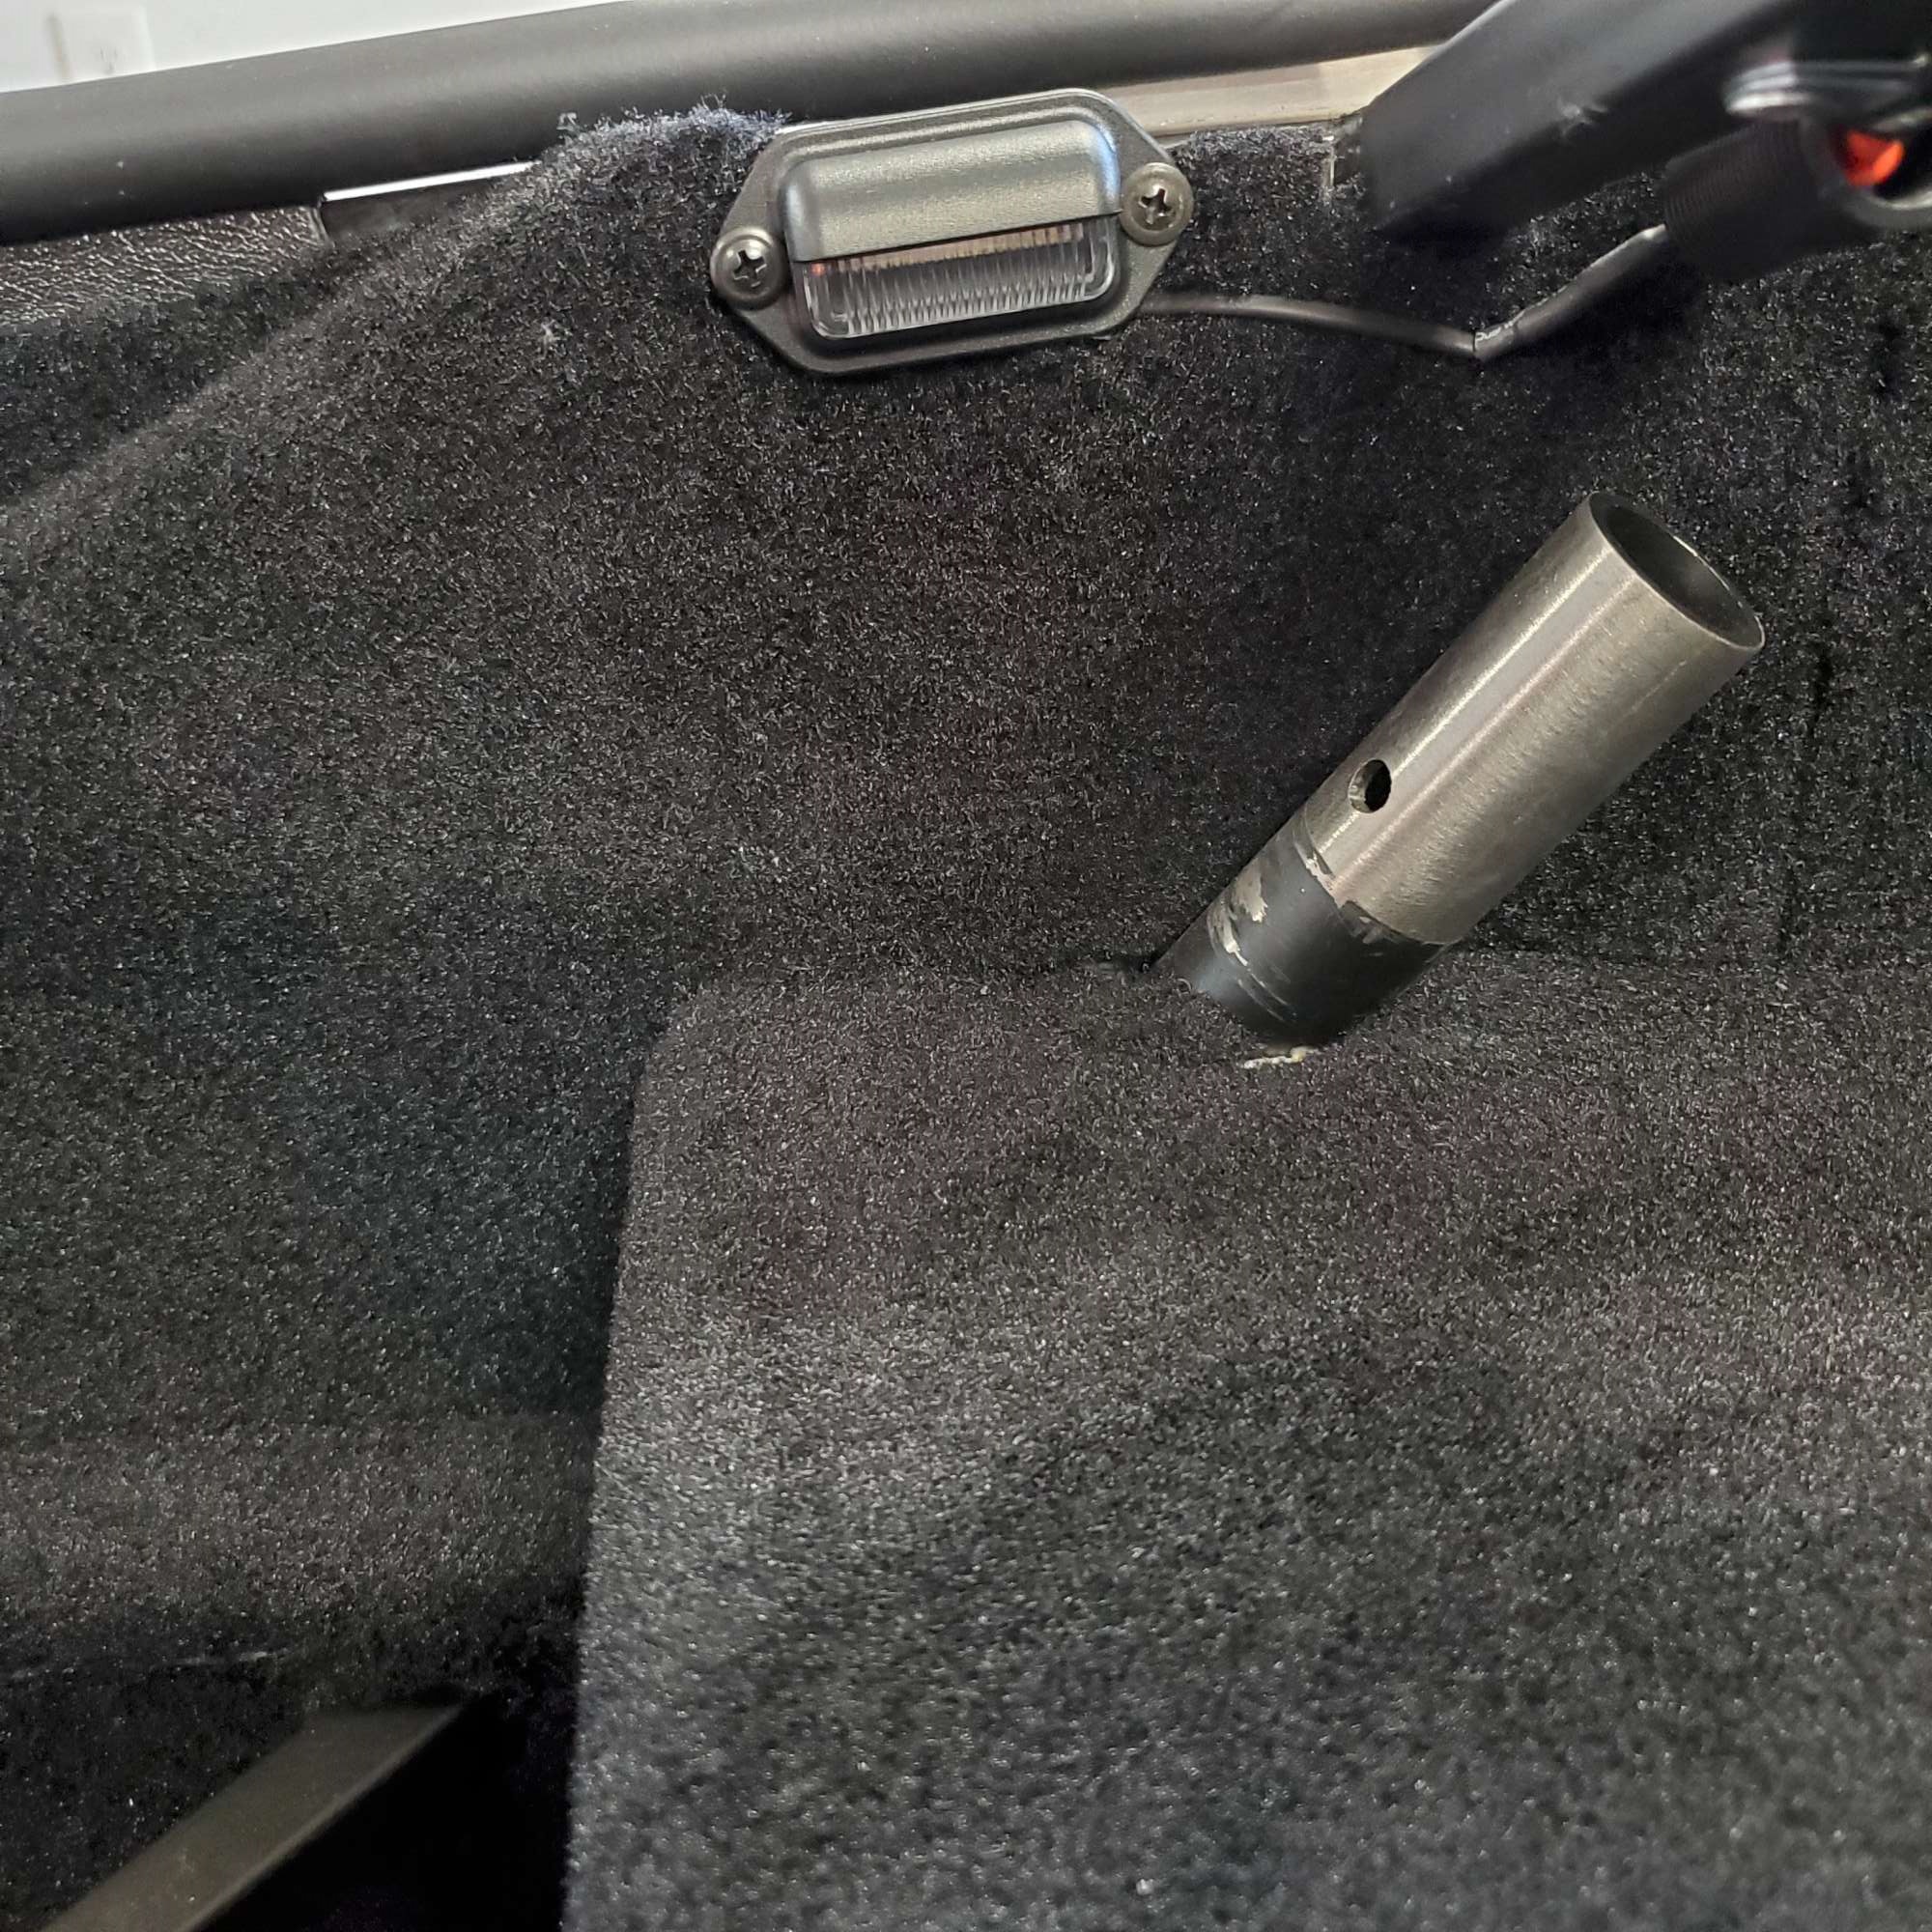
I think this will be enough light in the trunk.
I used the same LED lights for the footwells. I had previously installed a very similar version, but with incandescent bulbs. Since they are almost the identical footprint, I swapped out the incandescent so all my courtesy lighting is LED.

Chris
Coupe complete kit delivered: 4/22/24.
Build Thread. Coyote. T-56. IRS w/3.55. Wilwoods. PS. HVAC. Side windows.
MK4 Complete kit.
Build Thread Index. Delivered: 10/15/2020. Legal: 7/25/23. Coyote Gen3. TKO600 (0.64 OD). IRS w/3.55. PS. Wilwoods. Sway bars. This build is dedicated to my son, Benjamin.
Build Thread.
-
Post Thanks / Like - 1 Thanks, 3 Likes
Moniz thanked for this post
-
11-02-2022, 03:30 PM
#510
Senior Member
Head Rests
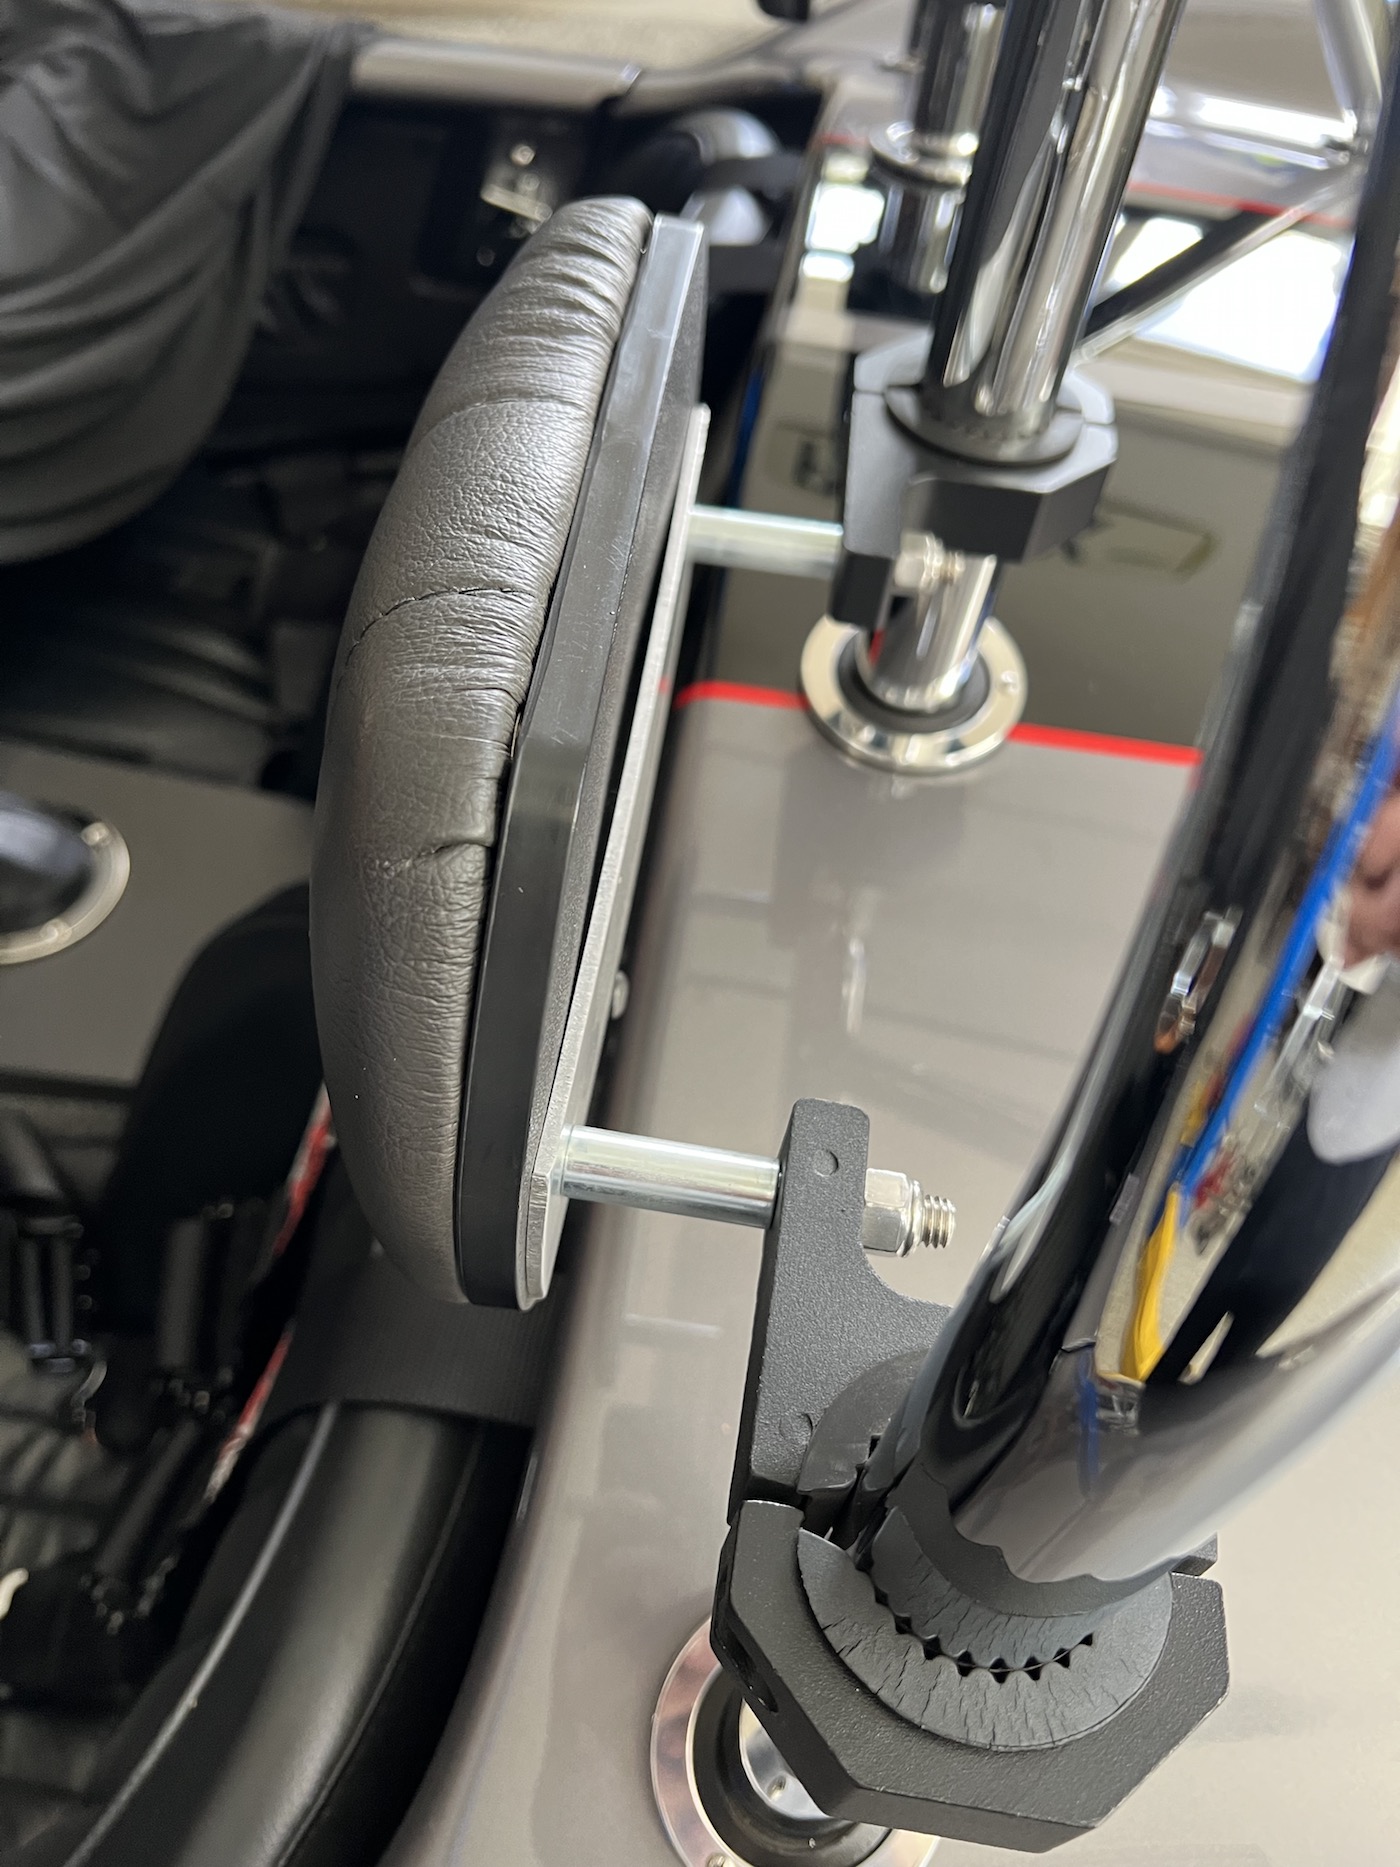
After completing the underbody bedliner and carpet install, guess I was ready for a couple quick wins: courtesy lights, and now installed neck protection/head rest on both roll bars. I got this idea from Fman, whom I believe was inspired by Skidd. (This forum is so helpful!). Fman detailed his approach here. I don't have anything to add to his helpful write-up, so I'll just include a few pictures of my install.
Here are the parts to put it all together. I'm showing two of the pads to give a view of both sides. The 6061 3/16" x 3" aluminum I had on-hand, leftover from another bracket.

Here it is installed. My jigsaw worked surprisingly well to cut the aluminum backing plate to match the contour of the pad. It was small enough to fit in my little oven for powdercoating. I picked up the M6-1.0 and M5-0.8 socket head screws that secure the pad to the backing plate at my local Ace. The larger 3/8-16 x 1.5" socket heads that secure the entire assembly to the roll bar clamps I had on-hand (unused) from the kit.

View from the rear. I was able to coax my wife into sitting in the passenger seat so I could get a measurement to position the headrest. I figure more safety gear equals more likely she'll ride with me once the build is complete.
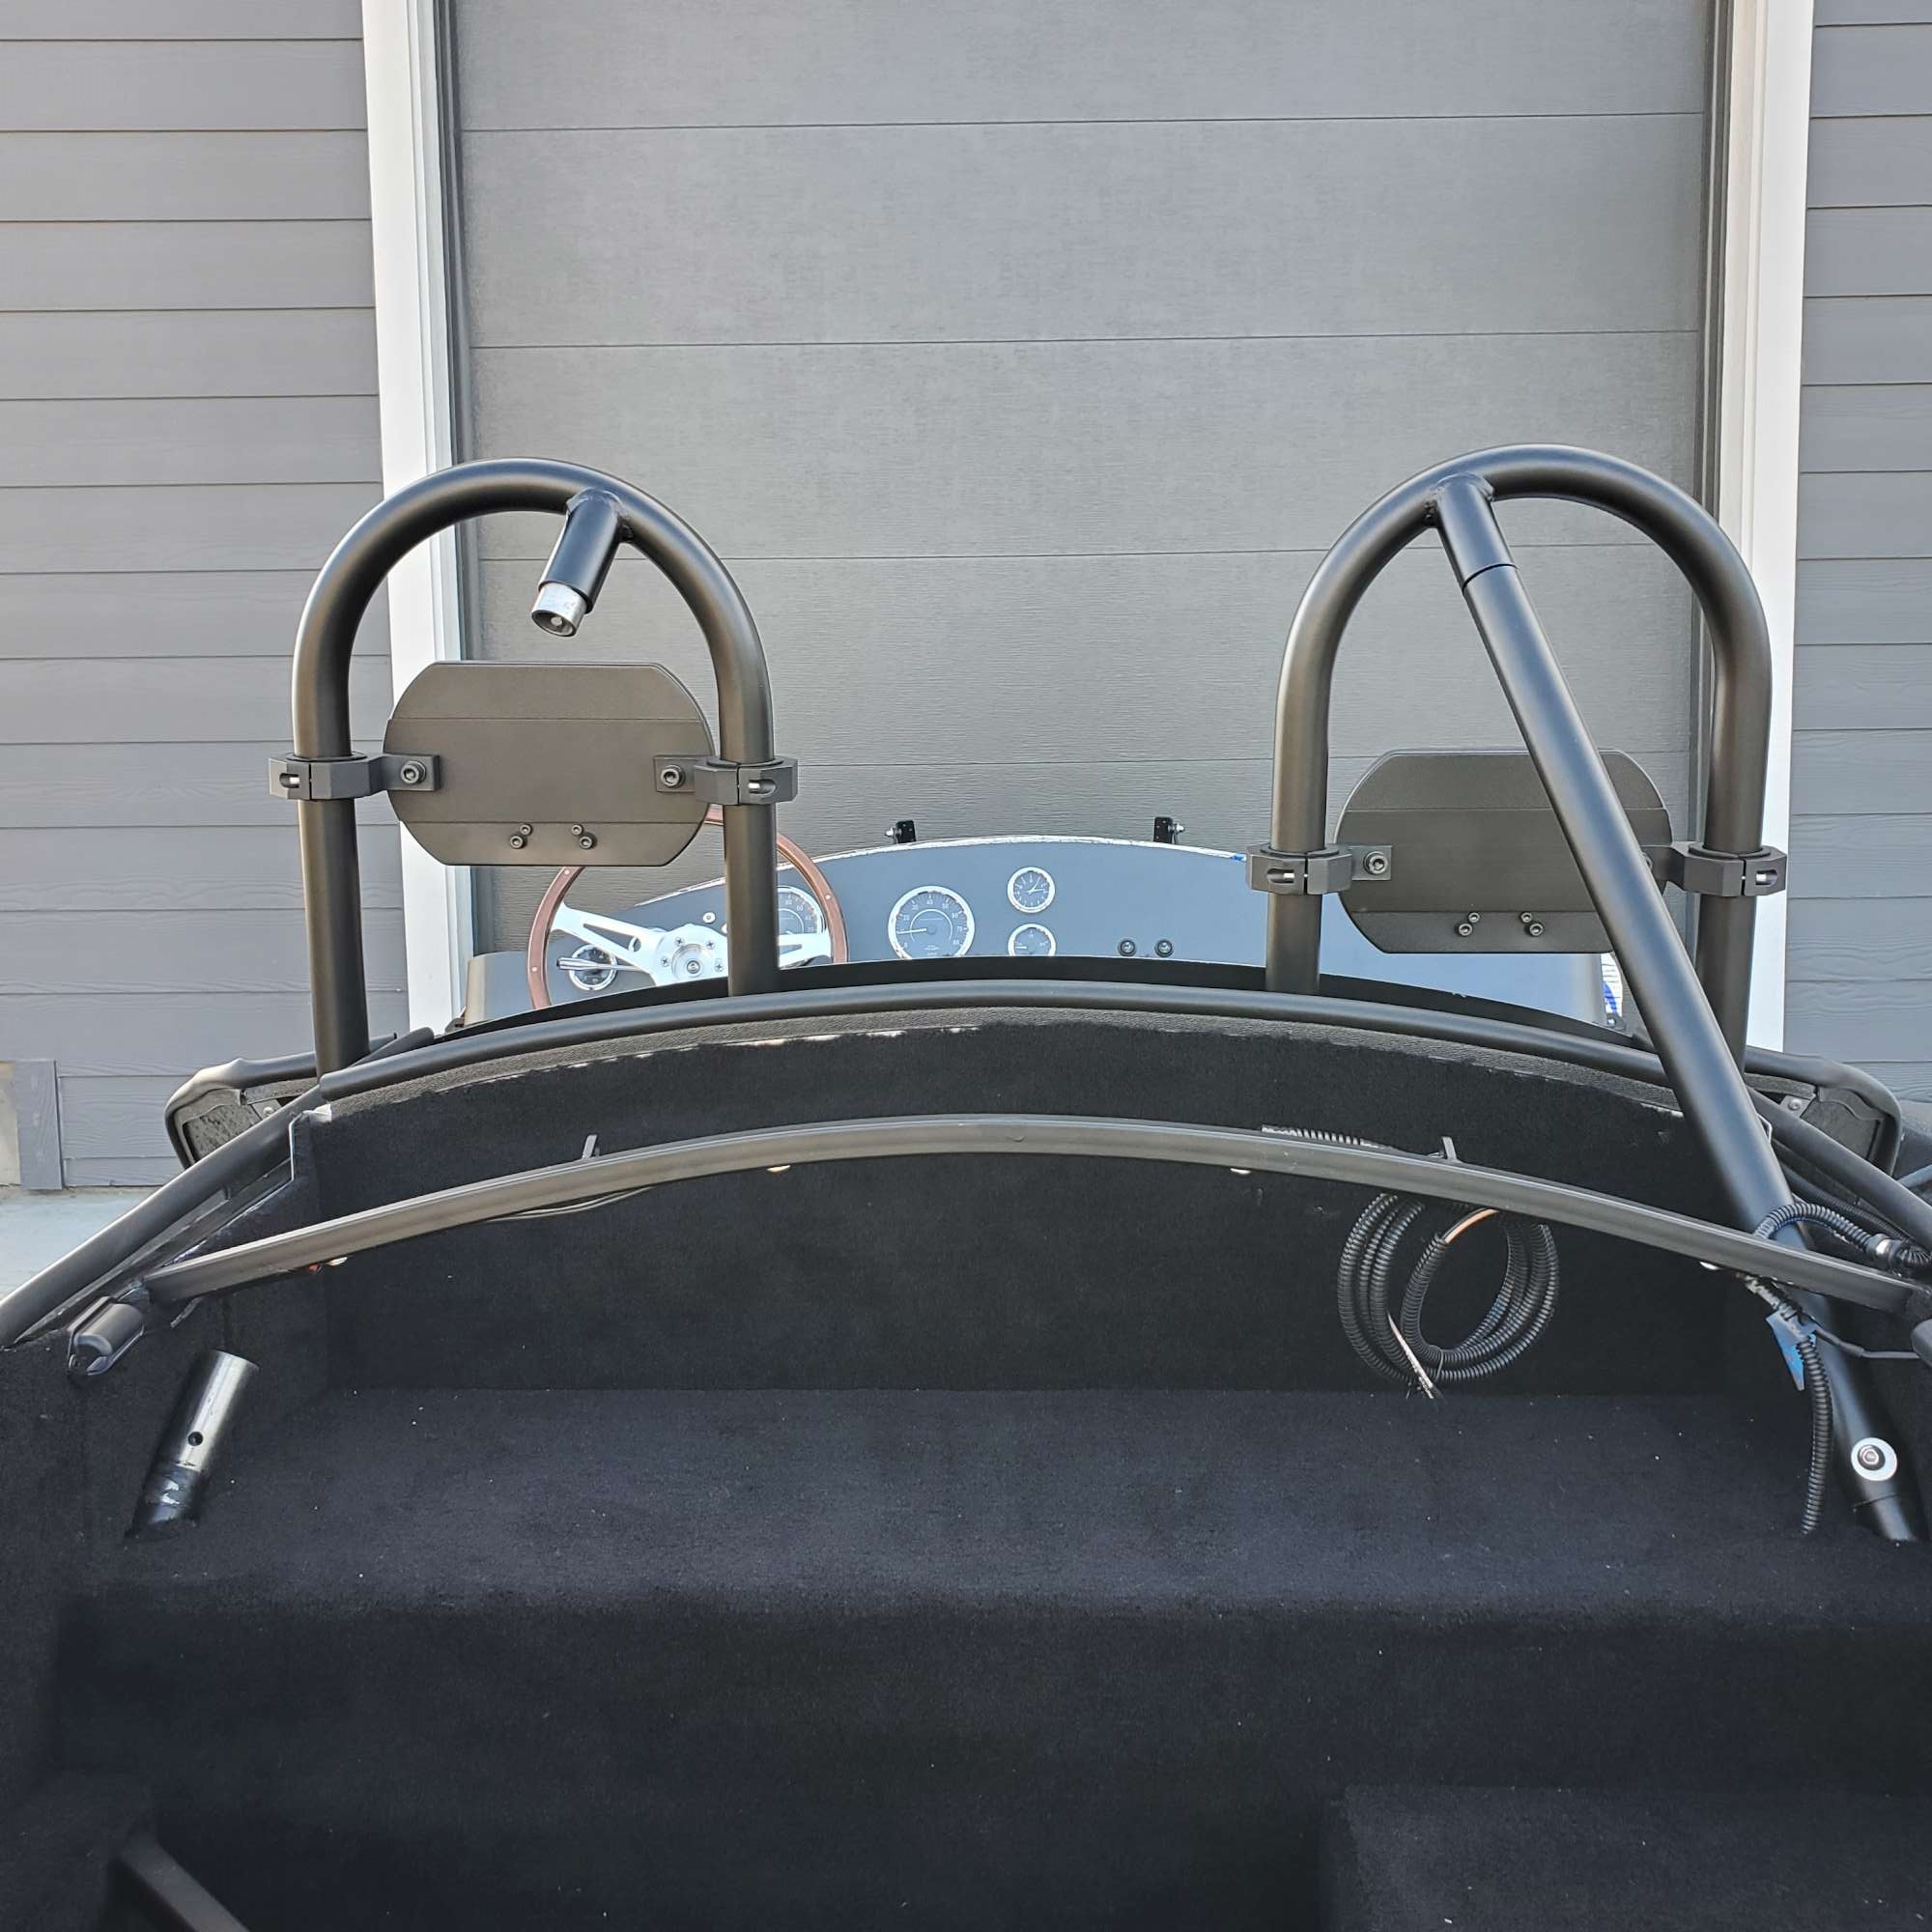
View from the front

I'm chipping away at a few things I want to do before putting the body on. Like ordering a set of assembled louvers from F5, so I can get those installed, Breeze seat bases, etc.
Chris
Coupe complete kit delivered: 4/22/24.
Build Thread. Coyote. T-56. IRS w/3.55. Wilwoods. PS. HVAC. Side windows.
MK4 Complete kit.
Build Thread Index. Delivered: 10/15/2020. Legal: 7/25/23. Coyote Gen3. TKO600 (0.64 OD). IRS w/3.55. PS. Wilwoods. Sway bars. This build is dedicated to my son, Benjamin.
Build Thread.
-
11-02-2022, 08:43 PM
#511
Senior Member
Looking good! and Yes I got the idea from Skidd. One thing I have done since I installed the head rests is add a 1.5" spacer to bring the headrest closer to your head. I think this really helps to eliminate the gap between your head and the actual headrest. If you ever took a rear end hit you don't want much space for your head to snap back.
-
Post Thanks / Like - 1 Thanks, 1 Likes
-
11-02-2022, 08:44 PM
#512
Senior Member
Oboy, does that look clean. Very excited for you, Chris.
MK4 #7838: IRS 3.55 TrueTrac T5z Dart 347
The drawing is from ~7th grade, mid-1970s
Meandering, leisurely build thread is
here
-
Post Thanks / Like - 1 Thanks, 0 Likes
-
11-02-2022, 08:55 PM
#513
Senior Member
Originally Posted by
Fman
Looking good! and Yes I got the idea from Skidd. One thing I have done since I installed the head rests is add a 1.5" spacer to bring the headrest closer to your head. I think this really helps to eliminate the gap between your head and the actual headrest. If you ever took a rear end hit you don't want much space for your head to snap back.
Even better. Great idea, Travis! Definitely going to follow your lead on the spacers. Might as well make these as functional as possible. Thank you.
Chris
Coupe complete kit delivered: 4/22/24.
Build Thread. Coyote. T-56. IRS w/3.55. Wilwoods. PS. HVAC. Side windows.
MK4 Complete kit.
Build Thread Index. Delivered: 10/15/2020. Legal: 7/25/23. Coyote Gen3. TKO600 (0.64 OD). IRS w/3.55. PS. Wilwoods. Sway bars. This build is dedicated to my son, Benjamin.
Build Thread.
-
11-02-2022, 10:49 PM
#514
Senior Member

Thanks for posting Chris and thanks Fman for the links. I just ordered my headrests.
I like the front view. It looks like someone winking and gasping at the same time.
-
Post Thanks / Like - 0 Thanks, 1 Likes
-
11-02-2022, 10:57 PM
#515
Senior Member
Chris one other recommendation would be to mount a light up on the inside of the trunk lid. If you have a full trunk load of stuff most of the light will be blocked (ask me how I know). Doing it again wish I would have put a light on inside lid shining down on the trunk (on my winter mod list).
Keep up the great work!
-
Post Thanks / Like - 1 Thanks, 0 Likes
-
11-05-2022, 01:03 PM
#516
Senior Member
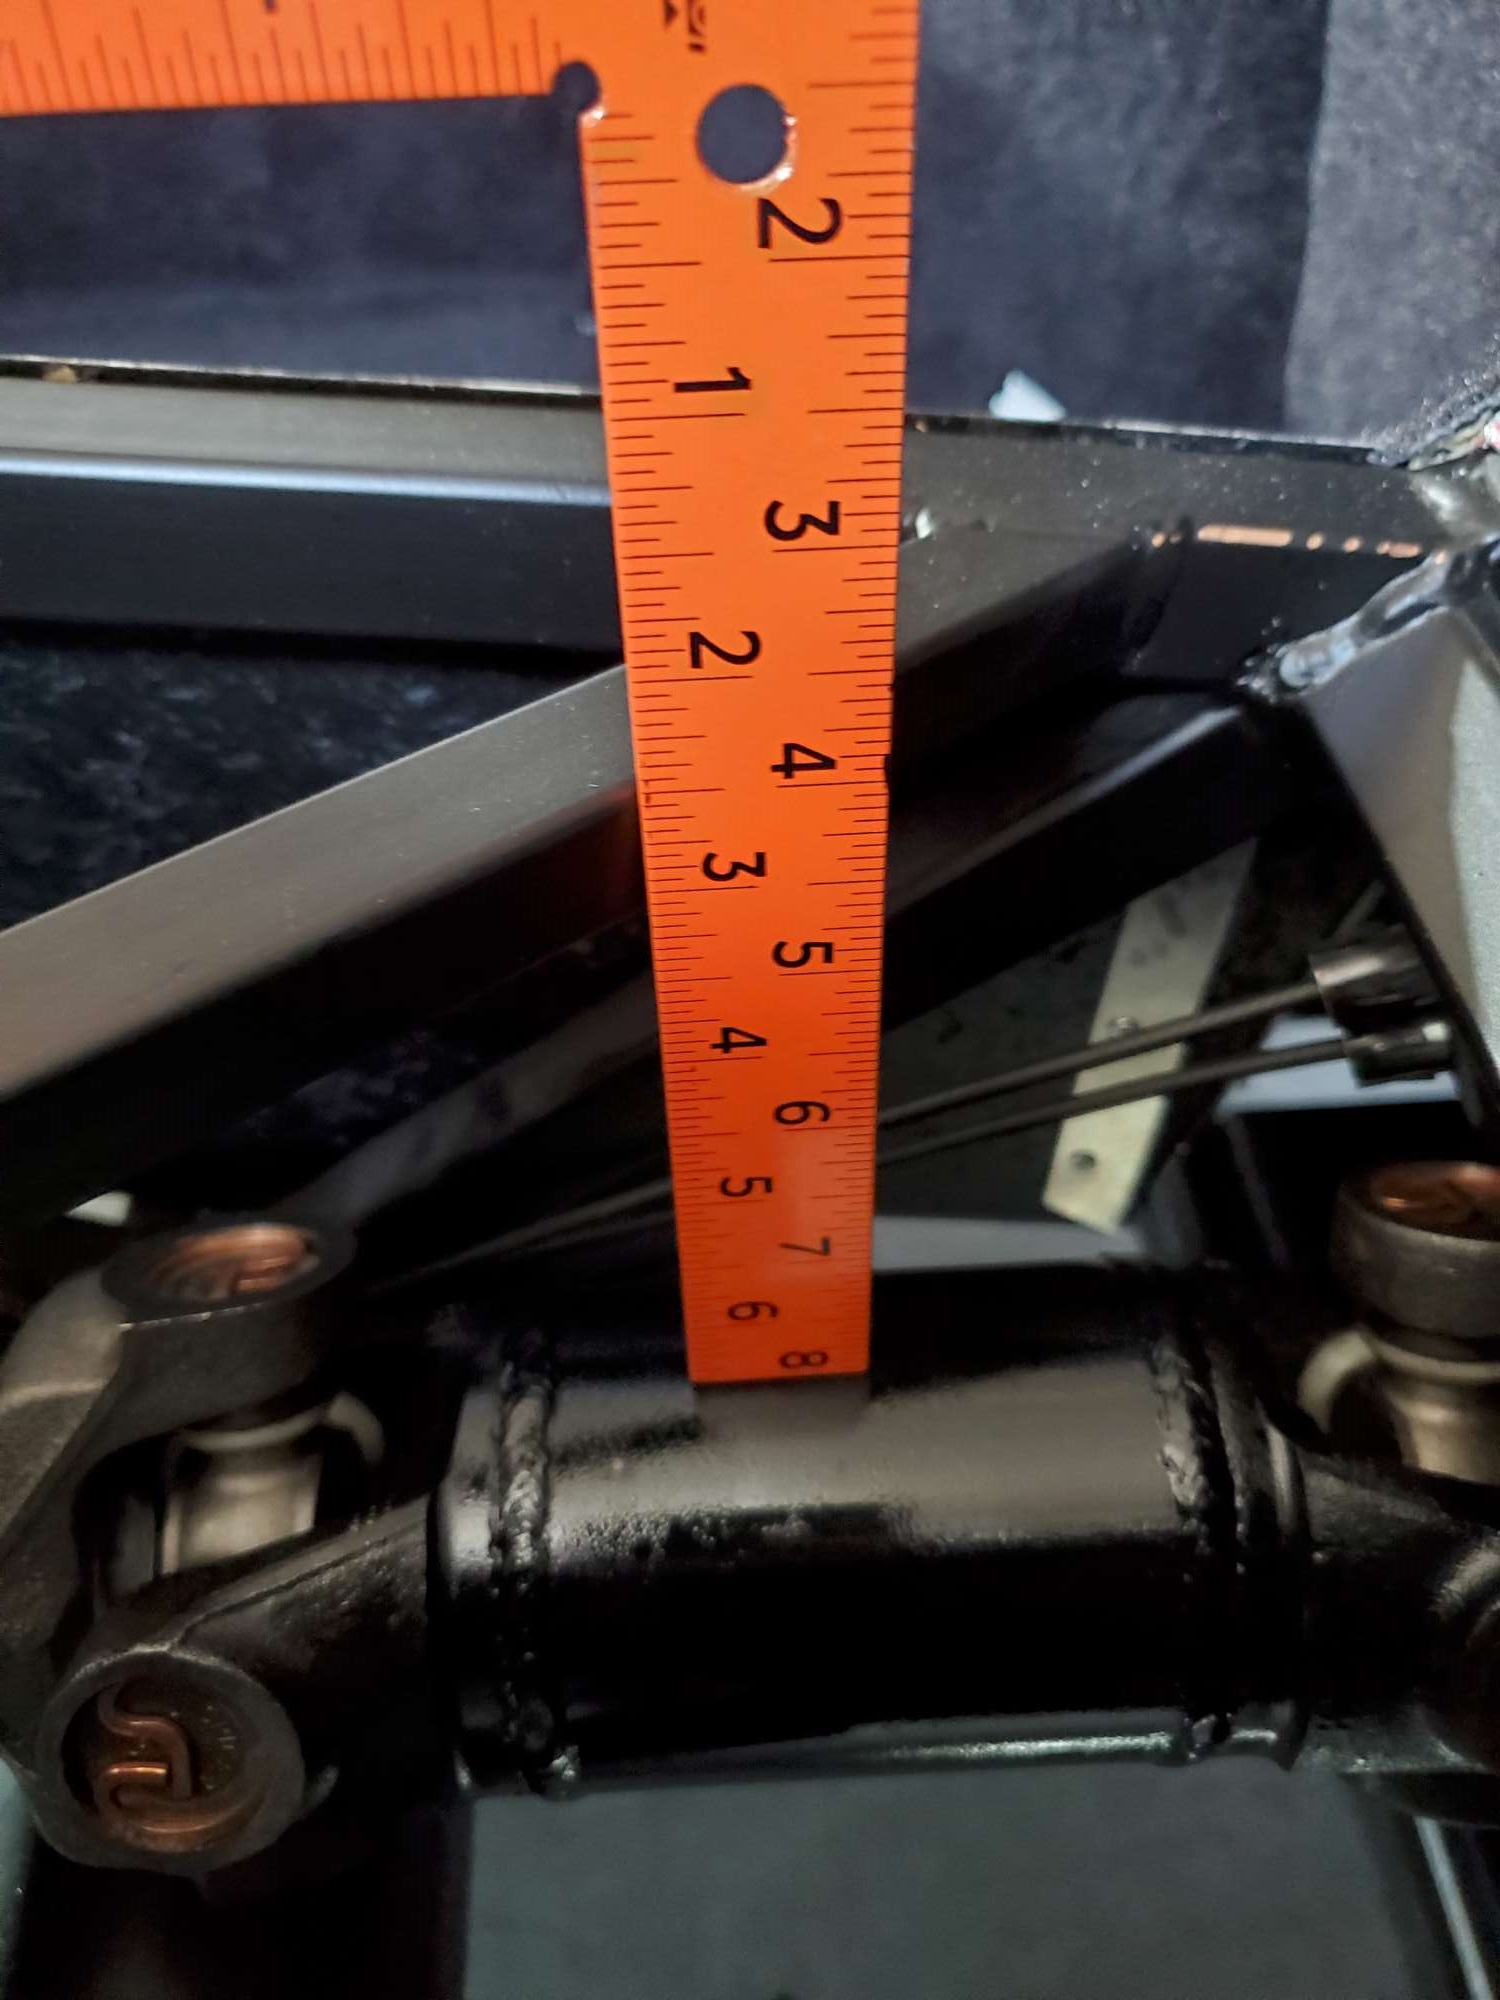
Metco Safety Loop Clearance?
I'm interested in the Metco safety loop MDL2500, but concerned about enough clearance to my cup holders. If anyone has a measurement or would be willing to take a measurement, I would appreciate it. I'm running the Coyote with TKO600 and IRS.
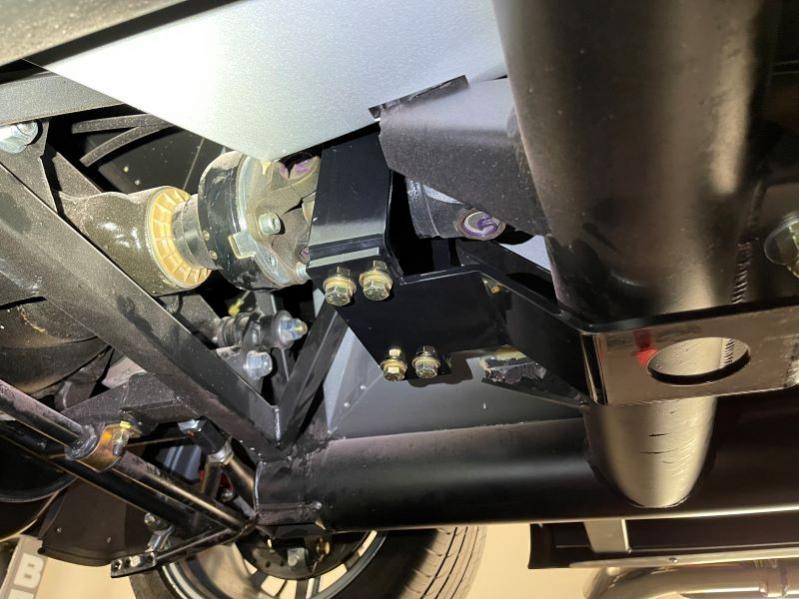
Here's the view from underneath (this is why I covered the ThermoTec ):

I'm looking for the distance from the bottom side of the tunnel square tubes to the top of the Metco safety loop. Something like this:
Chris
Coupe complete kit delivered: 4/22/24.
Build Thread. Coyote. T-56. IRS w/3.55. Wilwoods. PS. HVAC. Side windows.
MK4 Complete kit.
Build Thread Index. Delivered: 10/15/2020. Legal: 7/25/23. Coyote Gen3. TKO600 (0.64 OD). IRS w/3.55. PS. Wilwoods. Sway bars. This build is dedicated to my son, Benjamin.
Build Thread.
-
11-05-2022, 03:45 PM
#517
Hey Chris. Build is looking great. Haven't been on the forums much but I caught up a little bit last week. Here are some pictures of our setup. Hopefully they help.
Measuring from the bottom of the trans tunnel cover, about 3":

Measuring from the rear most cross tube, about 1.5":

You might be able to modify it a little bit and mount the hoop part below the mounting bracket instead of above, but it may be tight to the driveshaft when you're done. Excuse the body shop dust still all over the bottom of the frame. Really needs a good bath.
MK4 Complete Kit, EFI 427W/TKO 600, 2015 IRS
Ordered: 11/6/20, Kit Completion: 2/13/21, Picked Up: 2/16/21, Build Started: 2/19/21, First Start: 6/13/21, Go Kart: 8/15/21, Sent for Paint: 12/23/21, Back From Paint: 6/16/22, Street Legal: 7/11/22
-
11-06-2022, 04:15 PM
#518
Senior Member
NYMike to the rescue! Thanks for helping me out, Mike. Your pictures and measurements make me think it will be close, but doable. I'm going for it.
P.S. while you're out there enjoying that awesome Roadster, please snap and post a picture or two. Great motivation for us guys who are in the build process. Especially yours truly, the Turtleee Builder.
Chris
Coupe complete kit delivered: 4/22/24.
Build Thread. Coyote. T-56. IRS w/3.55. Wilwoods. PS. HVAC. Side windows.
MK4 Complete kit.
Build Thread Index. Delivered: 10/15/2020. Legal: 7/25/23. Coyote Gen3. TKO600 (0.64 OD). IRS w/3.55. PS. Wilwoods. Sway bars. This build is dedicated to my son, Benjamin.
Build Thread.
-
11-06-2022, 09:47 PM
#519
Hey Chris! Just thought I might share an idea I had with you. I was too, looking at the trans tunnel and realizing that there isn't a lot of space between that and the components underneath. The Metco safety loop doesn't help with this. I stared at the trans tunnel for a while and realized I it's really quite boxy and "broad" like a slab of a trapezoidal box. Why not add some curves to it? I plan to add a 1" thick plank of wood on top of the trans tunnel cover and sculpt the edge to give it a curve. 1" wouldn't get in the way of the shifter or anything like that, and it will give me additional vertical space for my cup holders!
My rough plans so far:
tunnel_cover.jpeg
(it's REALLY not to scale.)
P.S. Ahh sorry I just scrolled up and remembered that you already had your tunnel cover done. Should have mentioned this earlier!
-
11-07-2022, 10:23 PM
#520
Senior Member
What a creative idea, Dan. You have a knack for coloring outside the lines. I mean that in a good way, as you've demonstrated in several areas in your build. I look forward to seeing how it all comes together. Please keep us posted.
Chris
Coupe complete kit delivered: 4/22/24.
Build Thread. Coyote. T-56. IRS w/3.55. Wilwoods. PS. HVAC. Side windows.
MK4 Complete kit.
Build Thread Index. Delivered: 10/15/2020. Legal: 7/25/23. Coyote Gen3. TKO600 (0.64 OD). IRS w/3.55. PS. Wilwoods. Sway bars. This build is dedicated to my son, Benjamin.
Build Thread.


 Thanks:
  Likes:


 Reply With Quote

