-
09-24-2021, 05:33 AM
#241
Senior Member

Great progress Paul. Coupe looks stunning out there in the sun!
MK4 #8900 - complete kit - Coyote, TKO600, IRS - Delivered 6/28/16 First Start 10/6/16 Go cart - 10/16/16 Build completed - 4/26/17 - 302 days to build my 302 CI Coyote Cobra - Registered and street legal 5/17/17
Build Thread
http://thefactoryfiveforum.com/showt...e-build-thread
PHIL 4:13 INSTAGRAM - @scottsrides
-
Post Thanks / Like - 1 Thanks, 0 Likes
-
10-02-2021, 06:04 AM
#242
Senior Member

Electrical, A/C, Diff, Cab
Pretty quick update this week. Finalized all the electrical wiring I can do to this point. Few more connections to finalize when the dash is installed. Plus, some wiring at the shifter and center console. Only thing other than that is the four corner lighting when the body is on. I’m also finalizing the routing of the front harness. I exited the firewall under the top tube, which is slightly different than the manual. But once to the front, routed around the front suspension and under the radiator as shown. Seems to work out OK.
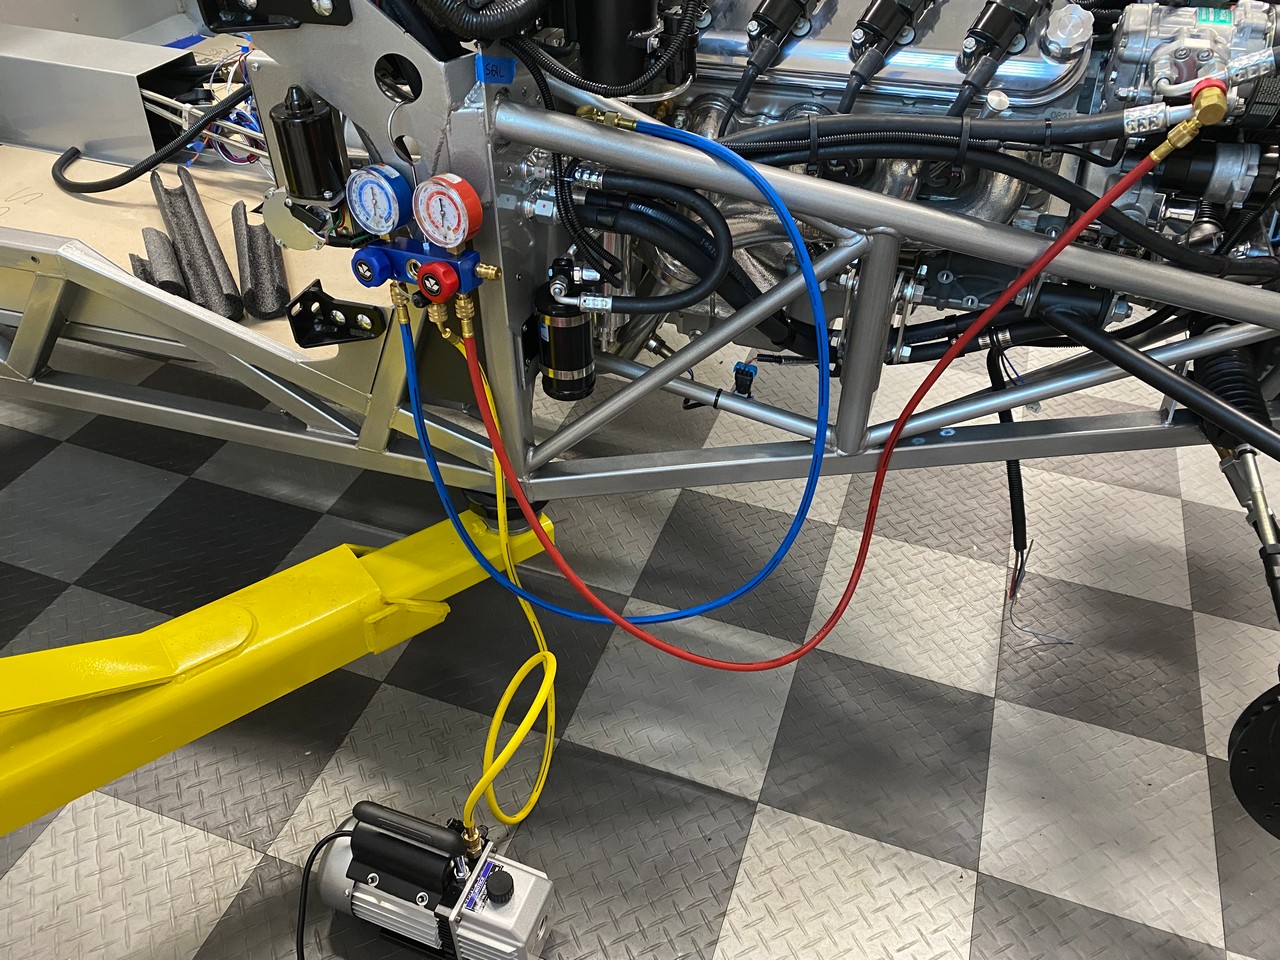
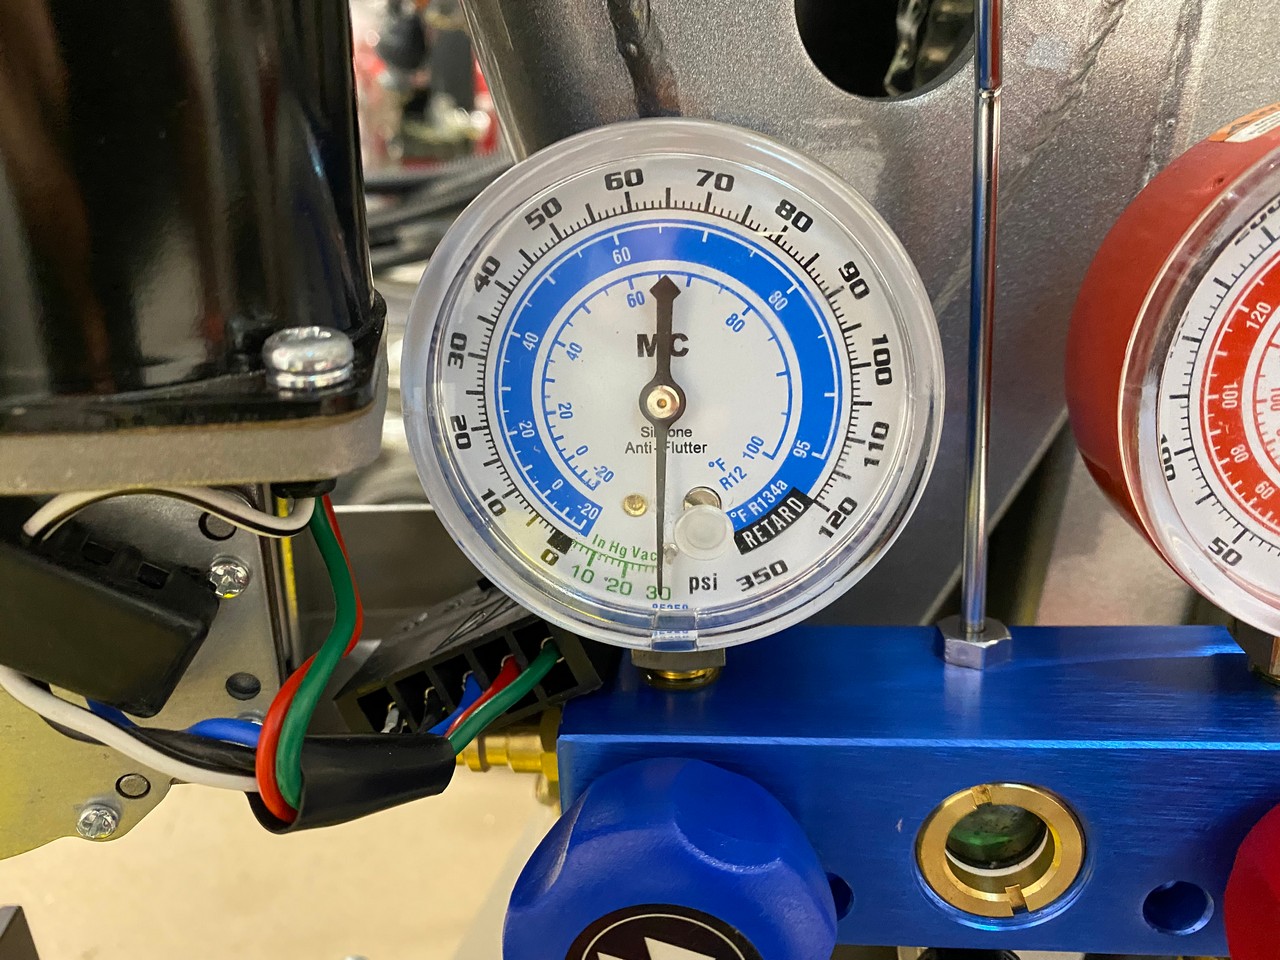
Got my A/C lines completely installed. The custom lines at the condenser that Vintage Air made worked out OK. They made them exactly per my patterns. In hindsight, could have made the legs coming out from the radiator area slightly shorter. Would have been a little easier to work around the front suspension. But it’s all Ok and buttoned up. Got out the manifold gauges and vacuum pump to check things out. Ran the pump for an hour to draw out any moisture and put the system under vacuum. With the gauge showing -30 inches of mercury, turned the pump off and let it sit to see if any leaks. Got busy and didn’t come back for about eight hours. Still at -30. Needle hadn’t moved. That’s a good thing. Good chance I have a leak free system. No hurry to charge plus I need the engine and compressor running. But seems ready to go.
Another item on my to-do was to fix the leaking Moser diff. This seems to be a bit of a recurring problem as others have reported the same thing. Not a huge leak. But a drip every day or two and general wetness along the bottom of the diff. I hate leaks… Contacted Moser and they sent me a new gasket. After reading through other fixes, and looking at various products, decided to use black Permatex The Right Stuff Gasket Maker. Moser suggested using it with the gasket. But upon further review and looking at Permatex documentation, it’s intended to be a complete gasket. Not a gasket dressing. So decided to leave the supplied gasket out. At the very last minute, ran across an available gasket product called Lubelocker, made from aluminum with a rubber coating. Very highly rated and will be my fall back if this doesn’t work. I had already purchased the Right Stuff (not cheap…) so stayed with my original plan. Carefully drained the lube plus friction modifier into a clean container so I could reuse it. Didn’t smell great (my wife noticed it immediately in the house…) but not as bad mixed. The cardboard looking gasket was glued on with RTV or whatever. But thoroughly saturated with gear lube. Can’t help but wonder if that’s the main source of the problem. With everything clean and dry, checked the flatness of the cover against the diff and also with a long flat file. Two holes were very slightly raised on the cover and easily filed flat. Everything else looked good. Put the 1/8” bead of Right Stuff on the cover and around the holes, and back into place. Torqued the bolts to 25 ft.lbs. as instructed by Moser. I have to think without the gasket in place, better chance the cover isn’t distorted. Got a nice solid filet of Right Stuff squeezed out all around. Cleaned things up and called it good. According to the instructions, can refill and drive in one minute. Maybe. But I let it sit until the next day. Put the fluid back in with just a little more needed from the bottle to top off. After a couple days, no sign of any leaks and not expecting any. But we’ll see. Really don't want to do that again.
Started scoping out what I need to do my upper and lower radiator hose connections. I’m not a big fan of the corrugated tubing that’s included with the kit. So won’t be using that. Both radiator connections, plus the lower radiator hose connection on the LS are 1-1/2” sized. But discovered the upper connection on the LS is 1-1/4”. Interesting. After looking at several options, picked up a Moroso 63740 T-filler. Has 1-1/2” on one side and 1-1/4” on the other. So with the proper size hoses, will make this work. For some reason, I was thinking the lower radiator hose needed to go through the frame and front suspension. Which looked challenging to say the least. Reviewed the manual, and found they route the lower hose under the frame. Makes sense plus still is above the lowest part of the grille. More work to pick out the balance of the parts and get this plumbed. Basically the last step needed before first start.
Finally, my main focus right now is to get the cab interior finished and mounted back onto the chassis. Have spent some quality time on the driveway cleaning up and sanding the interior. Now using a bit of Bondo to clean up and flatten the ceiling a bit. Nothing crazy. Then will spray with UPOL Raptor as previously mentioned which will be my final headliner. Need some average temps to complete, and fall is in the air in Michigan. While a beautiful time of year, we all know what happens next. Once October runs out, can start cooling off any time. Hope to get it sprayed and onto the chassis next week.
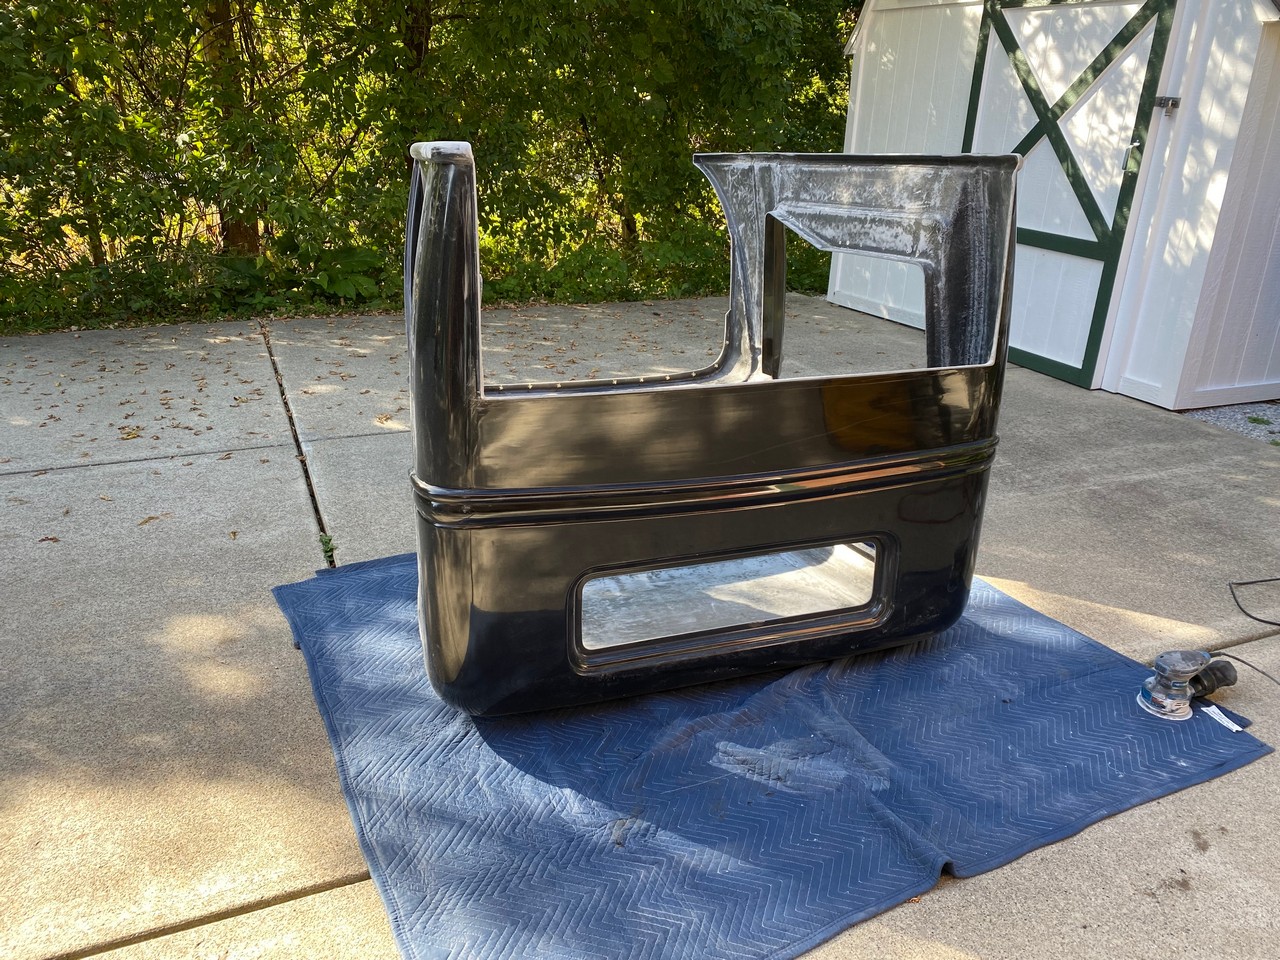
That’s it for now. Was invited to bring the Coupe to another big car show tomorrow (https://americanspeedfestival.com/) but right now rain is in the forecast tonight through Monday. See how that works out.
Last edited by edwardb; 10-02-2021 at 05:21 PM.
Build 1: Mk3 Roadster #5125. Sold 11/08/2014.
Build 2: Mk4 Roadster #7750. Sold 04/10/2017.
Build Thread
Build 3: Mk4 Roadster 20th Anniversary #8674. Sold 09/07/2020.
Build Thread and
Video.
Build 4: Gen 3 Type 65 Coupe #59. Gen 3 Coyote. Legal 03/04/2020.
Build Thread and
Video
Build 5: 35 Hot Rod Truck #138. LS3 and 4L65E auto. Rcvd 01/05/2021. Legal 04/20/2023.
Build Thread. Sold 11/9/2023.
-
Post Thanks / Like - 0 Thanks, 1 Likes
-
10-02-2021, 06:38 AM
#243
PLATNUM Supporting Member


Looking great so far! Keep up the good work.
16+ FFR kits and counting!
-
Post Thanks / Like - 1 Thanks, 0 Likes
-
10-02-2021, 05:57 PM
#244
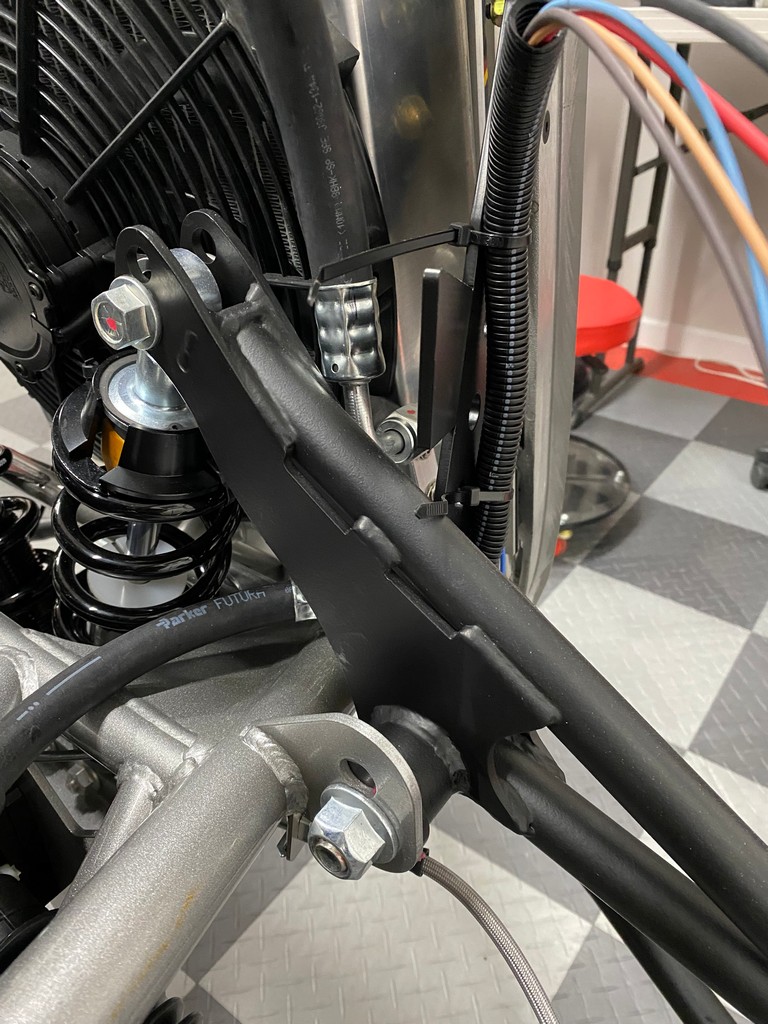
Nice work Paul. Heater hoses and a/c lines are next on my list. So far I have the heater control valve behind dash and should be able to fit the dryer in there too (benefit of the smaller evap unit). Do you have a picture of your a/c line routing up front? Also any concerns with leaving the a/c system under vacuum? I am sure my first start will be several months off.
-
10-02-2021, 10:43 PM
#245
Senior Member


Originally Posted by
McGuyver

Nice work Paul. Heater hoses and a/c lines are next on my list. So far I have the heater control valve behind dash and should be able to fit the dryer in there too (benefit of the smaller evap unit). Do you have a picture of your a/c line routing up front? Also any concerns with leaving the a/c system under vacuum? I am sure my first start will be several months off.
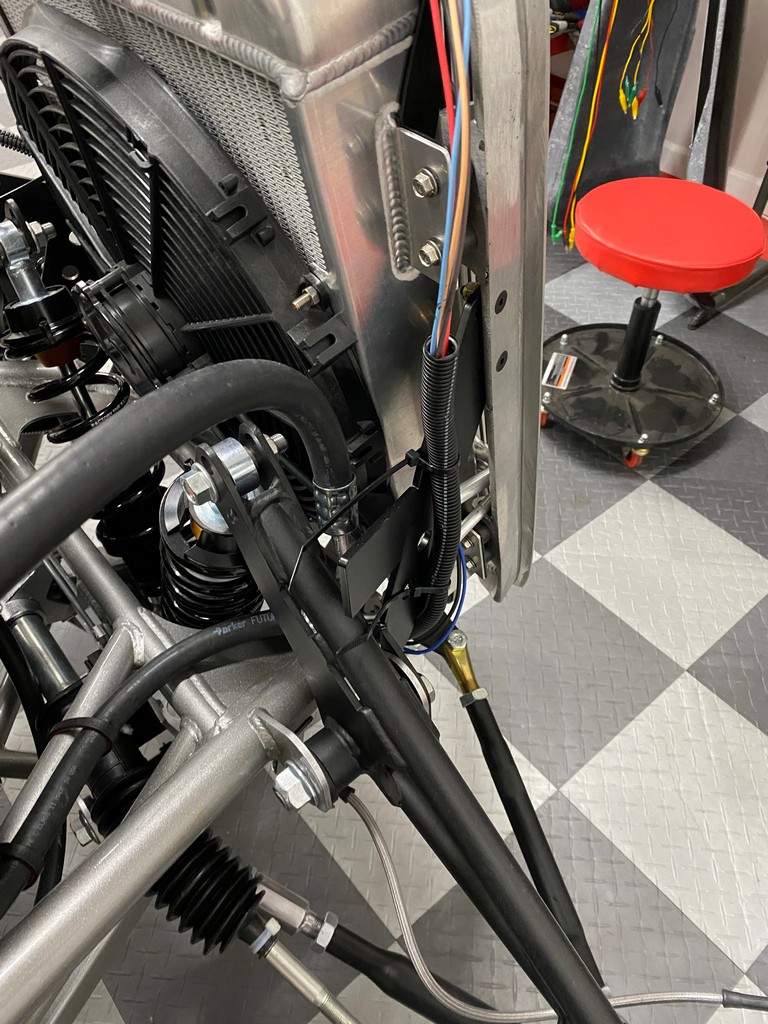
Thanks. Here are two pictures of the front where the A/C lines go around the front suspension to the condenser. Sorry, a little busy, but hopefully gives the idea. Note this is with the suspension at full droop. All the way up (shock at full compression) there's only room for the one hose underneath. I'm not aware that leaving the A/C system under vacuum is any problem. It is important to keep it sealed. At least according to the Vintage Air instructions where they say to leave the components sealed as long as possible.
Build 1: Mk3 Roadster #5125. Sold 11/08/2014.
Build 2: Mk4 Roadster #7750. Sold 04/10/2017.
Build Thread
Build 3: Mk4 Roadster 20th Anniversary #8674. Sold 09/07/2020.
Build Thread and
Video.
Build 4: Gen 3 Type 65 Coupe #59. Gen 3 Coyote. Legal 03/04/2020.
Build Thread and
Video
Build 5: 35 Hot Rod Truck #138. LS3 and 4L65E auto. Rcvd 01/05/2021. Legal 04/20/2023.
Build Thread. Sold 11/9/2023.
-
Post Thanks / Like - 1 Thanks, 1 Likes
-
10-03-2021, 12:20 AM
#246
Senior Member

I had the exact same issue with my moser. In case the drip comes back I used the below to do mine. I have a buddy that races mustangs and recommended as 8.8 diffs are notorious for leaks.
Fel-pro gasket
https://www.amazon.com/gp/product/B0...?ie=UTF8&psc=1
This is RTV specific for gear oil
https://www.amazon.com/gp/product/B0...?ie=UTF8&psc=1
Put a thin bead around the machined surface on the diff case. Lay the gasket on top and then another thin bead on the gasket. The other thing is double check the torques on the cover. Really got to make sure they are all evenly torqued if one is over torqued it will distort the diff cover and create a slight leak. Mine has been holding oil for a year now since I have done this.
-
10-08-2021, 04:51 AM
#247
Senior Member

Cab Inside Finished and Installed
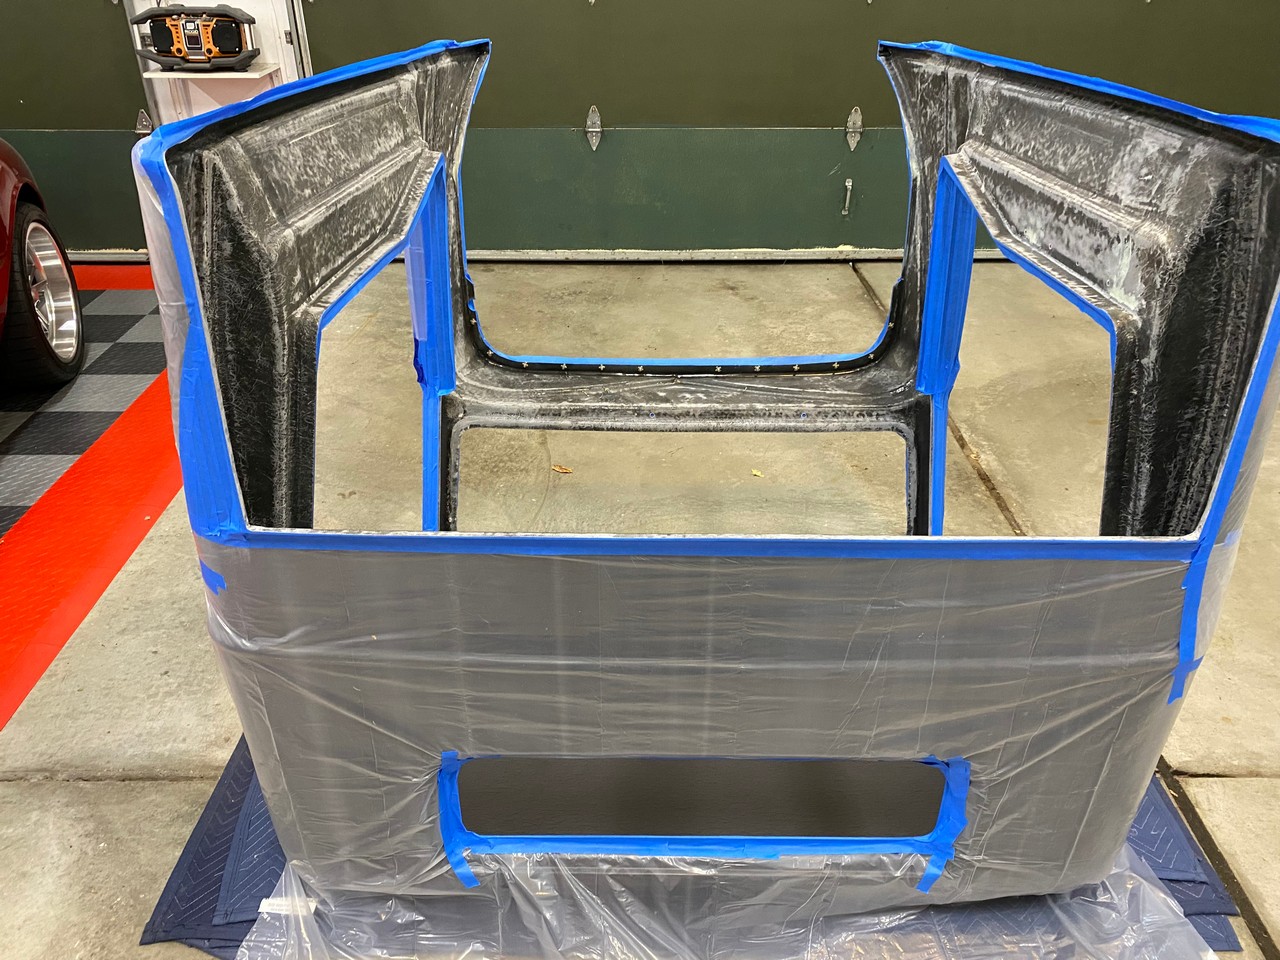
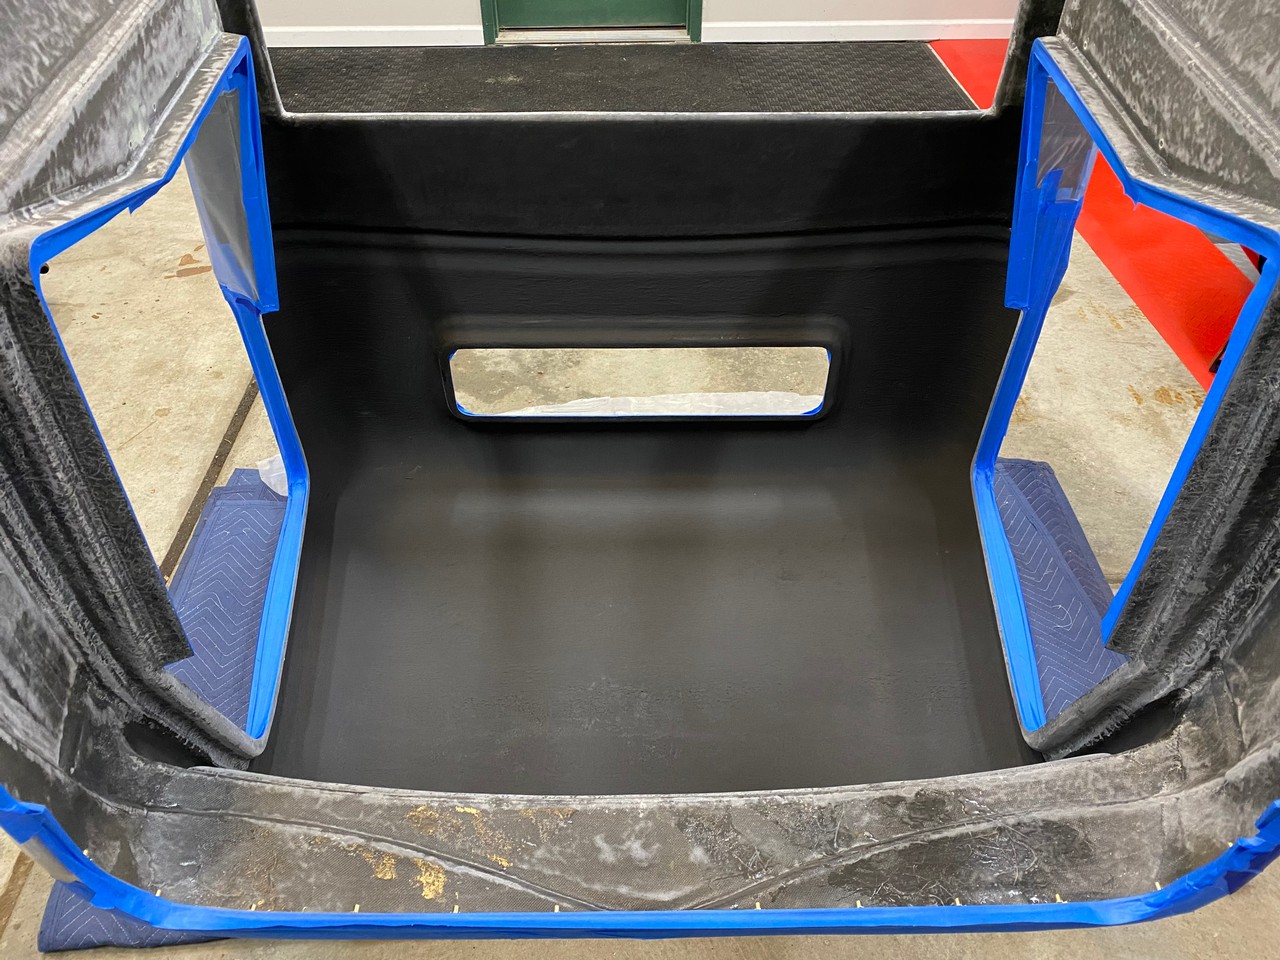
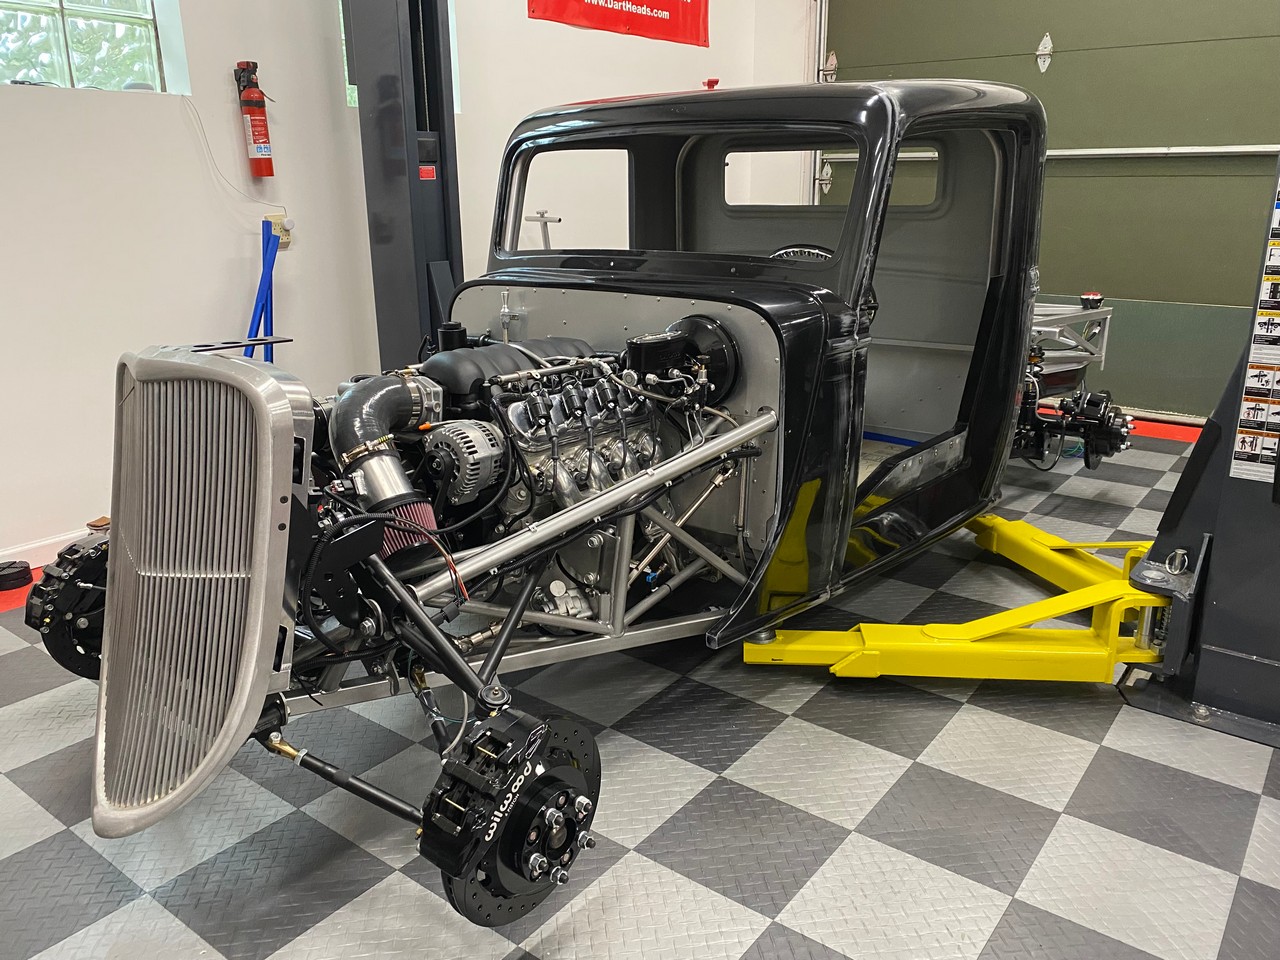
In my last update, showed a picture of the cab upside down in the driveway starting to clean-up and finish the interior. This week that was completed. Used a DA to knock down and clean up the glass a bit. Then some Bondo to level things out. I’m a rank beginner at such things and wasn’t going for a glass smooth surface. Just to make the bumps and glass layers smoothed out some. So a bit of a learning process. Main focus was the ceiling and back wall. Once that was done, rolled on a coat of LizardSkin's Ceramic Insulation coating also on the ceiling and back wall. Did this on the Coupe trying to reduce the amount of heat from the sun making it’s way into the interior. Don’t know if it helps but can’t hurt.
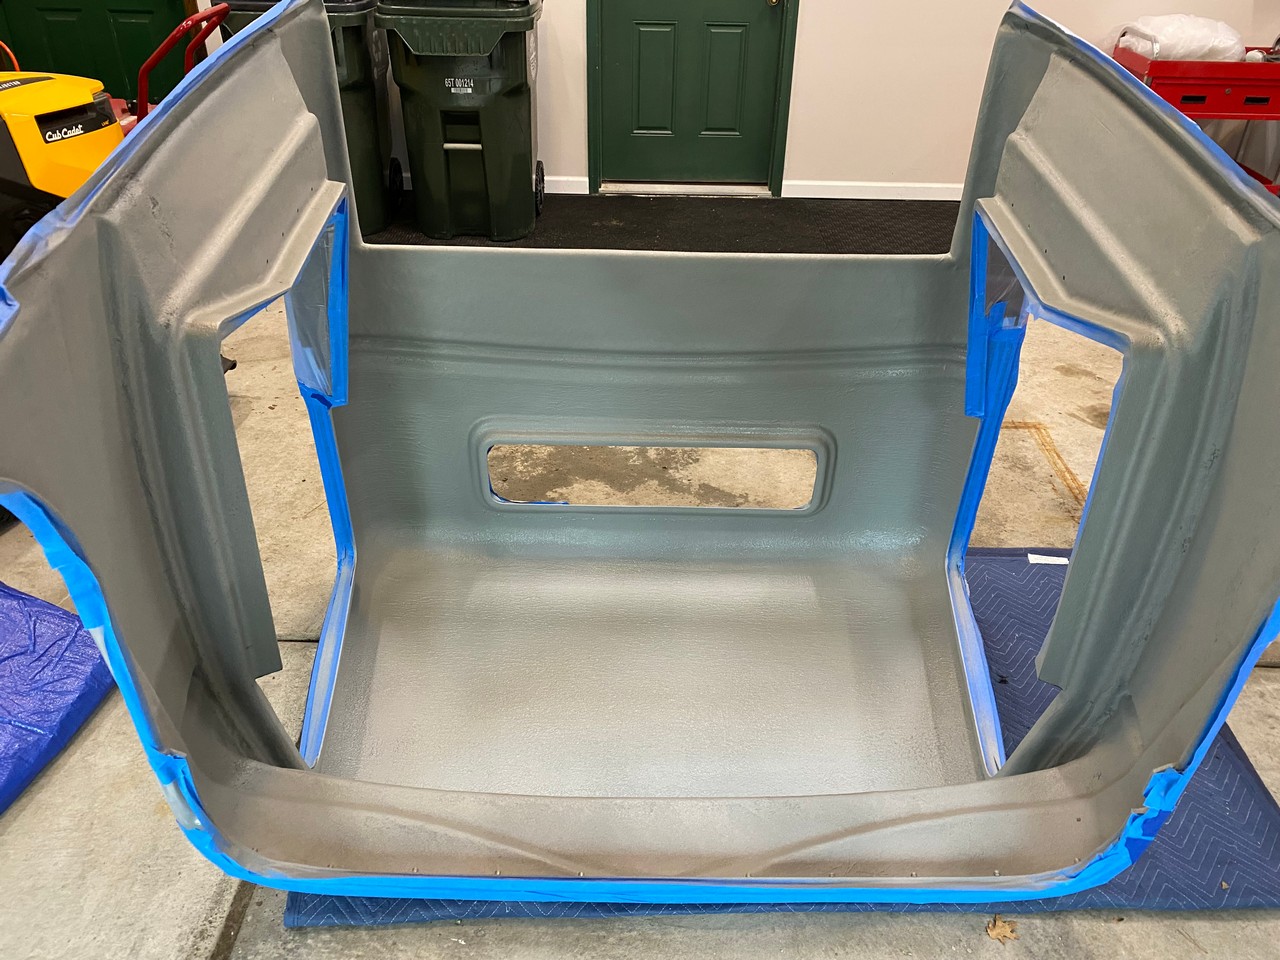
Then after masking, sprayed on two coats of UPOL Raptor. This is my second build using the Raptor product. Really like it. Did two things differently this time. First, standard Raptor is black. They also offer it in a tintable version with a number of colors available. Plus it can be tinted with other products apparently. Tried to lighten things up a bit this time so used their light gray tint which sort of matches the powder coat I used. Followed the directions for mixing and applying and all worked fine. Second, the standard spray gun they include in some of their kits is a very basic undercoat gun (often called a Schutz gun) which is what I used on the Coupe. Works OK but isn’t adjustable. You control the texture by varying the air pressure, distance spraying, and by adding a little reducer which I found helps some. In general lays down a pretty rough textured surface. UPOL also offers an upgraded adjustable gun (UPL-UP4880) which I decided to try for this build. The instructions were a little sparse, but after some experimenting and 40 PSI at the gun got it spraying nicely. Puts down a much smoother texture if that’s what you’re going for.
These pictures show the progress and final result with the cab back on the chassis. I personally don’t plan to take the cab back off for the rest of the build. Don’t know if the painter will. That’s TBD as I don’t have a painter selected yet. I’m happy with how it turned out. However, in hindsight I do wish I would have sprayed the LizardSkin insulation instead of rolling it on. It has more texture and variations than I really wanted. Thought it would flatten out more as it dried. Which it didn’t. It’s too late now and I’d do it differently in the future.
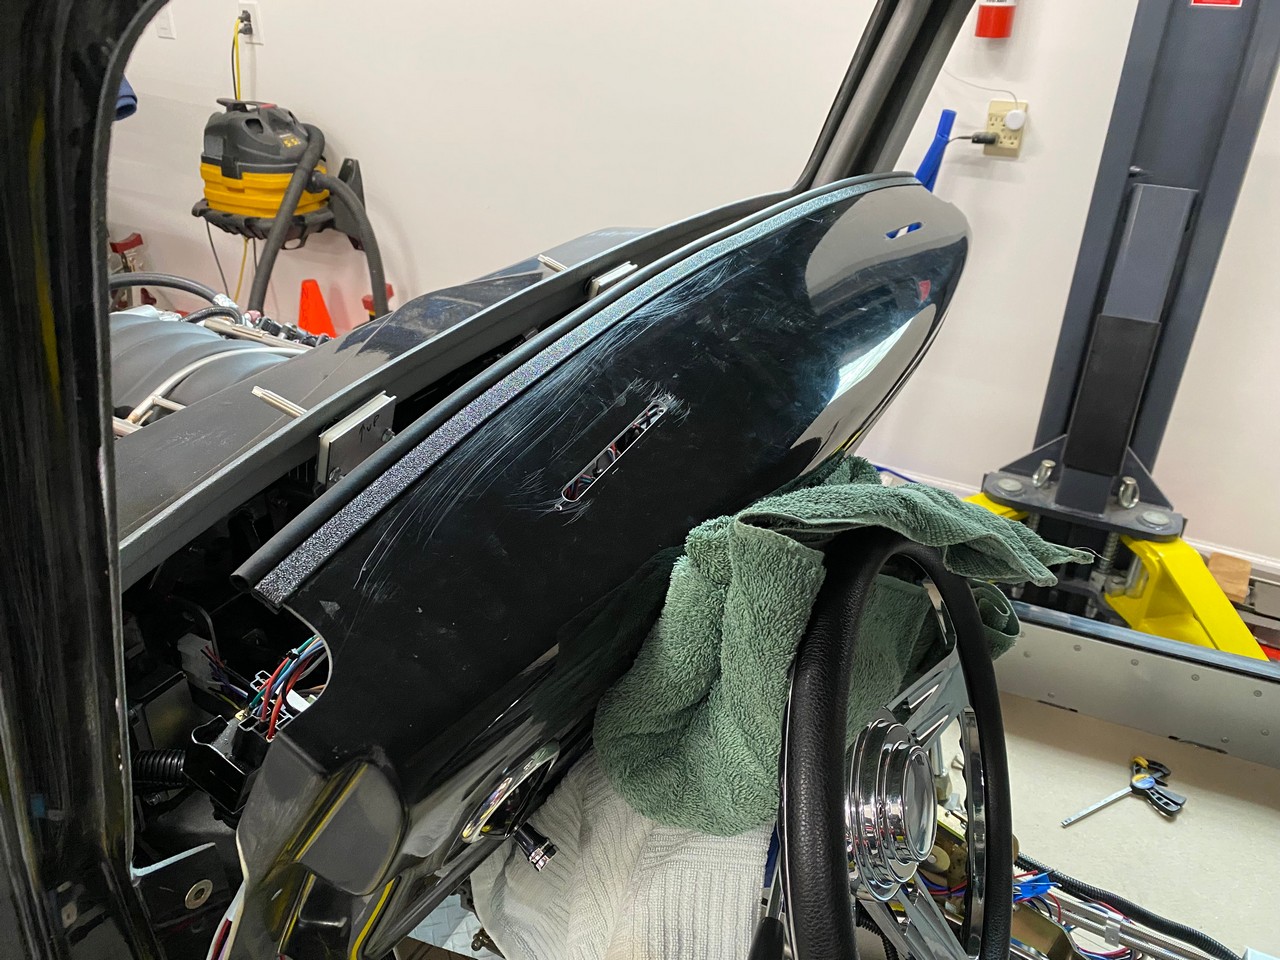
With the cab in place, now could do the final mounting on the dash and finish with a few remaining wires for electrical. I tried using the rubber edging the kit provided for the back of the dash against the windshield area. Didn’t care for it. Using bulb seal instead. Fortunately, I had a piece on hand that worked perfectly. Had to trim the back of the dash just slightly to match the curve of the windshield area. I used nutserts for the four dash mounting screws which are in the same general area as the upper door hinges. These https://www.mcmaster.com/97217A393/ which are specifically made for plastics. Worked great. I used the same style for the firewall except 10-32. Hooked up the remaining wires and tested the balance. Everything is working as it should including now the Vintage Air setup.
This is not a great picture, but thought I’d post it anyway. I wanted the dash to be removable for service or whatever. Plus I'm pretty sure I can't reach the upper door hinges with it in place. So tried to minimize or at least optimize the connections. But there are still several plus the duct hoses for the dash and defrost outlets. Not easy to reach from the bottom and clumsy to hold the dash away from the body while working. But I found if I put bolts into the lower mounting nutserts on each side I can rest the dash on those and tilt it down against the steering column and wheel, it’s easy to reach in and work. Will be a little harder with the windshield installed. But still workable.
Everything is buttoned up now. Literally the only thing standing in the way of first start now is the upper and lower radiator hoses. Then tires for a go-kart. So will be working on those next. Also happy to report no signs of leaking from my diff. So the fix described early seems to be holding. We’re going to be gone for the next week, so no updates for a couple weeks.
Last edited by edwardb; 10-08-2021 at 06:52 AM.
Build 1: Mk3 Roadster #5125. Sold 11/08/2014.
Build 2: Mk4 Roadster #7750. Sold 04/10/2017.
Build Thread
Build 3: Mk4 Roadster 20th Anniversary #8674. Sold 09/07/2020.
Build Thread and
Video.
Build 4: Gen 3 Type 65 Coupe #59. Gen 3 Coyote. Legal 03/04/2020.
Build Thread and
Video
Build 5: 35 Hot Rod Truck #138. LS3 and 4L65E auto. Rcvd 01/05/2021. Legal 04/20/2023.
Build Thread. Sold 11/9/2023.
-
Post Thanks / Like - 0 Thanks, 5 Likes
-
10-27-2021, 10:18 PM
#248
Senior Member

Back Home, Back At It
It’s been a while since an update. Back home after being gone. Caught up on things and finally back on the build some the last couple days. More about that later. But first our trip.
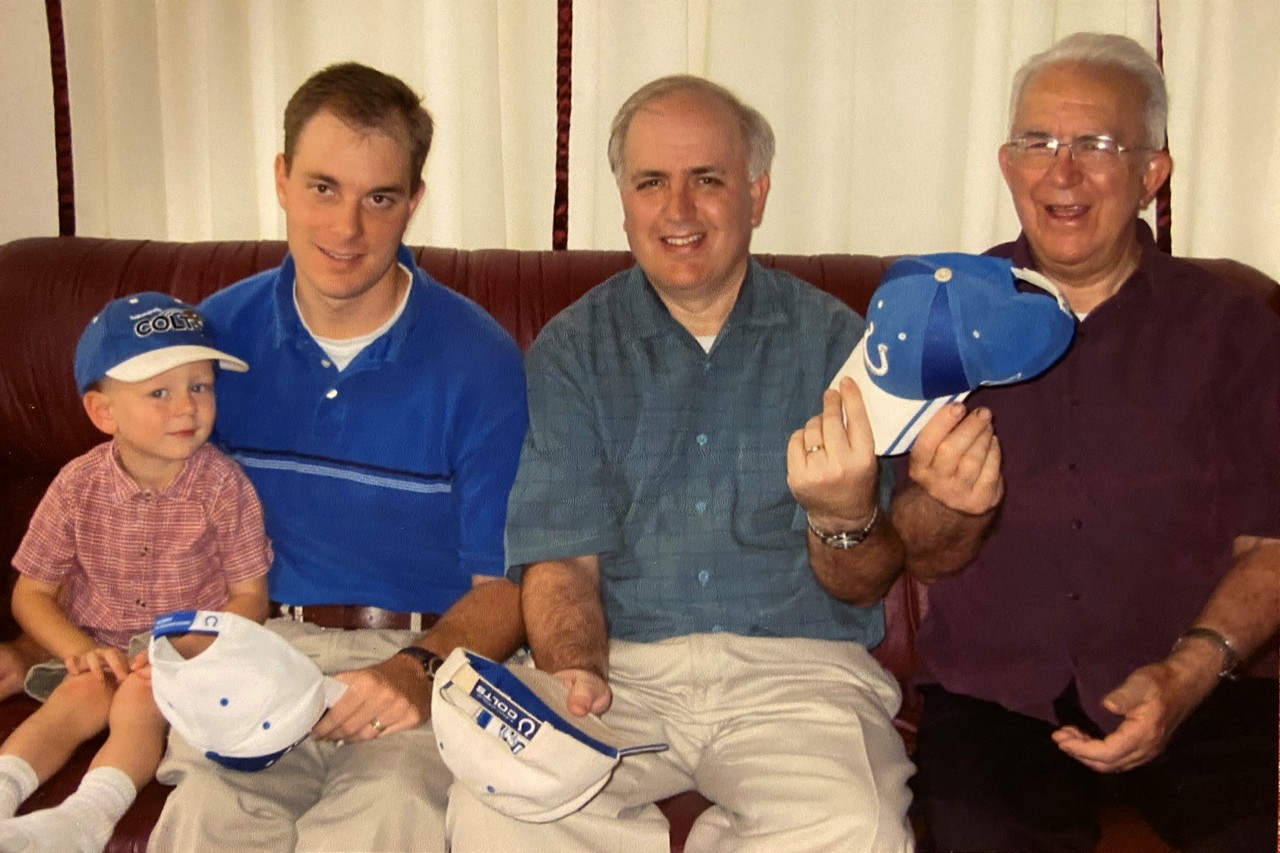
We went west to Oregon to celebrate the homegoing of my 91-year-old dad. He’s been in failing health for several years, and now has peacefully left us. If you don't mind, would like to say a few words. We had a celebration service of his life and it was perfect. He and my mom had 6 children. Yes, I'm the oldest as they all like to point out. Now with 17 grandchildren (and 16 spouses), and 34 great grandchildren. Not all could make it. But a lot of them did. My dad retired from the construction industry at an early age (in his late 40’s) and spent the second half of his life building churches, schools, an all-season camp, helping with my brother's business, and more than I could possibly mention. Plus, several overseas trips for more of the same. All for no or minimal pay. They weren't rich but they always had enough. Many were there to pay tribute to his life of service. It was awesome. There were lots of pictures. This is one of my favorites and thought I would share. This is four generations. My dad, me, our oldest son, and his oldest son. The picture was taken in Ecuador where our son lived at the time with his family. He was there flying for MAF (Mission Aviation Fellowship). We were there for two weeks with some other family members finishing a complete remodel of the house they lived in. Trying to keep ahead of the rain forest termites. Our son is now located back in their home office in Nampa, Idaho. Our first stop for trips when we go west. I’m not sure what exactly is happening in this picture. Something about passing the hats. You can guess we’re Colts fans. The picture is slightly dated as the little guy in this picture is now 6'4" and a sophomore mechanical engineering student at university. But it’s still one of my favorites because of the legacy it represents. Miss you dad.
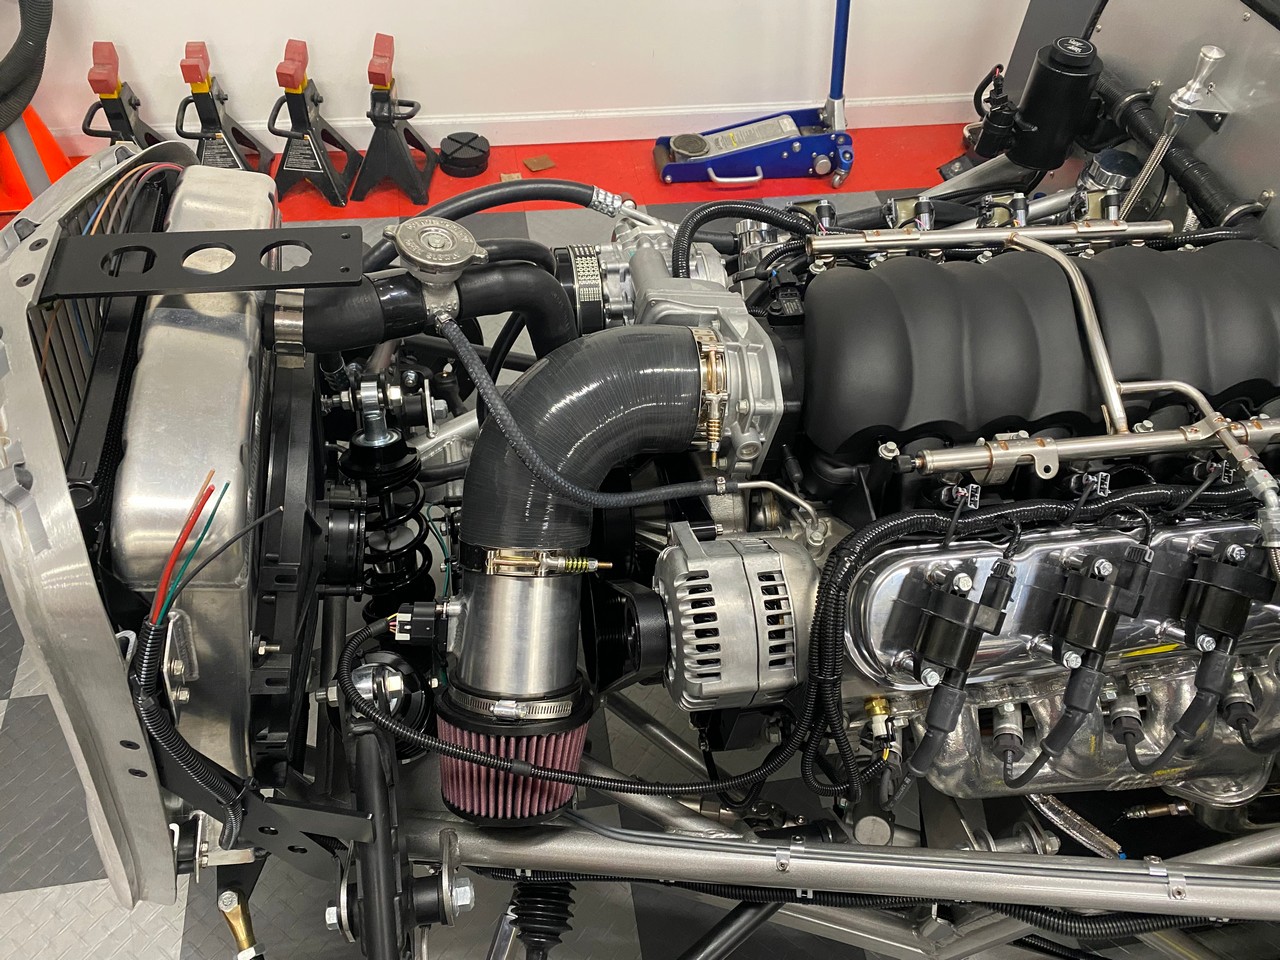
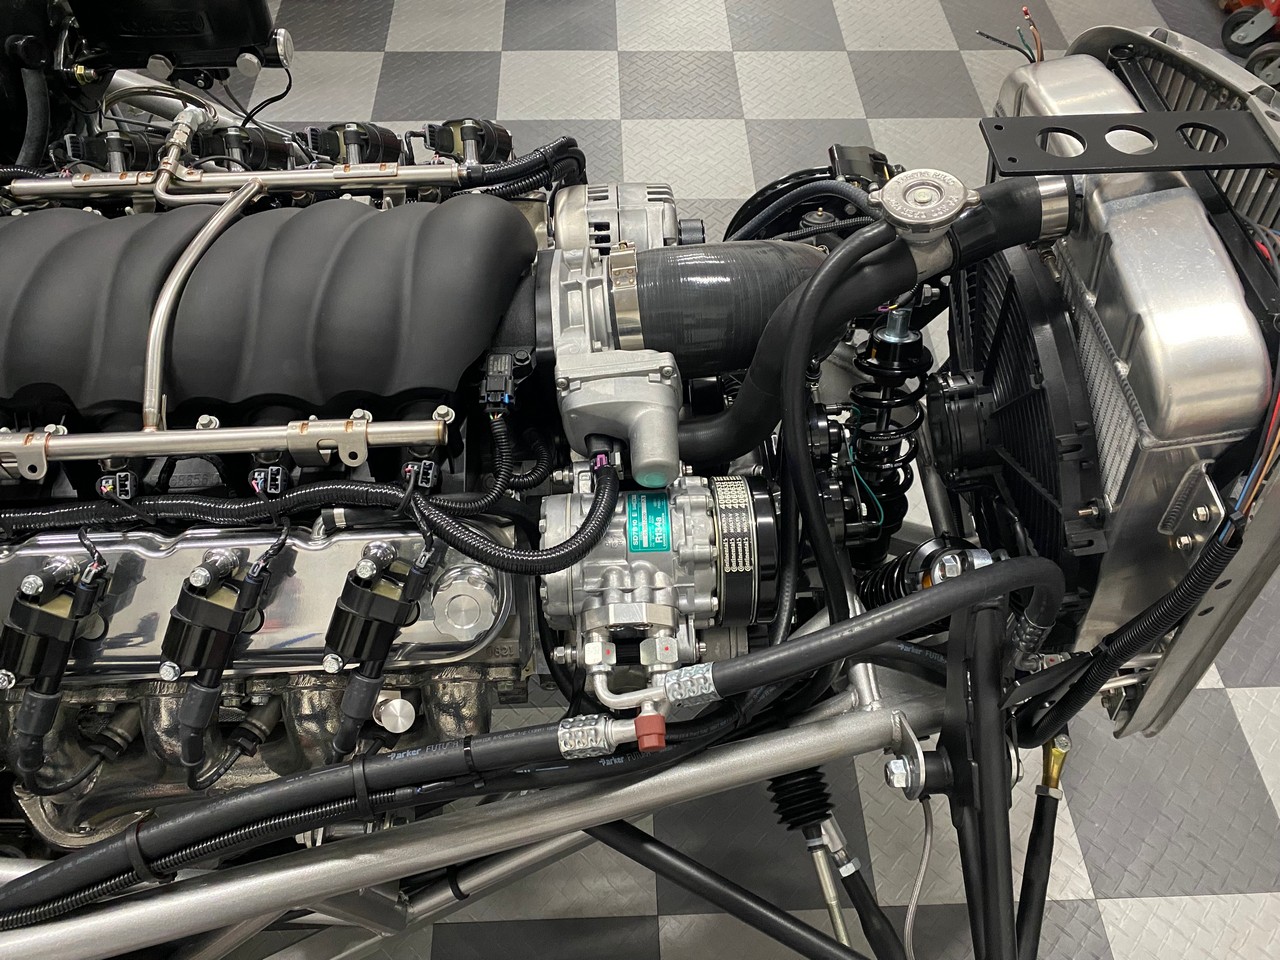
Back to the build. Not a ton to report. I’m wrapping up details on the LS installation. Have the top radiator hose and T-filler installed. For the hose, I used a short piece of 1-1/2” hose harvested from the kit supplied T-filler, the Moroso 63740 T-filler mentioned previously, two Continental 60425 right angle molded 1-1/4” hoses trimmed and joined with a Summit Racing 380600 connector. After some cutting and fiddling, lines up the inlet on the LS quite well. Happy with it. If you look closely, you’ll see I’m missing a couple clamps. I like to use the Gates PowerGrip heat shrink clamps. I need to order a few more, but waiting to finish the bottom hose where there will also be a couple. They all need to ordered for the exact OD.
In addition, I ran the line to the overflow tank at the manual recommended location on the firewall, plumbed the LS PCV hose from the RH valve cover to the intake, and hooked up the LS stem vent into the side of the T-filler. There I used a Gardner-Westcott J9044 hose barb to pipe fitting. I had to tap the 1/8" NPT threads into the T-filler. But that was easy enough to do.
I’m waiting for the last parts for the lower radiator hose. When received and installed, I'll fill the radiator, oil prime the engine, put some gas in the tank, and first start should be good to go. Anxious for that of course. I splurged and bought the Allstar Performance ALL10535 oil pressure primer tank Erik Treves recommended. A little more expensive than the garden sprayer homebuilt versions seen on YouTube. But for a $10K engine, decided this is a step I'm not going to take a chance on. The tank looks nice and more than up to the task. The LS requires a M16x1.5 to 1/8" NPT adapter to go into the oil gallery. That plus the fittings that came with the tank provided everything needed. That has to be an all-time first. I was pleasantly surprise to see a "Made in America" sticker on the AllStar Performance setup. Nice. Plus as you can barely see (lots going on there) I mounted the horns in the available space. Made a bracket and it's held onto the round frame member with two SS cushioned loop clamps. Works well and didn't have to drill the frame.
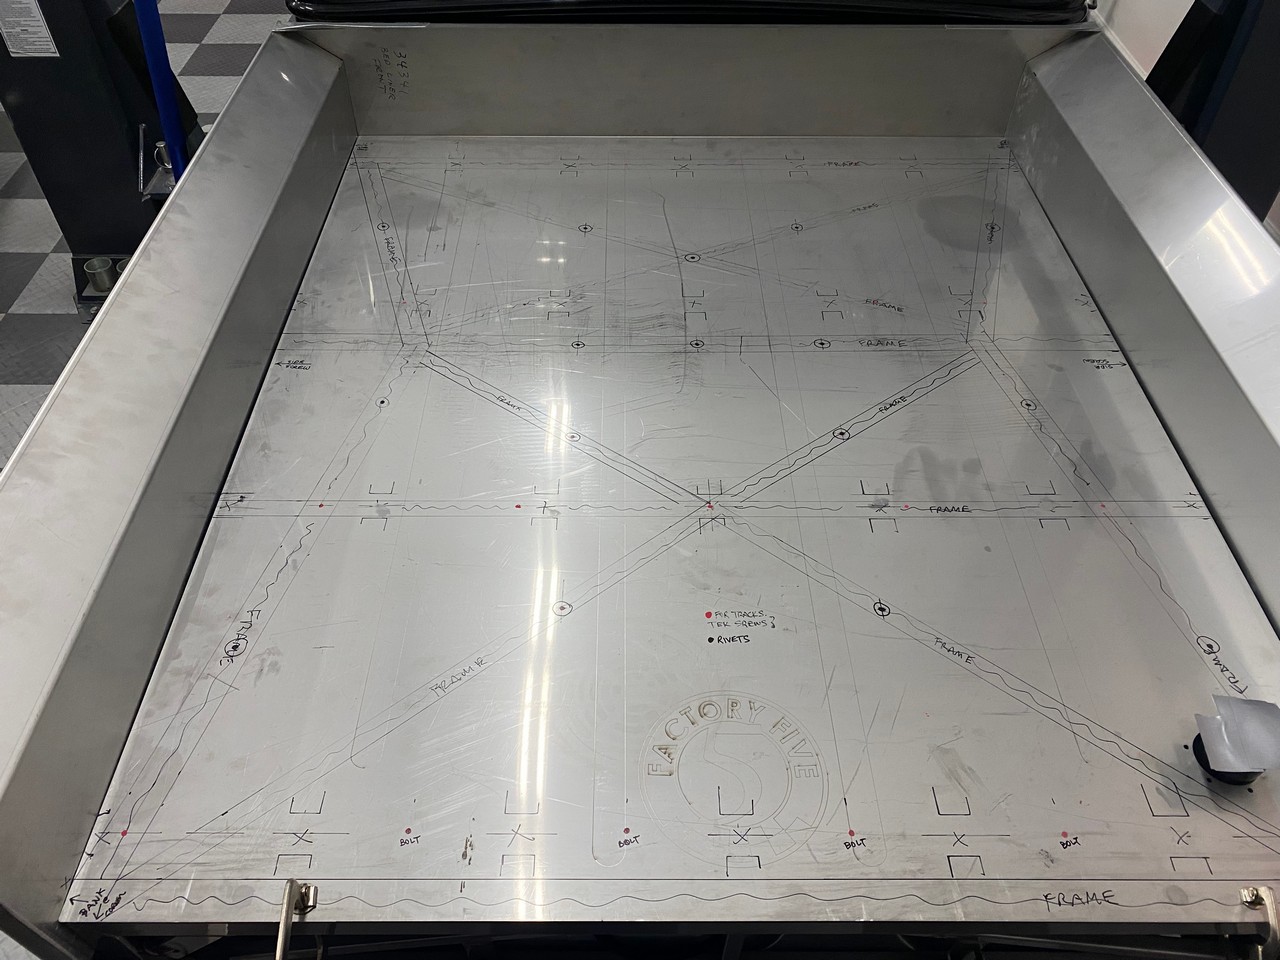
In the meantime, to keep making progress elsewhere, started working on body parts. First up the truck bed and sides. I have the Smokey Road Rod Shop aluminum bed wood system. Supplied by Factory Five after they were unable to supply the optional wood floor I ordered with the kit. It’s a great substitution. I see it’s now on the truck order form, part #35115. I’ve gone back and forth over whether to use the provided SS sheet floor under the “wood” system. Posted another thread and received some good feedback. Decided I’m going to use it. It makes the installation of the floor a bit easier (I think…) but mainly gives a clean underside for the bottom. It does add some weight (that thing is heavy…) but trucks typically need some weight in the back plus this isn’t a competition machine. So after mocking up the complete floor system on the SS sheet, with the sides temporarily clamped in place (sorry, didn’t take a picture) I finalized the layout and determined all the locating points. In order to that accurately, transferred the frame locations to the top side and marked where I’m going to put fasteners. All but several locations at the very back will be into frame members. My plan is to use some silicone between the SS sheet and the frame (just like the regular aluminum pieces) and rivet. Not many. Just to locate, get it flat on the frame, and hold in place. The fasteners for the floor cross pieces will do the rest. Picture of my artwork:
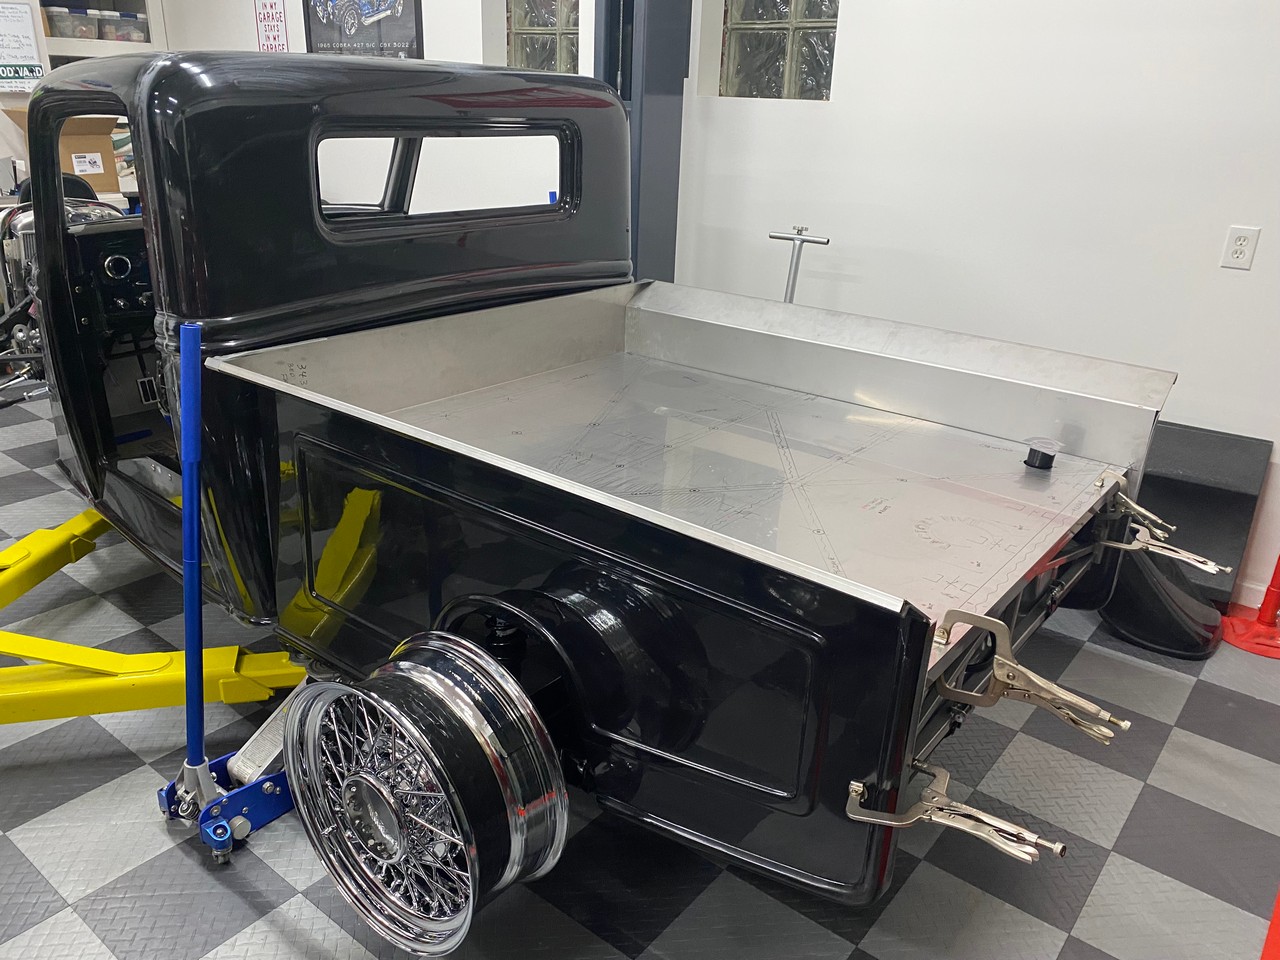
Today I started working on the sides. I had done some preliminary fitting and trimming previously, so not too much to do. I found the angle on the SS piece across the front did not accurately fit the angle on the sides. About 1/8” off in the length of where they meet. So trimmed the front piece so they fit nicely now. IMO the manual is a little light on details for mounting all the body parts. I have these pretty massive bags of parts for mounting the bed sides, back, fenders, etc. But the manual is very general on how to use them all. I browsed through a number of pictures of other builds so think I have a plan. Just clamped temporarily in place for now. I’m going to mock up more pieces before drilling and mounting permanently. Includes the back, fenders, running boards, etc. May even mock up the front engine covers and front fenders too so I can confirm the location of the running boards. My experience is fitting these bodies very often is dependent on multiple pieces and for the best overall fit check them all first.
That’s it for now. Fall and cool weather and definitely have arrived here in Michigan. Clearing leaves is now part of my job description. Love a wooded lot. But they can be a lot of work. Hope to get the Coupe out a few more times. But once we’re into November, on borrowed time. Time to switch the riding mower with the snow blower out of the storage shed. You guys in the warm climates are just jealous. I know.
Last edited by edwardb; 10-28-2021 at 04:46 AM.
Build 1: Mk3 Roadster #5125. Sold 11/08/2014.
Build 2: Mk4 Roadster #7750. Sold 04/10/2017.
Build Thread
Build 3: Mk4 Roadster 20th Anniversary #8674. Sold 09/07/2020.
Build Thread and
Video.
Build 4: Gen 3 Type 65 Coupe #59. Gen 3 Coyote. Legal 03/04/2020.
Build Thread and
Video
Build 5: 35 Hot Rod Truck #138. LS3 and 4L65E auto. Rcvd 01/05/2021. Legal 04/20/2023.
Build Thread. Sold 11/9/2023.
-
Post Thanks / Like - 3 Thanks, 6 Likes
-
10-28-2021, 06:45 AM
#249
Nice post about your family. Thanks for sharing. Keep up the top notch work!
-
Post Thanks / Like - 1 Thanks, 0 Likes
-
10-28-2021, 07:04 AM
#250
My condolences. Sounds like your dad was a great man!
-
Post Thanks / Like - 1 Thanks, 0 Likes
-
10-28-2021, 07:11 AM
#251

Steve >> aka: GoDadGo

Great Picture!
.........Great Story!
..................Great Patriarch!
.....Sorry for your loss, but I am sure he is with the Lord in paradise.
You Pop Sounds Like He Truly Was A Man For All Seasons!
-
Post Thanks / Like - 1 Thanks, 0 Likes
-
10-28-2021, 07:19 AM
#252
Not a waxer

Truly sorry for your loss Paul. Condolences to you and your family. Sounds like you have some great memories; hold them close and visit them often.
Jeff
-
Post Thanks / Like - 1 Thanks, 0 Likes
-
10-28-2021, 09:50 AM
#253
Paul, sorry to hear about your father but glad that you were able to get together to celebrate his life. Thanks for sharing the stories of your family.
-Steve
-
Post Thanks / Like - 1 Thanks, 0 Likes
-
10-28-2021, 10:15 AM
#254
Paul, thank you so much for sharing some memories of your father with us. He sounds like he was a pretty special guy, and will be missed by many. I'm so sorry for your loss.
-John
MkIV Roadster build: Gen 2 Coyote, IRS, TKO600. Ordered 10/24/18. Delivered 1/29/19. Engine installed 8/8/21. First start 9/12/21. First go-kart 9/17/21. Off to paint 4/11/22. Back from paint 12/30/22.
Build thread here.
-
Post Thanks / Like - 1 Thanks, 0 Likes
-
10-28-2021, 01:04 PM
#255
Paul Awesome memories. Thanks for sharing. Taking care of my mom now too. Slowing me down a bit but worth the time. Also have a family member that is in Mission Aviation. Still having fun building like you. Keep it up!
20th Anniversary MK4 Roadster, #8752, 18 of 20, Delivered 12/03/15, 1st Start 01/28/2017, off to paint 4/13/2017, Forte 351w/ Holley EFI, Forte throttle linkage, TKO 600/Forte Hyd. Clutch, UniSteer Electra Steering, RT's turn Signals, many Breeze parts, Paint by the Jeff Miller. Finished on 10/08/2017. 500 mile inspection on 10/21/2017, 3000 mile inspection on 1/14/19.
-
Post Thanks / Like - 1 Thanks, 0 Likes
-
10-28-2021, 08:34 PM
#256
Paul, what’s this snow blower thing you speak of? I haven’t seen that white stuff since I moved to Tampa 30 years ago…
Regards jeremie
-
Post Thanks / Like - 1 Thanks, 1 Likes
-
10-30-2021, 10:35 AM
#257
My condolences to you and family Paul. I am sure you have many many great memories.
Tony
-
Post Thanks / Like - 1 Thanks, 0 Likes
-
10-30-2021, 04:00 PM
#258
Sorry for your loss Paul and condolences to the entire family. Jim y
Mk4 9735 complete kit delivered 11/29/19 Gen 3 Coyote, Tremec TKO 600, Moser 3.55 First start June 25, 2020 First Go Cart July 20, 2020
-
Post Thanks / Like - 1 Thanks, 0 Likes
-
10-31-2021, 08:30 AM
#259
Paul-
Thanks for sharing a story about your Dad. He sounds a lot like you frankly. His selflessness sounds inspiring, and an attribute I wish more folks tried to emulate! I love that picture!
Like the others, I am sorry for your loss, and I hope the warm memories of this fine gentleman sustain you.
Thanks too, for the wonderful build threads that so many of us rely on. I appreciate you!
Regards,
Steve
-
Post Thanks / Like - 1 Thanks, 1 Likes
 Lew
Lew liked this post
-
10-31-2021, 10:14 AM
#260
Senior Member

Thank you guys. Really appreciate all the kind and generous comments. Means a lot.
Build 1: Mk3 Roadster #5125. Sold 11/08/2014.
Build 2: Mk4 Roadster #7750. Sold 04/10/2017.
Build Thread
Build 3: Mk4 Roadster 20th Anniversary #8674. Sold 09/07/2020.
Build Thread and
Video.
Build 4: Gen 3 Type 65 Coupe #59. Gen 3 Coyote. Legal 03/04/2020.
Build Thread and
Video
Build 5: 35 Hot Rod Truck #138. LS3 and 4L65E auto. Rcvd 01/05/2021. Legal 04/20/2023.
Build Thread. Sold 11/9/2023.
-
11-05-2021, 05:04 PM
#261
Senior Member

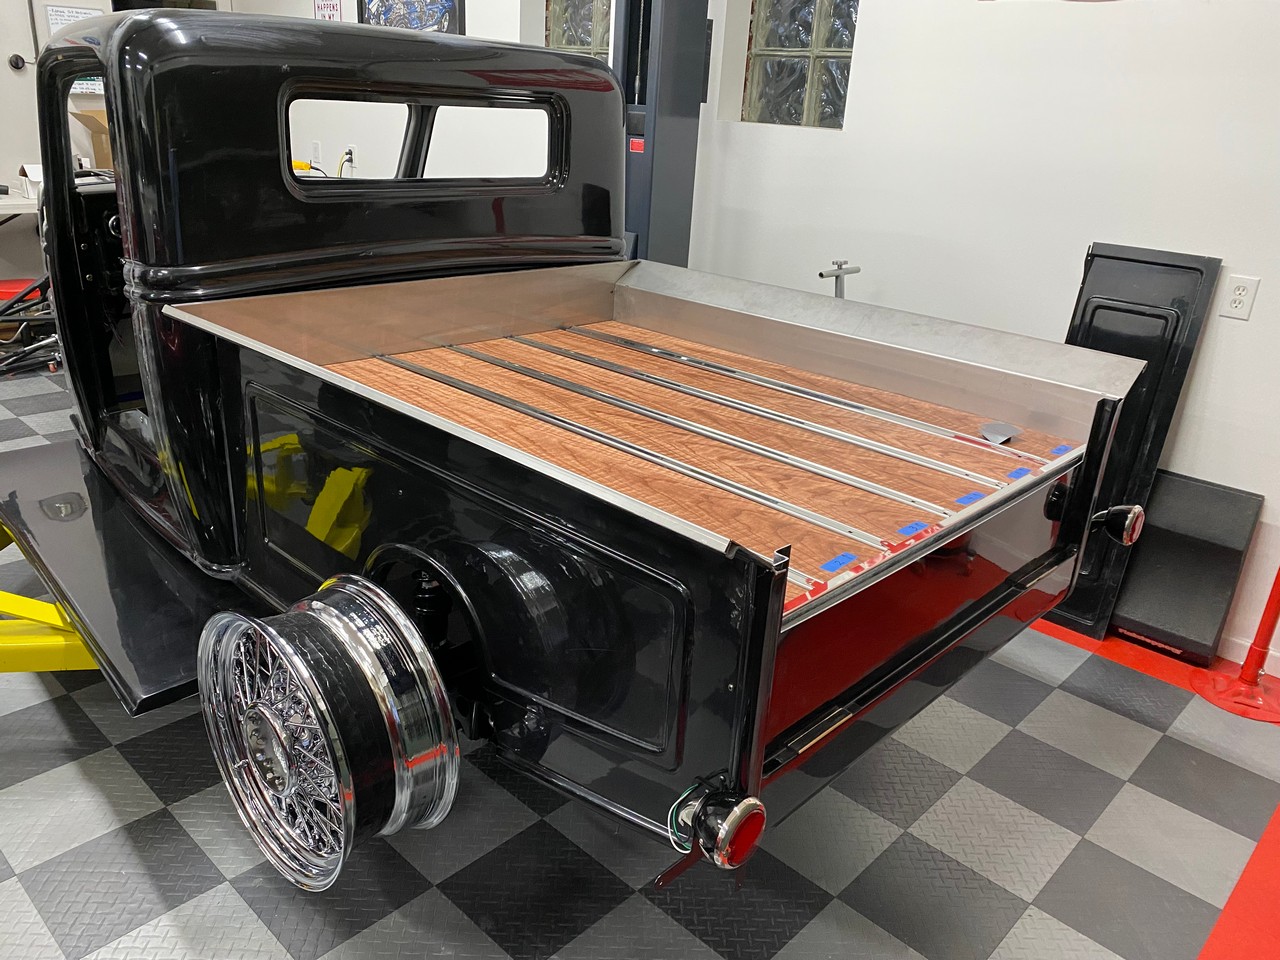
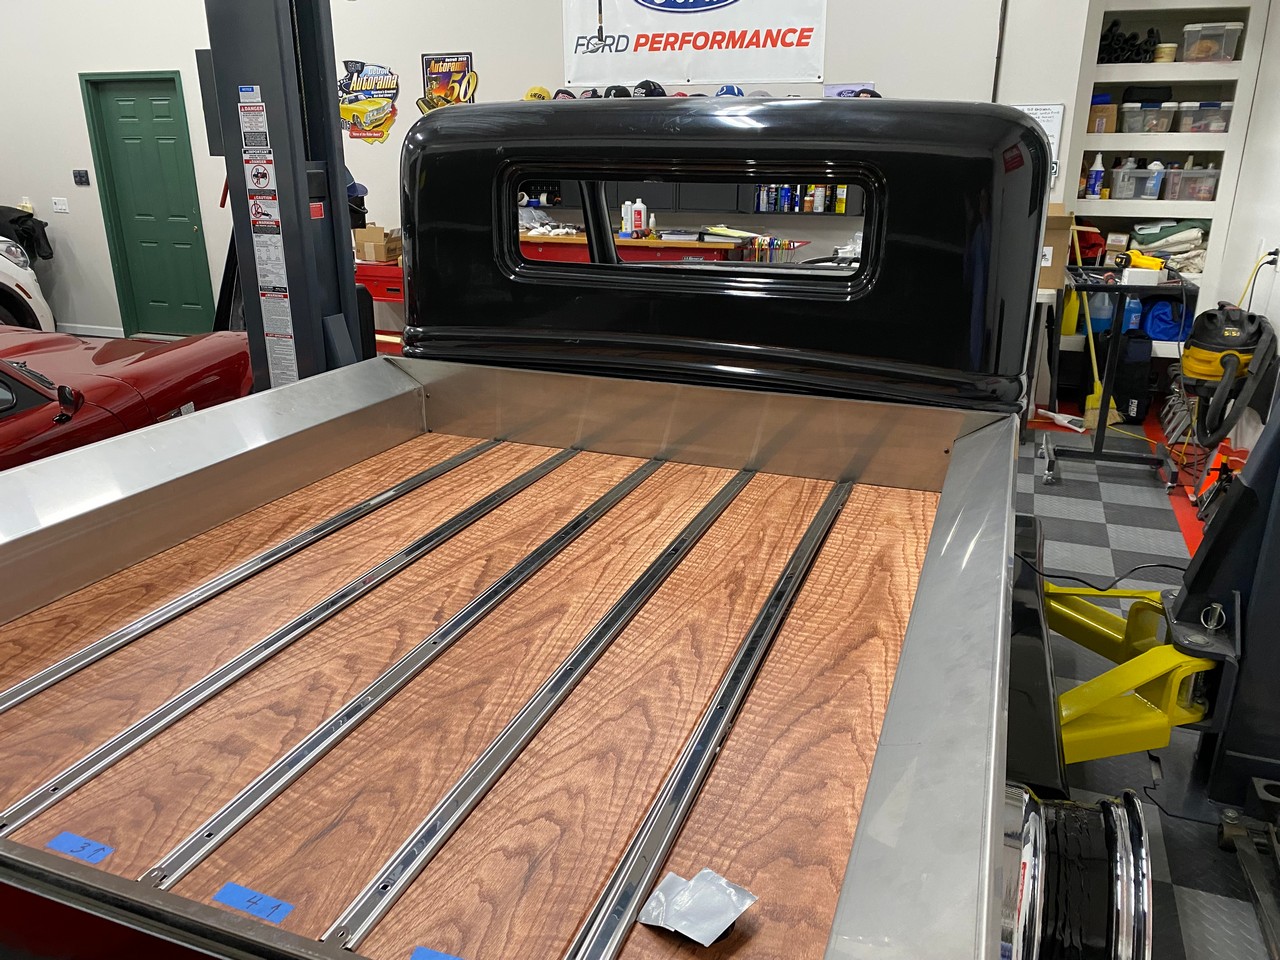
Big day today. Completed the first start. But a few things before that. While waiting the past few days for parts to arrive, I've worked on the truck bed quite a bit. First up was fitting the sides. Those things are heavy and bit clumsy to handle. Decided to attach with three bolts along the front, one in the middle (there’s a tab on the frame just for that purpose), and two in the back. For each, installed 1/4-20 nutserts in the frame. The front bolts require spacers between the side piece and frame. Included with the hardware. I used some instant glue and attached them to the inside of the sides. Nearly impossible to assembly otherwise. Just not enough hands. Really important to take your time to get the positioning just right. I lost track of how many times I had them off and on. But pleased with how they turned out. Then worked on the rear rollpan. This piece attaches to the bed sides from the top all the around to underneath. Again, lots of checking and fitting. It was quite a bit oversize and took more than the usual trimming. I have three bolts on each side on the underside. There are flat head screws included for the back, which need to be flush to not interfere with the tailgate. I haven’t installed those yet. Will wait until the tailgate is installed. Which I’ve started but not finished yet. Put the wood (aka aluminum/vinyl) bed pieces back in to check the look. I like it. Also put the taillights together and mounted those and started mocking up the running boards. Looking more and more like a truck.
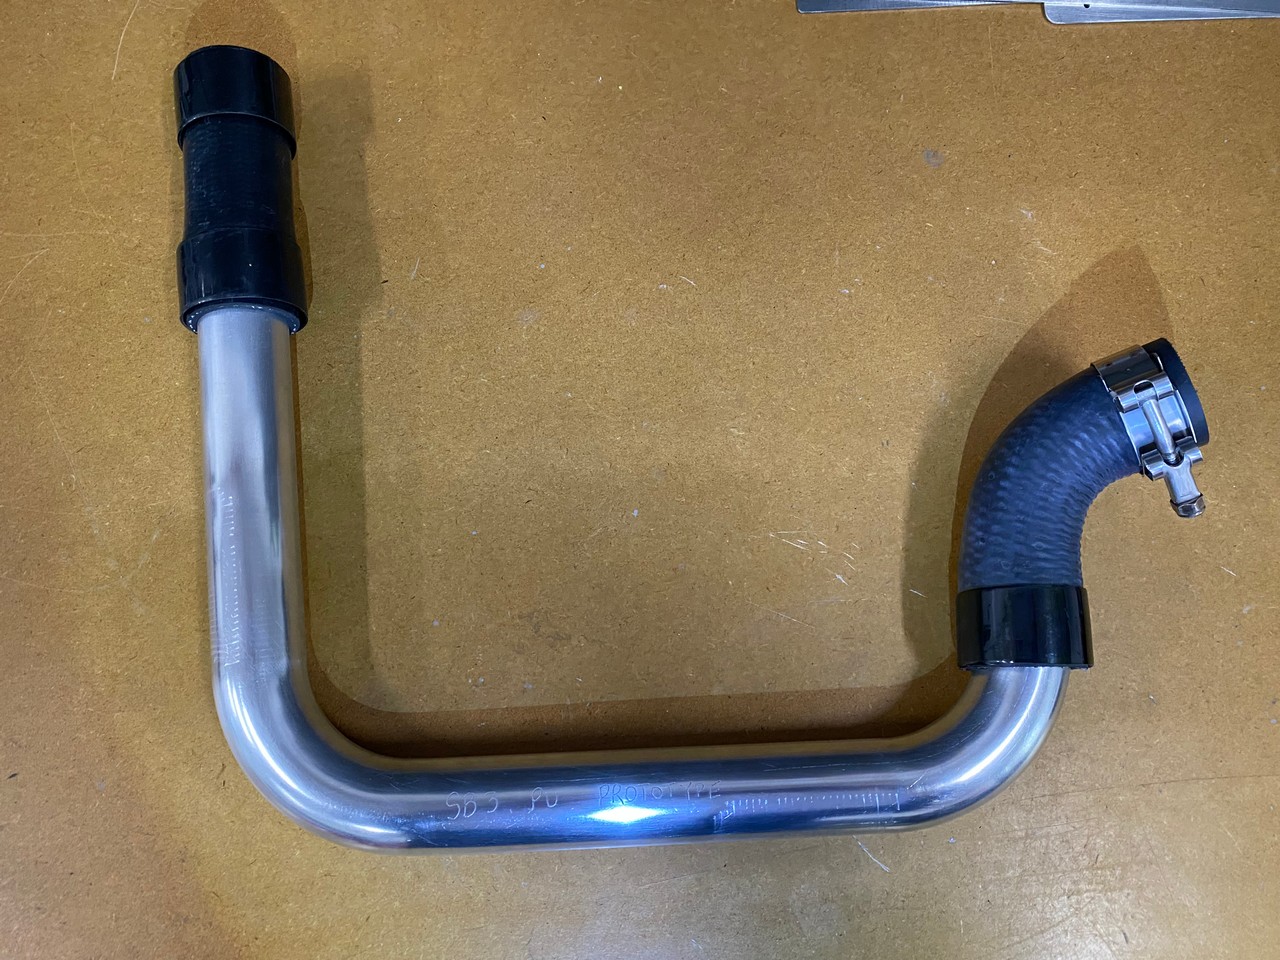
One remaining detail was the lower radiator hose. I’ve used Bob Boig’s Cool Tubes before. He has one for the truck on his website. But doesn’t say what engine it’s for. So contacted Bob, and he didn’t have one for my specific LS setup. After some discussion, I sent pictures and dimensions. Earlier this week, I received parts from Bob with several possibilities. With just a little trimming on each end, this one fit perfectly.
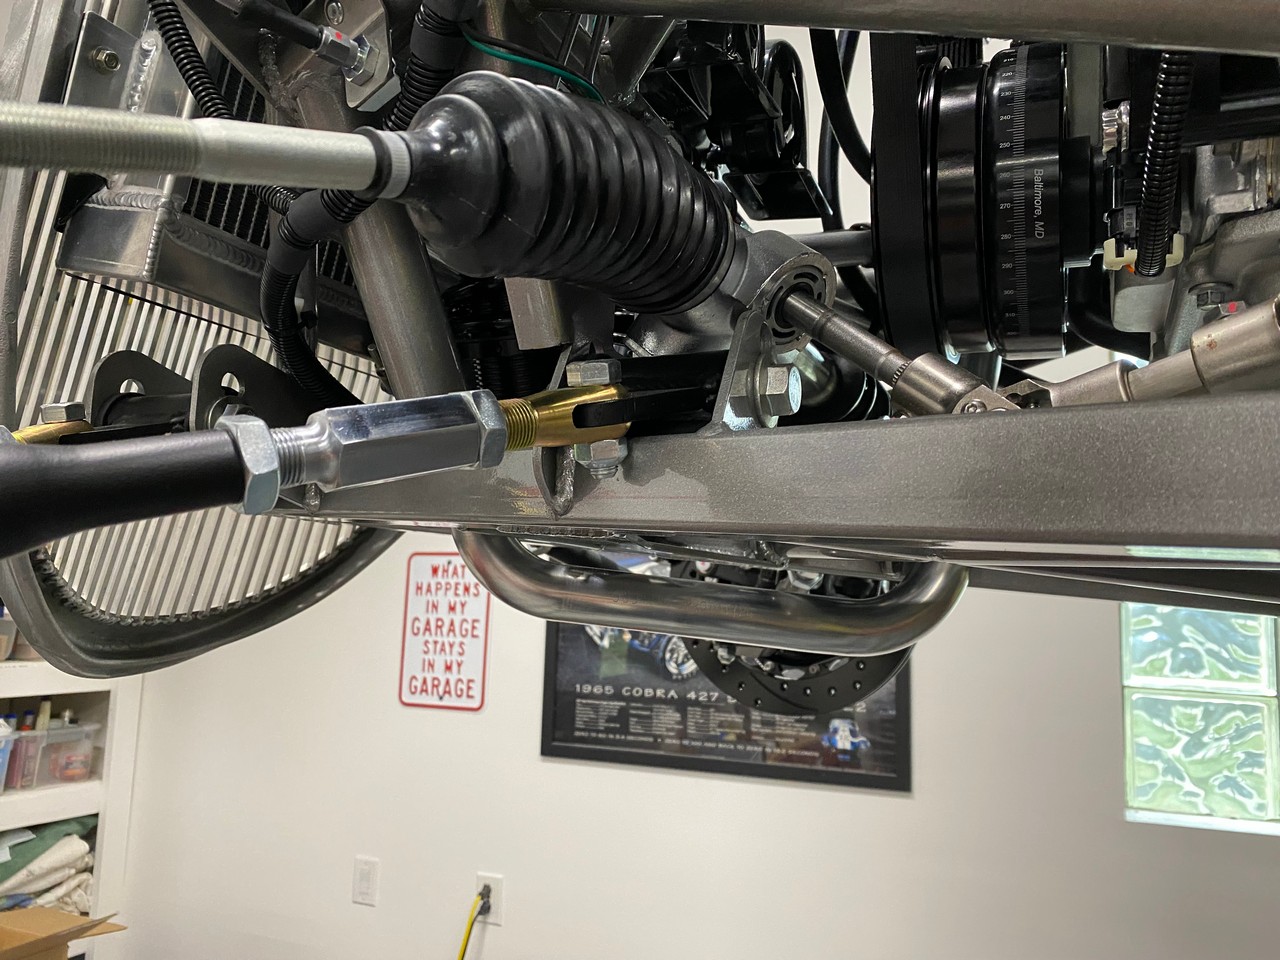
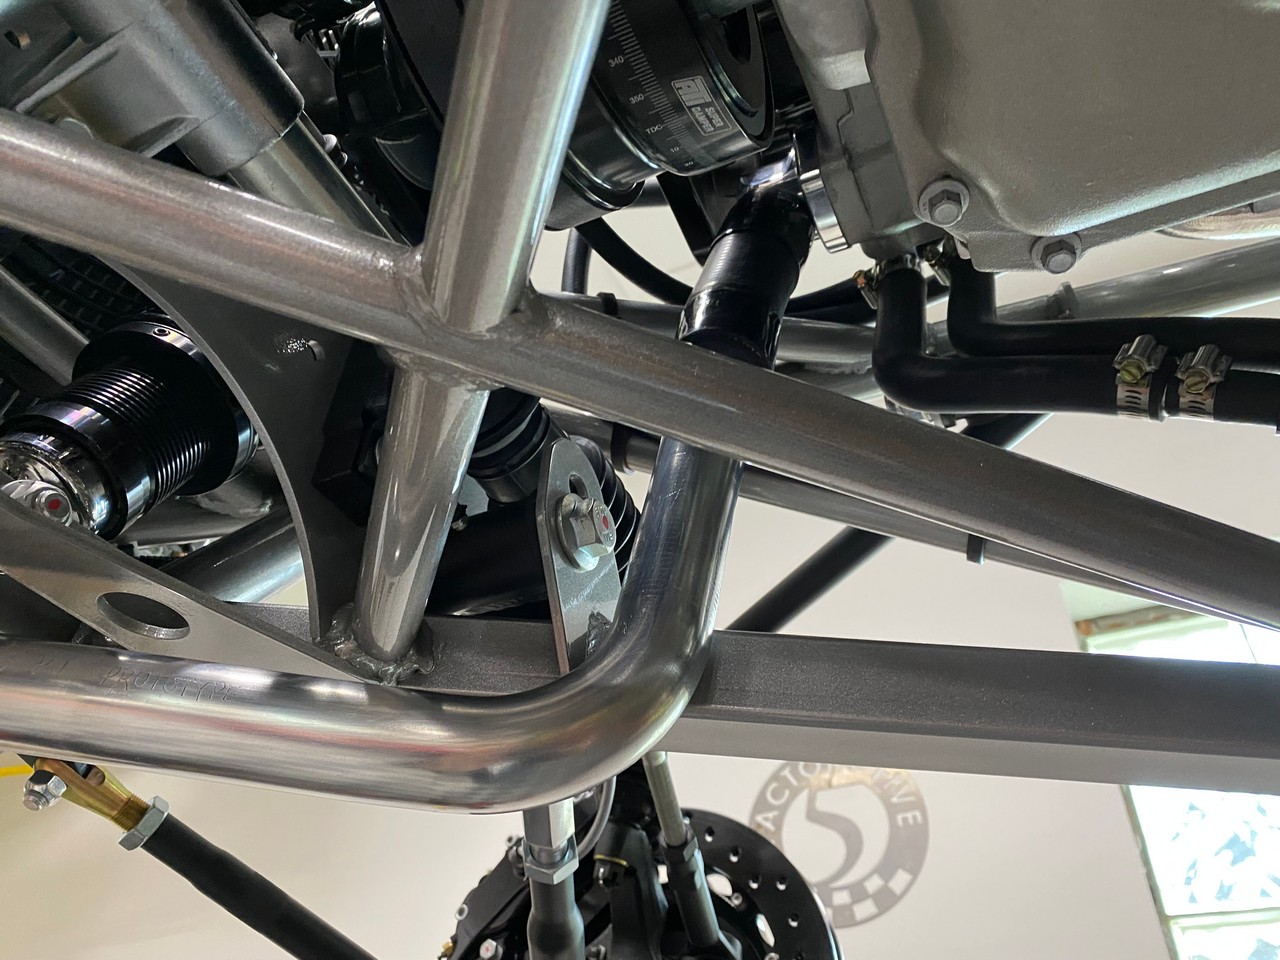
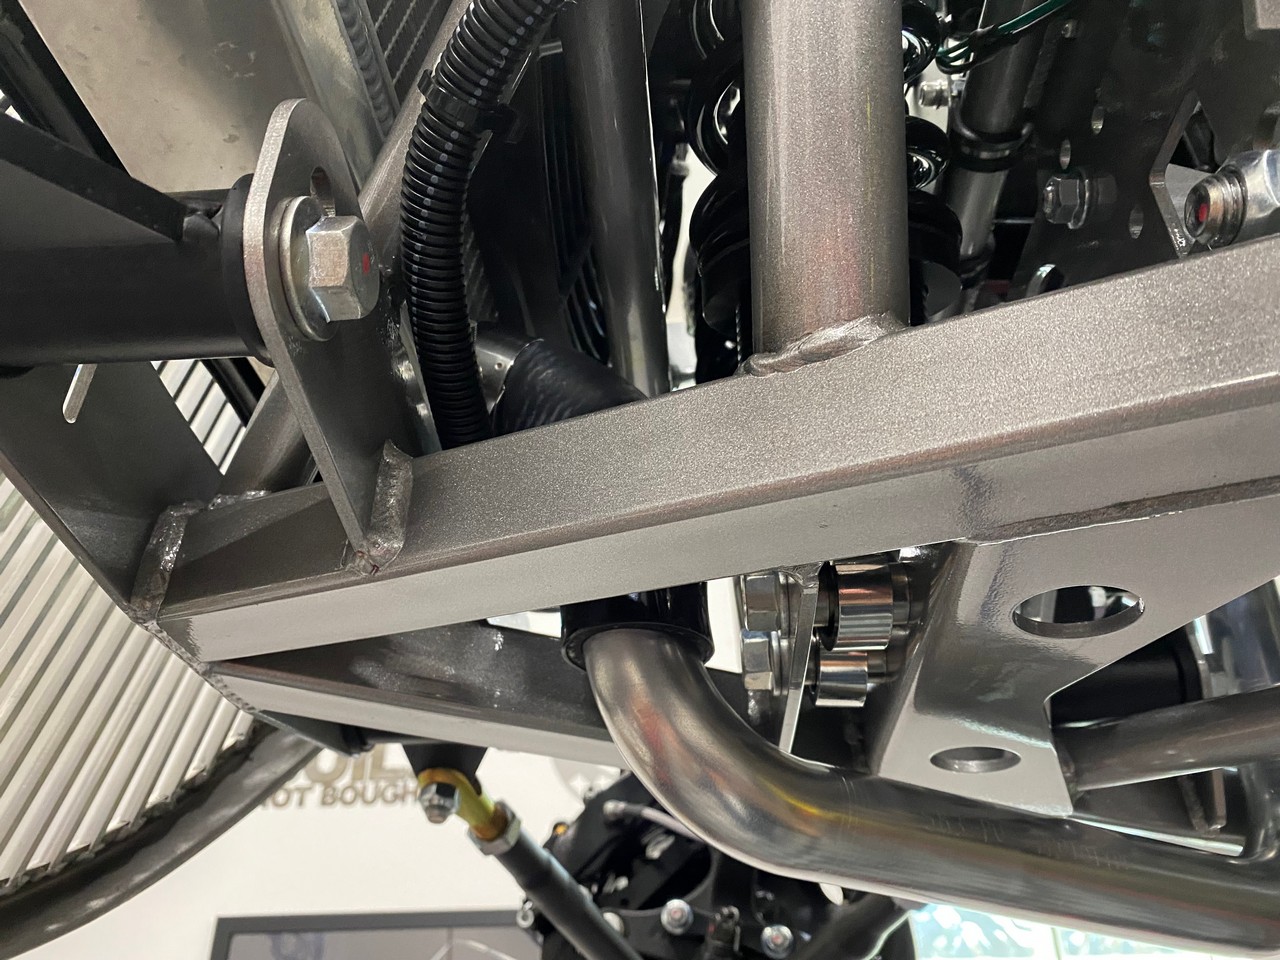
Maybe looks a little low in the picture. But it’s well above the lowest point of the grille. And also above the chassis bottom from the firewall back. Note that I’m using my usual Gates Power Grip clamps. Except on the radiator connections where I used T-bolt hose clamps. I like the Gates heat shrink clamps. But they’ve apparently gotten caught up in all the supply chain issues. The right sizes were really hard to find and the prices have gone way up. Stayed with them. But not without second thoughts. If you’re interested in Bob’s Cool Tubes, including for this combination, don’t hesitate to contact him. They work great.
Finally, in anticipation of my first start, made a checklist of the items to complete. Gas in the tank. Check. Put in 5 gallons to make sure to have plenty plus wanted to see where that hit on the gas gauge. About where I expected but most importantly it worked. Antifreeze in the radiator. Check. Used Dex-Cool as recommended in the LS instructions. Wally World had Prestone on sale. Used pre-mix since I don’t want our well water in the coolant. Took just under 2-1/2 gallons. Finally, primed the engine oil using the Allstar Performance primer tank mentioned previously. Since I had already put oil in the engine, I drained 4-5 quarts back out into a clean container. Put that into the tank and followed the instructions. Other than making a mess (which I’m inclined to do) it was easy enough. Confirmed the oil pressure gauge was showing about 25 PSI as the oil was going in through the port. Also happy to see the gauge working. Tried to set the fuel pressure regulator. But like the Coyote, the LS only runs the pump briefly when you turn the key on. Not enough to set anything. But unlike the Coyote, the instructions say to set it while running. 60 PSI. So took a chance that where it was would be enough to start and then come back and set while running. (Spoiler alert: Came back after it was running. It was at 55 PSI. Set to 60 and locked it down.)
With that, out of excuses. So, with my wife on the iPhone for the video, and my buddy Greg to watch and help as needed, climbed in and hit the key. Started almost instantly as you can see in the video. Can’t complain about that. Gauges all worked except the tach. Oil pressure showed 25-30 at idle and jumped to 40-50 with some acceleration. Voltage gauge seems stuck on 12 volts. Hmmm. Ran it long enough for the fan to kick on, which it did around 180/190 or so. Initially thought we had a small leak at the thermostat housing. But turned out not to be the case. No other signs of any leaks anywhere. On a subsequent start, did put it in gear and confirmed the rear wheels turned, with RPM the transmission shifted, and the speedo needle was swinging. Although not close but not unexpected since it’s not been calibrated. The FF mufflers aren’t super quiet. But they’re not bad. Certainly not nearly as loud as either the Roadsters or Coupe. Should be OK. Haven't scanned the ODB2 port yet. But the MIL didn't light, so not expecting to find anything. It does light when the key is first turned on, and stays on until the engine starts. Just how it's supposed to work. Not much else to say. Very happy in general with how it’s running. Here are two videos.
https://www.youtube.com/watch?v=eonK...nel=PaulBorror
https://www.youtube.com/watch?v=Dk4w...nel=PaulBorror
So, I have these issues to address. Wouldn’t be a build if we didn’t have things to troubleshoot, right?
1. Tach not working. Hooked it up exactly like the instructions said. It’s to the tach wire in the LS harness. The LS instructions say a “pull up resistor” might be required in some cases. Looks like I might be one of those cases. Will try that first. Pretty sure I have the setting in the Autometer gauge in the right position. But will check that too.
2. I’m not getting any output out of the alternator. Never saw more than 12 volts on the gauge, and the more we started and stopped, the slower the cranking and lower the reading. Checked the output at the post on the alternator and it’s reading no more than battery voltage. No jump when the engine starts. Check the 12 volt exciter wire, and it’s getting 12 volts with the key on like it’s supposed to. Eventually, I wasn’t able to start the engine. Everything was done on the battery only and it was tapped out. The alternator is a 1-wire Mechman 170 AMP piece included with the Vintage Air frontrunner system. I’ll contact Vintage Air and see what’s next. I know 1-wires aren't the favorite of some on the forum. But it’s what came with the frontrunner setup and the mounts are all tailored to that specific one. So will stick with it. I’ve used them before without issue.
3. While the transmission went into drive, turned the rear wheels, shifted, etc. (all normal) I wasn’t able to get it to go into reverse. Not sure if something with the Lokar shifter, the controller, or the transmission itself. Hopefully something minor. Was just starting to look at it when the battery died. The HGM controller has Bluetooth and an app on my phone. So will start there.
4. Finally, and not sure this an issue, but we were a little mystified. The coolant flow on the LS3 is the heated coolant goes into the top of the radiator, cooled, and back out the bottom of the radiator to the thermostat and into the water pump when the thermostat opens. We ran the engine long enough for the fan to start. It was at 180/190/200 for some minutes. The fan clearly made a difference and lowered the temp indication on the gauge. But what seemed strange was the top radiator hose and top of the radiator itself was hot to the touch as expected. But the lower half of the radiator and the lower radiator hose never seemed to get warm. In fact almost cold. Super efficient radiator or something wrong? Maybe hadn’t run long enough? But sure seemed like the thermostat wasn’t open. It’s a new thermostat that I bought along with the Vintage Air water neck. I didn’t test it. Probably should have. Based on the configuration, not possible to put it in backwards. At least I don’t think so. Will dig into this more. Hopefully nothing is wrong. Just seemed a little strange.
That’s it. And probably more than enough. Next week I’m going tire shopping so maybe can go-kart before the snow flies. Also want to get the truck on its own four feet so it can share the lift. Want to get the Coupe serviced and winterized.
Last edited by edwardb; 11-11-2021 at 04:39 AM.
Build 1: Mk3 Roadster #5125. Sold 11/08/2014.
Build 2: Mk4 Roadster #7750. Sold 04/10/2017.
Build Thread
Build 3: Mk4 Roadster 20th Anniversary #8674. Sold 09/07/2020.
Build Thread and
Video.
Build 4: Gen 3 Type 65 Coupe #59. Gen 3 Coyote. Legal 03/04/2020.
Build Thread and
Video
Build 5: 35 Hot Rod Truck #138. LS3 and 4L65E auto. Rcvd 01/05/2021. Legal 04/20/2023.
Build Thread. Sold 11/9/2023.
-
Post Thanks / Like - 0 Thanks, 3 Likes
-
11-05-2021, 06:28 PM
#262
Senior Member

Congrats on the first start. Will be watching to see what the resolution to the mentioned issues is. Luckily for me I am sure you will have them all worked out by the time I approach first start on my LS3!
MK4 #8900 - complete kit - Coyote, TKO600, IRS - Delivered 6/28/16 First Start 10/6/16 Go cart - 10/16/16 Build completed - 4/26/17 - 302 days to build my 302 CI Coyote Cobra - Registered and street legal 5/17/17
Build Thread
http://thefactoryfiveforum.com/showt...e-build-thread
PHIL 4:13 INSTAGRAM - @scottsrides
-
Post Thanks / Like - 1 Thanks, 0 Likes
-
11-05-2021, 08:03 PM
#263
Senior Member

Congratulations on another first start Paul. Just saw that your Father passed to the other side - truly sorry for your loss Paul.
Chris
Generation 3 Type 65 Daytona Coupe Complete Kit #151885 received May 6, 2022. Gen 3 Coyote, IRS, Tremec TKX, American Powertrain hydraulic throwout bearing & Wilwood brakes.
MK4 Basic Kit #7404, 347 EFI - Pro M Racing ECM, 30# injectors, 70 mm throttle body, 80 mm MAF, Edelbrock Performer aluminum heads & RPM II intake, all new G-Force T5, 3:55 gears, Pro 5.0 shifter, 3-link, carbon fiber dash/custom Speedhut gauges and paint by Da Bat.
-
Post Thanks / Like - 1 Thanks, 0 Likes
-
11-05-2021, 09:31 PM
#264
Lookin good and soundin good! Looking forward to seeing the go karting.
-
Post Thanks / Like - 1 Thanks, 0 Likes
-
11-05-2021, 09:55 PM
#265
Congratulations on the first start. Sounds great!
MkIV Roadster build: Gen 2 Coyote, IRS, TKO600. Ordered 10/24/18. Delivered 1/29/19. Engine installed 8/8/21. First start 9/12/21. First go-kart 9/17/21. Off to paint 4/11/22. Back from paint 12/30/22.
Build thread here.
-
Post Thanks / Like - 1 Thanks, 0 Likes
-
11-08-2021, 01:43 PM
#266
Congratulations on another stunner Paul, always checking to see your progress.
-
Post Thanks / Like - 1 Thanks, 0 Likes
-
11-08-2021, 04:01 PM
#267
Senior Member

First Start Issues Solved
During my first start, detected four issues. Pretty happy to report all are solved. I least I think so... 
Alternator not working: In hindsight this was an obvious problem and one I should have prevented. The Vintage Air 175011 frontrunner system I used (the source of the alternator) included detailed instructions for the Mechman alternator. Included were instructions for checking proper wiring including ground. Which unfortunately I didn't do at time of installation. (How hard is to hook up an alternator???) So went ahead and did it now. The test showed no ground path for the alternator. Oops. To confirm, I clipped a lead from the body of the alternator to chassis ground. Started the engine, and immediately the voltage gauge jumped from 12 volts to 14+ volts. Alternator working. The Vintage Air system I selected has all black anodized brackets, including the one holding the alternator. Clearly insulating the alternator from the engine block or heads where there are several ground connections. I made up a short piece of 8 gauge wire with crimped lugs on each end. Put one end under one of the alternator mounting bolts which fully contacts the bare case. The other end bolted to the block. Voltage gauge jumps from 12 volts (battery voltage) to 14+ volts (charging voltage) immediately when the engine starts. Fixed.
Tach not working: Both the Chevrolet Performance and Autometer instructions describe that the tach output wire from the ECU may be too weak for analog gauges. The easiest first solution is to install a “pull-up resistor” between the tach wire and +12 volts at the gauge. The recommended value is a 10k ohm 1/2 watt. Didn’t have any on hand, but next day from Amazon had some. Pulled the dash and clipped the resistor in temporarily. Success! A little more work and the resistor was soldered between the two leads on the gauge harness. Confirmed the proper 4-cylinder setting in the gauge (interestingly that’s the setting used for the LS) and confirmed the indicated RPM on the gauge matched with the data stream from the ODB2 port. Fixed.
Cold lower radiator tube: With some searching, confirmed this was a symptom of air still in the system. Basically, trapped behind the thermostat. So, it wasn’t getting the heated coolant and not opening. The LS3 is different than the Ford engines I’ve worked on to date. The thermostat is on the lower radiator hose. So, coolant flows from the top hose into the radiator and only returns to the engine from the lower radiator hose when the thermostat opens. So as the engine reached operating temperature, the top hose and top half of the radiator were hot. But the lower half and lower hose were cold because the coolant was dead-headed against the closed thermostat. As part of this system, there are a series of steam vents in the heads including one that I routed to the radiator cap location. I was under the impression this would make the system self-burping. After reading multiple instances on-line of LS installations and swaps having the exact symptoms as me, realized this isn’t the case. At least not for the initial fluid fill. I tried several suggestions I found with no success. Still a cold radiator lower half and lower hose. Even with the engine showing full operating temp and the cooling fan running. One of the suggestions was to run the heater because the coolant for the heater is off the back side of the thermostat so air there could be contributing to the problem. After a couple cycles, the heater started working (very well!) but still the lower hose was cold. I was just about convinced maybe I had a bad thermostat even though it was brand new. But before tearing into things, and making a mess with coolant everywhere, tried two more suggestions from on-line. First was to raise the front of the car to move air forward and hopefully find its way out more easily. Second involved getting the engine to temp, and then running it at a higher RPM including some throttle hits. This to open the bypass valve that’s part of the LS thermostat and releasing the trapped air. Did a little extended running at 4,000 RPM and then added some hits. One or both suggestions worked. The thermostat opened. Radiator completely hot. Lower hose hot. I will run a few more cycles to purge any remaining air. But this one I consider fixed too. Interesting learning experience.
One other quick comment on the same subject. The lower radiator tube I'm using and showed previously is a prototype piece from Bob Boig at https://boigmotorsports.com/. It fits perfectly and I'm really happy with. Highly recommended. If this is something you could use for your build, don't hesitate to contact him. He'd like to add it to his offerings. But isn't economical to only make one or two.
Transmission not shifting into reverse: The truck is still on the lift with only wheels on the back (no tires) so can run in gear and exercise the entire drivetrain. Forward gears all worked. And I can see on the HGM app that it’s shifting and going into torque converter lockup. But reverse didn’t seem to do anything. Including most importantly spinning the driveshaft the other direction. My first thought was something with the HGM controller. So sent a message to HGM. Within minutes, received a phone call and they walked me through everything. Fantastic customer service from HGM. Doesn't get better than that. Stayed on the phone while I tried things, started the engine, etc. Bottom line, the reverse function isn’t in the controller. It’s 100% in the transmission itself. (Explains why the controller showed I was in neutral even though I was in reverse.) After confirming there didn’t seem to be anything wrong, went a little higher on the RPM than I was trying before and guess what? Reverse driveshaft rotation. So what I thought was a problem isn’t. (Just remember, this is my first ever automatic transmission installation. So be kind…) Need to check the fluid level now that I can run it and get to temp. Might be low which would affect this. But bottom line, I consider this fixed to. Even though it was never broken.
So, for now, moving on to other things. Ordered tires today. Should have them in about a week. No surprise. A number of tire brands and sizes are in short supply. Showed them my wire wheels and they promised me they could mount and balance with no issues. I will report what I went with once received and hopefully the weather will hold so I can do my go-kart.
Last edited by edwardb; 11-08-2021 at 04:27 PM.
Build 1: Mk3 Roadster #5125. Sold 11/08/2014.
Build 2: Mk4 Roadster #7750. Sold 04/10/2017.
Build Thread
Build 3: Mk4 Roadster 20th Anniversary #8674. Sold 09/07/2020.
Build Thread and
Video.
Build 4: Gen 3 Type 65 Coupe #59. Gen 3 Coyote. Legal 03/04/2020.
Build Thread and
Video
Build 5: 35 Hot Rod Truck #138. LS3 and 4L65E auto. Rcvd 01/05/2021. Legal 04/20/2023.
Build Thread. Sold 11/9/2023.
-
Post Thanks / Like - 0 Thanks, 2 Likes
-
11-11-2021, 11:11 AM
#268
Senior Member

Last update on first start. Moving on.
Tweaked a couple things on my first start issues list. So thought I would share. Might be some learning in there that took me a little while to figure out.
Transmission shifting: When I picked up my transmission from Gearstar (the supplier of my 4L65E) I could tell it had fluid in it because it was leaking until a I put a driveshaft yoke in the back. I have a spare that I keep around just for that purpose. They also told me they had pre-filled the torque converter. Fast forward to the engine/trans installation and the Lokar transmission dipstick I added. When adding all the fluids, checked the dipstick and it showed well over the full mark. Not unusual for cold and not having pumped fluid everywhere. OK I thought for the first start. One of the early things I checked once it was running was the transmission fluid level. Showed between the marks so moved on. Couple days later, when talking to the guy at HGM, I mentioned the Lokar dipstick. He cautioned me that those were often too long and that I needed to check if it was measuring the fluid level full slightly above the pan rail. Yesterday I did that. Ideal method would be to remove the pan and take a direct measurement. But I didn’t want to dump the fluid, probably tear up the gasket, etc. So very carefully used a micrometer and measured by eye against the side of the case. Conclusion? My Lokar dipstick was nearly 1” too long. That’s a lot. Fortunately, the dipstick cable is held in by a setscrew in the handle. So easy enough to remove, shorten, and replace. Checked the measurement multiple times again and was satisfied the length was where it needed to be. With that, started the engine, warmed things up, and checked the level. No fluid on the stick. Added fluid and took three quarts to fill. The capacity is somewhere in the 12-13 quart range. So, I wasn’t likely in danger of hurting anything with very limited running at this stage. But would have been potentially damaging if I drove it that way. I can also report it shifts much better out of neutral. Nice and solid. Totally fixed the hesitancy going into reverse. I said this was fixed before. But now I can report it’s really fixed.
Air in cooling system: I ran the engine through several more heat cycles and I’m mostly confident the thermostat is opening properly and the air is purged. Checked for fluid out of the steam tubes on both heads and they’re flowing freely. Another place air can get trapped. But two things were happening that didn’t seem quite right. I had zero leaks out of the upper and lower radiator hoses when running. I have T-bar clamps on each and they’re as tight as I want to make them. But once shut off, as the engine cooled I would get a slight amount of coolant weeping out the bottom of each. Not a lot. But I don’t like leaks and obviously shouldn’t do that. Also, I wasn’t getting any fluid in or out of the overflow tank. After thinking about this some, decided I might have too high of a pressure cap on my Moroso T-filler. I was using the 20lb one that come the kit supplied Gates plastic T-filler. So picked up a 16lb cap. Swapped caps and yesterday ran another couple heat cycles. No leaks and about 1-2 inches of fluid movement in the overflow tank. Clearly the overflow wasn’t working and the system was building up excess pressure when cooling. Will continue to keep an eye on it. But I think this is really fixed too. As a side note, for yesterday’s run I kept a scanner on the ODB2 port for the runs and compared the engine reported temp to the reading on the Autometer gauge. In general tracked very closely. Good to know.
I’m now at zero issues based on first start (as far as I know!) so moving on for good. Completed the external wiring on the rear lights and assembled them to the mounting brackets. Thought quite a bit on how to connect them to the rear chassis harness. The wires go through a small hole in the body so no way to pass the usual Weatherpack connector through. Could just hard wire them to the chassis harness using a butt connector or something similar. But generally, not a fan of those and rarely use them. (Just my opinion and build style…). What I ended up doing was installing the Weatherpack seals, pins, and housings on the chassis harness. Then I installed only the seals and pins on the light fixture wires. Those I could feed through the hole in the body. Then temporarily plugged just the pins into the chassis connector. Enough friction for now and nothing around to short against. Later, during final assembly, can install the Weatherpack shrouds on the light fixture wires once through the body. I’d have to de-pin the shrouds to remove the light fixtures if ever necessary. But easier (I think) than a permanent connection that would require cutting wires.
Next up finished mounting the rear tailgate. Followed the directions in the manual and all went OK. Did make a minor change orienting the U-bolt for the straps front-to-back rather than upright. Felt like it worked a little better. But would have been fine the other way too. I’m surprised to see how many truck builds do something different with the back other than the tailgate. Like mounting it permanently and even some cases blending it into the bed. I agree with the depth of the bed it’s not too useful. But I still like it. Looks truck like. Still need to add a few countersunk screws. But mostly done.
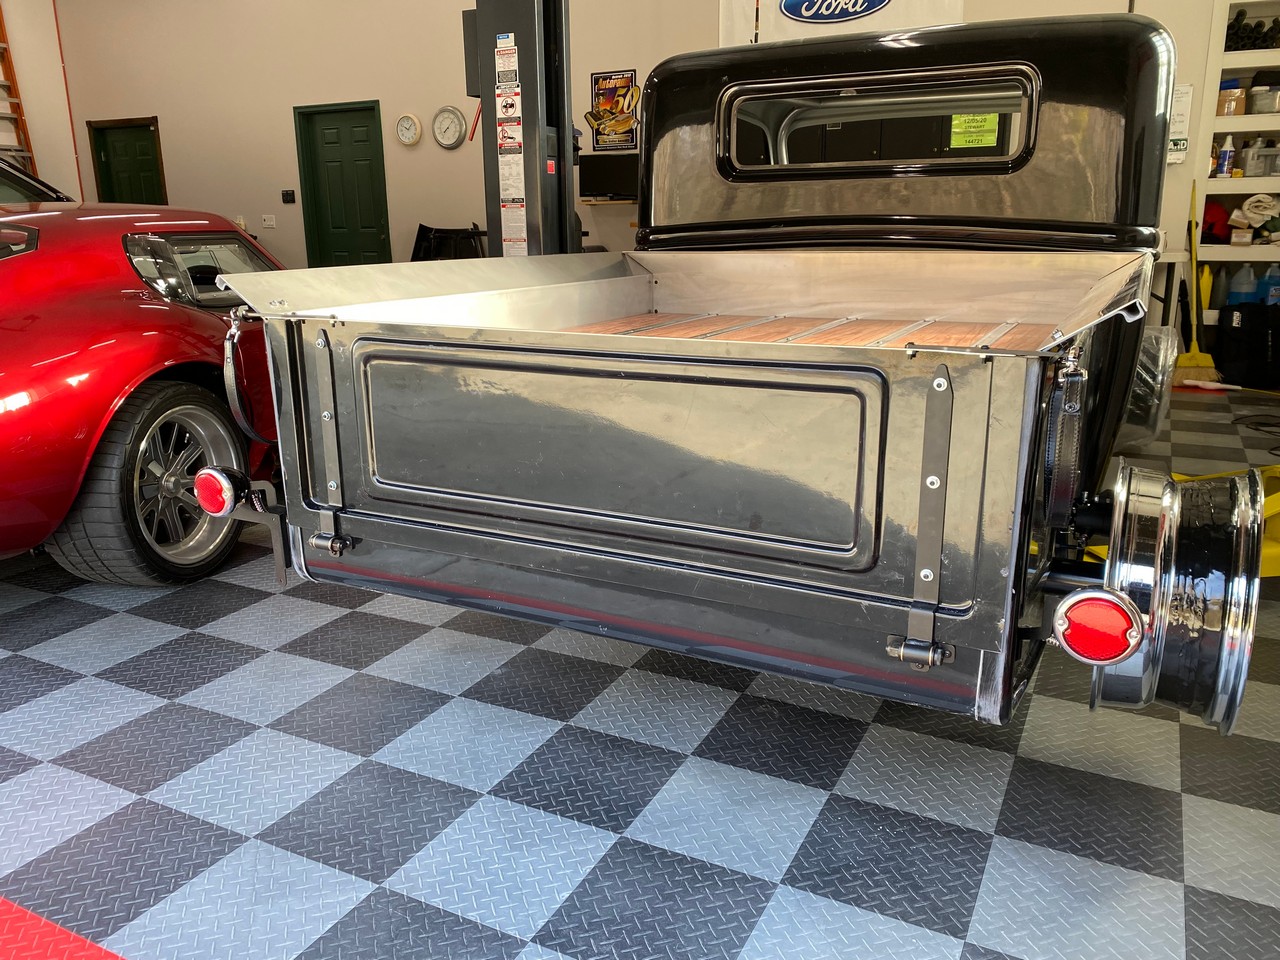
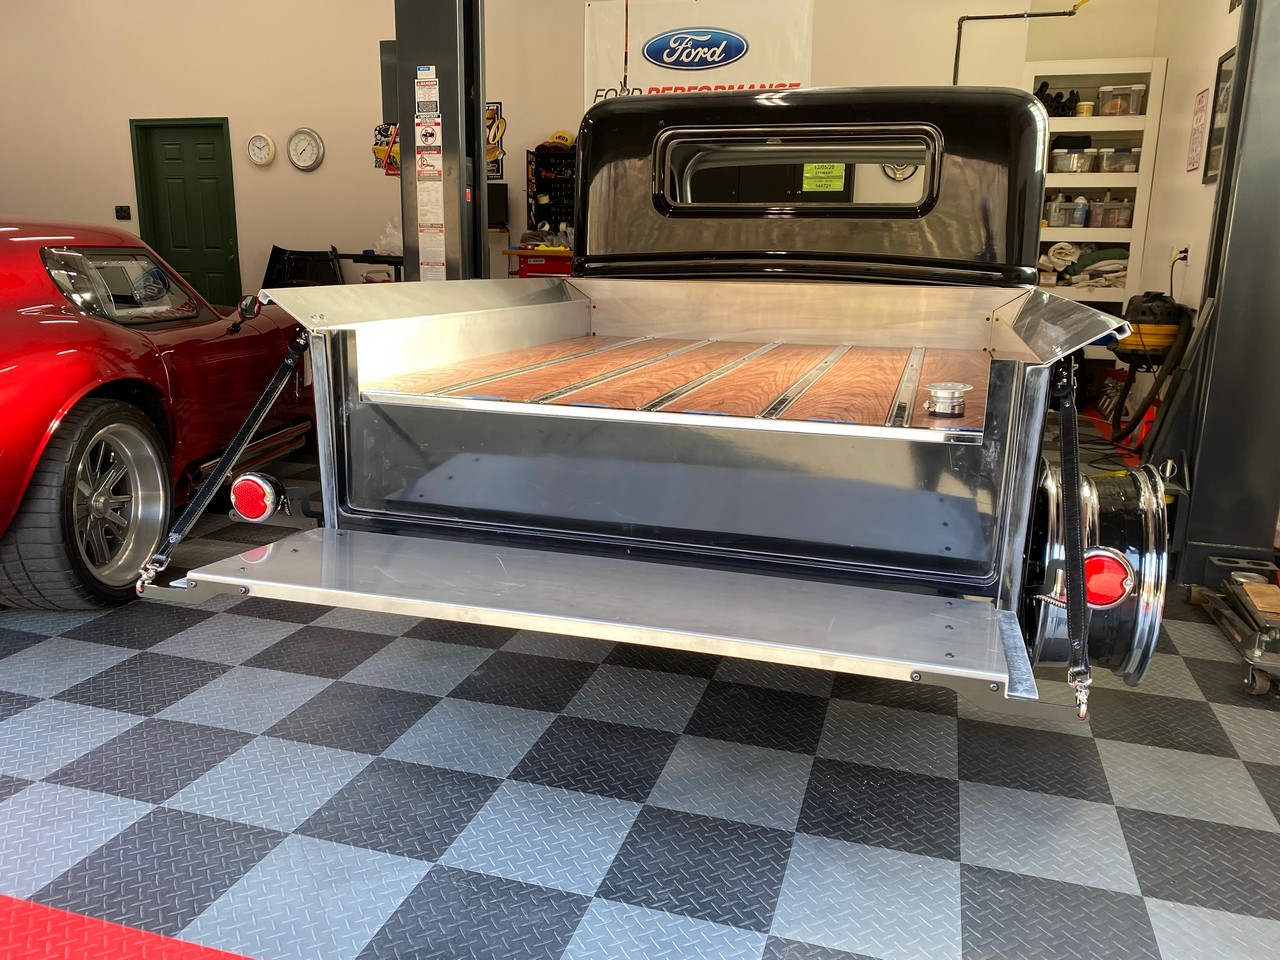
Received word from the tire dealer that my tires arrived and I have an appointment tomorrow to install them. Cool! Next post will hopefully be about a go-kart. Depending on weather I guess. At least it will be on all fours for the first time.
Last edited by edwardb; 11-11-2021 at 11:15 AM.
Build 1: Mk3 Roadster #5125. Sold 11/08/2014.
Build 2: Mk4 Roadster #7750. Sold 04/10/2017.
Build Thread
Build 3: Mk4 Roadster 20th Anniversary #8674. Sold 09/07/2020.
Build Thread and
Video.
Build 4: Gen 3 Type 65 Coupe #59. Gen 3 Coyote. Legal 03/04/2020.
Build Thread and
Video
Build 5: 35 Hot Rod Truck #138. LS3 and 4L65E auto. Rcvd 01/05/2021. Legal 04/20/2023.
Build Thread. Sold 11/9/2023.
-
Post Thanks / Like - 0 Thanks, 3 Likes
-
11-15-2021, 03:56 PM
#269
Senior Member

Go-Kart Time!
In spite of our first measurable snow yesterday, the sun came out today and with a balmy 36 degrees, melted the snow and dried the street enough to drive the truck around the neighborhood just a bit. First though, a few steps to get there since my last update.
Looked at a number of tire options and narrowed down to Nitto 555 G2’s or something from my former employer Continental. I had the Nittos on my 7750 Roadster build and liked them. But a call by my local tire dealer to Nitto found they were on national backorder with no ETA. Scratch that. Liked the idea of using Conti tires so looked at options. Went with four Contisportcontact 2 performance summer tires, size 245/45ZR18. No stagger on this build. The tires were available, have decent reviews, and somewhat reasonably priced. Used on Porsche, BMW, Jaguar, so in pretty good company. Treadwear is rated at 280. Not the softest around. But many are higher. Should be an OK match for how I plan to drive the truck. The local Discount Tire did the installation. I watched closely and they treated my rims fine with zero issues or damage. Overall, a decent experience.
With the tires mounted, installed them on the truck. Felt good to get to that stage. First up set the ride height after adjusting the tire pressures to 25 psi. The manual says 5.5” front, 6.0” rear when using the lower suspension holes. Always a good idea to set the initial ride height a little on the high side because it will settle. Ended up at 6.5” in the rear, and just over 6.0” in the front. Might like it a bit lower in the front. We’ll see how much it settles. The bottom of the radiator grille is already lower than that. Plus, it doesn’t seem there’s a lot of suspension travel left when set much lower. Will monitor. One other comment about ride height. In the early part of my build thread I noted that the driveshaft just barely touched the chassis when at full droop. Based on the suggestion of another builder, moved the rear shocks to the upper hole on the chassis. This limited the travel perfectly and prevented the interference. But that also affected how the coilovers were adjusted for ride height. Instead of being adjusted to the point that the spring is loose as has always been the case for me, it was necessary to crank the adjuster about two turns tight on the springs. Don’t think it’s an issue. Just different.
Next up was alignment. Over several builds, I’ve accumulated a decent set of tools so always do this myself. First centered the rear axle using the panhard bar. Used a laser line to establish a center line on the chassis and adjusted to that. Then checked the offset of the rear hubs to the front hubs. It was within less than 1/16” on four corners. Happy with that. Well inside the tolerance of the tools/method I was using. Then started on the front alignment. Used the power steering specs from the manual. The first time is always the hardest because you have to make pretty large moves and they all interact. So round and round between camber, caster, and toe and pretty soon they start getting close and finally where you want them. This front suspension has the adjusters on the bottom control arms versus the top like on the Roadster and Coupe. But other than that about the same. Was struggling just a bit dialing the 15 degrees back and forth on the turn plates for the caster measurement. Then (bolt of lightening…) realized I could switch on the ignition and get the electric power assist. Boy did that make it easier. Wrapped up the alignment this morning. Happy with how the numbers dialed in. I’ll check it again during final assembly. Might need to be tweaked a bit. But it’s really close now. Picture of the front alignment underway.
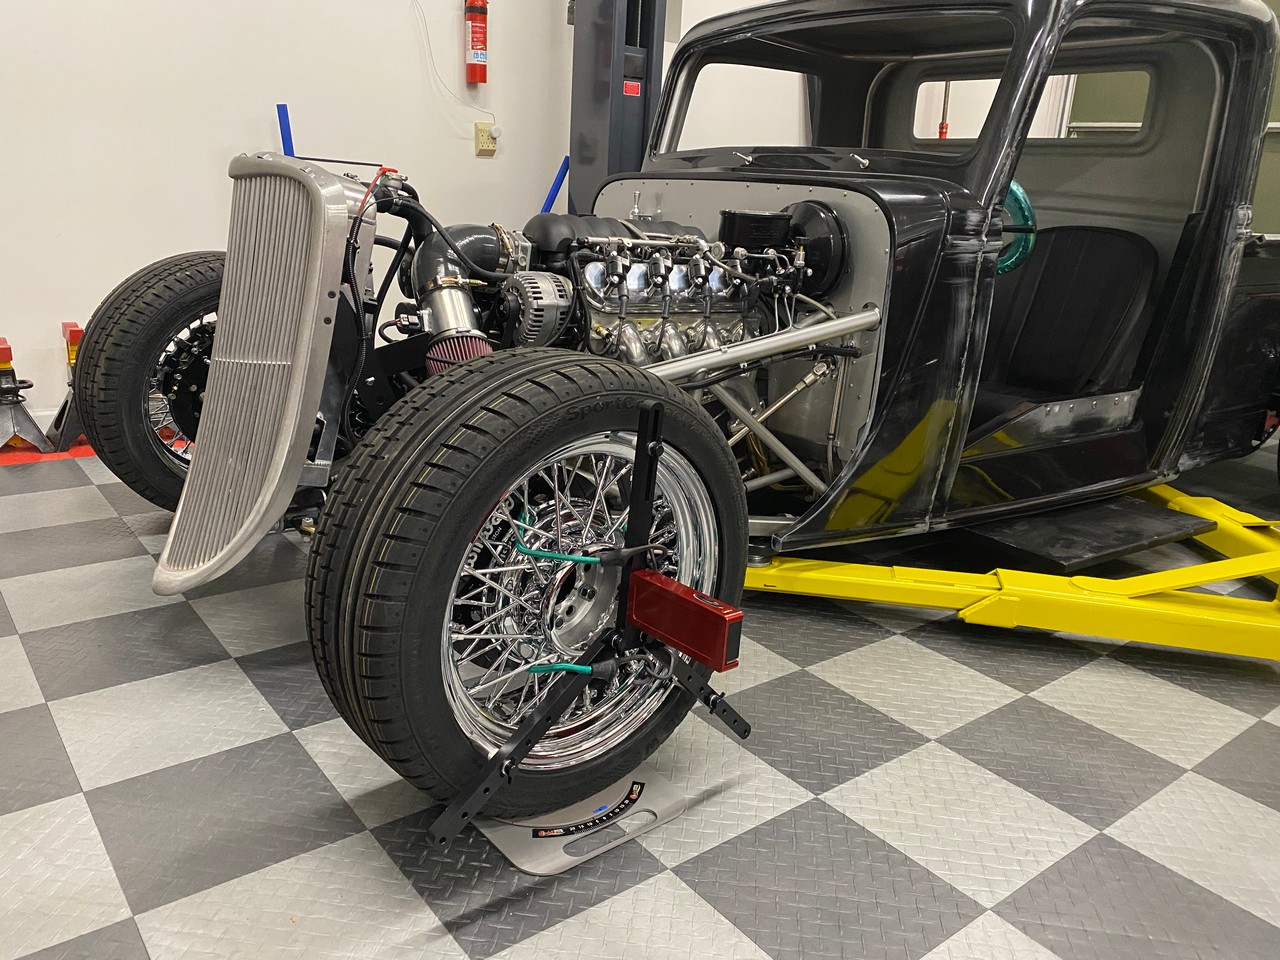
With that, nothing left to do but roll it out onto the driveway. First time off the lift and out of the garage since Stewart put it there on January 5, 2021. Just over 10 months ago. Not the fastest build in history by any means. Not even close. But for me, each one seems to go a little faster. I guess that makes sense. Snapped these pictures. It's going to look different once I get the doors, hood, fenders, engine sides, and running boards installed. But like how it looks now too.
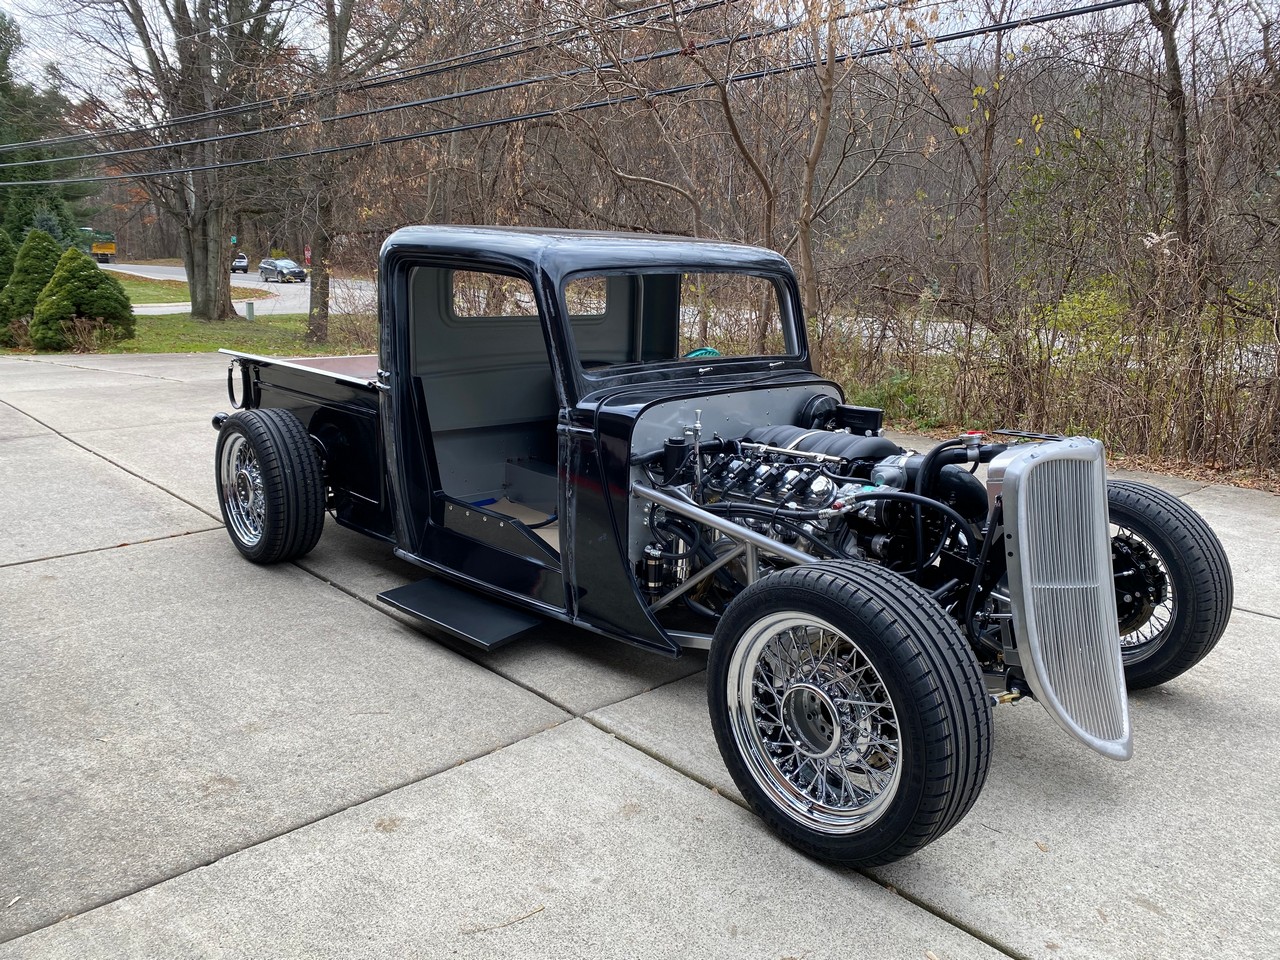
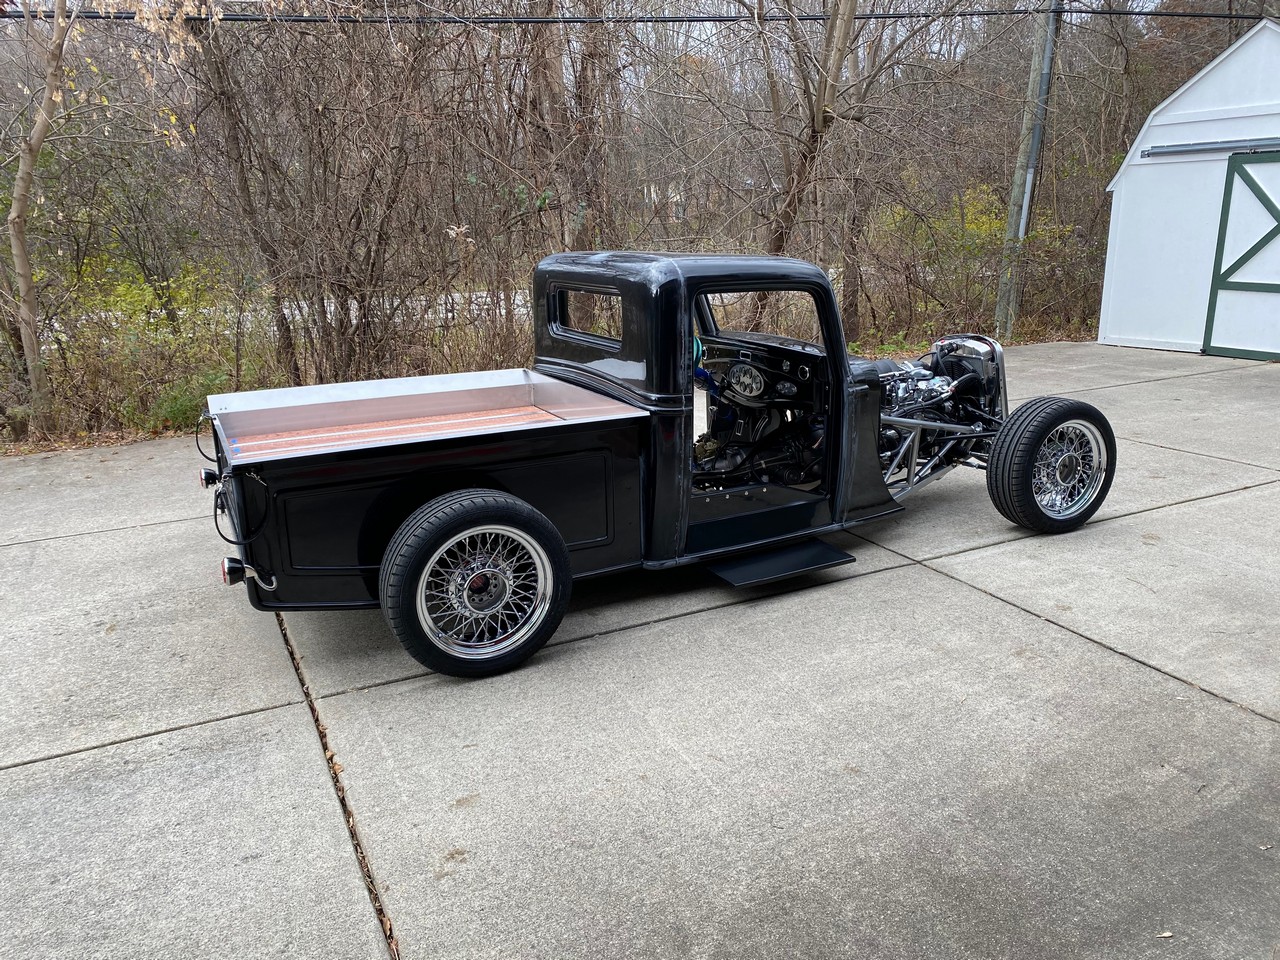
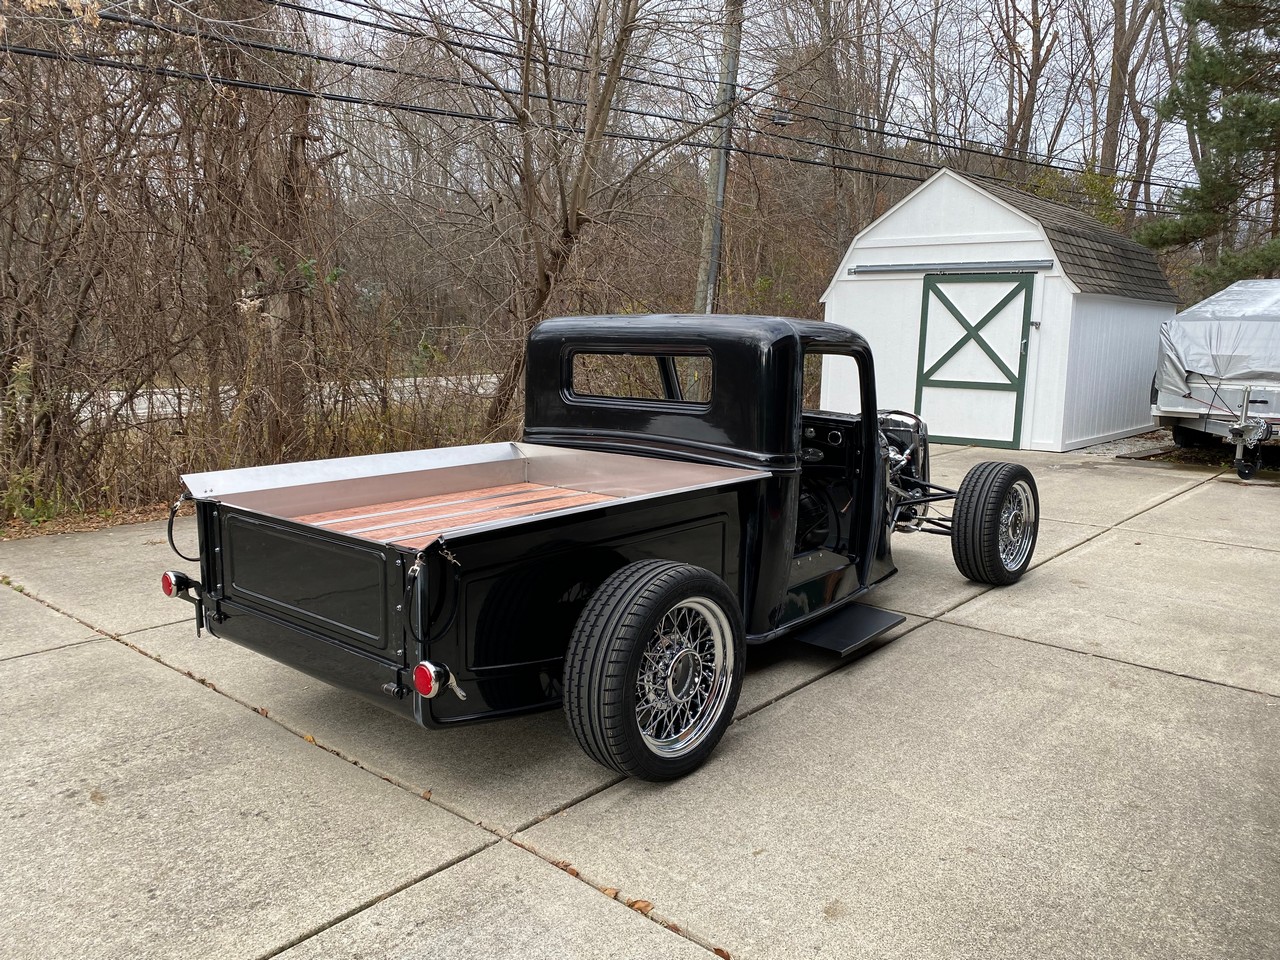
Coaxed my videographer to come out into the cold, climbed in, and drove it up and down the driveway and street a few times. Still haven’t decided about seats. Right now have the Roadster seats that came with the kit and they’re sitting on 2x4 blocks. Still way too low. But good enough for now. A couple neighbors waved, but other than that no other cars, issues, or incidents.
https://youtu.be/78kqPeApobM
https://youtu.be/KWbJYncLfAo
My speedo isn’t calibrated. In fact winds all the way around with not too much speed. So I’m now showing six miles on the odometer even though didn’t go anywhere near that much. Had a speed app going on my phone. Maxed at about 30 mph. Enough to feel it shift a couple times. So that’s good. The higher than typical stall torque converter seems fine. Easy to hold the truck at idle with the brakes. Only minor issue I noted was the brakes make a little bit of a shuddering sound when coming to a full stop. But still wearing the coating off that Wilwood has on the rotors. So hopefully that will change. Power brakes feel good. Power steering seems fine too. I’m pleased so far with the noise level. Hard to tell too much with no windows, doors, or interior insulation. But I’m thinking it’s going to be way quieter than what we’re used to. Which is what we want in this case. The LS3 seems to be running fine. No codes or anything. But again, it’s very early. Tried the cruise control briefly. But nothing happened. Suspect it has a minimum speed and I wasn’t going very fast. We’ll see. Really nothing else to say. All good. Don’t plan on driving it anymore until it’s finished. Really no point. I'm personally very conservative with the whole go-kart step. No title, no license, no insurance, and in this case no doors or seatbelts. You get the idea. Back into the garage to continue the build.
Last edited by edwardb; 11-15-2021 at 04:53 PM.
Build 1: Mk3 Roadster #5125. Sold 11/08/2014.
Build 2: Mk4 Roadster #7750. Sold 04/10/2017.
Build Thread
Build 3: Mk4 Roadster 20th Anniversary #8674. Sold 09/07/2020.
Build Thread and
Video.
Build 4: Gen 3 Type 65 Coupe #59. Gen 3 Coyote. Legal 03/04/2020.
Build Thread and
Video
Build 5: 35 Hot Rod Truck #138. LS3 and 4L65E auto. Rcvd 01/05/2021. Legal 04/20/2023.
Build Thread. Sold 11/9/2023.
-
Post Thanks / Like - 0 Thanks, 4 Likes
-
11-15-2021, 04:21 PM
#270
Congratulations. No matter how many you've built, first go-kart must still be a great feeling of accomplishment. It looks and sounds great so far.
I have the Contisportcontact 5p's on my daily driver and am pretty pleased with them. Good all-around tires for anything other than snow.
MkIV Roadster build: Gen 2 Coyote, IRS, TKO600. Ordered 10/24/18. Delivered 1/29/19. Engine installed 8/8/21. First start 9/12/21. First go-kart 9/17/21. Off to paint 4/11/22. Back from paint 12/30/22.
Build thread here.
-
Post Thanks / Like - 1 Thanks, 0 Likes
-
11-15-2021, 04:30 PM
#271
Looks great! Man all excited to get going now but seems like forever before my kit shows up. I know, I know patience....
-
Post Thanks / Like - 1 Thanks, 0 Likes
-
11-15-2021, 04:32 PM
#272
Looking great, as always, Paul!
-
Post Thanks / Like - 1 Thanks, 0 Likes
-
11-15-2021, 05:15 PM
#273
Congratulations. Looks like you have the right driveway, long and flat, for those running boards.
-Steve
-
Post Thanks / Like - 1 Thanks, 0 Likes
-
11-15-2021, 05:19 PM
#274
Congratulations! Another excellent build with the attention to detail I've come to expect from your build threads..
Jeff J.
-
Post Thanks / Like - 1 Thanks, 0 Likes
-
11-17-2021, 11:58 PM
#275
Senior Member

Congrats, Paul! Wow! I didn't realize how low it sits. If I hadn't read your ride height, would have guessed it's just as low as the Roadster. With the body on, it really looks like a vehicle, at least compared to the typical Roadster go-carts I see. Also, cool to hear and see a build with a LS3. Thanks for sharing.
Chris
Coupe complete kit delivered: 4/22/24.
Build Thread. Coyote. T-56. IRS w/3.55. Wilwoods. PS. HVAC. Side windows.
MK4 Complete kit.
Build Thread Index. Delivered: 10/15/2020. Legal: 7/25/23. Coyote Gen3. TKO600 (0.64 OD). IRS w/3.55. PS. Wilwoods. Sway bars. This build is dedicated to my son, Benjamin.
Build Thread.
-
Post Thanks / Like - 1 Thanks, 0 Likes
-
11-18-2021, 12:30 AM
#276
Tool Baron

Really like the exhaust note on this one Paul. It's coming right along.
Frank
__________________________
Factory Five Racing MKIII Super Snake Replica. Cannonball Cobra Drop Trunk Box, Horn Button and other machined Do Dads.
i.e.427 Chromed Full Width Roll Bar with integrated LED Third Brake Light.
I will never forget My Buddy Paul.
-
Post Thanks / Like - 1 Thanks, 0 Likes
-
11-18-2021, 06:46 AM
#277
Senior Member


Originally Posted by
frankeeski

Really like the exhaust note on this one Paul. It's coming right along.
Thanks. I'm happy with it too. Wasn't sure what to expect with the kit supplied exhaust parts. Some have replaced/updated with more name brand parts and I considered that myself. But decided to mount the kit parts and see if I was Ok with it. So far I am. The good part is with everything open on the bottom, it wouldn't be very hard to change it out in the future.
Build 1: Mk3 Roadster #5125. Sold 11/08/2014.
Build 2: Mk4 Roadster #7750. Sold 04/10/2017.
Build Thread
Build 3: Mk4 Roadster 20th Anniversary #8674. Sold 09/07/2020.
Build Thread and
Video.
Build 4: Gen 3 Type 65 Coupe #59. Gen 3 Coyote. Legal 03/04/2020.
Build Thread and
Video
Build 5: 35 Hot Rod Truck #138. LS3 and 4L65E auto. Rcvd 01/05/2021. Legal 04/20/2023.
Build Thread. Sold 11/9/2023.
-
Post Thanks / Like - 0 Thanks, 1 Likes
-
11-18-2021, 12:56 PM
#278
Member

I'm surprised too by how low it sits, but she's a sweet ride!
Russel
Mk4 Roadster #10204. Gen 3 Coyote, Tremec T56, IRS. Ordered 6/7/21 - Delivered 12/18/21
Build Thread
-
Post Thanks / Like - 1 Thanks, 0 Likes
-
11-19-2021, 09:58 AM
#279
Senior Member

Paul,
Great looking build as usual. I've been following all your build threads (roadster, coupe, truck) and at this point, how would you rank your builds in terms of body work required to bring it to your show level standard? I only have experience with my roadster build, but I totally underestimated the amount of effort to get a great looking result.
Thanks!
Mk IV Roadster #9749, Kit received Jan 2, 2020, Blueprint SBF 347 TKO600 Holley Sniper EFI, Dual roll bars, IRS, 17" Halibrand, Nitto 555 G2 245, 315 Road legal Oct 20, 2020
-
11-19-2021, 10:12 AM
#280
Senior Member


Originally Posted by
Caddy Dad

Paul,
Great looking build as usual. I've been following all your build threads (roadster, coupe, truck) and at this point, how would you rank your builds in terms of body work required to bring it to your show level standard? I only have experience with my roadster build, but I totally underestimated the amount of effort to get a great looking result.
Thanks!
I'd rank them in the order you listed. Roadster is the simplest in terms of body work and to take to whatever level you're going for. The Coupe adds complexity with the larger doors and especially the hood (cowl) fit to the body and pontoons. The Gen 3 Coupe body also has some mold "challenges" around the upper rear of the door openings. Mismatched mold pieces, fiberglass voids, etc. My understanding is the mold has been reworked to improve this area so should be better going forward. Mine wasn't terrible but I've seen some that were much worse. The same shop did two Roadsters for me and then the Coupe. Roughly twice the amount of hours were required for the Coupe. That's probably on the high end. But gives an idea. The truck is a work in progress for me so can't comment too much. Many have challenges getting the doors to fit properly. Based on some preliminary work I've done, looks like mine might be decent. But too early to say for sure. One of the big variables with the truck, much like the hot rod, is it depends on how many body parts you go with. Mine will be full fenders, running boards, hood, engine sides, etc. So a lot of pieces when it comes time for paint. My plan for the truck is I want a decent paint job. But don't want or need to have a full on show quality paint job. If I wanted a similar paint job as the Coupe, no doubt it would exceed the hours spent yet again. But not planning for that and likely will not be the same shop.
Last edited by edwardb; 11-19-2021 at 10:14 AM.
Build 1: Mk3 Roadster #5125. Sold 11/08/2014.
Build 2: Mk4 Roadster #7750. Sold 04/10/2017.
Build Thread
Build 3: Mk4 Roadster 20th Anniversary #8674. Sold 09/07/2020.
Build Thread and
Video.
Build 4: Gen 3 Type 65 Coupe #59. Gen 3 Coyote. Legal 03/04/2020.
Build Thread and
Video
Build 5: 35 Hot Rod Truck #138. LS3 and 4L65E auto. Rcvd 01/05/2021. Legal 04/20/2023.
Build Thread. Sold 11/9/2023.


 Thanks:
  Likes:


 Reply With Quote


