Forte's

Visit our community sponsor

Thanks Thanks:  29
Likes Likes:  40
Page 18 of 20 FirstFirst ... 81617181920 LastLast
Results 681 to 720 of 779

Thread: EdwardBs Mk4 #8674 20th Anniversary Build

  1. #681
    Mark Eaton's Avatar
    Join Date
    Apr 2017
    Location
    Medford, Oregon
    Posts
    757
    Post Thanks / Like
    Quote Originally Posted by edwardb View Post
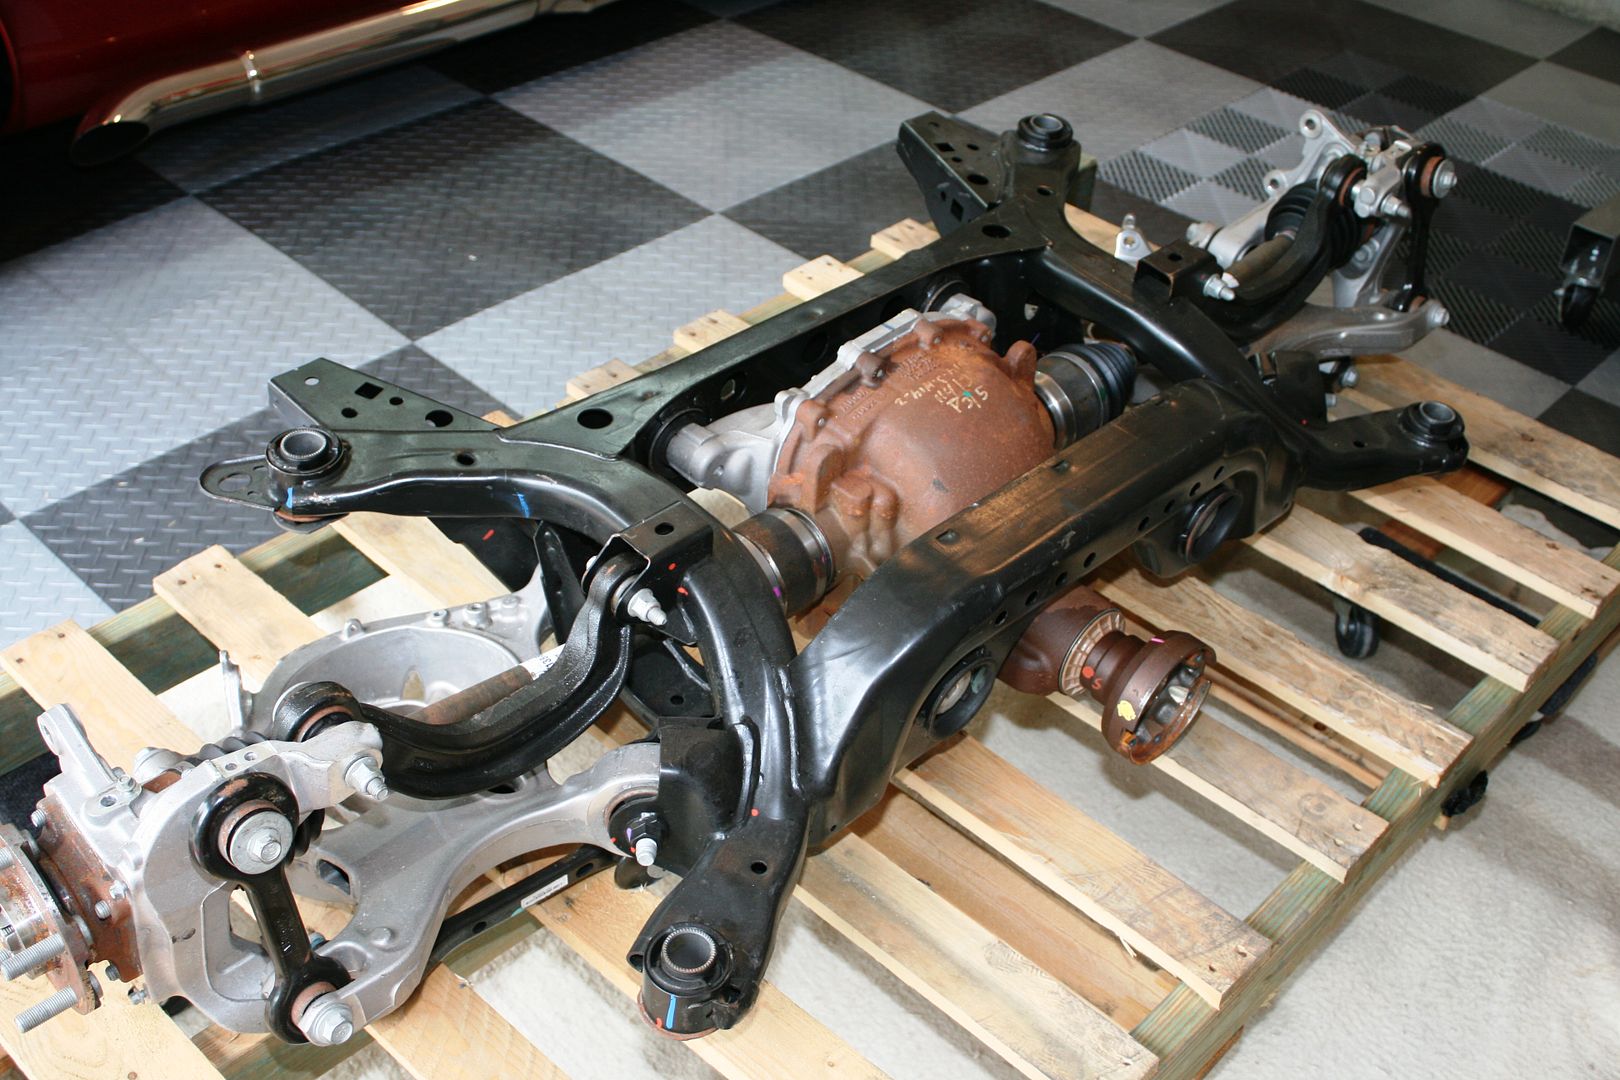
    This past week I received a copy of the IRS instructions (thanks Bob!) plus my first backorder shipment. Still a ways to go, but progress. I now have the first of the three control arms. I already had most of the hardware. But things are starting to take shape a little now. First a recap briefly mentioned in the opening post. The 2015 Mustang IRS setup requires three parts from a 2015 Mustang: The center section (differential), knuckles, and hubs. The rest of the parts are supplied by FF as part of the new IRS setup. You don't need the donor CV joints and have to install them onto new axles as in some earlier versions. FF is supplying the CV axles completed and ready to assemble into the suspension, e.g. with joints, boots, etc. Not long after ordering the kit, FF suggested I may want to start looking for the donor parts. I found complete 2015 Mustang rear suspension pallets at MPS Auto Salvage in Georgia, and picked one up. It's a "zero miles take-off" meaning the newly assembled Mustang went from the factory in Flat Rock, MI to an aftermarket performance assembly line and part of their upgrade is to replace the entire rear IRS assembly. The new IRS setup is beefy, but apparently not up to the task of the 800-900 HP aftermarket engine mods, stickier tires, etc. Although I only need a few parts off the pallet, at the time MPS wasn't selling them separately. Some other places were, but the cost for the individual pieces was higher. So, received the pallet looking like this:


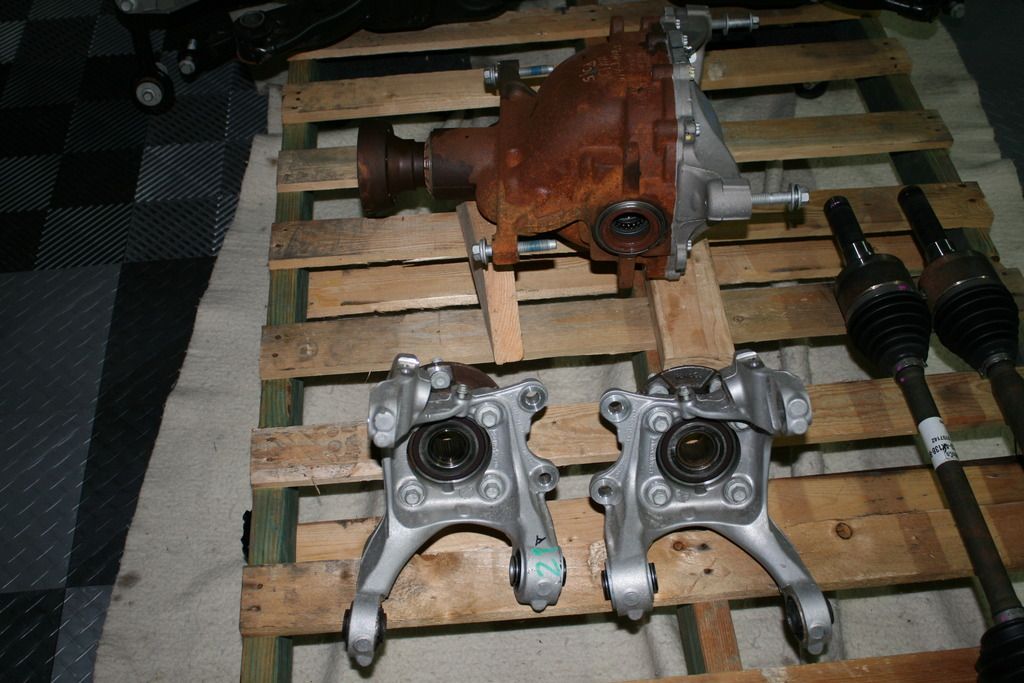
    Removed the parts I needed. I'm hoping to sell the balance and recover some of the cost. In total, should be a pretty good deal. The 3.55 center section case is cast iron, and posi like all new Mustang diffs.


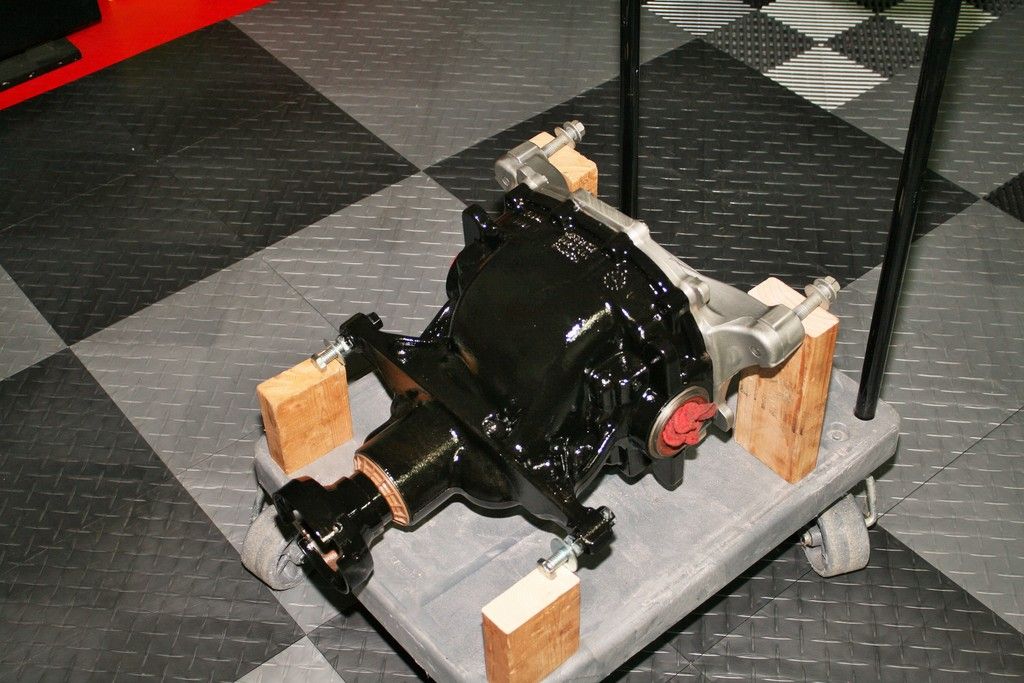
    The cast iron center section had some surface rust. Not unexpected. The hubs too had a little surface rust. But the parts appeared to be exactly as advertised. Basically brand new parts. A little wire wheel action and the rust was removed off the cast iron. After thorough cleaning and degreasing, applied some POR15 to the iron and clear Dupli-Color engine spray to the rear aluminum cover. Now ready for installation.


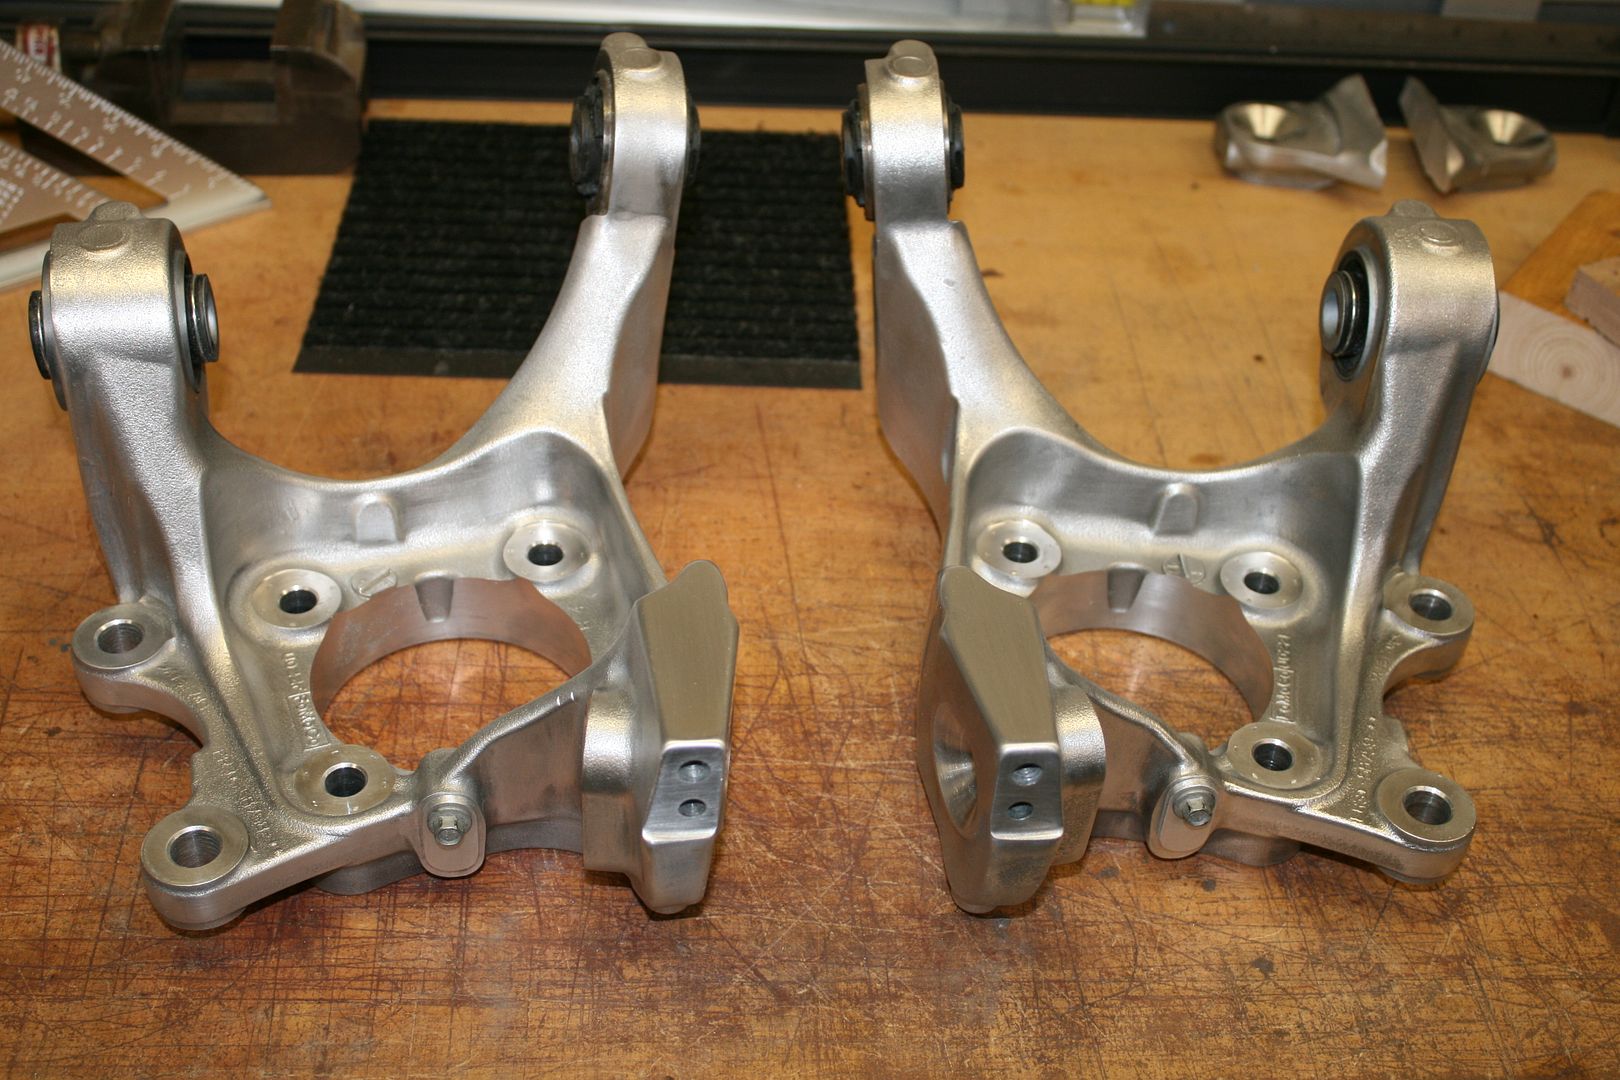
    The knuckles require a piece of one of the arms to be cut off. I saw this in the pictures and write-up, but waited until the instructions were in hand giving the details. The instructions give the location and shows using a Sawzall. I don't own one, plus prefer a little more "civilized" approach. With some blocks clamped to hold the knuckles square, I cut them with a band saw. Took it slow and easy and worked fine. A little scary though, lopping off those pieces.


    Cleaned up the cut using a disk sander, and then filed and sanded a little radius. I went over the complete knuckles and knocked off some of the larger casting parting lines and just cleaned up in general, and then gave them a quick coat of clear Duplic-Color like the center section. Not required at all, but I've had good luck with this stuff and should stay looking clean and nice for a while. I think they're good to go.


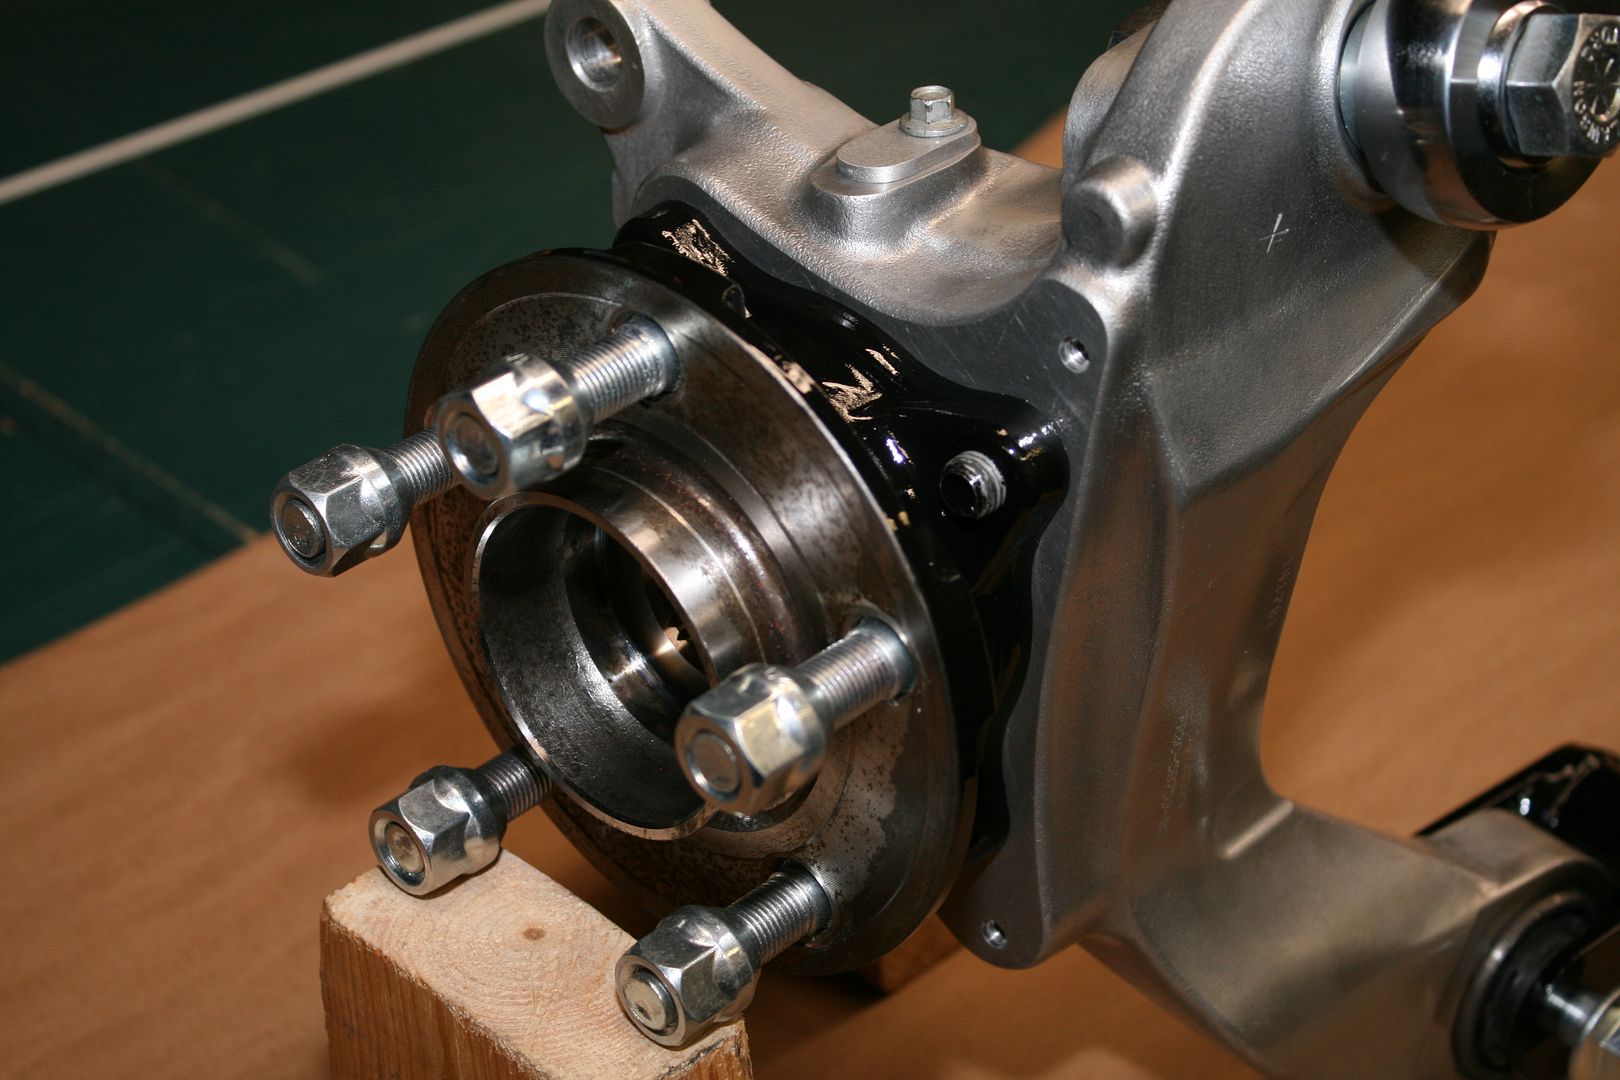
    The standard Mustang wheel wheel studs need to be changed to 1/2 x 20, same as the supplied front hubs and matching the lug nuts provided with the FF wheels. The 10 new wheel studs are included with the kit. The instructions show hitting the old ones out with a hammer. I chose instead to use a short piece of black pipe and squeeze them out using my bench vise. Took some muscle, but worked OK. The instructions showed putting the new ones back in with a lug nut, washer and a ratchet. I'm apparently not strong enough because that didn't work for me. Mainly I think because it's impossible to hold the hub while putting that much torque on it. So I rummaged through my junk hardware drawer and found a hardened 1/2 x 20 nut and few hardened washers. Lubed them up good with some assembly lube, and pulled all the studs in with an air impact driver. A press would be ideal to remove and replace the wheel studs, and thought maybe I had an excuse to finally buy one. But no luck. Managed without it. Then cleaned up the exposed parts of the hubs and also applied some POR15 and put them back in the knuckles. Note this is one of many changes with the new IRS parts. The axle bearing is in a bolted in carrier. No longer necessary to press the axle bearings in and out of the aluminum knuckle itself. Also note the little cover and screw in the knuckle just above the hub. This is where the standard ABS sensor is normally mounted. I'm not going to try an ABS installation, so don't need the sensor. But didn't want to leave an open hole directly down into the axle bearings. So made a little cover out of 1/8 inch aluminum and used the sensor mounting screw to hold it in place.
    I have two questions about painting the rear differential. #1) Did you use the full prep with POR engine degreaser and metal prep before applying the POR 15 paint? and #2) What is the purpose of the clear coat of Dupli color paint? Does it protect the aluminum somehow or just make it look better for car shows?

    Thanks so much

    Mark

  2. #682
    Senior Member edwardb's Avatar
    Join Date
    Feb 2011
    Location
    Lake Orion, Michigan
    Posts
    10,852
    Post Thanks / Like
    Quote Originally Posted by Mark Eaton View Post
    I have two questions about painting the rear differential. #1) Did you use the full prep with POR engine degreaser and metal prep before applying the POR 15 paint? and #2) What is the purpose of the clear coat of Dupli color paint? Does it protect the aluminum somehow or just make it look better for car shows?

    Thanks so much

    Mark
    Yes to the first part. I use the POR degreaser and metal prep products before applying POR-15. For the second question, I like to use the Duplicolor clear on aluminum parts like the center section cover, knuckles, etc. when they're new and clean. Then they stay that way. Dirt and grime wipes right off. I wouldn't say it's for car shows or visual in any way because 99% of the time the parts aren't visible with the car on the ground. But I've been known to put the car on the lift and clean the underside. Call it anal, call it whatever. It's not for everyone and I'm not promoting it. Just something I like to do.
    Last edited by edwardb; 09-17-2017 at 08:17 PM.
    Build 1: Mk3 Roadster #5125. Sold 11/08/2014. Build 2: Mk4 Roadster #7750. Sold 04/10/2017. Build Thread
    Build 3: Mk4 Roadster 20th Anniversary #8674. Sold 09/07/2020. Build Thread and Video. Build 4: Gen 3 Type 65 Coupe #59. Gen 3 Coyote. Legal 03/04/2020. Build Thread and Video
    Build 5: 35 Hot Rod Truck #138. LS3 and 4L65E auto. Rcvd 01/05/2021. Legal 04/20/2023. Build Thread. Sold 11/9/2023.

  3. #683
    Jazzman's Avatar
    Join Date
    Jan 2014
    Location
    Scottsdale, AZ
    Posts
    1,166
    Post Thanks / Like
    Bump - Just because this thread is much too valuable to get lost. This is required reading for first-timers!
    Last edited by Jazzman; 12-12-2017 at 10:16 AM.
    Jazzman

    MKIV #8745 "Flip Top" Roadster, Custom Tilt front, Coyote Engine, Tremec TKO600, Custom Interior. Best of Show winner, Huntington Beach Cruise In 2018.

    1967 Ford Mustang Coupe build thread updated 1/22/2021

    Roadster Frame Dolly Plan

  4. Thanks toadster thanked for this post
    Likes toadster liked this post
  5. #684
    Member JRD56's Avatar
    Join Date
    Oct 2014
    Location
    Olathe, KS
    Posts
    94
    Post Thanks / Like
    Edwardb, you probably get tired of hearing how valuable this thread is, but it is. I bought an un-assembled Mk3 and I'm starting the preliminary body work (cut out, minor mods, etc). From reading your thread it appears you previous did an Mk3 so I've got a couple of questions for you if you dont' mind.

    The Mk3 has an inner lip on the side vent openings. I cut out the opening and then set the vent (I'm using the FFR vents similar to yours) on the inside and realized the fit was terrible. I saw on your thread that you fit your opening to the vent so everything was parallel. I'm planning to do the same. It appears however the Mk4 does not have the inner lip like the Mk3, it that right? Is there any reason I couldn't grind off the inner lip and enlarge the opening as needed to fit the vent properly?

    My second question is regarding the front body mounting. I'm not crazy about using the bolts thru the side of the front vents to mount the body. I'm learning the early Mk4's used the quick jack mounts to essentially "float" the body. Since you've done both the Mk3 & Mk4 is it reasonable to use the Finish Line grommets to mount the front body. Also, I see they have a 3/4" ID but do you know what the OD is. My Mk3 does not have holes yet so I need to cut them.

    Thanks in advance for your help.

    JD

  6. #685
    Senior Member edwardb's Avatar
    Join Date
    Feb 2011
    Location
    Lake Orion, Michigan
    Posts
    10,852
    Post Thanks / Like
    Interesting how this thread keeps popping up. Happy to help if I can.

    Yes, the side vents are different between the Mk3 and Mk4. The Mk3 was more of a finished opening with the lip on the inside as you describe. The Mk4 is flat on both sides, and the louver opening just cut in. I don't see any reason why you couldn't flatten the back of the Mk3 and make the opening whatever shape you want. Spend time getting the opening cleaned up, straight, etc. I've seen some that were left pretty rough, including not even painting the exposed inner edge. Doesn't look too great.

    For the front mounts, I don't see any reason why you couldn't leave out the bolts in the side of the brake cooling inlet used on the Mk3 and hang the nose on the quick jacks. That's how the Mk4's were initially set up, with split tubes and washers to hang on the quick jacks. I didn't care for that setup, and used only the ********** grommets and 3/4-inch tubes on #7750, and it worked great. Talked about a bunch in this thread: http://www.ffcars.com/forums/17-fact...-grommets.html. Factory Five added a bracket sometime after I received #7750 that bolts to the quick jack mounting and is captured by the turn signal/running light bolts. I received those brackets with #8674, but didn't use them for a couple reasons. I'm very satisfied the grommets, properly fitted and installed, along with proper fitting quick jack tubes gives a solid mount. Others in the thread link I provided agree. If you're interested, I'm sure you could buy those brackets from Factory Five. But since they were developed for the Mk4, no guarantee they would fit your Mk3. Sorry I don't have the part numbers.

    Two other hints/responses: Since you don't have the quick jack holes in the body, be very careful. The nose is actually held up some, to the point where it floats above the hood 3/4-inch tubes. It's necessary to have it in that position to give the best hood fit plus not have interference with the hood hinges. You also want the holes in the body to fit the grommets precisely. Easy enough to measure when you have them. The hole will be kind of a racetrack shape.

    Hope this helps and good luck.
    Build 1: Mk3 Roadster #5125. Sold 11/08/2014. Build 2: Mk4 Roadster #7750. Sold 04/10/2017. Build Thread
    Build 3: Mk4 Roadster 20th Anniversary #8674. Sold 09/07/2020. Build Thread and Video. Build 4: Gen 3 Type 65 Coupe #59. Gen 3 Coyote. Legal 03/04/2020. Build Thread and Video
    Build 5: 35 Hot Rod Truck #138. LS3 and 4L65E auto. Rcvd 01/05/2021. Legal 04/20/2023. Build Thread. Sold 11/9/2023.

  7. #686
    Member JRD56's Avatar
    Join Date
    Oct 2014
    Location
    Olathe, KS
    Posts
    94
    Post Thanks / Like
    Thanks Edward. That was quite a discusion on the other forum. I know just what to now. Got the grommets and tubes on order. Best of luck on your new build, perhaps if I follow along I'll be motivated to do one next.

    Jim
    Purchased and un-assembled Mk3 in 2016. 5.0, Aluminum heads, Performer RPM Air gap, Quick Fuel 650 carb, BBK headers T5, 3.55 rear solid axle, Koni Shocks, PS with Hydra-boost. Also own two restored vintage Mustangs, two Model A fords, 1941 Chevy truck and several other hot rods.

  8. #687
    Member Scubasommer's Avatar
    Join Date
    Feb 2018
    Location
    NorthWest Indiana
    Posts
    63
    Post Thanks / Like
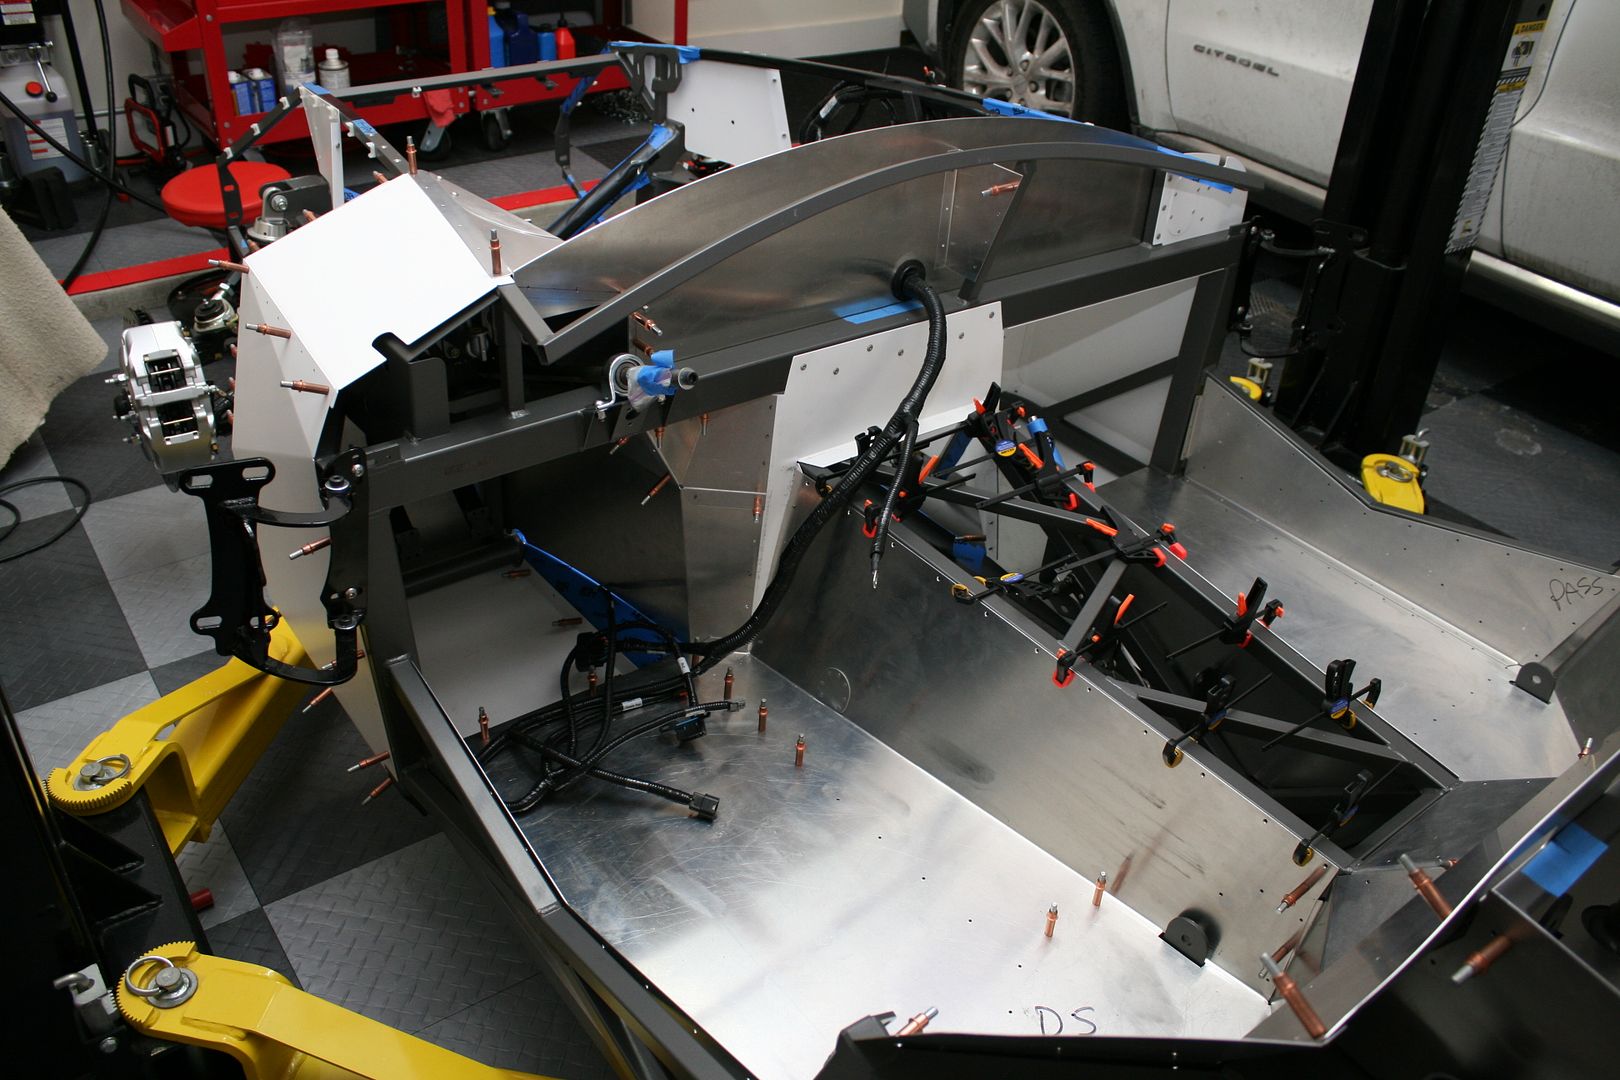
    I mentioned the King modified DS and firewall panels. I started mocking them up a bit. Looks like they’re going to work out fine. I’m getting a blank FFMetals DS footbox front and will replace the one pictured here. I’m not going to finalize any of these panels until I have the Coyote on hand, but looks very promising right now. Should have the necessary room up top, and still plenty of room for my feet. This is probably not the exact final position, but looks like I will have similar feet space as my current small block Mk4. Perfect. I will likely also do the King PS footbox expansion. Those pieces are a bit simpler, and similar to the ones I did for my current Mk4. Looks like I'm going to have several panels to get white powder coated like the ones from FF.


    Paul
    You mentioned that you used the King foot box expansion kit.....where did you get these (DS & PS)?
    I am currently trying to acquire the mod parts for my build that is scheduled for delivery in July.
    I am working on my engine now, 1969 351/427, so there should be some engine compartment breathing space to take, at 6’-2” I am trying to gain all the leg and foot box room I can.
    Any suggestions you can provide would be deeply appreciated!
    Also how far are you from Northwest Indiana?

    Thank you great job on your build threads, gives us newbie a sense of direction!
    Jimmy

  9. #688
    Senior Member edwardb's Avatar
    Join Date
    Feb 2011
    Location
    Lake Orion, Michigan
    Posts
    10,852
    Post Thanks / Like
    Quote Originally Posted by Scubasommer View Post
    Paul
    You mentioned that you used the King foot box expansion kit.....where did you get these (DS & PS)?
    I am currently trying to acquire the mod parts for my build that is scheduled for delivery in July.
    I am working on my engine now, 1969 351/427, so there should be some engine compartment breathing space to take, at 6’-2” I am trying to gain all the leg and foot box room I can.
    Any suggestions you can provide would be deeply appreciated!
    Also how far are you from Northwest Indiana?

    Thank you great job on your build threads, gives us newbie a sense of direction!
    Jimmy
    The timing of #8674 (delivered August 2015) was before Factory Five had a decent solution for wide engines like the Coyote. The sheet metal provided with my kit allowed the Coyote to fit, but took a huge chunk out of the DS footbox. King designed footbox mods to fit the Coyote and still have the same pedal space as before, which I jumped on. Nobody actually ever sold them. There was a group buy of fabbed parts back then, which is where mine came from. What Factory Five is delivering now, and what you should get with your kit, has revised sheet metal (suspiciously like King's... ) so I don't think you need to do anything. Plus Factory Five has added a small bump-out on the outside of the driver's side footbox to give even more room. It's not much, but every bit helps. With the sheet metal you'll receive, there are little tucks and mods you can make to gain a little more in places. But none that require replacing whole panels. You can find these on the forum, and decide if they're worth the effort. Just remember, every bit you gain on the inside you lose on the outside. With your planned engine, it gets real tight on the driver's side. Especially the back two plugs.

    King did have a mod for the passenger side. But I chose not to do that. It gained an inch or so in width and depth. But just decided it wasn't worth the effort. I did do a similar passenger side mod on #7750 (the build before this one) and while it was nice, always felt like it was a lot of work for what was really gained. I had my wife test the standard sheet metal in this build, and she was fine with it.

    We're 4-5 hours from NW Indiana. We have family in the Crown Point and Cedar Lake area. So get over that way occasionally. You're welcome to drop over to sunny Michigan. Just give me a shout.
    Last edited by edwardb; 12-29-2021 at 04:21 PM.
    Build 1: Mk3 Roadster #5125. Sold 11/08/2014. Build 2: Mk4 Roadster #7750. Sold 04/10/2017. Build Thread
    Build 3: Mk4 Roadster 20th Anniversary #8674. Sold 09/07/2020. Build Thread and Video. Build 4: Gen 3 Type 65 Coupe #59. Gen 3 Coyote. Legal 03/04/2020. Build Thread and Video
    Build 5: 35 Hot Rod Truck #138. LS3 and 4L65E auto. Rcvd 01/05/2021. Legal 04/20/2023. Build Thread. Sold 11/9/2023.

  10. #689
    Member Scubasommer's Avatar
    Join Date
    Feb 2018
    Location
    NorthWest Indiana
    Posts
    63
    Post Thanks / Like
    Quote Originally Posted by edwardb View Post
    The timing of #8674 (delivered August 2015) was before Factory Five had a decent solution for wide engines like the Coyote. The sheet metal provided with my kit allowed the Coyote to fit, but took a huge chunk out of the DS footbox. King designed footbox mods to fit the Coyote and still have the same pedal space as before, which I jumped on. Nobody actually every sold them. There was a group buy of fabbed parts back then, which is where mine came from. What Factory Five is delivering now, and what you should get with your kit, has revised sheet metal (suspiciously like King's... ) so I don't think you need to do anything. Plus Factory Five has added a small bump-out on the outside of the driver's side footbox to give even more room. It's not much, but every bit helps. With the sheet metal you'll receive, there are little tucks and mods you can make to gain a little more in places. But none that require replacing whole panels. You can find these on the forum, and decide if they're worth the effort. Just remember, every bit you gain on the inside you lose on the outside. With your planned engine, it gets real tight on the driver's side. Especially the back two plugs.

    King did have a mod for the passenger side. But I chose not to do that. It gained an inch or so in width and depth. But just decided it wasn't worth the effort. I did do a similar passenger side mod on #7750 (the build before this one) and while it was nice, always felt like it was a lot of work for what was really gained. I had my wife test the standard sheet metal in this build, and she was fine with it.

    We're 4-5 hours from NW Indiana. We have family in the Crown Point and Cedar Lake area. So get over that way occasionally. You're welcome to drop over to sunny Michigan. Just give me a shout.
    Thank you my friend!

  11. #690
    Senior Member shark92651's Avatar
    Join Date
    Feb 2018
    Location
    Frisco, TX
    Posts
    555
    Post Thanks / Like
    Quote Originally Posted by edwardb View Post
    Did a couple other things. Mounted the CNC brake and clutch reservoirs. Made up another bracket to mount it from the underside of the tube. It’s tight in this area, but the location clears everything. May look a little high to some, but I carefully measured (several times) the available space in the finished Mk4, and the caps clear the hood by about 1/4 inch. Tight, but should be OK.

    Paul I bought a large piece of aluminum angle that I plan to use to make a bracket to mount my triple reservoir, similar to what you did. How high can I mount the reservoirs and still clear the body and hood? Should the top of the caps be even with the top of the frame rail there, or can they go up a bit higher? What's your advice? Also, should I get it as close to the front of the DS foot box as possible?

  12. #691
    Senior Member edwardb's Avatar
    Join Date
    Feb 2011
    Location
    Lake Orion, Michigan
    Posts
    10,852
    Post Thanks / Like
    Quote Originally Posted by shark92651 View Post
    Paul I bought a large piece of aluminum angle that I plan to use to make a bracket to mount my triple reservoir, similar to what you did. How high can I mount the reservoirs and still clear the body and hood? Should the top of the caps be even with the top of the frame rail there, or can they go up a bit higher? What's your advice? Also, should I get it as close to the front of the DS foot box as possible?
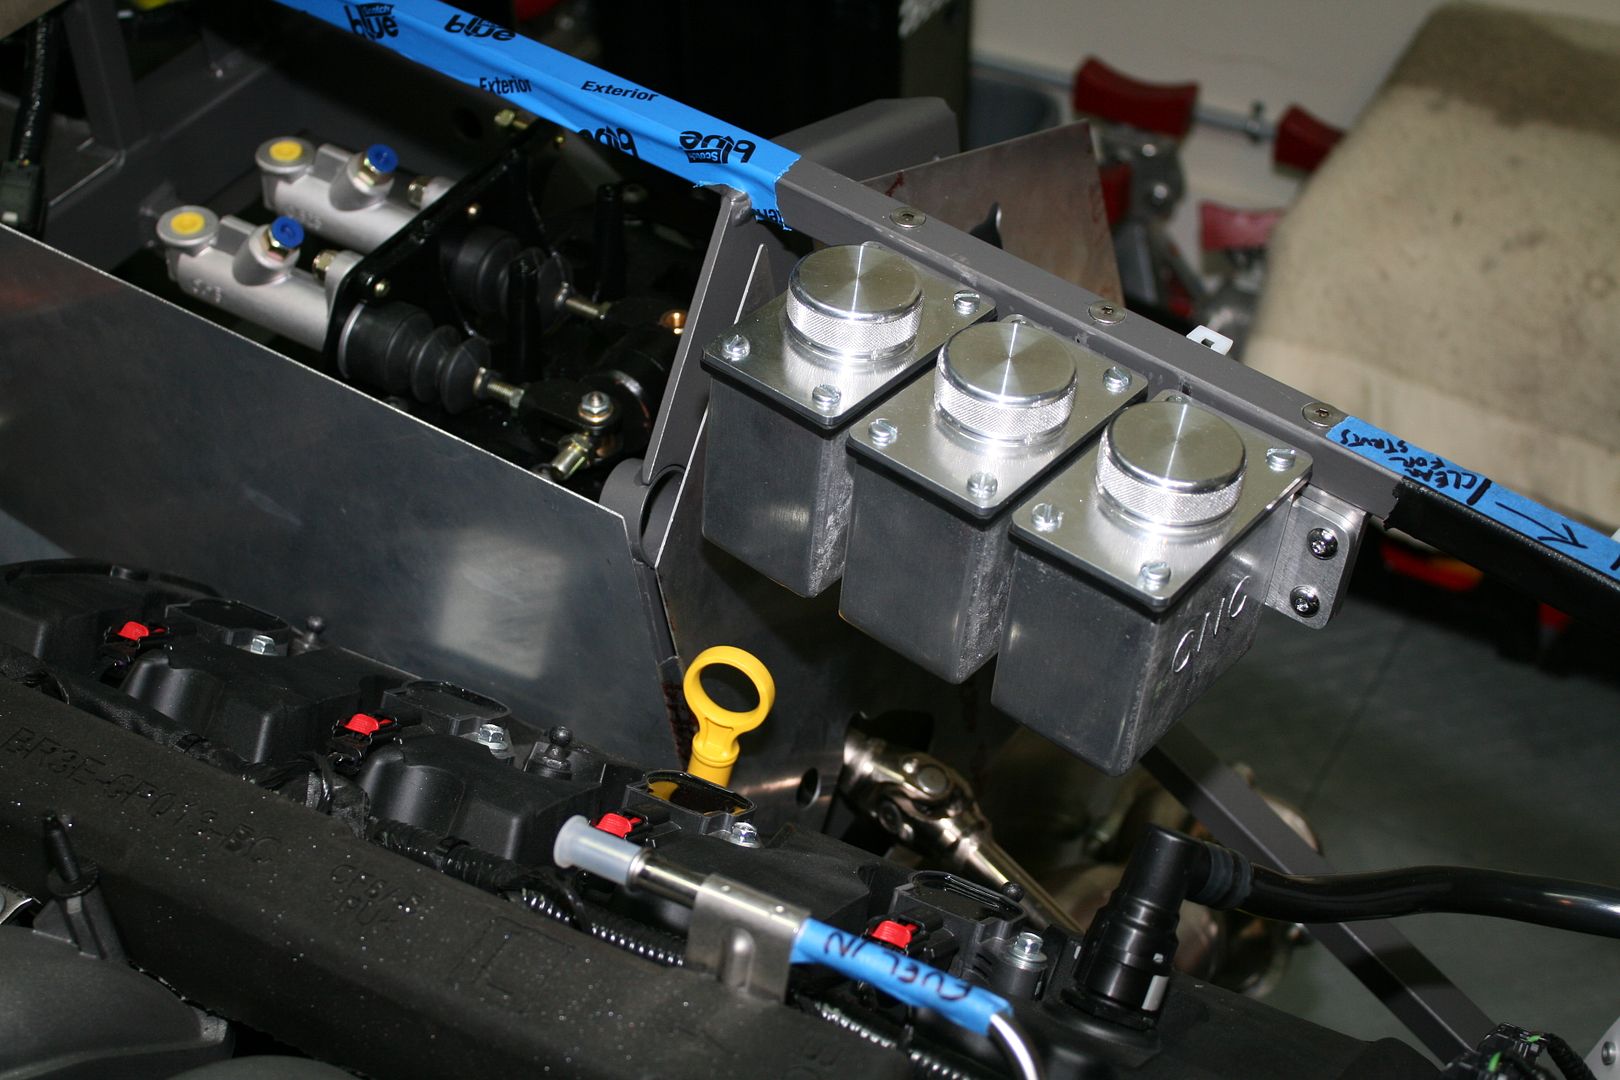
    This picture was actually early in my build and I later lowered the reservoirs from what is pictured here. These cleared, but basically with zero clearance to the hood. No reason to cut it that close. The final dimension is the top of the reservoir body 1/2-inch below the top of the 3/4-inch rails. Or said another way, the top of the caps 1/4-inch above the top of the rail. That provides adequate clearance.

    For the front to back, you need to be inside 11 inches from the front of the footbox to the outside of the front reservoir. That will prevent interference with the hood gas strut. As pictured here, they're 9-1/4 inches. So pretty close to the footbox as you mentioned. For a Coyote build, the hood gas strut isn't the first point of interference. Further forward the reservoirs could interfere with the PCV connection (in the picture) and even the coil covers. I'd recommend the 9-1/4 location (or closer if you like) with a Coyote.

    Cool this build thread is still getting traffic and questions. It's now in it's second driving season, and after a slow start this year with a winter that wouldn't die, finally getting out in earnest. Had an awesome cruise today on a beautiful sunny 72 degree Michigan day. Turned 2,000 miles in the process. Every time I drive it I'm so impressed. What a machine this thing is.
    Last edited by edwardb; 05-23-2018 at 06:50 PM.
    Build 1: Mk3 Roadster #5125. Sold 11/08/2014. Build 2: Mk4 Roadster #7750. Sold 04/10/2017. Build Thread
    Build 3: Mk4 Roadster 20th Anniversary #8674. Sold 09/07/2020. Build Thread and Video. Build 4: Gen 3 Type 65 Coupe #59. Gen 3 Coyote. Legal 03/04/2020. Build Thread and Video
    Build 5: 35 Hot Rod Truck #138. LS3 and 4L65E auto. Rcvd 01/05/2021. Legal 04/20/2023. Build Thread. Sold 11/9/2023.

  13. #692
    cv2065's Avatar
    Join Date
    Dec 2017
    Location
    Orlando, FL
    Posts
    2,147
    Post Thanks / Like
    Quote Originally Posted by edwardb View Post
    Cool this build thread is still getting traffic and questions. It's now in it's second driving season, and after a slow start this year with a winter that wouldn't die, finally getting out in earnest. Had an awesome cruise today on a beautiful sunny 72 degree Michigan day. Turned 2,000 miles in the process. Every time I drive it I'm so impressed. What a machine this thing is.
    Really great build thread. I've spent an hour or so each night for the last week making notes off of your posts and pictures, and am only on page 9. From e-brake pulleys to Volara sculpting foam for the dash, I'm getting it all! I'm sure it took a lot of extra time to post all of this info and pics so again, much appreciated.

    And of course, thanks to everyone else for posting theirs as well. I've been hopscotching around the site pulling from just about everyone. I'll try and return the favor to the forum when I start my build.
    Last edited by cv2065; 05-23-2018 at 05:25 PM.

  14. #693
    Junior Member
    Join Date
    Jun 2015
    Posts
    27
    Post Thanks / Like
    I know I am very late to reply to this topic but I am building #9279 and while I am excited about the prospect of "built not bought" I recognized my limitations both in skill and time frame so I elected to have my engine built by a professional local to me in Charlotte. Long story short, he was very high on the fuel pump hangar that you referenced here and I bought it along with the fuel pump from him and I will be installing it in my tank next week. I am not doing a Coyote build but rather a 351W convert to a 427.

    He even showed me the video you referenced which I agree is pretty compelling.

    While I am at it, I wanted to add my thanks to you on top of the others for your very detailed build threads. I enjoy reading them and I find that I reference them often especially where the FFR manual is often lacking the details you need when you are not an experienced builder.
    Glenn

  15. #694
    BadAsp427's Avatar
    Join Date
    Jul 2018
    Location
    Greeneville, TN
    Posts
    1,179
    Post Thanks / Like

    Very Important, Great Catch Paul!!!

    Quote Originally Posted by edwardb View Post
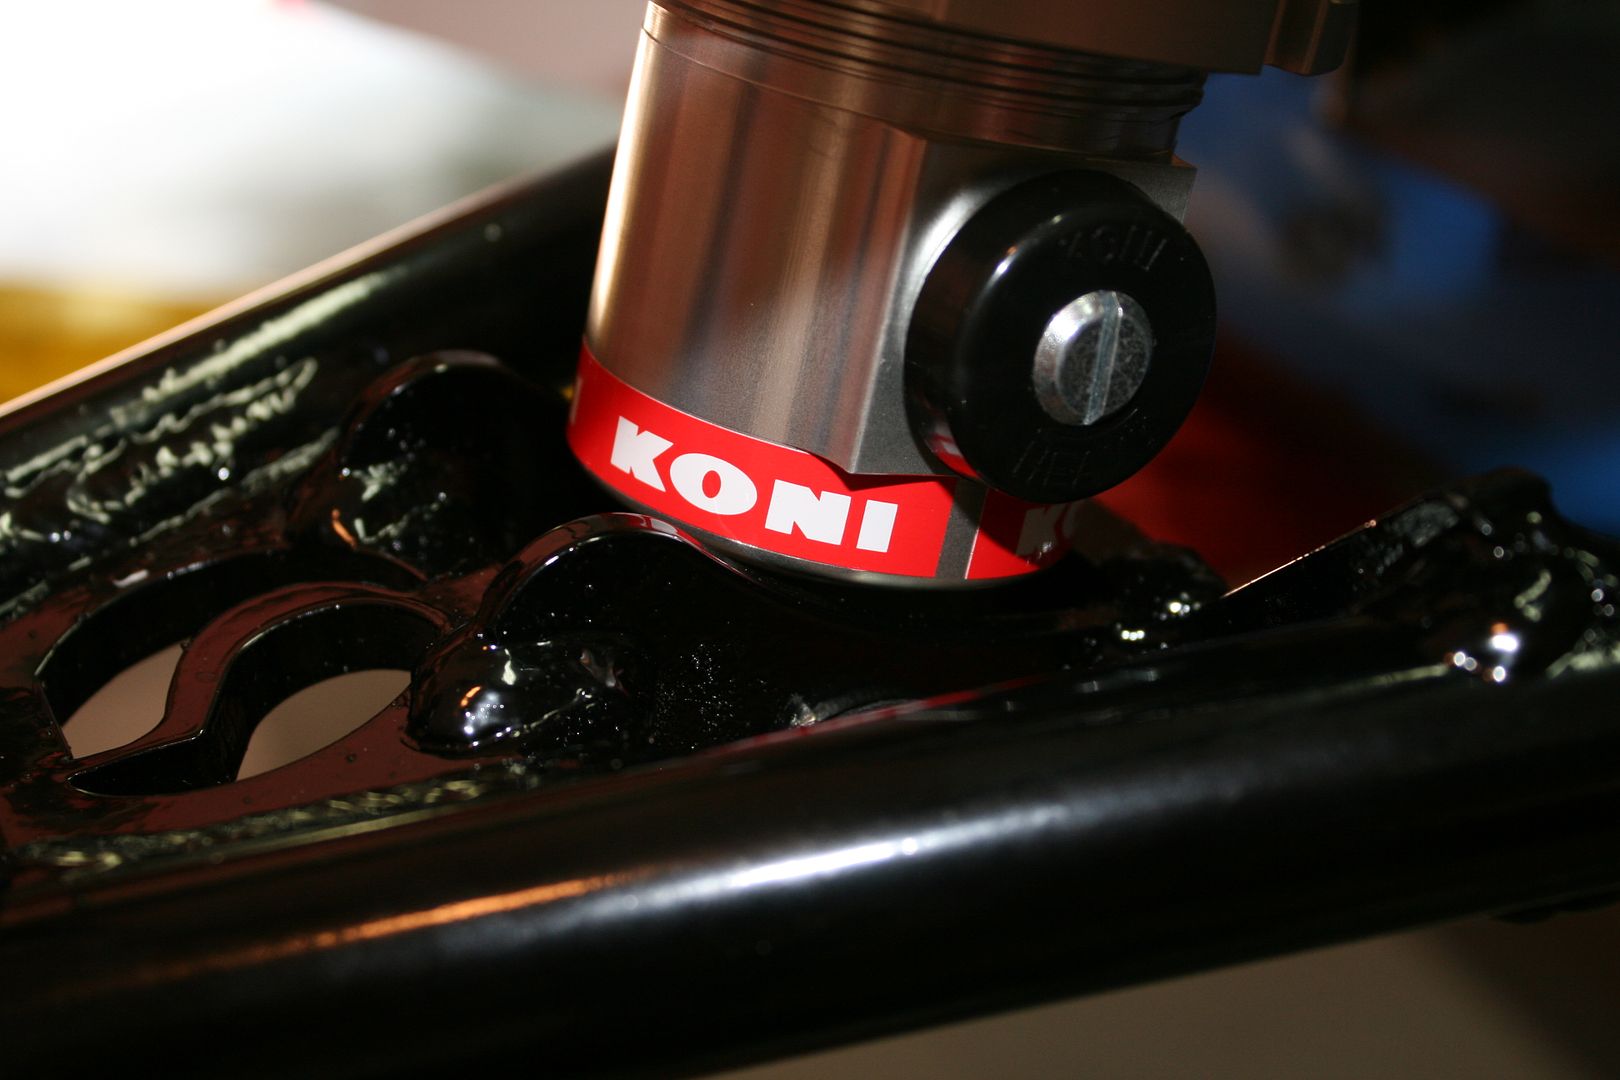
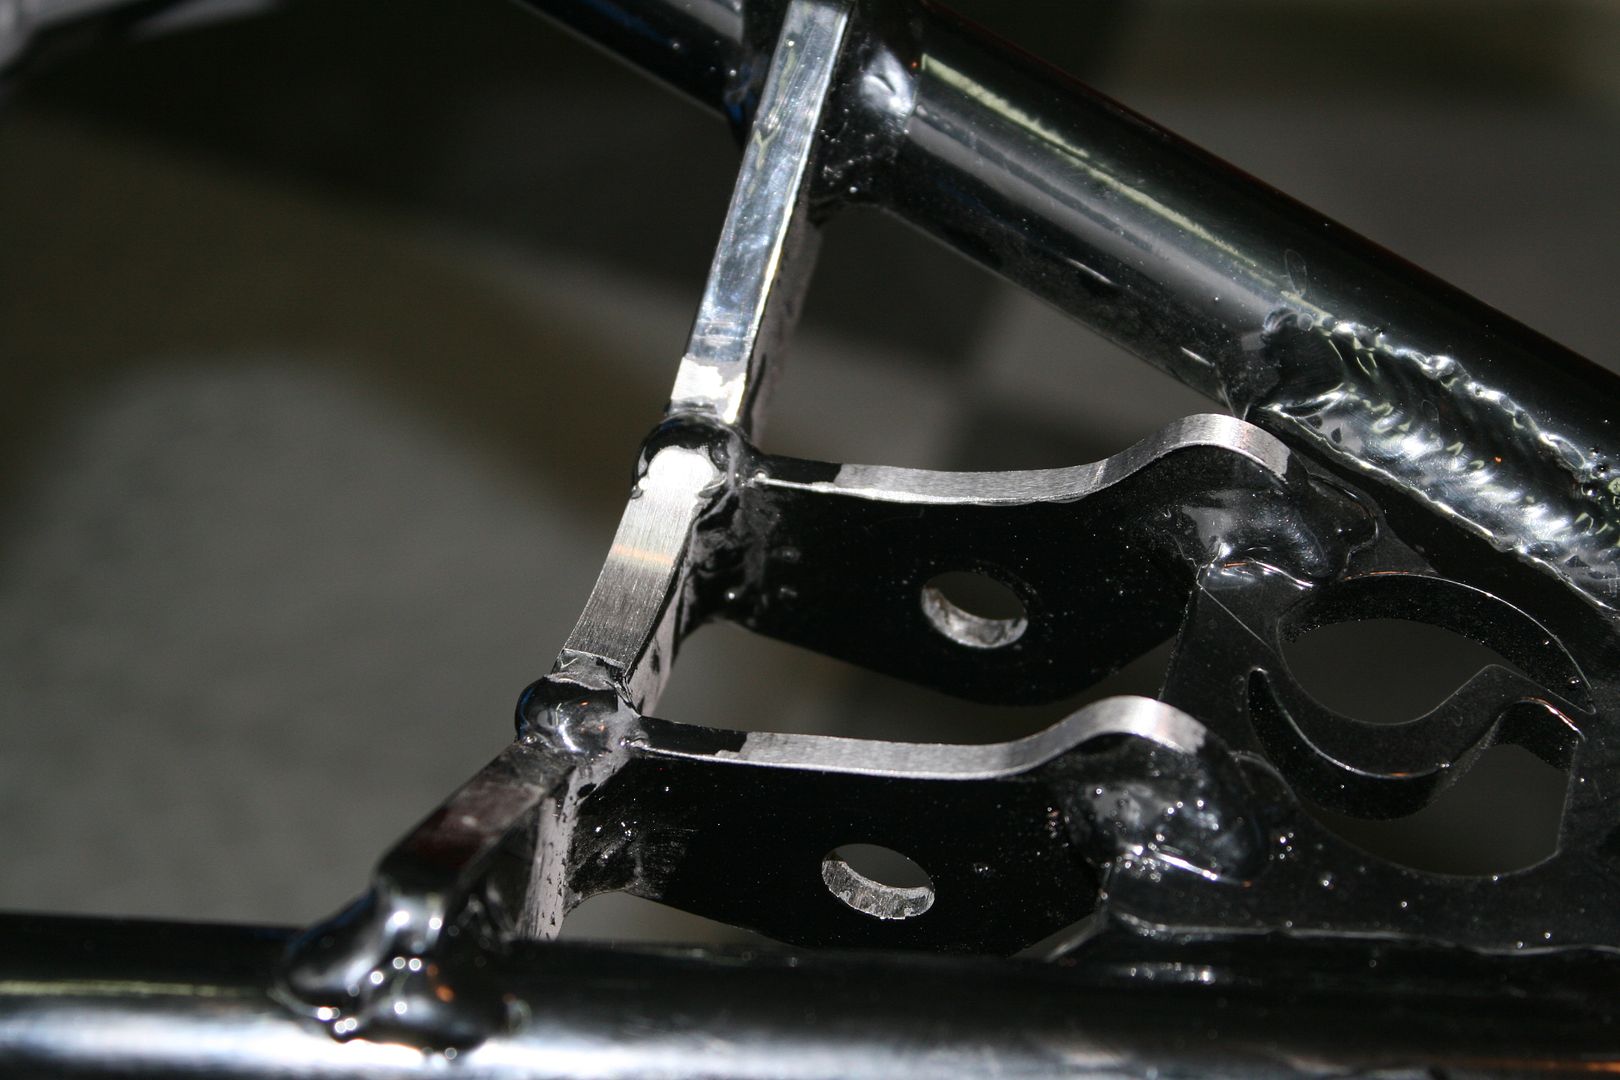
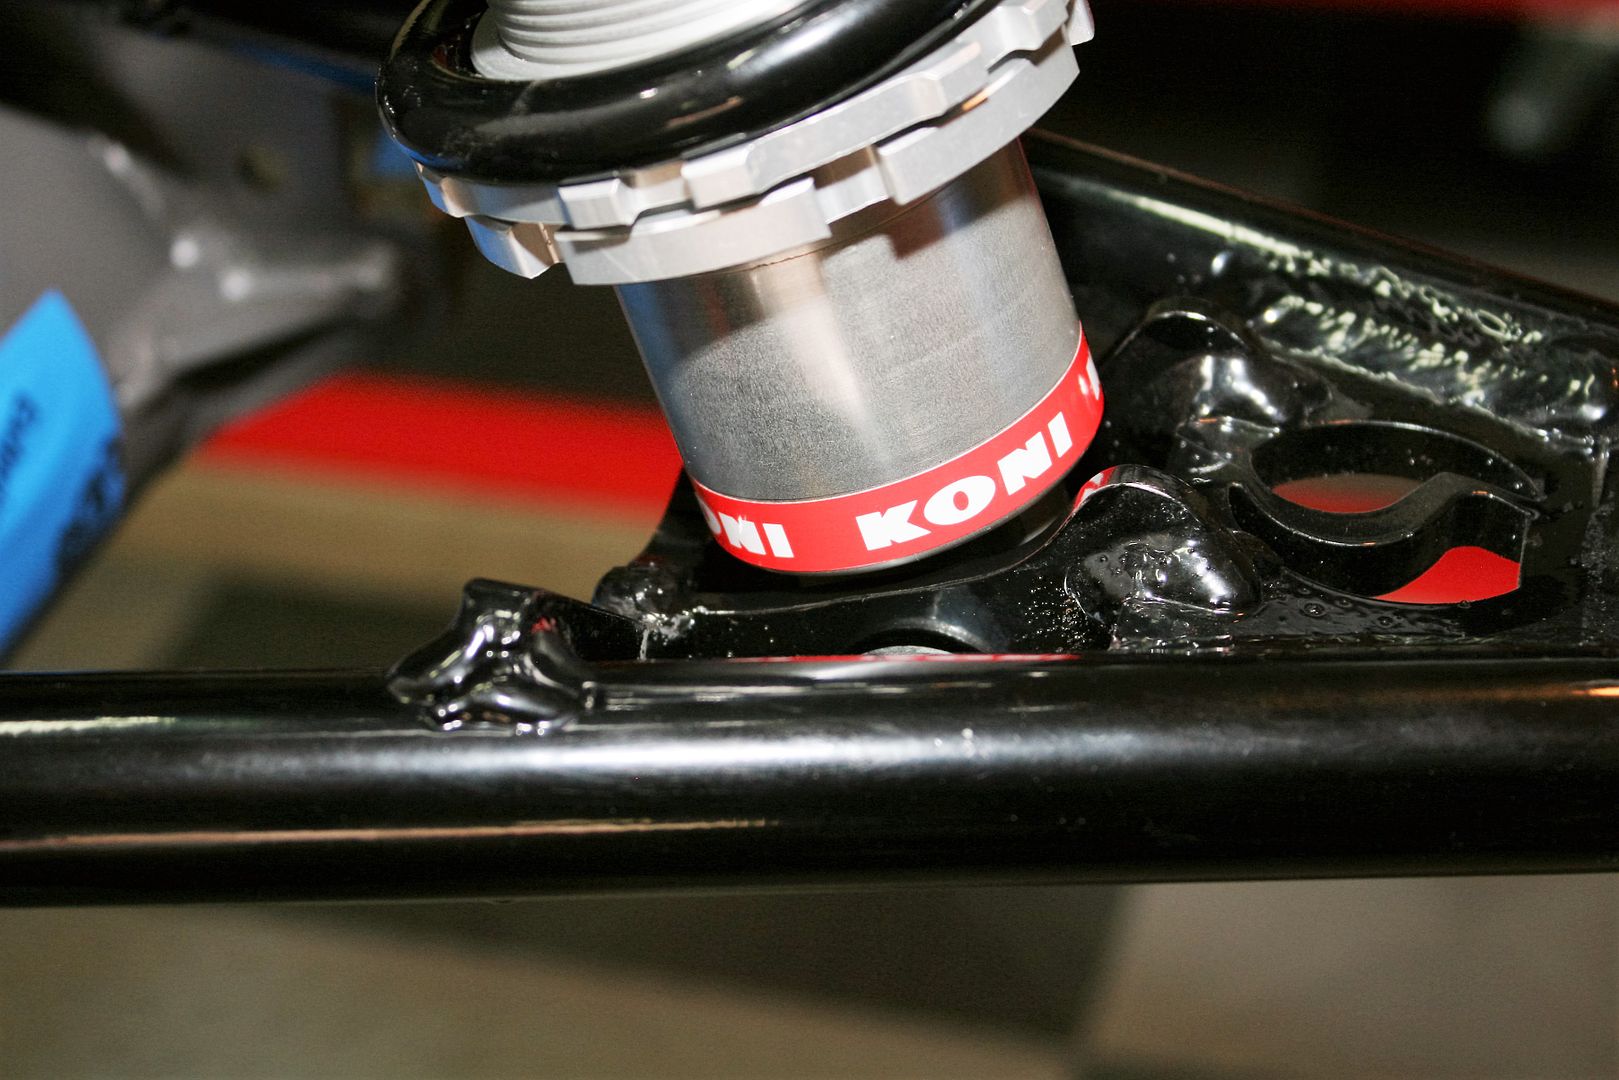
    The second issue was with the Koni 2812 double-adjustable aluminum body coil-over shocks. The manual says to install the standard Koni front shocks body UP. But the Koni instructions for these shocks quite emphatically says they are to be installed body DOWN. Something about the special valving in this shock type only functions correctly when installed down. And Factory Five does have them installed body down in their 20th Anniversary Roadster. So that's what I did. But I then realized the body interfered slightly with the LCA. In fact, if you look closely at the pics FF has on their website of their 20th Anniversary Roadster, you can see divots in the shock body from the interference. I decided not to duplicate this feature. Using a cut-off wheel and then a small air belt sander, I removed the interference from the two sides and back and confirmed clearance with the shock at full extension and compression. It's not a lot, so I'm confident the strength of the LCA is not affected. Here are three pics. Before, after trimming, and then with the shock back in place. Before assembling, I touched up the bare metal with gloss black POR15, which matches the black PC perfectly.


    AWESOME INFORMATION AND VERY IMPORTANT: Great Catch! So this could actually be a big deal... I just test fit my shocks and because of the binding that you indicate here, I only have about half of my upward travel and it is complete lock up and it can not go any further. Under loads, I'm positive this would/could cause major handling issues. I'm modifying my lower control arm shock mounts now.

    Mk4 20th Anniversary #8690 (#8 of 20) Purchased 8/18/18----Build Started 8/19/18
    Build Thread Click Here / Registry Entry Click Here / BluePrint Engines 347ci / TKO600
    Carb/Heater/Heated Seats/Cruise Control/Drop Trunk & Battery/Custom Cubby

  16. #695
    Senior Member edwardb's Avatar
    Join Date
    Feb 2011
    Location
    Lake Orion, Michigan
    Posts
    10,852
    Post Thanks / Like
    Quote Originally Posted by BadAsp427 View Post
    AWESOME INFORMATION AND VERY IMPORTANT: Great Catch! So this could actually be a big deal... I just test fit my shocks and because of the binding that you indicate here, I only have about half of my upward travel and it is complete lock up and it can not go any further. Under loads, I'm positive this would/could cause major handling issues. I'm modifying my lower control arm shock mounts now.
    I don't know the exact timing, but at some point this was addressed by FFR and fixed. The LCA's on my Gen 3 Coupe build, delivered 8+ months ago with the exact dual action Koni's, don't interfere. The profile at the attachment points looks similar to this modification I did on the LCA's received with the 20th anniversary Roadster in 2015.
    Build 1: Mk3 Roadster #5125. Sold 11/08/2014. Build 2: Mk4 Roadster #7750. Sold 04/10/2017. Build Thread
    Build 3: Mk4 Roadster 20th Anniversary #8674. Sold 09/07/2020. Build Thread and Video. Build 4: Gen 3 Type 65 Coupe #59. Gen 3 Coyote. Legal 03/04/2020. Build Thread and Video
    Build 5: 35 Hot Rod Truck #138. LS3 and 4L65E auto. Rcvd 01/05/2021. Legal 04/20/2023. Build Thread. Sold 11/9/2023.

  17. #696

    Join Date
    Apr 2017
    Location
    Elk Grove, NorCal
    Posts
    550
    Post Thanks / Like
    edwardb

    Your dashboard...and build for that matter looks awesome. How did you cut out the holes for the dashboard? And what size are they?

    And thank you for sharing your builds. I am referring to your threads a lot for my build.
    build thread: http://thefactoryfiveforum.com/showt...-USRRC-vspeeds

    Build School: July 14-16, 2017
    Kit purchased: July 25, 2017
    Kit delivered: September 13, 2017
    First Start: December 22, 2018
    Body painted and kit completed and drivable: July 2019 (but still not done)
    CA SB100 Registration: January 2020

    Mk4 - 289 USRRC Roadster kit, Roush 427SR with Schneider Racing custom camshaft, Fitech EFI, TKO600 (.64-5th gear), 15" wheels, stock brake calipers, under car exhaust with Spintech 7000 muffler, no roll bar, Russ Thompson turn signal, removable steering wheel, and many other small upgrades and modifications

  18. #697
    Senior Member edwardb's Avatar
    Join Date
    Feb 2011
    Location
    Lake Orion, Michigan
    Posts
    10,852
    Post Thanks / Like
    Quote Originally Posted by Vspeeds View Post
    edwardb

    Your dashboard...and build for that matter looks awesome. How did you cut out the holes for the dashboard? And what size are they?

    And thank you for sharing your builds. I am referring to your threads a lot for my build.
    Thanks for the comments. Glad this build thread continues to give back. I cut the large dash holes with an adjustable hole saw, like this one. https://www.amazon.com/General-Tools.../dp/B00004T7P1. I use it in a drill press set at low speed, with a wood backer, and a little cutting lube. Works really well. Some guys use them with a handheld drill. I guess, but not my preference. Be really careful if you do that. Especially right when the cutter breaks through. That's when it can get a little crazy. The sizes are set for each hole. I measure the diameter of the gauge and the thickness of the covering material. Set the hole cutter on the small side of thickness plus the gauge radius. Makes a nice snug fit.
    The smaller holes, like switches, indicators, etc. are mostly cut with step drills. Then adjusted if needed with hand files, small sanding drum, Dremel, whatever. The size is determined by what goes into the hole and whether the covering will be pulled through or not. I pull covering through and glue to the back with pie cuts whenever I can. But sometimes it's not possible. Mainly when the threads of the part can't handle the added thickness.
    Last edited by edwardb; 10-01-2018 at 09:08 AM.
    Build 1: Mk3 Roadster #5125. Sold 11/08/2014. Build 2: Mk4 Roadster #7750. Sold 04/10/2017. Build Thread
    Build 3: Mk4 Roadster 20th Anniversary #8674. Sold 09/07/2020. Build Thread and Video. Build 4: Gen 3 Type 65 Coupe #59. Gen 3 Coyote. Legal 03/04/2020. Build Thread and Video
    Build 5: 35 Hot Rod Truck #138. LS3 and 4L65E auto. Rcvd 01/05/2021. Legal 04/20/2023. Build Thread. Sold 11/9/2023.

  19. #698
    BadAsp427's Avatar
    Join Date
    Jul 2018
    Location
    Greeneville, TN
    Posts
    1,179
    Post Thanks / Like
    Quote Originally Posted by edwardb View Post

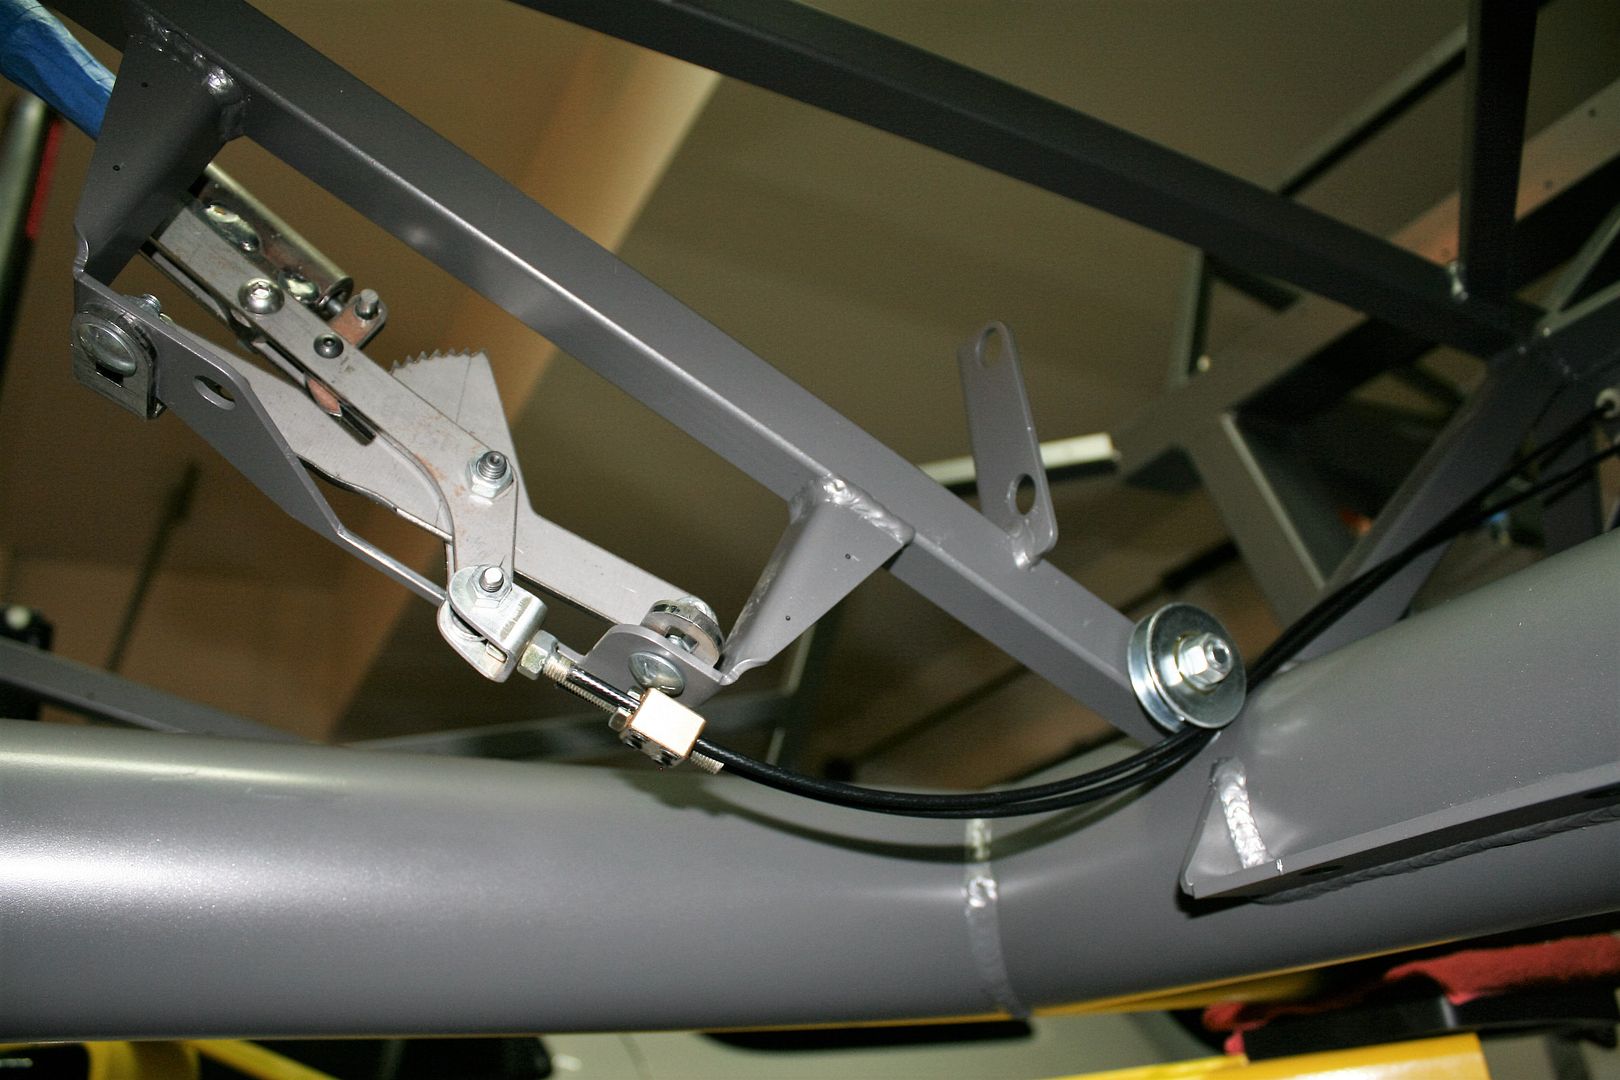
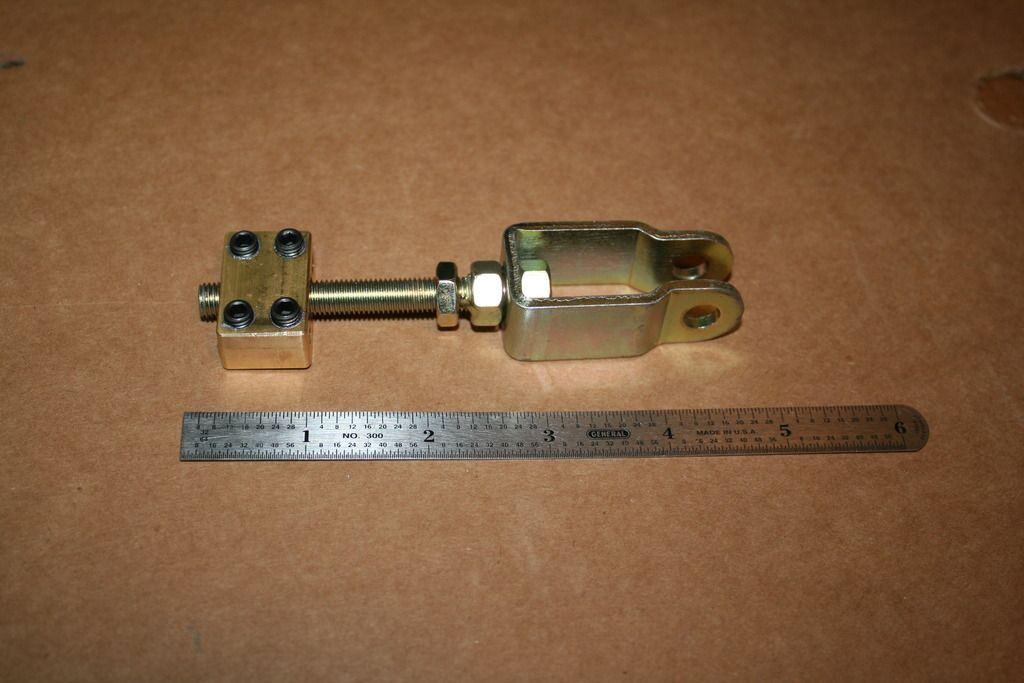
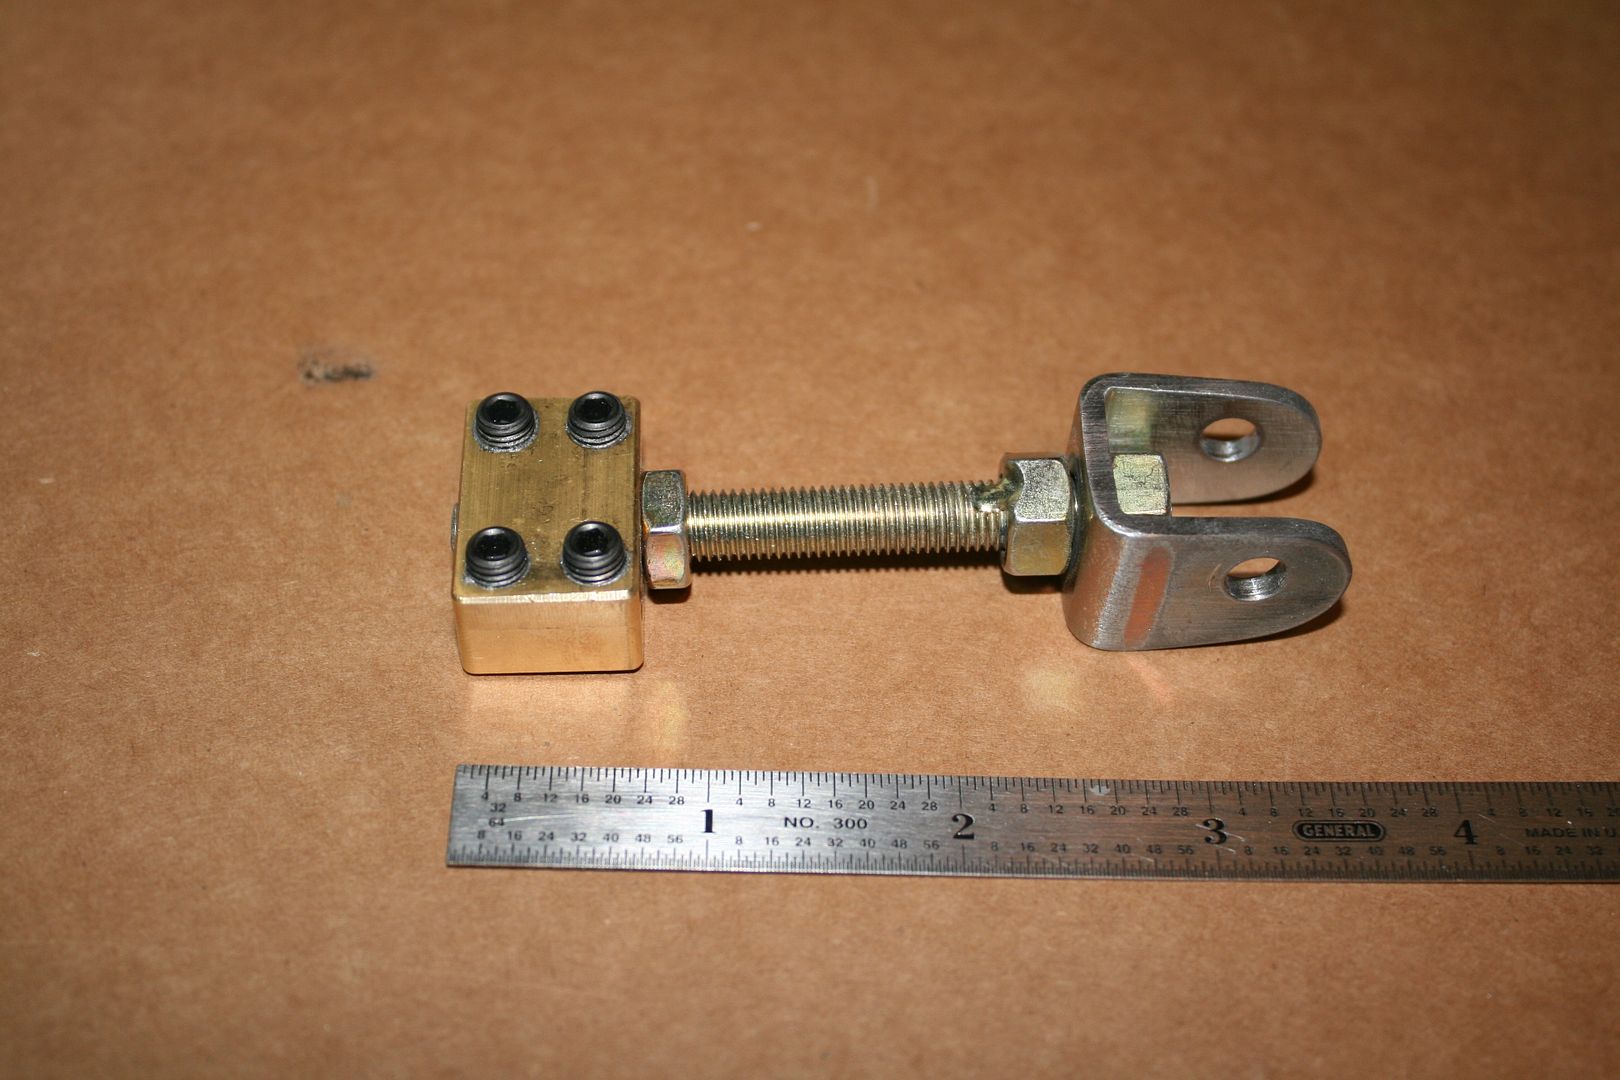
    My first idea was to add the Lokar cable clevis behind the FF provided rod ends where the cables attach to the e-brake handle. But then I realized with a little modification, the Lokar cable clevis could be used by itself. Simple and neat. This is the stock Lokar part. I think it’s used with most/all of their e-brake handle assemblies;


    After some careful layout, trimmed it down and drilled some new holes. Now looks like this:


    Paul,
    Was going to send this in a PM and then thought that others may learn from your reply as well.
    I'm completing a near mirror image mod on my e-brake cable. Why did you modify the Lokar clevis? I just test fit everything and can not see the logic that you had in making the small modification to the Lokar. I'm just trying to see what I'm missing so that the master can teach the young grasshopper...

    Mk4 20th Anniversary #8690 (#8 of 20) Purchased 8/18/18----Build Started 8/19/18
    Build Thread Click Here / Registry Entry Click Here / BluePrint Engines 347ci / TKO600
    Carb/Heater/Heated Seats/Cruise Control/Drop Trunk & Battery/Custom Cubby

  20. #699
    Senior Member edwardb's Avatar
    Join Date
    Feb 2011
    Location
    Lake Orion, Michigan
    Posts
    10,852
    Post Thanks / Like
    Quote Originally Posted by BadAsp427 View Post
    Paul,
    Was going to send this in a PM and then thought that others may learn from your reply as well.
    I'm completing a near mirror image mod on my e-brake cable. Why did you modify the Lokar clevis? I just test fit everything and can not see the logic that you had in making the small modification to the Lokar. I'm just trying to see what I'm missing so that the master can teach the young grasshopper...
    I'll pass on the master / grasshopper reference but here was my thinking on the Lokar mod. The pulley setup really works well and with two years on the road with #8674 I haven't touched it and still works perfectly. And I use the e-brake a lot. But the one issue with the mod is the clevis drags across the head of the rear carriage bolt holding the handle assembly to the frame. Shortening the clevis and also lowering the pivot point (you can see that if you look closely) is my attempt to minimize that drag. I've seen some builders do this e-brake pulley mod and use the Lokar clevis unmodified and seems to work OK. So you can decide how you want to approach it. One thing you'll find, and I've mentioned it before, is the Wilwood brakes used on the 20th Anniversary Roadster (and now available as an optional upgrade) use a separate e-brake caliper that requires very little actual cable movement. Basically, just tightening the cable actuates the e-brake. So there isn't a lot of actual movement across that bolt. One other thing, I'm assuming you saw in a later post, based on a suggestion, I added a second pulley so each cable has its own. Probably would work OK with one, but I'd recommend two.
    Build 1: Mk3 Roadster #5125. Sold 11/08/2014. Build 2: Mk4 Roadster #7750. Sold 04/10/2017. Build Thread
    Build 3: Mk4 Roadster 20th Anniversary #8674. Sold 09/07/2020. Build Thread and Video. Build 4: Gen 3 Type 65 Coupe #59. Gen 3 Coyote. Legal 03/04/2020. Build Thread and Video
    Build 5: 35 Hot Rod Truck #138. LS3 and 4L65E auto. Rcvd 01/05/2021. Legal 04/20/2023. Build Thread. Sold 11/9/2023.

  21. #700
    BadAsp427's Avatar
    Join Date
    Jul 2018
    Location
    Greeneville, TN
    Posts
    1,179
    Post Thanks / Like
    Quote Originally Posted by edwardb View Post
    I'll pass on the master / grasshopper reference but here was my thinking on the Lokar mod. The pulley setup really works well and with two years on the road with #8674 I haven't touched it and still works perfectly. And I use the e-brake a lot. But the one issue with the mod is the clevis drags across the head of the rear carriage bolt holding the handle assembly to the frame. Shortening the clevis and also lowering the pivot point (you can see that if you look closely) is my attempt to minimize that drag. I've seen some builders do this e-brake pulley mod and use the Lokar clevis unmodified and seems to work OK. So you can decide how you want to approach it. One thing you'll find, and I've mentioned it before, is the Wilwood brakes used on the 20th Anniversary Roadster (and now available as an optional upgrade) use a separate e-brake caliper that requires very little actual cable movement. Basically, just tightening the cable actuates the e-brake. So there isn't a lot of actual movement across that bolt. One other thing, I'm assuming you saw in a later post, based on a suggestion, I added a second pulley so each cable has its own. Probably would work OK with one, but I'd recommend two.
    IMG_1856.jpg
    Yes, I have the double roller set up... Thanks for the reply. I'm going to get back on it tomorrow and finish it up... It actually looks like if I do not cut the clevis, then the thread area of the adjuster will actually pass over the bolt head and might not even touch it. Either way, I'll get is all figured out and I very much thank you for your reply. For a little pep me up, I just watched all your first start and first go cart drive videos for #8674....

    This week is focused on getting everything taped off and ready for Lizard Skin Sound and Heat coatings this weekend... Oh Boy!!!

    Mk4 20th Anniversary #8690 (#8 of 20) Purchased 8/18/18----Build Started 8/19/18
    Build Thread Click Here / Registry Entry Click Here / BluePrint Engines 347ci / TKO600
    Carb/Heater/Heated Seats/Cruise Control/Drop Trunk & Battery/Custom Cubby

  22. #701

    Join Date
    Apr 2017
    Location
    Elk Grove, NorCal
    Posts
    550
    Post Thanks / Like
    Edwardb
    Thanks for the info on the dashboard holes. I was looking at that same tool as the hole saw bits just arent the right size. Ill pick up that type tool and make some practice holes on scrap aluminum to get the right size set up.
    build thread: http://thefactoryfiveforum.com/showt...-USRRC-vspeeds

    Build School: July 14-16, 2017
    Kit purchased: July 25, 2017
    Kit delivered: September 13, 2017
    First Start: December 22, 2018
    Body painted and kit completed and drivable: July 2019 (but still not done)
    CA SB100 Registration: January 2020

    Mk4 - 289 USRRC Roadster kit, Roush 427SR with Schneider Racing custom camshaft, Fitech EFI, TKO600 (.64-5th gear), 15" wheels, stock brake calipers, under car exhaust with Spintech 7000 muffler, no roll bar, Russ Thompson turn signal, removable steering wheel, and many other small upgrades and modifications

  23. #702
    Senior Member edwardb's Avatar
    Join Date
    Feb 2011
    Location
    Lake Orion, Michigan
    Posts
    10,852
    Post Thanks / Like
    Quote Originally Posted by BadAsp427 View Post
    I'm going to get back on it tomorrow and finish it up... It actually looks like if I do not cut the clevis, then the thread area of the adjuster will actually pass over the bolt head and might not even touch it. Either way, I'll get is all figured out and I very much thank you for your reply.
    The issue I was concerned with wasn't the threaded adjuster hitting the carriage bolt. It was the block where the cables are clamped. Plus I wanted the block to stay on the head of the bolt throughout its travel, and not get hung up on either side. The other issue, after I refreshed my memory and reviewed the pictures, is the full length clevis comes close to the back edge of the frame mounting. Shortening the clevis, and raising the attachment hole, was my attempt to mitigate all of the above. As seen in the early picture (e.g. unpainted, single roller) below. I also polished the marks off the head of the carriage bolt and added a little lube there. The clevis slides over it pretty easily. Your layout may be different and certainly there are multiple ways to address this. But that is the full story for why I modified the clevis.


    Quote Originally Posted by Vspeeds View Post
    Edwardb
    Thanks for the info on the dashboard holes. I was looking at that same tool as the hole saw bits just arent the right size. Ill pick up that type tool and make some practice holes on scrap aluminum to get the right size set up.
    Cool. I think you'll like how that cutter works. Practice is always good.
    Last edited by edwardb; 10-02-2018 at 10:00 PM.
    Build 1: Mk3 Roadster #5125. Sold 11/08/2014. Build 2: Mk4 Roadster #7750. Sold 04/10/2017. Build Thread
    Build 3: Mk4 Roadster 20th Anniversary #8674. Sold 09/07/2020. Build Thread and Video. Build 4: Gen 3 Type 65 Coupe #59. Gen 3 Coyote. Legal 03/04/2020. Build Thread and Video
    Build 5: 35 Hot Rod Truck #138. LS3 and 4L65E auto. Rcvd 01/05/2021. Legal 04/20/2023. Build Thread. Sold 11/9/2023.

  24. Likes BadAsp427 liked this post
  25. #703
    Member Texas Driver's Avatar
    Join Date
    Oct 2018
    Location
    Richmond, TX
    Posts
    50
    Post Thanks / Like
    Quote Originally Posted by edwardb View Post
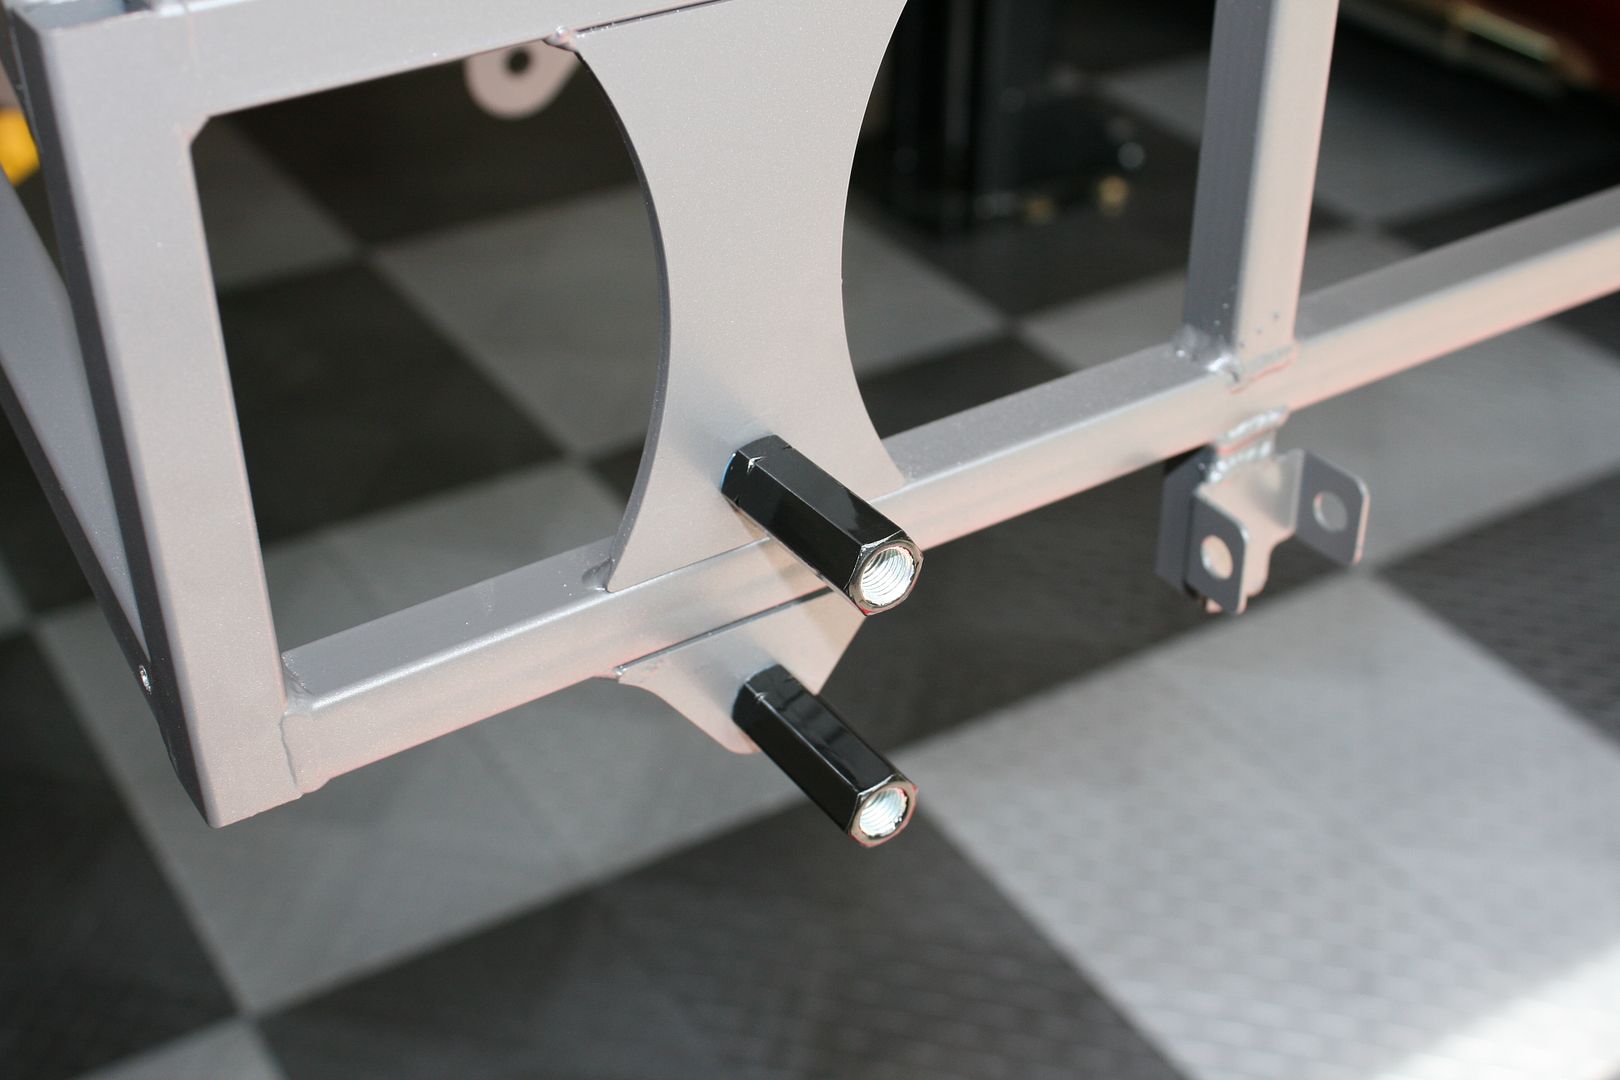
    Finally, before moving onto the main event, I installed couplers for the rear bumpers. Now is the time before any sheet metal or tank mounting. For new builders, the stock setup, especially now with the Mk4 where everything back there is really tight, the tank must be dropped to install/remove the rear bumpers or quick jacks, whatever you install. With the couplers, no longer necessary to drop the tank. I happen to like 7/16-20, because that's the threaded rod and hardware I use. Any similar size is good. Just one very small hint though. Pay attention to where you bolt these down. The holes in the frame are pretty large. Measure the vertical and horizontal locations, compared to the holes in the body and the bumper if you're going to use one. If you stack all the tolerances one direction, it's possible to be off 1/8 inch (or more) and complicates final assembly when that time comes. Ask me how I know…

    How long are the Couplers? Great idea to be ale to access the body without having to drop the tank and such. In the middle of inventorying my boxes with my wife, SSOOO ready to start building.
    Thanks
    Last edited by David Hodgkins; 12-30-2018 at 02:33 PM. Reason: added back close quote tag

  26. #704
    Senior Member edwardb's Avatar
    Join Date
    Feb 2011
    Location
    Lake Orion, Michigan
    Posts
    10,852
    Post Thanks / Like
    Quote Originally Posted by edwardb View Post
    Finally, before moving onto the main event, I installed couplers for the rear bumpers. Now is the time before any sheet metal or tank mounting. For new builders, the stock setup, especially now with the Mk4 where everything back there is really tight, the tank must be dropped to install/remove the rear bumpers or quick jacks, whatever you install. With the couplers, no longer necessary to drop the tank. I happen to like 7/16-20, because that's the threaded rod and hardware I use. Any similar size is good. Just one very small hint though. Pay attention to where you bolt these down. The holes in the frame are pretty large. Measure the vertical and horizontal locations, compared to the holes in the body and the bumper if you're going to use one. If you stack all the tolerances one direction, it's possible to be off 1/8 inch (or more) and complicates final assembly when that time comes. Ask me how I know…

    Quote Originally Posted by Texas Driver View Post
    How long are the Couplers? Great idea to be ale to access the body without having to drop the tank and such. In the middle of inventorying my boxes with my wife, SSOOO ready to start building.
    Thanks
    Those couplers are part number 90977A190 from McMaster. Grade 5, 7/16"-20 Thread Size, 1-3/4" long. https://www.mcmaster.com/90977A190. I used them because my other on-hand hardware (threaded rod, lock nuts, etc.) was also fine pitch 7/16"-20. Similar couplers are typically available at your local hardware in 7/16"-14 threads. Also usually about 1-3/4" long and would work fine. The length isn't critical though.
    Last edited by edwardb; 12-30-2018 at 02:23 PM.
    Build 1: Mk3 Roadster #5125. Sold 11/08/2014. Build 2: Mk4 Roadster #7750. Sold 04/10/2017. Build Thread
    Build 3: Mk4 Roadster 20th Anniversary #8674. Sold 09/07/2020. Build Thread and Video. Build 4: Gen 3 Type 65 Coupe #59. Gen 3 Coyote. Legal 03/04/2020. Build Thread and Video
    Build 5: 35 Hot Rod Truck #138. LS3 and 4L65E auto. Rcvd 01/05/2021. Legal 04/20/2023. Build Thread. Sold 11/9/2023.

  27. #705
    Papa's Avatar
    Join Date
    Dec 2016
    Location
    Mexico, MO
    Posts
    5,702
    Post Thanks / Like
    Quote Originally Posted by edwardb View Post
    Thanks for the comments. Glad this build thread continues to give back. I cut the large dash holes with an adjustable hole saw, like this one. https://www.amazon.com/General-Tools.../dp/B00004T7P1. I use it in a drill press set at low speed, with a wood backer, and a little cutting lube. Works really well. Some guys use them with a handheld drill. I guess, but not my preference. Be really careful if you do that. Especially right when the cutter breaks through. That's when it can get a little crazy. The sizes are set for each hole. I measure the diameter of the gauge and the thickness of the covering material. Set the hole cutter on the small side of thickness plus the gauge radius. Makes a nice snug fit.
    The smaller holes, like switches, indicators, etc. are mostly cut with step drills. Then adjusted if needed with hand files, small sanding drum, Dremel, whatever. The size is determined by what goes into the hole and whether the covering will be pulled through or not. I pull covering through and glue to the back with pie cuts whenever I can. But sometimes it's not possible. Mainly when the threads of the part can't handle the added thickness.
    Paul,

    That adjustable hole cutter is awesome! I'm getting one of those just because.

    Dave
    My Build Thread: http://thefactoryfiveforum.com/showt...ter-Build-9754
    (Most viewed Roadster build thread on this forum!)

    Delivered: 6/17/2017
    First Start: 12/30/2017
    Completed: 12/7/2019
    Legal: 1/30/2020

    Member of the The Gateway Cobra Club
    Dave's Cobra YouTube Channel: https://www.youtube.com/channel/UCbk...npK1UZHj4R-bYQ
    Agora 1:8 Scale Cobra Build: https://thefactoryfiveforum.com/show...l-Build-Thread

  28. Thanks edwardb thanked for this post
  29. #706
    Member Scubasommer's Avatar
    Join Date
    Feb 2018
    Location
    NorthWest Indiana
    Posts
    63
    Post Thanks / Like
    Driver’s side footbox. Again, nothing too exciting. I’m going to do a removable trans tunnel cover. Lots of discussion about whether this is really necessary, and I’ve never done one before or found it necessary. But I’m planning to cover it with something other than carpet. So it just makes sense to go ahead and make it removable. As a result, I drilled for rivets along the top edge. They’ll be flush mounts so the cover can slide past them.


    Paul
    I am knee deep in fitting panels and noticed that you drilled the top of the floor pans at the trans tunnel. In your post you say that you are doing a removable trans tunnel cover, I will be doing this as well. You also state that you will be using flush mount rivets in that area. Did this work out for you and meet your high standards my friend? Also where did you get the flush mount rivets?

    Thanks and have a great day
    Jimmy

  30. #707
    Senior Member edwardb's Avatar
    Join Date
    Feb 2011
    Location
    Lake Orion, Michigan
    Posts
    10,852
    Post Thanks / Like
    Quote Originally Posted by Scubasommer View Post
    Paul -- I am knee deep in fitting panels and noticed that you drilled the top of the floor pans at the trans tunnel. In your post you say that you are doing a removable trans tunnel cover, I will be doing this as well. You also state that you will be using flush mount rivets in that area. Did this work out for you and meet your high standards my friend? Also where did you get the flush mount rivets?

    Thanks and have a great day
    Jimmy
    Flush rivets worked great there. Not having the head of the rivet above the surface allows the trans cover to fit nicely. I used these from McMaster: https://www.mcmaster.com/97530a097. In addition to the usual drilled rivet holes, a small countersink is also required to let them set flush. These wide range style rivets are nice as well.

    Thanks for the compliment and you're welcome.
    Build 1: Mk3 Roadster #5125. Sold 11/08/2014. Build 2: Mk4 Roadster #7750. Sold 04/10/2017. Build Thread
    Build 3: Mk4 Roadster 20th Anniversary #8674. Sold 09/07/2020. Build Thread and Video. Build 4: Gen 3 Type 65 Coupe #59. Gen 3 Coyote. Legal 03/04/2020. Build Thread and Video
    Build 5: 35 Hot Rod Truck #138. LS3 and 4L65E auto. Rcvd 01/05/2021. Legal 04/20/2023. Build Thread. Sold 11/9/2023.

  31. #708
    Member
    Join Date
    Jul 2016
    Location
    West Linn oregon
    Posts
    98
    Post Thanks / Like
    Paul, In your post #460 you referenced hi temp silicone on the header bolts, is this the product you used this?
    Permatex 81160 ?
    Thanks
    Randy

  32. #709
    Senior Member edwardb's Avatar
    Join Date
    Feb 2011
    Location
    Lake Orion, Michigan
    Posts
    10,852
    Post Thanks / Like
    Quote Originally Posted by bluse View Post
    Paul, In your post #460 you referenced hi temp silicone on the header bolts, is this the product you used this?
    Permatex 81160 ?
    Thanks
    Randy
    That material might work. But what I actually use is Permatex 81878 Utra Copper. Also use it on the header to pipe connection instead of gaskets. Some use it on the actual exhaust header joint. But there I've stuck with Remflex gaskets.
    Build 1: Mk3 Roadster #5125. Sold 11/08/2014. Build 2: Mk4 Roadster #7750. Sold 04/10/2017. Build Thread
    Build 3: Mk4 Roadster 20th Anniversary #8674. Sold 09/07/2020. Build Thread and Video. Build 4: Gen 3 Type 65 Coupe #59. Gen 3 Coyote. Legal 03/04/2020. Build Thread and Video
    Build 5: 35 Hot Rod Truck #138. LS3 and 4L65E auto. Rcvd 01/05/2021. Legal 04/20/2023. Build Thread. Sold 11/9/2023.

  33. #710
    Member
    Join Date
    Jul 2016
    Location
    West Linn oregon
    Posts
    98
    Post Thanks / Like
    Quote Originally Posted by edwardb View Post
    That material might work. But what I actually use is Permatex 81878 Utra Copper. Also use it on the header to pipe connection instead of gaskets. Some use it on the actual exhaust header joint. But there I've stuck with Remflex gaskets.
    Thank you sir, placed the order for both the Permatex and Remflex gaskets today.

  34. #711
    Senior Member
    Join Date
    Jan 2018
    Posts
    116
    Post Thanks / Like
    Paul, were you at autorama this weekend?
    A friend of mine still in detroit posted a picture today that looked an awful lot like 8674

  35. #712
    Senior Member edwardb's Avatar
    Join Date
    Feb 2011
    Location
    Lake Orion, Michigan
    Posts
    10,852
    Post Thanks / Like
    Quote Originally Posted by JoeAIII View Post
    Paul, were you at autorama this weekend?
    A friend of mine still in detroit posted a picture today that looked an awful lot like 8674
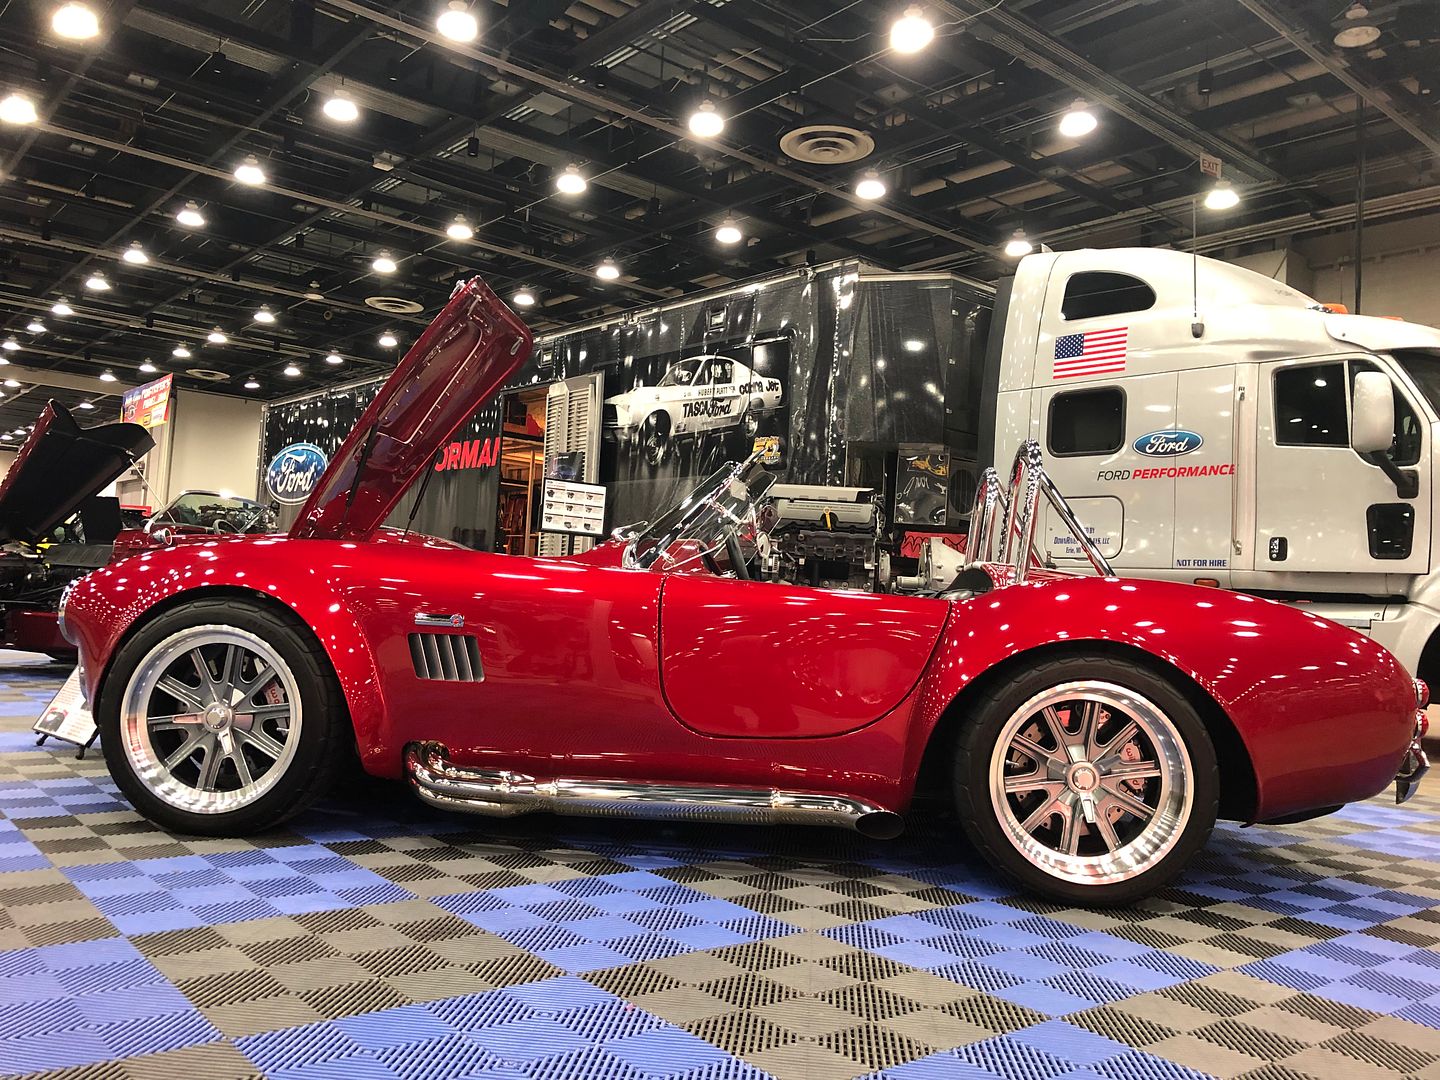
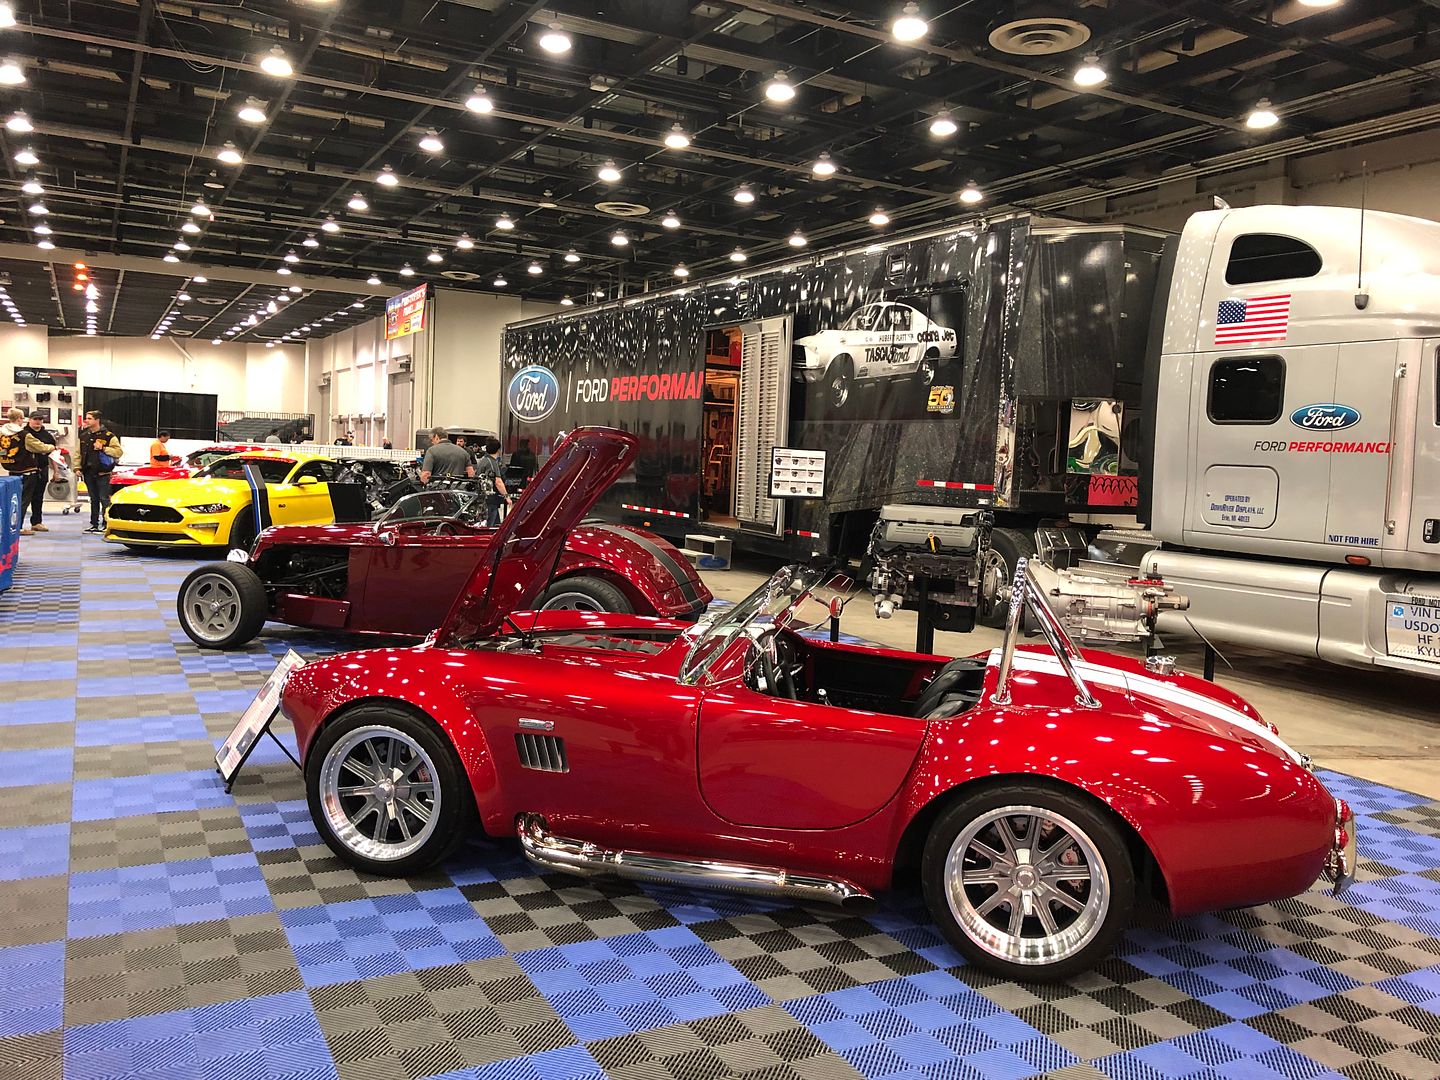
    Maybe... Ok, yes I was there. A couple weeks ago Ford Performance asked if they could show my car in their display next to their Coyote crate engine display. I went for it. Just home a little bit ago. Turns out they displayed a '33 Hot Rod next to mine. It's the build they did along with Factory Five a couple years ago with an Ecotec engine. Spent most of the weekend there. Pretty big crowds and talked to a lot of folks. Enjoy doing that. Note to Jeff K: Look away. There may have been some wax used in preparation for the show.


    Last edited by edwardb; 03-04-2019 at 08:11 AM.
    Build 1: Mk3 Roadster #5125. Sold 11/08/2014. Build 2: Mk4 Roadster #7750. Sold 04/10/2017. Build Thread
    Build 3: Mk4 Roadster 20th Anniversary #8674. Sold 09/07/2020. Build Thread and Video. Build 4: Gen 3 Type 65 Coupe #59. Gen 3 Coyote. Legal 03/04/2020. Build Thread and Video
    Build 5: 35 Hot Rod Truck #138. LS3 and 4L65E auto. Rcvd 01/05/2021. Legal 04/20/2023. Build Thread. Sold 11/9/2023.

  36. Likes RR20AC, Straversi, GoDadGo, PeteMeindl liked this post
  37. #713
    Not a waxer Jeff Kleiner's Avatar
    Join Date
    Feb 2011
    Location
    Bloomington, Indiana
    Posts
    8,699
    Post Thanks / Like
    Looks lovely as always Paul! Hey I don't mind the wax---every one I paint gets sent home with a bottle of polish for the owner---it just doesn't have a place on my old heap Speaking of wax, have you ever tried any of the Adams products? Tony Z is a big fan and introduced me to their stuff and their guys at SEMA...the products are amazing and I'm now a believer!

    Jeff

  38. #714
    Senior Member edwardb's Avatar
    Join Date
    Feb 2011
    Location
    Lake Orion, Michigan
    Posts
    10,852
    Post Thanks / Like
    Quote Originally Posted by Jeff Kleiner View Post
    Looks lovely as always Paul! Hey I don't mind the wax---every one I paint gets sent home with a bottle of polish for the owner---it just doesn't have a place on my old heap Speaking of wax, have you ever tried any of the Adams products? Tony Z is a big fan and introduced me to their stuff and their guys at SEMA...the products are amazing and I'm now a believer!
    Jeff
    Just pulling your chain Jeff. I've used Zaino products over the years, and have always been happy with them. As it turns out though, a lot of discussion lately about ceramic finishes. I wasn't ready to pony up the bucks for a pro job. But Adams released a DIY ceramic application that I ordered and applied a couple weeks before the show and pictures above. So you're seeing an Adams finish here. Plus was using their detail spray and cloths throughout the show. Cars get dusty in just a few hours in those big halls. Can't say that I think the Adams ceramic looks that different than a freshly applied Zaino finish, but it was pretty easy to put on and we'll see how it lasts. I've tried several Adams products now and I agree it's good stuff. Pricey, but then most of the boutique car detailing products including Zaino are too.
    Last edited by edwardb; 06-17-2019 at 06:09 AM.
    Build 1: Mk3 Roadster #5125. Sold 11/08/2014. Build 2: Mk4 Roadster #7750. Sold 04/10/2017. Build Thread
    Build 3: Mk4 Roadster 20th Anniversary #8674. Sold 09/07/2020. Build Thread and Video. Build 4: Gen 3 Type 65 Coupe #59. Gen 3 Coyote. Legal 03/04/2020. Build Thread and Video
    Build 5: 35 Hot Rod Truck #138. LS3 and 4L65E auto. Rcvd 01/05/2021. Legal 04/20/2023. Build Thread. Sold 11/9/2023.

  39. #715
    Senior Member wareaglescott's Avatar
    Join Date
    Apr 2016
    Location
    Auburn, AL
    Posts
    2,147
    Post Thanks / Like
    Another Adams user here. Good stuff!
    MK4 #8900 - complete kit - Coyote, TKO600, IRS - Delivered 6/28/16 First Start 10/6/16 Go cart - 10/16/16 Build completed - 4/26/17 - 302 days to build my 302 CI Coyote Cobra - Registered and street legal 5/17/17
    Build Thread http://thefactoryfiveforum.com/showt...e-build-thread
    PHIL 4:13 INSTAGRAM - @scottsrides

  40. #716
    Senior Member
    Join Date
    Jan 2018
    Posts
    116
    Post Thanks / Like
    Saw the article last night, car looked great.
    We grew up in the detroit 'burbs, so I have fond memories of autorama. We are considering a few trips up for things like woodward and autorama when ours is done (one of these years)
    That reminds me, I need to go work on the car!

  41. Thanks edwardb thanked for this post
  42. #717

    Steve >> aka: GoDadGo
    GoDadGo's Avatar
    Join Date
    Feb 2015
    Location
    Slidell, Louisiana
    Posts
    6,763
    Post Thanks / Like
    Blog Entries
    1
    Why Am I Not Suprised!

    Expert Builder; Most Definitely Yes If Ford Invites You To Display Your Car At Their Both!

    Great Job From This Chevy Fan, Great Job!

    Congratulations!

  43. Thanks edwardb thanked for this post
  44. #718
    Senior Member edwardb's Avatar
    Join Date
    Feb 2011
    Location
    Lake Orion, Michigan
    Posts
    10,852
    Post Thanks / Like

    5000 Mile Report

    Now in its third driving season, #8674 20th Anniversary Roadster is just about to turn 5,000 miles. Maybe even next week at the London show. Thought I would give a report of the journey since graduation.

    To recap, #8674 was ordered from a New York Thruway rest stop on the way to the 2015 Factory Five open house in Wareham. That was the day they were released for sale, and mine is number three of twenty. We were back in Wareham in August 2015 to pick it up. It was completed just in time for the 2017 Detroit Autorama, was legal a couple months later, and back in Wareham again for the 2017 Open House. Couple weeks later made its first trip to London and did some charity rides with only a few hundred miles on the odometer. Since then, we’ve driven it as much as our Michigan weather allows. Another London show. Detroit Autorama again only this time in the Ford Performance display. Made it to the Texas Spring Cruise earlier this year and back to London for the third time next week. In between, countless shows, cruise-ins, our local Woodward Dream Cruise, and multiple events and cruises with our local Great Lakes Cobra Club. I enjoy meeting people and sharing the car and experience, giving rides, plus won some awards along the way. A couple weeks ago we had a private event at the Ford proving grounds in Romeo, Michigan. Something that not many get to do. Was in a group of 30+ similar cars doing triple digits around their 5-mile banked high speed oval track. Now that was a gas. Just solid fun and great times with the car and great friends. It draws attention wherever it goes, even when parked with much more expensive and exotic cars, of which there are plenty around here in SE Michigan.

    Along the way, the car has been almost perfect. The Gen 2 Coyote crate motor is simply awesome, and thanks once again to those who talked me into it. Mostly Ron Everitt at the 2015 London show. The Coyote ran the stock Ford Performance tune for the first 1,000 miles or so. Then after hearing numerous positive reports, worked with Lund Racing for a custom tune. Made a great running engine even better. I had one ride of shame home on a flat bed, which in hindsight was mostly my fault. I didn’t re-tighten the hose clamps on the intake after the initial installation. On the way to a Saturday morning cars and coffee, the intake separated between the MAF sensor and the throttle body. Just won’t run that way, and I managed to not notice it until it was back home in my garage. Couple lessons learned there. Everything about the car for me is perfect. The Coyote of course, the hydraulic clutch, the Liberty Transmission TKO600, the KRC power steering, the big Wilwood brakes, the new (at the time) 2015+ Mustang based IRS. It’s easy to drive, and as I tell everyone, is as mild or wild as you want. It’s 99.9% a street driver, and I admit I’m a conservative driver. Partly out of being realistic about my driving skills, respect for the car, plus there’s a county sheriff substation just around the corner from where I live. I almost never go out driving without multiple LEO sightings. So I keep it legal and I’m fine with that. There is literally never a time that I climb in and drive down the street without a smile on my face and feeling blessed to own such a fun machine. Many of the miles are with my bride in the passenger seat. She’s a great sport about it and enjoys riding and the social aspect of our friends and club members. But she won’t drive it. Both of my sons have had some driving time. They’re both out of state, so doesn’t happen often. But rich times when it does. The three of us are the only ones that have driven it, and will probably stay that way.

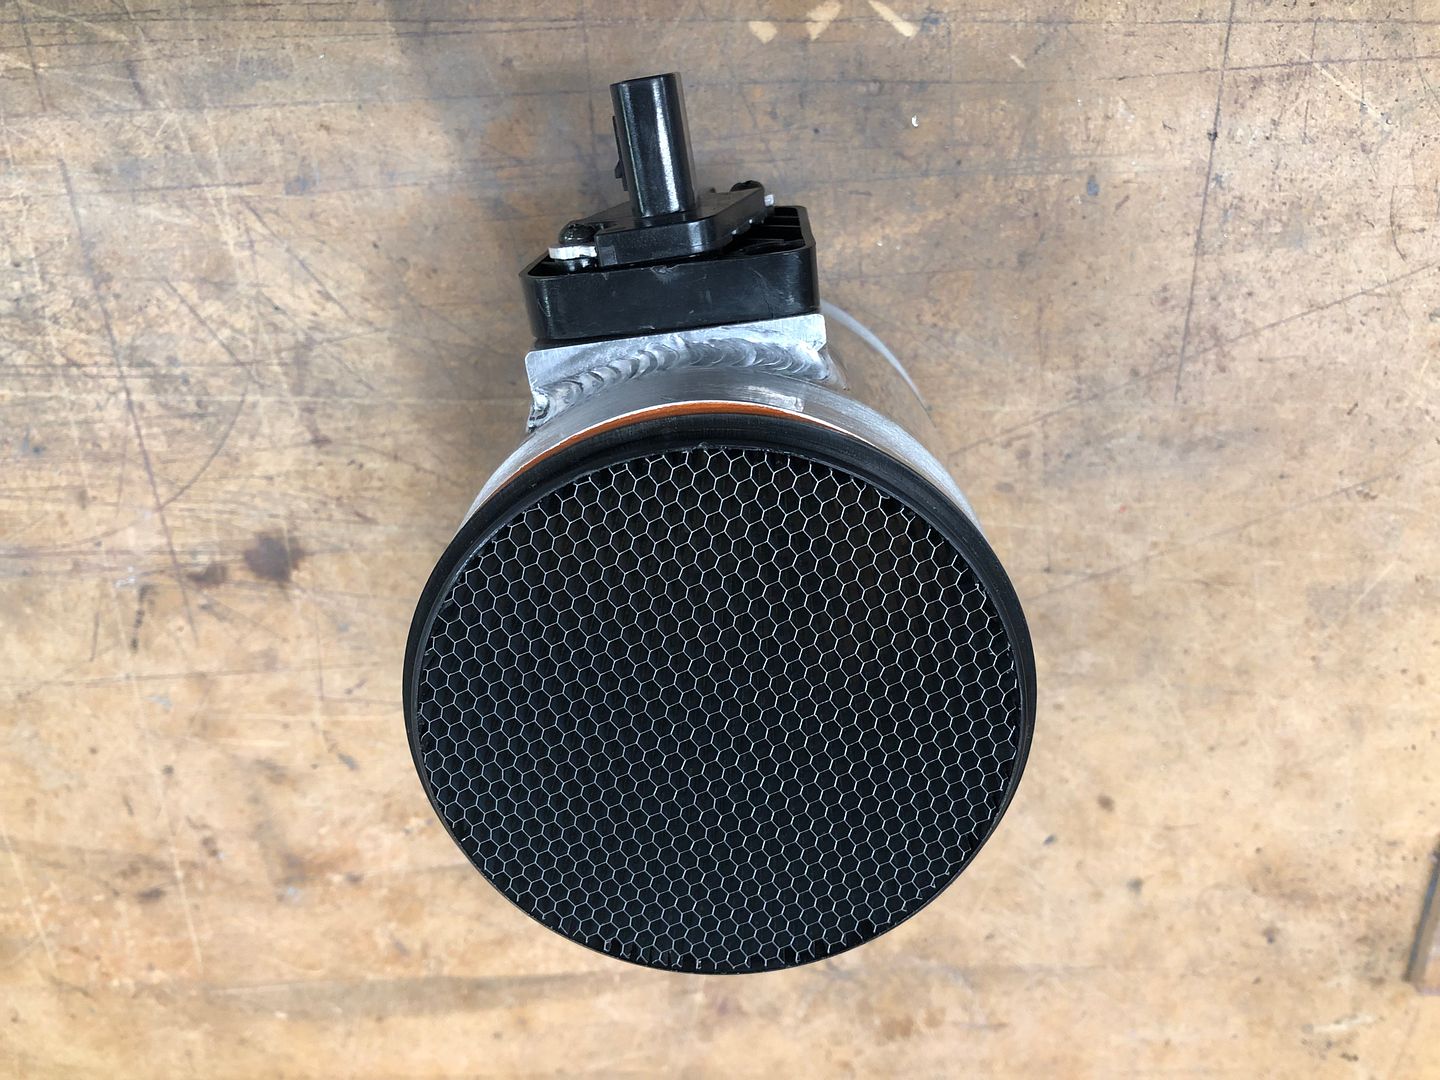
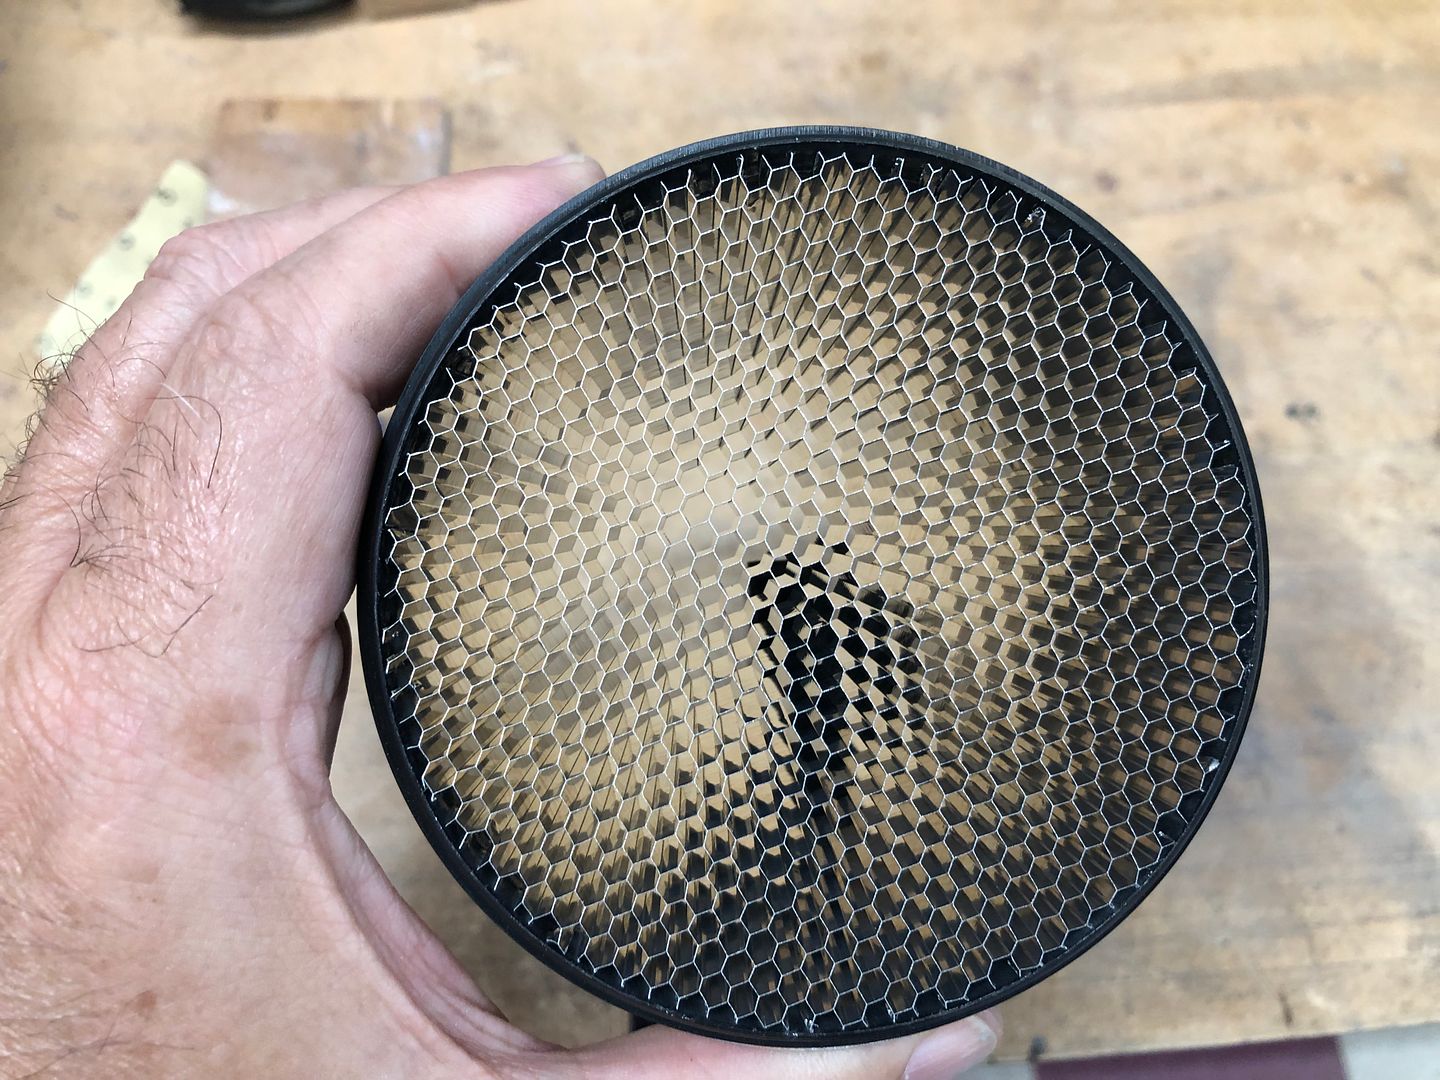
    Couple late breaking updates. While researching and installing the Gen 3 Coyote in my Gen 3 Coupe build, I found multiple references and recommendations for using a honeycomb airflow straightener in the cold air intake before the MAF sensor. Supposed to improve MAF readings improving idle, throttle response, etc. I ended up installing one in my Coupe build. Since it’s not on the road yet, no verdict on the results. But decided to try one on this build to see if any difference. I bought a 3.5-inch straightener, part number ACCH35, from Treadstone Performance. http://www.treadstoneperformance.com...w+Straightener. Was an easy installation in the air filter side of the Spectre MAF filter adapter. I made a cardboard template of the intake diameter, stuck to the honeycomb straightener with double back tape, and carefully sanded to the correct diameter on my stationery disk sander. Didn’t need much and with new 80 grit paper, cut easily. I put a very light coat of JB Weld plastic bonder around the inside of the intake and pushed into place. The tube is slightly tapered, so wedged in nicely. Looks like this.


    I’ve only driven the car 20 miles or so since the installation. Don’t know if it’s my imagination but does seem to run even better. Idle seems nice. In the past, every once in a while, I feel just the slightest hesitation under acceleration. It’s really minor, and I’ve logged and had Lund look at it. They don’t see anything and say everything looks perfect. Like I said, really minor and barely perceptable. I didn’t notice it at all during my initial drive after installing the straightener. Will be interesting to keep monitoring.

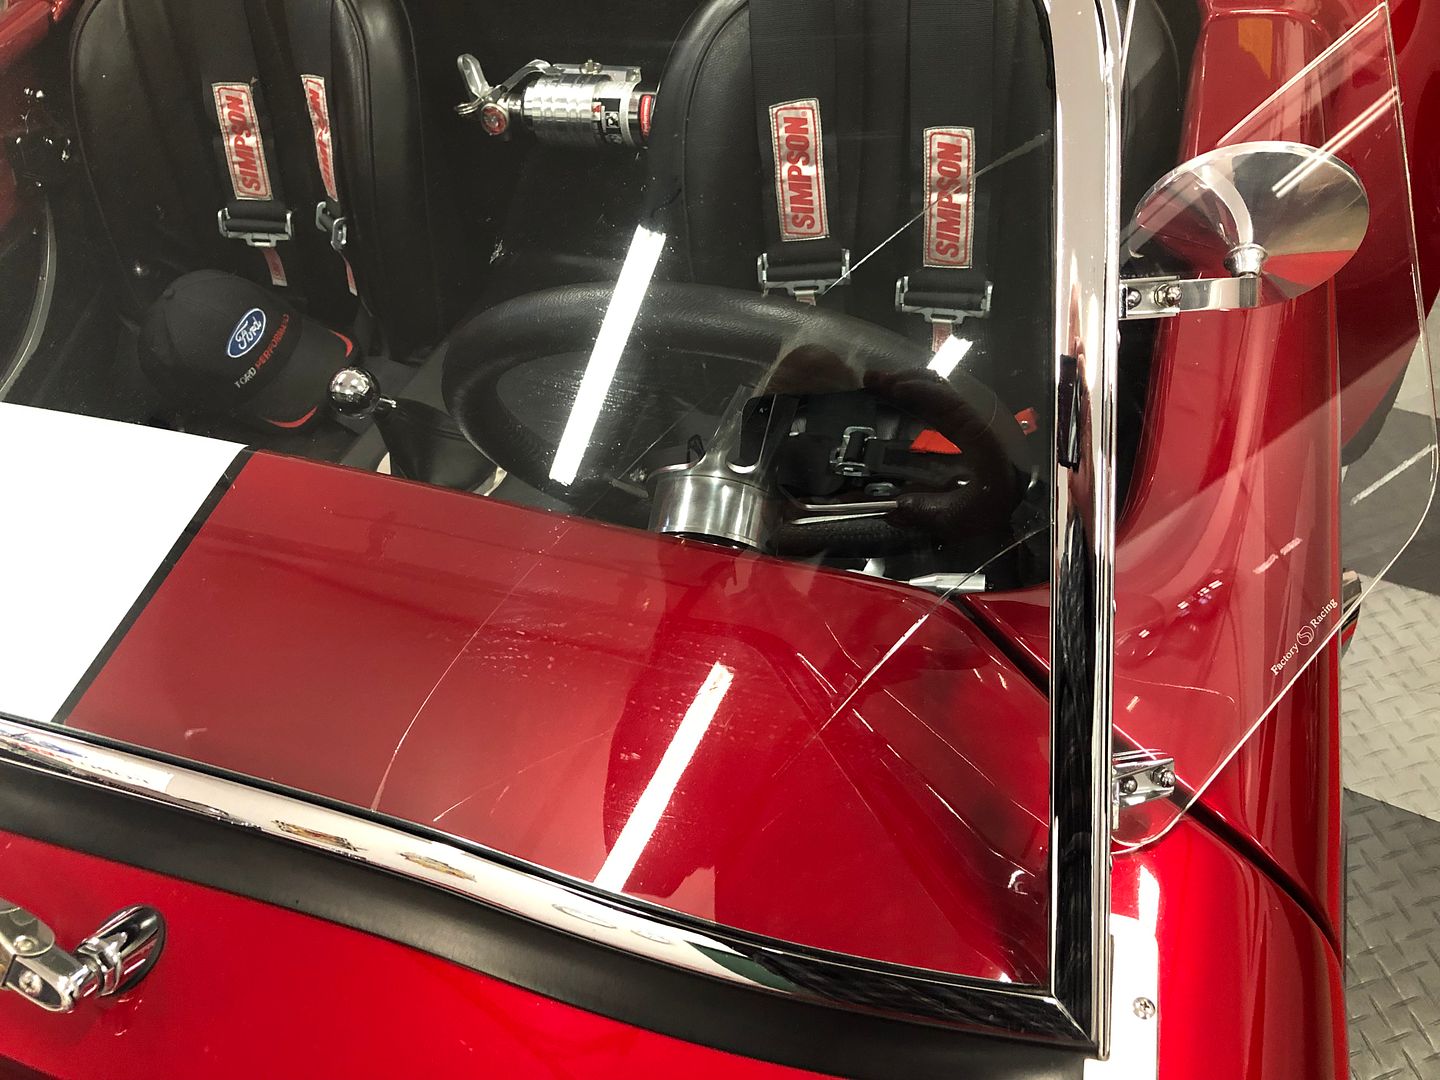
    Last thing. Between parking it in the garage last Monday afternoon, and climbing in for a drive Tuesday night, I found I’d joined the broken windshield club. Ugh.


    Feel like I installed the windshield properly. Shimmed for no stress. Don’t ever hang on it. Nothing. But three years later while sitting in a cool garage it broke. I guess this story has been repeated a lot. My first thought was to go with the Fast Freddie Lexan windshield. Michigan is one and done for inspection, so no issues there. His website says temporarily out of stock. Contacted him and was told (1) no ETA for more, (2) probably not going to offer it anymore. Also see his asking price is up to $600. So looked for other options. Many suggest getting a Lexan sheet and cutting your own. Found multiple recommendations for the Optic Armor brand. Probably the same thing as available through plastics suppliers. But available in the right rough size, plus through Summit Racing so only a $9.99 shipping premium. But wouldn’t be here for a couple weeks and really want this fixed for London next week. So decided to call Factory Five. Have a replacement glass on the way and should have fixed in the next couple days. If it breaks again, the next one will be Lexan.

    That's it. Back to driving and hope the next 5,000 is as fun as the first. Hope to see many of you in London next week.
    Last edited by edwardb; 06-16-2019 at 10:43 PM.
    Build 1: Mk3 Roadster #5125. Sold 11/08/2014. Build 2: Mk4 Roadster #7750. Sold 04/10/2017. Build Thread
    Build 3: Mk4 Roadster 20th Anniversary #8674. Sold 09/07/2020. Build Thread and Video. Build 4: Gen 3 Type 65 Coupe #59. Gen 3 Coyote. Legal 03/04/2020. Build Thread and Video
    Build 5: 35 Hot Rod Truck #138. LS3 and 4L65E auto. Rcvd 01/05/2021. Legal 04/20/2023. Build Thread. Sold 11/9/2023.

  45. Likes PeteMeindl liked this post
  46. #719
    Senior Member RickP's Avatar
    Join Date
    Feb 2016
    Location
    Boyertown, PA
    Posts
    683
    Post Thanks / Like
    Sorry to hear about your windshield Paul. You will get it fixed in no time.

    I hope to meet you at LCS. I’m just coming for the day to see what the big hullabaloo is all about.

    RickP

  47. #720
    Senior Member Kool AC's Avatar
    Join Date
    Sep 2018
    Location
    Armada, Mich
    Posts
    112
    Post Thanks / Like
    Hey Paul, thanks for the update. Glad to hear all is well with the car, (except for the windshield), and you are enjoying it. Good to know as my build is almost a shameless copy of your own. Sounds like you had a great time at the Ford proving grounds, I know exactly where that is. I am just down the road from the Ford Romeo engine plant. Unfortunately not a lot of good driving days so far this year in SE Michigan, where the heck is all this rain coming from? Anyway, hope you have many, many more great miles with the car. Will be looking for the first drive report on the coupe.
    MkIV Complete Kit #9423, Gen 3 Coyote, TKO-600, IRS Torsen 3.73, Wilwoods, DA Konis - Delivered 9/14/18

  48. Likes edwardb liked this post
Page 18 of 20 FirstFirst ... 81617181920 LastLast

Posting Permissions

  • You may not post new threads
  • You may not post replies
  • You may not post attachments
  • You may not edit your posts
  •  

Replica Parts

Visit our community sponsor