My build progress for the summer has been frustratingly slow. With my boys out of school for the summer we have been doing a lot of family stuff which is great but I have also been stupid busy at work. They started back to school today so my shop time should increase!
I have struggled with my mental concept of the dash, both the gauge layout and the appearance. Hot Rod or "Rat Rod" dashes appeal to me much more than the standard Cobra dash. I like the brushed metal and rivet look. Also, I am a new Powder coat convert. I ordered a blank dash from FFR and fabricated some mounting tabs, powder coated them, and installed them. I also made some lower support braces which I plan to powder coat, of course.
Here's the initial dash install, the final with have all the bolts with the same heads.
Still enjoying the build overall but not feeling close to heaven yet...
I have been contemplating the rear wiring harness and am now inching forward. I mocked up the layout and routed it around my drop trunk and rear battery mod. I placed cable clamps and secured them with self tapping 10-32 screws using "Tap magic" as the liquid media of choice. I can't remember who's build thread I got that idea from but I like it a lot. The screws are easy to back out and screw in again.
I have a Holley sniper EFI with an inline pump and I believe I will simply need to cut the wires on the provided fuel pump plug(meant for an in-tank pump) and connect them to my pump??
I want to add a trunk light, cubby light , back up light , and third brake light. I basically took the harness apart to run those wires through taking care to label them meticulously as I go!
I tapped the brake light and ground off the DS tail light limb as per Fixit's recommendation. I plan to heat shrink it with some dielectric grease.
Today I worked on my third rendition of the Firewall. I had no idea I was so picky about these things.
I am planning to powder coat this myself. It won't fit into my oven so I have some Youtube ideas of how to do it... I am also trying to wrap my brain around the wiring of the entire vehicle. A bit daunting. I can't force myself to hit the easy button and just go straight up Ron Francis harness, too many cool mod ideas. I will soon be reaching out with PM's to various forum members for advice so I don't annoy the forum with my unsophisticated wiring questions.
Don't worry Mark, the wiring is daunting but do-able. It is a "one step at a time" process. And always remember, we are all here for you! Don't worry about "unsophisticated" questions. You can bet that there either are already a lot of guys reading this and wondering the same thing, or that will be reading it in the future and will appreciate you asking the "unsophisticated" question that they were already thinking!! As away!
PS: Be picky about everything! It is your car, it is a reflection of your commitment to craftsmanship. Don't worry if you do things two or three times. Just do them right for you!
Jazzman
MKIV #8745 "Flip Top" Roadster, Custom Tilt front, Coyote Engine, Tremec TKO600, Custom Interior. Best of Show winner, Huntington Beach Cruise In 2018.
Mark, I can’t tell you how many times I redid things a half dozen times. I learned when I got too frustrated and rushed to fix an error, I made more mistakes. Sometimes it pays to push away from the table and reflect/research...
Wiring wasn’t my thing in terms of mechanical understanding. I can picture gears and moving objects in my head. But as my Dad would say who flew Navy EA6B electronic countermeasures jets, electricity is f@#king magic!
That being said, I do beautiful electrical work without understanding it and my car believe it or not worked. You got a lot of expertise on the Forum and builders who want to pay it forward. So ask away my friend...
Chris
Last edited by cgundermann; 10-21-2018 at 09:38 AM.
Generation 3 Type 65 Daytona Coupe Complete Kit #151885 received May 6, 2022. Gen 3 Coyote, IRS, Tremec TKX, American Powertrain hydraulic throwout bearing & Wilwood brakes.
MK4 Basic Kit #7404, 347 EFI - Pro M Racing ECM, 30# injectors, 70 mm throttle body, 80 mm MAF, Edelbrock Performer aluminum heads & RPM II intake, all new G-Force T5, 3:55 gears, Pro 5.0 shifter, 3-link, carbon fiber dash/custom Speedhut gauges and paint by Da Bat.
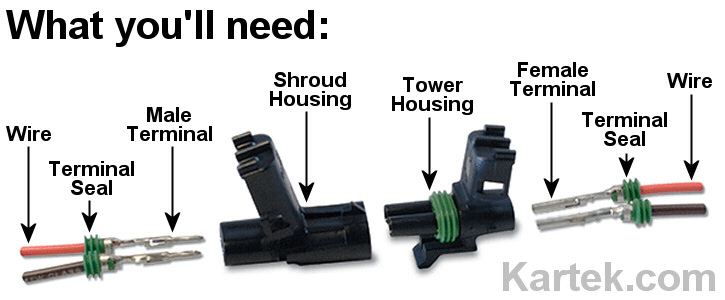
I ordered up some Delphi weather packs, these things are really nifty.
So, there are male and female terminal pins AND there are male and female connectors. Everything appears to be interchangeable but I am wondering what the standard procedure for joining them is? Should male terminal pins be in male connectors and female in female? I realize it probably doesn't matter as long as you are consistent through out the build or things could get very confusing. There must be an industry standard...
Also, I split out the tan running light wires in the Rear RF harness so that all four tails lights are on when headlights are illuminated, thanks Edwardb. I am planning to heat shrink the soldered junction with adhesive tubing which I have never used before. I would like to add dielectric grease over the solder prior to placing the adhesive heat shrink tubing. I am wondering if the adhesive in the heat shrink obviates the need for the dielectric grease as a waterproofing agent in this junction.
Finally, I need to purchase 7ft of 2AWG battery cable to run my + from my trunk battery to the master disconnect under the dash. Is there much difference in the quality of battery/welding cables? Should I get the "premium extra flexible" cable?
Good question about the weatherpacks. I took a look at my distributer wiring which has a weatherpack pre-installed. It is a female connector with female pins. Based on that, I guess it will be a good guess that female connectors get the female pins and the male connectors get the male pins.
Build School: July 14-16, 2017
Kit purchased: July 25, 2017
Kit delivered: September 13, 2017
First Start: December 22, 2018
Body painted and kit completed and drivable: July 2019 (but still not done)
CA SB100 Registration: January 2020
Mk4 - 289 USRRC Roadster kit, Roush 427SR with Schneider Racing custom camshaft, Fitech EFI, TKO600 (.64-5th gear), 15" wheels, stock brake calipers, under car exhaust with Spintech 7000 muffler, no roll bar, Russ Thompson turn signal, removable steering wheel, and many other small upgrades and modifications
I am planning to heat shrink the soldered junction with adhesive tubing which I have never used before. I would like to add dielectric grease over the solder prior to placing the adhesive heat shrink tubing. I am wondering if the adhesive in the heat shrink obviates the need for the dielectric grease as a waterproofing agent in this junction.
Finally, I need to purchase 7ft of 2AWG battery cable to run my + from my trunk battery to the master disconnect under the dash. Is there much difference in the quality of battery/welding cables? Should I get the "premium extra flexible" cable?
The double wall heat shrink tubing seals up the connection really well with the adhesive. I don't see any need for the dielectric grease. For the 2 gauge battery cable, I've been using the cable from West Marine. They sell it by the foot. Not cheap, but seems to be very high quality. I like it a lot.
Build 1: Mk3 Roadster #5125. Sold 11/08/2014. Build 2: Mk4 Roadster #7750. Sold 04/10/2017. Build Thread Build 3: Mk4 Roadster 20th Anniversary #8674. Sold 09/07/2020. Build Thread and Video. Build 4: Gen 3 Type 65 Coupe #59. Gen 3 Coyote. Legal 03/04/2020. Build Thread and Video Build 5: 35 Hot Rod Truck #138. LS3 and 4L65E auto. Rcvd 01/05/2021. Legal 04/20/2023. Build Thread. Sold 11/9/2023.
The West-Marine near me has a heavy duty crimper mounted on a bench in the back for customers to use. Nice to be able to make the cable ends without buying the tool.
-Steve
Just about have my rear wiring harness completed and began installation. I am using the Holley Sniper EFI which has a 14 AWG wire to power the in-line fuel pump which came with the kit. I noticed in the RF harness the power to the fuel pump is 18 AWG. I went ahead and added a 14 AWG wire to the RF harness to power my pump. This is at the pump end,
and in the cockpit...
I figure I'll just plug the 14 AWG wire into the connector on the RF harness.
Wiring's very linear, and approach it as eating an elephant... one bite at a time.
If you've got a spare Weatherpak terminal, just replace the RF "fuel pump" wire with your larger gauge feeder. You'll need a pin extractor to get the terminal out of the housing.
(It's nothing more than a very thin-wall piece of tubing that slides over the terminal and compresses the "barbs" on the terminal so you can pull it out of the housing. You could probably make one from a piece of brake line and some time on a grinder, or they're available at a good parts store.)
At the fuel pump end you can butt-splice the 14ga. onto a short stub of the (supplied) 18ga. That inch or two of 18 won't make a bit of difference.
(Plus you'll gain a "spare" 18ga from the dash to the rear of the car with the abandoned 18ga)
You're already on a good track... obsessive labeling, and using good practices/methods/materials. An additional suggestion is take the diagrams from the wiring manual and blow them up on a copier. Pencil in your additions, and mark where you've made your taps & splices or color changes. (You'll thank yourself later!)
Build School: July 14-16, 2017
Kit purchased: July 25, 2017
Kit delivered: September 13, 2017
First Start: December 22, 2018
Body painted and kit completed and drivable: July 2019 (but still not done)
CA SB100 Registration: January 2020
Mk4 - 289 USRRC Roadster kit, Roush 427SR with Schneider Racing custom camshaft, Fitech EFI, TKO600 (.64-5th gear), 15" wheels, stock brake calipers, under car exhaust with Spintech 7000 muffler, no roll bar, Russ Thompson turn signal, removable steering wheel, and many other small upgrades and modifications
I got the fuel tank installed and hooked up the rear fuel send and return lines. The Rear Wiring Harness is in. I tested all wires for resistance and everything seems to be in continuity!
I really want to install the trunk panels and apply Lizard skin but I think I had better get to go kart stage first to make sure I don't have any problems with the rear harness wiring, fuel lines, or brake lines.
Build School: July 14-16, 2017
Kit purchased: July 25, 2017
Kit delivered: September 13, 2017
First Start: December 22, 2018
Body painted and kit completed and drivable: July 2019 (but still not done)
CA SB100 Registration: January 2020
Mk4 - 289 USRRC Roadster kit, Roush 427SR with Schneider Racing custom camshaft, Fitech EFI, TKO600 (.64-5th gear), 15" wheels, stock brake calipers, under car exhaust with Spintech 7000 muffler, no roll bar, Russ Thompson turn signal, removable steering wheel, and many other small upgrades and modifications
My firewall wouldn't fit into my oven so I powder coated it and cooked it with my propane heater.
It worked really well.
I decided to go ahead and apply lizard skin to the firewall and DS footbox, trans tunnel cover. I am holding off on lizard skin and final installation for the other panels until I have go-karted and worked out mechanical issues. The Lizard skin was easy to apply and not as much of a mess as I expected.
I told my boys months ago that we could put a basketball goal in at the shop. Today was the day to start. My 12yo, Nick, came out to help and got to learn to weld with the MIG welder. I set it to 4 sec spot weld and let him go at it.
I set some tac beads but other than that these are all his.
Now all we have to do is paint it with POR 15 and install it.
We had a couple hours before his games so we did the final install on the firewall and inside DS footbox panel.
Tell your baby boy that we welds way, way better than me.
Seriously, he really does so let him know that:
Volcanic Bird Poop For You!
Great Detour For Sure!
I installed the main wiring harness. I am also putting in a Busbar for behind the dash power with an ingnition relay(60 amp) as outined by Edwardb and endorsed by many.
I wired the relay following Papa and Japollon's instructions
87-to starter, 86- existing blue wire in, 30- 12V power from busbar in, 85- to ground, 87a- PIN of mystery (not used)
As I plod along I am starting to get my head around the whole wiring thing. It was sort of an epiphany for me when I realized the main harness fuse box was really just that and not some sort of "box of mystery". At this point the only box of mystery is the EFI but I'm not going to mess with that until I have the engine in again.
I am learning a lot about relays, fuses, circuit breakers, switches. Nothing too difficult here, however, putting them all together in a way that will function reliably when deviating from the manual will be the tricky part...
I do want to say at this point how appreciative I am of all those whom have come before me and documented what they have done. Has helped me immensely!
Today with the help of two buddies I dropped my 347 DART into the Chassis for the final time. I had discussed this with my 15 yo last Sunday night and he was interested in helping. I was looking forward to it all week, however, this morning he informed me that he had more important things going on. It was a bitter pill to swallow...
I had also installed the heater to the firewall. This is not the most confidence inspiring piece of equipment. I used longer screws because of my thicker firewall which now has Lizard skin as well. I managed to get all six screws in place, one of them is cattywhompus.
Now I'm chomping at the bit to get first start! I need help with coupling my Sniper EFI to the RF Harness. Plan to post a separate thread for that.
Today with the help of two buddies I dropped my 347 DART into the Chassis for the final time. I had discussed this with my 15 yo last Sunday night and he was interested in helping. I was looking forward to it all week, however, this morning he informed me that he had more important things going on. It was a bitter pill to swallow...
Mark
At least your son is helping. I have to force my 14 year old to help me. He isn't really interested in the build...he would rather it be done so he could ride in it.
Build School: July 14-16, 2017
Kit purchased: July 25, 2017
Kit delivered: September 13, 2017
First Start: December 22, 2018
Body painted and kit completed and drivable: July 2019 (but still not done)
CA SB100 Registration: January 2020
Mk4 - 289 USRRC Roadster kit, Roush 427SR with Schneider Racing custom camshaft, Fitech EFI, TKO600 (.64-5th gear), 15" wheels, stock brake calipers, under car exhaust with Spintech 7000 muffler, no roll bar, Russ Thompson turn signal, removable steering wheel, and many other small upgrades and modifications
I am sorry to hear about your teenager being a teenager! I empathize and hope he makes the decision to get more involved. I firmly believe that you will both make memories that will last long after you are gone. Hang in there, and just enjoy the time when he does decide to join you in that amazing work space!
Oh, and I want to make a suggestion regarding the basketball backboard support y'all made. It looks great, but you may want to add some more support down low, because as your son starts hanging from the rim on all those monster dunks he will be making, you don't want it to come crashing down on him! ;-o)
I look forward to more updates; keep up the good work!
Kids these days want instant gratification when they do anything. When I had a bunch of guys help me install my engine, one of them had his 13 year old son with him. When we got the engine settled into the car, he asked if I was going to start it up before they left. When I explained all the stuff that still had to be done before we could start the engine, he seemed a lot less interested in being there.
He'll come around once you have something "stimulating" to work on.
Generation 3 Type 65 Daytona Coupe Complete Kit #151885 received May 6, 2022. Gen 3 Coyote, IRS, Tremec TKX, American Powertrain hydraulic throwout bearing & Wilwood brakes.
MK4 Basic Kit #7404, 347 EFI - Pro M Racing ECM, 30# injectors, 70 mm throttle body, 80 mm MAF, Edelbrock Performer aluminum heads & RPM II intake, all new G-Force T5, 3:55 gears, Pro 5.0 shifter, 3-link, carbon fiber dash/custom Speedhut gauges and paint by Da Bat.


 Thanks:
  Likes:


 Reply With Quote