-
11-21-2021, 08:29 AM
#281
Senior Member

Leaks, Charcoal Filter, Coupe Winterize
Busy week and not a lot of build time. So, this is a minor update. I’ve had more issues with coolant leaks on this build than any other. Two have been bugging me since I filled the system. Not gushers. But slow drips that I just couldn’t get stopped. But finally, success.
The kit supplied overflow tank dripped coolant out of the drain side. Even though coolant wasn’t near the top of the tube inside the tank. Didn't make any sense. Additionally, often belched some coolant every time I started the engine. The DEX orange coolant is hard to miss. Checked the fitting in the bottom of the tank, which I installed with the proper sealant, and it looked OK. This week drained the tank and took it apart. Found the problem. The tube that extends inside to near the top of the tank is threaded into the drain fitting in the bottom of the tank. But only about 1/4" of somewhat roughly cut threads, not very tight, and no sign of any sealant. Highly suspect and clearly would be easy for coolant to leak past it. Cleaned things up and set the tube back into the fitting using JB Weld on the threads and a filet around the top. JB Weld makes a good sealant if you don’t want it back apart. Ever. Now back together and confirmed no longer leaking. Something other builders may want to check with that tank.
The lower radiator hose connection also dripped coolant occasionally. I have Gates heat shrink PowerGrip hose clamps on all the upper and lower radiator hose connections except the actual connections to the radiator. There I chose to use T-bolt clamps for serviceability since the Gates clamps are one-time use. But no amount of adjusting or tightening would prevent a slight leak from the lower radiator hose connection. So drained fluid and replaced the T-bold clamp with another Gates PowerGrip clamp. No more leaks. Can’t explain why the T-bolt clamp didn’t work. They're usually very reliable. But the heat shrink clamp certainly does. In addition to the cleaner look, they work well. Highly recommended.
Finally, I’ve used charcoal filters on the gas tank vent line for each of my builds. This is to prevent gasoline odors in the garage. Some report no gasoline odors without a filter. Some report gasoline odors even with a filter. I only know I’ve used them on each of my builds and have never had any odors. For my first build, I used a Mustang charcoal filter with the purge valve disabled. They’re not particularly cheap and also not serviceable. Several years ago there were a bunch of forum posts about making your own using aquarium filter charcoal and various containers. Jeff Kleiner showed making a container from PVC pieces, which I patterned mine after. These are standard plumbing pieces from HD or Lowes and dirt cheap.
Here are all the pieces I used to make and mount the filter.
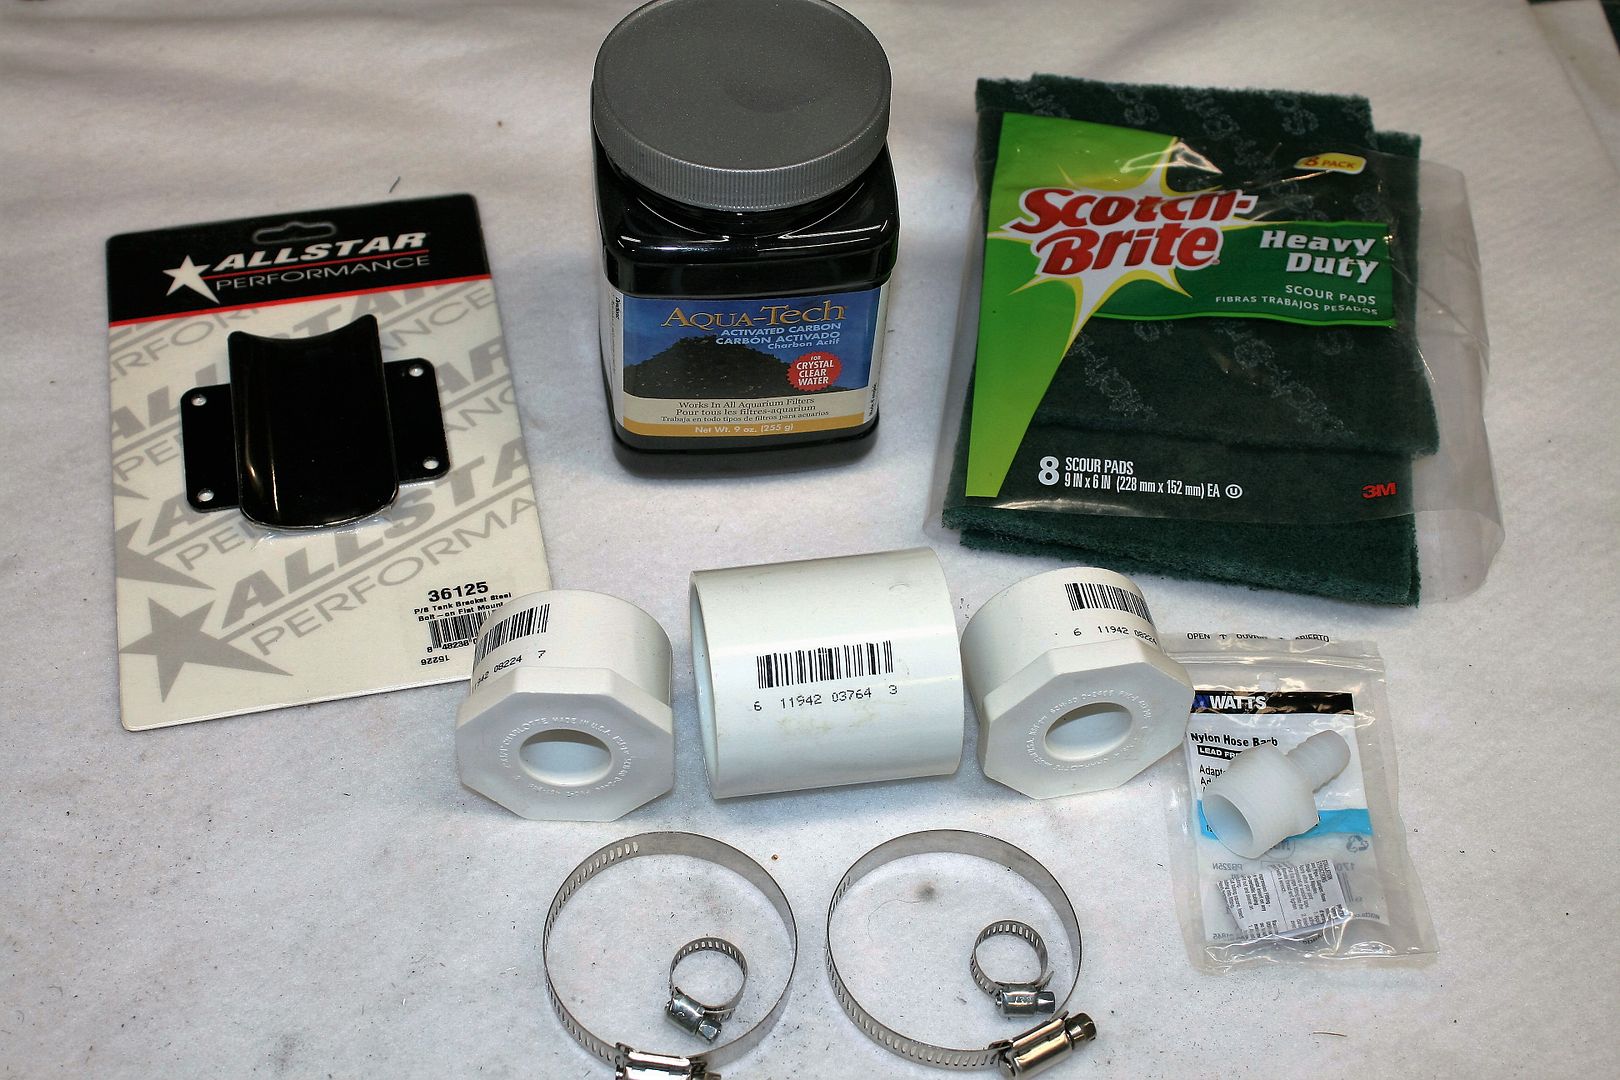
The mounting bracket isn’t necessary, but I like how it mounts the filter with hose clamps and looks somewhat professional. The three PVC pieces are the main body of the filter. The one I use is actually a 2-inch coupler, and then caps for each end with a 3/4-inch hole. One end gets the hose barb glued in for the vent hose, the other end is left open. Two circles of Scotch Brite go in each cap to keep the charcoal pieces inside. The charcoal is from the pet section at Walmart. I glue on one end cap and leave the other end loose. It’s a tight fit also held in place by the large hose clamp. Would be very easy to remove the assembly from the mounting bracket and put in new charcoal if necessary. This is the fourth build I’ve used this exact setup and, in all cases, haven’t noticed any odor afterwards.
For the other builds, typically installed in the area of the tank filler. For the truck, not really a good place to mount there and have the hose routed the way I wanted. I’m using the Breeze 70648 Big Bore Vent Check Valve Kit. Taking a cue from Mark’s instructions, I routed the hose along a chassis brace and mounted the filter on the LH side.
With the weather changing, unfortunately I’ve decided the driving season is over. So, off the lift with the truck and replaced with the Coupe. Will do the usual annual maintenance. Oil/filter change, chassis lube, Stabil 360 in the nearly full tank, and general look over, clean up, etc. Initial review including brakes looks really good. Should be a quick and easy process. Then back on the truck build. I do have one small spot under the nose to touch up. I’ve managed to rub the underside of the nose on the Coupe several times now. It’s longer and lower than I seem to be able to get used to. Even after two driving seasons.
Also, if you look closely at the Coupe windshield on the LH side, right above the London Cobra Show sticker, you can see a glint or shiny line. Yup, a broken windshield. My son and I were out cruising and we took a rock (or something...) off the windshield. Started off as a pretty deep star near the top and several inches of crack. Now has spread and of course needs to be replaced. Have had a windshield on order with Factory Five for some months now. They are in stock, but apparently waiting for a suitable box or packaging method. Trying to remain patient... Not looking forward to getting the old one out and going through the installation process again. But thankful it didn't hit the body. It was a hard hit and would have done serious damage.

Last edited by edwardb; 11-21-2021 at 12:09 PM.
Build 1: Mk3 Roadster #5125. Sold 11/08/2014.
Build 2: Mk4 Roadster #7750. Sold 04/10/2017.
Build Thread
Build 3: Mk4 Roadster 20th Anniversary #8674. Sold 09/07/2020.
Build Thread and
Video.
Build 4: Gen 3 Type 65 Coupe #59. Gen 3 Coyote. Legal 03/04/2020.
Build Thread and
Video
Build 5: 35 Hot Rod Truck #138. LS3 and 4L65E auto. Rcvd 01/05/2021. Legal 04/20/2023.
Build Thread. Sold 11/9/2023.
-
Post Thanks / Like - 0 Thanks, 3 Likes
-
11-21-2021, 12:36 PM
#282
Senior Member

Paul that picture should be an advertisement for Factory Five! Awesome!
MK4 #8900 - complete kit - Coyote, TKO600, IRS - Delivered 6/28/16 First Start 10/6/16 Go cart - 10/16/16 Build completed - 4/26/17 - 302 days to build my 302 CI Coyote Cobra - Registered and street legal 5/17/17
Build Thread
http://thefactoryfiveforum.com/showt...e-build-thread
PHIL 4:13 INSTAGRAM - @scottsrides
-
Post Thanks / Like - 1 Thanks, 2 Likes
-
11-22-2021, 10:01 AM
#283
Senior Member

Paul, I have mostly Gates and have T-bolt clamps in the same locations. As soon as the temp drops, I also get small leaks that no amount of tightening can stop. I’ve been procrastinating going to Gates in these locations, but now you’ve sold me.
I’ve finally pulled the trigger on a Daytona, so I’ve been reviewing your build thread. Sorry to hear about your windshield...
Chris
Generation 3 Type 65 Daytona Coupe Complete Kit #151885 received May 6, 2022. Gen 3 Coyote, IRS, Tremec TKX, American Powertrain hydraulic throwout bearing & Wilwood brakes.
MK4 Basic Kit #7404, 347 EFI - Pro M Racing ECM, 30# injectors, 70 mm throttle body, 80 mm MAF, Edelbrock Performer aluminum heads & RPM II intake, all new G-Force T5, 3:55 gears, Pro 5.0 shifter, 3-link, carbon fiber dash/custom Speedhut gauges and paint by Da Bat.
-
11-22-2021, 04:52 PM
#284
Senior Member

Originally Posted by
cgundermann

Paul, I have mostly Gates and have T-bolt clamps in the same locations. As soon as the temp drops, I also get small leaks that no amount of tightening can stop. I’ve been procrastinating going to Gates in these locations, but now you’ve sold me.
I’ve finally pulled the trigger on a Daytona, so I’ve been reviewing your build thread. Sorry to hear about your windshield...
Chris
Too funny. Walked out into the garage this AM to find my favorite drops of orange antifreeze on the ground from the one remaining T-bolt clamp in my entire installation. The top radiator connection. I'm so done with this. Changing it over to a Gates clamp and hopefully that's the last of that. Your comment about temperature is interesting. Very well could be what I'm experiencing. It's turned cold here, and even though my garage is limited to 50 degrees by my heater, definitely cooler than it's been recently.
Congrats on the Coupe! We sure like ours. Good luck with it.
Build 1: Mk3 Roadster #5125. Sold 11/08/2014.
Build 2: Mk4 Roadster #7750. Sold 04/10/2017.
Build Thread
Build 3: Mk4 Roadster 20th Anniversary #8674. Sold 09/07/2020.
Build Thread and
Video.
Build 4: Gen 3 Type 65 Coupe #59. Gen 3 Coyote. Legal 03/04/2020.
Build Thread and
Video
Build 5: 35 Hot Rod Truck #138. LS3 and 4L65E auto. Rcvd 01/05/2021. Legal 04/20/2023.
Build Thread. Sold 11/9/2023.
-
Post Thanks / Like - 0 Thanks, 1 Likes
-
11-23-2021, 08:58 PM
#285
Senior Member

Hi Paul -
I know I am a little late to the party but LS's are notorious for trapping air in the PS cylinder head which eventually blocks flow to the thermostat, preventing it from opening. The typical fix for the a Gen 1 Camaro is to get the front end up in the air, remove the radiator cap and massage (read squeeze over and over until your hands cramp) the upper radiator hose which will eventually burp the air out of the system. I had the exact same issue and the guys from the Camaro forum saved me. Sounds like you have it figured out though, so no worries. Also, you may see the LS runs a little hotter than other engines - this is normal. Otherwise, nice looking ride and great build thread as always.
Last edited by PNWTim; 11-23-2021 at 09:02 PM.
-
Post Thanks / Like - 1 Thanks, 0 Likes
-
11-24-2021, 10:42 PM
#286
Senior Member

Originally Posted by
edwardb
Finally, I’ve used charcoal filters on the gas tank vent line for each of my builds. This is to prevent gasoline odors in the garage. Some report no gasoline odors without a filter. Some report gasoline odors even with a filter. I only know I’ve used them on each of my builds and have never had any odors. For my first build, I used a Mustang charcoal filter with the purge valve disabled. They’re not particularly cheap and also not serviceable. Several years ago there were a bunch of forum posts about making your own using aquarium filter charcoal and various containers. Jeff Kleiner showed making a container from PVC pieces, which I patterned mine after. These are standard plumbing pieces from HD or Lowes and dirt cheap.
Also, if you look closely at the Coupe windshield on the LH side, right above the London Cobra Show sticker, you can see a glint or shiny line. Yup, a broken windshield.
Huge bummer about your windshield, Paul. Sorry to hear it.
Thanks for the charcoal filter post. I hadn't seen this approach yet: looks like a good one.
Chris
Coupe complete kit. Index. Delivered: 4/22/24.
Build Thread. Coyote Gen 4X. T-56. IRS w/3.55. Wilwoods. PS. HVAC. Side windows.
MK4 Complete kit.
Build Thread Index. Delivered: 10/15/2020. Legal: 7/25/23. Coyote Gen3. TKO600 (0.64 OD). IRS w/3.55. PS. Wilwoods. Sway bars. This build is dedicated to my son, Benjamin.
Build Thread.
-
Post Thanks / Like - 1 Thanks, 0 Likes
-
12-01-2021, 06:10 PM
#287
Hi Paul,
I am new here, but I looked back through the thread. I could not find an answer as to why you chose a 3 link vs IRS on this build. I have found some of your posts that talk very highly of IRS. Just planning a build myself and was curious on the reason for your choice on this build. Thanks
-
12-01-2021, 08:54 PM
#288
Senior Member
Originally Posted by
Iziks
Hi Paul,
I am new here, but I looked back through the thread. I could not find an answer as to why you chose a 3 link vs IRS on this build. I have found some of your posts that talk very highly of IRS. Just planning a build myself and was curious on the reason for your choice on this build. Thanks
Welcome! Yes, I'm a big fan of IRS. However, the truck is only offered in the solid axle/3-link configuration. That's it. So that's why you're seeing a 3-link.  The 33 hot rod has the IRS option, in addition to solid axle 3-link and 4-link. But from the firewall back, the chassis of the truck and hot rod are quite different. If you closely study Factory Five's website you can see what's available. The order forms are very specific.
Build 1: Mk3 Roadster #5125. Sold 11/08/2014.
Build 2: Mk4 Roadster #7750. Sold 04/10/2017.
Build Thread
Build 3: Mk4 Roadster 20th Anniversary #8674. Sold 09/07/2020.
Build Thread and
Video.
Build 4: Gen 3 Type 65 Coupe #59. Gen 3 Coyote. Legal 03/04/2020.
Build Thread and
Video
Build 5: 35 Hot Rod Truck #138. LS3 and 4L65E auto. Rcvd 01/05/2021. Legal 04/20/2023.
Build Thread. Sold 11/9/2023.
-
12-01-2021, 11:18 PM
#289
Senior Member
Truck Bed Completed
Have the truck bed completed now. First a quick update about my favorite subject. Coolant leaks. Mentioned in a previous update that my upper radiator hose was still occasionally leaking coolant at the radiator connection. A few drops occasionally is one thing. But also with all the congestion up there, dripping onto the cooling fan, shocks, my crossover wiring harness, etc. Just not something very desirable. I also mentioned before I had a T-bar clamp in that position. For serviceability. But nothing I did would make it stop occasionally dripping. So I ordered another shrink clamp and as of today after several days and several engine runs, no more leaking. I’ve said several times I was done with that subject. Now I’m really done with that subject. Clean sweep. All radiator upper and lower connections have the shrink clamps and I've yet to have a single one leak a drop. Note I’ve found the Gates Power Grip clamps are getting hard to find in certain sizes. This 2-inch size, which is likely very common, was one of them. Turns out Edelbrock also sells a similar product. They appear to be the same including how they’re packaged with a cardboard core. But no Gates marking. Found this one on Amazon. None of the other usual shopping places I use had the branded Gates 2-inch in stock. Supply chain again? Who knows. But this Edelbrock piece looks and installs exactly the same and seems to be doing the job.
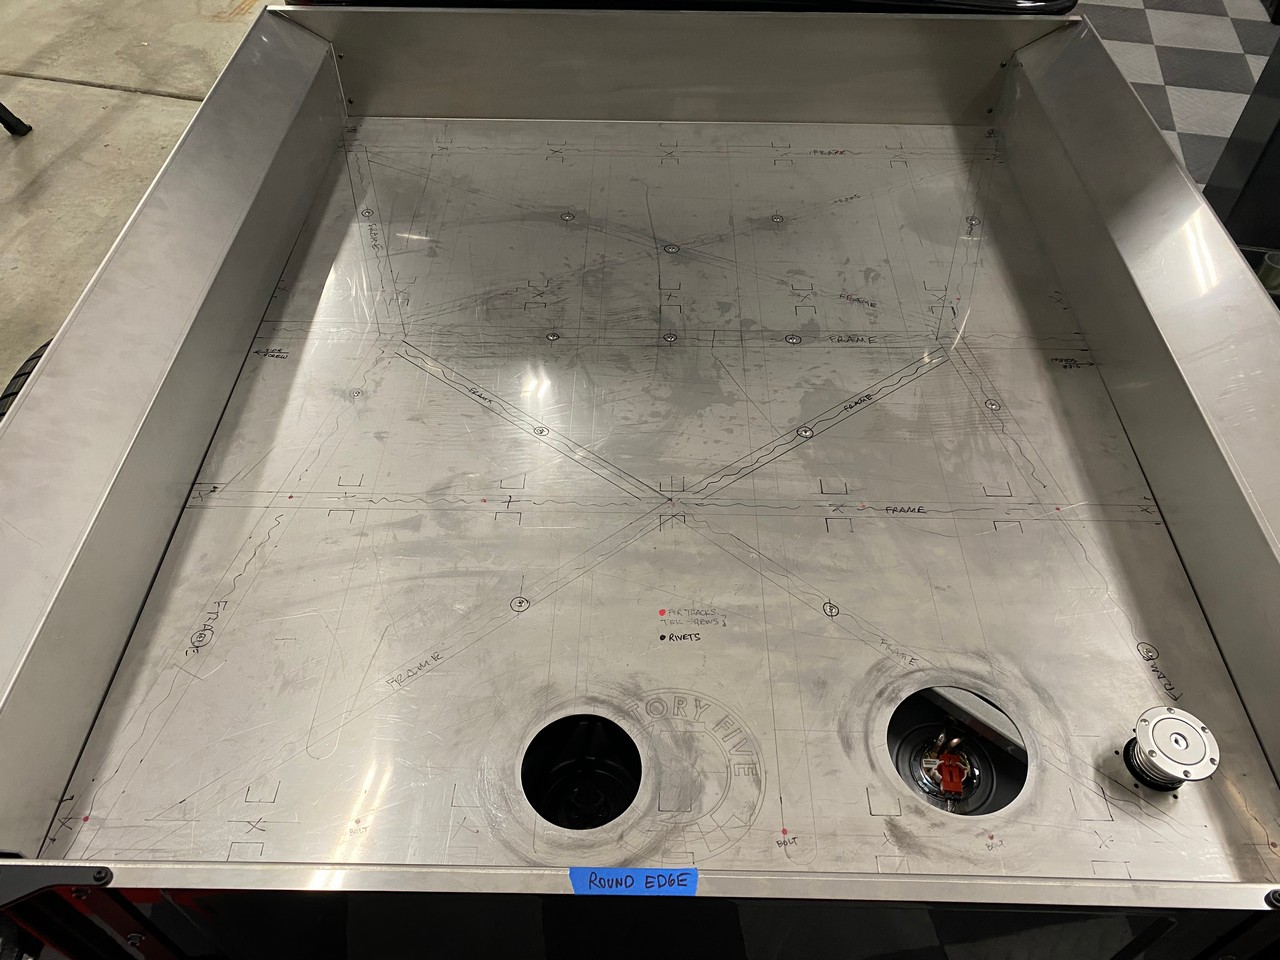
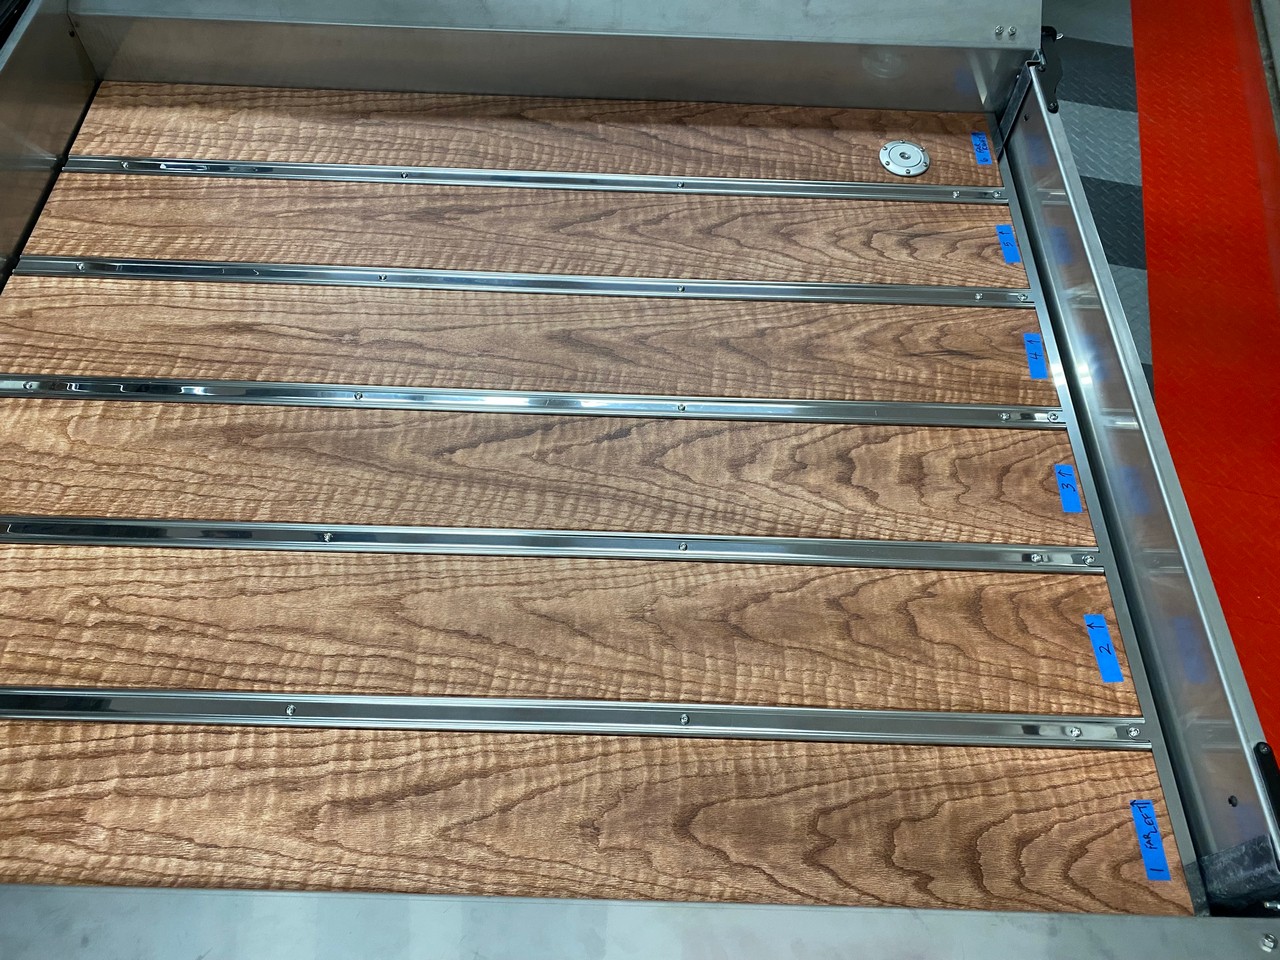
Back to the build. Factory Five includes a large piece of 16 gauge (.060") SS sheet for the truck bed floor. The build manual is somewhat vague about it. There is no mention of attaching it to the frame. Just placing it. Also says if installing a wood floor the base can be the SS sheet or plywood. Suggesting it’s optional? I reviewed several build threads and also started a separate thread on the subject. Received a mixed response on whether to use it or not. Some don't. Gave it some thought and decided I’m going to use it. At 2.52 lbs/ft, based on several on-line metal sites, it’s a bit over 50 lbs. Seems heavier because it’s cumbersome to handle. But not too worried about the weight. Most trucks can use a little extra weight over the rear tires and I'm not building a racer here. Plus, the underside looks much more finished with the sheet in place IMO. It has a slightly polished finish that is surprisingly close to the color of my powder coated frame. With that decision made, outlined the underlying frame structure on top. Then planned for where I could attach the four wood (aka aluminum w/vinyl) support pieces and some additional 3/16” SS rivets so all attachments went into the frame.
Which brought me to another issue. Some builders cut holes in the SS sheet for access to the tank sending unit and fuel pickup/pump. I wasn’t planning to do that because it’s not that hard to drop a tank with a lift. Support the tank and lift the chassis off. Have done that numerous times during previous builds although never on a finished build. And hope to keep it that way... But for the truck, realized for the first time that with the rollpan installed, which covers about half of the tank underneath, it would very difficult to drop the tank out the bottom. Removing the rollpan isn’t a great option since it’s trapped between the bed sides. And in my case also by the rear fenders. A lot of disassembly that wouldn’t be desirable on a finished/painted body plus a lot of work. So, joined the club and cut holes over the two tank locations. Found out that SS sheet is tough. At least for the tools I have. Best turned out to be metal cutting jigsaw blades with lots of cutting lube and letting it cool every inch or two. Still burned through a few blades but got it done. Then smoothed with sanding drums. Note some also cut an access hole in the front where the battery is located. I decided against that. I agree the battery location is cumbersome. But it is reachable from the bottom and having on the lift does help a little.
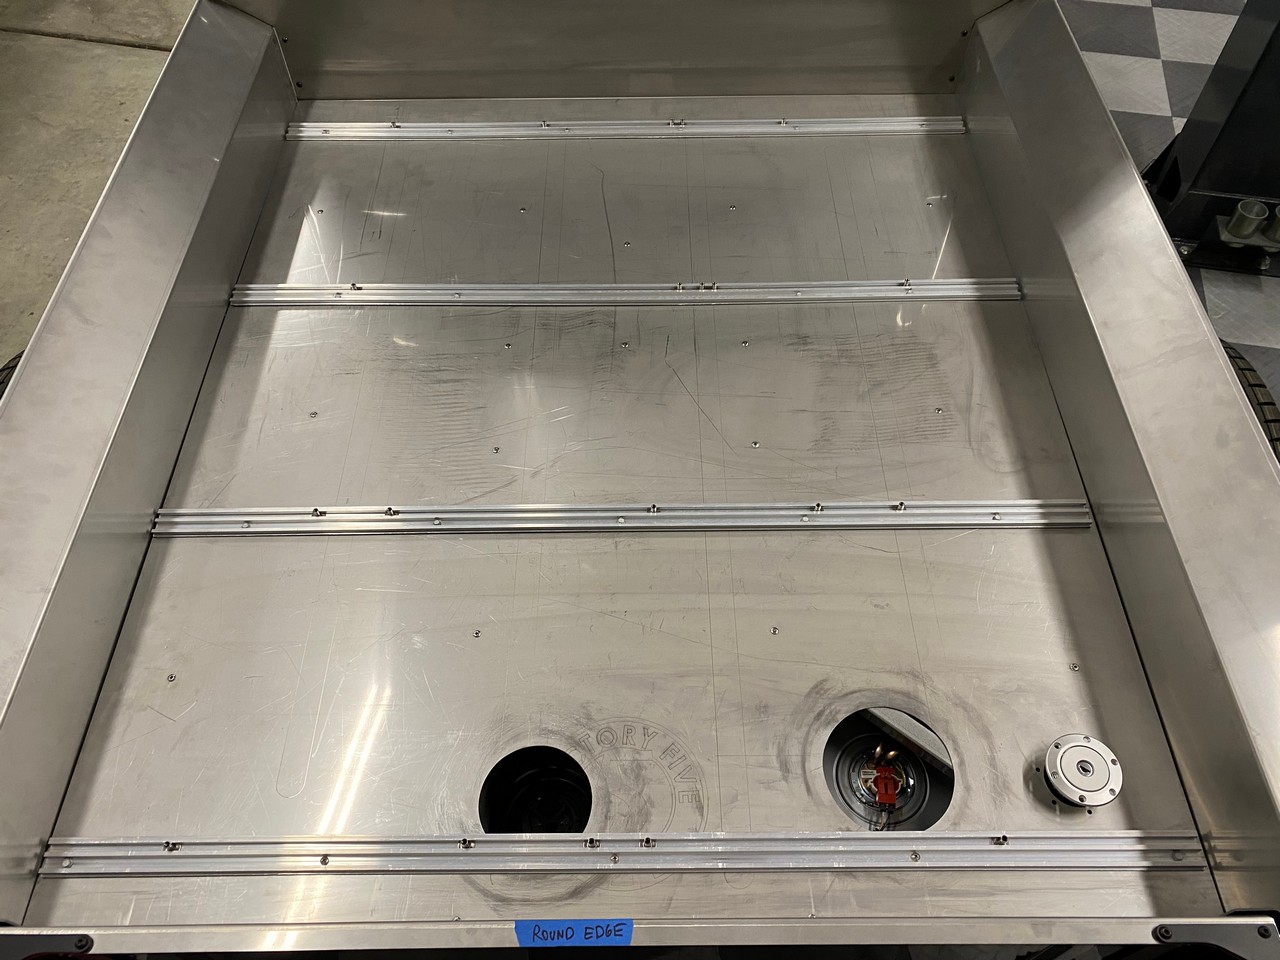
With that done and our oldest grandson in town for Thanksgiving, used his young muscles to help me lower the sheet onto the chassis after putting a bead of silicone on the top of the frame rails. Then riveted. Drilling for the rivets wasn’t quite as challenging as cutting the access holes. But again, that SS sheet is tough and fights back. Sharp drill bits and cutting oil are the order of the day. Also, no way I could have pulled the 3/16 SS rivets by hand. My Milwaukee cordless rivet puller even growled a bit.
Next up, laid out the cross pieces for the Smokey Road Rod Shop aluminum bed wood system. Explained previously as an alternative Factory Five offered me since the original wood floor option I ordered was no longer available. Note they are now listing this on the truck order form. Part number 35115 - Hot Rod Truck Aluminum Bed Kit. My plan was to use #12 x 3/4" long Teks style self-drilling screws to attach the cross pieces. I knew they wouldn’t drill through the SS sheet so drilled pilot holes first. But found out the hard way that the pilot had to be the full diameter of the threads. Otherwise, the SS sheet strips the threads right off. In hindsight, should have figured that out first before stripping a couple and breaking another. But got it done and the cross pieces aren't going anywhere. The chrome strips that go between the boards was used to get the right front-to-back spacing of the cross pieces. Side-to-side is adjustable as the T-nuts slide in the channel. Quick word about that gas cap. The kit comes with a very nice looking aluminum gas cap. But I sometimes attend indoor car shows that require a locking gas cap. Plus I like the added security. So I’ve used the Breeze locking cap on every build. https://www.breezeautomotive.com/sho...g-3-25-flange/. It’s not cheap. But super high quality and looks nice. This is the first time it hasn’t been hidden under a LeMans cap. I installed nutserts in the aluminum floor and did have to slightly enlarge the cutout in the SS floor. Otherwise, the kit supplied silicone connector tube was rubbing the edge based on the pre-cut hole in the aluminum floor. Not a good long term idea. The ground strap is attached to one of the mounting bolts and frame underneath.
With that, temporarily installed the aluminum wood pieces and chrome trim. Very happy with it overall. I especially like the angle piece supplied for the end by the tailgate. Gives a high quality finished look when closed and open. You don’t see the end of the boards. This will come out for body and paint. But not hard now that everything is mocked up and fitting.
The last thing I did today was install the backup/reverse light. Not required by MI state regulations for assembled vehicles. But I installed them on the Coupe and decided it’s a good safety feature. My HGM transmission controller has a lead that’s +12V when in reverse. But, per the instructions, cannot be used to directly light the light. Has to go through a relay. So installed a relay behind the dash as part of my electrical plan. Used the RF radio circuit to power the light itself and added the wire into the rear harness before installing. I went back and forth on what fixture to use and where to place it. Ended up with a Maxxima 14 LED M42206 White Surface Mount Backup/Courtesy Light placed in the center below the tailgate. I would have liked something with a less modern style. More in keeping with the old truck theme. But just didn’t find anything I liked better. Since the inside at this location is basically inaccessible with the bed installed, made a plate with nutserts and bonded on the inside. Could have used the supplied self-tapping screws. But for this purpose, prefer the machine screws and nutserts and something more than just into fiberglass. Used a 2-wire Weatherpack connector. Tested and working. It’s very bright and I’m pretty Ok with how it looks. There are covers that go over the mounting screws that I'll add at final assembly. That's it for today. Need to get back to winterizing the Coupe. With snow on the ground and salt on the roads the local driving season is officially over.

Last edited by edwardb; 12-02-2021 at 11:37 AM.
Build 1: Mk3 Roadster #5125. Sold 11/08/2014.
Build 2: Mk4 Roadster #7750. Sold 04/10/2017.
Build Thread
Build 3: Mk4 Roadster 20th Anniversary #8674. Sold 09/07/2020.
Build Thread and
Video.
Build 4: Gen 3 Type 65 Coupe #59. Gen 3 Coyote. Legal 03/04/2020.
Build Thread and
Video
Build 5: 35 Hot Rod Truck #138. LS3 and 4L65E auto. Rcvd 01/05/2021. Legal 04/20/2023.
Build Thread. Sold 11/9/2023.
-
Post Thanks / Like - 0 Thanks, 2 Likes
-
12-02-2021, 11:07 AM
#290
Senior Member
Beautiful, almost a crime to place anything on it...
Chris
Generation 3 Type 65 Daytona Coupe Complete Kit #151885 received May 6, 2022. Gen 3 Coyote, IRS, Tremec TKX, American Powertrain hydraulic throwout bearing & Wilwood brakes.
MK4 Basic Kit #7404, 347 EFI - Pro M Racing ECM, 30# injectors, 70 mm throttle body, 80 mm MAF, Edelbrock Performer aluminum heads & RPM II intake, all new G-Force T5, 3:55 gears, Pro 5.0 shifter, 3-link, carbon fiber dash/custom Speedhut gauges and paint by Da Bat.
-
Post Thanks / Like - 1 Thanks, 0 Likes
-
12-09-2021, 11:25 PM
#291
Senior Member
Wipers and Washers
Mainly working on finishing up the wiper and washer installation this week. Among a few other things. The Coupe is all winterized and up on the RaceRamps FlatStoppers. Couple of things to address during the winter. But otherwise done for now and out of the way as much as possible. Other than usual maintenance items and clean-up, all looked good with no issues underneath. Fixed the little "oops" scratch under the nose. Just short of 4,000 miles now.
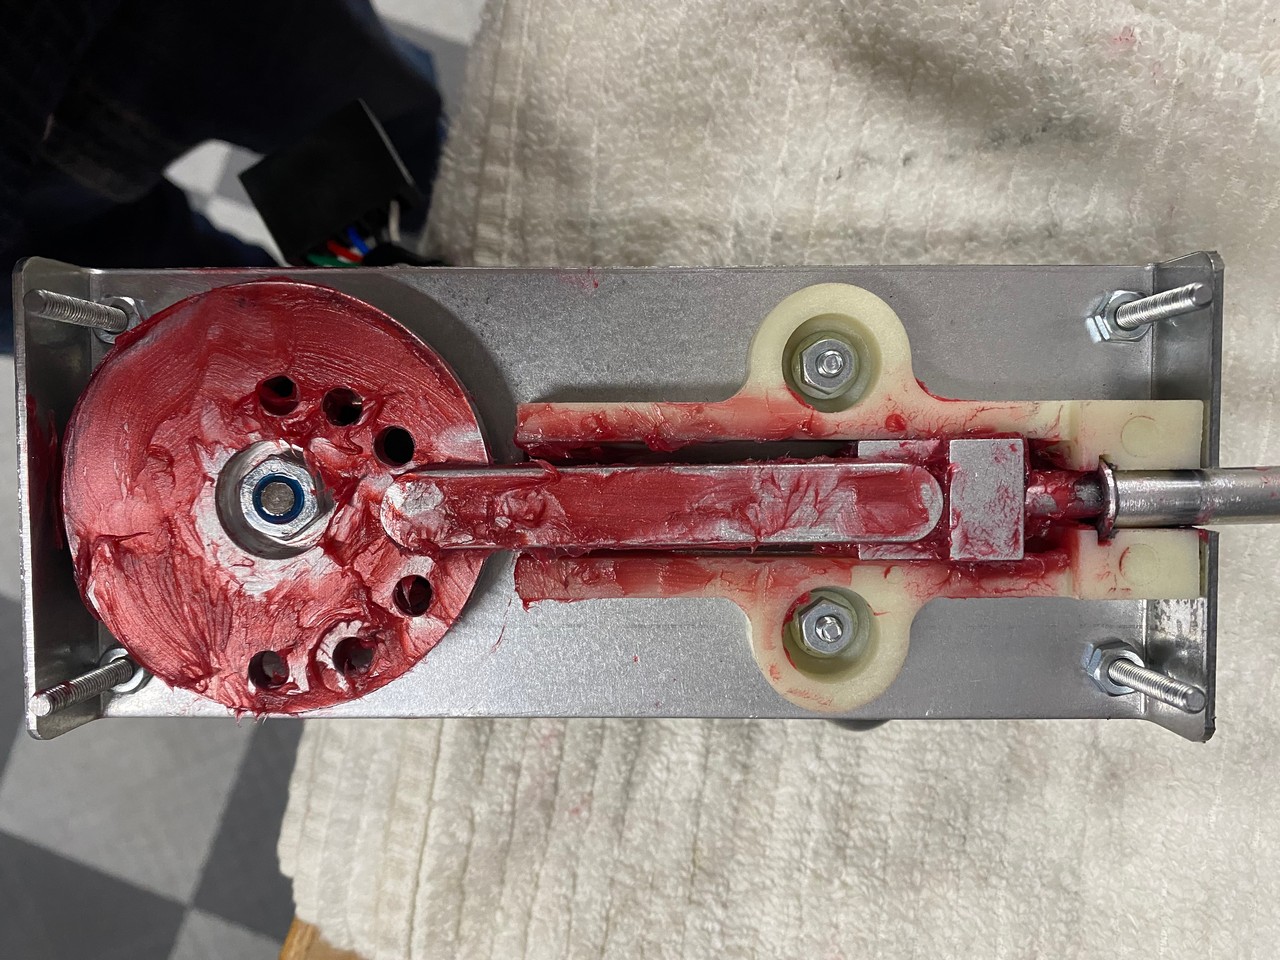
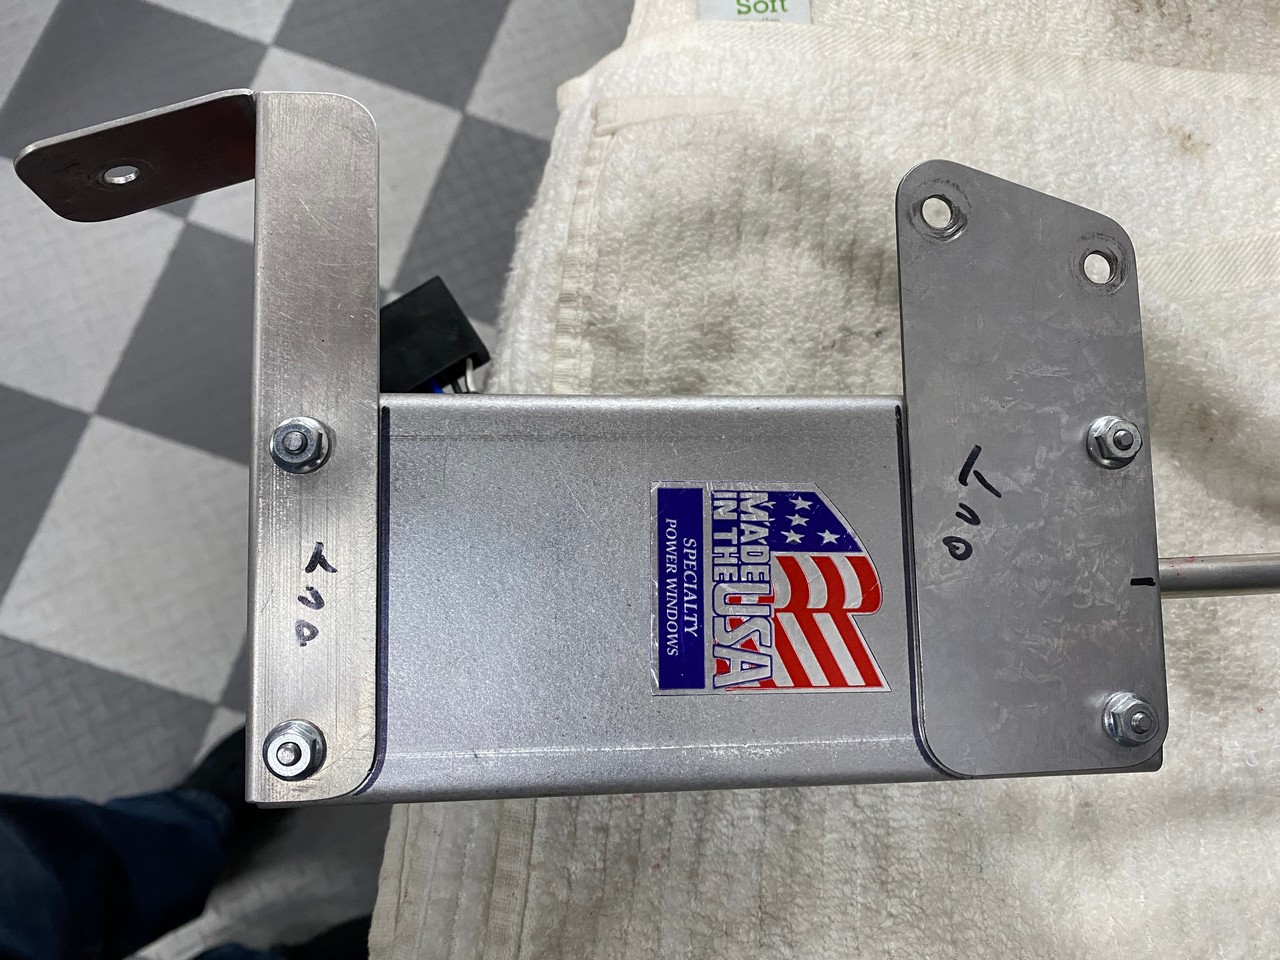
For the truck build, described in previous updates that I’m installing the Specialty Power Windows WWK2 Complete Universal Wiper Drive Kit. Same one I used on the Coupe. Also showed how I borrowed an idea from another truck builder and tucked the drive motor in the outside wall of the RH footbox in front of the door. Fits nicely and out of the way there. Plus saves valuable space elsewhere. Now to mount the wipers and assemble the drive mechanism. The SPW wipers are somewhat similar to the usual Lucas replica wipers, e.g. a drive cable running in a tube turning wheelboxes at the wipers, parking, etc. But it’s much more robust, completely adjustable, and a little cheaper. Have only had to run it a couple times in the Coupe (that’s a good thing…) but works fine. It is a bit bulkier, so wouldn’t say it’s a direct replacement for the Lucas style system. Plus probably a bit more work to initially install. But is a good fit for the truck.
First up bent the aluminum tube from the drive motor to the first wheel box and flared the ends. Than added the piece between the two wheelboxes and the one at the end. Also with flares. Then cut down the threaded portion and driveshafts on the wheelboxes. They’re quite long to be universal. Then trial fit the Specialty Power Windows WAB-01BR Billet Aluminum Wiper Arms, RH Bend I’m using. Note these aren’t included with the basic power window kit. Greased things up (kinda messy process…), assembled the drive cable, and adjusted the sweep. Took a couple tries to get the right settings. The instructions are very thorough with multiple sweep combinations and directions possible depending on the position of the drive wheel and hole used. Mine ended up on the 120 degree setting. Looks like this inside. Like I said. Kind of messy with the required grease.
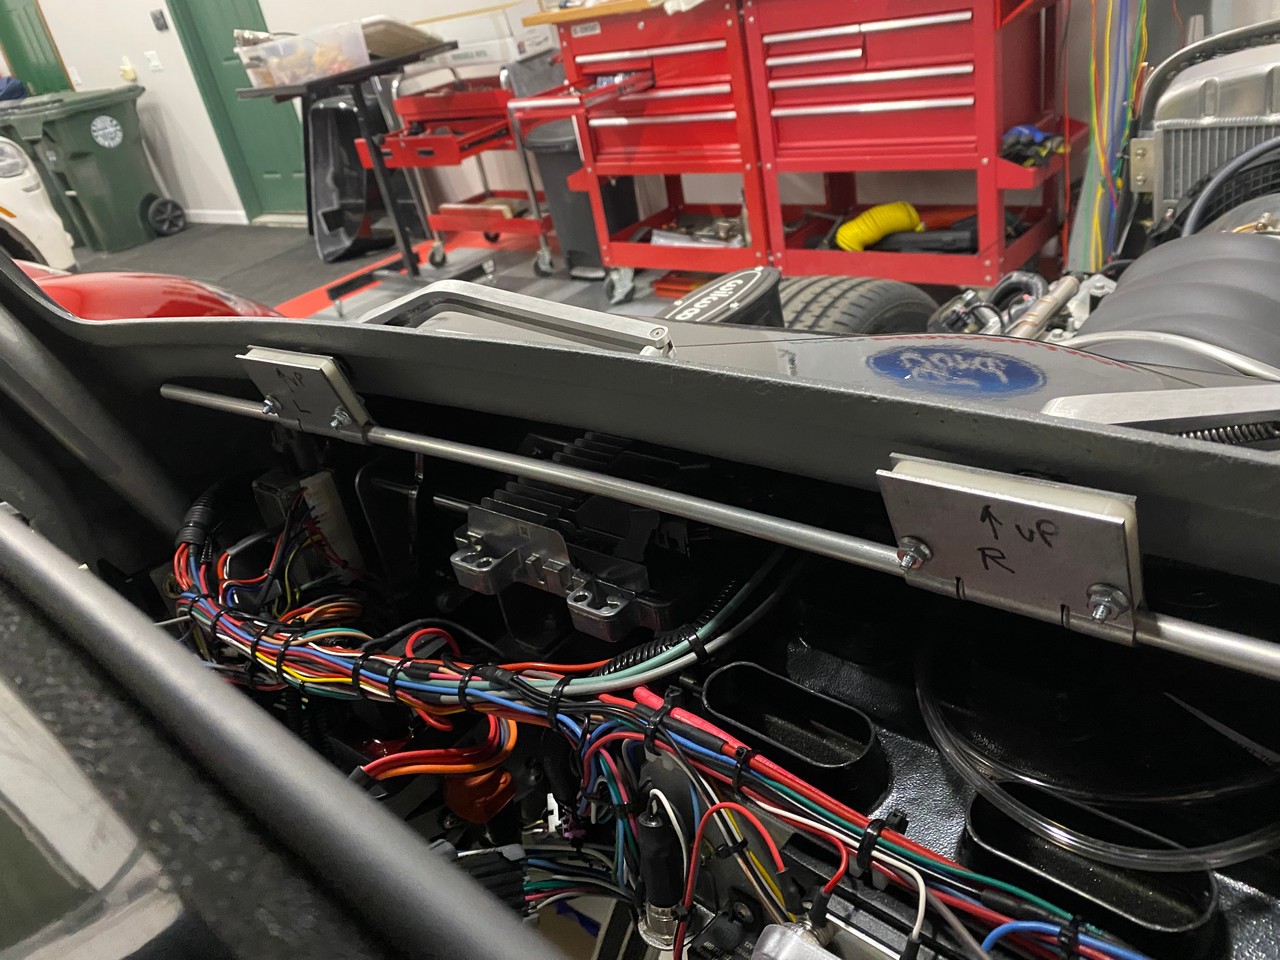
These are the brackets I added to mount in the footbox.
Then the cable routing.

Finally, from the front with the wiper arms loosely positioned. I’ll hit them with some satin black rattle can at final assembly. Did the same on the Coupe and although not the same wipers, they’re holding up well.
Next up was the washers. This was pretty simple. I described the Chase Bays Compact Windshield Washer Reservoir I’m using previously. For washer nozzles, I’m again using the same ones I found worked well on the Coupe. https://www.amazon.com/gp/product/B0...?ie=UTF8&psc=1. These are crazy cheap and I was skeptical but gave them a try. Actually don’t look bad and work very well. The nozzles are adjustable. Note washers are supposedly required for Michigan. I’ve talked my way out of them for a couple builds. But have just put them on the last two. Especially maybe useful for the truck since it’s more of a cruiser and might actually be needed. I put the washers on the same mounting surface by the wipers. I was able to adjust the spray to hit the center of the windshield. I'm using the switch that came with the SPW wiper system. Changed the knob so it matches the headlight switch. Shown previously. It's a pretty low tech switch with two speeds and a push to spray. Not fancy like the Cole Hersee 75600-04 in the Coupe -- with intermittent, automatic wipe with spray, etc. But it's bulky and a bit pricey. So kept it simple for the truck.
These parts will all be removed when it’s time for body and paint. But the detail work is done and will go back on with minimal effort. I spent some additional time on the cruise control. During my brief go-kart drives, I did try to engage the cruise control. I was kind of fumbling around with a lot going on, not going very fast (25-30 mph) and wasn’t convinced I worked the controls properly. But never did engage. So I got the idea maybe I could test them more extensively with the truck on the lift and the rear wheels off the ground. Could get a little more indicated speed and confirm I was working it properly. Still no love though. Didn’t engage. I went through the table of troubleshooting steps in the instructions. Mostly all was OK. But had a couple questions so called Dakota Digital tech support. Answered my questions and had a couple more things for me to check and test. No change. Called back again and he suggested moving the ground for the control module from regular chassis ground to the ground wire in the Chevrolet Performance control harness. He said it was critical for the cruise control system to have the same exact ground as the rest of the engine control system. Interestingly referred to in the Chevrolet wiring diagram as “Low Reference.” I found with a little more research that this is the same unit sold by Rostra (maybe they’re the actual mfg?) and their instructions show the ground to low reference from the start. Anyway, changed the wire as described. Not too fun on the completed wiring. But not bad. But, still no love. The tech also warned me, when I described how I was testing, that the system may not engage with the rear tires free wheeling on the lift. Said it was likely they needed to be under load. He wasn’t positive. But for now out of ideas and so am I. So will wait for further testing until I can actually drive it. I’m positive all the wiring is correct. So the only thing left is the module itself. We’ll see. If anyone has any insight on this, would appreciate hearing about it.
One more little tidbit while I'm updating. I hadn't put the door hinge brackets on the chassis before mounting the cab. I assumed they would be in the way when dropping the body into place, so left them off. Well we all know about assume. I was looking for something in the build manual and ran across the part showing them being installed before the cab was dropped into place. Now I know why. What a pain that was. Had to remove a few cab mounting bolts to spread things a bit to get the top ones positioned. Then like building a ship in a bottle to get the bolts in place. Bottom ones weren't as bad. But still would have been way easier without the cab in place. Don't do what I did on this one. At this point, I don't know if the body will come off for paint. My preference would be not since all the alignments including the yet to be finalized doors are especially critical. Everything else, yes, but maybe not the cab.
One more shameless tool story. A couple builds ago I noted how I’d started using a headlamp at certain times. My garage shop is reasonably well lit. But for real close work, including underneath when out of direct lighting, having a bright light shining from your forehead is a huge help and keeps your hands free. Notwithstanding my aging eyes and ever stronger reading glasses. The headlamp I bought back then was somewhat bulky and battery life between charges getting shorter and shorter. So started looking for a replacement. Between light and battery technology, plenty of much better options available. I ended up selecting this Coast XPH30R model. Super compact, bright, and runs for hours. Even fits under my bump cap. An important feature. I also like how one side of the light fixture has a magnet. So I can just stick it on the overhead cabinet above my workbench when not using. Pretty cool.
That’s it for this week. Next up is getting the rest of the body parts mounted. They need a little bit of cutting and sanding to be cleaned up, and I strongly prefer that to be outside to cut down on the mess. But it’s been cold and snowy. So cramping my style a little. We’ll figure it out.
Last edited by edwardb; 12-10-2021 at 06:13 AM.
Build 1: Mk3 Roadster #5125. Sold 11/08/2014.
Build 2: Mk4 Roadster #7750. Sold 04/10/2017.
Build Thread
Build 3: Mk4 Roadster 20th Anniversary #8674. Sold 09/07/2020.
Build Thread and
Video.
Build 4: Gen 3 Type 65 Coupe #59. Gen 3 Coyote. Legal 03/04/2020.
Build Thread and
Video
Build 5: 35 Hot Rod Truck #138. LS3 and 4L65E auto. Rcvd 01/05/2021. Legal 04/20/2023.
Build Thread. Sold 11/9/2023.
-
Post Thanks / Like - 1 Thanks, 1 Likes
-
12-10-2021, 08:45 AM
#292
Senior Member

A couple of suggestions for the cruise control:
- make sure the brake sense wire is connected to the load side of the brake switch. Otherwise the controller will receive 12volts continuously, signalling it that the brake pedal is depressed.
- some controllers need to sense a path to ground through the brake lamps when the pedal is released. If the brake lights are not connected, or are LED, there may not be a path to ground. Try connecting a standard globe temporarily in the bra circuit to give a ground connection through its to filament
Mk.4 FFR supplied Right hand drive
Received 12/2012 completed 12/2019
Gen1 Coyote / TKO600 / IRS
Lots of mods to make compliant for Australian design rules
-
12-10-2021, 09:45 AM
#293
Senior Member

Paul, Interesting information on windshield wipers, I had not known of Specialty Power Windows or the Wiper Drive Kit.
I am faced with a wiper delema on my 1928 Mercedes SSK replica street rod. It was an Excalibur Phaeton originally, (Studebaker & Chevy parts) now it is a step-over roadster with Lexus running gear. The original Lucas wiper system was electrically DOA, who'da thunk it. I am running the Lexus electricals and found a way to integrate the Lexus motor and gear to the Lucas transmission. I still need wiper arms. SPW lists their arm/blade as 10".
What is your wiper arm length and how tall is your windscreen? Do the blades (male/female) slide-latch to the arms or snap in place?
jim
-
Post Thanks / Like - 1 Thanks, 0 Likes
-
12-10-2021, 10:15 AM
#294
Thanks EdwardB. Great info as I will install the same on my truck build. Your postings is a true God send. Thank you.
-
Post Thanks / Like - 0 Thanks, 1 Likes
-
12-10-2021, 02:46 PM
#295
Senior Member
Originally Posted by
Nigel Allen
A couple of suggestions for the cruise control:
- make sure the brake sense wire is connected to the load side of the brake switch. Otherwise the controller will receive 12volts continuously, signalling it that the brake pedal is depressed.
- some controllers need to sense a path to ground through the brake lamps when the pedal is released. If the brake lights are not connected, or are LED, there may not be a path to ground. Try connecting a standard globe temporarily in the bra circuit to give a ground connection through its to filament
Thanks for your post and for following my build. Have both of these points covered I think. Per the instructions, this unit has one of the controller wires connected to the hot side of the brake light switch. Then another wire to the cold side of the switch (only has +12V when the brake pedal is pushed) has to be grounded for the system to work as you said. And yes this build is 100% LED. Dakota Digital has that covered in their instructions and shows installing a relay to ground which is broken when the brake pedal is pushed. The proper operation of that relay was one of the things their tech support had me confirm. This could easily be user error (wouldn't be the first) but everything we've checked is wired and working as it's supposed to and exactly per the instructions. All the voltages on the various pins are what they're supposed to be. But on hold now until it's a driver and see what happens then.
Last edited by edwardb; 12-10-2021 at 02:56 PM.
Build 1: Mk3 Roadster #5125. Sold 11/08/2014.
Build 2: Mk4 Roadster #7750. Sold 04/10/2017.
Build Thread
Build 3: Mk4 Roadster 20th Anniversary #8674. Sold 09/07/2020.
Build Thread and
Video.
Build 4: Gen 3 Type 65 Coupe #59. Gen 3 Coyote. Legal 03/04/2020.
Build Thread and
Video
Build 5: 35 Hot Rod Truck #138. LS3 and 4L65E auto. Rcvd 01/05/2021. Legal 04/20/2023.
Build Thread. Sold 11/9/2023.
-
12-10-2021, 02:54 PM
#296
Senior Member
Originally Posted by
J R Jones
Paul, Interesting information on windshield wipers, I had not known of Specialty Power Windows or the Wiper Drive Kit.
I am faced with a wiper delema on my 1928 Mercedes SSK replica street rod. It was an Excalibur Phaeton originally, (Studebaker & Chevy parts) now it is a step-over roadster with Lexus running gear. The original Lucas wiper system was electrically DOA, who'da thunk it. I am running the Lexus electricals and found a way to integrate the Lexus motor and gear to the Lucas transmission. I still need wiper arms. SPW lists their arm/blade as 10".
What is your wiper arm length and how tall is your windscreen? Do the blades (male/female) slide-latch to the arms or snap in place?
jim
The SPW wipers I'm using on this build are 10" arms and 10" blades. The windscreen on the truck is just under 12". So a decent fit. The instructions say the blade length can be adjusted, but I won't need to. The blades fit onto 1/2" knurled drum with a set screw. FWIW, I used ANCO Adjustable Wiper Arms 44-01 on my Coupe build with ANCO 5215 wiper blades on this same SPW system. Those arms use the same drum style attachment. Different blade lengths are available too.
Build 1: Mk3 Roadster #5125. Sold 11/08/2014.
Build 2: Mk4 Roadster #7750. Sold 04/10/2017.
Build Thread
Build 3: Mk4 Roadster 20th Anniversary #8674. Sold 09/07/2020.
Build Thread and
Video.
Build 4: Gen 3 Type 65 Coupe #59. Gen 3 Coyote. Legal 03/04/2020.
Build Thread and
Video
Build 5: 35 Hot Rod Truck #138. LS3 and 4L65E auto. Rcvd 01/05/2021. Legal 04/20/2023.
Build Thread. Sold 11/9/2023.
-
12-10-2021, 04:19 PM
#297
Senior Member
Paul,
Researching parts is complicated by simplistic "application" specs and not dimensions.
My windshield is flat and 12" high. I have the 1/2 inch knurled drive shafts and they are a bit worn, a set screw would help.
I do not recognize the SPW blade to arm attachment on your 33. I have 10" Mini Cooper blades with a standard M/F slide latch coupling.
What is the length of your Coupe ANCO 44-01 arms? I find only application data on them, not dimensions.
jim
-
12-10-2021, 04:38 PM
#298
Senior Member
Originally Posted by
J R Jones
Paul,
Researching parts is complicated by simplistic "application" specs and not dimensions.
My windshield is flat and 12" high. I have the 1/2 inch knurled drive shafts and they are a bit worn, a set screw would help.
I do not recognize the SPW blade to arm attachment on your 33. I have 10" Mini Cooper blades with a standard M/F slide latch coupling.
What is the length of your Coupe ANCO 44-01 arms? I find only application data on them, not dimensions.
jim
The ANCO 44-01 arms on my Coupe are adjustable from 10.8 to 15.5 in. long, with 15 in. blades. As I recall I have them set as short as they go. Pictured below. The attachment between the SPW blade and arm on the ones for the 35 Truck is just a small flat head machine screw into an aluminum machined pivot. Something custom and not standard at all. The wiper has a channel for the rubber to slide into place.

Build 1: Mk3 Roadster #5125. Sold 11/08/2014.
Build 2: Mk4 Roadster #7750. Sold 04/10/2017.
Build Thread
Build 3: Mk4 Roadster 20th Anniversary #8674. Sold 09/07/2020.
Build Thread and
Video.
Build 4: Gen 3 Type 65 Coupe #59. Gen 3 Coyote. Legal 03/04/2020.
Build Thread and
Video
Build 5: 35 Hot Rod Truck #138. LS3 and 4L65E auto. Rcvd 01/05/2021. Legal 04/20/2023.
Build Thread. Sold 11/9/2023.
-
12-21-2021, 11:54 PM
#299
Senior Member
Transmission Tunnel Cover
This week I finally finished installing the fiberglass transmission tunnel cover. Took way longer than I expected. Lost track of how many times I had it in and out in the process. But it’s done and I’m satisfied with how it turned out. But sure a lot of fiddling around. The manual says you can cut it down in some cases. Specifically to make it narrower. I’m assuming with a much smaller manual shift transmission. But for the GM 4L65E automatic I’m using, it must stay full size as provided and just clears. But still requires some trimming and adjusting for the best fit. Plus the cutouts for the shifter and e-brake. One of the decisions is whether to make it removable or not. I decided it needs to be for future serviceability. I used 10-32 screws around the perimeter on the floor and firewall. Most are open on the other side for a lock nut. But for several along the back and the top front, they are blind holes. So there I installed nutserts. For the fill piece on the top, I bonded and riveted nut plates on the underside of the main cover and the fill piece is held in place with six screws. I’ll install insulation and carpet later and leave it loose in the areas where there are mounting screws. Wouldn’t be easy to take everything out, and hope I never have to because it wouldn't be particularly easy (or fun). But the option will be there if needed.
Before wrapping things up and attaching the cover for hopefully the last time, had a couple small wiring tasks to complete. One was to wire the Lokar ES4L60EFMP Electronic Sport Shifter. I think I mentioned this before. But I had contacted HGM, the supplier of my transmission controller, and they provided the wires and installation instructions. Installed into the controller previously. Same setup as used for a paddle shifter. But had never actually hooked them up to the shifter. Completed through a 4-cavity Weather Pack connector. Once done, did a brief test and confirmed operation. The HGM controller has a Bluetooth connection and an app on my iPhone. The app dashboard shows the gear the transmission is in. With the rear wheels elevated, started and ran through the gears. When in “sport mode" with the shifter pushed to the right while in drive, the shift lever bumps the gears up and down just like it’s supposed to. Cool. Also permanently wired the starter safety switch. I only had it temporarily wired previously. The switch is also part of the Lokar shifter and I have the RF blue solenoid start wire routed through it. Only completes the start circuit if in park or neutral. Tested and works the way it’s supposed to.
Another open item was all the cables and hoses I had routed through the transmission area. Early in the build decided to go that way and had my doubts a few times. Posted a separate thread asking how others had done it. Didn’t get a lot of feedback. Some routed on the underside of the chassis. But that was too late for me and didn’t want to go back anyway. Got everything routed and tied off and I’m OK with how it turned out. Mainly the only thing touching the trans is the vent tube. And by design it has to touch. With everything in this build, lots going on through those cables. Main battery power, rear harness (with added wires for the transmission cooler and back-up light), transmission control harness, power window wires (to switches between the seats), and the sport shifter wires mentioned previously. Hoses include the transmission vent and transmission cooler lines going to the powered cooler under the truck bed.
Pictures of all the above. Still need to fit a boot around the e-brake. The kit provides the Roadster style boot and says to cut to fit. Same as they did with the Coupe.
Another item of note this week is I had another leaker. I’ve never had this much trouble with leaking in previous builds. Nearly every fluid on the build has leaked at some point. Good grief. Several days ago, noticed some brake fluid on the frame and floor from the area of the master cylinder and related connections. Found the issue was the brake pressure switch. It was leaking fluid between the main switch housing and the insulator out the front where the wires attach to terminals. Everybody knows how corrosive brake fluid is (it's evil) and sitting on powder coat for several days at least left some marks on my frame. I’d be really upset if I wasn’t going to install the engine side covers. But with those installed, won’t be noticeable or probably even visible. But still don't like messing up that very nice powder coat. I ordered a new Wilwood switch. It arrived and it’s slightly different than the one that came on the assembly, including having an engraved part number and a date code. The original part didn’t. Guessing it’s a knock-off and maybe not great quality. Wilwood parts can fail too. But I'll still take my chances with those versus what appears to be a lower quality generic part. Installed the new part and watched for a couple days including exercising the brakes repeatedly. No leaks. I've had nothing but trouble with that master cylinder and booster assembly purchased for this build. I've talked about it several times. Could we please stop with the leaking action? This pic is the new part installed and a catch rag in case needed. It wasn't.
Made a pretty big decision this week. I’ve been going back and forth on what to do with seats. Trying to find something that fits and also that I can elevate to improve visibility and legroom. Hadn't found any better options IMO, so basically decided to go with the Roadster seats and adding headrests. Something I also consider mandatory since the back wall of the cab is right behind your head. In another recent thread, forum members were discussing seating options for the truck, and one member cited experience with https://www.wiseguys-seats.com/. Upon further review, their 16-inch buckets seemed very interesting. Based on the dimensions, looked like a good fit. Plus look great and should be very comfortable. After several back and forths with Nicole, who was very helpful to answer my questions, decided to go with them. So, my order is placed. Will be black vinyl matching the kit provided door cards, a rolled design that is quite attractive, headrests, sliders, and 4-inch risers. Leadtime is 12-14 weeks, so can’t be in a big hurry. But works with my build schedule. Not cheap (there’s that again) but this is a huge part of the finished product and these are exactly what I was looking for. Should give the interior a higher end more custom look. I’ll sell the NIB Roadster seats which will offset the cost some. The headrest options I was looking at weren't cheap either. Related to this, and also to the transmission tunnel cover discussion above, I’m planning to fabricate a center console that takes in the shifter, the window switches, some cup holders, and an armrest between the seats with a hinged cover and storage inside. Important since there's no glovebox. Won’t start on that until the seats arrive.
Finally, I was able to get outside and finish up the rough clean-up of all my fiberglass parts before winter got a little more serious. We now have snow on the ground and temps are mostly below freezing. Got it done just in time. There are 19 fiberglass parts on this build when you count everything (!!!) so it adds up when doing the full boat with fenders, hood, etc. Next up I’ll be working on the front grille surround, hood, and engine side covers. Just barely started. First up have to figure out how to manipulate those side covers around the front suspension. Some kind of puzzle, right?

That’s it. Merry Christmas everyone.
Last edited by edwardb; 12-22-2021 at 04:12 PM.
Build 1: Mk3 Roadster #5125. Sold 11/08/2014.
Build 2: Mk4 Roadster #7750. Sold 04/10/2017.
Build Thread
Build 3: Mk4 Roadster 20th Anniversary #8674. Sold 09/07/2020.
Build Thread and
Video.
Build 4: Gen 3 Type 65 Coupe #59. Gen 3 Coyote. Legal 03/04/2020.
Build Thread and
Video
Build 5: 35 Hot Rod Truck #138. LS3 and 4L65E auto. Rcvd 01/05/2021. Legal 04/20/2023.
Build Thread. Sold 11/9/2023.
-
Post Thanks / Like - 0 Thanks, 2 Likes
-
12-22-2021, 11:30 AM
#300
I really appreciate the quality of your photos. How do you get the lighting so professional looking?
Thanks Lewis
-
12-22-2021, 12:13 PM
#301
Senior Member
Originally Posted by
Lew
I really appreciate the quality of your photos. How do you get the lighting so professional looking?
Thanks Lewis
Thanks! Appreciate the comments. Posting decent pictures is important to me. Thanks for noticing. I'm not doing anything special though. My garage shop has light colored walls and ceiling and is decently lit. Plus I have a couple of large windows. So normally lots of light. I'm using an iPhone 11 Pro Max phone with default photo settings. Nothing particularly special. Typically I just point and shoot without any effects or whatever. I don't use the flash. I download them in full size (12 megapixels) where I save locally for my personal files. Then downsize to 1280 x 960 so the file size (around 300 KB) can be uploaded to this forum's picture gallery. Then link from there. It's a relatively easy/quick process and I agree the quality is surprisingly good. For my first build threads, I was using a Canon Rebel digital SLR. In theory, a decent camera. Certainly a much larger sensor and lens. I was just commenting to someone the other day how far cell phone cameras have progressed. I'm getting consistently better pictures now than before with much less effort. At least for this purpose.
Interestingly, the inside of the cab looked a little dark for the two pictures in this last update of the transmission without the cover. So I set my cordless LED shop light on the floor of the cab before snapping the pics. Talk about pro lighting equipment. The two pictures with the cover on were just with natural light. In hindsight, maybe could have used a little added light too. A little dark under the dash.
Last edited by edwardb; 10-22-2023 at 09:04 AM.
Build 1: Mk3 Roadster #5125. Sold 11/08/2014.
Build 2: Mk4 Roadster #7750. Sold 04/10/2017.
Build Thread
Build 3: Mk4 Roadster 20th Anniversary #8674. Sold 09/07/2020.
Build Thread and
Video.
Build 4: Gen 3 Type 65 Coupe #59. Gen 3 Coyote. Legal 03/04/2020.
Build Thread and
Video
Build 5: 35 Hot Rod Truck #138. LS3 and 4L65E auto. Rcvd 01/05/2021. Legal 04/20/2023.
Build Thread. Sold 11/9/2023.
-
Post Thanks / Like - 1 Thanks, 1 Likes
-
12-22-2021, 05:15 PM
#302
Senior Member
Looking great Paul. Merry Christmas.
MK4 #8900 - complete kit - Coyote, TKO600, IRS - Delivered 6/28/16 First Start 10/6/16 Go cart - 10/16/16 Build completed - 4/26/17 - 302 days to build my 302 CI Coyote Cobra - Registered and street legal 5/17/17
Build Thread
http://thefactoryfiveforum.com/showt...e-build-thread
PHIL 4:13 INSTAGRAM - @scottsrides
-
Post Thanks / Like - 0 Thanks, 1 Likes
-
12-22-2021, 05:26 PM
#303
 Administrator

Paul,
The leadership you show in documenting your builds is truly inspiring and is THE gold standard. 5 builds already. Absolutely one of the legends of our hobby.
Happy holidays brother!

FFR 5369 Pin Drive, IRS, Trigos, Torsen, Wilwoods, FMS BOSS 302 "B" cam , Mass-flo. CA SB100 (SPCN) Registered
Delivered 4/23/06. "Finished" 4/2012 (still not done!)
-
Post Thanks / Like - 1 Thanks, 1 Likes
-
12-22-2021, 05:31 PM
#304
Senior Member
Originally Posted by
wareaglescott
Looking great Paul. Merry Christmas.
Thanks Scott. Your Camaro is looking pretty awesome yourself. Merry Christmas to you too.
Originally Posted by
David Hodgkins
Paul,
The leadership you show in documenting your builds is truly inspiring and is THE gold standard. 5 builds already. Absolutely one of the legends of our hobby.
Happy holidays brother!
You're very generous David. Just doing what I enjoy. But your comments are appreciated. Happy Holidays your direction as well.
Last edited by edwardb; 12-22-2021 at 05:35 PM.
Build 1: Mk3 Roadster #5125. Sold 11/08/2014.
Build 2: Mk4 Roadster #7750. Sold 04/10/2017.
Build Thread
Build 3: Mk4 Roadster 20th Anniversary #8674. Sold 09/07/2020.
Build Thread and
Video.
Build 4: Gen 3 Type 65 Coupe #59. Gen 3 Coyote. Legal 03/04/2020.
Build Thread and
Video
Build 5: 35 Hot Rod Truck #138. LS3 and 4L65E auto. Rcvd 01/05/2021. Legal 04/20/2023.
Build Thread. Sold 11/9/2023.
-
12-24-2021, 08:27 AM
#305
Member

I second Davids compliment. Reading your build threads is the reason Im documenting mine on here, and Im shamelessly walking the trail youve blazed. Ive also gone to the extreme of copying and pasting all your updates from your anniversary roadster build into a Word document and printing them out. Sits along side the build manual, and to be fair, its consulted probably more than the FFR manual. Your details go to the depths that the manual misses. When I pull the trigger on a coupe, Ill do the same for that!
Have a great Christmas and try to stay warm up there!
Russel
Mk4 Roadster #10204. Gen 3 Coyote, Tremec T56, IRS. Ordered 6/7/21 - Delivered 12/18/21
Build Thread
-
Post Thanks / Like - 1 Thanks, 1 Likes
-
01-01-2022, 11:46 PM
#306
Senior Member
Door Cards and Misc
Happy New Year everyone. We stayed home and had a quiet holiday with just the two of us. Happy to have technology to visit with our out-of-state sons and families via video chat. Our youngest son officially announced the pending arrival of grandchild number five. Their second. As they said, daughter Hannah (soon to be two) just graduated to big sister. They're excited and so are we. Due in July. Able to keep inching along with the build. Coming up to the one year anniversary of the kit delivery – Jan 5, 2021. About where I expected to be at this point I guess. Finished preliminary fitting of the grille cowl and fit the two aluminum lower cowl mounts that fill the area below the radiator. Not finalizing anything until all the surrounding pieces are also fitted. That’s one of the lessons I’ve learned from previous builds.
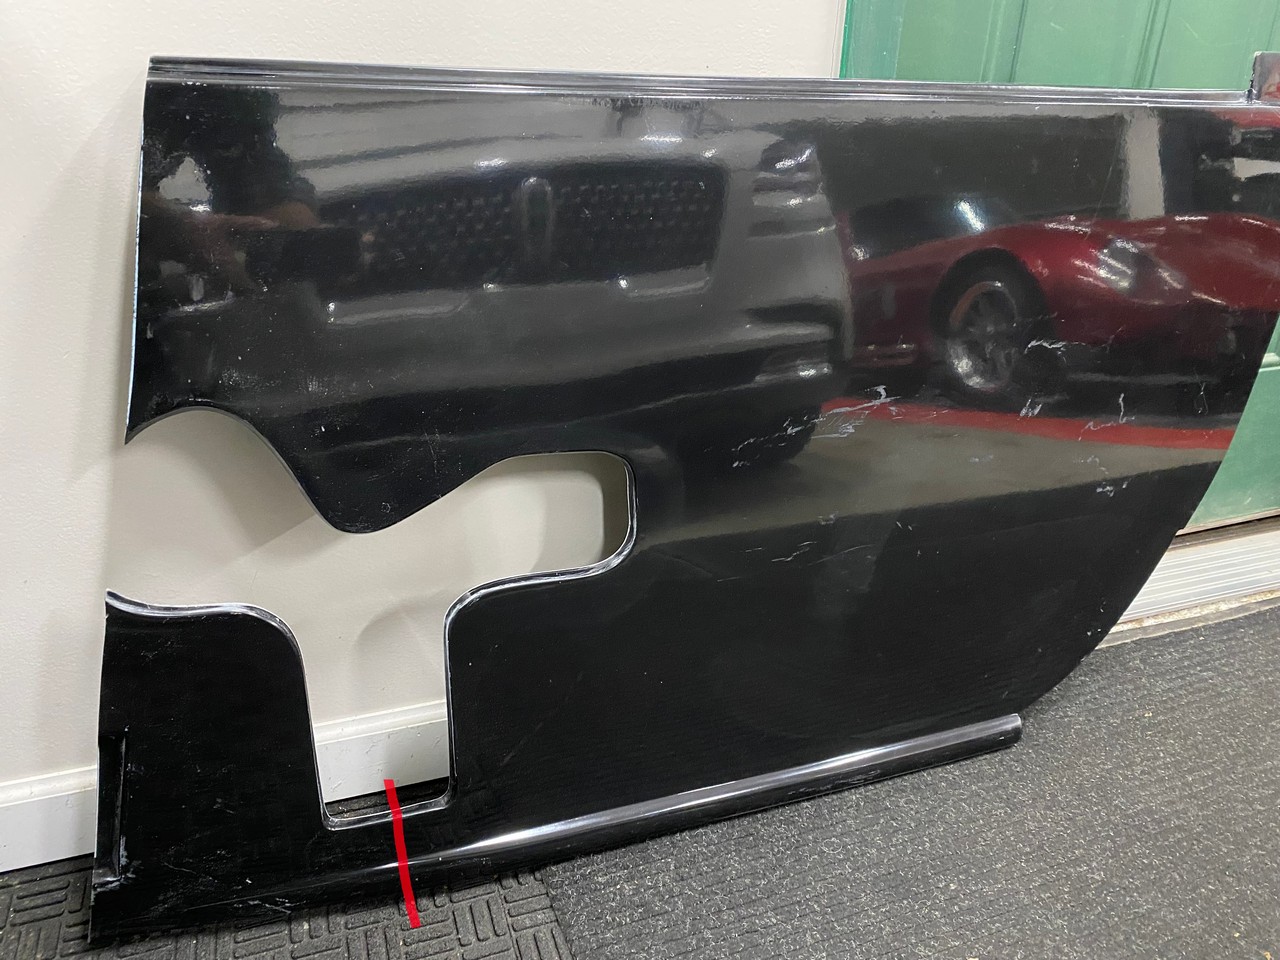
So next up was the hood and engine side covers. For the hood, assembled and placed the hood hinges. Found the manual a bit confusing as some of the pictures don’t match the drawing. So had them apart and together at least three or four times before everything was oriented properly. Can't blame the manual for all of that... Need to put nutserts into the hood to mount the hinge brackets. The factory trim on the hood seems pretty close. But want to get the engine side covers in place first. With that, hit the wall. I was unable to figure a way to fit the engine side covers over the front suspension. Addressed in at least one other build thread. But for whatever reason, my usual Google searches didn’t find it. The hot rod side side covers have the opening at the bottom and just drop into place. But the truck covers have the opening in the front and no amount of twisting or contortions will fit them into place around the front suspension. Posted a separate thread to see what others have done. https://thefactoryfiveforum.com/show...also-Hot-Rod-). Thanks to those who responded and Ron E who also posted and messaged me. Turns out I’m not crazy (no comments…) and it’s necessary to remove the front LCA each time the covers go on or off. Or cut something, which is what I’m going to do. I will cut in the area of the red line shown below and build up a bridge on the back side so the piece can be removed and replaced when necessary. Need some HSRF to do it how I’m planning and I ran out. I’m waiting for some to arrive next week. So, no further work in this area for now.
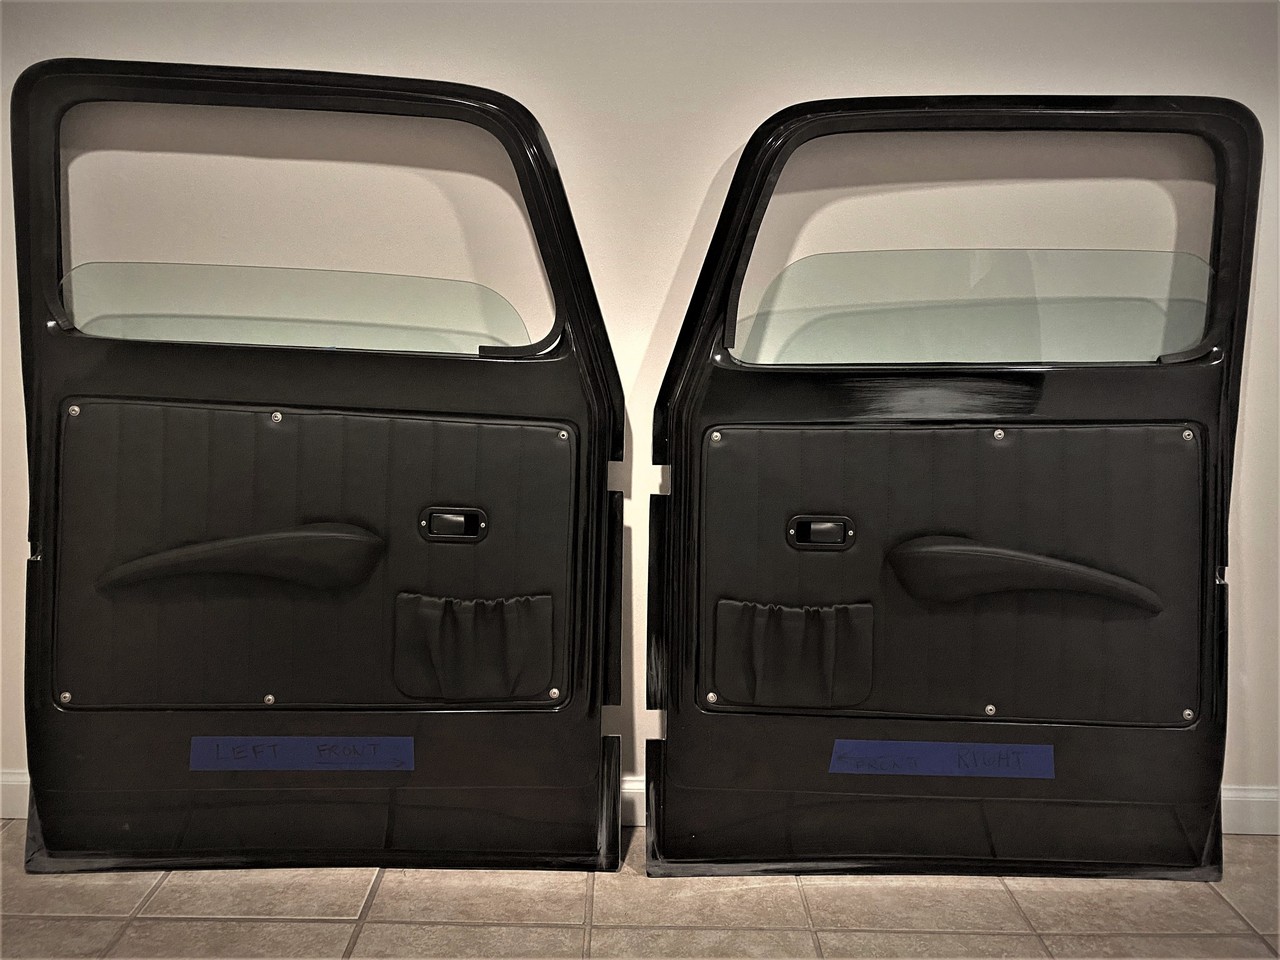
To keep making progress, decided to work on the door cards. The kit came with a set but needed some TLC plus some assembly. They’re pretty substantial. The panels are aluminum versus the usual hardboard. Bent to fit the opening on the inside of the doors. Come with armrests and a small pouch with an elastic opening. My guess is they come from the same supplier as the seats. If not, someone who uses the same glue on the vinyl that doesn’t stick too well. Vinyl was loose around the edges of the panels. Plus loose over major parts of the armrests. Used some DAP Weldwood contact cement to stick things back down. On the armrests, added upholstery staples around the back perimeter. The provided screws for the armrests were too short. How does that happen? They’re metric (M6 x 1.0) so a trip to the hardware store for longer ones. Put fender washers under the heads of the screws. Probably not necessary, but I felt better. The manual shows using self-tapping panel screws around the perimeter to attach the door cards to the doors. The kind with the integral countersunk washers. I’m just not a fan of self-tapping screws for something that probably would be on-off multiple times. Especially into somewhat thin fiberglass. Plus, these doors are HEAVY (each weighs 46 pounds with the skins, steel frame, windows, power lift, etc.) and the arm rest has an integral pull to close the door. Needs to be solid. So I decided to put 1/4-20 nutserts in the doors and use that size hardware. No doubt massive overkill. But easy enough to do and will be plenty strong. Then attached the storage pouches. The manual doesn’t give any direction on how to attach them. I put five 6-32 T-nuts on the inside of the wood frame that forms the pouch and flat head screws through the back of the panel. Final assembled door cards installed on the doors pictured below. I’ll probably switch the exposed screws to something else. Maybe black them out. But they’re ready for final assembly and look decent I think.
In yet still another chapter in every fluid in this build leaks… I’ve had a few drips of transmission fluid on the ground and upon review and monitoring, found the edge around the 4L65E transmission pan almost always wet with fluid. Is there no end to this? Checked the bolts but they were all tight. Overtightening these stamped pans can make it worse. Looked like a pretty generic cork or fiber gasket. Ordered a Moroso rubber/steel gasket. Thought about changing the pan too in case this one was warped or deformed in some way. Plus most replacement pans have a drain plug. Unlike this one. But drew the line at yet another couple hundred bucks and decided to try re-using this one. Removed the pan doing the best I could to catch the still new fluid in a clean container. Made a mess (of course) but got it done. One minor benefit of taking the pan off was I got to confirm the length of the Lokar dipstick. The full mark is supposed to be 1/4 inch above the bottom of the housing. I had estimated that previously. Now I could actually measure it. I was about 1/8 inch off. Not bad but now it’s just right. Checked the pan for flatness. It was OK. Put the new Moroso gasket in and torqued all the bolts to 10 ft-lbs as specified. No leaks and all dry for about a week now. Is this the last leaker? Who knows. I don’t think there are any left that I haven’t had to fix.
I’m going to cut the openings in the cab for the door hinges and start fitting the doors while waiting to finish up the engine covers, hood, etc. I’ve trimmed the doors just enough to fit into the openings. Will not do any further trimming and set gaps until all the other panels are installed. That was one of my biggest regrets on the Coupe build. I fit the doors too early. They should have been last. After everything else was fitted.
Off topic for the build, but a quick shout-out to Russ Thompson. I have two things to fix on the Coupe while in winter hibernation. The broken windshield if Factory Five will ever ship the replacement (mild rant…) and my RT turn signal. Last season the RH direction stopped latching in the turn position. I took it apart and tried to adjust/fix. But no luck. After talking to Russ, sent it to him and he tried to fix it. He said he’s done over a thousand of these things (!!!) and usually can fix them. He returned it and it worked for a little while. But then back to its old ways. Talked to Russ again and he’s got a new shipment of switches so we’re going to replace it. He’s giving it to me for a very fair price considering it’s over three years old. He’s a gentlemen and a real pleasure to work with.
That’s it. We’re supposed to get 5-7 inches of snow overnight. Snow blower is gassed and ready to go.
Last edited by edwardb; 01-02-2022 at 06:37 AM.
Build 1: Mk3 Roadster #5125. Sold 11/08/2014.
Build 2: Mk4 Roadster #7750. Sold 04/10/2017.
Build Thread
Build 3: Mk4 Roadster 20th Anniversary #8674. Sold 09/07/2020.
Build Thread and
Video.
Build 4: Gen 3 Type 65 Coupe #59. Gen 3 Coyote. Legal 03/04/2020.
Build Thread and
Video
Build 5: 35 Hot Rod Truck #138. LS3 and 4L65E auto. Rcvd 01/05/2021. Legal 04/20/2023.
Build Thread. Sold 11/9/2023.
-
Post Thanks / Like - 0 Thanks, 2 Likes
-
01-16-2022, 12:06 AM
#307
Senior Member
More Fiberglass Work Including Doors
Lots going on since my last update, some not build related, so not too much to report. Our main home office computer crashed. A Windows file was corrupted and nothing I could do to get it back or to reboot. I do regular backups, so didn’t lose anything. But major hours spent on a complete rebuild. What a pain. Plus, now I’m doing fiberglass body work which for me seems to take forever. But making some progress.
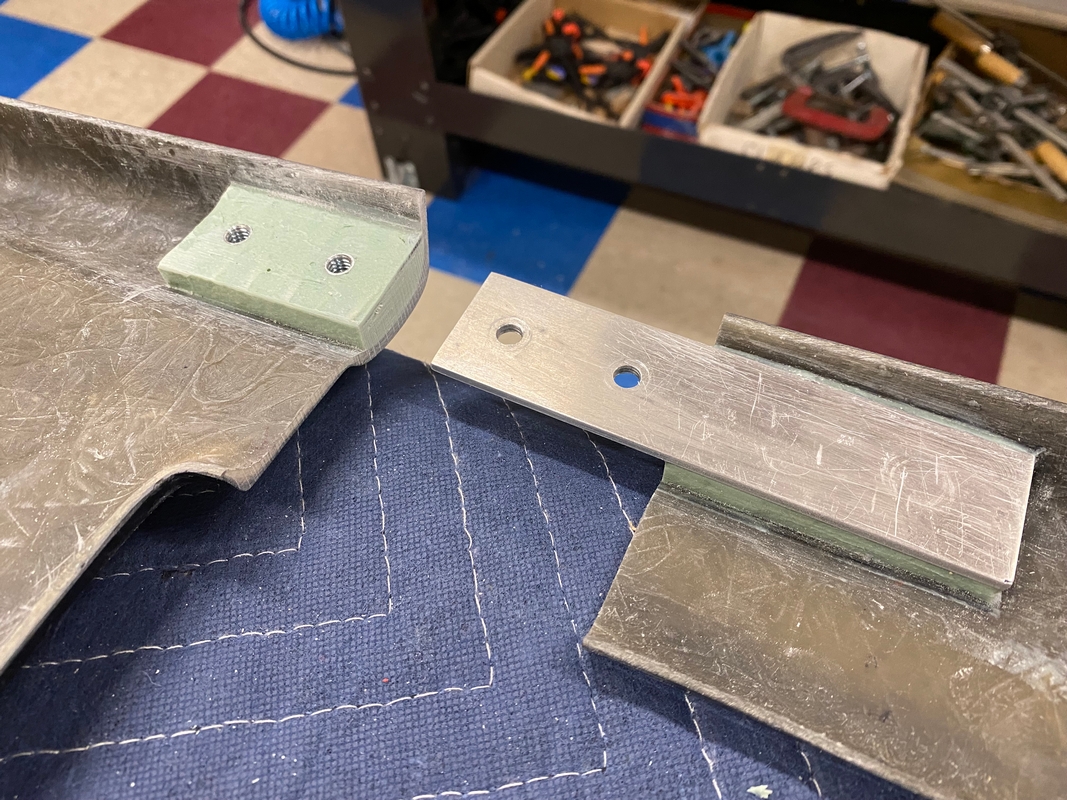
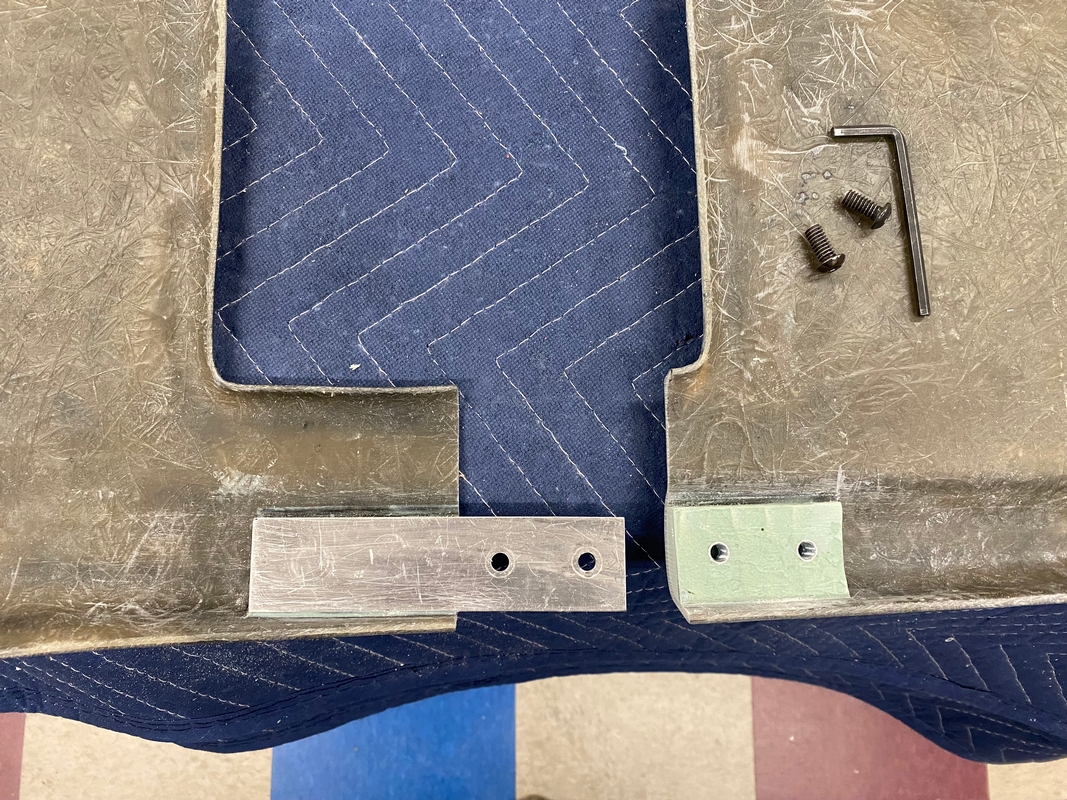
I received the can of HSRF so put the break in the engine side covers as discussed in my last update. I don’t have pictures of every step, but this is what I did. Cut a piece of 1/8” aluminum 5” x 1-1/4”. The idea was to have one side bonded to the cut-off pieces and the other side mounted to the covers with 5/16-18 cap screws. I put the cap screws on one side of the aluminum pieces with T-Nuts on the other side. Then with a piece of plastic over the underside, used the aluminum pieces and clamps to mold HSRF into roughed-up sections in the covers. Took a pretty good amount to fill, but that was the plan. The T-Nuts are buried and completely solid. Then removed the aluminum pieces and cut the engine covers apart. Done this way the alignment between the two pieces was exact. Then bonded the aluminum onto the fixed sides. Happy with how it turned out. Goes on solid and lines up well. Checked and (surprise) now I can get the engine covers over the suspension.
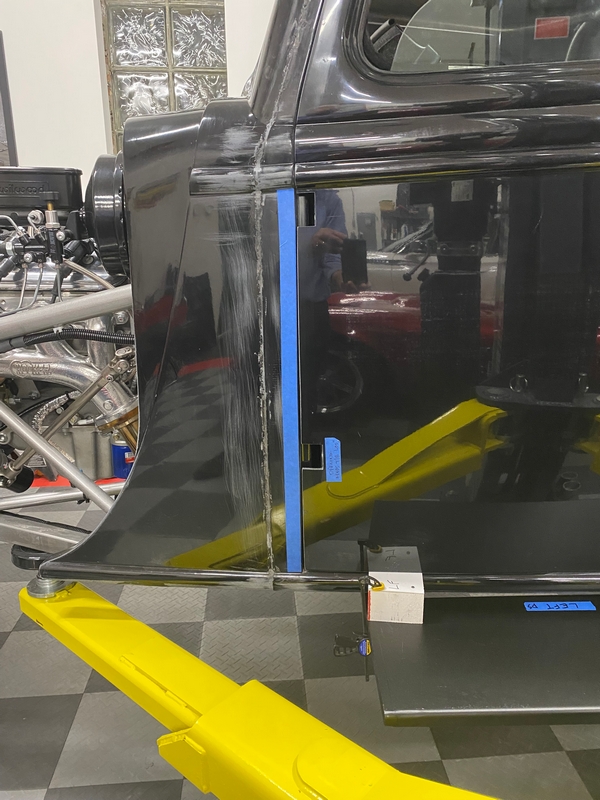
While waiting for the HSRF to arrive, decided to start working on the doors. I know I said this would be last. But I decided I could mount the hinges and get the doors onto the body. No fiberglass cutting or gaps set. Was able to get it mainly done, and I’m reasonably happy with how they fit. Too early to say for sure, but mostly just 1/4-3/8” proud at the bottom rear corners. Interestingly, both sides are off nearly the same mount. Will see what happens when I final fit them and get serious about the hinge alignment and gaps. But I can pull out the bottom rear corners of the cab if I have to. But FWIW I did learn some things in the process of setting the hinges and the doors in the openings. I see now first hand why some consider mounting these doors to be a pain. The hinge access on the body is challenging to say the least. The dash must be dropped to reach the top hinges. Major gymnastics are necessary to get the bolts and nuts into their proper locations. Expect to be dropping stuff multiple times… The instructions show tapping 5/16-18 threads in the outside top body hinges because there isn’t enough room for the nuts on the other side. I found this was true for the bottom hinges as well. Plus I changed the supplied 3/8” long hex screws with 1/2" long hex drive round headed screws for those holes. Uses all the threads better plus (maybe) a bit easier to install/tighten. Mounting the doors and adjusting the hinges will be even harder once the windshield is installed. For final assembly, it will be best to get everything done first and hopefully won't have to get back in there again.
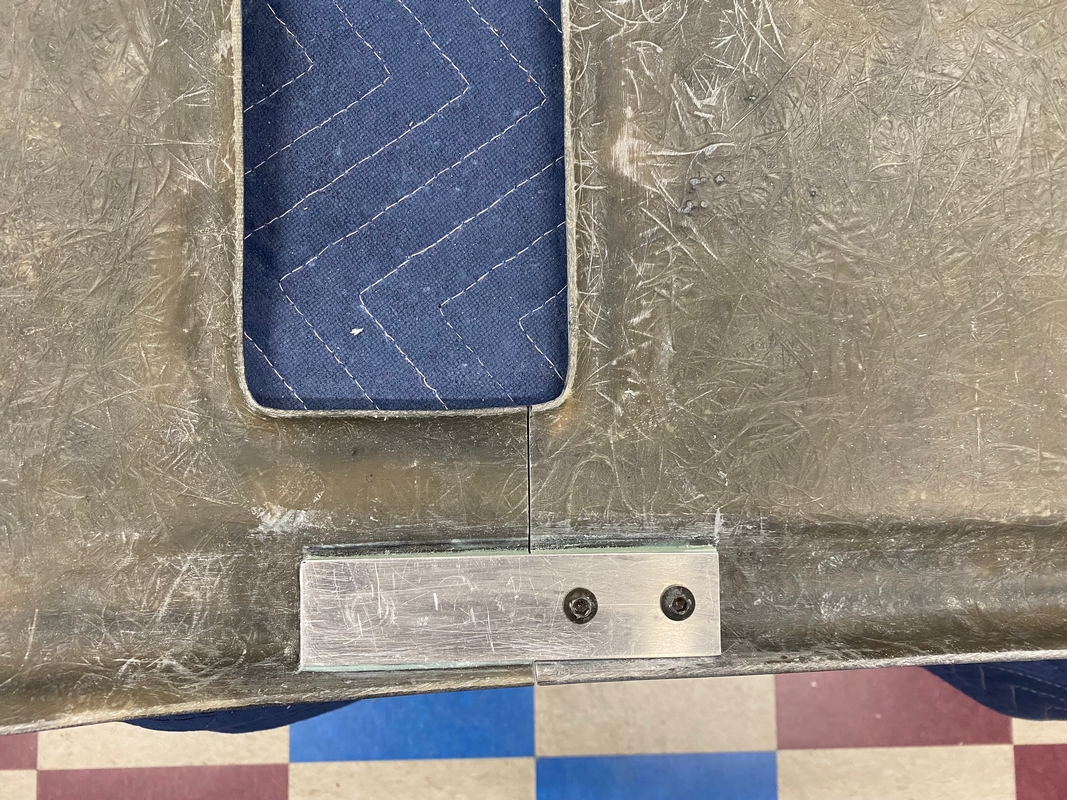
In general, I was impressed with how everything lined up. But did have one problem. Previously, I cut all the hinge locations and slots in the doors using the supplied templates. What I didn’t notice at the time was the lower hinge mount on the left side was over 1/4" different than all the others. Now noticed and it's a problem. Visible in this picture.
If left this way, the body side of the hinge would be outside the offset in the opening and likely outside the adjustment range of the hinge mount on the frame. So I made a spacer out of stacked scrap pieces of fiberglass and bonded to the door at the hinge location. It’s sanded smooth and dead flat on the outside. So should disappear when painted. Looks like this now and moving back to the engine covers and hood.

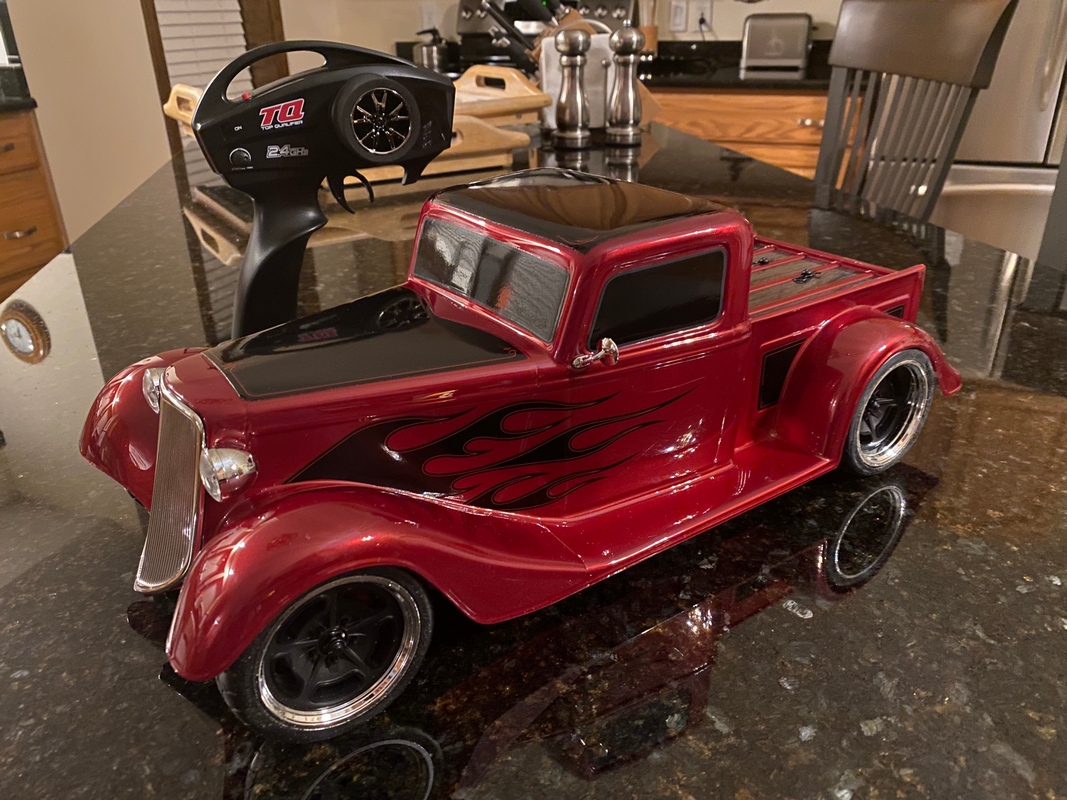
One other important update. I’ve been eyeing the Traxxas version of the truck. Factory Five made their supply available to order so decided I needed one. Chose red. Imagine that. It’s pretty cool. Don't know how much I'll actually drive it. Maybe when the grandkids are around. For now, it has a prominent display location in my man cave and could be interesting to take to shows with the full size version. We'll see.
Last edited by edwardb; 01-16-2022 at 10:18 AM.
Build 1: Mk3 Roadster #5125. Sold 11/08/2014.
Build 2: Mk4 Roadster #7750. Sold 04/10/2017.
Build Thread
Build 3: Mk4 Roadster 20th Anniversary #8674. Sold 09/07/2020.
Build Thread and
Video.
Build 4: Gen 3 Type 65 Coupe #59. Gen 3 Coyote. Legal 03/04/2020.
Build Thread and
Video
Build 5: 35 Hot Rod Truck #138. LS3 and 4L65E auto. Rcvd 01/05/2021. Legal 04/20/2023.
Build Thread. Sold 11/9/2023.
-
Post Thanks / Like - 1 Thanks, 1 Likes
-
01-16-2022, 10:00 AM
#308
Paul-
Everything looks amazing as always. I do have one small criticism though -- I just wish that your posts had a little more detail in them.  HAHA
HAHA
In all sincerity, all your threads are wonderfully done and provide the level of detail that really helps when we get stuck. I won't tell you how many times I have looked through your roadster threads!
I look forward to seeing your truck all done; I bet she looks better than the Traxxas!!
Thanks for letting us come along on your builds Paul, I am grateful for your hard work!!
Regards,
Steve
-
Post Thanks / Like - 2 Thanks, 2 Likes
-
01-26-2022, 07:25 AM
#309
Senior Member
More Progress With Body Parts
I’m plodding along slowly. But making some progress getting body parts mounted. Feeling a little burned out with them, to be honest. Amazed how many hours I manage to spend. But will try to keep moving forward. The end is in sight.
With the engine side covers mounted in their proper positions, and the lower edge of the hood trimmed, set the hood in place. Did an initial pass at getting the front and rear gaps where they should be, then marked the hinge locations from underneath. The manual shows to attach the hinge brackets with the kit supplied 1/4-20 nutserts. They’re nice parts, and I’ve used a bunch of them. But they are primarily for metal and a relatively small “roll” on the underside holding them in place. For high strength into plastic (or in this case fiberglass) I feel better using nutserts intended for that application like these. https://www.mcmaster.com/97217A393/. The "wings" spread out wide on four sides. I’ve used these in several other locations in different sizes. Like the dash and the firewall. With the hinges attached and adjusted, the hood now opens and closes. Waiting to install the prop rod and latch until later when everything is set. I like that the hood kit latch, a bear claw style like the doors, comes with an inside release. So that, along with the door handles that come with locks, means the truck can be locked and secured. Nice.
Next up finished fitting the engine side covers around the front suspension including the small piece that I made removeable as shown previously. Since I’m installing fenders, appearance isn’t super critical. But still tried to keep everything neat. After fitting the sides to the radiator cowl, checked all the clearances with the suspension at ride height and full hang. Several adjustments to the molded cutouts were necessary. Including one that was my fault because of where I mounted the front brake flex hoses. Now done.
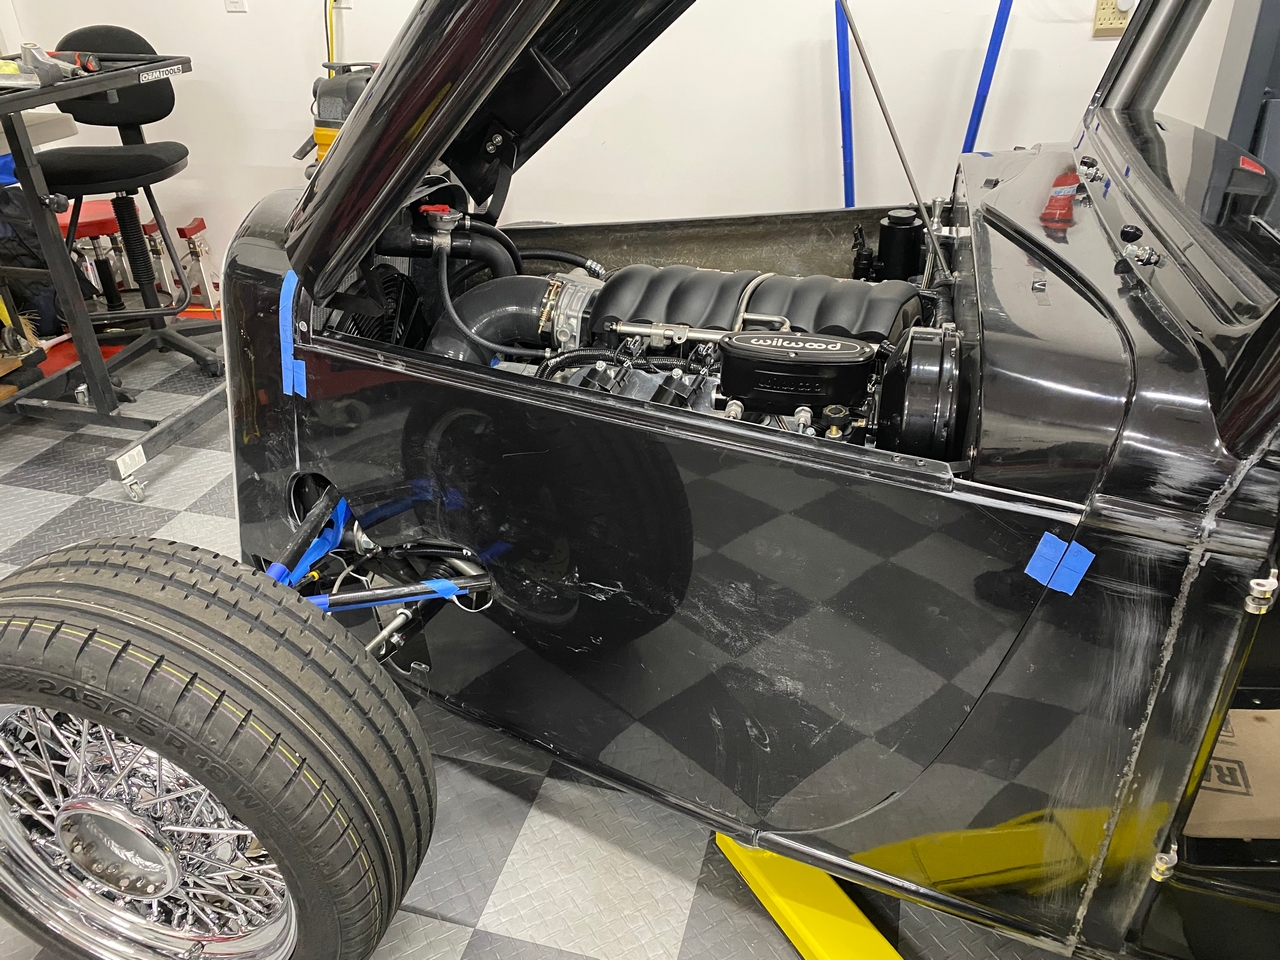
With everything getting finalized, my radiator/grille/cowl position has to remain exactly where it is now. Any movement in height or angle would make a mess of things. The assembly is held in place by very robust brackets underneath the front UCA bolts. The brackets are slotted for adjustment but held once the UCA bolts are tightened. However, could theoretically move if the bolts were loosened. Not good. The brackets have a 1/4" hole in the area of the frame tabs. Although not mentioned in the manual, maybe these are intended to pin the radiator mount brackets in location? Whether that’s the intent or not, I used them for that. Drilled through the frame tabs and installed grade 8 1/4" bolts on both sides. Ignore all the messy looking tape on the suspension parts. Was trying to keep from scratching them up with all the on and off of the engine side covers.
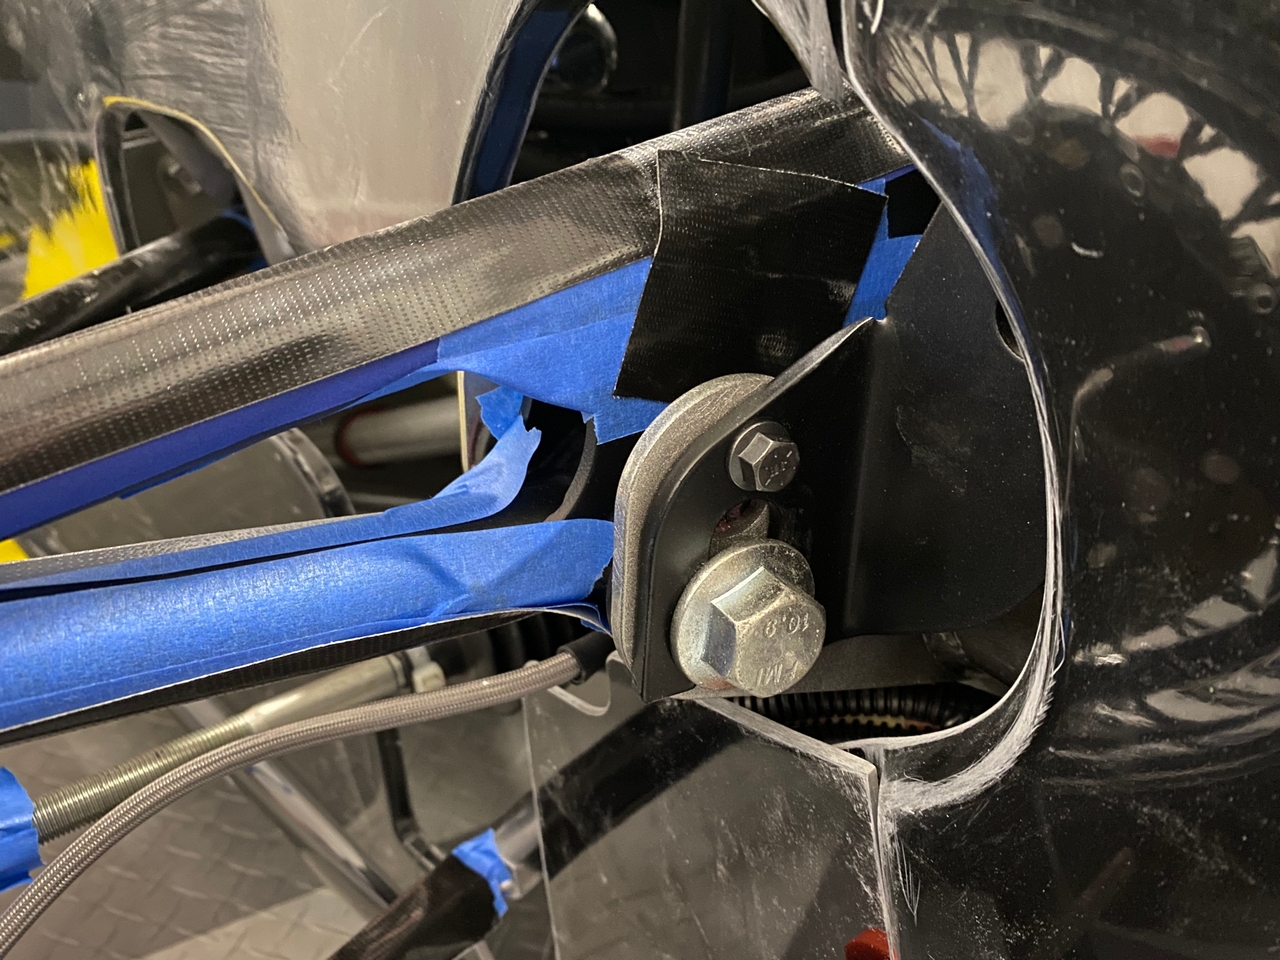
Discovered an “oops” after installing the engine side covers. One of my A/C connections is only about one inch away from the side and pointed right at it. I struggled a bit with fittings and hose installation back when I was setting all that up. Totally miscalculated and missed how close it would be. Not sure what to do now. Really don’t want to reconfigure hoses and go through that again. But may be the best choice. There are right angle fittings I can get for my manifold set. But not sure there’s room for that either. Could drill a hole through the side cover. Not liking that idea much. Or remove the fender and engine cover each time a connection is needed. Not liking that idea too much either. Anyone have any suggestions? The system isn't charged yet.

Another issue I discovered, and to honest was suspecting it, is that the top of the radiator cowl isn’t level. It’s low at the back. This is partly a function of the height and angle of the radiator/grille assembly. But I have mine in the only location/angle possible to prevent interference with everything around it, e.g. the frame, shocks, etc. including the A/C condenser. It’s all very tight fit, and at least in my case, not a lot of adjustment possible. But the engine side covers matched up pretty closely. So I’m thinking the location and angle I have is very close to what’s intended and it's just a function of the cowl piece itself and how it was shaped and molded. With the hood in place, the top of the cowl isn’t on the same plane as the top of the hood. If I align the hood with the lip on the cowl, then it’s not a straight line. Every picture I’ve seen of the truck with a hood this is a straight line and agree that’s how it should be. Wouldn't look right otherwise. So I set the hood hinge location for a straight line to the front of the radiator cowl. Whoever does my body work will need to do some filling on the radiator cowl to fill the gap. Don't think it's a big deal.

One thing I’ve gone back on forth on this build is whether to install vents in the side of the engine covers. I know some do this on their builds. Some don’t. I’ve looked at a bunch of different products, and so far haven’t found any that I’m super excited about. Adds a little complexity and cost, and I think I prefer the clean look anyway. I’d be more than happy to not have them. My pretty mild all aluminum LS3 isn’t super tight in the engine compartment so I’m thinking (hoping?) cooling isn’t an issue. Suggestions or comments?
Next is fenders and running boards. What that, I’ll be officially out of loose fiberglass parts. Set them in place just for inspiration. Not remotely aligned or at the proper height. But this is what I’m going for.

Last edited by edwardb; 12-07-2022 at 03:40 PM.
Build 1: Mk3 Roadster #5125. Sold 11/08/2014.
Build 2: Mk4 Roadster #7750. Sold 04/10/2017.
Build Thread
Build 3: Mk4 Roadster 20th Anniversary #8674. Sold 09/07/2020.
Build Thread and
Video.
Build 4: Gen 3 Type 65 Coupe #59. Gen 3 Coyote. Legal 03/04/2020.
Build Thread and
Video
Build 5: 35 Hot Rod Truck #138. LS3 and 4L65E auto. Rcvd 01/05/2021. Legal 04/20/2023.
Build Thread. Sold 11/9/2023.
-
Post Thanks / Like - 0 Thanks, 2 Likes
-
01-26-2022, 08:43 AM
#310
-
Post Thanks / Like - 1 Thanks, 0 Likes
-
01-26-2022, 09:27 AM
#311
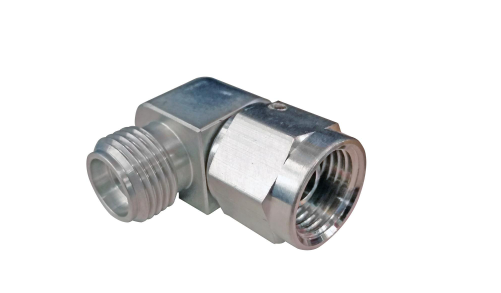
East Coast Speed Machines

Paul - on your AC line - I had a similar situation in the Coupe - I ended up with something like this... yes , I suppose this another potential leak point - but mine has never leaked
This would basically allow you to "rotate" that hose 90* ; or redo the line and buy 2 fittings... this fitting is only $50 and might be something to consider.
FFR 1879, Blown DSS 306,REDLINE management, VeryCoolParts Tuned 460RWHP
FFR 818S, The Flash, Chassis #5, 2.0L, LSD, Electromotive TEC-S, VCP Tuned, 278RWHP 265 RWTQ
FFR 6651, Green Lantern, 408W Crate, Hellion 66mm Turbo, JGS Waste gate / Blowoff valve, Tec-GT management, VCP Tuned, 575 RWHP, 690 RWTQ
FFR 8335, Black Mamba, 289 FIA CSX 2001 tribute car, 347, 48 IDA webers, VCP Tuned, 311 RWHP 386 RWTQ, 3-link, Trigo's
FFR 0004, Gen 3 , Hawk Coupe, Coyote twin turbo, 683 RWHP 559 RWTQ, IRS, VCP Tuned. "not too shabby"
US ARMY Maintenance Test Pilot (CW4 Retired)
-
Post Thanks / Like - 1 Thanks, 2 Likes
-
01-26-2022, 10:44 AM
#312
Senior Member
Paul, I do not have a lot of history with rivnuts, FFR changed that. Previously I designed thread bosses and used weld nuts. When it comes to FRP I am concerned that the squeeze is too high and could damage the plastic structure. I bought aluminum rivnuts for my plastic panels.
On hood venting, my street rod experience with open roadsters is that heat exhausts the louvers and finds it's way into the cockpit. Sides may not be quite so bad but top louver heat comes over the windshield.
jim
-
01-26-2022, 11:54 AM
#313
Senior Member
Originally Posted by
J R Jones
Paul, I do not have a lot of history with rivnuts, FFR changed that. Previously I designed thread bosses and used weld nuts. When it comes to FRP I am concerned that the squeeze is too high and could damage the plastic structure. I bought aluminum rivnuts for my plastic panels.
On hood venting, my street rod experience with open roadsters is that heat exhausts the louvers and finds it's way into the cockpit. Sides may not be quite so bad but top louver heat comes over the windshield.
jim
A little late with making a change on the rivnuts since 90% of them are installed. But I wouldn't change anything anyway. I agree you could probably damage the fiberglass by over squeezing. That's something I'm pretty careful about. But also a positive of the ones I'm using for plastic/fiberglass. The ears are wide and make a lot of contact. The feedback when they are pulled far enough is very distinct. Plus I've learned the hard way after installing a bunch of rivnuts (aka nutserts) in these builds into various materials is if you over torque them (e.g. pull too hard) they can distort, go off-center, go crooked, etc. No matter the type, when they're snug stop. I've tried multiple installation tools as well. The hand squeeze type, which often require more force than I can provide. The lever type (like Astro Pneumatic), which works well but at least for me isn't easy to control. I find these wrench driven ones from McMaster give me the most consistent results and it's very easy to feel when you've squeezed far enough. https://www.mcmaster.com/rivet-nut-i...vet-nut-tools/
Thanks for the feedback on the vents. My inclination at this moment is to not install any. The bottom of the engine bay is wide open and with the engine I'm using, how I plan to drive it, plus what I hope is an efficient cooling system, not anticipating excess heat issues. It is something I could cut in and add in the future. But still have a (somewhat...) open mind on the topic.
Last edited by edwardb; 01-26-2022 at 11:57 AM.
Build 1: Mk3 Roadster #5125. Sold 11/08/2014.
Build 2: Mk4 Roadster #7750. Sold 04/10/2017.
Build Thread
Build 3: Mk4 Roadster 20th Anniversary #8674. Sold 09/07/2020.
Build Thread and
Video.
Build 4: Gen 3 Type 65 Coupe #59. Gen 3 Coyote. Legal 03/04/2020.
Build Thread and
Video
Build 5: 35 Hot Rod Truck #138. LS3 and 4L65E auto. Rcvd 01/05/2021. Legal 04/20/2023.
Build Thread. Sold 11/9/2023.
-
01-26-2022, 12:31 PM
#314
East Coast Speed Machines
Paul - while the bottom of the engine bay is open - I can tell you (for me) riding around in the HOT ROD during the power tour that heat does tend to get "stuck" in the engine compartment since the air going through the rad - also hot.... it got bad enough for the boys 100+ out for 4-5 hours - that they put the hot rod in the trailer and jumped in the roadster.... my 427W truck was pretty warm as well.... again might ask over on the HOTROD forum and see what people think over there - since most people don't run full fenders the pool of info is quite small.... more food for thought.
FFR 1879, Blown DSS 306,REDLINE management, VeryCoolParts Tuned 460RWHP
FFR 818S, The Flash, Chassis #5, 2.0L, LSD, Electromotive TEC-S, VCP Tuned, 278RWHP 265 RWTQ
FFR 6651, Green Lantern, 408W Crate, Hellion 66mm Turbo, JGS Waste gate / Blowoff valve, Tec-GT management, VCP Tuned, 575 RWHP, 690 RWTQ
FFR 8335, Black Mamba, 289 FIA CSX 2001 tribute car, 347, 48 IDA webers, VCP Tuned, 311 RWHP 386 RWTQ, 3-link, Trigo's
FFR 0004, Gen 3 , Hawk Coupe, Coyote twin turbo, 683 RWHP 559 RWTQ, IRS, VCP Tuned. "not too shabby"
US ARMY Maintenance Test Pilot (CW4 Retired)
-
01-26-2022, 12:54 PM
#315
Senior Member
Originally Posted by
Erik W. Treves
Paul - while the bottom of the engine bay is open - I can tell you (for me) riding around in the HOT ROD during the power tour that heat does tend to get "stuck" in the engine compartment since the air going through the rad - also hot.... it got bad enough for the boys 100+ out for 4-5 hours - that they put the hot rod in the trailer and jumped in the roadster.... my 427W truck was pretty warm as well.... again might ask over on the HOTROD forum and see what people think over there - since most people don't run full fenders the pool of info is quite small.... more food for thought.
Good input. Thanks. Mine does have the double insulated floor, which I think was a later add. And I do have what I hope is a good functioning Vintage Air setup. But your point is valid. Probably I could be swayed if I found some vents I liked. It would be best if I'm going to install to do so before body and paint. Don't like cutting on a finished car. Plus the vents might need paint as well. Will keep looking.
Build 1: Mk3 Roadster #5125. Sold 11/08/2014.
Build 2: Mk4 Roadster #7750. Sold 04/10/2017.
Build Thread
Build 3: Mk4 Roadster 20th Anniversary #8674. Sold 09/07/2020.
Build Thread and
Video.
Build 4: Gen 3 Type 65 Coupe #59. Gen 3 Coyote. Legal 03/04/2020.
Build Thread and
Video
Build 5: 35 Hot Rod Truck #138. LS3 and 4L65E auto. Rcvd 01/05/2021. Legal 04/20/2023.
Build Thread. Sold 11/9/2023.
-
01-26-2022, 02:03 PM
#316
Right now what I am thinking is create a shape I like for the side vents. Create a wood plywood die and use perforated steel sheets. No idea which I like but something like these. https://www.mcmaster.com/wire-mesh/ This would press them into a pleasing shape that would fit in the cutout and not just look like they were glued in from the back. You could include other shapes in the die for something a little different. I was even thinking of including 33 in the middle of mine. But who knows I am a long way from that!
-
01-26-2022, 02:26 PM
#317
Paul,
What do you think of something like these? You might even be able to just create the full side panels from them.
https://twistedroadcustoms.com/colle...vered-pair-set
Dave
-
Post Thanks / Like - 1 Thanks, 1 Likes
-
01-27-2022, 05:49 PM
#318
Paul, On your a/c line the high side tap does not have to be at the compressor. They make in-line tap fittings that you may be able to splice into your existing discharge line. Another thought is if the system is charged and leak free you don’t absolutely have to have a readily accessible high side tap.
-
Post Thanks / Like - 1 Thanks, 1 Likes
-
01-27-2022, 11:41 PM
#319
Senior Member
Originally Posted by
McGuyver
Paul, On your a/c line the high side tap does not have to be at the compressor. They make in-line tap fittings that you may be able to splice into your existing discharge line. Another thought is if the system is charged and leak free you don’t absolutely have to have a readily accessible high side tap.
Thanks for the post. Thinking along the same lines. I didn't know Vintage Air (and others...) sell an in-line fitting with the tap. But found 35826-VUG on their website a couple days after I posted the update. Unless a better idea comes along, will probably cut one of those into the existing line and orient the tap so it's not an issue. Will likely replace the existing 90 degree end with one without a tap. Pretty easy fix. I vacuumed out the system to confirm no leaks (still holding) but haven't charged it yet.
Build 1: Mk3 Roadster #5125. Sold 11/08/2014.
Build 2: Mk4 Roadster #7750. Sold 04/10/2017.
Build Thread
Build 3: Mk4 Roadster 20th Anniversary #8674. Sold 09/07/2020.
Build Thread and
Video.
Build 4: Gen 3 Type 65 Coupe #59. Gen 3 Coyote. Legal 03/04/2020.
Build Thread and
Video
Build 5: 35 Hot Rod Truck #138. LS3 and 4L65E auto. Rcvd 01/05/2021. Legal 04/20/2023.
Build Thread. Sold 11/9/2023.
-
01-29-2022, 12:03 PM
#320
PLATNUM Supporting Member


All I can ad is after building 3-33's and a 35 if you run fully enclosed sides your vehicle will overheat in weather above 80 degrees. Especially using the A/C. Most hot rod guys here in FL take their sides off in warm weather to avoid overheat problems. Michigan is much cooler than FL so maybe not the same. Not sure how many days above 80 you get up there. Best of luck.
16+ FFR kits and counting!


 Thanks:
  Likes:


 Reply With Quote


