-
08-05-2022, 10:52 AM
#201
Senior Member

Hi John. Would you mind providing the link to the vendor? Want to make sure I get my fair share. 
Chris
Coupe complete kit delivered: 4/22/24.
Build Thread. Coyote. T-56. IRS w/3.55. Wilwoods. PS. HVAC. Side windows.
MK4 Complete kit.
Build Thread Index. Delivered: 10/15/2020. Legal: 7/25/23. Coyote Gen3. TKO600 (0.64 OD). IRS w/3.55. PS. Wilwoods. Sway bars. This build is dedicated to my son, Benjamin.
Build Thread.
-
Post Thanks / Like - 0 Thanks, 1 Likes
-
08-08-2022, 11:26 AM
#202
Senior Member

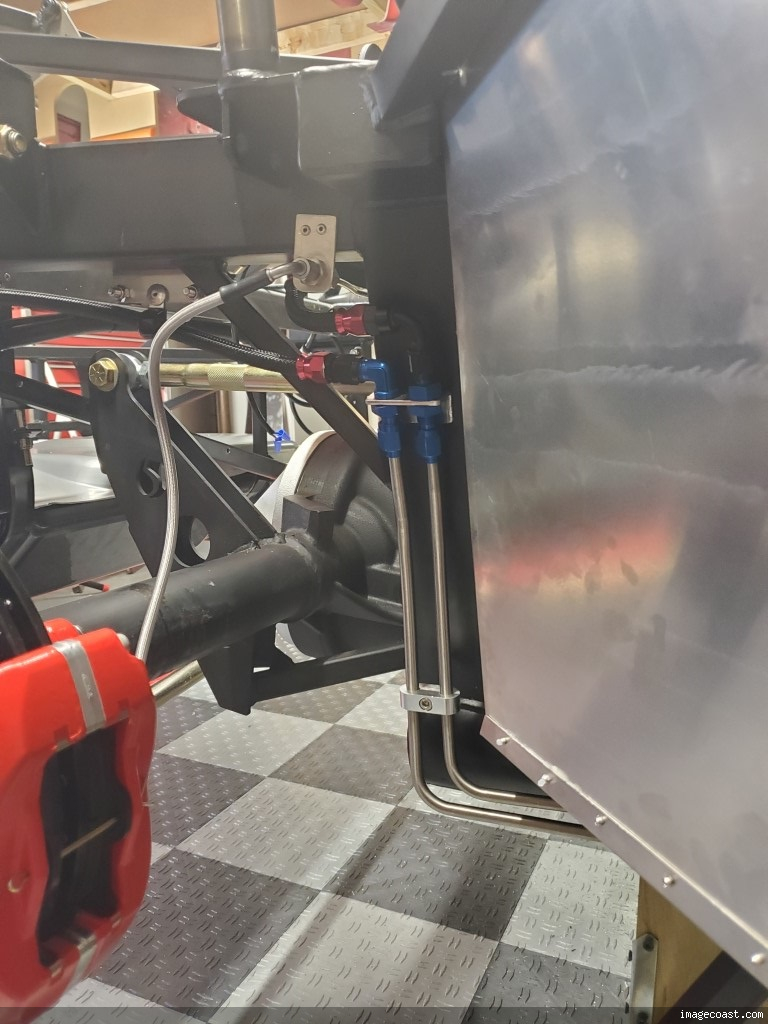
A bit of two steps forward and one back this weekend. With the power steering hoses hooked up and Honda power steering fluid in hand, I decided to fill the system over the weekend. Was greeted with a small pool of fluid on the garage floor under the reservoir on Sunday morning. The 6AN fitting was dry under the reservoir so that's not a problem. Lots of mating surface on the 10-AN connection, so I tightened that up a bit but still have a leak, maybe slower, I'm not sure. I then noticed there was some fluid pooled right around the bottom of the reservoir, above the 10AN hose and connector. Unless power steering fluid can wick up on metal, that raises concerns about the reservoir welds and the bottom of the reservoir itself. I now have duct tape wrapped around the exit from the reservoir, just above the connection to the 10AN hose. I should be able to tell if the fluid is running down the outside of the tape, which would mean the reservoir gets drained and replaced, or on the inside, in which case I have a problem with either my connection or my hose end. Not a huge step backward to drain the reservoir and replace if that's the case.
Meanwhile, plenty of other stuff to do. I finished off all the cockpit sound mat. The transmission tunnel top has the hole in the wrong place for my T5 shifter, so that's getting attention next. I have some extra blocking plates, so rather than getting a new tranny tunnel top, I'll patch the existing one and redrill in the right location. I'm planning on a padded & leather covered top, so the patch has to be absolutely flush with the top surface of the cover. I think this is a time when epoxy is a better choice than silicone (I'm not sealing two panels as much as creating one permanent panel). Unless someone chimes in with "bad idea", that's the direction I'm headed.
MK4 #7838: IRS 3.55 TrueTrac T5z Dart 347
The drawing is from ~7th grade, mid-1970s
Meandering, leisurely build thread is
here
-
Post Thanks / Like - 0 Thanks, 1 Likes
-
08-08-2022, 02:17 PM
#203
Senior Member
... and the verdict is ... power steering fluid on the outside of the tape, dry on the side. Tonight the reservoir comes out for return for a replacement.

Untitled by John Ibele, on Flickr
MK4 #7838: IRS 3.55 TrueTrac T5z Dart 347
The drawing is from ~7th grade, mid-1970s
Meandering, leisurely build thread is
here
-
08-08-2022, 03:46 PM
#204
Member

I experienced the heater template issue as well, nice job!
-
Post Thanks / Like - 1 Thanks, 0 Likes
-
08-08-2022, 04:59 PM
#205
Senior Member

Originally Posted by
Zach Bohn

I experienced the heater template issue as well, nice job!
Yeah, the heater template inaccuracy was on my radar, but my downfall was trying to 'improve' on the sheet metal screws that come with the heater. I'll think through things more carefully before trying something like that again (famous last words ...). In the end, thanks to those fasteners, I ended up where I wanted.
MK4 #7838: IRS 3.55 TrueTrac T5z Dart 347
The drawing is from ~7th grade, mid-1970s
Meandering, leisurely build thread is
here
-
08-16-2022, 09:56 AM
#206
Senior Member
My wife and I got away for a weekend of sea kayaking in Lake Superior last weekend, so not much to report on the build front. Great weekend and big adventure on the lake.
I did manage to sneak out to the garage before and after the trip to make some progress on the tranny cover. With my T5 and Steeda shifter, the oval cutout location in the FFR cover doesn't quite work for me. I put in a patch using JBWeld, and held in place with some countersink / flush rivets. A little sanding after our trip and its ready to go.

Untitled by John Ibele, on Flickr

Untitled by John Ibele, on Flickr
The 4" hole is about as big as I can go to stay inside the trim ring, but the Steeda rubber gasket still hits the edge of the hole in a few places ... a few relief notches should take care of that and still be under the trim ring.
My replacement power steering reservoir is due arrive in a few days, so I can hopefully take two steps forward again. If you ever have to do a defective part return to Summit, I hope your experience is as easy as mine was. I've done returns before, but when you select 'damaged or missing' in the online process, it seems targeted toward problems created by shipping. So I called. Less than 10 minutes later, I had a replacement part being shipped to me, with apologies for the inconvience and no need to return the defective part. I'm guessing they have a customer profile that tells them that's the right decision to make, but regardless of how they get there, that was top notch service.
MK4 #7838: IRS 3.55 TrueTrac T5z Dart 347
The drawing is from ~7th grade, mid-1970s
Meandering, leisurely build thread is
here
-
Post Thanks / Like - 1 Thanks, 2 Likes
-
08-18-2022, 01:18 PM
#207
Senior Member
Got my replacement reservoir in place and hoses hooked back up last night, was greeted with this when checking this morning ... same leak, same spot on the reservoir.
At some point, this might start to get frustrating.

Untitled by John Ibele, on Flickr
Current plan is to call Summit and let them know they have more than a one-off kind of problem, and then either get a tested replacement unit or find an alternate unit. One that's more in line with the 'you get what you pay for' idea. Then fab a new bracket that fits the new reservoir. That fits the holes I've drilled and tapped in the frame.
MK4 #7838: IRS 3.55 TrueTrac T5z Dart 347
The drawing is from ~7th grade, mid-1970s
Meandering, leisurely build thread is
here
-
08-18-2022, 08:31 PM
#208
Senior Member
Originally Posted by
John Ibele
I put in a patch using JBWeld, and held in place with some countersink / flush rivets. A little sanding after our trip and its ready to go.
If you ever have to do a defective part return to Summit, I hope your experience is as easy as mine was. I've done returns before, but when you select 'damaged or missing' in the online process, it seems targeted toward problems created by shipping. So I called. Less than 10 minutes later, I had a replacement part being shipped to me, with apologies for the inconvience and no need to return the defective part. I'm guessing they have a customer profile that tells them that's the right decision to make, but regardless of how they get there, that was top notch service.
Looks like your tranny cover is getting into the shape you need. I like me some JB Weld too, John. Used it a number of times on my build. Great stuff!
Summit Racing customer service? Couldn't agree more with you! They have become one of my favorite online vendors. A few months back I mistakenly ordered the old school (green) coolant for my Coyote. The local shipping depot wanted $80+ to ship back two gallon jugs--"hazardous" materials and all. A little tough to stomach given the free shipping from Summit (orders over $99) to me. I called Summit and fessed up to my mistake. They gave me a refund for both gallon jugs, and didn't ask for me to return them. They treat me as if they want a customer for life. I'm in!
P.S. sorry to hear about your second round of power steering leak. You strike me as a man of patience. Hang in there!
Chris
Coupe complete kit delivered: 4/22/24.
Build Thread. Coyote. T-56. IRS w/3.55. Wilwoods. PS. HVAC. Side windows.
MK4 Complete kit.
Build Thread Index. Delivered: 10/15/2020. Legal: 7/25/23. Coyote Gen3. TKO600 (0.64 OD). IRS w/3.55. PS. Wilwoods. Sway bars. This build is dedicated to my son, Benjamin.
Build Thread.
-
Post Thanks / Like - 1 Thanks, 0 Likes
-
08-19-2022, 05:52 AM
#209
Senior Member
Originally Posted by
460.465USMC
Looks like your tranny cover is getting into the shape you need. I like me some JB Weld too, John. Used it a number of times on my build. Great stuff!
Summit Racing customer service? Couldn't agree more with you! They have become one of my favorite online vendors. A few months back I mistakenly ordered the old school (green) coolant for my Coyote. The local shipping depot wanted $80+ to ship back two gallon jugs--"hazardous" materials and all. A little tough to stomach given the free shipping from Summit (orders over $99) to me. I called Summit and fessed up to my mistake. They gave me a refund for both gallon jugs, and didn't ask for me to return them. They treat me as if they want a customer for life. I'm in!
P.S. sorry to hear about your second round of power steering leak. You strike me as a man of patience. Hang in there!
Thanks, Chris. I know every build has a thing or two like this, or worse. Nothing like having to pull a radiator to get a weld fixed, for example. In the meantime I’ve got other things to do to keep pushing toward first start - roll bars, side pipes, final checkout of wiring, but other than that the list is getting pretty short. Good motivation to keep forging ahead.
MK4 #7838: IRS 3.55 TrueTrac T5z Dart 347
The drawing is from ~7th grade, mid-1970s
Meandering, leisurely build thread is
here
-
Post Thanks / Like - 0 Thanks, 1 Likes
-
08-19-2022, 12:04 PM
#210
Senior Member

I personally hate running over the same real estate twice. It's actually a dysfunction of mine I have to push through so I feel your pain.
How is that fitting attached to the reservoir? is that welded, pressed in, or threaded? I'm curious if there is an opportunity to improve that item.
MK4 #10008 - Ordered 10/06/20, Delivered 03/03/21, First Start 7/22/21, First Go Kart 7/24/21
Paint by Metal Morphous 5/14/22, Legally registered 6/8/22, Graduated 7/20/22
Build Thread
https://thefactoryfiveforum.com/show...been-delivered
Complete Kit, Ford 306, Sniper/Dual Sync, T5, Hydraulic clutch
-
Post Thanks / Like - 1 Thanks, 0 Likes
-
08-19-2022, 02:40 PM
#211
Senior Member
Originally Posted by
Blitzboy54
I personally hate running over the same real estate twice. It's actually a dysfunction of mine I have to push through so I feel your pain.
How is that fitting attached to the reservoir? is that welded, pressed in, or threaded? I'm curious if there is an opportunity to improve that item.
Hey Jesse, welded on the inside of the reservoir, so the gap that shows isn’t directly indicative of a problem. I’ll give Summit a ring to let them know there’s a problem with that product. Would’a done it earlier but I picked up a drill to put holes in roll bars. Seemed like a good way to blow off steam ")
MK4 #7838: IRS 3.55 TrueTrac T5z Dart 347
The drawing is from ~7th grade, mid-1970s
Meandering, leisurely build thread is
here
-
08-20-2022, 06:20 PM
#212
Senior Member
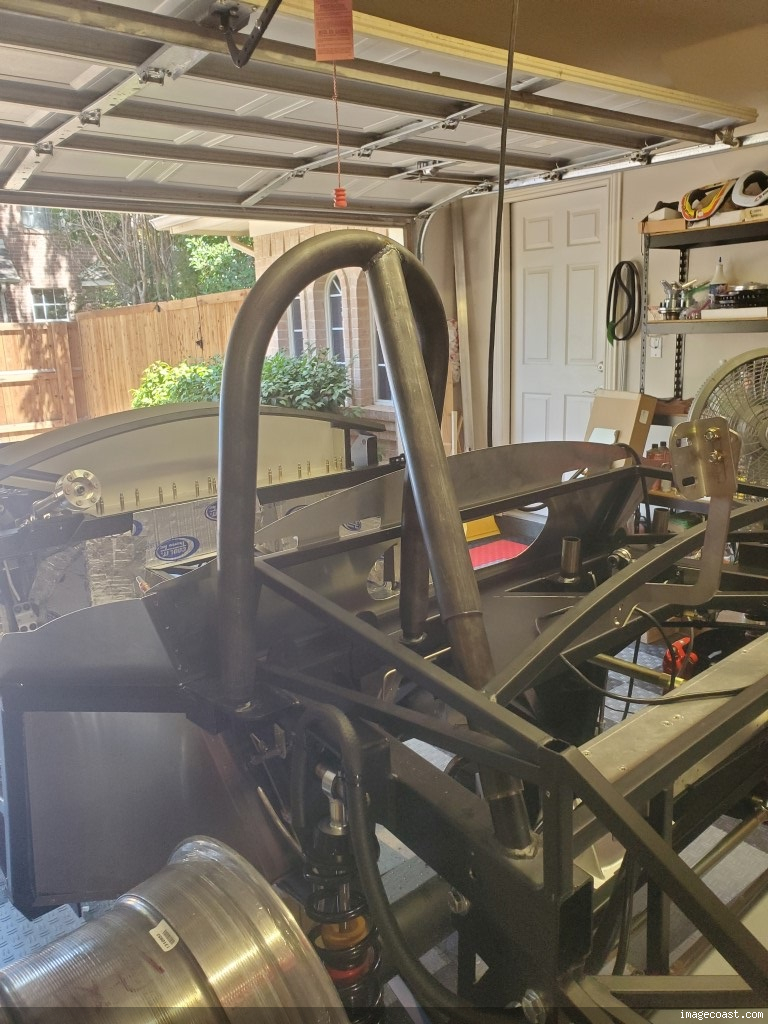
Roll bars are in. Sharp drill bits and stepping up to 5/16" worked fine for me. I did do some filing at the end of one of the rear bars to get everything flush at the joint.
I decided to use 3/8-16 SS set screws to attach the rear reinforcing bar to the roll bar. This is not a recommendation, simply a personal choice. I figured shearing this would take a rough trip upside down and backwards in the car, and in that case, the fact that I used 3/8" SS set screws rather than the 5/16" frankenstein bolts wouldn't show up on my list of regrets.
Looks pretty good, I think. With a lighter stripe and roll bar color they should blend in even better. I put the set screw on the inside facing part of the bar, so it doesn't show from the front, rear, or near side of the car when you're on the side.

Untitled by John Ibele, on Flickr

Untitled by John Ibele, on Flickr
MK4 #7838: IRS 3.55 TrueTrac T5z Dart 347
The drawing is from ~7th grade, mid-1970s
Meandering, leisurely build thread is
here
-
Post Thanks / Like - 1 Thanks, 1 Likes
 zee
zee thanked for this post
-
08-22-2022, 03:10 PM
#213
Senior Member
The set screws disappear into the background well, John. Clever idea!
Chris
Coupe complete kit delivered: 4/22/24.
Build Thread. Coyote. T-56. IRS w/3.55. Wilwoods. PS. HVAC. Side windows.
MK4 Complete kit.
Build Thread Index. Delivered: 10/15/2020. Legal: 7/25/23. Coyote Gen3. TKO600 (0.64 OD). IRS w/3.55. PS. Wilwoods. Sway bars. This build is dedicated to my son, Benjamin.
Build Thread.
-
Post Thanks / Like - 1 Thanks, 0 Likes
-
08-22-2022, 10:09 PM
#214
Senior Member
Installed my single homemade line clamp to attach the 3/8" hard fuel line in the engine bay. Holy cow, I'd have to get more efficient and add a few key bench tools if I were going to make any more. Not for this car.

Untitled by John Ibele, on Flickr
MK4 #7838: IRS 3.55 TrueTrac T5z Dart 347
The drawing is from ~7th grade, mid-1970s
Meandering, leisurely build thread is
here
-
08-23-2022, 08:32 AM
#215
Senior Member

Originally Posted by
John Ibele
Installed my single homemade line clamp to attach the 3/8" hard fuel line in the engine bay. Holy cow, I'd have to get more efficient and add a few key bench tools if I were going to make any more. Not for this car.
Untitled by
John Ibele, on Flickr
That's where a bulkhead fitting and a simple piece of aluminum angle comes in handy.
-
Post Thanks / Like - 0 Thanks, 1 Likes
-
08-23-2022, 10:15 AM
#216
Senior Member
Originally Posted by
John Ibele
Roll bars are in. Sharp drill bits and stepping up to 5/16" worked fine for me. I did do some filing at the end of one of the rear bars to get everything flush at the joint.
I decided to use 3/8-16 SS set screws to attach the rear reinforcing bar to the roll bar. This is not a recommendation, simply a personal choice. I figured shearing this would take a rough trip upside down and backwards in the car, and in that case, the fact that I used 3/8" SS set screws rather than the 5/16" frankenstein bolts wouldn't show up on my list of regrets.
Looks pretty good, I think. With a lighter stripe and roll bar color they should blend in even better. I put the set screw on the inside facing part of the bar, so it doesn't show from the front, rear, or near side of the car when you're on the side.
Untitled by
John Ibele, on Flickr
Untitled by
John Ibele, on Flickr
This is dadgum genius John. Mine are currently un bolted as I didn't want the big bolt. In reality the bolt doesn't really do very much. It is secured from 3 points and on a sleeve. It can't really come loose but it does have just enough movement that it clanks a bit. I am going to copy this very soon.
MK4 #10008 - Ordered 10/06/20, Delivered 03/03/21, First Start 7/22/21, First Go Kart 7/24/21
Paint by Metal Morphous 5/14/22, Legally registered 6/8/22, Graduated 7/20/22
Build Thread
https://thefactoryfiveforum.com/show...been-delivered
Complete Kit, Ford 306, Sniper/Dual Sync, T5, Hydraulic clutch
-
Post Thanks / Like - 1 Thanks, 0 Likes
-
08-23-2022, 10:44 AM
#217
Senior Member
Originally Posted by
Blitzboy54
This is dadgum genius John. Mine are currently un bolted as I didn't want the big bolt. In reality the bolt doesn't really do very much. It is secured from 3 points and on a sleeve. It can't really come loose but it does have just enough movement that it clanks a bit. I am going to copy this very soon.
I thought so too, Jesse, which is why I copied another builder who didn’t happen to put it in their build thread 
MK4 #7838: IRS 3.55 TrueTrac T5z Dart 347
The drawing is from ~7th grade, mid-1970s
Meandering, leisurely build thread is
here
-
08-23-2022, 10:56 AM
#218
Senior Member
Originally Posted by
Mike.Bray
That's where a bulkhead fitting and a simple piece of aluminum angle comes in handy.
Faster, just as secure and good looking. Which just underscores why your lines look so awesome on your build. Looks great Mike!
MK4 #7838: IRS 3.55 TrueTrac T5z Dart 347
The drawing is from ~7th grade, mid-1970s
Meandering, leisurely build thread is
here
-
Post Thanks / Like - 1 Thanks, 0 Likes
-
08-23-2022, 11:20 AM
#219
Senior Member

Originally Posted by
Blitzboy54
This is dadgum genius John. Mine are currently un bolted as I didn't want the big bolt. In reality the bolt doesn't really do very much. It is secured from 3 points and on a sleeve. It can't really come loose but it does have just enough movement that it clanks a bit. I am going to copy this very soon.
520 speedworks offers a boltless roll bar kit as another option as well.
-
Post Thanks / Like - 0 Thanks, 1 Likes
-
08-23-2022, 11:50 AM
#220
Senior Member
I went with the Breeze roll bar for a variety of reasons. I don't like the "paperclip" tall bar from FFR, the Breeze ones is more like the original in tube size and height. And the fasteners are hidden under the body.
-
08-23-2022, 11:54 AM
#221
Senior Member
Chewy, Mike, good options to highlight, and I seriously considered both. I just decided to keep my money in my pocket for this round.
Last edited by John Ibele; 08-23-2022 at 01:07 PM.
MK4 #7838: IRS 3.55 TrueTrac T5z Dart 347
The drawing is from ~7th grade, mid-1970s
Meandering, leisurely build thread is
here
-
08-23-2022, 01:35 PM
#222
Senior Member
Originally Posted by
egchewy79
520 speedworks offers a boltless roll bar kit as another option as well.
Understood, It's also $160 for 2 roll bars and I already drilled my back tube. Getting all that to bind correctly and line up to the existing holes seems like a challenge.
MK4 #10008 - Ordered 10/06/20, Delivered 03/03/21, First Start 7/22/21, First Go Kart 7/24/21
Paint by Metal Morphous 5/14/22, Legally registered 6/8/22, Graduated 7/20/22
Build Thread
https://thefactoryfiveforum.com/show...been-delivered
Complete Kit, Ford 306, Sniper/Dual Sync, T5, Hydraulic clutch
-
08-23-2022, 08:07 PM
#223
Senior Member
Tank Vent
I'm going with this for now. There will be plenty of time with the body off to put on a filter if I smell gas, if not time to figure out how gasoline vapors can be simultaneously heavier and lighter than air in order to get through the vent hose.

Untitled by John Ibele, on Flickr
MK4 #7838: IRS 3.55 TrueTrac T5z Dart 347
The drawing is from ~7th grade, mid-1970s
Meandering, leisurely build thread is
here
-
09-15-2022, 09:53 PM
#224
Senior Member
Well, not much in terms of pictures or description of concrete progress to report, but it's not for lack of time in the garage. I'm soooooo close to first start, just have to verify spark and timing for the plug from #1, add coolant and fuel, and turn the key.
What's holding me up is the final checkout of wiring, and a problem with a short or low resistance to ground that is kicking my butt. I had checked each circuit - I thought - before moving the dash and dash harness to the car, but I obviously missed something. I've narrowed it down to the headlight wiring behind the dash. I've used the RT turn signal setup, and my stomp switch on the deadpedal is basically just the same wiring as is used for the standard dash switch. I added a relay to use the momentary switch on the turn stalk for flash-to-pass, but plenty of folks have done that and the circuit design for that is pretty clear and available elsewhere on the forum. So I need to go through that again to see if I can find the problem.
Everything works, but the first sign that something is wrong is that when I turn on the high beams, either with lights on and the stomp switch hit once, or done with the momentary on the turn stalk, I see a slight glow in my turn signal dash lights. Checking voltage read at a ground wire behind the dash, I have an alarming 9V ... wondering why I didn't let smoke out at that point ... and a low resistance (77 Ohm) between the dash ground wire and the 12V on my bus bar behind the dash.
So, something clearly not right. Hard to get help from the forum until I can formulate a more specific, coherent question. Frustrating, but as can be said about just about any builder, I'm nothing if not persistent. I'll find it.
Last edited by John Ibele; 09-15-2022 at 10:04 PM.
MK4 #7838: IRS 3.55 TrueTrac T5z Dart 347
The drawing is from ~7th grade, mid-1970s
Meandering, leisurely build thread is
here
-
09-15-2022, 11:17 PM
#225
Senior Member

G'day John,
I think you might have a bad ground connection. This is usually the case when you see other lamps glow when a high load like the headlamp is turned on. Current will try and find its way back to ground any way it can, If it passes through a lamp on the way, then the filament will likely glow.
Tracing the fault:
1. Measure DC volts between the battery negative post and the ground wire behind the dash. With the high beam switched on you should see less than 1 volt of drop between these 2 points. Any more than that will definitely indicate a bad ground connection between battery negative and your ground wire.
2. Make sure you also measure your battery volts with the high beam on, maybe your battery is weak also.
As for the electrical short:
A measurement of 77 ohms between the ground wire and the positive bus is not something to be concerned about as far as a short circuit.
Current = Voltage/Resistance = 12/77 = 0.16 amps.
0.16 amps will discharge your battery in a week or 2, but is definitely not considered a short. Maybe you were measuring your gauge lights or similar low current device that was switched on?
Let us know how you get on. Always happy to help.
Nigel
Mk.4 FFR supplied Right hand drive
Received 12/2012 completed 12/2019
Gen1 Coyote / TKO600 / IRS
Lots of mods to make compliant for Australian design rules
-
Post Thanks / Like - 1 Thanks, 0 Likes
-
09-15-2022, 11:28 PM
#226
I feel you John.... Been frustrated with my electrical too. I had everything perfect and then, after adding my dashboard and tightening up the "rats nest" I had no turn signal. I traced it to the ignition feed where I had used a cheaper connection that failed. My $1 connector cost me 3-4 hours of tracing. Replaced that connector with a $11 Weather Pack and no issues since. You get what you pay for. Looking forward to your first start... I'm not far behind you.
Ted
#10333 Complete Kit, Carbed 427w, TKX, IRS and many other upgrades
- Order Date: September 11, 2021 - 20th Anniversary of 9/11
- Delivery Day: April 1, 2022 - April Fool's Day
- First Start and Go-Kart: January 20th, 2023
- Graduation Date: July 4th, 2023 - Independence Day!!
- Legal Registration Date: October 4, 2023 - My Birthday!!
Visit my MKIV Build Thread (#10333)
-
Post Thanks / Like - 1 Thanks, 0 Likes
-
09-16-2022, 08:46 AM
#227
Not a waxer

John,
I'm with Nigel and it sounds like it's seeking a ground. A quick check in the interest of isolation is to unplug the headlights and try it; this will remove the big draw load from the circuit. If you still get the glow it would indicate an issue with the dashboard high beam indicator or it's associated wiring.
Good luck...these sort of gremlins can drive you batty!
Jeff
-
Post Thanks / Like - 1 Thanks, 0 Likes
-
09-16-2022, 12:33 PM
#228
Senior Member
Ted, Nigel, Jeff, thanks a bunch for the encouragement and the tips and reminders. I'm fairly confident based on both Nigel and Jeff's suggestions that I'm dealing with a ground / wiring issue on the dash or within the dash harness, which would significantly help in bounding the problem. From there I should be able to trace it ... good weekend project.
MK4 #7838: IRS 3.55 TrueTrac T5z Dart 347
The drawing is from ~7th grade, mid-1970s
Meandering, leisurely build thread is
here
-
09-16-2022, 01:45 PM
#229
Senior Member
So close to first start, John! Really looking forward to hearing your build come to life and rumble!
I think it's difficult to get to First Start without at least one electrical stutter-step. I had mine. Best wishes for getting it tracked down and resolved this weekend. Reading about some of your other cool solutions, I know you'll get to the root cause in short order. Just don't feed that Gremlin after midnight, expose it to light, or let it get wet.
Chris
Coupe complete kit delivered: 4/22/24.
Build Thread. Coyote. T-56. IRS w/3.55. Wilwoods. PS. HVAC. Side windows.
MK4 Complete kit.
Build Thread Index. Delivered: 10/15/2020. Legal: 7/25/23. Coyote Gen3. TKO600 (0.64 OD). IRS w/3.55. PS. Wilwoods. Sway bars. This build is dedicated to my son, Benjamin.
Build Thread.
-
09-17-2022, 01:01 PM
#230
Senior Member
Well, that wasn't so bad after all.
I have LED dash lights, and after experiencing the full strength of these things in a dim garage and practically searing my eyeballs, I decided I wasn't going to live with those on a nighttime drive.
So I triggered a relay with the headlight switch, and I used this to toggle between a direct connection to ground for the dash lights when the headlights are off, to a second path through an LED dimmer when the headlights are on.
It's important to remember this when you're trying to diagnose a problem, because when you turn on the headlight switch, the ground for the dash lights doesn't read as ground on a multimeter. It will give you flaky voltage and resistance readings as the dimmer is connecting and interrupting the ground connection many times per second.
So ... wiring is good as far as it goes, but I still get 3 dimly lit dash lights whenever a fourth one is ON in dimmed condition, due to some back voltage induced by the PWM dimmer providing intermittent ground to the lit light (plus the other ones that are not on).
That's all well and good. I could leave the system as is without a problem. But dimly lit dash lights scream "home-built, quirky kit car", which is not a vibe I want to give off. So I tried using a diode in various spots to address the back voltage. Across the dimmer ... no good. Upstream and downstream from a dash light ... still no good. Finally I tried a diode across one of the dash lights, and this almost eliminates the problem. But not quite.
Does anyone know the right diode to use as a flyback diode in this situation? Of course I can do the Google search route but I'm happy to simply ask for the expertise of the builders on the forum at this point.
Worst case? I'll have a quirky feature on my home-built, quirky roadster. And be happy with it. Sure as heck not going to live with full-strength LED dash lights when driving at night. Every build is full of choices.
MK4 #7838: IRS 3.55 TrueTrac T5z Dart 347
The drawing is from ~7th grade, mid-1970s
Meandering, leisurely build thread is
here
-
09-17-2022, 08:05 PM
#231
John
How about a dimmer switch for the dash lights? I saw this thread. Maybe the recommended dimmer switch would help
https://thefactoryfiveforum.com/show...ges-and-wiring
Tom
-
Post Thanks / Like - 1 Thanks, 0 Likes
-
09-18-2022, 12:15 AM
#232
Senior Member
Originally Posted by
Gizmosrcool
Thanks Tom. The link you included relates to dimming the gauge lights, and with an older kit, I avoided the confusion created by Speed Hut’s change to the gauges. I should have been more specific: I converted to LED turn signal, bright indicator and hazard lights, and it’s these I’m working on dimming. With the right diode I should have it solved.
MK4 #7838: IRS 3.55 TrueTrac T5z Dart 347
The drawing is from ~7th grade, mid-1970s
Meandering, leisurely build thread is
here
-
09-18-2022, 10:42 PM
#233
Senior Member
I made up 3 of these - one for each dash light with the problem - and installed across the two turn indicators and the high beam indicator light. The hazard light is wired with a 515 Ohm resistor across it already.

Untitled by John Ibele, on Flickr
With dash lights now hooked into this setup, the glow through the non-lit lights when I'm using the PWM dimmer goes away. Everything works right on the dash now, so I'm moving on.
MK4 #7838: IRS 3.55 TrueTrac T5z Dart 347
The drawing is from ~7th grade, mid-1970s
Meandering, leisurely build thread is
here
-
Post Thanks / Like - 0 Thanks, 1 Likes
-
09-26-2022, 12:57 PM
#234
Senior Member
The first part of the weekend was devoted to closing up things 'up North', but so-called rest day yesterday allowed for 6 hours in the garage. I love those big chunks of time when you can get into the flow of work on the car; they're much more productive than those hour long chunks that have represented the bulk of my build time. That can sometimes be an exercise in frustration, but the only greater frustration I can think of is not building one at all.
I've been sneaking up on first start items all week. I had disconnected all the Sniper electrical connections when first hooking up the dash and testing all functions with the battery hooked up. Once I had that all working properly, I hooked up the Sniper with the exception of the fuel relay connection to the fuel pump, which I'm leaving disconnected for now. After spending some time with the Sniper handheld screen I concluded that I'm ready to go with the Sniper. It has the same settings and distributor orientation as it had when it came off the dyno, so it should be ready to go.
Oil pressure and coolant temp look as though they're working, and the TPS went up to 86% when I bottomed out the gas pedal. There was a bit of room left on the throttle linkage, so after adjusting my stop botton for the accelerator I got the TPS to read 90% ... virtually indistiguishable from 100% in terms of position at the Sniper, so I'm leaving it there. I'd rather that than be pushing the mechanical throttle to the point of bottoming out.
I turned the key to the start position briefly, just to make sure the starter engages properly with the flywheel. All good to go there.
I had taped off around the bottom of my power steering reservoir to see if the bottom of the reservoir will stay fluid-free ... after 2 days, it's completely dry. So any slow leak has to be from one of my hose connections, which may be wicking up to the bottom of the reservoir (not sure that's a thing, but that's my only theory left for how I acculated a drop of fluid on the bottom of the reservoir after several days). I gave the 10AN fitting another turn of the wrench ... there's a fair amount of mating surface on that connection, so maybe I didn't have it tight enough. I'll check it again this evening.
I picked up some Li-based chassis grease, loaded up the grease gun and greased all 14 lube points in the front of the car. I'm a little confused by the drive shaft lube points ... I see no zerk fittings anywhere on my (vintage 2012) drive shaft. I'll take off the trans cover and look from above this evening, but I don't think I'm missing anything. I sent Dan at FFR a quick note to verify, but if anyone on the forum has the answer I'm all ears.
Last on this item is to lube the IRS grease points ... only control arm ends, I believe. My second question to Dan was whether I should add zerk fittings to any control arm ends that don't have them. I greased these when I assembled the rear end, so they're at least okay for now.
I greased the turn signal flags on the RT turn signal assembly with some lithium bearing grease, loosened the set screws on the pillow block for the upper steering shaft, tightened down the steering wheel, set it to minimum clearance from the RT turn signal assembly, and tightened down the set screws again. Steering is good to go.
I added 2 1/2 gallons of non-oxy premium to the gas tank.
So I think that leaves me with this punch list:
- Finish with chassis lube.
- Lower the rear end, and add coolant (with car tilted to encourage air to move to the front and out the coolant fill spot).
- Plug in the fuel pump relay, and turn the key with the fuel line directed into a gas can. Repeat two more times to flush any contaminants and metal shavings out of the fuel lines.
- Hook the fuel line back up to the Sniper.
- Gather a few family members & friends if I'm feeling courageous.
- Set video to 'record'.
- Turn the key.
Let me know if you spot anything I'm missing.
MK4 #7838: IRS 3.55 TrueTrac T5z Dart 347
The drawing is from ~7th grade, mid-1970s
Meandering, leisurely build thread is
here
-
09-26-2022, 04:18 PM
#235
Senior Member
Originally Posted by
John Ibele
I picked up some Li-based chassis grease, loaded up the grease gun and greased all 14 lube points in the front of the car. I'm a little confused by the drive shaft lube points ... I see no zerk fittings anywhere on my (vintage 2012) drive shaft. I'll take off the trans cover and look from above this evening, but I don't think I'm missing anything. I sent Dan at FFR a quick note to verify, but if anyone on the forum has the answer I'm all ears.
That's a very small list, John. You're almost there! Good to hear you've eliminated your power steering pump as the leak source.
My driveshaft (circa 2020) doesn't have any zerks either.
I don't recall how long your motor has been sitting? In my case it was about 1.5 years, so I primed the motor by pumping in a couple quarts of oil through the oil pressure switch connection. Maybe you already did this? Throwing it out there just in case.
Chris
Coupe complete kit delivered: 4/22/24.
Build Thread. Coyote. T-56. IRS w/3.55. Wilwoods. PS. HVAC. Side windows.
MK4 Complete kit.
Build Thread Index. Delivered: 10/15/2020. Legal: 7/25/23. Coyote Gen3. TKO600 (0.64 OD). IRS w/3.55. PS. Wilwoods. Sway bars. This build is dedicated to my son, Benjamin.
Build Thread.
-
10-01-2022, 05:30 PM
#236
Originally Posted by
John Ibele
Let me know if you spot anything I'm missing.
Like Chris said I also primed my engine before the first start. Other that everything looks good John! Let's hear it!
-
10-07-2022, 03:03 PM
#237
Senior Member
Well, it finally happened. Here, in all its first-time-builder glory (it is a video, click picture or this link):

Untitled by John Ibele, on Flickr
Clearly I didn't expect the power steering fluid to cycle through with that much pressure, or that quickly ... or the coolant to slosh around quite so much.
Yucks aside, like most builders I don't like surprises. REALLY didn't like burping fluid on my engine. But after thinking about that a bit, I reminded myself you can't learn absolutely everything from talking and reading, you actually have to learn some things by doing. And mistakes like this are benign, easily learned, practical stuff. So no harm done.
My favorite part, though, is my flinch when the thing fired right up. Yikes, why didn't someone tell me these things make noise
Second time around, things were a bit more predictable (click picture or this link):

Untitled by John Ibele, on Flickr
To maximize chances of starting up promptly the first time, I stepped up to first start in stages:
- Checked out all my dash wiring on the bench with a couple 6V lantern batteries in series (would be better off with a current-limited power supply, good to have current protection in place even here)
- With the dash on the car, disconnected the fuel pump relay connection to the fuel pump, disconnected the Sniper connectors.
- Hooked up the battery and ensured proper operation of all non-Sniper connections with key in OFF and RUN positions.
- Turned key to START briefly just to ensure proper engagement of starter motor to flywheel.
- Hooked up Sniper connections but not the fuel relay / fuel pump, turned key to RUN and ensured proper operation of Sniper and familiarized myself with handheld interface.
- Disconnected flex fuel hose connection to Sniper and put end of hose in a gas can. Reconnected fuel relay to fuel pump. Cycled through key position OFF / RUN / OFF three times to flush fuel lines. Reconnected fuel hose to Sniper.
- Turned key to RUN to ensure proper fuel pressure at the fuel pressure gauge I installed just before the Sniper.
- My builder wasn't honestly very concerned about priming the engine after a long rest, and was much more concerned about ensuring that the engine wouldn't flood. I wanted to make sure I had 15* timing before starting the car:
- Again disconnected the fuel pump relay, and temporarily pulled all spark plug wires.
- Checked to ensure I had a spark at 15* on cylinder #1
- Connected all connectors, ready for first start.
Overall, very happy reaching this milestone, and having it go so well with all the important things which I did work to nail down in advance. I'm off in CO this week for a wedding and a nice break with the family, after which I'm excited for some more extended runs to make sure the Sniper gets into learning mode and the fan kicks on. After that, alignment and go-kart as the next big thing in the build, which should set me up pretty well for working on the body when the snow's flying in MN.
Last edited by John Ibele; 11-01-2022 at 01:49 PM.
MK4 #7838: IRS 3.55 TrueTrac T5z Dart 347
The drawing is from ~7th grade, mid-1970s
Meandering, leisurely build thread is
here
-
Post Thanks / Like - 0 Thanks, 4 Likes
-
10-07-2022, 04:01 PM
#238
John congratulations! I too had that twitch haha, it's a surreal feeling! Glad everything went well and I COMPLETELY understand the need for a break afterwards. All the anxiety built up needs to be released somehow :P. Hope you enjoy your break and can't wait to see your first go kart!
P.S. I love the big RF harness schematics on the side.
-
Post Thanks / Like - 1 Thanks, 0 Likes
-
10-07-2022, 04:02 PM
#239
Senior Member

Congratulations!! Very cool!
---------------------------
Jeff
-
Post Thanks / Like - 1 Thanks, 0 Likes
-
10-07-2022, 04:33 PM
#240
Senior Member
Originally Posted by
facultyofmusic
P.S. I love the big RF harness schematics on the side.
... eyes of a certain age'll do that to you 
MK4 #7838: IRS 3.55 TrueTrac T5z Dart 347
The drawing is from ~7th grade, mid-1970s
Meandering, leisurely build thread is
here


 Thanks:
  Likes:


 Reply With Quote


