BluePrint Engines

Visit our community sponsor

Thanks Thanks:  10
Likes Likes:  25
Page 12 of 28 FirstFirst ... 2101112131422 ... LastLast
Results 441 to 480 of 1104

Thread: Jazzman’s #8745 "Flip Top" Build

  1. #441
    Jazzman's Avatar
    Join Date
    Jan 2014
    Location
    Scottsdale, AZ
    Posts
    1,164
    Post Thanks / Like
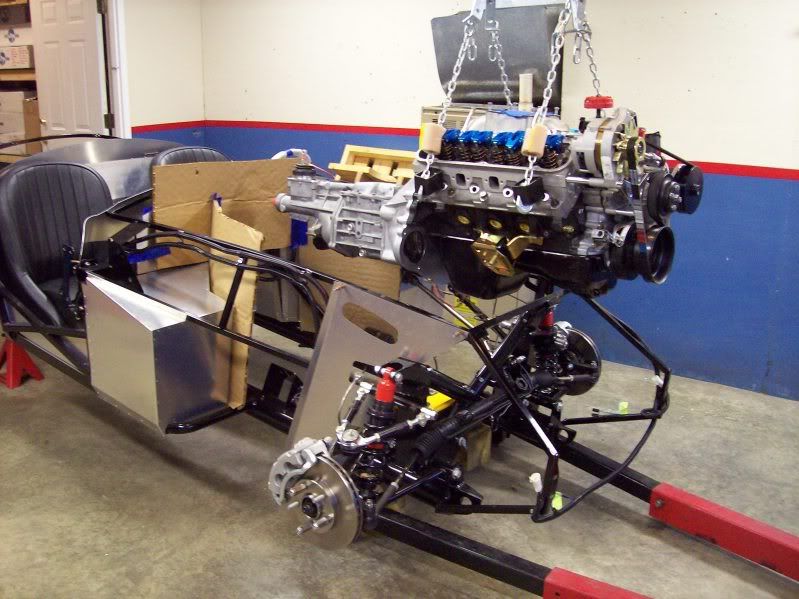
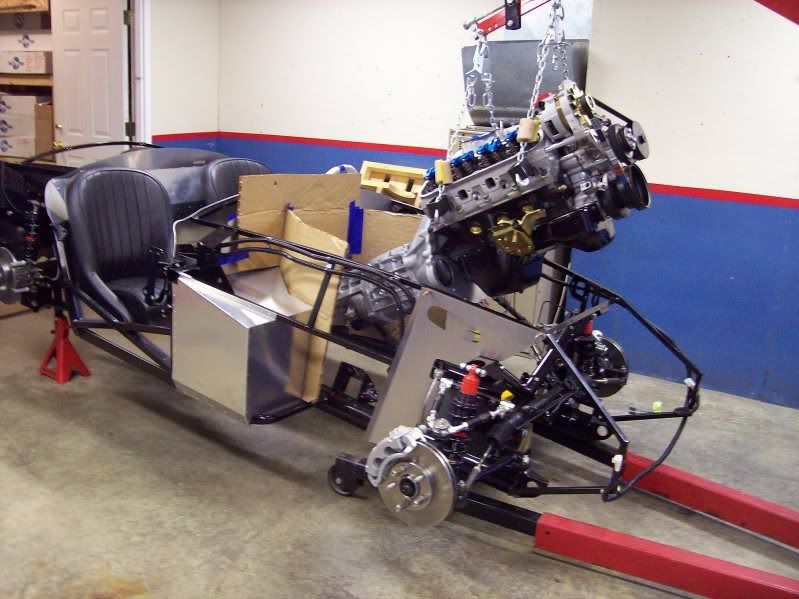
    So at this point it seems like it is time to attach the transmission to the engine. The engine is hanging from the shop crane at a decent angle. I tried several methods to attach a ratched tie down strap to the front of the engine to raise it. I found the one that worked was to attach one end of the strap to the bolt that holds the power steering pump to the engine, run the strap up over the top of the crane arm, then down to the lower leg where the other end was attached. Because the powersteering pump is attached with three bolts and a large steel bracket, I felt the weight of the end of the engine would be spread over three differnt points on the engine block. It worked. With the help of my lovely assistant, a bit of sweat and multiple adjustments on the crane, the leveling tie strap, and the position of the transmission, we finally got the transmission shaft to slide completely into the clutch and seat on the bearing. It was a very good feeling! Until . . .


    Now I am a lover of chrome, a fan of bright and shiny objects. To my mind, they belong out in the open where they can be enjoyed. So it never occurred to me that this lovely piece of bling would get completely buried between the tranny and the bell housing. Needless to say, we reluctantly pulled the tranny back out of the clutch assembly, slid the mating ring onto the housing of the tranny, and once again slid the shaft back into place. It did go easier this time. (Experience? Luck?)


    I found that the long bolts that come with Forte's Hydraulic clutch kit are the right size and length for their purpose, but I did not have the correct size shorter bolts for the PS side of the transmission. Off to Ace I went to buy two 7/16" x 1.25" grade 8 bolts. All the bolts fit into their holes easier the second time. Clearly the adapter/mating ring that we missed the first time is important. Loctite and lock washers again, but still no known torque specs. I tighened them "appropriately".

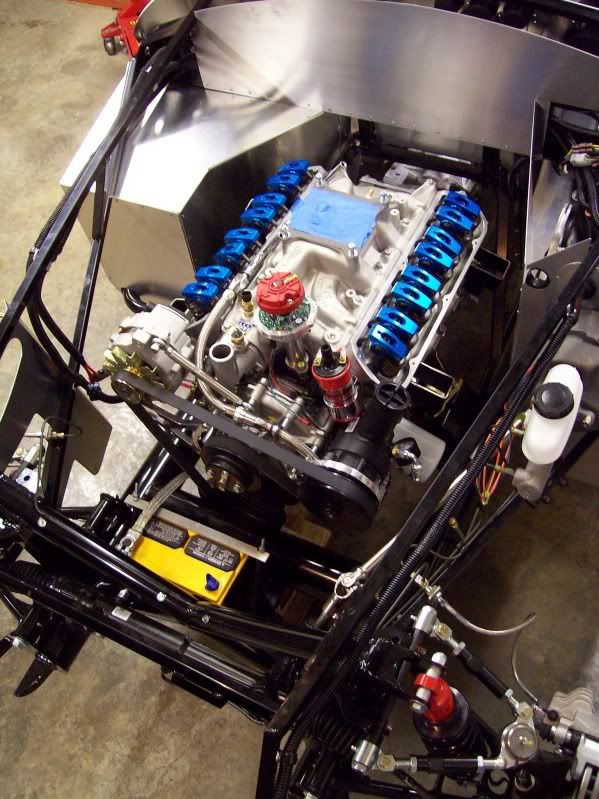
    The FFR Coyote installation instructions show replacing the stock oil pressure gauge sending unit. I have two issues with this. First, it looks very nicely installed into the coyote wiring harness, and second, I don't think I have the FFR supplies oil pressure gauge sending unit illustrated. I sure don't remember ever seeing one, and certainly can't find it now. What do you think? Should I replace the factory supplied oil pressure gauge sending unit?


    The FFR instructions also say to remove this plug, and replace it with a new water temperature sending unit supplied by FFR.


    I suspect this is the water temp sending unit that they are talking about, but it looks significantly different from the photos in the instructions, and I also don't have the adapter they list. I can get one at Ace, but should I?


    What do you think? is this the part? I can get an adapter at Ace, but should I?
    Jazzman

    MKIV #8745 "Flip Top" Roadster, Custom Tilt front, Coyote Engine, Tremec TKO600, Custom Interior. Best of Show winner, Huntington Beach Cruise In 2018.

    1967 Ford Mustang Coupe build thread updated 1/22/2021

    Roadster Frame Dolly Plan

  2. #442
    Jazzman's Avatar
    Join Date
    Jan 2014
    Location
    Scottsdale, AZ
    Posts
    1,164
    Post Thanks / Like
    I installed the starter. No drama at all. Three bolts, a bit of loctite. Easy Peasy.


    I installed the PS engine mount, but left the DS off. I have been warned that it is a lot easier to tighten the DS header bolts if that engine mounting unit is not in your way.


    The car is currently flat on the floor. After I have the engine partially installed, I will like need to put at least the front of the car up on jackstands to be able to get under it to install the lower and rearward header bolts, and possibly the engine mount bolts as well. I figured having the car as low as possible would be both easier and more safe as I put the engine in. However, if I need to lift the front of the car to access the rearmost header bolts, how will I do it without one engine mount installed?

    I was looking for other parts, specifically the oil pressure and water temperature sending units, and came across something I didn't remember I had: header bolts! I have 16 header bolts (8 each side), and four longer, thicker, with flanges around the head that I have no idea what they are for!!! Because FFR provided the header bolts, I returned the ones I had purchased, and removed all the header studs on both sides of the engine. I think I will like the look, a bit cleaner than the studs and nuts.


    I finished up the night starting to put a second layer of Thermo Tek insulation mat in the corner of the DS footbox. I wanted a second coat for insulation purposes, but it also serves another role. I covered the 4" round tube showing on the inboard side of the DS footbox, then carried this one piece partially up the inboard wall of the DS footbox. This provides a nice seal against water, but it also provides a backstop for the bead of silicone that I put into that corner from the engine bay side to completely seal up that seam against water entry. I will ultimately give all the panels near the headers a second coat of heat shielding. That will wait for another day.
    Jazzman

    MKIV #8745 "Flip Top" Roadster, Custom Tilt front, Coyote Engine, Tremec TKO600, Custom Interior. Best of Show winner, Huntington Beach Cruise In 2018.

    1967 Ford Mustang Coupe build thread updated 1/22/2021

    Roadster Frame Dolly Plan

  3. #443
    Senior Member edwardb's Avatar
    Join Date
    Feb 2011
    Location
    Lake Orion, Michigan
    Posts
    10,577
    Post Thanks / Like
    The oil pressure and water temp sending units are in the gauge box. They come with the gauges. They look just like the ones in the FF Coyote instructions. Assuming we're talking about Speedhut.

    Just make sure the header bolts you're considering are engaging as much of the threads in the head as possible. Check with the header and gasket, and confirm the amount of threads showing through are nearly the full depth.

    I install the engine with the chassis on wheel dollies. Easy to move around plus high enough to reach under for engine mounts, headers, etc.
    Build 1: Mk3 Roadster #5125. Sold 11/08/2014. Build 2: Mk4 Roadster #7750. Sold 04/10/2017. Build Thread
    Build 3: Mk4 Roadster 20th Anniversary #8674. Sold 09/07/2020. Build Thread and Video. Build 4: Gen 3 Type 65 Coupe #59. Gen 3 Coyote. Legal 03/04/2020. Build Thread and Video
    Build 5: 35 Hot Rod Truck #138. LS3 and 4L65E auto. Rcvd 01/05/2021. Legal 04/20/2023. Build Thread. Sold 11/9/2023.

  4. #444
    Jazzman's Avatar
    Join Date
    Jan 2014
    Location
    Scottsdale, AZ
    Posts
    1,164
    Post Thanks / Like
    Thanks Edwardb!! You officially sleep even less than I do!! It has to be almost 2 am there!! Welcome to the night owl club��!!
    Jazzman

    MKIV #8745 "Flip Top" Roadster, Custom Tilt front, Coyote Engine, Tremec TKO600, Custom Interior. Best of Show winner, Huntington Beach Cruise In 2018.

    1967 Ford Mustang Coupe build thread updated 1/22/2021

    Roadster Frame Dolly Plan

  5. #445
    Not a waxer Jeff Kleiner's Avatar
    Join Date
    Feb 2011
    Location
    Bloomington, Indiana
    Posts
    8,094
    Post Thanks / Like
    My engine installation recommendation---

    Get the chassis as high as is practical (make sure your jackstand placement won't interfere with the hoist legs as you roll it into position) with the nose down and tail up. Doing so reduces the amount of angle required on the engine & trans as you stab it into the tunnel. An engine leveler is invaluable and turns the process into a one man, 10 minute job:


    Good luck!

    Jeff

  6. #446
    Senior Member wareaglescott's Avatar
    Join Date
    Apr 2016
    Location
    Auburn, AL
    Posts
    2,146
    Post Thanks / Like
    2nd recommendation for the engine leveler. It is so tight getting the coyote in that I'm not sure we could have done it without multiple asjustmebts on the leveler along the way to make things work. Kind of like once we cleared something and then came to the next potential conflict we releveled to clear that and then moved to the next.

    My cheap harbour freight one worked great. However the plastic handle that comes with it is junk. I got some bolts and threaded rod and made a better handle. I would recommend that.
    Last edited by wareaglescott; 11-12-2016 at 07:21 AM.
    MK4 #8900 - complete kit - Coyote, TKO600, IRS - Delivered 6/28/16 First Start 10/6/16 Go cart - 10/16/16 Build completed - 4/26/17 - 302 days to build my 302 CI Coyote Cobra - Registered and street legal 5/17/17
    Build Thread http://thefactoryfiveforum.com/showt...e-build-thread
    PHIL 4:13 INSTAGRAM - @scottsrides

  7. #447
    cobra Handler skullandbones's Avatar
    Join Date
    Jul 2011
    Location
    Superstition Mtn foothills 5 miles west of Gold Canyon AZ
    Posts
    2,686
    Post Thanks / Like
    Blog Entries
    19
    Hi Kevin,

    Aren't we having fun! Your post caused those memories to flood back into my head. I remember how bizarre our set up was. I had the hoist set up to the side with the chassis on it's dolly facing down the garage pad which sounds crazy. However, it allowed me to inch the small block/trans straight into the tunnel without much adjustment on the engine angle. So basically the engine was pretty much level with the car angled down. My lovely assistant (I have one too) was at the end of a large anchor rope with belaying pin. She was somewhat bored during the process but managed it well. It is amazing when a plan works just like you see it in your head. The only sticking point was when the trans tail piece had to be raised a little to clear the mount and 4 inch tube. It was a ten minute process that should have taken longer but you are just thankful when things go your way. I have helped others do it similarly and find that the leveler is worth every penny you spent on it! If I didn't know better, I would say that little engine really wanted to be in a Cobra.

    Good luck and be extra careful.

    WEK.
    FFR MkIII 302 (ATK), EFI 75mm TB with custom box plenum chamber, 24# injectors, 4 tube BBK ceramic, cold air sys, alum flywheel, crane roller rockers, T5, Wilwood pedals, custom five link with Watt's link, 4 rotors, coil overs, power steering with Heidt valve, alum FFR rad, driver's crash bar mod, mini dead pedal mod, quick release steering wheel hub #6046

  8. #448
    2bking's Avatar
    Join Date
    Jul 2013
    Location
    Garland, Texas
    Posts
    799
    Post Thanks / Like
    Quote Originally Posted by Jazzman View Post
    I was looking for other parts, specifically the oil pressure and water temperature sending units, and came across something I didn't remember I had: header bolts! I have 16 header bolts (8 each side), and four longer, thicker, with flanges around the head that I have no idea what they are for!!! Because FFR provided the header bolts, I returned the ones I had purchased, and removed all the header studs on both sides of the engine. I think I will like the look, a bit cleaner than the studs and nuts.
    The studs and nuts are far superior to the bolts when aluminum is the material having threads. Ford puts them in there for this reason. I kept mine as it came from the factory but cut the studs to the minimum length so about one thread was showing when the nuts were torqued to spec to make the header installation easier. I did have to raise the engine off the DS mount to get that header on. I was able to get access all the nuts to tighten them although only about half of them can be accessed with a torque wrench.
    King
    Roadster #8127, ordered 7/12/13, received 9/11/13
    http://thefactoryfiveforum.com/showt...4-Coyote-Build

  9. #449
    Jazzman's Avatar
    Join Date
    Jan 2014
    Location
    Scottsdale, AZ
    Posts
    1,164
    Post Thanks / Like
    Quote Originally Posted by edwardb View Post
    The oil pressure and water temp sending units are in the gauge box. They come with the gauges. They look just like the ones in the FF Coyote instructions. Assuming we're talking about Speedhut.
    Thanks, you were right. I looked everywhere else, but I didn't look in the gauge box. There they were. You are amazing: You can find things in my garage from 2000 miles away!! Of course my wife says I can't find my sox in my drawer!
    Last edited by Jazzman; 11-12-2016 at 01:59 PM.
    Jazzman

    MKIV #8745 "Flip Top" Roadster, Custom Tilt front, Coyote Engine, Tremec TKO600, Custom Interior. Best of Show winner, Huntington Beach Cruise In 2018.

    1967 Ford Mustang Coupe build thread updated 1/22/2021

    Roadster Frame Dolly Plan

  10. #450
    Jazzman's Avatar
    Join Date
    Jan 2014
    Location
    Scottsdale, AZ
    Posts
    1,164
    Post Thanks / Like
    I took my bride out for breakfast this morning, then we headed to home Depot. I needed more silicone caulk, she wanted to look at tile and paint. I think that trip is going to be much more expensive in the future than it was today.

    It is good to have a friend with a full machine shop! According to those that have done the engine install before, I need a 3/4" spacer to hold up the rear end of the transmission. I went to Ace last night and considered using metal bushings or washers, but I wasn't sure that would be good enough. I called a good friend, and he quickly whipped up these beauties:


    Stack them up, and you get exactly 3/4" thick. While no one will ever really see it or notice, it is nice to know that these spacers are exactly 4"x2", the 1/2" holes are exactly centered in every direction within 1/10000"! Thus are the capabilities of a master craftsman and his mill!

    Back at the shop, I got to work on final, minor details. I added a second ground strap to the PS engine mount.


    I moved the engine and hoist over near the front of the car to see if I would be able to maneuver it in the space available. Just barely, but It should work.


    I applied caulk to the area where the inboard side of the DS Footbox meets the 4" frame tube. I laid in a generous supply, then leveled it out. Since it dries clear, it should be almost invisible once it hardens.

    I reattached the rear wiring harness to the corner of the tranny tunnel. It is high and tight, completely out of the way of the tranny/engine install.

    I dropped the front of the car so the wheels are on the ground, but left the tail end up on the jack stands. Appearantly this will make it easier to slide the engine in. Since I don't have an engine leveler, and would have the ability to attach it to my engine anyway, I want to make the process as easy as I can.

    I decided to remake the cable from the battery to the starter. It was just a bit short and I wanted to make sure to do it now while it was easier to access. Off to Ace to get more cable terminals. I also was lucky enough to find the 14mm Hex Key I needed to remove the plug from the water jacket. That is the biggest hex key they had, and the biggest I have ever seen. $10 for a one time use. Oh well, can't remove the plug without it. Home I go.


    After I returned, I started work on the oil pressure and water temperature sending units. I had all the pieces I needed for the oil pressure unit, but didn't want to fully install it before I had the water temp unit installed because it would be in the way. Unfortunatly I did not have the 3/4" to 1/2" adapter that was necessary to install the water temp sender. I did have the 1/2" to 1/8" NPT adapter. So back to Ace I go. Trip #2. I was looking for a 3/4" to 1/2" adapter, which they had, but they also had a 3/4" to 1/8"npt adapter. It would eliminate one adapter. Made sense to me, so I went with the single adapter. Back to the house.

    The water sender goes in without issue. Teflon tape, a bit of wrench work, and it is installed.


    Last edited by Jazzman; 11-12-2016 at 10:24 PM.
    Jazzman

    MKIV #8745 "Flip Top" Roadster, Custom Tilt front, Coyote Engine, Tremec TKO600, Custom Interior. Best of Show winner, Huntington Beach Cruise In 2018.

    1967 Ford Mustang Coupe build thread updated 1/22/2021

    Roadster Frame Dolly Plan

  11. #451
    Senior Member
    Join Date
    Feb 2011
    Location
    Bourne-Cape Cod, MA
    Posts
    813
    Post Thanks / Like
    Those tranny spacers are cool. Do you have the mount extension from FFR ? You will need one of those as well... as the transmission will be about 2 inches away from the "A" frame.


    .....never mind, I see it in post 441.
    FFinisher/AKA RE63

  12. #452
    Jazzman's Avatar
    Join Date
    Jan 2014
    Location
    Scottsdale, AZ
    Posts
    1,164
    Post Thanks / Like
    The oil pressure sending unit threaded right in. no problem. then I started attaching the wires to the sending units. The water temp was easy as it just clips in. However the oil pressure unit requires two wires. I attached the appropriate terminators on the wire ends, and covered it up in shrink wrap. With just a nut driver in hand, I put the wires on the posts, black to "G" (ground) and white to "S" (signal). Ground wire tighens up just fine. Then the signal terminal . . .


    Yep, it snapped off with just my hand held nut driver. Either I was suddenly overcome with Hulk-like strength, or this piece is really cheap! I removed it and headed over to the local O'Reily store to see if by some miracle they actually have one. This is the same store that never seems to have what I need. And this time . . . no surprise, they don't have this either. Of course their job of even figuring out what it is was significantly complicated by the fact that it has no manufacturers name, no part number, nothing to help identify it.

    So now I have three options. 1) put the engine in without the right part and try to fight access to it after the headers on on, 2) wait to install the engine until next week and call FFR on Monday, or 3) use the factory installed oil pressure sending unit. Since Ford put a sending unit in, wired it into the factory harness, and covered it with heat protection tape, why shouldn't I just use Ford's unit and connect up Ford's wiring? I think that is the direction I will go for now. It doesn't look like access to this area will be too bad after install. It is forward of the engine mounts, forward of the DS footbox, and rearward of the alternator. If you have thoughts on why I should use FFR's sender rather than the stock Ford piece, please let me know.
    Jazzman

    MKIV #8745 "Flip Top" Roadster, Custom Tilt front, Coyote Engine, Tremec TKO600, Custom Interior. Best of Show winner, Huntington Beach Cruise In 2018.

    1967 Ford Mustang Coupe build thread updated 1/22/2021

    Roadster Frame Dolly Plan

  13. #453
    Jazzman's Avatar
    Join Date
    Jan 2014
    Location
    Scottsdale, AZ
    Posts
    1,164
    Post Thanks / Like
    This seems to be a evening of setbacks and frustrations. I began installing and adjusting the slave cylinder for the clutch. I have been told that I should trim it, but an exact length was unknown. I measured it against the space available from the mounting point on the clutch fork to what should be the bottom of the MC. I cut off about 1".


    I put the shaft back in the slave, and found that it appeares to be very short. There does not appear to be room for the boot.


    Worst of all, it is still too long to fit in the space available. I started comparing the spacing I see in this photo of my current setup . . .


    with the spacing I see in the second photo of post #291 in EdwardB's 20th Anniversary build thread: (Here is the link, and I also copied the picture here for comparison. Thank you in advance, EdwardB!!)

    http://thefactoryfiveforum.com/showt...ry-Build/page8


    It sure looks to me like the tip of my clutch fork is too far rearward. If I am right, it appears to me that the only adjustment that will move the tip of the clutch fork forward is to extend out the length of the pivot bolt deep inside the bell housing. To get to this place again, I have to remove the transmission and remove the bell housing . . . again! It is 10pm. I have screwed up enough for one day. I am going to bed. Perhaps an epiphany will come to me in a dream. Or perhaps your name is Epiphany!! Got any ideas?
    Jazzman

    MKIV #8745 "Flip Top" Roadster, Custom Tilt front, Coyote Engine, Tremec TKO600, Custom Interior. Best of Show winner, Huntington Beach Cruise In 2018.

    1967 Ford Mustang Coupe build thread updated 1/22/2021

    Roadster Frame Dolly Plan

  14. #454
    Senior Member edwardb's Avatar
    Join Date
    Feb 2011
    Location
    Lake Orion, Michigan
    Posts
    10,577
    Post Thanks / Like
    Sorry to hear about the setbacks. It happens... That sending unit is fragile. I've stripped one, but not broken it off completely. They need a very light touch. I ordered another from Speedhut. I think that's your only viable option. I wouldn't try to use another type or brand. It's easily accessible with the engine in and headers mounted. No problem there. So you can easily install the part once it arrives and not hold up your progress. For several reasons, I wouldn't try to break into the Ford wiring harness.

    For the hydraulic clutch setup, yes the boot has to fit up and over the rod end. That's visible in my picture you posted. But I don't think you have the clutch arm adjusted quite right. The pivot does need to be raised a bit and move the clutch arm away from the slave cylinder. Too bad you put everything together that far already. It's pretty normal to have just the bell housing off and on a few times to find the right location for the pivot. Then install the transmission.
    Last edited by edwardb; 11-13-2016 at 12:10 AM.
    Build 1: Mk3 Roadster #5125. Sold 11/08/2014. Build 2: Mk4 Roadster #7750. Sold 04/10/2017. Build Thread
    Build 3: Mk4 Roadster 20th Anniversary #8674. Sold 09/07/2020. Build Thread and Video. Build 4: Gen 3 Type 65 Coupe #59. Gen 3 Coyote. Legal 03/04/2020. Build Thread and Video
    Build 5: 35 Hot Rod Truck #138. LS3 and 4L65E auto. Rcvd 01/05/2021. Legal 04/20/2023. Build Thread. Sold 11/9/2023.

  15. #455
    Senior Member edwardb's Avatar
    Join Date
    Feb 2011
    Location
    Lake Orion, Michigan
    Posts
    10,577
    Post Thanks / Like
    Quote Originally Posted by Jazzman View Post
    Thanks Edwardb!! You officially sleep even less than I do!! It has to be almost 2 am there!! Welcome to the night owl club��!!
    LOL. We're in Oregon visiting family. It was late, but not 2 am.
    Build 1: Mk3 Roadster #5125. Sold 11/08/2014. Build 2: Mk4 Roadster #7750. Sold 04/10/2017. Build Thread
    Build 3: Mk4 Roadster 20th Anniversary #8674. Sold 09/07/2020. Build Thread and Video. Build 4: Gen 3 Type 65 Coupe #59. Gen 3 Coyote. Legal 03/04/2020. Build Thread and Video
    Build 5: 35 Hot Rod Truck #138. LS3 and 4L65E auto. Rcvd 01/05/2021. Legal 04/20/2023. Build Thread. Sold 11/9/2023.

  16. #456
    Senior Member wareaglescott's Avatar
    Join Date
    Apr 2016
    Location
    Auburn, AL
    Posts
    2,146
    Post Thanks / Like
    I had the exact same problem with the oil pressure sender. I called FFR and Tony just happened to have one sitting in a box of spare parts under the desk and sent it for free. You may want to check with them before speedhut. I changed it out with the motor in place. I wouldn't say it was easily accessible like Paul but it was doable for me. My headers may be different. A lift would certainly make it more accessible and Paul has much more experience working in the tight confines of the engine area. I found it quite tight to get my big hands in there to tighten things up. Paul's recommendation not to delay the engine install for that is a good one.

    Like you I didn't have the needed fitting for the water temp sender. Not sure why FFR can put that in the directions but can't send the correct part.

    Good luck moving forward. Sorry I didn't mention the leveler before you put it down to extend the crane arm. I'm not sure how I would have got the motor to clear everything without adjusting it multiple times during the install but again that may just be my inexperience.
    MK4 #8900 - complete kit - Coyote, TKO600, IRS - Delivered 6/28/16 First Start 10/6/16 Go cart - 10/16/16 Build completed - 4/26/17 - 302 days to build my 302 CI Coyote Cobra - Registered and street legal 5/17/17
    Build Thread http://thefactoryfiveforum.com/showt...e-build-thread
    PHIL 4:13 INSTAGRAM - @scottsrides

  17. #457
    Not a waxer Jeff Kleiner's Avatar
    Join Date
    Feb 2011
    Location
    Bloomington, Indiana
    Posts
    8,094
    Post Thanks / Like
    The oil pressure sender is specific to Speedhut. Call them Monday and they'll get one out to you. Their customer service is great---which is a damn good thing given the quality of their products (I think you can read between the lines to understand what I'm saying )

    Jeff

  18. #458
    Jazzman's Avatar
    Join Date
    Jan 2014
    Location
    Scottsdale, AZ
    Posts
    1,164
    Post Thanks / Like
    The engine didn't go in this weekend. I realized that I had to take about 8 steps backwards to get to the pivot bolt that controled the location of the clutch fork. I will not document it all with photos, because, lets face it, its going to look just like it went together!! I did all the following:

    1. Removed the hydraulic clutch kit.
    2. Removed the Transmission. At first I forgot to use the leveling strap to keep the engine aligned with the tranny, but once I noted that error it came apart . . . with a lot of grunting!!
    3. Removed the starter.
    4. Noted the distance from the rear of the clutch fork to the front of the bell housing flange: 1/2".
    5. Removed the bell housing.
    6. Removed the pivot bolt.

    I was surprised to find that though the hole for the pivot bolt is 1" deep, the bolt was only threaded into the hole 7/16".


    I am sure that those of you that got a better grade in high school geometry than I did could figure out how much further out the pivot bolt should be adjusted to move the other end of the clutch fork away from the flange to at least 1", perhaps a little more. High school geometry was a long time ago, and I certainly can't remember the right theorem to figure it out. I do know that I am uncomfortable having much less than 3/8" of thread holding the pivot bolt in the hole. I think I am going to need to order a slightly longer pivot bolt. I have only read about one person that had to buy a longer pivot bolt, but I don't think he was using a similar engine/bell housing/tranny combination. Did any one else have to do this? What length did you find that worked well?

    I made a small bit of progress on the sending units. I decide that even without the oil pressure sending unit, I could get the wiring in there. I had been warned by WarEagleScott that it would be much easier to do now than to wait till the engine was in the car. I bought some of this stuff to cover the wires:


    I but the wires for the oil pressure and the water temperature senders together, wrapped them in convoluted tubing, then taped up the convolute in a few places just to keep it the wires in. I then took long strips of this tape and wrapped it around the last 15" of the convoluted covering. This heat tape sticks very well, and should do the job nicely. I zip tied it to the other wires already going in the direction I wanted, and left most of the wire on top of the engine. It will be dealt with later on after the engine is in.


    I may need to add one more zip tie to keep the wires as far away from the headers as possible. That decision will be made after the engine and headers are in the car.

    Now I have to wait for a number of replacement parts to fix all the things I broke this weekend: A new shaft for the slave cylinder, a new oil pressure sending unit, and now a longer pivot bolt. Maybe the engine will go in next weekend. I was really hoping to fire it up Thanksgiving weekend, exactly one year from the day I started this journey. I still have to order power steering hoses, coolant hoses, install the radiator, the Power steering overflow tank, and a bunch of other stuff. I don't think I am going to get it started by Thanksgiving. Then again, this is not a race, and I sure am having fun! I don't want this journey to end any too soon. Of course I don't like going backwards either!
    Last edited by Jazzman; 11-13-2016 at 09:28 PM.
    Jazzman

    MKIV #8745 "Flip Top" Roadster, Custom Tilt front, Coyote Engine, Tremec TKO600, Custom Interior. Best of Show winner, Huntington Beach Cruise In 2018.

    1967 Ford Mustang Coupe build thread updated 1/22/2021

    Roadster Frame Dolly Plan

  19. #459
    Jazzman's Avatar
    Join Date
    Jan 2014
    Location
    Scottsdale, AZ
    Posts
    1,164
    Post Thanks / Like
    I guess it hasn't been an entirely unproductive day. I had noticed that the way the chains were connecting the engine to the hoist, the DS chain was very close to the end of the fuel rail. If I were to try to tip the rear end of the engine downward to get it into the engine bay, the DS chain would tear off the fuel rail. That did it. I had to take the time to buy a load leveler for the engine hoist and get it installed above the engine. I hate HF, but in this case this will likely be a one use item, so I went ahead and spent the $50 to get a HF load leveler. They had it in stock, no one else I could find did.

    I set down the engine on my very temporary engine stand. (Glad I didn't throw that away!!) I had to completely disconnect the engine from the shop crane in order to install the load leveler. Installing the leveler is pretty straight forward. Disconnect everything, put the leveler on the hoist hook, reconnect the chains to the ends of the leveler. After reconnecting the chains and taking a guesstimate of where to center the leveler over the engine, I lifted the engine up again. Came right up easy as you please, centered like I knew what I was doing!! The chains are now a long way from anything they will damage. It should have plenty of tilting area to go into the engine bay.

    Last edited by Jazzman; 11-13-2016 at 10:26 PM.
    Jazzman

    MKIV #8745 "Flip Top" Roadster, Custom Tilt front, Coyote Engine, Tremec TKO600, Custom Interior. Best of Show winner, Huntington Beach Cruise In 2018.

    1967 Ford Mustang Coupe build thread updated 1/22/2021

    Roadster Frame Dolly Plan

  20. #460
    Jazzman's Avatar
    Join Date
    Jan 2014
    Location
    Scottsdale, AZ
    Posts
    1,164
    Post Thanks / Like
    One of the things I like about a project of this magnitude is the fact that there seems to be a never ending list of additional things to do. With the engine install on hold for now, I set to work redoing another task. Several months ago FFR was kind enough to send me replacement bolts and misallignment spacers for the connection of the IRS upper control arm and the rear spindle. It didn't really look like much, but now that it's done, I think I see the logic. Here are the pieces that FFR sent with my original kit installed on the PS.


    and here are the new parts that FFR sent installed on the DS. I didn't have the 5/8" washer that they specified. I went back to my orginal installation instructions and didn't discover that one was supposed to be there. I looked in my ever growing pile of miscellaneous parts to see if I had mistakenly not installed them. (I keep everything!!) Nope, I did not find any 5/8" washers. I looked at the parts, and decided that the washer was not really necessary, so I installed it without the washer.


    If you compare the two photos, you can see where the outside portion of the upper control arm end has a bit more room to move. It must be important if FFR went to the effort of sending it to me 6 months after I got my kit. Thanks FFR for looking out for us!
    Last edited by Jazzman; 11-14-2016 at 12:49 AM.
    Jazzman

    MKIV #8745 "Flip Top" Roadster, Custom Tilt front, Coyote Engine, Tremec TKO600, Custom Interior. Best of Show winner, Huntington Beach Cruise In 2018.

    1967 Ford Mustang Coupe build thread updated 1/22/2021

    Roadster Frame Dolly Plan

  21. #461
    Jazzman's Avatar
    Join Date
    Jan 2014
    Location
    Scottsdale, AZ
    Posts
    1,164
    Post Thanks / Like
    Perceptions and expectations. Those things that bend our mind to believe that we know what is going on even when we do not. After removing the transmission and bell housing again, I still could find no adjustment to the pivot bolt that made sense to my mind, to my perception of the problem, to my expectations of what I thought I knew. After adjusting the pivot bolt to the longest length I deemed safe, I reinstalled the clutch fork and bell housing. I discovered that not only did I not solve the problem, I had made is worse! Frustrated and hungry, (these often go together!) I got dinner, and considered what in the world I should do. I had already called FFR, Forte, and Quicktime to see if they had any suggestions. They did not. No one had expressed this particular problem. Returning to the engine, I tried to peer in through the rear hole of the bell housing to see if I could spot the problem. I could not even see pivot bolt from that angle. I leaned way over, looking virtually upside down into the rear hole of the bell housing. I could see the pivot bolt, and at that moment the epiphany hit me: My perception and expectations were all wrong, quite literally 180 degrees off! In my mind, I had constructed a mental picture of the inside of the bell housing. In this faulty mental picture, the more I extended the pivot bolt, the further away from the rear of the opening the clutch fork should move. However, that is exactly backward. I realized by looking at the clutch fork and pivot bolt upside down that the correct solution was to screw the pivot bolt into the rear of the bell housing, to make the pivot bolt head SHORTER, not longer, in order to move the other end of the clutch fork forward, away from the rear of the clutch fork window.

    I removed the bell housing once again. (I'm am getting pretty good at it now!) I screwed in the pivot bolt as far as it would go into the bell housing, making the bolt as short as it could possibly be. After reinstalling the fork, I installed the bell housing for what I hope will be the last time. The clutch fork location in the window is definitely better, but not as far forward as I would like.

    I then began refitting the Forte hydraulic clutch slave cylinder. The shaft of the slave cylinder is as short as it could get, but has no play at all. Even at this length, the boot is jammed tight against the slave cylinder, too much compression from what I have seen. It all fit, but is very tight, too tight from what I have read. I will call Mike Forte again tomorrow and see if he can make any suggestions.


    The transmission went on with a little bit of fight, but it got done. I find the secret is to compress the clutch fork so that the clutch disk can move a little as the shaft from the transmission is slid into place.

    I have been trying to anticipate all the points of difficulty as I put the motor into place. I really don't want to have to take it out to fix anything!! I know that the nuts and bolts that hold the headers on are very difficult to access once the engine is in place. I would like to end up using only bolts but I also know that I need some studs to hang the headers and gaskets on while I install all the bolts. I decided to put two studs in place to hang the gasket and the header on. I decided to put a stud in the forward most top position on each side, and another one on the #3 hole on the bottom of each side as you count from front to rear. By doing this, the front one can be removed and replaced with a bolt after other bolts are installed, and the rear most bolt will be well hidden if it is not removable. I hung both headers on just to make sure they were going to line up. All looks as good as i think it can.


    Finally, the oil separator arrived from JLT Performance today. It looks nice, but I am not going to install it until the engine is fully in. I am still waiting on some braided stainless vacuum hose to arrive. The interesting part is that I can't seem to unscrew the bottom section from the top. I will have to call JLT tomorrow on that.
    Jazzman

    MKIV #8745 "Flip Top" Roadster, Custom Tilt front, Coyote Engine, Tremec TKO600, Custom Interior. Best of Show winner, Huntington Beach Cruise In 2018.

    1967 Ford Mustang Coupe build thread updated 1/22/2021

    Roadster Frame Dolly Plan

  22. #462
    Senior Member wareaglescott's Avatar
    Join Date
    Apr 2016
    Location
    Auburn, AL
    Posts
    2,146
    Post Thanks / Like
    Kevin,
    If you notice in your post 453 the picture you posted of Pauls hydraulic clutch the boot sits differently than how yours is in this last post. I am having a hard time understanding your issue but if you extend the boot down the rod like Paul did would that help you at all?
    I positioned my boot like Paul shows. It was tight getting it on there but worked good then.
    MK4 #8900 - complete kit - Coyote, TKO600, IRS - Delivered 6/28/16 First Start 10/6/16 Go cart - 10/16/16 Build completed - 4/26/17 - 302 days to build my 302 CI Coyote Cobra - Registered and street legal 5/17/17
    Build Thread http://thefactoryfiveforum.com/showt...e-build-thread
    PHIL 4:13 INSTAGRAM - @scottsrides

  23. #463
    Jazzman's Avatar
    Join Date
    Jan 2014
    Location
    Scottsdale, AZ
    Posts
    1,164
    Post Thanks / Like
    Quote Originally Posted by wareaglescott View Post
    Kevin,
    If you notice in your post 453 the picture you posted of Pauls hydraulic clutch the boot sits differently than how yours is in this last post. I am having a hard time understanding your issue but if you extend the boot down the rod like Paul did would that help you at all?
    I positioned my boot like Paul shows. It was tight getting it on there but worked good then.
    Funny you should notice that. Paul and I were just talking about that today. That is a big part of the issue. Paul suggested I take the boot off entirely, fit the shaft correctly, then put the boot back on only for the final fitting. That is project #1 tonight.
    Jazzman

    MKIV #8745 "Flip Top" Roadster, Custom Tilt front, Coyote Engine, Tremec TKO600, Custom Interior. Best of Show winner, Huntington Beach Cruise In 2018.

    1967 Ford Mustang Coupe build thread updated 1/22/2021

    Roadster Frame Dolly Plan

  24. #464
    Brandon #9196 TexasAviator's Avatar
    Join Date
    May 2016
    Posts
    679
    Post Thanks / Like
    Excellent progress. The setup is coming along nicely. I see you have the family involved and I am sure your wife know how much it means to you to be able to build this. Very well done.

  25. #465
    Jazzman's Avatar
    Join Date
    Jan 2014
    Location
    Scottsdale, AZ
    Posts
    1,164
    Post Thanks / Like
    The clutch slave unit is finally in, and adjusted to what I believe is the correct distances.


    The key was to slide the boot all the way up over the rod end piece so that the entire rod end is inside the boot. I ended up cutting a total of about 1.125" off the shaft of the slave unit to make it fit well. The shaft has just a little bit of play when the clutch fork is all the way back. I am glad to have that one done!!

    A trusted advisor commented that I may be overthinking things regarding preparations for installing the engine. Yeah, that may indeed be true. But I think at this point I am ready to install the engine. Lets see if I have checked all the boxes:

    The engine grounding straps are both attached to the rear side of both engine mounts welded onto the frame.
    The steering shaft has been disconnected at the steering rack and laid as far outboard as it will go.
    The triple CNC brake/clutch fluid reservoirs are disconnected and swung out of the way.
    All the wire below the firewall are wrapped, clamped into place.
    The starter power wire and the starter signal wire are both heat wrapped, clamped to the down rail, and terminated with ring ends, ready to attach to the starter.
    The alternator power wire is installed and in place, although it is not yet clamped into place because I am not yet sure what length it will end up.
    The hydraulic line from the clutch MC to the Clutch slave cylinder is routed out of the DS foot box, riveted into place with wire clamps, and is hanging near where the slave cylinder will be.
    The fuel lines are all in and attached to the inside wall of the PS footbox. The last 4 feet of fuel line connecting the pressure regulator to the engine fuel rail is here, just waiting to be cut to length.
    FFR Engine mount plates are installed to lift the engine 1/2"
    3/4" tall transmission support plates are made and ready to go. Longer transmission attachment bolts are on hand.
    The Transmission support rack is on hand.
    I have pads on hand to protect the footboxes, the firewall, and the front rail.

    Things I might still need to do:
    Cut one of the crossmembers from the top of the tranny tunnel. From other photos I have seen, I think my mid-shift shifter location will hit this crossmember. I have decided to wait to do that until I can confirm it is necessary.
    Per EdwardB's recommendation, I have ordered a set of RemFlex header gaskets and some 10mm hex head screws to use for the installation of the headers. I am hoping they will get here by the end of the week, but I fear they may not.

    Did I miss anything?

    I think all I have left to do is find some friends who might help me. My wife is quite nervous about me/us doing it by ourselves. I am really not sure how much help I should have or will need. Several of my good friends who are very excited that I am doing this project are either out of town or have admitted that they would be about as useful as a bicycle to a fish! I think this thing is going in Saturday come you-know-what or high water!! I'm tired of waiting to cross this hurdle.
    Jazzman

    MKIV #8745 "Flip Top" Roadster, Custom Tilt front, Coyote Engine, Tremec TKO600, Custom Interior. Best of Show winner, Huntington Beach Cruise In 2018.

    1967 Ford Mustang Coupe build thread updated 1/22/2021

    Roadster Frame Dolly Plan

  26. #466
    Senior Member wareaglescott's Avatar
    Join Date
    Apr 2016
    Location
    Auburn, AL
    Posts
    2,146
    Post Thanks / Like
    Tell your wife not to be to concerned and the friends that think they would not be helpful they are probably wrong. Me, my wife and two guys that had never done this before put mine in. The helpers just help with sets of hands to stabilize and move. No special knowledge needed.
    Looks like you are ready to go! Cant wait to see that update. Seeing that it is only Wednesday I am not sure you can wait for the weekend without recruiting someone for some late night help tonight or tomorrow! haha
    The only other thing I did was to take the piece the shifter handle bolts to that is sticking up from the transmission off and tape over the opening. That gives a couple more inches clearance without the nub sticking up. I got that tip from Paul and it was a good one! ( I later ended up taking the cover plate off again to pour in the fluid which was very easy and clean. If you take it off maybe just leave it off until you are ready for the fluid to go in and it will save a step.)
    MK4 #8900 - complete kit - Coyote, TKO600, IRS - Delivered 6/28/16 First Start 10/6/16 Go cart - 10/16/16 Build completed - 4/26/17 - 302 days to build my 302 CI Coyote Cobra - Registered and street legal 5/17/17
    Build Thread http://thefactoryfiveforum.com/showt...e-build-thread
    PHIL 4:13 INSTAGRAM - @scottsrides

  27. #467
    Jazzman's Avatar
    Join Date
    Jan 2014
    Location
    Scottsdale, AZ
    Posts
    1,164
    Post Thanks / Like
    Note to future builders: install the gas pedal before you permanently attach the engine compartment sidewall of the DS footbox. It gets very small in that space, especially now that there are master cylinders and wire harnesses and brake lines and clutch lines and . . . on and on!! I followed the FFR instructions to cut the Coyote pedal. I did leave it a bit longer than FFR so that the cut would not be seen. The actual pedal is a bit more vertical than I would like, but as soon as you even touch the pedal, it goes back on the spring loaded mounting to fit just fine. The pedal isn't very pretty, and it is on a bit of an angle, but I still have one more idea that I may try. You'll know it after I try it!


    I started out this evening adjusting the brake MC's to move the brake pedal forward. I wanted a bit more leg room, and at my height (5'9") that doesn't take much. I moved the clutch pedal forward a couple of weeks ago, but was stumped by my inability to turn the shafts of the brake MC's. The boots were held on extremely tightly with metal clips around the end near the shaft. I removed that metal clip, pushed back the boot, and found that there is non-threaded area further aft on the MC shaft. It was relatively simple to screw the shafts into the pedal to move the pedal forward. I was able to move the brake pedal forward so that I have more legroom, but . . .


    I now think that I may have moved the brake and clutch pedals a bit too far forward. They are supposed to be 2" aft of the gas pedal, sadly just about where I had them set before I adjusted them for more leg room. That is just about as far forward as you can get the gas pedal, so the brake and clutch pretty much have to be moved aft. Hmmm. What to do. Yep. Sleep on it.
    Jazzman

    MKIV #8745 "Flip Top" Roadster, Custom Tilt front, Coyote Engine, Tremec TKO600, Custom Interior. Best of Show winner, Huntington Beach Cruise In 2018.

    1967 Ford Mustang Coupe build thread updated 1/22/2021

    Roadster Frame Dolly Plan

  28. #468
    Not a waxer Jeff Kleiner's Avatar
    Join Date
    Feb 2011
    Location
    Bloomington, Indiana
    Posts
    8,094
    Post Thanks / Like
    I think you'll find that you do not want all 3 pedals on the same plane when they're at rest---too easy to get a foot on the throttle and brake simultaneously. I ordinarily set them up so that the throttle pedal is about 2 inches or so forward of the brake much like your daily driver.

    I'm enjoying watching your progress; you're doing a great job of building and documenting!

    Jeff

  29. #469
    Senior Member wareaglescott's Avatar
    Join Date
    Apr 2016
    Location
    Auburn, AL
    Posts
    2,146
    Post Thanks / Like
    I found doing the carpet the other day that the side piece that wraps around from the outer wall of the drivers footbox to the forward wall behind the pedals is quite tricky to get in there as well. Particularly with the adhesive applied. You should enjoy that space crunch similar to putting the accel pedal in! It is one piece the wraps around the corner. I ended up cutting it into 2 pieces and hiding the cut right in the corner behind the bar. You may give some consideration to pre carpeting just that piece prior to putting that outer wall back on.

    My pedals are aligned about like your pictures. At 6'3" I needed them all as far away from me as I can get them. As Jeff mentioned I have had a couple instances of brake and gas pedal at the same time. My big feet are learning though. That setup is less than optimal. If I had more leg room I would change it. If you can adjust them some that would probably be preferred.
    MK4 #8900 - complete kit - Coyote, TKO600, IRS - Delivered 6/28/16 First Start 10/6/16 Go cart - 10/16/16 Build completed - 4/26/17 - 302 days to build my 302 CI Coyote Cobra - Registered and street legal 5/17/17
    Build Thread http://thefactoryfiveforum.com/showt...e-build-thread
    PHIL 4:13 INSTAGRAM - @scottsrides

  30. #470
    Jazzman's Avatar
    Join Date
    Jan 2014
    Location
    Scottsdale, AZ
    Posts
    1,164
    Post Thanks / Like

    The Coyote has landed!!!

    Patience has never been my virtue. So when the Remflex gaskets arrived today from Summit, I just couldn't resist trying to put the engine in. No, I didn't have a group of experienced friends standing around helping. I was armed only with the love of a good woman. My bride has helped me put the pumpkin in, has helped me install the transmission three times, and done a dozen other tasks she never thought she would do. But tonight, we both attacked the next big obstacle: shoehorning an engine which is clearly too big for most reasonable people to want into a hole that looks as if it won't hold the motor from a Vespa! But as so many have already proven, somehow it does go in there!!

    I started by installing the oil pressure sending unit that arrived today from Speedhut. No drama this time, but I was very careful not to over tighten anything.


    I removed the low oil sensor from the DS of the oil pan and I am very glad that I did. The engine simply would not have gone in without removing it. The Moroso oil pan is just barely narrow enough to go between the engine mounts on the frame.

    I removed the gear shift lever from the top of the transmission. Again, I was very glad I did because it was one less thing to have to watch.


    My garage has sort of an odd ceiling. It is 8' high near the garage door, but 9.5' high at the back of the garage. When the garage door is open, the vertical space is only a little over 7 feet. Because of this, I had to have the shop crane with the engine on it raised up toward the back of the garage. This meant that the rear of the car had to be near the garage door. This also meant that the maneuvering area at the front end of the car (the rear of the garage) was quite limited. It took quite a number of back and forth movements just to get the shop crane under the car and lined up with frame. I had to turn the front wheels to their limit first to the left, move the crane a little, then turn the wheels to the right and move the crane a little more.


    I needed to control the downward angle of the transmission. I hooked one end of a ratched tie down strap to the tip of the transmission, went under the 4" frame member at the front, and then up to the top of the shop crane. You can see where I attached the red strap right next to my wife's right hand.


    Then it was just a matter of very, very, VERY slowly moving the engine down and into the engine bay. We were literally moving in 1/4" increments.


    We stopped several times to reset the strap that was pulling the transmission down while we lowered the engine. It was a constant process of lowering the engine while pulling down the transmission, then lowering the engine while allowing the transmission to rise and the engine to level it self out.


    There came a point where all the padding that I had placed to protect the footboxes was just in the way. We couldn't see what we were supposed to be avoiding. I pulled them all out and moved the engine ever lower. What do you know, it worked!!

    Jazzman

    MKIV #8745 "Flip Top" Roadster, Custom Tilt front, Coyote Engine, Tremec TKO600, Custom Interior. Best of Show winner, Huntington Beach Cruise In 2018.

    1967 Ford Mustang Coupe build thread updated 1/22/2021

    Roadster Frame Dolly Plan

  31. #471
    Jazzman's Avatar
    Join Date
    Jan 2014
    Location
    Scottsdale, AZ
    Posts
    1,164
    Post Thanks / Like
    The engine is in, but it is not really set down yet. The PS engine mount is lined up perfectly. There still is no engine mount on the DS. I still need to get the header installed on the DS before I install the engine mount. I ordered a better set of header bolts from McMaster but they haven't gotten here yet. I decided to get the headers in place with just the two studs and nuts that I had left there to check fitment, but I will wait till I get the bolts from McMaster to tighten up the headers and ultimately drop the engine into place.


    Now I can check a few more areas to be sure we don't have conflict. The PS front corner of the engine is way too close to the PCM. There is a small wire harness attachment point that sticks out from the head cover. It does nothing in this installation, so it will likely get cut off. I will wait on that till the engine is fully down. Because the plug on the harness attached to the engine has a 90 degree plug on the end, It could end up being a conflict with the engine. Time will tell.


    The space between the firewall and the engine seems to be just fine. I wouldn't mind more space, but it will do. The fuel pressure regulator is at a great height, it will be easy to read once the engine is set down.


    Some have noted the very close fit of the rear engine lift plate and the corner of the PS footbox. It is waaaayy too close for comfort. I have about 1/16" of space between them. I hope that as the engine rotates even more level, there will be just enough space to allow the plate to clear. When I get the engine lift plates off, I am going to show you how I would modify them just a little to make them fit just a little better.


    I used the same red ratcheted tie down strap to support the tail end of the transmission until I can install the permanent tranny support rack. Hooked it on the door latch hole on one side, looped it under the tranny, then back up to the opposite side door latch area.


    I am pleased to find that I will not have to cut any of the crossmembers in order to make the mid shifter fit. It sits neatly between the two crossmembers just like it is supposed to.


    Thanks to all of you for your suggestions, each was used in the process. Special thanks to Jeff Kleiner for his suggestion to raise the rear and lower the front. That really seemed to help make the engine slide in more naturally.
    Last edited by Jazzman; 11-18-2016 at 01:53 AM.
    Jazzman

    MKIV #8745 "Flip Top" Roadster, Custom Tilt front, Coyote Engine, Tremec TKO600, Custom Interior. Best of Show winner, Huntington Beach Cruise In 2018.

    1967 Ford Mustang Coupe build thread updated 1/22/2021

    Roadster Frame Dolly Plan

  32. #472
    Not a waxer Jeff Kleiner's Avatar
    Join Date
    Feb 2011
    Location
    Bloomington, Indiana
    Posts
    8,094
    Post Thanks / Like
    Success

    Congrats!

    Jeff

  33. #473
    Senior Member wareaglescott's Avatar
    Join Date
    Apr 2016
    Location
    Auburn, AL
    Posts
    2,146
    Post Thanks / Like
    Nice work! Congrats
    MK4 #8900 - complete kit - Coyote, TKO600, IRS - Delivered 6/28/16 First Start 10/6/16 Go cart - 10/16/16 Build completed - 4/26/17 - 302 days to build my 302 CI Coyote Cobra - Registered and street legal 5/17/17
    Build Thread http://thefactoryfiveforum.com/showt...e-build-thread
    PHIL 4:13 INSTAGRAM - @scottsrides

  34. #474
    Senior Member edwardb's Avatar
    Join Date
    Feb 2011
    Location
    Lake Orion, Michigan
    Posts
    10,577
    Post Thanks / Like
    Looking good! Way to go. Now get that thing buttoned up and started.
    Build 1: Mk3 Roadster #5125. Sold 11/08/2014. Build 2: Mk4 Roadster #7750. Sold 04/10/2017. Build Thread
    Build 3: Mk4 Roadster 20th Anniversary #8674. Sold 09/07/2020. Build Thread and Video. Build 4: Gen 3 Type 65 Coupe #59. Gen 3 Coyote. Legal 03/04/2020. Build Thread and Video
    Build 5: 35 Hot Rod Truck #138. LS3 and 4L65E auto. Rcvd 01/05/2021. Legal 04/20/2023. Build Thread. Sold 11/9/2023.

  35. #475
    Jazzman's Avatar
    Join Date
    Jan 2014
    Location
    Scottsdale, AZ
    Posts
    1,164
    Post Thanks / Like
    No photos tonight. I just spent the last four hours installing header bolts and the DS engine mount. Wow is that slow hard work. I got 15 of them in and tight, 8 of them actually torqued to the 20 lb spec, the rest tightened as much as humanly possible given the space available. I have only one left to put in. It is DS, top, second from the front. Should be a little easier when the lift plate is out of the way. Unfortunately it is surrounded by all four exhaust pipes. The problem is that that one bolt will not go in straight, and I am certainly not going to force it. I did get the DS engine mount installed and dropped the engine down to its final location. It sits perfectly. The oil pan is perfectly level between the frame rails, the transmission tail is perfectly alligned with the end of differential, and the PS engine lift plate cleared with 1/16" to spare!
    Jazzman

    MKIV #8745 "Flip Top" Roadster, Custom Tilt front, Coyote Engine, Tremec TKO600, Custom Interior. Best of Show winner, Huntington Beach Cruise In 2018.

    1967 Ford Mustang Coupe build thread updated 1/22/2021

    Roadster Frame Dolly Plan

  36. #476
    Senior Member edwardb's Avatar
    Join Date
    Feb 2011
    Location
    Lake Orion, Michigan
    Posts
    10,577
    Post Thanks / Like
    Getting the DS header installed is certainly challenging. Just a hint. It's risky to tighten the bolts in the header before all 8 are at least started threading in. It helps to have the header a little bit away from the surface of the head plus you can wiggle the header a bit to get the alignment where the bolts will start threading in. The GP Headers bolt holes are pretty tight tolerance and in my experience need to be perfectly aligned to get the bolts started.

    Good to hear your engine and trans are lining up well.
    Build 1: Mk3 Roadster #5125. Sold 11/08/2014. Build 2: Mk4 Roadster #7750. Sold 04/10/2017. Build Thread
    Build 3: Mk4 Roadster 20th Anniversary #8674. Sold 09/07/2020. Build Thread and Video. Build 4: Gen 3 Type 65 Coupe #59. Gen 3 Coyote. Legal 03/04/2020. Build Thread and Video
    Build 5: 35 Hot Rod Truck #138. LS3 and 4L65E auto. Rcvd 01/05/2021. Legal 04/20/2023. Build Thread. Sold 11/9/2023.

  37. #477
    Jazzman's Avatar
    Join Date
    Jan 2014
    Location
    Scottsdale, AZ
    Posts
    1,164
    Post Thanks / Like
    When you install the Coyote motor into the Roadster engine bay, you have to remove the low oil sensor from the side of the oil pan for the pan to slide between the frame engine mounts. However, before you actually lower the engine fully down on the engine mounts, it is important to reinstall the low oil sensor. It is too long to fit into the hole without begin caught on the 4" frame tube. How do I know this tidbit of wisdom? Because today I tried to reinstall the sensor, only to find out that I would have to lift the engine up about 1/2" for 3 seconds to install it.

    Yesterday I was trying to install the primary bolts that attach the engine mounts on the engine to the engine mounts welded to the frame. The DS nut was too tight to move. I have been nursing along my 45+ year old air compressor. Well last week it finally gave up. I decided it was time to upgrade and I couldn't put it off any longer. I decided for my use, it was hard to justify an extremely expensive two stage compressor, so I opted for the lower price with a decent warranty.


    It took 4 1/2 hours to buy, haul home, get set up, and get it broken in. It two four seconds to tighten the two engine bolts. Perfect!!

    I installed the transmission support A Frame. It took longer to find the four correct bolts than it did to install it. I used the two 3/8" transmission spacers that my friend made last week. THey fit perfectly. I made sure to install all the bolts facing downward. They all have nylock nuts and/or Loctite, so they really should not come out, but if they do, having the bolts downward might retain them long enough for me to reinstall a new nut.

    I hooked up the cable going from the alternator to the fused link that feeds all the interior wiring and ultimately the battery as well. It is the big red one in this photo:


    I installed the last 24" of braided stainless fuel line to the fuel rail on the engine. It looks good. Too bad more than half of it will be covered by the engine cover.


    I trimmed and routed a whole series of wires along the top of the engine. I shortened a couple of long wires, and routed the alternator wire, the MAF sensor wire into place. I trimmed the wires from the oil pressure sensor and the water temperature sensor. I routed them all together into one line of convolute tubing. I then zip tied all these new lines into place. It I wish I could hide more of them, but it looks nice and clean.


    I decided to stop before I permanently attached these wires into place. I decided to install a weatherpak to organize all these sensor wires and also make it easier to disconnect if I ever have to remove the engine. I will have to order a six post weatherpak for that location. One more for the next DelCity order.

    I dug out the MAF sensor off the extra Coyote parts box. I got it installed on the Spectre air system. Not difficult, just followed the instructions. It got a bit messy using the silicone sealer, but once that was done, it wasn't too big a deal.

    Last edited by Jazzman; 11-20-2016 at 11:07 PM.
    Jazzman

    MKIV #8745 "Flip Top" Roadster, Custom Tilt front, Coyote Engine, Tremec TKO600, Custom Interior. Best of Show winner, Huntington Beach Cruise In 2018.

    1967 Ford Mustang Coupe build thread updated 1/22/2021

    Roadster Frame Dolly Plan

  38. #478
    Senior Member wareaglescott's Avatar
    Join Date
    Apr 2016
    Location
    Auburn, AL
    Posts
    2,146
    Post Thanks / Like
    Looking good Kevin.
    What 6 wires are you using the weatherpack on?
    MK4 #8900 - complete kit - Coyote, TKO600, IRS - Delivered 6/28/16 First Start 10/6/16 Go cart - 10/16/16 Build completed - 4/26/17 - 302 days to build my 302 CI Coyote Cobra - Registered and street legal 5/17/17
    Build Thread http://thefactoryfiveforum.com/showt...e-build-thread
    PHIL 4:13 INSTAGRAM - @scottsrides

  39. #479
    Jazzman's Avatar
    Join Date
    Jan 2014
    Location
    Scottsdale, AZ
    Posts
    1,164
    Post Thanks / Like
    I have thought about putting the following items in one weatherpack at the back of the engine: Oil Pressure, Oil Temperature, water temperature, tach, and a ground wire. However, after looking over everything else that is going on in that area, and everything that would have to be unhooked anyway, I think a weatherpak in this area is a waste of effort. I am just going to attach the wires in the standard form with heat shrink around them.
    Jazzman

    MKIV #8745 "Flip Top" Roadster, Custom Tilt front, Coyote Engine, Tremec TKO600, Custom Interior. Best of Show winner, Huntington Beach Cruise In 2018.

    1967 Ford Mustang Coupe build thread updated 1/22/2021

    Roadster Frame Dolly Plan

  40. #480
    Jazzman's Avatar
    Join Date
    Jan 2014
    Location
    Scottsdale, AZ
    Posts
    1,164
    Post Thanks / Like
    I removed the engine lift plates from the engine yesterday. Great thanks goes out to EdwardB for designing them. They worked well, even if my measurements were off on one of them!! After reviewing them, I think there might be a couple of minor modifications that will help them fit even better. First, the right rear plate:


    This plate comes far too close to the corner of the PS footbox. To combat this, you have two options. On the right hand side of the plate in the photo, I have drawn a large black triangle about where the plate is bent. If you will notch this section out, you will have enough clearance to avoid hitting the PS footbox. Option #2 is to adjust the hole on the left hand side of the plate upward so that the plate is attached more vertically to the engine. This will also provide enough clearance from the PS footbox. Double check your hole location because the tolerances on these holes is really tight. If I were going to remake these plates, I would make the top section about 2" longer, and move the hole for the hoist hook up on the elongated plate. This would give the hook and chain a bit more clearance over the engine coils.

    The left front plate is pretty good as it is. It might also benefit from being a couple of inches longer, but you could only do this if you bent this plate as well. If you want to extend the length of the plate, you will want to bend it at approximately the line I have drawn across it:


    I had to do a bit of minor surgery on the plug from the engine to the PCM. The reason was pretty simple: the plug turns 90 degrees, and there is not enough room between the engine and the PCM to allow this.


    After removing all the tape around the plug, I very carefully cut away the plastic frame that forced the wires to make the hard turn left. I was careful not to nick any of the wires. Sadly I was not careful enough. Luckily I only scuffed the insulation around the wire, not the wire itself. I double checked with a magnifying glass to be sure that none of the wire strands were damaged. All ok. I carefully sealed it up with electrical tape, and thanked God I did not cut one of these wires!!


    I then had to cut away and area on the top of the plug to allow the wires to remain straight. This step went smoothly.


    After wrapping the wires in a layer of electrical tape, adding a small piece of convolute tube for added protection around the cut top of the plug case, I was able to wrap the entire plug set in a straight line with multiple layers of electrical tape.

    now it lays in the very small space nicely. A few zip ties to hold it in place, and it is good to go.

    Jazzman

    MKIV #8745 "Flip Top" Roadster, Custom Tilt front, Coyote Engine, Tremec TKO600, Custom Interior. Best of Show winner, Huntington Beach Cruise In 2018.

    1967 Ford Mustang Coupe build thread updated 1/22/2021

    Roadster Frame Dolly Plan

Page 12 of 28 FirstFirst ... 2101112131422 ... LastLast

Posting Permissions

  • You may not post new threads
  • You may not post replies
  • You may not post attachments
  • You may not edit your posts
  •  

Martin's Dent and Collision Shop

Visit our community sponsor