-
08-21-2020, 11:11 AM
#441
Senior Member

Kyle
Complete Kit pickup 09/05/2015, 351w, QF680, 3.55, 3-Link, 15" Halibrands with MT's, Painted Viking blue with Wimbledon white stripes on 03/15/2017. Sold in 08/2018 and totally regret it.
-
08-21-2020, 01:19 PM
#442
Senior Member

Looks great - love that color scheme!
-
09-05-2020, 04:19 PM
#443
Senior Member

-
Post Thanks / Like - 0 Thanks, 1 Likes
-
09-05-2020, 05:20 PM
#444
Senior Member
-
Post Thanks / Like - 0 Thanks, 3 Likes
-
09-05-2020, 07:41 PM
#445
Beautiful! Love the colors. Neat idea on the centering post. Haven’t seen that before.
You are having a great holiday weekend for sure.
-Steve
-
09-05-2020, 07:47 PM
#446
Senior Member

MK IV - #9586, Gen 2 Coyote, TKO 600
-
09-05-2020, 11:54 PM
#447
Outstanding. It turned out fantastic! The engine covers paint ties it together well.
MK IV Build #9659, 3 link, 17's, Forte 347, Sniper EFI, power steering, built for a freak sized person with 17" Kirkey Vintage seats, RT drop trunk, RT turn signal, lots of stuff from Breeze Automotive, Wilwood brakes, paint by Jeff Miller
-
09-06-2020, 05:59 AM
#448
Senior Member
Wow, that is stunning! Congrats and the engine bay paint scheme really is sharp.
Last edited by KDubU; 09-06-2020 at 06:08 AM.
Kyle
Complete Kit pickup 09/05/2015, 351w, QF680, 3.55, 3-Link, 15" Halibrands with MT's, Painted Viking blue with Wimbledon white stripes on 03/15/2017. Sold in 08/2018 and totally regret it.
-
09-06-2020, 07:03 AM
#449
PLATNUM Supporting Member


Super Job!
16+ FFR kits and counting!
-
09-06-2020, 07:23 AM
#450
Wow! That turned out beautiful. Congratulations on a stunning car. Well done.
MKIV complete kit w/powder coating and cut outs, serial #9189 delivered 10/10/17, first start - 10/5/18, legal - 10/08/20. Blueprint 306 w/Holley Sniper EFI, TKO 600, power steering, Breeze fan shroud, trunk cubby, & engine compartment battery kit, CNC brake reservoirs, RT turn signal & gas pedal, mechanical throttle linkage, METCO safety loop, GASN side pipes, drop trunk, dual chrome roll bars, vintage gauges, glove box, custom center console, cup holders, and speakers.
-
09-06-2020, 07:36 AM
#451

Steve >> aka: GoDadGo

Congratulations!
.You Must Be Thrilled!
-Well Done!
Last edited by GoDadGo; 09-06-2020 at 07:38 AM.
-
09-06-2020, 11:24 AM
#452
Senior Member

Bradley
Build thread - Mk4, Coyote, IRS, Wilwood brakes, old-style soft top and accessories.
The distance between "finished" and finished is literally infinite.
-
09-06-2020, 02:28 PM
#453
Senior Member
Today I took my brother out for a short cruise and got lots of looks and thumbs ups! When I got home I made a short walk-around video in the sun.
-
Post Thanks / Like - 0 Thanks, 1 Likes
-
09-06-2020, 03:23 PM
#454
Senior Member

MKIV Complete Kit #9822 l BluePrint 347 EFI l TKO600 l Power Steering l Heater/Defrost l
Build Thread
-
09-06-2020, 05:21 PM
#455
Senior Member

looks great. I know you must be thrilled.
MK4 #8900 - complete kit - Coyote, TKO600, IRS - Delivered 6/28/16 First Start 10/6/16 Go cart - 10/16/16 Build completed - 4/26/17 - 302 days to build my 302 CI Coyote Cobra - Registered and street legal 5/17/17
Build Thread
http://thefactoryfiveforum.com/showt...e-build-thread
PHIL 4:13 INSTAGRAM - @scottsrides
-
09-06-2020, 08:43 PM
#456
Senior Member

Awesome! Double thumbs up for your color combo and that attention to detail in the engine compartment. And thank you for putting together a great build thread, I visit your thread often to help guide me through my journey.
You really put together one amazing car!
-
09-07-2020, 07:35 AM
#457
Senior Member

Dude, looks GREAT!!
Higgy
MK4 #11012 picked up 04/16/24
351W, 3 link, single roll bar
MK4 #10616 picked up 4/10/23
302w, 4 link, 17's, dual roll bar SOLD
MK4 #9759 picked up on 4/3/19
351C, 3 link, 17's, dual roll bars SOLD
-
09-07-2020, 09:59 PM
#458
Senior Member

Looks fantastic! Love the Ruby Red!
-
09-09-2020, 12:59 AM
#459
Wow! The paint is flawless! I like the wheels also. Now, I'm thinking of getting a new set of wheel and tire packages for my roadster.
-
Post Thanks / Like - 1 Thanks, 0 Likes
-
09-13-2020, 02:11 PM
#460
Senior Member
Carpet installed
This week I removed the seats, racing harnesses, shift knob, trans tunnel cover, e-brake boot, and door catches so that I can install the carpet. I almost hated taking the car offline as the weather has cooled off this weekend and I would love to take it out, but I want to get it finished up. I managed to get all but the under door carpet pieces installed this morning.
For the trunk I used 3M Super 90 spray adhesive, which worked well with the stretchy material I used in the trunk. The cockpit carpet doesn't stretch so I wanted to use outdoor carpet adhesive so I have time to shift parts around before it sets. I installed the bottom half of the rear cockpit wall but did not have very good results - it wouldn't hold and I really had to roll it on very firmly to get it to grab at all. After a PM to EdwardB I discovered that the notches in my trowel were just too small so I wasn't getting enough adhesive on the wall. I picked up a notched putty knife at Home Depot for a few bucks and it works WAY better. I believe the notches on this one are about 1/8" to 3/16". I used just over 1/2 a gallon of Dap Weldwood Carpet adhesive to install all the cockpit carpet. I mostly used the notched putty knife to spread the adhesive, and some paint stir sticks to dap it into the tight areas where the putty knife would not fit. After positioning and pressing into place, I used a small roller to roll it flat and a clean plastic putty knife to press down all the seams.

Before gluing each piece into position I test fitted and trimmed each one. Nearly every piece required at least a small amount of trimming, especially the floor pieces and the piece at the rear of the transmission tunnel. Once the rear cockpit carpet was in place I re-installed my fire extinguisher bracket and installed the shoulder harness trim bezels I picked up from replicaparts.com.


I didn't want any carpet between the floor and seat brackets of the Breeze seat mounts, so I had to cut around those. I first marked where the bolts are and punched holes in the carpet so it would mostly lay flat. I did not use any cement on the floor bracket and once I had the entire floor carpet piece in place and rolled, I came back with a razor knife and cut out around the bracket.

Since I made a leather-covered, removable trans tunnel cover, I cut the top off of the trans tunnel carpet and trimmed each side so that the carpet stops just under my rivnuts. I plan to tuck each side under my trans tunnel cover and then screw it down. Hopefully the carpet on the sides and rear won't make that too difficult.

-
Post Thanks / Like - 0 Thanks, 1 Likes
-
09-13-2020, 02:28 PM
#461
Senior Member
Heel pad installation
Because the accelerator is so close to the side of the footbox, I like the idea of a heel pad to reduce wear and tear on the carpet and to allow the foot to slide more easily than it would against the carpet. I picked up a small black pad at www.heelpadwarehouse.com - yes that is an entire web site dedicated to heel pads believe it or not  I picked up some leather sewing waxed thread and a needle on Amazon and I spent a couple hours hand-stitching the pad to the footbox carpet. I test fitted the pad and decided this was the best orientation, it runs just above the round frame tube and just far enough back to protect the carpet during full depress of the accelerator, while not interfering with it's movement (it's kind of tight in there and I didn't want it jamming up on the pad, so I moved it a bit forward). I then taped it temporarily to the carpet and pulled it back out to hand-stitch it.

After I stitched the bottom side of the pad, I masked off the carpet and sprayed some Super 90 in there and then pressed it into place. I figured this would help ensure the pad didn't "poof out", although I'm not sure that would happen anyway. It took me a couple hours to stitch this thing up. I used "tapestry" needles you can find at Michael's to help with this. I also pre-punctured holes in the pad using an awl. After pushing the needle and thread down from the top through the bottom, I would use a 2nd needle in the "return" hole on top to help guide the needle and thread back up. It was very tedious and took a couple hours, but I am glad that I did it and I like the finished product.

At this point I think I will clean up my seats, harnesses, and other parts and get the car back into driving condition. There is quite a bit of dust and gunk on the seats and harness from the bodywork - definitely a body-on paint job makes a bigger mess of the interior of the car. I am going to take my under door carpet pieces to an upholstery shop for some edging so those outside corners look nice and neat. Those pieces should be easy enough to install with the seats back in place, or so I hope.
Last edited by shark92651; 09-13-2020 at 02:32 PM.
-
09-15-2020, 11:12 AM
#462
Senior Member
-
Post Thanks / Like - 0 Thanks, 1 Likes
-
09-15-2020, 12:19 PM
#463
Mark
Mk1, Frame #1929 Complete restoration/upgrade. BP 347 with Edelbrock PF4 439/420. 4 link with coilovers. 8.8 3.55, 15 Halibrand, New beefed up T5 w/short throw shifter, Power 4 wheel disc brakes, Custom original style steering wheel, shaft and boss, Heat/AC, Heated seats, PPW wipers w/washers, Fortes throttle linkage, RT trunk hoop mod, Pusher cooling fans, full LED lighting, custom headrests, 5 point seat belts with sub pass through, Speedhut GPS gauges, battery drop box in trunk, LED courtesy lights, Breeze trunk cubby kit.
-
09-15-2020, 10:44 PM
#464
Senior Member

Nice find! Another must-have added to my list when I eventually get to that point.
Your finished MK4 looks awesome! Looks like a very clean build. Thanks again for sharing your learnings!
Chris
Coupe complete kit delivered: 4/22/24.
Build Thread. Coyote. T-56. IRS w/3.55. Wilwoods. PS. HVAC. Side windows.
MK4 Complete kit.
Build Thread Index. Delivered: 10/15/2020. Legal: 7/25/23. Coyote Gen3. TKO600 (0.64 OD). IRS w/3.55. PS. Wilwoods. Sway bars. This build is dedicated to my son, Benjamin.
Build Thread.
-
09-19-2020, 12:34 PM
#465
Senior Member
-
09-19-2020, 08:34 PM
#466
Member

Wow. That looks fantastic! Great attention to detail. Im making a note about that heel pad, and the floor mat clips, and that transmission tunnel cover, and the door sill carpet stitching...
-
Post Thanks / Like - 1 Thanks, 0 Likes
-
09-20-2020, 04:35 PM
#467
Senior Member
After spending a couple hours trimming the Dark Water door sill trim and polishing it, I decided I didn't like the look so I will be selling them. I went with the FFR supplied trim and I like the more subtle look. I felt I had too many shiny bits in the cockpit as it is and I think the rubber trim, along with painting my trans tunnel trim black, will tone it down a bit and will look better. I put a bead of silicon on the sill to help hold the trim in place.

I bolted my fog lights in behind the oil cooler grill, just need to adjust the lights a bit to center them better.

-
09-22-2020, 11:43 AM
#468
Question on Rear Quick Jack Mod
[QUOTE=shark92651;326241]I didn't get as much time to work on my kit this weekend as I would have liked, but my back-ordered control arms did come in late Saturday and I received my dropped trunk kit from Russ Thompson.
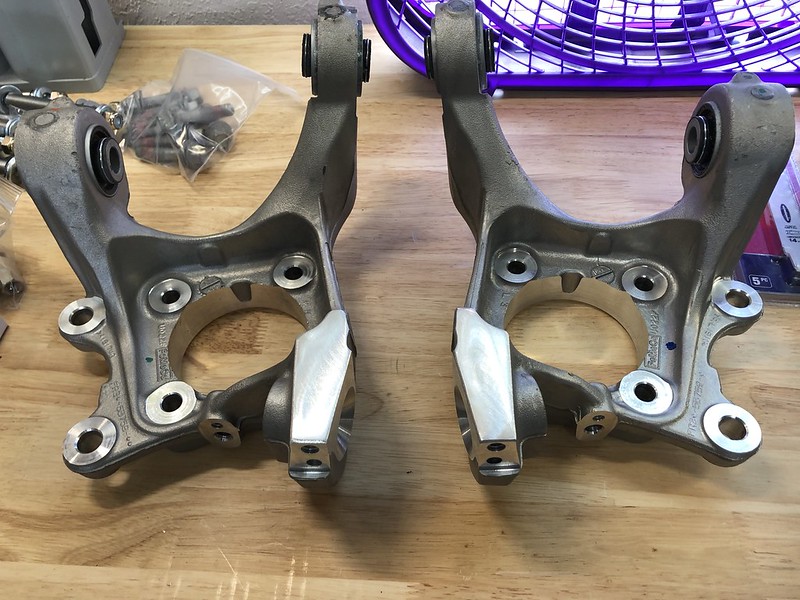
I cut the ends off of the rear spindles using my angle grinder and a cutting wheel, cleaned up with a flap disc.

I had a heck of a time swapping out the wheel studs. The FFR recomended method to remove the old studs (grab head of stud in vice, bang out with hammer) worked pretty well but their method to draw in the new studs with a lug nut and washer did not. I got one in with great effort, but about 1/2 way through the 2nd stud the lug nut was getting destroyed, the washers were bending up, etc... So I went to Home Depot and bought a large bolt to use as a punch, ground down the threads on one side, and used a socket in the vice and beat the studs in with a 4lb hammer. It took about a dozen blows to fully seat each stud, but I got them all in.
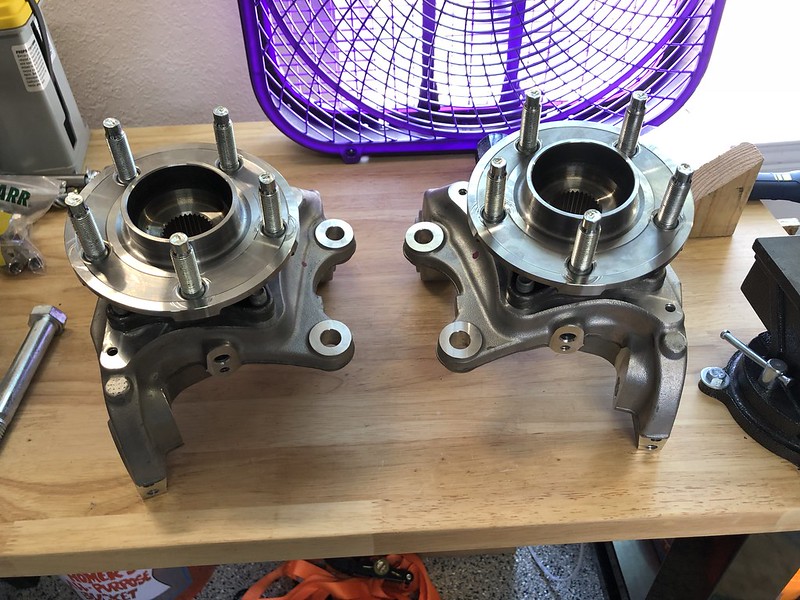
Here are the completed spindles and hubs. You can see the socket and hammer blows marred the hubs a bit, but I guess it shouldn't cause me to lose too much sleep since they will be hidden.
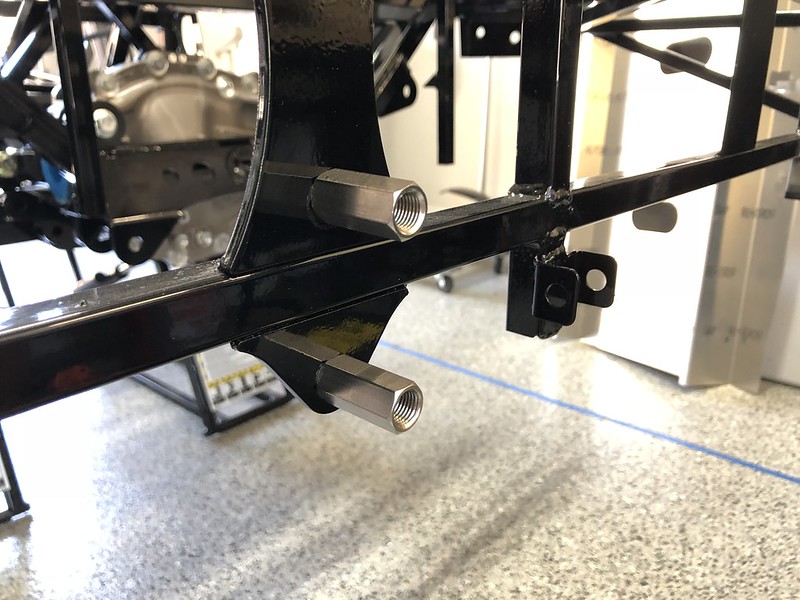
I also ordered up some stainless bolts and couplers from McMaster Carr for the rear Quick Jacks mod.
Shark,
I'm just getting started on a build very similar to yours, MK4 complete kit, IRS, Coyote, etc and thank you for all your insights! I'm really enjoying your build thread. Lots of great info and lessons learned that are already benefiting me. I know it's been a while back, but do you remember the specs on the bolts and couplers you ordered from McMaster Carr for the rear quick jack mod? I can't find that info on the forum, probably because I'm too new to know how to search properly.
Thanks for the help!
Barrow
-
09-22-2020, 11:52 AM
#469
 Administrator


Originally Posted by
shark92651

I have read that the FFR floor mats can shift around and bunch up in the footbox so I wanted to avoid that - not only is it annoying but can be dangerous if it happens around the pedals. I like the clips that are built into the floor mats of most daily drivers so looked for something like that. I found these AZERONE car mat carpet clips on Amazon and they were only $9.99 for a set of 8 clips.
https://www.amazon.com/gp/product/B0...rch_asin_title
I used a 25mm hole punch that I had from a previous project and the entire job only took about 30 minutes. I laid the mats in place and determined where I wanted the clips. The bottom half of the clip has a bent nail and you press it down into the carpet and then slide it forward to lock it into place under the carpet backer. Once the bottom clip was in place I put the round piece on top and then put the mat back in place and pressed down to put an imprint on the plastic backer of the mat. That left just enough of an indention to punch out the hole in the correct position. I installed the clips in pairs, one side at a time and test fitted the mat before marking for the 2nd set of clips. It was a quick and easy job and seems very secure and looks great.


LOVE this! What a simple solution to a common problem. How come I've never seen this before? WHY DIDN'T I THINK OF THAT??

FFR 5369 Pin Drive, IRS, Trigos, Torsen, Wilwoods, FMS BOSS 302 "B" cam , Mass-flo. CA SB100 (SPCN) Registered
Delivered 4/23/06. "Finished" 4/2012 (still not done!)
-
Post Thanks / Like - 0 Thanks, 1 Likes
-
09-23-2020, 03:14 PM
#470
Senior Member
Originally Posted by
GBarrow
Shark,
I'm just getting started on a build very similar to yours, MK4 complete kit, IRS, Coyote, etc and thank you for all your insights! I'm really enjoying your build thread. Lots of great info and lessons learned that are already benefiting me. I know it's been a while back, but do you remember the specs on the bolts and couplers you ordered from McMaster Carr for the rear quick jack mod? I can't find that info on the forum, probably because I'm too new to know how to search properly.
Thanks for the help!
Barrow
McMaster keeps a nice record of all past orders. Here are the parts I ordered for that mod:
18-8 Stainless Steel Coupling Nut
18-8 Stainless Steel Hex Head Screw
18-8 Stainless Steel SAE Washer
-
Post Thanks / Like - 2 Thanks, 0 Likes
-
09-26-2020, 04:42 PM
#471
Senior Member
-
09-26-2020, 05:41 PM
#472
Senior Member
#9327 is graduated!
Well I guess it's time to call #9327 graduated! Of course I'm not done working on it, probably will never be, but at some point you have to say "that's it, I'm done". When I started this project in mid-2018 I really didn't fully comprehend the amount of work and the obsession this would become, but was excited and ready to see what I could build. I'm so thankful for everyone on this forum for providing inspiration, motivation, guidance, and technical support! This really is the best, most helpful forum of any topic that I have been a member of. For those of you that are just here for the graduation pics and summary, I built an FFR MK4 with a Gen2 Ford Coyote crate motor, ford performance clutch, and TKO-600 5-speed w/synchro upgrade from Liberty Gears. The car has IRS, dual anti-sway bars, has KRC power steering, Mike Forte external hydraulic clutch, Wilwood 13" disc brakes, 18" FFR halibrand style wheels, FFR stainless headers and side pipes, and dual stainless breeze roll bars. And without further ado, here are the graduation pics.


Last edited by shark92651; 09-26-2020 at 07:33 PM.
-
Post Thanks / Like - 0 Thanks, 2 Likes
-
09-26-2020, 06:26 PM
#473
Senior Member

MkIV Complete Kit #9423, Gen 3 Coyote, TKO-600, IRS Torsen 3.73, Wilwoods, DA Konis - Delivered 9/14/18
-
09-26-2020, 06:46 PM
#474
Senior Member

A stellar build. Thanks for sharing your journey.
Cheers,
Nigel
-
09-27-2020, 12:06 AM
#475
Outstanding work and results! Enjoy the fruits of your labor.
MK IV Build #9659, 3 link, 17's, Forte 347, Sniper EFI, power steering, built for a freak sized person with 17" Kirkey Vintage seats, RT drop trunk, RT turn signal, lots of stuff from Breeze Automotive, Wilwood brakes, paint by Jeff Miller
-
09-27-2020, 08:59 AM
#476
Senior Member

CONGRATS! What's the next project?
MKIV #7275 Acquired June 2019 (2010 partial build), Gen 2 Coyote by Forte w/TK600- PRO 5.0 - McLeod RST twin Clutch-QT Bell, old style IRS, 8.8 3.55 Rear, Gas'n Headers/Pipes, Power Steering, Hydroboost by Forte, Breeze Roll Bar, Heated Seats, 17" halibrand w/ Nitto G2, Maradyne Fan Controller, Paul Proe Vent Kit, Russ Thompson Signal w/ FTP- Received June 2019/First Start April 2020/Go Cart May 2020/Legal September 2020/PAINT BY SPOTLIGHT CUSTOMS JAN 2021
-
09-27-2020, 09:02 AM
#477
Not a waxer

Well done David! Enjoy it
Jeff
-
09-27-2020, 09:38 AM
#478
Congratulations. Beautiful work and great choices along the way. Thank you for sharing your build. I’ve enjoyed following along.
-Steve
-
09-27-2020, 10:08 AM
#479
Senior Member
Congrats. Looks great. Very nice work. I enjoyed following your progress along the way. Hope you enjoy many happy miles!!
MK4 #8900 - complete kit - Coyote, TKO600, IRS - Delivered 6/28/16 First Start 10/6/16 Go cart - 10/16/16 Build completed - 4/26/17 - 302 days to build my 302 CI Coyote Cobra - Registered and street legal 5/17/17
Build Thread
http://thefactoryfiveforum.com/showt...e-build-thread
PHIL 4:13 INSTAGRAM - @scottsrides
-
09-27-2020, 12:59 PM
#480
Senior Member

Originally Posted by
shark92651
I have read that the FFR floor mats can shift around and bunch up in the footbox so I wanted to avoid that - not only is it annoying but can be dangerous if it happens around the pedals. I like the clips that are built into the floor mats of most daily drivers so looked for something like that. I found these AZERONE car mat carpet clips on Amazon and they were only $9.99 for a set of 8 clips.
https://www.amazon.com/gp/product/B0...rch_asin_title
I used a 25mm hole punch that I had from a previous project and the entire job only took about 30 minutes. I laid the mats in place and determined where I wanted the clips. The bottom half of the clip has a bent nail and you press it down into the carpet and then slide it forward to lock it into place under the carpet backer. Once the bottom clip was in place I put the round piece on top and then put the mat back in place and pressed down to put an imprint on the plastic backer of the mat. That left just enough of an indention to punch out the hole in the correct position. I installed the clips in pairs, one side at a time and test fitted the mat before marking for the 2nd set of clips. It was a quick and easy job and seems very secure and looks great.
Super nice idea to hold those in place. I’ve tried several things and those rascals shift around and can truly be a hazard.
Chris
Generation 3 Type 65 Daytona Coupe Complete Kit #151885 received May 6, 2022. Gen 3 Coyote, IRS, Tremec TKX, American Powertrain hydraulic throwout bearing & Wilwood brakes.
MK4 Basic Kit #7404, 347 EFI - Pro M Racing ECM, 30# injectors, 70 mm throttle body, 80 mm MAF, Edelbrock Performer aluminum heads & RPM II intake, all new G-Force T5, 3:55 gears, Pro 5.0 shifter, 3-link, carbon fiber dash/custom Speedhut gauges and paint by Da Bat.


 Thanks:
  Likes:


 Reply With Quote


