Boig Motorsports

Visit our community sponsor

Thanks Thanks:  4
Likes Likes:  9
Page 2 of 5 FirstFirst 1234 ... LastLast
Results 41 to 80 of 168

Thread: 20th Anniversary MK4 Build Thread - #10 of 20 - #8697

  1. #41
    Boydster's Avatar
    Join Date
    Aug 2014
    Location
    Maryville, TN
    Posts
    1,104
    Post Thanks / Like
    Your roadster is gonna be a blast, Russell. A bit the same as my plan. I have a question, tho...

    Why the dual inline fuel filters? I think the 100 micron will catch everything so the 10 becomes redundant. I understand the need for a 10 and a 100 in an external pump application (before and after the pump), but with the internal 255 you have, I thought just the 100 was needed. I'm sure there's a logic behind it, just wondering as I'll be using many of the same items you are (427W, Terminator EFI, etc).

    Thanks for keeping us up on your build.

    EDIT: I believe I got it backwards... The 10 micron will catch everything and make the 100 micron redundant. I was thinking particle size, not filter size.
    Last edited by Boydster; 11-15-2015 at 09:56 PM.

  2. #42

    Join Date
    Jun 2015
    Location
    Parker, TX
    Posts
    288
    Post Thanks / Like
    Quote Originally Posted by Boydster View Post
    The 10 micron will catch everything and make the 100 micron redundant. I was thinking particle size, not filter size.
    Thanks Boydster,
    You are correct that it is redundant and overkill. I picked up the filters to follow the Holley EFI fuel system kit but then opted for the in-tank pump. I'm going to install them both basically because I have them and I think they will filter better and longer as a pair. So really more circumstance than logic...

  3. #43
    Boydster's Avatar
    Join Date
    Aug 2014
    Location
    Maryville, TN
    Posts
    1,104
    Post Thanks / Like
    Quote Originally Posted by RRussellTx View Post
    Thanks Boydster,
    You are correct that it is redundant and overkill. I picked up the filters to follow the Holley EFI fuel system kit but then opted for the in-tank pump. I'm going to install them both basically because I have them and I think they will filter better and longer as a pair. So really more circumstance than logic...
    You just like really clean fuel, right? Thanks and lookin forward to more updates.

  4. #44

    Join Date
    Jun 2015
    Location
    Parker, TX
    Posts
    288
    Post Thanks / Like
    All I want for Christmas is my Drivetrain from Forte and my back ordered brakes/axles.
    Heck, I would be happy with an accurate promise date for any of the above.
    My frustration level is pretty high at this point.

    Worked on the aluminum panels, brake/clutch reservoir mount and played around with my new polisher while I'm waiting.

    I'm polishing up the wheel spinners and had some paint matched to the wheels to paint the indented areas on the spinners.
    I'll post some pics when I get done but I need to pick up another paint gun as mine had too much corrosion for me to trust it.

  5. #45
    Senior Member KDubU's Avatar
    Join Date
    May 2015
    Location
    Kennebunkport, ME
    Posts
    1,193
    Post Thanks / Like
    Looks good so far. Just a FYI on your drivetrain from Mike. Jesse called me on Saturday after dyno'ing mine and I ordered a while back in July. He's getting through the orders and I know his Dyno going down for weeks in Sept really did not help things. Hope you hear some good news in the near future as I also waited a bit for Wilwood brakes as well.
    Kyle

    Complete Kit pickup 09/05/2015, 351w, QF680, 3.55, 3-Link, 15" Halibrands with MT's, Painted Viking blue with Wimbledon white stripes on 03/15/2017. Sold in 08/2018 and totally regret it.

  6. #46

    Join Date
    Jun 2015
    Location
    Parker, TX
    Posts
    288
    Post Thanks / Like
    Thanks for the info Kyle! That is actually very helpful. When I ordered Mike said it would be about 6 weeks from order to shipment (I ordered mid-September) so that's why I'm frustrated. If he had said six months then I would be fine right now. My main issue is expectations for planning and info for communication. The first questions from my buddies and family is always "did you get the motor yet?" and the second questions is "When is it coming?". My answers are "Nope" and "No freakin clue". I've tried to pin Mike down on a date but I don't think he works that way.

    Sounds like I should just plan on mid January but I was hoping to have it for the Christmas Holidays for when my Dad is in town to help...

  7. #47

    Join Date
    Jun 2015
    Location
    Parker, TX
    Posts
    288
    Post Thanks / Like
    I received the Shipping Label for Gumball's Steering wheel so I'm off to the FedEx store. I'm also going to to send a little care package to Team Forte to see if bribery works at all...
    IMG_0625.JPG

  8. #48
    Administrator David Hodgkins's Avatar
    Join Date
    Feb 2011
    Location
    Corona del Mar, CA
    Posts
    6,131
    Post Thanks / Like
    Blog Entries
    7
    Any updates on this build? The 20th Anniversary cars are awesome...


    FFR 5369 Pin Drive, IRS, Trigos, Torsen, Wilwoods, FMS BOSS 302 "B" cam , Mass-flo. CA SB100 (SPCN) Registered
    Delivered 4/23/06. "Finished" 4/2012 (still not done!)


  9. #49

    Join Date
    Jun 2015
    Location
    Parker, TX
    Posts
    288
    Post Thanks / Like
    Hi David. I'm still waiting on the front brakes and the motor. I received the rear brakes and axles right before Christmas and they went in without any issues. I've started the safety wire on the hats but got distracted over the holidays with work and family (and a little chill time for me).

    King stopped by with his very impressive recently titled ride just before Christmas and gave me a bit of a scare. I tried to climb in his cockpit with my 6'-4" frame and it was not going to happen. My left foot was never going to get over that door sill - no matter how much yoga I took. Anyway, King and his son got a phone call and needed to run but I knew I had some work to do to set my mind at ease.

    Since I had everything to get a rolling chassis - that's what we did. I got the wheels and tires mounted and rolled the chassis out in the driveway and then set the body on and set the seat in place. Then I was able to practice various entry and exit moves that should work just fine. There should be a step by step guide on how to enter/exit one of these little guys!

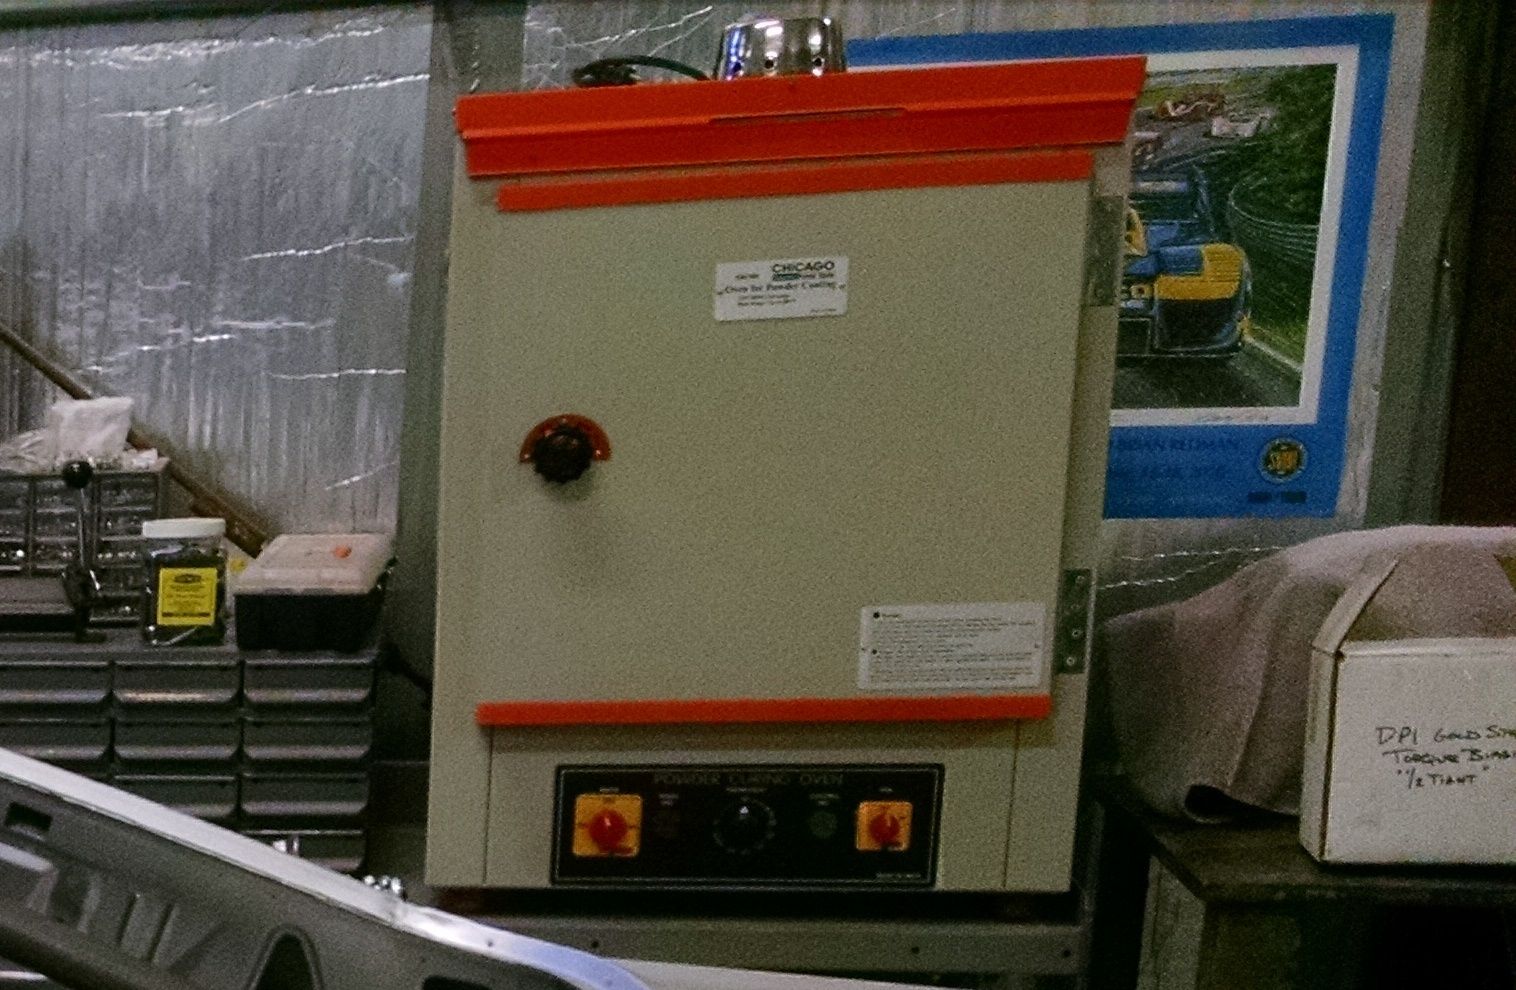
    I also followed other people's lead and picked up a powder coating rig from Eastwood. I then took to Craigslist for the oven and picked up a very nice 1950's vintage Hotpoint Oven for $35 bucks. We spent some time rewiring it to an extension cord and putting it on wheels and I now have a very cool powder coating oven.

    Other activities include creating a bracket for the CNC triple brake reservoir, cutting and mounting the rear differential vent, drilling and clecoing panels, practicing bending/flaring stainless steel brake lines...

    I'll get a proper update with pics soon but right now I have many things started but few things finished...

  10. #50

    Join Date
    Jun 2015
    Location
    Parker, TX
    Posts
    288
    Post Thanks / Like
    Powder Coating Setup:

    I want to thank everyone that posted about how simple it is to get started with your own Powder Coating setup. It really is VERY cheap and easy to get setup. I went with the Eastwood Dual Voltage HotCoat Powder Coating Gun
    Item #11676 and a pound of the #10107 Powder High Gloss Black. That set me back about $120 - all I needed then was an Oven to bake it in. I considered the little Eastwood Oven but I was afraid it would be too small so I took to Craigslist and found a 1950's Vintage Oven for $35 bucks. It was in great shape but it still had the 1950's wiring... I took it apart enough to get a modern extension cord hooked up and I placed the oven on a little dolly so I can roll it under my shop workbench. So now, for a little over $150, I'm all set for powder coating small parts.

    Here are some pics of my new toy:


    And here is a pic of one of the parts I have powder coated so far:


    The oven has a Dual Rotisserie and an Automatic Shutoff timer - pretty fancy for a Powder Coating Rig...
    i am going to try the Clear Powder next to see how it seals Aluminum.
    Last edited by RRussellTx; 07-30-2017 at 03:06 PM.

  11. #51

    Join Date
    Jun 2015
    Location
    Parker, TX
    Posts
    288
    Post Thanks / Like

    Tires:

    I also went ahead and picked up my tires last month. I went with the BFGOODRICH G-FORCE RIVAL S tires. I have had several sets of these in the past and I like the performance/price/treadwear combination that they provide. I picked up the P315/30ZR-18 for the rear and P245/40ZR-18s for the front. They are fat and sticky!


    Last edited by RRussellTx; 07-30-2017 at 03:09 PM.

  12. #52

    Join Date
    Jun 2015
    Location
    Parker, TX
    Posts
    288
    Post Thanks / Like
    Rolling Chassis - to see if I fit...

    As I mentioned a couple of posts back - King stopped by over the holidays and I had a hard time getting in and out of his car (AKA - it was never going to happen). I climbed in like I would my DD and my left leg was NOT going to get over door sill. Anyway, since I had my tires mounted and most of my suspension done, I thought I would roll it out and see if i could get into mine. I did figure out an easy way to get in and out but I do need to support myself on the center console and the body behind the door. Anyway, here is a pic of me pulling out some cleco's so I can get the seat in:


    And another shot without the body:


    You can almost see the Diff Vent Tube in that shot but here is a better look. I just trimmed the 2015 Mustang Vent and heated it up a bit to get the bend a little straighter. I did not have to move the clip although the test fit left a little bite mark on the right...
    Last edited by RRussellTx; 07-30-2017 at 03:11 PM.

  13. #53

    Join Date
    Jun 2015
    Location
    Parker, TX
    Posts
    288
    Post Thanks / Like
    Rear Suspension is Complete!!:

    I did receive the Axles and Rear Wilwood brakes right before Christmas. I was so happy to get something that I could actually finish! I was able to get the rear end 100% complete.
    Everything looks just like Edwardb's outstanding photos so I'm going to skip those photos for now. Although I did get the obligatory shot of the safety wire - (like Edwardb - don't look too close).


    I'm still waiting on the front Brakes - Jay said that Wilwood is having issues with the Rotors or something... I also don't have the emergency brake cables. I thought maybe they were going to come with the brakes but they were not in the shipment from Wilwood. If anyone can tell me the FFR part number or which box it came in I could double check my paperwork but after a good hour of searching, I really don't think it made in on my list of parts.

    I have also made quite a bit of progress drilling the panels. I have also generated and ordered my initial list of parts for the rear brake lines but I'm still not 100% sure how I'm going to exit the DS footbox with the rear brake lines so ideas are welcome. I have also practiced bending and flaring the Stainless Brake lines and I do love the Eastwood flare tool. Perfect flares every time. I did have some challenges getting the bends exactly right so I ordered some 3/32" X 36" aluminum TIG welding rods to bend as a template (like cardboard before sheet metal), I'll see how that works after my brake line parts show up.

    Hopefully the next updates will include front brakes and maybe even news about my motor from Forte.

    Happy New Year everyone!
    Last edited by RRussellTx; 07-30-2017 at 03:13 PM.

  14. #54
    2bking's Avatar
    Join Date
    Jul 2013
    Location
    Garland, Texas
    Posts
    799
    Post Thanks / Like
    Quote Originally Posted by RRussellTx View Post
    I have also practiced bending and flaring the Stainless Brake lines and I do love the Eastwood flare tool. Perfect flares every time. I did have some challenges getting the bends exactly right so I ordered some 3/32" X 36" aluminum TIG welding rods to bend as a template (like cardboard before sheet metal), I'll see how that works after my brake line parts show up.
    I like the look of the 18 inch rims and low profile tires. And where is the picture of you in the seat?

    I used the brake lines supplied with the kit for mockup and then bent the stainless.
    King
    Roadster #8127, ordered 7/12/13, received 9/11/13
    http://thefactoryfiveforum.com/showt...4-Coyote-Build

  15. #55
    Senior Member edwardb's Avatar
    Join Date
    Feb 2011
    Location
    Lake Orion, Michigan
    Posts
    10,795
    Post Thanks / Like
    Lots of great updates and progress! Cool seeing the chassis sitting down on the wheels and tires. I don't remember stoves like that (and I'm kind of from the 50's too... ) but what a perfect setup for powder coat. I might have to try that one of these days. Love the tires. Those are the exact ones that are on my short list when I think about tires in a few months. I see you chose the 245/40ZR18 for the fronts. Did you look at the 275/35ZR18's? 275's are generally at the upper limit for the front, if not too wide. But in the listings I could find, appear to be very similar in size to the 245's given the lower aspect ratio. Just curious. The 315's look perfect. I too like the 18 inch wheels and low profile. It's a different look, and one the traditionalist's may question. But it fits the overall modern theme of the build.
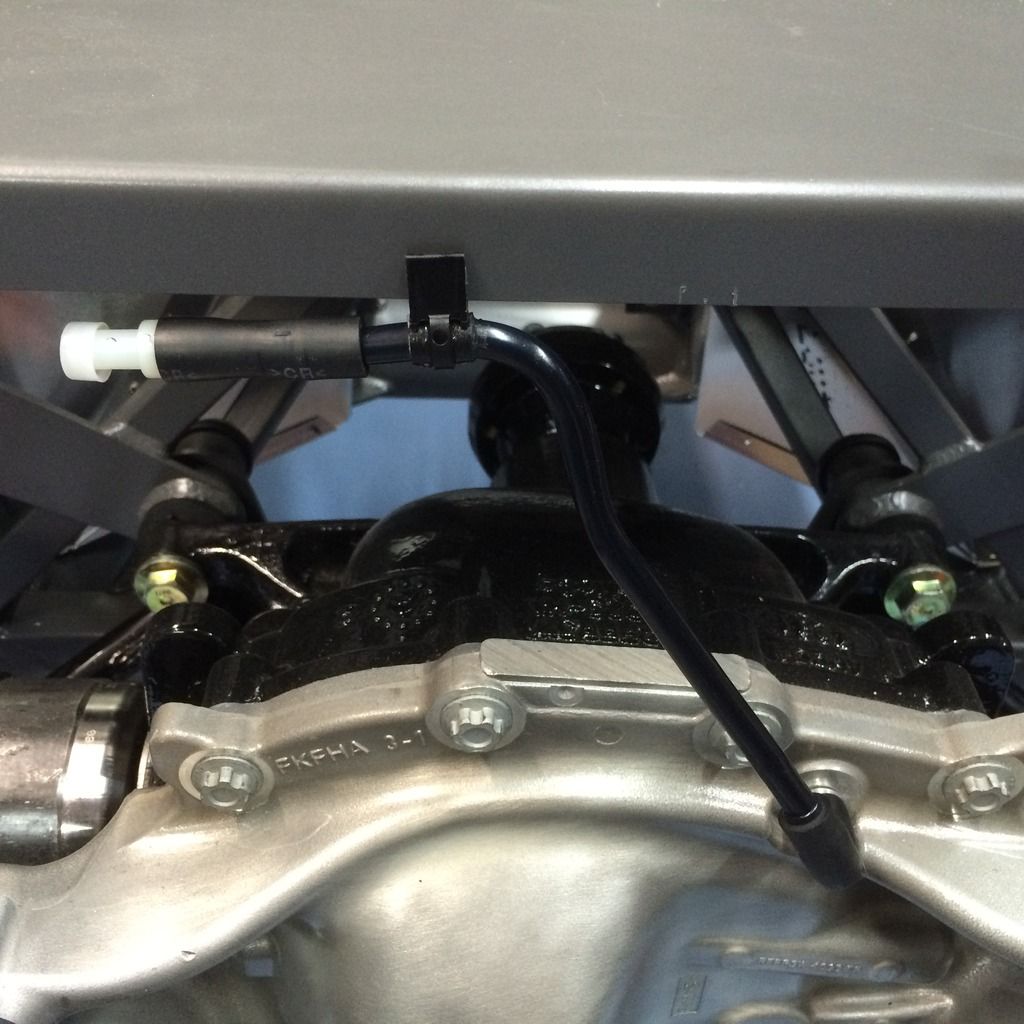
    Like what you did with the diff breather. May copy that one. For the e-brake cables, my kit delivery also did not have them. They weren't on the manifest anywhere or on the POL shortage. Included them on the missing parts list I sent to FF and I received them shortly after. The part number on the cables is "14690 2015W." I've got them installed per the routing in the IRS instructions, and mocked up with the handle a few days ago. All seems OK. Hopefully you received the little clips required to attach the cable ends to the Wilwood e-brake caliper lever. Another powder coat opportunity since they're bare steel. I used a rattle can.

    I'm still thinking about how to route the rear brake lines out of the footbox. My two other builds had the MC outside the footbox, so this is a first for me as well. Right now I'm thinking to bring both front and rear out of the footbox together. The front stopping at the 3/4 inch tube and going forward to the front wheels. The rear on down to the bottom of the footbox and then to the back along the outside of the 4 inch chassis tube. Similar to what FF shows in their build videos, and what I've seen from a number of other builds. I've seen a couple of builds where they take them down inside the footbox before exiting to go back on the 4 inch chassis tube. But I really don't want to bury them in there. Like 2bking, I used the FF supplied brake lines for mockup and then duplicated in stainless. For the 3/8 inch fuel lines on my last build, I bought a roll of 3/8 inch copper tubing at Home Depot (about $15 as I recall) and used that to mock up the various fuel line pieces. It bends easily by hand. Then duplicated in stainless. Planning to do the same this time around.
    Last edited by edwardb; 01-04-2016 at 07:50 AM.
    Build 1: Mk3 Roadster #5125. Sold 11/08/2014. Build 2: Mk4 Roadster #7750. Sold 04/10/2017. Build Thread
    Build 3: Mk4 Roadster 20th Anniversary #8674. Sold 09/07/2020. Build Thread and Video. Build 4: Gen 3 Type 65 Coupe #59. Gen 3 Coyote. Legal 03/04/2020. Build Thread and Video
    Build 5: 35 Hot Rod Truck #138. LS3 and 4L65E auto. Rcvd 01/05/2021. Legal 04/20/2023. Build Thread. Sold 11/9/2023.

  16. #56

    Join Date
    Jun 2015
    Location
    Parker, TX
    Posts
    288
    Post Thanks / Like
    Thanks for the tips on the brake lines guys. I may try them both since I have the materials on hand.

    Edwardb,
    I went with the 245's because I was not familiar enough with the car yet to know if the 275's would fit. I will certianly try the wider option for the next set if it will fit after I get everything dialed in. One of the things I like about the BF Goodrich Rivals is a very thick bead right around the rim. It saved me from curb rash in the past. The problem with the 245's is that there is less than 1/8th" overhang on the bead. The rears have a little over 1/4" and I ran a bit more than that on my last car.

    Also, thanks for the e-brake info - very helpful as always!

  17. #57
    Senior Member
    Join Date
    Apr 2013
    Location
    Albuquerque, NM
    Posts
    186
    Post Thanks / Like
    Quote Originally Posted by RRussellTx View Post

    You can almost see the Diff Vent Tube in that shot but here is a better look. I just trimmed the 2015 Mustang Vent and heated it up a bit to get the bend a little straighter. I did not have to move the clip although the test fit left a little bite mark on the right...
    I'm clearly not an expert on the topic(especially with this particular diff) but one comment about the vent tube routing/layout. With the checkball/one-way vent on the end, the only way it works as designed is if it's mounted vertical. Most have a small plastic/poly ball in them the seats properly based the situation: car upright/no pressure escaping, car upright/vent out under pressure, car sideways or upside down, etc....
    The line coming out of the diff is at about 11o'clock position with the vent at 9o'clock. It looks like if you move the line to 2o'clock, the vent will be upright at 12o'clock and can still be mount on the same surface. All of this being said, it may not really matter that much based on the baffle on the inside of the diff for the vent. Oh, and by keeping the car shiny side up....

    Beautiful build, I'll be continuing to follow as you make progress.

    -TJ

  18. #58
    Jazzman's Avatar
    Join Date
    Jan 2014
    Location
    Scottsdale, AZ
    Posts
    1,166
    Post Thanks / Like
    I applaud your ingenuity with the powder coating. I may have to look into that on the next build. One question though. I can see where a home oven would work great for small pieces, anything that would fit in the oven. What do you plan to do for the larger panels that are too big for the oven?

    Thanks for the photo of your differential vent tube installation. I am working on that right now. It is nice to see on possible option. Do you plan to make any change to the routing based upon TJ's comment about the need to install the vent vertically?

    You are doing a great job! It has to be a great feeling to get it on the ground in the new shoes.
    Jazzman

    MKIV #8745 "Flip Top" Roadster, Custom Tilt front, Coyote Engine, Tremec TKO600, Custom Interior. Best of Show winner, Huntington Beach Cruise In 2018.

    1967 Ford Mustang Coupe build thread updated 1/22/2021

    Roadster Frame Dolly Plan

  19. #59
    Junior Member
    Join Date
    Aug 2015
    Posts
    8
    Post Thanks / Like
    Most check valves have a spring on the ball that forces it to seat unless there is pressure pushing the ball up, allowing the pressure to escape. It could very well work in any orientation.

  20. #60
    Senior Member edwardb's Avatar
    Join Date
    Feb 2011
    Location
    Lake Orion, Michigan
    Posts
    10,795
    Post Thanks / Like
    Quote Originally Posted by jeepurz View Post
    I'm clearly not an expert on the topic(especially with this particular diff) but one comment about the vent tube routing/layout. With the checkball/one-way vent on the end, the only way it works as designed is if it's mounted vertical. Most have a small plastic/poly ball in them the seats properly based the situation: car upright/no pressure escaping, car upright/vent out under pressure, car sideways or upside down, etc....
    The line coming out of the diff is at about 11o'clock position with the vent at 9o'clock. It looks like if you move the line to 2o'clock, the vent will be upright at 12o'clock and can still be mount on the same surface. All of this being said, it may not really matter that much based on the baffle on the inside of the diff for the vent. Oh, and by keeping the car shiny side up....

    Beautiful build, I'll be continuing to follow as you make progress.

    -TJ
    Quote Originally Posted by Jazzman View Post
    Thanks for the photo of your differential vent tube installation. I am working on that right now. It is nice to see on possible option. Do you plan to make any change to the routing based upon TJ's comment about the need to install the vent vertically?
    Quote Originally Posted by networkcrasher View Post
    Most check valves have a spring on the ball that forces it to seat unless there is pressure pushing the ball up, allowing the pressure to escape. It could very well work in any orientation.
    I just looked at the Ford differential vent tube (FR3Z-4A058-A) and this is a non-issue. There's no check valve in the end of the line. It's just a little plastic cap that's loosely mounted, I'm assuming to keep water, debris, whatever from getting into the tube. Blowing through the tube it works exactly the same except when in a complete upside down position. It should be fine mounted as pictured. I'm actually not surprised about this. The 8.8 solid axle also has a vent on the top of the axle tube about halfway between the diff and the end of the axle. It's metal, but it also has a loosely fitted cap I assume for the same reason.
    Build 1: Mk3 Roadster #5125. Sold 11/08/2014. Build 2: Mk4 Roadster #7750. Sold 04/10/2017. Build Thread
    Build 3: Mk4 Roadster 20th Anniversary #8674. Sold 09/07/2020. Build Thread and Video. Build 4: Gen 3 Type 65 Coupe #59. Gen 3 Coyote. Legal 03/04/2020. Build Thread and Video
    Build 5: 35 Hot Rod Truck #138. LS3 and 4L65E auto. Rcvd 01/05/2021. Legal 04/20/2023. Build Thread. Sold 11/9/2023.

  21. #61

    Join Date
    Jun 2015
    Location
    Parker, TX
    Posts
    288
    Post Thanks / Like
    Thanks for answering Edwardb - Spot on answer as always! I don't usually have time to check/update the forum until I take care of work and the kids homework so I appreciate the help! And TJ - you are also correct - Plan A is to keep the shiny side up!


    Quote Originally Posted by Jazzman View Post
    One question though. I can see where a home oven would work great for small pieces, anything that would fit in the oven. What do you plan to do for the larger panels that are too big for the oven?
    I have a local Powder Coater that I use that will take care of my big stuff like the Panels. He does a nice job but he has a $90 minimum plus he's about 30 minutes away. My little rig is going to be mostly for the odds and ends that need to be coated along the way. They can be sprayed, heated/cured and cooled in less than an hour and are fully ready to go. Items like the spacers for the shocks, the e-brake parts, hinges can be done but also all of parts that I fabricate along the way can be done quickly. I'm also going to try Clear Powder on the Aluminum CNC Reservoir bracket that I made as well as the spinners on the wheels once I shine them up - as examples.

  22. #62

    Join Date
    Jun 2015
    Location
    Parker, TX
    Posts
    288
    Post Thanks / Like
    Well, after almost 5 months since my kit was 'ready', I have received my very last back-ordered part today (door latches)!
    I received the front brakes last week and got them installed over the weekend without any issues and received the e-brake cables yesterday.

    Now - where is that engine from Forte?

  23. #63
    Senior Member
    Join Date
    Sep 2014
    Location
    Farmington, Maine
    Posts
    122
    Post Thanks / Like
    I am happy to report that I also received my door latches and front hubs this week. Front brakes came last week, so I was able to complete the front suspension. Only thing left on BO is the windshield. I picked up my Forte engine last month. Hang in there, Mike will get it to you. I hope to get the engine installed by the end of this month.

  24. #64
    Senior Member Paul Mischenko's Avatar
    Join Date
    Nov 2015
    Location
    Westchester, NY
    Posts
    177
    Post Thanks / Like
    Hey Guys, I'm all up to date on my 20th Ann POL as well. Latches came the other week. After finishing the IRS, started working on getting all the panels clecoed and installed before sending to PC. I did notice the drviers front box panel that was PC'd white with my kit was for the Mustang doner pedal box and not the Wilwood. Others may want to double check as well, as my body came with an aluminum wildwood panel in place. Quick call to guys at FF and they sorted it out quickly. I have to say their CS is pretty impressive. I hope to finish all my panels this weekend and send them off. Still haven't decided on the engine package but given my progress rate I have a little time. Looks like were finally going to get some snow in NY this weekend, so I hope to get some more work done on the weekend. Hope all your builds are going well. Cheers

  25. #65

    Join Date
    Jun 2015
    Location
    Parker, TX
    Posts
    288
    Post Thanks / Like
    I finally received an update from Forte! He completed the engine a couple of weeks ago and I think he is getting ready to ship it out. Attached are the results from the Dyno...
    Screen Shot 2016-02-07 at 8.12.45 PM.png

  26. #66

    Join Date
    Jun 2015
    Location
    Parker, TX
    Posts
    288
    Post Thanks / Like

    Brakes are complete!

    Also, the brakes are just about complete. Here are a few pics of the finished product:

    DS Front:


    PS Front:


    At Reservoir:


    Footbox Panel:


    Pedal Box:


    Inside Footbox:


    Looking down on the DS Rear:


    I used the Gardner-Westcott Chrome Fittings and Stainless Steel Lines flared with the Eastwood Flare Tool. I also use the Ron Francis Brake Light Pressure Switch (SW32). This was my first attempt at brake lines and I'm pretty happy with the results. There is a pretty good pile of rejected attempts but I finally got a few runs that I was happy with. I still have some work to do getting the rear brake lines through the footbox floor but that should be pretty easy compared to the rest of it.

    Really looking forward to getting the engine so I can be sure of the fuel line routing and the general fit for the engine compartment panels.
    Last edited by RRussellTx; 07-30-2017 at 03:20 PM.

  27. #67
    Senior Member edwardb's Avatar
    Join Date
    Feb 2011
    Location
    Lake Orion, Michigan
    Posts
    10,795
    Post Thanks / Like
    Great job on your brake lines. First time and stainless too! Excellent work. I'm going to steal a couple of your routing ideas since my Anniversary build is the first time I've had the MC's inside the footbox. One hint/observation: Nice and neat how you brought the fluid reservoir lines through that access panel in the footbox front. But that location is normally used for the front wiring harness leg to exit the footbox and go up to the front of the chassis. Could get a little congested in there, or maybe will take some other creative routing. Your engine numbers look great too.
    Build 1: Mk3 Roadster #5125. Sold 11/08/2014. Build 2: Mk4 Roadster #7750. Sold 04/10/2017. Build Thread
    Build 3: Mk4 Roadster 20th Anniversary #8674. Sold 09/07/2020. Build Thread and Video. Build 4: Gen 3 Type 65 Coupe #59. Gen 3 Coyote. Legal 03/04/2020. Build Thread and Video
    Build 5: 35 Hot Rod Truck #138. LS3 and 4L65E auto. Rcvd 01/05/2021. Legal 04/20/2023. Build Thread. Sold 11/9/2023.

  28. #68

    Join Date
    Jun 2015
    Location
    Parker, TX
    Posts
    288
    Post Thanks / Like
    Quote Originally Posted by edwardb View Post
    One hint/observation: Nice and neat how you brought the fluid reservoir lines through that access panel in the footbox front. But that location is normally used for the front wiring harness leg to exit the footbox and go up to the front of the chassis. Could get a little congested in there, or maybe will take some other creative routing. Your engine numbers look great too.
    Thanks for the tip. I'm finding that 'Creative routing' is a large part of my build! I don't need the clutch opening since I'm going hydraulic so I was looking at that for the wiring harness exit. It also won't be the first thing I've had to redo if I don't like it later.

  29. #69
    Administrator David Hodgkins's Avatar
    Join Date
    Feb 2011
    Location
    Corona del Mar, CA
    Posts
    6,131
    Post Thanks / Like
    Blog Entries
    7
    GREAT JOB running those brake lines!

    re: fitting into the car. On both of my build I cut off ~.45" of the threads between the MC and the pedal, and then cranked them all the way down to the bolt at the top of the threads to gain about 2" of legroom. What are you doing for seats? I used the Kirkey Vintage 48's instead of the big and tall traditional style seats. This gives you additional legroom as well. Last note regarding entry/exit. I instruct all newbies to stand on the seat and put their butt on the edge of the body (watch out for Levy jeans buttons and keys!) and then "walk" their feet down into the footwell and drop down into the seat. Exiting is a tricep press, working your butt up to the top of the seat before swinging your left leg out over the door sill and pipe. Trying to get your leg out before getting your butt up above the seat is a SURE FIRE way to get burned by the side pipes!

    See my 15th anniversary build thread for how I mounted my seat brackets:
    http://thefactoryfiveforum.com/showt...-the-DMV/page6

    Looking FANTASTIC with that body on! SOOOOO jealous!


    FFR 5369 Pin Drive, IRS, Trigos, Torsen, Wilwoods, FMS BOSS 302 "B" cam , Mass-flo. CA SB100 (SPCN) Registered
    Delivered 4/23/06. "Finished" 4/2012 (still not done!)


  30. #70

    Join Date
    Jun 2015
    Location
    Parker, TX
    Posts
    288
    Post Thanks / Like

    The wait is over!

    I ordered the 427w Dart with the Holley Terminator EFI on September 17th from Mike Forte and it finally arrived today. It was supposed to be 6-8 weeks but turned out to be 24. I think Mike is like that friend of the family that wants to help everyone out but just does not have the time to get to everything. He will take care of you eventually but just can't say when - Kinda reminds me of my Dad and all of his projects without the pass that I get to the front of the line.

    Anyway, I hope to get everything stabbed in this weekend (Hopefully Dad can make it up) so I can start to figure out the fuel line routing, electrical placement, power steering pump, other bling on the front of the engine, headers and all the other items that need to go around the engine.

    Here are some pics and I hope to get some more this weekend with it in the car.


    Last edited by RRussellTx; 07-30-2017 at 03:25 PM.

  31. #71
    Member dougski's Avatar
    Join Date
    Dec 2014
    Location
    San Luis Obispo, California
    Posts
    53
    Post Thanks / Like
    Great looking motor. Seems worth the wait to me but hopefully did not hold you up too much. Did Mike run a dyno?

    Doug
    Mk4 Roadster #8567, IRS, Levy Racing 427w Stroker, 8-stack EFI

  32. #72

    Join Date
    Jun 2015
    Location
    Parker, TX
    Posts
    288
    Post Thanks / Like
    Quote Originally Posted by dougski View Post
    Great looking motor. Seems worth the wait to me but hopefully did not hold you up too much. Did Mike run a dyno?
    I agree - I'm not in a hurry so the wait was not a problem at all - the lack of knowing when to expect delivery was frustrating but not a problem. I posted the dyno results on February 7th below - well worth the wait!
    Last edited by RRussellTx; 02-24-2016 at 09:16 PM.

  33. #73
    Senior Member
    Join Date
    May 2014
    Location
    Burlington, WI
    Posts
    695
    Post Thanks / Like
    Blog Entries
    1
    Your build looks great. In particular, the brake line routings look clean and sharp. And, I'm sure you're anxious to drop that motor in to see how everything fits. I have a general question about taking delivery of stroker engines and, this is more for documentation purposes. Other than the parts list to build the engine and a dyno sheet, what other information are others getting with their engine? I would guess their not blue printed, but maybe bore and stroke data for example. And, is any other information necessary? Maybe knowing the ci, hp and torque is enough. As a first time roadster builder I just dont know. Thought I would ask.

  34. #74
    Out Drivin' Gumball's Avatar
    Join Date
    Feb 2011
    Location
    Blackberry Township, IL
    Posts
    2,653
    Post Thanks / Like
    Your build is looking great - ought to be a very nice car when done. One of the best parts of building an FFR is that not only is it a great project and fun to build, but when you're done, you have an awesome car to drive!!!

    Great job on the powder coating, too. My wife bought me the DIY Eastwood kit, too and I found one of the discontinued Harbor Freight ovens at a local garage sale. It'd been used only a couple of times for the seller's chopper project and he decided not to build any more bikes - so I was able to pick it up for $100.

    Pic is a bit distorted as it was cropped from a larger photo, but if anyone is looking for one of these, here's a visual - inside is about 22x18x18:

    Later,
    Chris

    "There are no more monsters to fear, and so, we have to build our own."
    Mk3.1 #7074

  35. #75

    Join Date
    Jun 2015
    Location
    Parker, TX
    Posts
    288
    Post Thanks / Like
    Quote Originally Posted by ThickCobra View Post
    Other than the parts list to build the engine and a dyno sheet, what other information are others getting with their engine? I would guess their not blue printed, but maybe bore and stroke data for example. And, is any other information necessary? Maybe knowing the ci, hp and torque is enough. As a first time roadster builder I just dont know. Thought I would ask.
    Thanks for comments on the build and the brakes! As for the info on the engine, I went with Mike Forte based on his reputation in this community and his pragmatic views on what these cars need. Given that, I went on the assumption that no other data is needed but I probably I expected a little more data than I actually received.

    I have actually not had much luck with communication from Mike - latest example, I was supposed to get a video about the build but I have not received one yet and he has not responded to my emails. I also received an extra hydraulic clutch kit from him with 2 extra master cylinders and he has not answered the email about how to return them yet either...

    That said, it's a great looking engine and I'm quite sure it's going to run like a scalded dog.

    I would probably build the next engine myself so I know exactly what I have but it's nice to have that out of the way so that I can focus on the rest of the car. I'm not sure what other people have experienced but that is mine.

  36. #76

    Join Date
    Jun 2015
    Location
    Parker, TX
    Posts
    288
    Post Thanks / Like
    Quote Originally Posted by Gumball View Post
    Great job on the powder coating, too. My wife bought me the DIY Eastwood kit, too and I found one of the discontinued Harbor Freight ovens at a local garage sale. It'd been used only a couple of times for the seller's chopper project and he decided not to build any more bikes - so I was able to pick it up for $100.

    Very cool - DIY Powder Coating is the ONLY way to go for the small stuff! I'm contemplating building a larger homemade oven to do the larger panels but I'll probably end up just taking them in to a local powder coater. I just received 12lbs of the 20th anniversary white powder that Edwardb found a source for so I'll probably go one way or the other next week.

  37. #77
    Senior Member
    Join Date
    May 2014
    Location
    Burlington, WI
    Posts
    695
    Post Thanks / Like
    Blog Entries
    1
    Has anyone had issues with the Prismatic Powders white? As you know, the anniversary roadster comes with several panels coated with Prismatic Powders white. My local powder coater is doing a great job applying the Extreme Powder Coating's Glimmer but is not fond of the powders from Prismatic. He has found them to be difficult to order from and they are very slow to deliver. Also, he finds the product terrible to work with and often has to apply several coats, with light sanding in between.

  38. #78
    Senior Member edwardb's Avatar
    Join Date
    Feb 2011
    Location
    Lake Orion, Michigan
    Posts
    10,795
    Post Thanks / Like
    Quote Originally Posted by ThickCobra View Post
    Has anyone had issues with the Prismatic Powders white? As you know, the anniversary roadster comes with several panels coated with Prismatic Powders white. My local powder coater is doing a great job applying the Extreme Powder Coating's Glimmer but is not fond of the powders from Prismatic. He has found them to be difficult to order from and they are very slow to deliver. Also, he finds the product terrible to work with and often has to apply several coats, with light sanding in between.
    Strange, isn't it? I needed three pounds to do a few custom panels that I made, to replace the ones supplied already coated from FF. I ordered directly from Prismatic Powders on a Thursday, and had the powder on Friday. Less than 24 hours after I ordered. They had a promotion going for next day delivery, so that was part of it. But their website claims they ship same business day when ordered before a certain time. The parts came out very nice. No problems were noted, to me anyway. My powder coater said he liked the coating and color very much. Said he was going to consider making it one of his standard offerings. I don't know anything about powder coating (other than the general concept) so I can't begin to explain why two companies would have such different experiences.
    Last edited by edwardb; 03-06-2016 at 12:05 PM.
    Build 1: Mk3 Roadster #5125. Sold 11/08/2014. Build 2: Mk4 Roadster #7750. Sold 04/10/2017. Build Thread
    Build 3: Mk4 Roadster 20th Anniversary #8674. Sold 09/07/2020. Build Thread and Video. Build 4: Gen 3 Type 65 Coupe #59. Gen 3 Coyote. Legal 03/04/2020. Build Thread and Video
    Build 5: 35 Hot Rod Truck #138. LS3 and 4L65E auto. Rcvd 01/05/2021. Legal 04/20/2023. Build Thread. Sold 11/9/2023.

  39. #79
    Senior Member
    Join Date
    May 2014
    Location
    Burlington, WI
    Posts
    695
    Post Thanks / Like
    Blog Entries
    1
    That is strange. I wonder whether it may be a relationship issue between my powder coater and Prismatic. I am waiting for a call from my powder coater to pick the white pieces. I can only hope their as nice as the glimmer color. I'll keep you posted.

  40. #80

    Join Date
    Jun 2015
    Location
    Parker, TX
    Posts
    288
    Post Thanks / Like
    I got the engine out of the crate latest weekend and mounted it on an old Jet Ski stand so I can roll it around. I noticed some oil in the crate so I let it set for the week to see how bad the leak was. Here is a pic of the engine on my stand and the puddle underneath it after one week.


    Looks like I have some work to do on my 'crate' engine before I can install it...
    Last edited by RRussellTx; 07-30-2017 at 03:28 PM.

Page 2 of 5 FirstFirst 1234 ... LastLast

Posting Permissions

  • You may not post new threads
  • You may not post replies
  • You may not post attachments
  • You may not edit your posts
  •  

Martin's Dent and Collision Shop

Visit our community sponsor