BluePrint Engines

Visit our community sponsor

Thanks Thanks:  1
Likes Likes:  1
Page 1 of 2 12 LastLast
Results 1 to 40 of 45

Thread: Important Information Regarding 2015-2016 Coyote CMCV Plumbing

  1. #1
    Senior Member edwardb's Avatar
    Join Date
    Feb 2011
    Location
    Lake Orion, Michigan
    Posts
    10,866
    Post Thanks / Like

    Important Information Regarding 2015-2016 Coyote CMCV Plumbing

    When I ordered the base Coyote crate motor (M-6007-M50A) last October for my Anniversary Roadster #8674 build, I found that Ford had released an updated version. There were many changes to the engine itself as well as a completely new crate motor Controls Pack. One of those was the addition of Charge Motion Control Valves (CMCV) also called intake manifold runner controls. The manifold runners are driven by vacuum motors on the back of the intake controlled by the PCM, and are supposed to provide better idle and higher torque at low RPM’s. The CMCV function is cited as one of the reasons for the higher torque ratings of the updated Coyote.

    Neither the Factory Five Coyote installation manual or the Ford Performance M-6017-504V 5.0L Controls Pack instruction sheet mention anything about the CMCV function. Several of us, myself included, took the same plumbing and installation approach. But after running/driving are getting P2004 (Intake Manifold Runner Control Stuck Open Bank 1) and P2005 (Intake Manifold Runner Control Stuck Open Bank 2) DTC’s. This post addresses the overall issue. This won’t be short. So get comfortable for a bit of a read.

    There are at least four ways this can be approached. Each has pluses and minuses.
    (1) Custom tune with the P2004 and P2005 error codes suppressed. The manifold runner default positions are open and one can argue the benefits they provide are not important for our build.
    (2) Remove the vacuum motors completely and lock down the runners. There are aftermarket parts available. Also requires tune changes. For some builds, like the 33, there isn’t space available for the vacuum motors.
    (3) Change to the Boss intake which removes the stock intake and CMCV function completely. Custom tune (again) but that’s necessary with the Boss intake anyway. I don’t think there’s any question the Boss intake looks better. But the performance improvement, especially for the 2015-2016 Coyote, is questionable especially for how we run the cars. Plus it’s not a cheap solution.
    (4) Leave everything intact and plumb the CMCV system to do what it’s designed to do. That’s what I thought I was doing with my initial plumbing, but turns out that’s not the case. The balance of this post will focus on this aspect and what I believe is a solution for this choice.

    Out of the box, the crate motor has two vacuum lines going through the intake. One on each side. The one on the left (DS on this side of the pond) goes from the CMCV vacuum motors to a connection on the cold air intake. The one on the right (PS) goes from a large connector on the back of the intake into space at the front of the motor. Several of us dug a little deeper and found this connection makes its way over to the power brakes booster in a Mustang, so deemed it unnecessary and removed it.

    For my initial installation, I installed a connector on the Spectre intake for the vacuum line on the DS. I used the large connection vacated by the PS hose as the vacuum source for the fuel regulator. There is another large vacuum connection on the front of the engine near the throttle body. Factory Five shows using this as the vacuum source for the fuel regulator. I thought it was easier and neater to use the closer one on the back of the intake. With the engine plumbed this way, it started and ran just fine. Several short go-karts seemed great. I did get one occurrence of the P2004 and P2005 error codes. But cleared them and they didn’t show up again, so didn’t pursue it. I know of several builds that installed their Coyote just like I described.

    Later, several forum members reported the large vacuum connection we were using on the back of the intake for the fuel regulator had no vacuum signal. I measured mine and found this to be the case. Nothing. This certainly seemed a mystery as initial understanding was this provided vacuum for the Mustang power brakes. Various theories included the hole needed to be drilled out, etc. But I just capped it and moved the fuel regulator vacuum to the front connection described by Factory Five. Confirmed it had a strong vacuum signal and considered the installation complete.

    Fast forward several months. I have been in contact with Scott (forum member wareaglescott) with a similar 2015-2016 Coyote build. He has been driving his go-kart quite a bit more than me, and has seen the P2004 and P2005 Intake Manifold Runner Control Stuck Open error codes repeatedly. He started a discussion with Ford Performance tech support and they sent the following Coyote vacuum diagram.


    Kudos to wareaglescott for his persistence trying to get to the bottom of this. Studying this diagram is very enlightening. Multiple observations:
    (1) The large connection on the rear of the intake with the hose on the PS of the engine, that we have all removed, is part of the vacuum circuit for the CMCV system, but not in the way we expected.
    (2) There is a reservoir in the rear of the intake pressurized by the line we removed. First I’ve heard anything about a vacuum reservoir in the intake.
    (3) The CMCV circuit actually receives it’s vacuum from another connection on the rear of the engine (which we haven’t disturbed) on the reservoir. So that part is OK. But since the reservoir isn’t being pressurized, there’s no vacuum available for the CMCV circuit.
    (4) The hose we removed actually attaches to yet another hose that we didn’t receive with the engine (the one at the top of the diagram) and it attaches to the vacuum connector Factory Five told us to use for the fuel regulator vacuum signal. That’s where both the power brakes and CMCV circuit get their vacuum. Sounds confusing but it really isn’t.

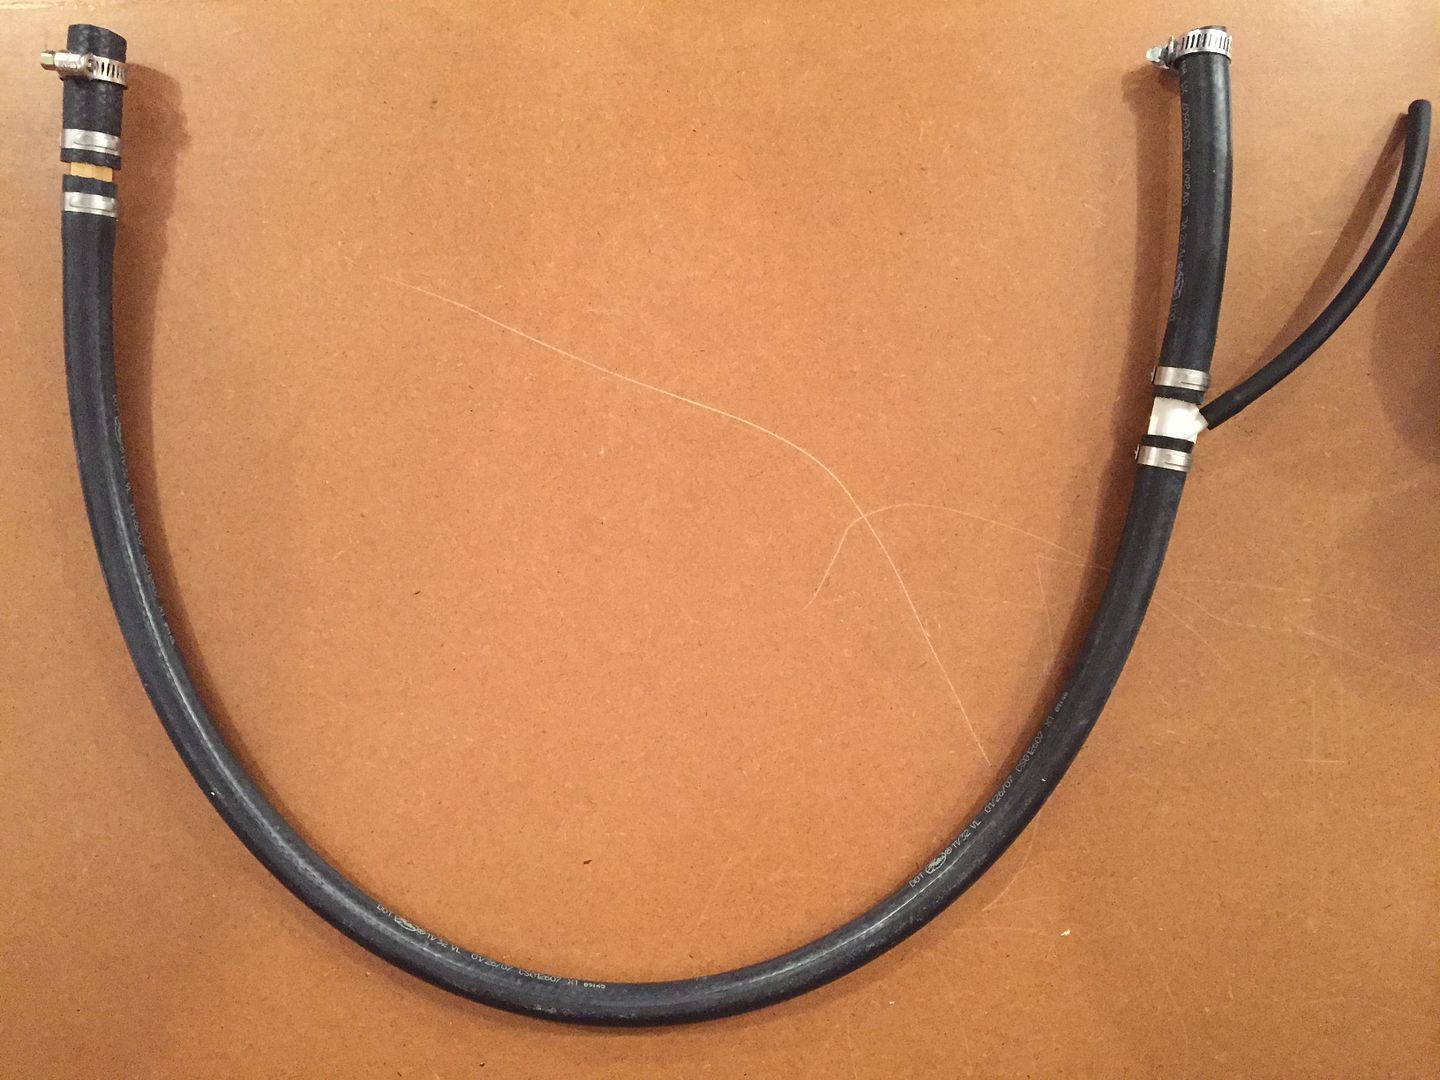
    Armed with this new information, I decided to re-plumb my installation. The PS vacuum line that was previously removed could perhaps be re-used, but too late. I pitched it along with other unused parts. It would be a bit awkward anyway IMO. Instead I made up a new hose going from the large vacuum port on the front of the engine by the throttle body around to the nipple on the back of the intake. At the back, I put in a “Y” connector with a smaller hose for the fuel regulator. It was a little challenging because all the connectors are different sizes. This is the bill of material for what I came up with:

    2 inches long 1/2-inch ID fuel hose
    30 inches long 11/32-inch vacuum hose
    5-1/4 inches long 11/32-inch vacuum hose
    6 inches long 5/32-inch vacuum hose (this length could vary based on fuel regulator location)
    3/8-inch barb / 1/4-inch NPT male fitting (Xtra Seal 15-5744)
    3/8 x 3/8 x 3/16 “Y” fitting (included in Dorman 47354)
    Hose clamps as required

    The 1/2-inch ID fuel hose is the only thing I could find that fit the vacuum fitting on the front of the engine. Normally it’s not recommended to use fuel hose for vacuum because it’s made for pressure not vacuum. But for this short of a piece, it’s not going to collapse and should be fine. The 11/32-inch vacuum hose fits the nipple on the back of the intake. The only thing I could find to make the transition between the two was the barb/NPT fitting. Not completely desirable, but the NPT threads fit tightly into the 1/2-inch hose and with a clamp I think will be fine. I found all the parts listed at my local O’Reilly Auto Parts store. The final assembly looked like this:


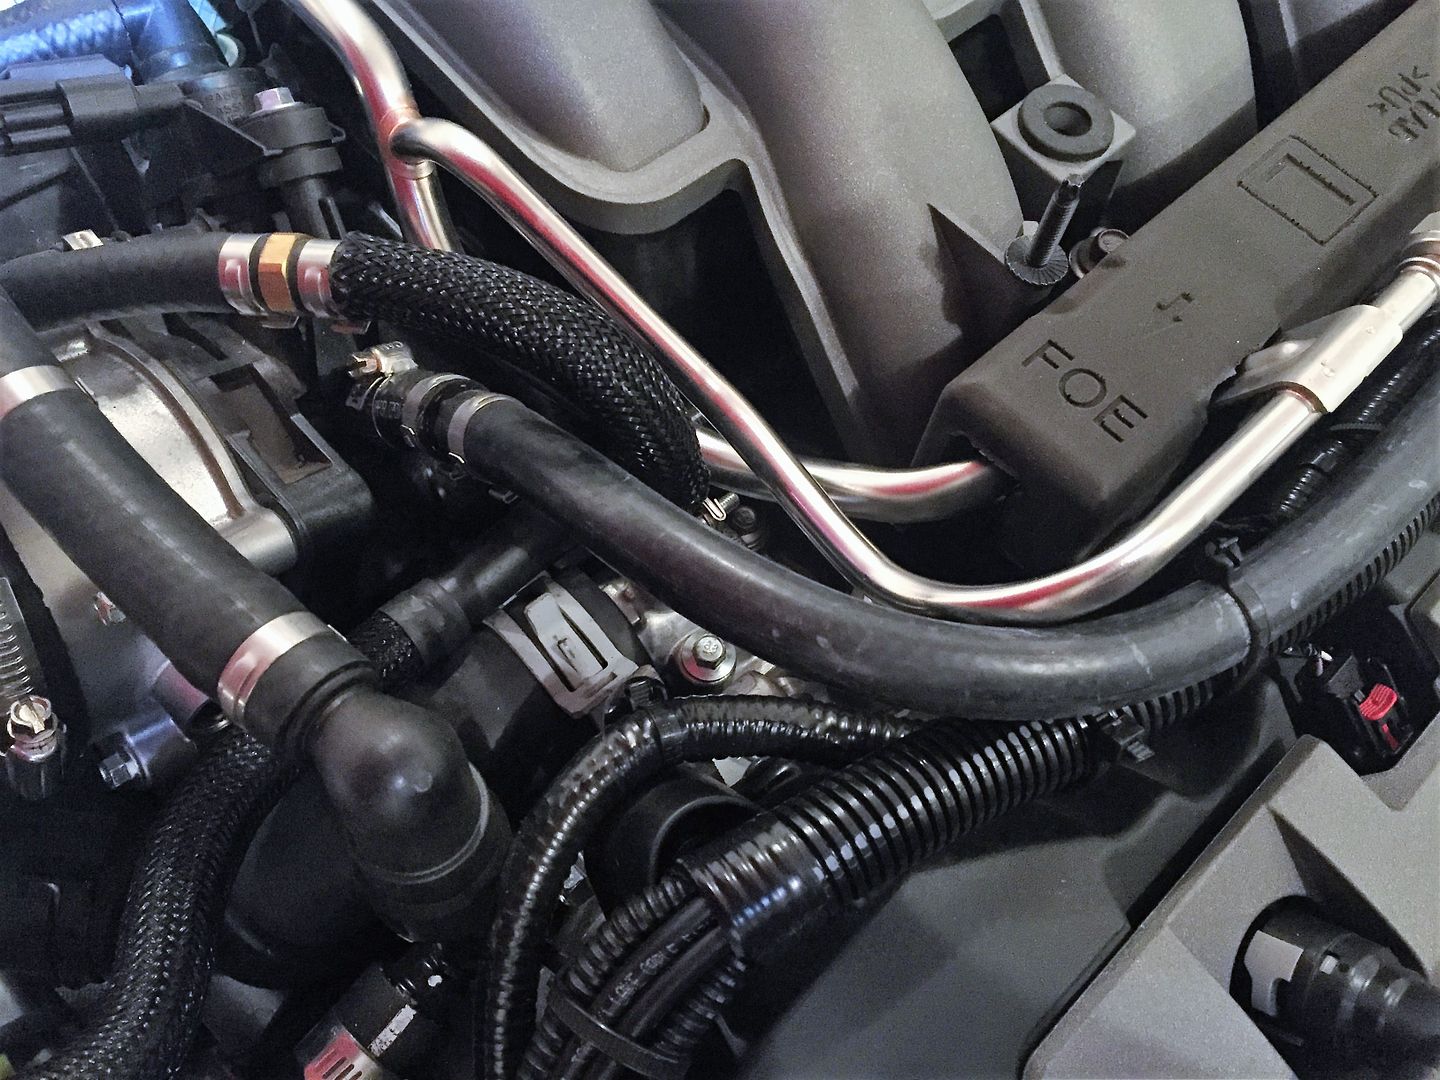
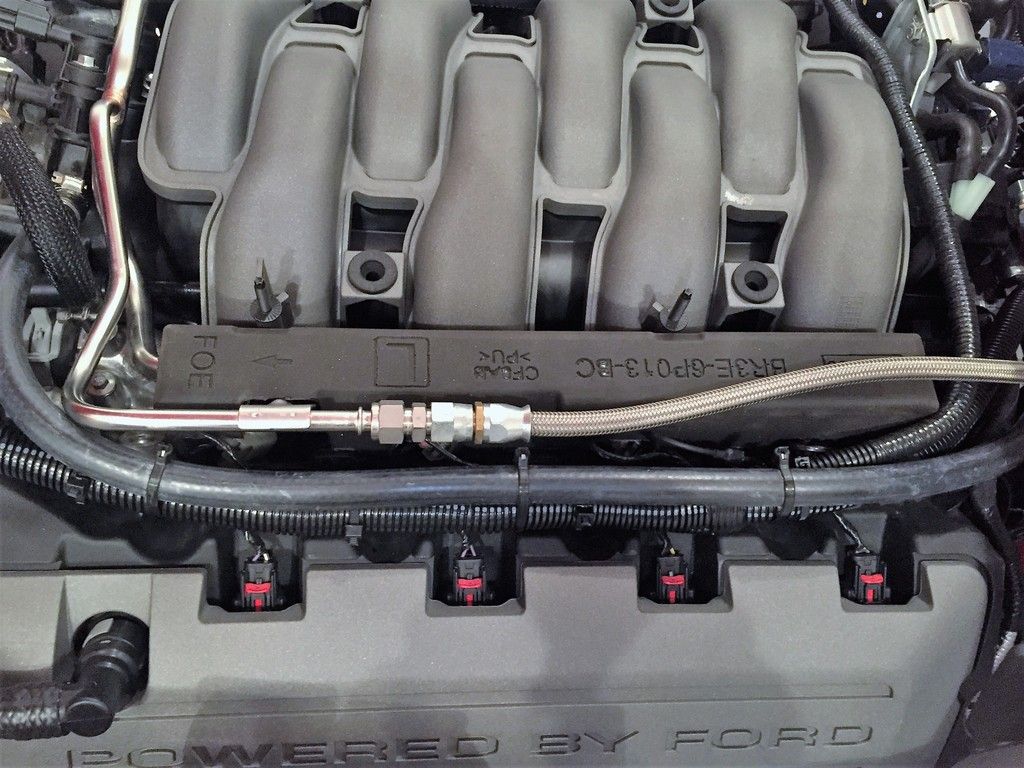
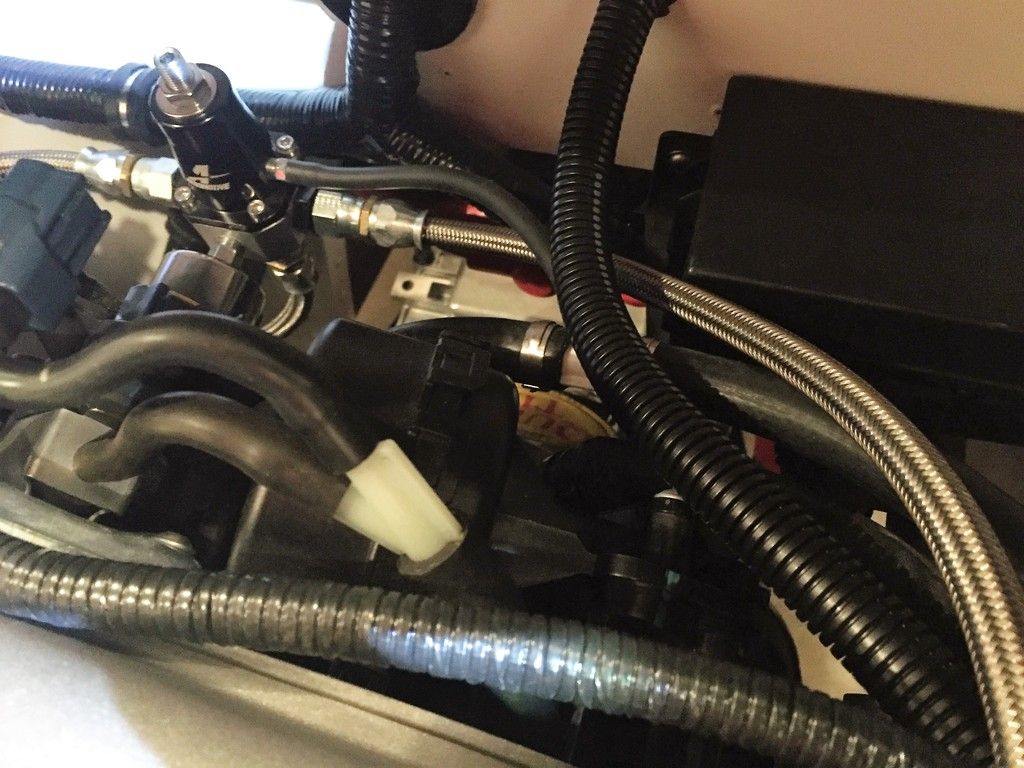
    I used pinch clamps in several places because they’re neat, look OEM, and I have a selection on hand along with the pincers to install them. Regular worm drive clamps could be used for all instead. I didn't put any clamps on the small hose from the "Y" connector to the fuel regulator. The barbs are both pretty long and the smaller hose seems a tight fit. I don't think they're going anywhere. The hose assembly installs on the DS of the engine and easily fits under the engine cover. Here are a few pics of it installed.


    I tie wrapped it to the wiring cable added previously, just to keep it in place under the cover. Last night I started the engine and ran it for a bit with the new plumbing. I don’t know if it’s my imagination or not, but it seemed to run even better than before. No sign of any DTC’s, but they only seem to show up in actual driving. But I’m confident the CMCV system is now receiving the same vacuum as the factory setup. Hopefully this information is helpful for other 2015-16 Coyote builders.
    Last edited by edwardb; 10-30-2016 at 12:46 PM.
    Build 1: Mk3 Roadster #5125. Sold 11/08/2014. Build 2: Mk4 Roadster #7750. Sold 04/10/2017. Build Thread
    Build 3: Mk4 Roadster 20th Anniversary #8674. Sold 09/07/2020. Build Thread and Video. Build 4: Gen 3 Type 65 Coupe #59. Gen 3 Coyote. Legal 03/04/2020. Build Thread and Video
    Build 5: 35 Hot Rod Truck #138. LS3 and 4L65E auto. Rcvd 01/05/2021. Legal 04/20/2023. Build Thread. Sold 11/9/2023.

  2. #2
    Jazzman's Avatar
    Join Date
    Jan 2014
    Location
    Scottsdale, AZ
    Posts
    1,166
    Post Thanks / Like
    Many thanks to you and Scott for the immense number of hours you have committed to finding this fix. I am not far from needing this information, and have added it to my to-do list.
    Jazzman

    MKIV #8745 "Flip Top" Roadster, Custom Tilt front, Coyote Engine, Tremec TKO600, Custom Interior. Best of Show winner, Huntington Beach Cruise In 2018.

    1967 Ford Mustang Coupe build thread updated 1/22/2021

    Roadster Frame Dolly Plan

  3. #3
    Senior Member wareaglescott's Avatar
    Join Date
    Apr 2016
    Location
    Auburn, AL
    Posts
    2,147
    Post Thanks / Like
    Awesome work Paul. Thank you for the detailed trouble shooting and write up. I hope to install this on my car in the next week and give it some driving miles. Interestingly enough after clearing the codes 3 times the first 5 miles I drove the car I have not seen it the in the last 10 miles. That also corresponds to when we did the pcm update for the P0116 code. I don't think that it is really related but I curious what conditions trigger the P2004 and P2005 codes since I have not been getting them the last couple times driving.
    MK4 #8900 - complete kit - Coyote, TKO600, IRS - Delivered 6/28/16 First Start 10/6/16 Go cart - 10/16/16 Build completed - 4/26/17 - 302 days to build my 302 CI Coyote Cobra - Registered and street legal 5/17/17
    Build Thread http://thefactoryfiveforum.com/showt...e-build-thread
    PHIL 4:13 INSTAGRAM - @scottsrides

  4. #4
    Senior Member Duke's Avatar
    Join Date
    Dec 2015
    Location
    Taxachusetts
    Posts
    404
    Post Thanks / Like


    Thank you for this. I just got the same code for the first time a few days ago, cleared it out and put it on my to-do list to investigate.

  5. #5
    Senior Member wareaglescott's Avatar
    Join Date
    Apr 2016
    Location
    Auburn, AL
    Posts
    2,147
    Post Thanks / Like
    Paul I hope you don't mind but I am going to copy the information I posted about the P0116 code here for added visibility since there is a reasonable chance the people reading this will get both:

    My MIL illuminated and indicated P0116 - engine coolant temp sensor 1 circuit range performance

    I have become friendly with a supervisor at Ford tech support and I asked him about this. He actually indicated that this is a known issue and there is a coolant temp software issue that is causing this in the crate motors. Apparently when they get the factory PCM they diet a lot of stuff out of the production version of the pcm when packaging it with the crate motor control pack kits. Somewhere along the way this caused an issue and there is a software update for this.
    I was given the option of sending my PCM to them to flash with an update or they could send me a device to upload a software fix through the OBD port. So if anyone gets this code in the future call Ford for a software update. Dont try to trouble shoot it with other methods.

    I received the flash device Ford sent me and it took about 5 minutes to upload the fix and it has not returned. As a side note if you plan on running a custom tune when you upload the custom tune it will over write this fix and the P0116 code can return. You will need to get your tune programmer to account for this.

    This is the information from Ford on what needs to be accounted for in a custom tune:


    To fix the p0116 code we set ECT_DELTA to 254 to avoid the intake temperature not being close enough to ECT temps after a short soak because there is no soak timer and it is set to a max soak time every time the PCM shuts off. Additionally we set DSDN_CMD_CH to and DSDN_CMD_SL to -4095 to ensure that the engine doesn’t go into CSER mode which causes high idle when this soak time is presumed to be long. This is basically how we got around implementing a timer altogether.

    This will allow you to have the fix for that code built into whatever tuning you have done
    MK4 #8900 - complete kit - Coyote, TKO600, IRS - Delivered 6/28/16 First Start 10/6/16 Go cart - 10/16/16 Build completed - 4/26/17 - 302 days to build my 302 CI Coyote Cobra - Registered and street legal 5/17/17
    Build Thread http://thefactoryfiveforum.com/showt...e-build-thread
    PHIL 4:13 INSTAGRAM - @scottsrides

  6. #6
    Senior Member edwardb's Avatar
    Join Date
    Feb 2011
    Location
    Lake Orion, Michigan
    Posts
    10,866
    Post Thanks / Like
    No problem. Makes sense to have this issue included as well. Also thanks for including me in the correspondence with Ford and getting this fix installed in my engine as well. It's all good.
    Build 1: Mk3 Roadster #5125. Sold 11/08/2014. Build 2: Mk4 Roadster #7750. Sold 04/10/2017. Build Thread
    Build 3: Mk4 Roadster 20th Anniversary #8674. Sold 09/07/2020. Build Thread and Video. Build 4: Gen 3 Type 65 Coupe #59. Gen 3 Coyote. Legal 03/04/2020. Build Thread and Video
    Build 5: 35 Hot Rod Truck #138. LS3 and 4L65E auto. Rcvd 01/05/2021. Legal 04/20/2023. Build Thread. Sold 11/9/2023.

  7. #7
    Senior Member BEAR-AvHistory's Avatar
    Join Date
    May 2015
    Location
    Raleigh NC & Ocean Isle Beach NC
    Posts
    1,692
    Post Thanks / Like
    Great job on getting this issue solved. Being a pair of pioneers it can be really tough pulling the arrows out. Salute!! Hope FFR picks this work up & upgrades the install guides.

    Any thoughts on skipping the fix & going to a BOSS intake? Not really sure with the weight & standard gearing that the car needs any increase in low end torque.
    Kevin
    MKIV #8234
    Coyote '14/TKO-600/3-Link 3:55 Rear
    I love the smell of 100 octane in the morning.
    NITTO NT01 275X40X17ZR - 315X35ZRX17
    Delivered 2/7/14 - Plate "COYOTE NC1965" 3/25/15

  8. #8
    Senior Member edwardb's Avatar
    Join Date
    Feb 2011
    Location
    Lake Orion, Michigan
    Posts
    10,866
    Post Thanks / Like
    Quote Originally Posted by BEAR-AvHistory View Post
    Any thoughts on skipping the fix & going to a BOSS intake? Not really sure with the weight & standard gearing that the car needs any increase in low end torque.
    Yea, I mentioned that as one of the options at the beginning of the post. But didn't go into much detail because that wasn't the intention of the post. At $500+ for the intake alone plus a mandatory custom tune it's not an inexpensive option. As I said, no question it's better looking. But I've read several reviews for the 2015-16 Coyote and doesn't seem to quite have the performance bump as in the previous Coyote. Plus it too is maybe in a range that isn't that important for street cruising.
    Build 1: Mk3 Roadster #5125. Sold 11/08/2014. Build 2: Mk4 Roadster #7750. Sold 04/10/2017. Build Thread
    Build 3: Mk4 Roadster 20th Anniversary #8674. Sold 09/07/2020. Build Thread and Video. Build 4: Gen 3 Type 65 Coupe #59. Gen 3 Coyote. Legal 03/04/2020. Build Thread and Video
    Build 5: 35 Hot Rod Truck #138. LS3 and 4L65E auto. Rcvd 01/05/2021. Legal 04/20/2023. Build Thread. Sold 11/9/2023.

  9. #9
    Senior Member Duke's Avatar
    Join Date
    Dec 2015
    Location
    Taxachusetts
    Posts
    404
    Post Thanks / Like
    Here's the dyno showing stock vs the Boss on this motor. Note the drop in torque throughout the curve. Also note the drop in HP until the end of the pull. You do get another 1K or so RPM out of the motor, but I'm not sure if it will live. I recall something about the prior gen coyote having oiling gear issues or some other internal gear issues with higher RPMs. I'm not sure if it's been fixed or not for our motors.


  10. #10
    Senior Member edwardb's Avatar
    Join Date
    Feb 2011
    Location
    Lake Orion, Michigan
    Posts
    10,866
    Post Thanks / Like
    Quote Originally Posted by Duke View Post
    Here's the dyno showing stock vs the Boss on this motor. Note the drop in torque throughout the curve. Also note the drop in HP until the end of the pull. You do get another 1K or so RPM out of the motor, but I'm not sure if it will live. I recall something about the prior gen coyote having oiling gear issues or some other internal gear issues with higher RPMs. I'm not sure if it's been fixed or not for our motors.
    Interesting. I think that's one of the videos I also saw on this topic. So the stock manifold in the new Coyote beats the Boss until they start separating at 6,500 RPM. Pretty much proves for (mostly legal...) street cruising the advantage just isn't there. They are cool looking though.
    Build 1: Mk3 Roadster #5125. Sold 11/08/2014. Build 2: Mk4 Roadster #7750. Sold 04/10/2017. Build Thread
    Build 3: Mk4 Roadster 20th Anniversary #8674. Sold 09/07/2020. Build Thread and Video. Build 4: Gen 3 Type 65 Coupe #59. Gen 3 Coyote. Legal 03/04/2020. Build Thread and Video
    Build 5: 35 Hot Rod Truck #138. LS3 and 4L65E auto. Rcvd 01/05/2021. Legal 04/20/2023. Build Thread. Sold 11/9/2023.

  11. #11
    Junior Member
    Join Date
    Oct 2016
    Posts
    7
    Post Thanks / Like
    First time posting on this board so excuse any faux pas I may commit.

    edwardb, I've been following your #8674 build for a while. My interest is in the coyote install as I'm doing the swap in a '96 Mustang GT. It seems you Factory Five guys have better documentation of the engine and it's install than the Mustang guys. But to the point, thanks for figuring out the vacuume system! I also need a source for the fuel press. regulator. I'm using a take out engine and have the tubing the crate doesn't ship with. If anyone needs it the part number is FR3Z-2420-C Vacuum Tube. Looks to be around $80. If you need a picture of where it connects let me know. There are two connects on the front.

    On the Boss intake option I'd also like to mention that I've seen some examples of 2015-16 Mustangs running over the stock RPM without much issue. It seems going over 7800 may be an issue. But the problem is the stock pump gears give out because of the beating. There are solutions if you really want to go that route. (I think that intake looks very nice in your cars)

    Another consideration is the newish GT350 intake and TB. It seems to offer better high rpm power without the large sacrifice on the low end that the Boss intake sees. You would still need a vacuum solution to keep the IRMC function which is the real secret sauce to the low RPM performance.

    Thanks,
    Byron

  12. #12
    Senior Member edwardb's Avatar
    Join Date
    Feb 2011
    Location
    Lake Orion, Michigan
    Posts
    10,866
    Post Thanks / Like
    Quote Originally Posted by 96TennGT View Post
    First time posting on this board so excuse any faux pas I may commit.

    edwardb, I've been following your #8674 build for a while. My interest is in the coyote install as I'm doing the swap in a '96 Mustang GT. It seems you Factory Five guys have better documentation of the engine and it's install than the Mustang guys. But to the point, thanks for figuring out the vacuume system! I also need a source for the fuel press. regulator. I'm using a take out engine and have the tubing the crate doesn't ship with. If anyone needs it the part number is FR3Z-2420-C Vacuum Tube. Looks to be around $80. If you need a picture of where it connects let me know. There are two connects on the front.

    On the Boss intake option I'd also like to mention that I've seen some examples of 2015-16 Mustangs running over the stock RPM without much issue. It seems going over 7800 may be an issue. But the problem is the stock pump gears give out because of the beating. There are solutions if you really want to go that route. (I think that intake looks very nice in your cars)

    Another consideration is the newish GT350 intake and TB. It seems to offer better high rpm power without the large sacrifice on the low end that the Boss intake sees. You would still need a vacuum solution to keep the IRMC function which is the real secret sauce to the low RPM performance.

    Thanks,
    Byron
    Welcome to the forum. Interesting first post. Good luck with your installation. We're all learning over here too. The GT350 intake and TB is another option for sure. But the $1300 price of admission will keep me with my kluged $20 vacuum hose for now.
    Build 1: Mk3 Roadster #5125. Sold 11/08/2014. Build 2: Mk4 Roadster #7750. Sold 04/10/2017. Build Thread
    Build 3: Mk4 Roadster 20th Anniversary #8674. Sold 09/07/2020. Build Thread and Video. Build 4: Gen 3 Type 65 Coupe #59. Gen 3 Coyote. Legal 03/04/2020. Build Thread and Video
    Build 5: 35 Hot Rod Truck #138. LS3 and 4L65E auto. Rcvd 01/05/2021. Legal 04/20/2023. Build Thread. Sold 11/9/2023.

  13. #13
    Junior Member
    Join Date
    Oct 2016
    Posts
    7
    Post Thanks / Like
    Thanks! Hopefully I'm adding to the conversation. I really appreciate how detailed the posts are from you and others on this forum. Some day I'd love to build an FFR or 33. But I have enough projects at the moment. It seems I can't change my profile yet. But I have the 96GT as a track car and a '63 F100 I'm "restoring".

  14. #14
    Administrator 65 Cobra Dude's Avatar
    Join Date
    Feb 2011
    Location
    Port Charlotte, FL
    Posts
    1,526
    Post Thanks / Like
    Blog Entries
    1
    Ed et al,

    I may have missed it but what did you do with the Pax side? Just delete it and cap it off?

    Thx,

    Henry

  15. #15
    Senior Member edwardb's Avatar
    Join Date
    Feb 2011
    Location
    Lake Orion, Michigan
    Posts
    10,866
    Post Thanks / Like
    Quote Originally Posted by 65 Cobra Dude View Post
    Ed et al,

    I may have missed it but what did you do with the Pax side? Just delete it and cap it off?

    Thx,

    Henry
    No. The function of the vacuum lines on both sides of the engine must be duplicated. The thread describes everything in detail. CliffsNotes version: The DS line is connected to the cold air intake. The PS must be connected to the large vacuum port on the front of the engine near the thermostat. I have them both routed on the DS, but the function of each is duplicated. Hope that makes sense.

    Edit: The original post had the DS and PS backwards. Now fixed. Also, per subsequent posts, Ford has deleted the DS hose. So that connection is no longer necessary.
    Last edited by edwardb; 05-22-2017 at 06:54 PM.
    Build 1: Mk3 Roadster #5125. Sold 11/08/2014. Build 2: Mk4 Roadster #7750. Sold 04/10/2017. Build Thread
    Build 3: Mk4 Roadster 20th Anniversary #8674. Sold 09/07/2020. Build Thread and Video. Build 4: Gen 3 Type 65 Coupe #59. Gen 3 Coyote. Legal 03/04/2020. Build Thread and Video
    Build 5: 35 Hot Rod Truck #138. LS3 and 4L65E auto. Rcvd 01/05/2021. Legal 04/20/2023. Build Thread. Sold 11/9/2023.

  16. #16
    Senior Member
    Join Date
    Feb 2011
    Location
    Bourne-Cape Cod, MA
    Posts
    828
    Post Thanks / Like
    Quote Originally Posted by edwardb View Post
    No. The function of the vacuum lines on both sides of the engine must be duplicated. The thread describes everything in detail. CliffsNotes version: The PS line is connected to the cold air intake. The DS must be connected to the large vacuum port on the front of the engine near the thermostat. I have them both routed on the PS, but the function of each is duplicated. Hope that makes sense.
    Actually the drivers side goes to the intake and passengers side goes to the vacuum port..

    And... the one I have here now has no tube on the drivers side. Must be a change from Ford.
    FFinisher/AKA RE63

  17. #17
    Senior Member q4stix's Avatar
    Join Date
    Jul 2016
    Location
    Seattle, WA
    Posts
    474
    Post Thanks / Like
    Ford is now putting caps on the ports that used to run to the driver side intake. It confused me at first too, but looks like it just refers to ambient pressure now on that side of the solenoid.
    Gen 3 Type 65 Coupe builder

  18. #18
    Senior Member edwardb's Avatar
    Join Date
    Feb 2011
    Location
    Lake Orion, Michigan
    Posts
    10,866
    Post Thanks / Like
    Quote Originally Posted by FFinisher View Post
    Actually the drivers side goes to the intake and passengers side goes to the vacuum port..

    And... the one I have here now has no tube on the drivers side. Must be a change from Ford.
    Quote Originally Posted by q4stix View Post
    Ford is now putting caps on the ports that used to run to the driver side intake. It confused me at first too, but looks like it just refers to ambient pressure now on that side of the solenoid.
    Thanks. The thread is correct, but I managed to get the summary in my last post backwards. I fixed it for future readers. I had heard that Ford deleted the DS hose to the intake on later versions of the engine. Eliminates having to make the connection in the Spectre intake.
    Build 1: Mk3 Roadster #5125. Sold 11/08/2014. Build 2: Mk4 Roadster #7750. Sold 04/10/2017. Build Thread
    Build 3: Mk4 Roadster 20th Anniversary #8674. Sold 09/07/2020. Build Thread and Video. Build 4: Gen 3 Type 65 Coupe #59. Gen 3 Coyote. Legal 03/04/2020. Build Thread and Video
    Build 5: 35 Hot Rod Truck #138. LS3 and 4L65E auto. Rcvd 01/05/2021. Legal 04/20/2023. Build Thread. Sold 11/9/2023.

  19. #19
    Administrator 65 Cobra Dude's Avatar
    Join Date
    Feb 2011
    Location
    Port Charlotte, FL
    Posts
    1,526
    Post Thanks / Like
    Blog Entries
    1
    OK, thank you guys. I appreciate it.

    Henry

  20. #20
    Senior Member
    Join Date
    Feb 2011
    Location
    Bourne-Cape Cod, MA
    Posts
    828
    Post Thanks / Like
    Henry if you have any questions just give me a buzz and I can talk you through it.
    FFinisher/AKA RE63

  21. #21
    Banned
    Join Date
    May 2017
    Posts
    12
    Post Thanks / Like
    edwardB.

    Sounds like your CMCV system wasn't working. No vacuum. And yet during your few hundred miles of driving in another thread you've been quite adamant that a tune isn't necessary for you engine. If I can quote you;

    "Are my observations about how the engine runs based on only a couple hours in the driver's seat? Yes, and I've said that every time. The build was just finished so it's a little hard for me to cite thousands of miles of driving. But that doesn't mean my initial observations aren't valid or should be discredited. This isn't my first rodeo. I have a pretty good idea when something is running well or not and what I can feel in my backside. Plus I'm monitoring it technically to make sure it's not running lean which is what Ford has warned about. This monitoring also shows it's operating well."

    It appears your highly tuned backside may need to be calibrated.

    A dyno session would have picked up this issue. All the technical monitoring would be in front of you through the entire RPM range. I'm a proponent of tuning.

    IMO,
    Last edited by Wylie Coyote; 05-22-2017 at 10:02 PM.

  22. #22
    Senior Member edwardb's Avatar
    Join Date
    Feb 2011
    Location
    Lake Orion, Michigan
    Posts
    10,866
    Post Thanks / Like
    Quote Originally Posted by Wylie Coyote View Post
    edwardB.

    Sounds like your CMCV system wasn't working. No vacuum. And yet during your few hundred miles of driving in another thread you've been quite adamant that a tune isn't necessary for you engine. If I can quote you;

    "Are my observations about how the engine runs based on only a couple hours in the driver's seat? Yes, and I've said that every time. The build was just finished so it's a little hard for me to cite thousands of miles of driving. But that doesn't mean my initial observations aren't valid or should be discredited. This isn't my first rodeo. I have a pretty good idea when something is running well or not and what I can feel in my backside. Plus I'm monitoring it technically to make sure it's not running lean which is what Ford has warned about. This monitoring also shows it's operating well."

    It appears your highly tuned backside may need to be calibrated.

    A dyno session would have picked up this issue. All the technical monitoring would be in front of you through the entire RPM range. I'm a proponent of tuning.

    IMO,
    You might want to check the dates and facts. I created this thread on 10-30-2016. See post #1. Almost seven months ago. Several of us installing the Gen 2 Coyote collaborated to figure out why the CMCV wasn't working and why we were getting trouble codes. A solution was determined, installed and checked out, and I posted about it. The thread was just recently resurrected with a question and then several follow-up posts.

    My CMCV system has had vacuum the entire time I've been driving the new Roadster since it was legal now one month ago. I haven't gotten any trouble codes since I started driving the car, including the previously mentioned CMCV codes. The quote you cited is from a list of points I recently wrote for a specific reason. I agree it is a little strong. But I stand by what I wrote.

    I'm not opposed to custom tuning. If the time comes that I think it's necessary I'll do it. One of my challenges is I haven't found a local shop that supports the crate version of the Coyote. Regular Mustang Coyotes all day long. But mention the crate and they don't do them. I've looked at a few options for remote tuning, but holding off on that for now for a couple of reasons. Especially since the engine is running well and monitoring shows it's OK technically. Lots of builds are running the stock tune and report good results. I'm not the only one.

    I'm surprised what an emotional issue this seems to be for some. Even without the cheap and unnecessary personal shots.
    Last edited by edwardb; 05-23-2017 at 12:46 AM.
    Build 1: Mk3 Roadster #5125. Sold 11/08/2014. Build 2: Mk4 Roadster #7750. Sold 04/10/2017. Build Thread
    Build 3: Mk4 Roadster 20th Anniversary #8674. Sold 09/07/2020. Build Thread and Video. Build 4: Gen 3 Type 65 Coupe #59. Gen 3 Coyote. Legal 03/04/2020. Build Thread and Video
    Build 5: 35 Hot Rod Truck #138. LS3 and 4L65E auto. Rcvd 01/05/2021. Legal 04/20/2023. Build Thread. Sold 11/9/2023.

  23. #23
    Senior Member wareaglescott's Avatar
    Join Date
    Apr 2016
    Location
    Auburn, AL
    Posts
    2,147
    Post Thanks / Like
    Quote Originally Posted by Wylie Coyote View Post
    edwardB.

    Sounds like your CMCV system wasn't working. No vacuum. And yet during your few hundred miles of driving in another thread you've been quite adamant that a tune isn't necessary for you engine. If I can quote you;

    "Are my observations about how the engine runs based on only a couple hours in the driver's seat? Yes, and I've said that every time. The build was just finished so it's a little hard for me to cite thousands of miles of driving. But that doesn't mean my initial observations aren't valid or should be discredited. This isn't my first rodeo. I have a pretty good idea when something is running well or not and what I can feel in my backside. Plus I'm monitoring it technically to make sure it's not running lean which is what Ford has warned about. This monitoring also shows it's operating well."

    It appears your highly tuned backside may need to be calibrated.

    A dyno session would have picked up this issue. All the technical monitoring would be in front of you through the entire RPM range. I'm a proponent of tuning.

    IMO,
    I realize you have a grand total of 7 posts on this forum but this one isn't a real winner. Seems pretty inappropriate and while Paul is to nice to say it directly a comment about calibrating his highly tuned backside is flat out rude. The great part of this forum is the help people offer others and then general theme of positive support for everyone trying to build a great car. Really don't need antagonistic posts like this here.
    It is pretty safe to say Paul has done more to document installation of the 2015 version of the coyote issues and install than anyone else here. I'm running the same setup as Paul with no issues as well. Vacuum system is working perfectly fine with the supplied solution.
    MK4 #8900 - complete kit - Coyote, TKO600, IRS - Delivered 6/28/16 First Start 10/6/16 Go cart - 10/16/16 Build completed - 4/26/17 - 302 days to build my 302 CI Coyote Cobra - Registered and street legal 5/17/17
    Build Thread http://thefactoryfiveforum.com/showt...e-build-thread
    PHIL 4:13 INSTAGRAM - @scottsrides

  24. #24
    Senior Member Jdav's Avatar
    Join Date
    Sep 2016
    Location
    ATL GA
    Posts
    443
    Post Thanks / Like
    I have the 2017 version of the Coyote and I want to make sure I am interpreting this correctly.
    I just need to cap the tube that I have circled here?
    FullSizeRender.jpg
    Or was the reference to this one?
    FullSizeRender 2.jpg

    And where does the one that does not get capped go?
    MK4 #9028 - Coyote - TKO600
    Delivery: 1/30/17 First Start: 7/23/17 Legal: 10/5/17 Graduated: 10/15/18
    Build thread: http://thefactoryfiveforum.com/showt...8-Build-Thread

  25. #25
    Senior Member edwardb's Avatar
    Join Date
    Feb 2011
    Location
    Lake Orion, Michigan
    Posts
    10,866
    Post Thanks / Like
    For your first picture, that vacuum source and is required. In the Mustang circuit illustrated, it delivers vacuum to the power brakes and the CMCV system. We only need it for the CMCV system. The FF Coyote instructions are a little confusing. In one section they tell you to cap it. In another they say to use it as the vacuum source for the fuel pressure regulator. They don't address needing the vacuum for the CMCV system. You need to connect this vacuum source to the nipple on the back of the intake manifold. I installed a "Y" in the line also for the fuel pressure regulator vacuum source. A picture of the connection and the hose I made is in the first post. Note there has been some discussion whether the vacuum source for the regulator is required, and apparently some tuners recommend not using it. Your choice I guess. I have it hooked up and all seems OK after 600 miles.

    Your second picture is of the DS (left) EGR connection. Not part of the CMCV circuit, but still needs to be addressed. The FF Coyote instructions talk about "tough" and "relaxed" connections for the EGR circuit. "Tough" meaning back into the intake (as Ford designed) and "relaxed" meaning vented to atmosphere behind the engine. A little like back in the good old days with breather tubes. I chose the "tough" option and routed the DS into the Spectre intake. You didn't ask, but the PS (right) EGR I left plumbed into the intake on that side as delivered from Ford.

    Disclaimer: My experience and this write-up were completed with the 2015 Coyote version. I'm 99% confident these two responses still apply to the 2017 version you're asking about, but have to say it anyway. The only difference as I understand so far is there is no CMCV hose to the intake like in my 2015 version. It's left vented to atmosphere back at the CMCV vacuum motors.
    Last edited by edwardb; 07-05-2017 at 08:29 AM.
    Build 1: Mk3 Roadster #5125. Sold 11/08/2014. Build 2: Mk4 Roadster #7750. Sold 04/10/2017. Build Thread
    Build 3: Mk4 Roadster 20th Anniversary #8674. Sold 09/07/2020. Build Thread and Video. Build 4: Gen 3 Type 65 Coupe #59. Gen 3 Coyote. Legal 03/04/2020. Build Thread and Video
    Build 5: 35 Hot Rod Truck #138. LS3 and 4L65E auto. Rcvd 01/05/2021. Legal 04/20/2023. Build Thread. Sold 11/9/2023.

  26. #26
    David aka Ducky2009 Ducky2009's Avatar
    Join Date
    Dec 2016
    Location
    Lilburn, GA
    Posts
    787
    Post Thanks / Like
    Quote Originally Posted by Jdav View Post
    I have the 2017 version of the Coyote and I want to make sure I am interpreting this correctly.
    I just need to cap the tube that I have circled here?
    FullSizeRender.jpg
    Or was the reference to this one?
    FullSizeRender 2.jpg

    And where does the one that does not get capped go?
    Edwardb is correct. You also have two hoses capped that are needed. The Coyote kit should have given you a 90 degree elbow to plug into the vacuum port for fuel regulator (coyote manual pg 37). It's also needed for the CMCV line. The manual does not show that this line also supplies vacuum to the CMCV valves. It shows that you need to screw several pcs together to make this connection. I didn't purchase the coyote kit, so I purchased a one-piece 1/2" to 1/4" elbow (see pic). I have extra if you want one. The EGR line instructions say to cut/remove the supplied line (manual pg 45-46). NOTE: The manual says "Use a hose clamp to attach the hose to the intake tube".... but doesn't show where to connect. It is not necessary to cut this hose. If you install the fitting into cold air inlet in the correct location, the supplied line works. See pic.
    The two lines that you cave capped. See pics. The both go to the coolant tank. The 3/4" hose goes to the bottom of the coolant tank.

    Capped Port.jpg EGR Hose.jpg Vacuum fitting.jpg
    Last edited by Ducky2009; 07-07-2017 at 03:13 PM.
    MK4 Build #9035 Delivered 2/17/17, First Start & Go-Kart 6/2/17, Licensed 9/1/17
    Paint - Lightning Blue Metallic, No Hood Scoop, No Stripes
    Gen 2 Coyote Engine & TKO-600. Solid Axle, 8.8-3.55, Power Steering, Power Brakes, Dual Roll Bars
    Heater and Glove Box, Drop Trunk, Wipers, Radio, FFR Vintage Gauges, Custom Dash
    Build Thread: http://thefactoryfiveforum.com/showt...MK4-Build-9035

  27. #27
    Senior Member edwardb's Avatar
    Join Date
    Feb 2011
    Location
    Lake Orion, Michigan
    Posts
    10,866
    Post Thanks / Like
    Quote Originally Posted by Ducky2009 View Post
    The two lines that you have capped. See pics. The both go to the coolant tank.
    Thanks for the additional info. One follow-up though. Those two lines (plus a couple others) go to the coolant tank if you're using the Mustang expansion tank and plumbing. Which I recommend and used BTW. But that's different than the plumbing shown in the FF Coyote instructions. They show their typical T-filler and overflow tank setup. So the extra connections on the Coyote aren't used in that case.
    Build 1: Mk3 Roadster #5125. Sold 11/08/2014. Build 2: Mk4 Roadster #7750. Sold 04/10/2017. Build Thread
    Build 3: Mk4 Roadster 20th Anniversary #8674. Sold 09/07/2020. Build Thread and Video. Build 4: Gen 3 Type 65 Coupe #59. Gen 3 Coyote. Legal 03/04/2020. Build Thread and Video
    Build 5: 35 Hot Rod Truck #138. LS3 and 4L65E auto. Rcvd 01/05/2021. Legal 04/20/2023. Build Thread. Sold 11/9/2023.

  28. #28
    On a roll Al_C's Avatar
    Join Date
    Aug 2014
    Location
    Wheaton, IL
    Posts
    1,473
    Post Thanks / Like
    I'm a little late to this party, but until now, this was not applicable. It is now, as it's one of the last remaining items before I do my first start. David (Ducky2009) and I discussed this topic on the phone yesterday and it makes more sense now than previously, but I still have some questions that I hope the group can resolve.

    First, I have all the original vacuum lines in place. The first photo shows the PS vacuum line. It is attached to the loom for the PCM. It is the "lower" hose depicted in the Ford diagram at the beginning of this thread.


    This next photo is the DS vacuum hose. It is the "upper" hose in the Ford diagram. Apparently, this would plug into the intake on the Mustang air box.


    Finally, I have two candidates for plugging stuff in to. You can see them in this last photo, and I stuck a pen into one and the pen cover into the other to highlight them:


    I'm attempting to reconcile the hoses I have with Paul's "y" hose. One end of that hose goes into the port where the pen is (last photo), but it's unclear where the rear connection for that hose is.

    So, do I keep the DS hose in the second photo? If yes, where does that connect? To the 90 degree elbow on the air intake?

    What, if anything do I do with the PS hose? It sounds like many have removed it, but mine's still there, so maybe it has some utility?

    Finally, do I cap the engine connection point where I have the pen cap stuck in or do I connect something there? I appreciate your input!
    Mk IV Roadster - #8650 - delivered 7-17-2015 - first start 7-28-2018 - first go-kart 10-13-2018 - licensed and on the road 9-9-19: body/paint completed 3-17-2020.
    Complete kit / 2015 Coyote / TKO600 / IRS / Wilwood brakes / Mid-Shift mod / Power Steering / Heater and Seat Heaters / RT turn signal / Breeze radiator shroud and mount

  29. #29
    Senior Member Dave Howard's Avatar
    Join Date
    Feb 2012
    Location
    North Bay, Ontario
    Posts
    536
    Post Thanks / Like
    The Coyote install kit from FFR used to include an assortment of caps and gear clamps to cap off vaccum or cool connections not being used with your jnstallation. Supply vacuum where your installation requires it. Cap the rest. You can remove unused or unwanted hosed to de-clutter your installation. Typically, if you aren't using vacuum assist PB, remove the hose and cap the connection on the manifold.

  30. #30
    Senior Member edwardb's Avatar
    Join Date
    Feb 2011
    Location
    Lake Orion, Michigan
    Posts
    10,866
    Post Thanks / Like
    Quote Originally Posted by Al_C View Post
    I'm a little late to this party, but until now, this was not applicable. It is now, as it's one of the last remaining items before I do my first start. David (Ducky2009) and I discussed this topic on the phone yesterday and it makes more sense now than previously, but I still have some questions that I hope the group can resolve.
    This thread has gotten a little hard to follow because of how I originally plumbed the vacuum lines and later fixed (subject of the original post), then differences in later Coyote versions from the one originally described, plus a couple diversions along the way.

    You appear to have the same version as mine (2015) so the hookup is pretty simple:

    - The PS hose needs to go to the vacuum source. Where you have the pen in your picture. The other end of the hose comes from the factory attached to the vacuum reservoir connection on the back of the intake and should stay there. (I initially removed this hose and then replaced it with a hose pictured on the DS. I know, it’s confusing. Sorry. But the DS hose I pictured is going to the vacuum reservoir connection and doing the same thing.)

    - The PS vacuum hose is also the source for the vacuum reference signal that goes to the fuel pressure regulator. Mentioned in both the FF and Ford instructions. That’s the “Y” you’re seeing in my pictures, and FF includes the “Y” fitting in the Coyote installation kit. Not to go off topic, but lots of discussion of whether this vacuum reference signal is really needed. My tuner (Lund Racing) says no. Did log files for the custom tune with and without the line and didn’t detect any differences. I took their advice and have it plugged. But it doesn’t appear to hurt anything if you use it. Your choice.

    - The DS hose needs to go to the elbow in the intake. (In later versions this hose was removed by Ford and the CMCV valves vent to atmosphere directly at the valves.)

    - The connection where you have the pen cap in your picture should be capped. It’s not used in our installations.

    Quote Originally Posted by Dave Howard View Post
    The Coyote install kit from FFR used to include an assortment of caps and gear clamps to cap off vaccum or cool connections not being used with your jnstallation. Supply vacuum where your installation requires it. Cap the rest. You can remove unused or unwanted hosed to de-clutter your installation. Typically, if you aren't using vacuum assist PB, remove the hose and cap the connection on the manifold.
    Ford added the CMCV valves and intake runners to the 2015+ Gen 2 Coyotes. Not present in your Gen 1 Coyote. They have to be plumbed or will throw DTC's as described. Unfortunately, neither Factory Five or Ford mention how to do that in their instructions.
    Last edited by edwardb; 06-26-2018 at 01:46 PM.
    Build 1: Mk3 Roadster #5125. Sold 11/08/2014. Build 2: Mk4 Roadster #7750. Sold 04/10/2017. Build Thread
    Build 3: Mk4 Roadster 20th Anniversary #8674. Sold 09/07/2020. Build Thread and Video. Build 4: Gen 3 Type 65 Coupe #59. Gen 3 Coyote. Legal 03/04/2020. Build Thread and Video
    Build 5: 35 Hot Rod Truck #138. LS3 and 4L65E auto. Rcvd 01/05/2021. Legal 04/20/2023. Build Thread. Sold 11/9/2023.

  31. #31
    On a roll Al_C's Avatar
    Join Date
    Aug 2014
    Location
    Wheaton, IL
    Posts
    1,473
    Post Thanks / Like
    OK, thanks. So here's what I have:

    - PS goes to vacuum "port" on driver's side (where the pen is).
    - Cap off port where pen cap is.
    - choice of capping off vacuum port on fuel pressure regulator or attaching it via "Y"
    - make (yet another) hole in the elbow and attach DS hose.

    Problems: There is no "Y" in my coyote fitment kit. Or anywhere else in my "misc. parts box". That's another story. So, I may just go the capping route. Also, if I'm going to go the "tough" emissions route for the PCV, I need to make a hole for that in the elbow, too. If the newest generation Coyote doesn't have the DS hose, why not just leave it unconnected? The only difference is filtered vs. unfiltered air.
    Mk IV Roadster - #8650 - delivered 7-17-2015 - first start 7-28-2018 - first go-kart 10-13-2018 - licensed and on the road 9-9-19: body/paint completed 3-17-2020.
    Complete kit / 2015 Coyote / TKO600 / IRS / Wilwood brakes / Mid-Shift mod / Power Steering / Heater and Seat Heaters / RT turn signal / Breeze radiator shroud and mount

  32. #32
    Senior Member edwardb's Avatar
    Join Date
    Feb 2011
    Location
    Lake Orion, Michigan
    Posts
    10,866
    Post Thanks / Like
    Quote Originally Posted by Al_C View Post
    OK, thanks. So here's what I have:

    - PS goes to vacuum "port" on driver's side (where the pen is).
    - Cap off port where pen cap is.
    - choice of capping off vacuum port on fuel pressure regulator or attaching it via "Y"
    - make (yet another) hole in the elbow and attach DS hose.

    Problems: There is no "Y" in my coyote fitment kit. Or anywhere else in my "misc. parts box". That's another story. So, I may just go the capping route. Also, if I'm going to go the "tough" emissions route for the PCV, I need to make a hole for that in the elbow, too. If the newest generation Coyote doesn't have the DS hose, why not just leave it unconnected? The only difference is filtered vs. unfiltered air.
    You're on the right path. I didn't have a Coyote completion kit. The "Y" connector I used was from my local O'Reilly Auto Parts. But just capping the vacuum port on the regulator seems to be an acceptable alternative. For the DS hose, I honestly don't know if you can just remove it. As I understand, the change Ford made is more than leaving the hose off. They apparently added some type of caps or filters to the CMCV valves. But I don't have any actual experience. Maybe someone else can chime in. Not that it matters, but it's a little more than just filtered vs. unfiltered. The intake connection would have some kind of air pressure and velocity. But clearly Ford determined it wasn't necessary. The connectors for the elbow are available from JLT Performance. Maybe you've seen that in other threads. Pretty easy to drill the holes and attach. FWIW I personally prefer the tough emissions approach.
    Last edited by edwardb; 06-26-2018 at 07:05 PM.
    Build 1: Mk3 Roadster #5125. Sold 11/08/2014. Build 2: Mk4 Roadster #7750. Sold 04/10/2017. Build Thread
    Build 3: Mk4 Roadster 20th Anniversary #8674. Sold 09/07/2020. Build Thread and Video. Build 4: Gen 3 Type 65 Coupe #59. Gen 3 Coyote. Legal 03/04/2020. Build Thread and Video
    Build 5: 35 Hot Rod Truck #138. LS3 and 4L65E auto. Rcvd 01/05/2021. Legal 04/20/2023. Build Thread. Sold 11/9/2023.

  33. #33
    Senior Member Dave Howard's Avatar
    Join Date
    Feb 2012
    Location
    North Bay, Ontario
    Posts
    536
    Post Thanks / Like
    I ditched the CVS hoses and installed small K&N filters on each cylinder head. Eliminated the need for drilling a hole in my intake runner and the addition of another unsightly hose. I think I used the vacuum port for the power brakes as the vacuum source for the fuel pressure regulator. Used a series of reducers to get to the proper size. Like I said in my previous post " Supply vacuum where your installation requires it. Cap the rest. You can remove unused or unwanted hosed to de-clutter your installation."
    Attached Images Attached Images

  34. #34
    Senior Member
    Join Date
    Dec 2016
    Location
    Kirkland, WA
    Posts
    287
    Post Thanks / Like
    For what it's worth, Ford Racing told me not to simply remove the left side vacuum tube on my 2016 Coyote and leave the CMCV valves open to atmosphere. As Paul notes above, they changed the valves when they eliminated the left side tube, because the original valves weren't set up for atmospheric intake.

    If you haven't already, calling Ford Racing is usually very helpful - can save a lot of hunting through the forum. Of course, I learned most of what I know about these cars hunting through the forums on different topics, so you never know what you're going to learn
    Mk4 #8861 Complete kit. Delivered: 27 Apr 2016, currently a roller.
    Gen-2 Coyote, clutch, TKO600, midshift, and solid axle from Forte. Many pieces from Breeze and Replicarparts.

  35. #35
    On a roll Al_C's Avatar
    Join Date
    Aug 2014
    Location
    Wheaton, IL
    Posts
    1,473
    Post Thanks / Like
    Update: I found a 3/8 quick disconnect tube and a 3/8 to 1/2 double male. that allows me to put together a short hose that will connect to the PS vacuum hose (the quick disconnect) to the DS engine vacuum port (1/2 inch). This way I can connect that line as it should be. Concurrently, I found a vendor (unfortunately not a forum sponsor so I won't mention the name) that has a FFR CMCV/PCV kit with the connectors and grommets. That will solve the DS hose dilemma (mentioned by initiator). As edwardb suggests, I'll cap the vacuum connection on the fuel pressure regulator. Thanks everyone. Sorry if I hijacked the thread...
    Mk IV Roadster - #8650 - delivered 7-17-2015 - first start 7-28-2018 - first go-kart 10-13-2018 - licensed and on the road 9-9-19: body/paint completed 3-17-2020.
    Complete kit / 2015 Coyote / TKO600 / IRS / Wilwood brakes / Mid-Shift mod / Power Steering / Heater and Seat Heaters / RT turn signal / Breeze radiator shroud and mount

  36. #36
    Senior Member edwardb's Avatar
    Join Date
    Feb 2011
    Location
    Lake Orion, Michigan
    Posts
    10,866
    Post Thanks / Like
    Quote Originally Posted by Al_C View Post
    Sorry if I hijacked the thread...
    Not a hijack at all. You were right on topic. Sounds like you're on the home stretch. Good luck.
    Build 1: Mk3 Roadster #5125. Sold 11/08/2014. Build 2: Mk4 Roadster #7750. Sold 04/10/2017. Build Thread
    Build 3: Mk4 Roadster 20th Anniversary #8674. Sold 09/07/2020. Build Thread and Video. Build 4: Gen 3 Type 65 Coupe #59. Gen 3 Coyote. Legal 03/04/2020. Build Thread and Video
    Build 5: 35 Hot Rod Truck #138. LS3 and 4L65E auto. Rcvd 01/05/2021. Legal 04/20/2023. Build Thread. Sold 11/9/2023.

  37. #37
    David aka Ducky2009 Ducky2009's Avatar
    Join Date
    Dec 2016
    Location
    Lilburn, GA
    Posts
    787
    Post Thanks / Like

    2017 Coyote CMCV Vacuum Set-up

    Just found this diagram for the 2017 Coyote. The 2017 (from Ford Racing) has a vacuum line from the rear vacuum tank to the front on the PS, show in the diagram with the red illustration line being attached to the vacuum port. The vacuum lines are capped.....Where the blue electrical connectors are plugged in. (The 2015 shows existing vacuum lines).
    Attached Images Attached Images
    MK4 Build #9035 Delivered 2/17/17, First Start & Go-Kart 6/2/17, Licensed 9/1/17
    Paint - Lightning Blue Metallic, No Hood Scoop, No Stripes
    Gen 2 Coyote Engine & TKO-600. Solid Axle, 8.8-3.55, Power Steering, Power Brakes, Dual Roll Bars
    Heater and Glove Box, Drop Trunk, Wipers, Radio, FFR Vintage Gauges, Custom Dash
    Build Thread: http://thefactoryfiveforum.com/showt...MK4-Build-9035

  38. #38
    Senior Member
    Join Date
    Oct 2017
    Location
    Williamsport, IN
    Posts
    173
    Post Thanks / Like
    I just started a thread today before I found this one. It seems to be a confusing topic. I have the 17 version of the coyote. There is no hose provided on the driver side. I called Ford tech support 2 weeks ago and they sent me the older diagram showing one is needed. I see your newer diagram which looks like my set up from Ford. Mine seems to be running fine as it came but I want to make sure it’s right.
    MkIV complete kit #9259, Coyote, TKO600, IRS, Wilwoods x 4, many parts from Breeze, Forte, Russ's Garage and North Racecars
    17" Bullit style wheels, custom Kirkey seats, mid shift conversion, drop trunk, KRC power steering, Forte Hyd. clutch and slave, manual brakes
    overall build plan: build it to drive, not polish and black it out wherever possible, paint will be some shade of dark cherry

  39. #39
    Senior Member edwardb's Avatar
    Join Date
    Feb 2011
    Location
    Lake Orion, Michigan
    Posts
    10,866
    Post Thanks / Like
    Quote Originally Posted by sbhunter View Post
    I just started a thread today before I found this one. It seems to be a confusing topic. I have the 17 version of the coyote. There is no hose provided on the driver side. I called Ford tech support 2 weeks ago and they sent me the older diagram showing one is needed. I see your newer diagram which looks like my set up from Ford. Mine seems to be running fine as it came but I want to make sure it’s right.
    Too bad Ford confused things. (But then this thread is confusing too... ). Sounds like your 2017 version is correct. DS no hose. The CMCV vacuum motors are vented to atmosphere, so no hose to the intake like previous versions. On the PS, you should have the hose connected to the vacuum port on the front by the throttle body. Like the diagram Ducky2009 posted.
    Build 1: Mk3 Roadster #5125. Sold 11/08/2014. Build 2: Mk4 Roadster #7750. Sold 04/10/2017. Build Thread
    Build 3: Mk4 Roadster 20th Anniversary #8674. Sold 09/07/2020. Build Thread and Video. Build 4: Gen 3 Type 65 Coupe #59. Gen 3 Coyote. Legal 03/04/2020. Build Thread and Video
    Build 5: 35 Hot Rod Truck #138. LS3 and 4L65E auto. Rcvd 01/05/2021. Legal 04/20/2023. Build Thread. Sold 11/9/2023.

  40. #40
    Senior Member dbo_texas's Avatar
    Join Date
    Feb 2018
    Location
    Austin, TX
    Posts
    499
    Post Thanks / Like
    Quote Originally Posted by Al_C View Post
    Update: I found a 3/8 quick disconnect tube and a 3/8 to 1/2 double male. that allows me to put together a short hose that will connect to the PS vacuum hose (the quick disconnect) to the DS engine vacuum port (1/2 inch). This way I can connect that line as it should be. Concurrently, I found a vendor (unfortunately not a forum sponsor so I won't mention the name) that has a FFR CMCV/PCV kit with the connectors and grommets. That will solve the DS hose dilemma (mentioned by initiator). As edwardb suggests, I'll cap the vacuum connection on the fuel pressure regulator. Thanks everyone. Sorry if I hijacked the thread...
    I know I'm a couple of years late here, but I assume your final CMCV plumbing on the 2017 Coyote Gen2 looks something like this? I found a 3/8 SAE Quick Disconnect male to 1/2 ID barb on Amazon that I plan to use for the jumper between the PS hose (came installed on the engine) and the vacuum port near the intake (on the DS).
    Darryl [dbo_texas]
    MKIV #9644 (build thread) (Index)
    MK4 Complete Kit | Gen2 crate Coyote | Tremec T56, 3.55 IRS | power steering | hydroboost | dual roll bars | FFR carbon fiber dash | 18" Halibrands + Wilwoods | RT drop trunk kit & turn signal | front battery mount | saddle leather Intatrim Stoneleigh seats + interior accents

Page 1 of 2 12 LastLast

Posting Permissions

  • You may not post new threads
  • You may not post replies
  • You may not post attachments
  • You may not edit your posts
  •  

Martin's Dent and Collision Shop

Visit our community sponsor