FormaCars

Visit our community sponsor

Thanks Thanks:  10
Likes Likes:  25
Page 4 of 28 FirstFirst ... 2345614 ... LastLast
Results 121 to 160 of 1104

Thread: Jazzman’s #8745 "Flip Top" Build

  1. #121
    Jazzman's Avatar
    Join Date
    Jan 2014
    Location
    Scottsdale, AZ
    Posts
    1,164
    Post Thanks / Like
    Here is a cardboard template I made to see If I wanted to just get a second FFR fluid reservoir. I think the shape and size will work out fine. I am a bit concerned about the location, right over the headers, but that is pretty much where the manual says to put it, and where the CNC reservoirs would be anyway. The lids are level with the top of the frame rail, so they should not interfere with the hood. I'm not sure how this might interfere with wiring, but I plan to run the wireloom on the outside of the same frame rail, so it should not interfere. I will even use the same attachment points to both hold the reservoir bracket and the wireloom. What do you think? Have I missed anything obvious?


    Jazzman

    MKIV #8745 "Flip Top" Roadster, Custom Tilt front, Coyote Engine, Tremec TKO600, Custom Interior. Best of Show winner, Huntington Beach Cruise In 2018.

    1967 Ford Mustang Coupe build thread updated 1/22/2021

    Roadster Frame Dolly Plan

  2. #122
    Administrator David Hodgkins's Avatar
    Join Date
    Feb 2011
    Location
    Corona del Mar, CA
    Posts
    6,082
    Post Thanks / Like
    Blog Entries
    7
    I'd put the bracket on the inside of the 3/4" tube, not the outside as shown above. It will clear the body better that way. I also mount mine just a little more toward the front of the car...


    FFR 5369 Pin Drive, IRS, Trigos, Torsen, Wilwoods, FMS BOSS 302 "B" cam , Mass-flo. CA SB100 (SPCN) Registered
    Delivered 4/23/06. "Finished" 4/2012 (still not done!)


  3. #123
    Administrator David Hodgkins's Avatar
    Join Date
    Feb 2011
    Location
    Corona del Mar, CA
    Posts
    6,082
    Post Thanks / Like
    Blog Entries
    7
    Regarding fuel line routing, here's how I did mine. It may not be the ultimate way to do it but it's how I did it.


    FFR 5369 Pin Drive, IRS, Trigos, Torsen, Wilwoods, FMS BOSS 302 "B" cam , Mass-flo. CA SB100 (SPCN) Registered
    Delivered 4/23/06. "Finished" 4/2012 (still not done!)


  4. #124
    Jazzman's Avatar
    Join Date
    Jan 2014
    Location
    Scottsdale, AZ
    Posts
    1,164
    Post Thanks / Like
    Well the Ace Hardware tube flaring kit is a complete waste of money. The tube just slips right through the jaws. What tube flaring kit do you use and recommend?

    I did go ahead and order a second brake/clutch fluid reservoir from FFR. I like the look and at least I won't waste money on throwing this one away. Now I need to find a 6" square piece of sheet aluminum, at least 3/32" thick. Surprisingly hard to find locally. I know where I can get it, but it is a 45 minute drive, and they are not particularly helpful. (They are if you need 1000 feet of steel, but for small parts, pretty poor service.)
    Jazzman

    MKIV #8745 "Flip Top" Roadster, Custom Tilt front, Coyote Engine, Tremec TKO600, Custom Interior. Best of Show winner, Huntington Beach Cruise In 2018.

    1967 Ford Mustang Coupe build thread updated 1/22/2021

    Roadster Frame Dolly Plan

  5. #125
    Administrator David Hodgkins's Avatar
    Join Date
    Feb 2011
    Location
    Corona del Mar, CA
    Posts
    6,082
    Post Thanks / Like
    Blog Entries
    7
    What are you flaring? I was able to do my brake and fuel lines without having to do any flair. If you need one though Eastwood makes a good one...

    I can get you some aluminum. I have a good metal supply place near me. Want me to pick it up and mail to you?


    FFR 5369 Pin Drive, IRS, Trigos, Torsen, Wilwoods, FMS BOSS 302 "B" cam , Mass-flo. CA SB100 (SPCN) Registered
    Delivered 4/23/06. "Finished" 4/2012 (still not done!)


  6. #126
    Senior Member edwardb's Avatar
    Join Date
    Feb 2011
    Location
    Lake Orion, Michigan
    Posts
    10,585
    Post Thanks / Like
    x2 on the Eastwood flaring tool. Pretty much mandatory for something like stainless. Killer for other materials as well, but at $200 there are other options. I have some scrap pieces of 3/16 aluminum sheet here in my scrap bin. Leftover from another project. PM the exact dimension you need and your address. Happy to send a piece your way.
    Build 1: Mk3 Roadster #5125. Sold 11/08/2014. Build 2: Mk4 Roadster #7750. Sold 04/10/2017. Build Thread
    Build 3: Mk4 Roadster 20th Anniversary #8674. Sold 09/07/2020. Build Thread and Video. Build 4: Gen 3 Type 65 Coupe #59. Gen 3 Coyote. Legal 03/04/2020. Build Thread and Video
    Build 5: 35 Hot Rod Truck #138. LS3 and 4L65E auto. Rcvd 01/05/2021. Legal 04/20/2023. Build Thread. Sold 11/9/2023.

  7. #127
    Jazzman's Avatar
    Join Date
    Jan 2014
    Location
    Scottsdale, AZ
    Posts
    1,164
    Post Thanks / Like
    David, I am going to follow Edwardb's lead and put in 3/8" stainless fuel lines, which will require flaring. I also have routed the front brake line across the X brace, and it took far less distance than the allotted 60" length of brake line. I will have to look into the Eastwood set. $200 is significantly more than I had planned, but I want to do it right. Thanks for the offer of going to get a piece of aluminum for me. I really appreciate the willingness. I am going to PM Edwardb and see if he has a scrap he can mail to me.

    Follow up to the Ace Hardware flare tool: I attempted to return it, showing them both the tool and the tube that slipped, and their attitude was "too bad, no returns, store credit only". I had no choice but to take it, but lesson learned, don't buy tools at Ace Hardware. Fittings and bolts perhaps, but not tools. Worst of all the "store credit" is only listed on one register receipt that I now have to keep in my wallet until I use it up. They don't even keep records of it in their bookkeeping! On the upside, it never expires, except if I lose the receipt!!
    Jazzman

    MKIV #8745 "Flip Top" Roadster, Custom Tilt front, Coyote Engine, Tremec TKO600, Custom Interior. Best of Show winner, Huntington Beach Cruise In 2018.

    1967 Ford Mustang Coupe build thread updated 1/22/2021

    Roadster Frame Dolly Plan

  8. #128
    2bking's Avatar
    Join Date
    Jul 2013
    Location
    Garland, Texas
    Posts
    799
    Post Thanks / Like
    Quote Originally Posted by Jazzman View Post
    David, I am going to follow Edwardb's lead and put in 3/8" stainless fuel lines,.... Worst of all the "store credit" is only listed on one register receipt that I now have to keep in my wallet until I use it up. They don't even keep records of it in their bookkeeping! On the upside, it never expires, except if I lose the receipt!!
    The fuel line calculations show that the 5/16" line is sufficient for the supply side and 1/4" for the return, even for engines up to 500 HP. The EFI systems push the fuel through the lines rather than suck like the engine mounted fuel pumps did in days past so the larger lines are not needed unless you have some engine upgrades planned for the future. I purchased the 3/8" stainless line and decided not to use it. I used the FFR kit supplied 5/16" and 1/4" line.

    Now about that receipt, be wary of the thermal printed receipts that have disappearing ink.
    King
    Roadster #8127, ordered 7/12/13, received 9/11/13
    http://thefactoryfiveforum.com/showt...4-Coyote-Build

  9. #129
    Not a waxer Jeff Kleiner's Avatar
    Join Date
    Feb 2011
    Location
    Bloomington, Indiana
    Posts
    8,116
    Post Thanks / Like
    Quote Originally Posted by 2bking View Post
    The fuel line calculations show that the 5/16" line is sufficient for the supply side and 1/4" for the return, even for engines up to 500 HP...
    Agreed.

    Jeff

  10. #130
    Jazzman's Avatar
    Join Date
    Jan 2014
    Location
    Scottsdale, AZ
    Posts
    1,164
    Post Thanks / Like
    Before I button up the DS footbox, I need to do something about putting in an hydraulic clutch master cylinder and hook it into the overflow reservoir. I know I have read of several builders installing a hydraulic clutch kit. I have searched this forum, and I can't seem to find the source of such a kit. I thought it was Forte, but I couldn't find it on his website. Then I looked at Breeze. Perhaps (Likely!) I don't know how to search for the kit or parts I will need. Can someone that has installed this mod please tell me from what vendor you found the kit. Thanks for the help.
    Jazzman

    MKIV #8745 "Flip Top" Roadster, Custom Tilt front, Coyote Engine, Tremec TKO600, Custom Interior. Best of Show winner, Huntington Beach Cruise In 2018.

    1967 Ford Mustang Coupe build thread updated 1/22/2021

    Roadster Frame Dolly Plan

  11. #131
    Senior Member edwardb's Avatar
    Join Date
    Feb 2011
    Location
    Lake Orion, Michigan
    Posts
    10,585
    Post Thanks / Like
    Quote Originally Posted by Jazzman View Post
    Before I button up the DS footbox, I need to do something about putting in an hydraulic clutch master cylinder and hook it into the overflow reservoir. I know I have read of several builders installing a hydraulic clutch kit. I have searched this forum, and I can't seem to find the source of such a kit. I thought it was Forte, but I couldn't find it on his website. Then I looked at Breeze. Perhaps (Likely!) I don't know how to search for the kit or parts I will need. Can someone that has installed this mod please tell me from what vendor you found the kit. Thanks for the help.
    The one many of us use is from Forte's. You need to call to order. Based on engine, bell housing, and trans Mike will set you up.
    Build 1: Mk3 Roadster #5125. Sold 11/08/2014. Build 2: Mk4 Roadster #7750. Sold 04/10/2017. Build Thread
    Build 3: Mk4 Roadster 20th Anniversary #8674. Sold 09/07/2020. Build Thread and Video. Build 4: Gen 3 Type 65 Coupe #59. Gen 3 Coyote. Legal 03/04/2020. Build Thread and Video
    Build 5: 35 Hot Rod Truck #138. LS3 and 4L65E auto. Rcvd 01/05/2021. Legal 04/20/2023. Build Thread. Sold 11/9/2023.

  12. #132
    Jazzman's Avatar
    Join Date
    Jan 2014
    Location
    Scottsdale, AZ
    Posts
    1,164
    Post Thanks / Like
    Still working on brake and fuel lines. I think the second one, for the front going from DS to PS, came out almost perfectly. It is much shorter than the allotted 60", so this is one that will have to be flared.


    Based upon wise counsel, I pulled out the fuel filter because the location was going to conflict with the brake line routing. Since I don't have rear spindles, rotors or brakes for the IRS, I am sort of filling in where I can. I noticed this heavy frame item. It looks like it may be designed to carry one of the other types of rear suspension, but thus far I cannot figure out what attaches to this when using the IRS. Am I correct?


    Now if I am right and this chunk of steel ends up having nothing attached to it, I had an idea of how to use it quite effectively. Conceptually, what about using this as the termination point for the rear brake lines? The photo just shows the flexible brake line running through the hole, but obviously it would be appropriately mounted in similar fashion to the front brake line termination point. This does seem to put the brake line almost exactly where it will need to be. What do you think?
    Jazzman

    MKIV #8745 "Flip Top" Roadster, Custom Tilt front, Coyote Engine, Tremec TKO600, Custom Interior. Best of Show winner, Huntington Beach Cruise In 2018.

    1967 Ford Mustang Coupe build thread updated 1/22/2021

    Roadster Frame Dolly Plan

  13. #133
    Senior Member edwardb's Avatar
    Join Date
    Feb 2011
    Location
    Lake Orion, Michigan
    Posts
    10,585
    Post Thanks / Like
    Quote Originally Posted by Jazzman View Post
    Now if I am right and this chunk of steel ends up having nothing attached to it, I had an idea of how to use it quite effectively. Conceptually, what about using this as the termination point for the rear brake lines? The photo just shows the flexible brake line running through the hole, but obviously it would be appropriately mounted in similar fashion to the front brake line termination point. This does seem to put the brake line almost exactly where it will need to be. What do you think?
    No, those brackets aren't used for your IRS suspension. But I would advise against them for the brake lines. That location is only a couple inches away from the inside of the rear wheel rim. It's going to be a little tough to route them properly and stay away from the wheel without some really harsh bends. I'd recommend you wait until you have all the parts and can mount the wheel and then see what location provides the best routing, takes into account the suspension movement, etc. Where I put them (same as FF and pictured in my build thread) looks to work OK, and I'm sure there are other locations that could work as well. But I wouldn't recommend that one.
    Build 1: Mk3 Roadster #5125. Sold 11/08/2014. Build 2: Mk4 Roadster #7750. Sold 04/10/2017. Build Thread
    Build 3: Mk4 Roadster 20th Anniversary #8674. Sold 09/07/2020. Build Thread and Video. Build 4: Gen 3 Type 65 Coupe #59. Gen 3 Coyote. Legal 03/04/2020. Build Thread and Video
    Build 5: 35 Hot Rod Truck #138. LS3 and 4L65E auto. Rcvd 01/05/2021. Legal 04/20/2023. Build Thread. Sold 11/9/2023.

  14. #134
    Senior Member AZPete's Avatar
    Join Date
    Feb 2011
    Location
    Scottsdale, AZ
    Posts
    2,374
    Post Thanks / Like
    Jazzman, I'm enjoying your build thread. Since we both live in Scottsdale, if you would like to borrow my Eastwood Flaring tool, let me know. I built & sold a Mk3 and have an 818 nearly on the road. Now looking forward to some Barrett-Jackson beers next week.
    I sent you a PM with cell number.
    Pete
    Last edited by AZPete; 01-22-2016 at 04:54 PM.
    818S/C : Chassis #25 with 06 WRX 2.5 turbo, ABS, cruise, PS, A/C, Apple CarPlay, rear camera, power windows & locks, leather & other complexities. Sold 10/19 with 5,800 miles.
    Mk3 Roadster #6228 4.6L, T45, IRS, PS, PB, ABS, Cruise, Koni's, 17" Halibrands, red w/ silver - 9K miles then sold @ Barrett-Jackson Jan 2011 (got back cash spent).

  15. #135
    Jazzman's Avatar
    Join Date
    Jan 2014
    Location
    Scottsdale, AZ
    Posts
    1,164
    Post Thanks / Like
    It has been an exhausting two days, none of it devoted to the Roadster. We helped my 90 year old in-laws prepare to downsize from their 1/2 acre home of 40+ years to a 2 bedroom apartment. Tough time for all concerned, but all turned out well in the end.

    The thing that has buoyed up my spirits is the friendship of people on this forum that I have not even met in person. You people are amazing!! On Wednesday I received a package from EdwardB of a piece of aluminum that I will need to fabricate a bracket for my fluid reservoirs. On Thursday I had a series of conversations with SkullandBones. He is willing to help me with my brake line flaring issue. He even called in another friend that will also be willing to help. Then yesterday, AZPete contacts me and is willing let me borrow the tool I need from him! Wow!! The generosity of the members of this forum is absolutely wonderful. I have been so busy the past few days that I have not had a chance to formally thank all of you. I ask your forgiveness for that oversight. I look forward to 1) paying forward EdwardB's generosity, 2) meeting with SkullandBones and his friend, and 3) meeting AzPete to see his 818. (I will have to go looking for your build thread Pete!) Thank you all so very much!!

    (The rear spindles and hubs for the IRS arrived sometime in the last few days. I was so busy I didn't realize that my son had put them in the shop without telling me! More on that process coming soon . . .)
    Jazzman

    MKIV #8745 "Flip Top" Roadster, Custom Tilt front, Coyote Engine, Tremec TKO600, Custom Interior. Best of Show winner, Huntington Beach Cruise In 2018.

    1967 Ford Mustang Coupe build thread updated 1/22/2021

    Roadster Frame Dolly Plan

  16. #136
    Senior Member AZPete's Avatar
    Join Date
    Feb 2011
    Location
    Scottsdale, AZ
    Posts
    2,374
    Post Thanks / Like
    Jazzman, don't waste time looking for my build thread. I don't have a build thread because it's so hard to find stuff in them, but I post by category in the 818 forum when I think I have something useful. Call my cell or send a PM and we can arrange a time to meet and get the Eastwood flare kit, or see my 818 if you like. Next week I'll be at Barrett-Jackson a lot so perhaps meet there?
    Pete
    818S/C : Chassis #25 with 06 WRX 2.5 turbo, ABS, cruise, PS, A/C, Apple CarPlay, rear camera, power windows & locks, leather & other complexities. Sold 10/19 with 5,800 miles.
    Mk3 Roadster #6228 4.6L, T45, IRS, PS, PB, ABS, Cruise, Koni's, 17" Halibrands, red w/ silver - 9K miles then sold @ Barrett-Jackson Jan 2011 (got back cash spent).

  17. #137
    Jazzman's Avatar
    Join Date
    Jan 2014
    Location
    Scottsdale, AZ
    Posts
    1,164
    Post Thanks / Like

    Barrett-Jackson, Fuel lines, and differential vents

    It has been a very exciting, but not particularly productive week. This week is the Barrett Jackson Auto Auction. I am lucky enough to live in Scottsdale where the biggest of them all is held each year in January. I can't guess how many cars are auctioned off over the course of the week, but it is well in excess of 1200. Almost every collectible car is on display, and some are simply amazing. I went three times this year. I saw a decent number of Cobra replicas, and even one actual original. Inspiration can drawn from each one, but the greatest takeaway was that quality shows! There were a lot of the replicas that obviously had shoddy workmanship, poor care, or both. I was only able to spot two actual Factory Five Roadsters. One was a raffle car raising money for Disabled Veterans, and the other was a display car that was not for sale. There may well have been others, but I didn't spot them. Tuesday I had the pleasure of spending several hours with AZPete as we walked around looking at cars. He is a great guy, very knowledgeable and engaging. Tomorrow I will go to his home to see his 818 build and borrow an eastwood flaring tool. The fun continues!!

    I did get a little bit of time to work on the car this week. I finished the PS front brakes after purchasing a replacement Willwood brake hat. It all looks like the DS, only reversed, so I won't waste your time with additional pictures here. After waiting for almost a month to get the differential vent, I finally was able to pick it up from Ford.


    The problem is that the geniuses at Ford didn't order the piece that connects the end of the vent tube to the differential. The hole in the differential is not threaded, so it must be a rubber fitting of some sort. The end of the vent tube is a 90 degree angle rubber hose, so it must be a barbed fitting. The trouble is that when I asked the genius at the Ford parts desk for the part, he told me that they didn't have it and that it was on backorder - with no current date for delivery. I asked him for the part number and he told me it didn't have one!! I would really love to be able to just order up the part and have it delivered to my door by mail. Does anybody have a good online source for Ford parts? Does anyone know the part number for the missing connector? This delay causes a waterfall of backups: I can't install the trunk floor until the batter box is installed, which I can't install until the rear brake line is installed, which I can't install until the battery box is installed, which I can't install until the differential vent is installed!


    I got the fuel lines installed. I purchased a new tube bender because I was concerned that the 5/16" tubing might be a bit much for me to bend around the Coke bottle. I am glad I did, but I was less than entirely impressed by the bender results. The tubing ended up having a just a little bit of a flat spot on one side. It is not enough to cause any problems with flow, it just is annoying since my other bends are nice and smooth. Oh well. It's done.


    I finished preparing all the sheet aluminum for powder coating. (Note to self: Next time do all the powder coating at once!!) I drilled most of the holes, but left some of them for drilling at final assembly. Some of the panels are not fitting back together exactly as expected. I want to get the pieces in place and not moving before I drill the final holes at that time. I can't really install the cockpit aluminum anyway until the trunk floor is installed. And we already know what is stopping that process. I am going over everything to make sure I only have to do one more batch of powder coating.

    While at the Barrett-Jackson today, I noticed some of the really nice cars had powder coated parts that could only be seen from the underside of the car. One in particular was the driveshaft. I got to thinking this might be a nice touch. Can I powder coat the driveshaft without damaging it? It looks like it has plastic fittings where the four way shafts intersect the main parts:


    Will the plastic fittings be damaged by the oven heat of the powder coating process? It looks like this joint could be taken apart, but I didn't want to go too far without counsel. What's your opinion? (I don't know how comfortable I am that those parts are plastic anyway!!) Oh well.
    Last edited by Jazzman; 01-31-2016 at 02:17 AM.
    Jazzman

    MKIV #8745 "Flip Top" Roadster, Custom Tilt front, Coyote Engine, Tremec TKO600, Custom Interior. Best of Show winner, Huntington Beach Cruise In 2018.

    1967 Ford Mustang Coupe build thread updated 1/22/2021

    Roadster Frame Dolly Plan

  18. #138
    Jazzman's Avatar
    Join Date
    Jan 2014
    Location
    Scottsdale, AZ
    Posts
    1,164
    Post Thanks / Like

    Rear Spindles and Hubs

    I bought a "new" (used) air compressor. The size is about as much as my garage can reasonably handle. It is quite loud so I hesitate to use it at night for fear of waking the neighbors, or worse still, my slumbering bride! I did discover that it needed some serious overhaul. I had to remove, reseal, tighten almost every fitting. After it was all done, it still leaked. So I took apart the only remaining fitting, the only one that didn't seem to be leaking, and discovered that the valve was shot. With a bit of internet searching, I found the part, found a source, ordered it up, and $22 later, I have a new compressor. It still leaks a bit, but not enough to worry about. I just cant leave it on, as it will keep itself topped off to 145lbs, and do it several times during the night.

    With the new compressor working, It was time to tackle the rear spindles. I cut off the ears as instructed. I have to say that was a slow and nerve-racking procedure. They came off without any particular drama, other than being loud. I had just received replacement 24 volt batteries from Ridgid for my Sawsall, and I really put it to the test. I got one ear completely off and the other about 75% done before the first battery gave out. Not bad for such heavy work.

    I am beginning to see that working on aluminum is sort of similar to working with really hard wood. After cutting off the ears with a Sawsall and a wood blade (12 teeth/inch), I smoothed the cut off area using the 40 grit belt on my sanding station. It worked great. It looks like it was meant to be that way.


    I then pulled out the die grinder and attacked the mold lines on the spindles. No, they don't have to be smoothed out, but I can't let EdwardB have all the fun. I am stealing his procedure entirely. With a couple more sessions with the grinder and several pads, I think they will be ready for duplicolor paint. I haven't found a source for that locally. I will have to check at Summit. (Other source suggestions?) I am also finding that I go through the die grinder pads pretty quickly. Buying them from Home Depot in small starter packs is getting pretty expensive. Suggestions on where to buy good quality die grinder pads in somewhat larger volumes to save a bit of money?


    I next attacked the hubs. Getting the bolts out wasn't too tough with a 5lb sledge hammer. It was getting them back in that took some doing. I tried the "tighten then nut on the bolt" method, but I could not hold on to the hub tightly enough to tighten the nuts. I gave up and went back to the more primitive method driving the bolts in with the sledge hammer. It seemed to work just fine, but boy did my right arm hurt after driving in all ten bolts!!

    Last edited by Jazzman; 01-31-2016 at 02:46 AM.
    Jazzman

    MKIV #8745 "Flip Top" Roadster, Custom Tilt front, Coyote Engine, Tremec TKO600, Custom Interior. Best of Show winner, Huntington Beach Cruise In 2018.

    1967 Ford Mustang Coupe build thread updated 1/22/2021

    Roadster Frame Dolly Plan

  19. #139
    Senior Member edwardb's Avatar
    Join Date
    Feb 2011
    Location
    Lake Orion, Michigan
    Posts
    10,585
    Post Thanks / Like
    My center section already had the vent fitting. Probably since it was a zero miles take-out unit. Just a quick search I see the new units Ford Racing is selling doesn't have the fitting. Just a yellow plug. Nice. The fitting is aluminum, and appears to be pressed in. Probably with a little red Loctite (your favorite ). I stopped buying parts at my local Ford dealer. Way easier to find on-line, know the availability, and have shipped to my door. Even with shipping charges, with the discounted pricing usually cheaper. I use Tasca Parts, and they've given me great service. There are others. I think ihis is the part you're looking for: http://www.tascaparts.com/ford/musta...part_name=vent. If nothing else, the part number is 2L1Z-4022-BA and with that your local dealer should be able to get it.

    Our local auto parts stores -- Auto Zone, Advance, O'Reilly -- all have a pretty full selection of Duplicolor products. Summit has it too, and in a pinch I think I bought some from them once. But you should be able to find the normal stuff on the shelf locally.

    I wouldn't put that driveshaft in a powder coat oven. And for sure I wouldn't try to take it apart. The plastic seals are quite typical. Those are high quality Dana Spicer u-joints, so nothing to worry about there. I guess if you really wanted to you could put some rattle can spray on it. Just mask off the slip joint and the end of the yoke. But it's completely hidden when the car is on the ground. Plus the grey color kind of matches the transmission. It's new, it's clean. Personally I'd leave it alone.

    I'd like to get to a Barret-Jackson auction some time. A buddy of mine goes to the one in Vegas every year and has a great time. I've watched some of the current Scottsdale event on TV. Just last night during Saturday prime time the prices were going crazy. Every car across the block with multiple hundred thousand sell prices. Just a bit rich for my blood.
    Last edited by edwardb; 01-31-2016 at 08:19 AM.
    Build 1: Mk3 Roadster #5125. Sold 11/08/2014. Build 2: Mk4 Roadster #7750. Sold 04/10/2017. Build Thread
    Build 3: Mk4 Roadster 20th Anniversary #8674. Sold 09/07/2020. Build Thread and Video. Build 4: Gen 3 Type 65 Coupe #59. Gen 3 Coyote. Legal 03/04/2020. Build Thread and Video
    Build 5: 35 Hot Rod Truck #138. LS3 and 4L65E auto. Rcvd 01/05/2021. Legal 04/20/2023. Build Thread. Sold 11/9/2023.

  20. #140

    Join Date
    Jun 2015
    Location
    Parker, TX
    Posts
    288
    Post Thanks / Like
    I got my vent tube a vent fitting here:
    http://www.oemfordpart.com/ford/must...part_name=vent

    I went ahead and ordered a new set with my diff cover that had to be replaced from damage during shipping. I just pressed this out of the old damaged one. PM me your address and I can mail it to you if you would like it - but at less than 10 bucks a new one is probably the way to go if you can find it.

    image.jpeg

  21. #141
    Jazzman's Avatar
    Join Date
    Jan 2014
    Location
    Scottsdale, AZ
    Posts
    1,164
    Post Thanks / Like
    I am waiting for parts, so things are kind of slow. I still need rear brakes, CV axels, powder coated parts, etc. While I am waiting I am double checking my work. I was just not happy with the routing of the front brake line crossover piece. I decided to buy a new tube and rebend it to go in front of the x member rather than behind.


    Jazzman

    MKIV #8745 "Flip Top" Roadster, Custom Tilt front, Coyote Engine, Tremec TKO600, Custom Interior. Best of Show winner, Huntington Beach Cruise In 2018.

    1967 Ford Mustang Coupe build thread updated 1/22/2021

    Roadster Frame Dolly Plan

  22. #142
    Jazzman's Avatar
    Join Date
    Jan 2014
    Location
    Scottsdale, AZ
    Posts
    1,164
    Post Thanks / Like

    Lets play "Name That Part"

    During this downtime, I am going through every box and part and collecting everything that needs to be powder coated. I am hoping to take one last load of parts in for coating. Most of them are easily identifiable, and have been added to the box for hammered Silver parts or the bag of gloss black parts. However I have a few parts I just can't identify.

    First, what are these? They look like they might be related to the exhaust system, but I don't even have an exhaust system yet.


    Second, what are these? They look similar to the small brackets for the front brakes where the hard brake lines connect to the flexible brake lines at the wheels. I have been looking for the rear brackets for this purpose, but these are definitely slightly different than the front ones. Most importantly, the opening is not round like the front bracket. So what say you?


    Thanks for your help identifying these random pieces.
    Jazzman

    MKIV #8745 "Flip Top" Roadster, Custom Tilt front, Coyote Engine, Tremec TKO600, Custom Interior. Best of Show winner, Huntington Beach Cruise In 2018.

    1967 Ford Mustang Coupe build thread updated 1/22/2021

    Roadster Frame Dolly Plan

  23. #143
    Not a waxer Jeff Kleiner's Avatar
    Join Date
    Feb 2011
    Location
    Bloomington, Indiana
    Posts
    8,116
    Post Thanks / Like
    The 3 items in the first photo are spacers which are used with a donor master cylinder. The two tabs in the second are for mounting OEM/donor rubber brake line hoses. None of these will be used for your build.

    Jeff

  24. #144
    Senior Member
    Join Date
    May 2013
    Location
    Harrisburg, PA
    Posts
    190
    Post Thanks / Like
    Save the master cylinder spacers, though. There are folks on here who use them when doing the Whitby power brake setup and if they have a complete kit, they may not have them, but would use 1 or 2.

  25. #145
    Jazzman's Avatar
    Join Date
    Jan 2014
    Location
    Scottsdale, AZ
    Posts
    1,164
    Post Thanks / Like

    The Waiting

    Sorry for not updating this thread more recently. The past few weeks have been mostly about the waiting. I'm still waiting for minor parts which are holding up more major processes. I'm still waiting on that silly little plastic differential vent plug. I have lost track of how long now, but I think I started trying to get it six weeks ago. It was on backorder til 2/12, now it is 2/18. Who knows when it will arrive. Oh well, what little time I have had, I have stayed busy.

    About a week ago, I jumped in and cut out the cross bars that formed the trunk floor. I decided I didn't want them running through the dropped trunk floor box. I cut them out with the sabre saw, then ground down the remaining bits with the die grinder.


    I then started cutting and fitting the replacement parts. I started with the rear rail. A friend brought over his MIG welder and began teaching me how to weld. I discovered something important: Welding is a lot like learning to play the bass. It is surprisingly easy to learn the basics, but it then takes and immense amount of work to really get good at it! Here are my first welds. Not terrible, but certainly not up to the FFR standard that I see all over the frame. I still have a lot to learn, but I think it will do.


    I got all the remaining parts back from the powder coater. I started by installing the floor on the passengers side. No real problems. I put the emergency brake together, got it installed. Next lesson, If you are going to use some combination of Carl and Edwardb's emergency brake modification, don't rivet down the floor until you complete the installation of the emergency brakes. I think I can get the hole drilled for the pulley wheels, but it is going to be tight. I forgot to order the pulleys from McMaster, so I will have to wait on completing that project, and thus wait on installing the drivers floor.


    I began fabricating the lower console for the dash. Without a metal brake, I had to improvise. Bending that aluminum sheeting is not easy. The bends ended up pretty good. Somewhere between a high school sophomore auto shop project and an apprentice at an auto shop, but not too bad. It ended up being too tall to fit between the bottom of the standard dash panel and the top panel over the transmission tunnel. I think it needs to be about 3/16" to 1/4" shorter. I was able to use the left over front panel from the DS footbox. I will have to remake it, but It was good exercise.


    Last edited by Jazzman; 02-22-2016 at 03:29 PM.
    Jazzman

    MKIV #8745 "Flip Top" Roadster, Custom Tilt front, Coyote Engine, Tremec TKO600, Custom Interior. Best of Show winner, Huntington Beach Cruise In 2018.

    1967 Ford Mustang Coupe build thread updated 1/22/2021

    Roadster Frame Dolly Plan

  26. #146
    Member dougski's Avatar
    Join Date
    Dec 2014
    Location
    San Luis Obispo, California
    Posts
    53
    Post Thanks / Like
    Jazzman,
    I think your bends look just fine. I have a small 20" brake that makes nice sharp clean bends but it is amazing how often I cannot use it because of a previous bend on the workpiece and so on. What technique did you use to produce your bends?
    Mk4 Roadster #8567, IRS, Levy Racing 427w Stroker, 8-stack EFI

  27. #147
    Jazzman's Avatar
    Join Date
    Jan 2014
    Location
    Scottsdale, AZ
    Posts
    1,164
    Post Thanks / Like
    You're going to laugh when I tell you, but it worked ok. First, I clamped the short side of the bend (the 3/4" side) into the 16" wide wood vise on my bench. I then used a small piece of plywood to push the entire panel over at once. I clamped the plywood to the aluminum sheet to start the bend and keep the pressure applied equally. after I got the initial bend started, I removed the clamps, but continued to use the plywood to push over the aluminum panel. After it was almost fully flat, I then used a dead blow hammer on top of the plywood on top of the panel to set the corner and make it look sharp. The first three sides were ok to do this way, the last side was much more challenging. After building the entire panel, I discovered that my finished size was too large by at least 1/4" I will have to find a way to re-bend this one, or completely re-make the piece. It did help that the first bent edge was already done. (The piece it was cut off of the original DS footbox front panel.) I will probably just remake the piece. The practice will be good for me.

    In order to complete the dash I envision, I am going to have to fabricate a lower dash panel that I have already tried, then two sides to enclose the lower box area under the primary dash panel. I am going to get one of the hand tools that EdwardB recommended at Harbor Freight. I am hoping that this might help to keep the bends clean, or clean up ones that didn't quite work right. I may have to break down and buy a brake. I really don't want to invest the money or the shop real estate in something like this. Time will tell.

    It was a physically demanding effort. I am glad I don't have to do it all day, every day!
    Jazzman

    MKIV #8745 "Flip Top" Roadster, Custom Tilt front, Coyote Engine, Tremec TKO600, Custom Interior. Best of Show winner, Huntington Beach Cruise In 2018.

    1967 Ford Mustang Coupe build thread updated 1/22/2021

    Roadster Frame Dolly Plan

  28. #148
    Jazzman's Avatar
    Join Date
    Jan 2014
    Location
    Scottsdale, AZ
    Posts
    1,164
    Post Thanks / Like

    DIfferential vent and fluid replacement

    This little sucker has held up progress for weeks! It finally arrived a few days ago. Note for other builders: When you order the IRS differential vent assembly, be sure to order one of these too! They don't come packaged together, and apparently the fine folks at the Ford parts counter never thought to ask if I needed it.


    I could finally cut and fit the mustang vent tube into the Roadster. Nothing particularly difficult or time consuming.


    Next I decided to drain and refill the center section just to be sure it had fresh fluids. It is quite clear that it will be much easier to do this now before all the sheet aluminum is permanently installed and the battery box is in place. (It will be do-able later, but it will be a frustratingly tight workspace!!) I now believe that it was not necessary to do this. When I drained out the existing gear lubricant, it was perfectly clear. It didn't look as if the center section had even been turned over! Oh well, now I know for sure. Live and learn.

    I have always been very pleased with the Mobil 1 synthetic products that I have used in my other cars. So off to O'Reilly I go to get gear oil and friction modifier. I found the 75W-90, and was assured that this was an acceptable replacement for the Ford specified 75W-85 Gear Oil. This is the only friction modifier they had, so I bought it.


    After I got home, I notice the following notation on the Mobil 1 Synthetic Gear Lubricant LS 75W-90 bottle: "Limited Slip Friction Modifier Included"


    So should I use the little bottle of LubeGard Limited Slip Suppliment?

    Next up, the battery box. (FINALLY!!!)
    Last edited by Jazzman; 10-29-2016 at 02:58 PM.
    Jazzman

    MKIV #8745 "Flip Top" Roadster, Custom Tilt front, Coyote Engine, Tremec TKO600, Custom Interior. Best of Show winner, Huntington Beach Cruise In 2018.

    1967 Ford Mustang Coupe build thread updated 1/22/2021

    Roadster Frame Dolly Plan

  29. #149
    Jazzman's Avatar
    Join Date
    Jan 2014
    Location
    Scottsdale, AZ
    Posts
    1,164
    Post Thanks / Like

    Under Dash Console

    Progress is slow these days, but still moving forward. After installing the battery box, I realized that I needed a place to ground the battery. The obvious choice was to use the location indicated in the manual, but to attach it on the underside instead of on top. Note to self and others: it would be much easier to grind off the powder coating on the underside of the trunk floor before the installation of all the rear suspension gear! Oh well, with a bit of extra effort and some rather odd body positions, I got the powder coat removed and the negative line attached. Here's a photo looking up from the floor to the underside of the trunk floor.


    I began to mock up the console that I want underneath the main dash. I began by making all the parts in cardboard (several times) and taping them together to get them to fit just right. Next I cut the aluminum panel that goes on top of the tunnel at the right point so that the back 2/3rds of it could be removed for maintenance if necessary. This was another one of those "no turning back" moments: once it was cut, the only way out if it didn't work was to order a new one from FFR.


    I then began the process of making each custom piece. Lessons: It is hard to get a really sharp, nice looking bend in sheet aluminum without a sheet metal brake. So far I have done all of the bend work by clamping the piece in my wood vise and bending the remaining material with a sheet of plywood, finishing off the bend by striking the plywood sheet with a sledge hammer to set the corner and make it sharp. For the most part it worked pretty well. Not perfect, but I think good enough once you get all the surfaces covered with leather, carpet, wood, etc.


    After a lot of work (and re-work) I finally got it done. All the pieces are just screwed together temporarily. The blank dashboard arrived last week, but I will not begin working on it until I am sure I am ready to go with all the various decisions that have to be made.


    I am considering buying a brake, but at $500 for a good one, i'm not sure I can justify it. Yes, I know there are cheaper ones, but I hate buying cheap tools. We'll see how that transpires. I am also finding that I need to get an air nibbler to cut sheet aluminum. Cutting it with a sabre saw works, but its slow and wastes a lot of blades. You can cut it on your table saw with a carbide bit if you are very, VERY, careful! If you are not very careful, it will bite and come flying back at you at high speed. (Again, ask me how I know!!) The cuts will heal. So a nibbler is the next tool. I still have more sheet metal work to do.
    Last edited by Jazzman; 10-29-2016 at 03:01 PM.
    Jazzman

    MKIV #8745 "Flip Top" Roadster, Custom Tilt front, Coyote Engine, Tremec TKO600, Custom Interior. Best of Show winner, Huntington Beach Cruise In 2018.

    1967 Ford Mustang Coupe build thread updated 1/22/2021

    Roadster Frame Dolly Plan

  30. #150
    Senior Member edwardb's Avatar
    Join Date
    Feb 2011
    Location
    Lake Orion, Michigan
    Posts
    10,585
    Post Thanks / Like
    Looking good! You should be able to do some interesting things with that console. I don't like buying cheap tools either. But the little 30 inch bending brake for about $50 from Harbor Freight will do most of the bends you might need. I've used it for three builds now and made countless parts. It's not very fancy, has definite limitations, but is still way better than manually bending with straight edges and hammers. I too would like a real brake, but have avoid spending the $$ so far. Maybe some day. I'm surprised you're having trouble with a sabre saw. I do most of my cuts on a band saw, if it fits. But also do a bunch with my sabre saw. The finest metal cutting blade along with the edge supported is actually pretty smooth. And I have only used 2-3 blades in three builds. I looked at a nibbler, and almost bought one once. But then I saw all the little discs it throws off while cutting and decided to stick with my woodworking tools. Carry on!
    Build 1: Mk3 Roadster #5125. Sold 11/08/2014. Build 2: Mk4 Roadster #7750. Sold 04/10/2017. Build Thread
    Build 3: Mk4 Roadster 20th Anniversary #8674. Sold 09/07/2020. Build Thread and Video. Build 4: Gen 3 Type 65 Coupe #59. Gen 3 Coyote. Legal 03/04/2020. Build Thread and Video
    Build 5: 35 Hot Rod Truck #138. LS3 and 4L65E auto. Rcvd 01/05/2021. Legal 04/20/2023. Build Thread. Sold 11/9/2023.

  31. #151
    2bking's Avatar
    Join Date
    Jul 2013
    Location
    Garland, Texas
    Posts
    799
    Post Thanks / Like
    A band saw did most of my contour trimming and cutting the sheets to fit in the 40" shear. This tool works for trimming panels already installed (like the rear panel for fitting the body) and cutting down big sheets and its about $40 at Eastwood. It cuts the .040 aluminum like butter.
    p40093[1].jpg
    Last edited by 2bking; 03-09-2016 at 11:32 AM.
    King
    Roadster #8127, ordered 7/12/13, received 9/11/13
    http://thefactoryfiveforum.com/showt...4-Coyote-Build

  32. #152
    Jazzman's Avatar
    Join Date
    Jan 2014
    Location
    Scottsdale, AZ
    Posts
    1,164
    Post Thanks / Like

    The Beginning of Wiring

    Trying to kill time waiting for CV axels and rear brakes, I decided to dive into the wiring harness. So far, no major problems, but there is not much room inside the DS footbox!! (Yeah, I know, not news!!) After getting the main harness wormed into its location, I started with the front harness because it looked like the most straight forward. (Joke not intended, but at 11:45pm, what do you expect!!) I had to buy a 1.25" hole saw, which delayed the start of this process, then had to bring the block off plate onto the front harness from the front end of that harness because the multi wired plugs won't fit through the 1.25" hole.


    When I got to the radiator area, I did what seemed to be instructed, but I am concerned that this wiring is just too close to a heat source. Should I find a way to move the harness away from the radiator, or should I wrap the harness to protect from heat?


    I found an extra off-shoot from the main harness that was designated "for Hot-Rod Only". Can this be removed, should I just bury it, what is the best way to deal with this? Are there any wires there that I might need for other purposes in my car?


    I was thrilled, then almost got a hernia, when I discovered my CV axels on the front porch. I don't know who made them, but they are stout pieces! I think I read that the shipping weight for the two of them was over 45lbs! It's too late to start that project tonight, but that will be job one tomorrow night. Now if Wilwood will just send my rear brakes, I can finish my brake lines and begin buttoning up the rear end. Hello, Wilwood . . .
    Last edited by Jazzman; 03-15-2016 at 02:16 AM.
    Jazzman

    MKIV #8745 "Flip Top" Roadster, Custom Tilt front, Coyote Engine, Tremec TKO600, Custom Interior. Best of Show winner, Huntington Beach Cruise In 2018.

    1967 Ford Mustang Coupe build thread updated 1/22/2021

    Roadster Frame Dolly Plan

  33. #153
    Carl carlewms's Avatar
    Join Date
    May 2012
    Location
    Nokesville, VA
    Posts
    1,125
    Post Thanks / Like
    Jazzman,

    I am not sure what brand FFR uses but here are the temperature specs on the stuff McMaster Carr sells ...

    Polyethylene—Temperature range is -40° to 200° F. Flame-retardant polyethylene meets UL 94V2.
    High-Strength Nylon—Has better impact resistance than polyethylene. Temperature range is -40° to 300° F.

    BTW ... although I have not had my car on the road yet; I have wiring for the fans running down the PS of my radiator using braided loom and have not had a problem during several runs up to temperature (which was as high as 210 deg one time going into the radiator).

    McMaster Carr also sells a heat resistant version of the braided loom ...

    http://www.mcmaster.com/#standard-ca...eving/=11jop1z

    Carl
    Mk 4 Roadster
    October 25, 2012 - Kit Arrives
    April 8, 2013 - Build Starts
    August 23, 2015 - Rolling Chassis/Engine & Transmission Installed
    March 26, 2016 - Go Cart

  34. #154
    Senior Member edwardb's Avatar
    Join Date
    Feb 2011
    Location
    Lake Orion, Michigan
    Posts
    10,585
    Post Thanks / Like
    Ah wiring... Can be one of the most challenging aspects of the build. That's what I'm doing myself right now. The DS footbox is quite full, as you said. Try it adding the Coyote harness! That Hot Rod leg is not needed for your build. You can remove it if you want. Many of us do. I've removed it a couple of times. The wires are "live" and extensions of wires elsewhere in the harness, so you need to be a little careful. I remove enough tape and convolute to get back into the main harness, clip the leads, put a piece of shrink wrap over the ends, and tape it back up. I typically use the adhesive lined heat shrink for that extra margin of safety. Some guys put a little 180 degree bend in the end of the wire before heating the shrink sleeve. That works too.

    I don't think you'll have any heat issues with the harness around the radiator tank as long as you keep it a little distance away and not directly touching. RF seems to use a decent quality convolute for their harness. I often put heat shrink tubing on the ends instead of tape if I've modded something and their tubing handles the heat gun OK. Some of the cheaper varieties I've found wilt almost immediately with any temp from the heat gun. Looks like you may need to reorient your padded clamp a little though, just to get it off the tank. You'll also want to get all the slack out of that harness. You'll find there's just barely enough to get to the PS front and have enough wire to connect the lights on that corner. The other three have plenty.

    CV axles. Cool! They are beefy. Feels good getting those in and finishing up the IRS. Have fun torquing the axle nut. I still haven't done mine. Planning to wait until it's got tires and sitting on the ground. Can't believe you don't have rear Wilwood brakes yet. I'm still waiting for my "sorry for the delay" T-shirt they promised.
    Last edited by edwardb; 03-15-2016 at 06:48 AM.
    Build 1: Mk3 Roadster #5125. Sold 11/08/2014. Build 2: Mk4 Roadster #7750. Sold 04/10/2017. Build Thread
    Build 3: Mk4 Roadster 20th Anniversary #8674. Sold 09/07/2020. Build Thread and Video. Build 4: Gen 3 Type 65 Coupe #59. Gen 3 Coyote. Legal 03/04/2020. Build Thread and Video
    Build 5: 35 Hot Rod Truck #138. LS3 and 4L65E auto. Rcvd 01/05/2021. Legal 04/20/2023. Build Thread. Sold 11/9/2023.

  35. #155
    Jazzman's Avatar
    Join Date
    Jan 2014
    Location
    Scottsdale, AZ
    Posts
    1,164
    Post Thanks / Like

    CV Axels and Rear brakes

    For a woman that does not consider herself mechanically inclined, my wife does a fantastic job as my assistant!! I could not have gotten the CV axels in without her. I began by removing the plastic caps that had been keeping the insides of the differential clean. I was a bit worried that some of my nice clean gear oil might come pouring out, but none did. I wasn't sure how hard to hit the axel to get it to go in, but after a few taps, it pretty much slipped right in. No drama at all. Right one, same story. Not hardly worth a photo. No drama at all. I got the spindles on to the lightly greased ends of the axels. Not problem at all. Put all the bolts back in to the control and toe arms, got them all torqued down, and realized I had not put grease on the bolts. I haven't taken them back out and greased them yet, but it is on the to-do list.

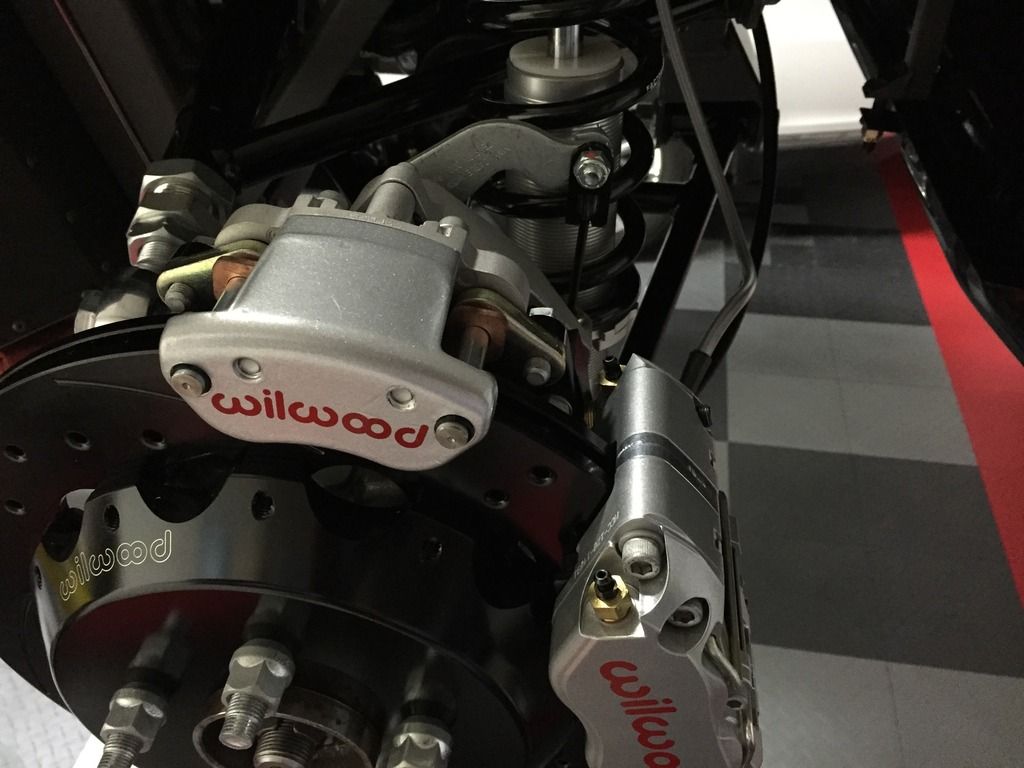
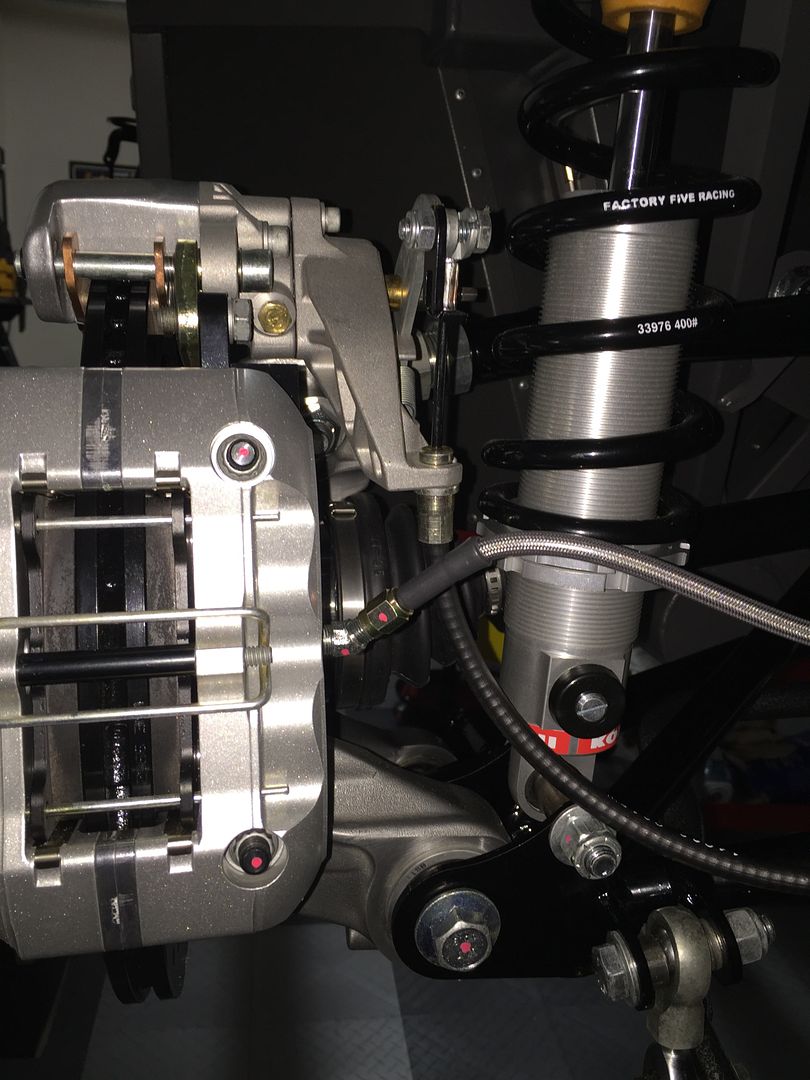
    Yesterday morning a big box from Wilwood finally arrived! Yeah. I didn't get to spend much time working yesterday, but unpacked it and looked it all over. It looks like it is going to be quite similar to the front ones. (No real surprise there.) Began today installing the brakes, and discovered something that has me flummoxed. The emergency brakes seem to need to be reversed. (or the boxes were mis-marked). Here is what I found.

    This is the left side spindle with the "LEFT" emergency brake caliper. As you can see, the mechanism interfers with the spindle and upper control arm attachment.


    Now this is still the left side spindle, with the "RIGHT" emergency brake caliper. This one fits fine, does not interfere, and matches the one extremely small black and white photo in the installation instructions.


    I am inclined to reverse them. The cables and lines will not interfere. I just did not want to miss something obvious. Did my calipers just get shipped in the wrong boxes? Thoughts?
    Jazzman

    MKIV #8745 "Flip Top" Roadster, Custom Tilt front, Coyote Engine, Tremec TKO600, Custom Interior. Best of Show winner, Huntington Beach Cruise In 2018.

    1967 Ford Mustang Coupe build thread updated 1/22/2021

    Roadster Frame Dolly Plan

  36. #156
    Senior Member Duke's Avatar
    Join Date
    Dec 2015
    Location
    Taxachusetts
    Posts
    401
    Post Thanks / Like
    Quote Originally Posted by Jazzman View Post

    When I got to the radiator area, I did what seemed to be instructed, but I am concerned that this wiring is just too close to a heat source. Should I find a way to move the harness away from the radiator, or should I wrap the harness to protect from heat?

    Temp rating on that plastic is up to 200 deg F. As long as it's not actually touching the radiator you should be okay. You may want to adjust your rivits accordingly to ensure at least 3/8" clearance.

  37. #157
    Senior Member edwardb's Avatar
    Join Date
    Feb 2011
    Location
    Lake Orion, Michigan
    Posts
    10,585
    Post Thanks / Like
    Quote Originally Posted by Jazzman View Post
    Yesterday morning a big box from Wilwood finally arrived! Yeah. I didn't get to spend much time working yesterday, but unpacked it and looked it all over. It looks like it is going to be quite similar to the front ones. (No real surprise there.) Began today installing the brakes, and discovered something that has me flummoxed. The emergency brakes seem to need to be reversed. (or the boxes were mis-marked). Here is what I found.

    This is the left side spindle with the "LEFT" emergency brake caliper. As you can see, the mechanism interferes with the spindle and upper control arm attachment.

    Now this is still the left side spindle, with the "RIGHT" emergency brake caliper. This one fits fine, does not interfere, and matches the one extremely small black and white photo in the installation instructions.

    I am inclined to reverse them. The cables and lines will not interfere. I just did not want to miss something obvious. Did my calipers just get shipped in the wrong boxes? Thoughts?
    There you go reading labels on boxes again! I don't recall the e-brake caliper boxes saying left and right, although obviously they must have. I seem to recall the mounting adapter instructions showed the proper orientation, but I don't have them in front of me. But bottom line you need to reverse them. I just want out and took these two pictures. This is the left (driver's) side. Note the e-brake actuation lever is to the back, toward the brake caliper. In the second pic, also shows the lever to the back, and with the e-brake cable routing around the back of the LCA shock mounting. Everything works this way without interference.


    Last edited by edwardb; 03-20-2016 at 08:56 PM.
    Build 1: Mk3 Roadster #5125. Sold 11/08/2014. Build 2: Mk4 Roadster #7750. Sold 04/10/2017. Build Thread
    Build 3: Mk4 Roadster 20th Anniversary #8674. Sold 09/07/2020. Build Thread and Video. Build 4: Gen 3 Type 65 Coupe #59. Gen 3 Coyote. Legal 03/04/2020. Build Thread and Video
    Build 5: 35 Hot Rod Truck #138. LS3 and 4L65E auto. Rcvd 01/05/2021. Legal 04/20/2023. Build Thread. Sold 11/9/2023.

  38. #158
    Jazzman's Avatar
    Join Date
    Jan 2014
    Location
    Scottsdale, AZ
    Posts
    1,164
    Post Thanks / Like
    Thanks EdwardB. Good to know simple logic works occasionally. Finished up both side brake installs tonight. Next up, finish up the rear brake lines and ebrake cables.
    Jazzman

    MKIV #8745 "Flip Top" Roadster, Custom Tilt front, Coyote Engine, Tremec TKO600, Custom Interior. Best of Show winner, Huntington Beach Cruise In 2018.

    1967 Ford Mustang Coupe build thread updated 1/22/2021

    Roadster Frame Dolly Plan

  39. #159
    Senior Member
    Join Date
    May 2014
    Location
    Burlington, WI
    Posts
    689
    Post Thanks / Like
    Blog Entries
    1
    Quote Originally Posted by Jeff Kleiner View Post
    Agreed.

    Jeff
    Sorry for being late to the party on fuel line size and filter usage. Often when I'm browsing thru posts, I see something that I want to be certain about for my anniversary build. First the fuel line size. I have a Forte supplied Dart 351stroker (427) with a mild cam -450 hp. I have read a few postings on the fuel line size but want to be certain. I am running an engine mounted fuel pump with no return line. And, of course, no in-tank fuel pump. The kit comes with a 5/16" size fuel line which I have already run. Will I regret not switching to 3/8".

    Second, I have read that installing the supplied ffr fuel filter, for my set up, between the fuel tank and mechanical pump is a no no as it could lead to fuel pump failer. Mike Forte tells me he installed an in line filter at the carburetor. Am I correct on this topic?

  40. #160
    Jazzman's Avatar
    Join Date
    Jan 2014
    Location
    Scottsdale, AZ
    Posts
    1,164
    Post Thanks / Like
    I am probably not the best expert on this topic, ThickCobra, but I will share what I have learned. I am going with the Coyote engine, and there seems to be consensus that the 5/16" lines are adequate for "mid range" builds. EdwardB (certainly an expert far beyond my own knowledge) is a proponent of the 3/8" lines and has used them on two builds. His current and previous build threads have a good discussion on the reasons he believes that the larger lines provide a larger margin of safety for higher horsepower installations. The reason for the concern about the in line filter has to do with unnecessary strain on the fuel pump leading to premature pump failure. I went with an in tank fuel pump, but a higher volume pump. I'm sorry I can't give you specific information about your setup.
    Jazzman

    MKIV #8745 "Flip Top" Roadster, Custom Tilt front, Coyote Engine, Tremec TKO600, Custom Interior. Best of Show winner, Huntington Beach Cruise In 2018.

    1967 Ford Mustang Coupe build thread updated 1/22/2021

    Roadster Frame Dolly Plan

Page 4 of 28 FirstFirst ... 2345614 ... LastLast

Posting Permissions

  • You may not post new threads
  • You may not post replies
  • You may not post attachments
  • You may not edit your posts
  •  

Replica Parts

Visit our community sponsor