Visit our community sponsor

Thanks:
9

Likes:
27
-
04-14-2017, 09:37 AM
#521

Steve >> aka: GoDadGo


Originally Posted by
wareaglescott

I am nervous about drilling into the body! Will be slow and careful.
Cover everything with BLUE TAPE and drill a 1/8" pilot hole for each fastener before moving to the stepped drill bit and it will come out great.
Heck, you fly a Jumbo Jet for a living so drilling a few holes will be child's play.
Good Luck & Have A Happy Easter!
Last edited by GoDadGo; 04-14-2017 at 09:59 AM.
-
04-17-2017, 03:06 PM
#522
Senior Member

Alignment complete and ready for pickup
Whitby took the car to get aligned today. That is complete and they sent me these pictures telling me everything is done and it is ready for pickup! My shipper is picking it up Thursday morning and either delivering late Thursday (depending on Atlanta traffic) or first thing Friday. You can find me in the garage this weekend! So excited!!!


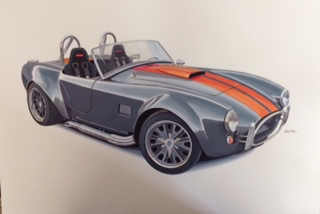
Thought it would be fun to post my original concept drawing from the beginning. Changed things up by going a little darker and the stripe pattern change but I am pretty pleased how this is turning out from my original vision.
Last edited by wareaglescott; 04-17-2017 at 03:17 PM.
MK4 #8900 - complete kit - Coyote, TKO600, IRS - Delivered 6/28/16 First Start 10/6/16 Go cart - 10/16/16 Build completed - 4/26/17 - 302 days to build my 302 CI Coyote Cobra - Registered and street legal 5/17/17
Build Thread
http://thefactoryfiveforum.com/showt...e-build-thread
PHIL 4:13 INSTAGRAM - @scottsrides
-
04-17-2017, 03:22 PM
#523
Scott,
The car looks great! Enjoy the weekend.
Len
1972 Corvette Stingray 350 c.i. Manual Steering & Brakes
2003 H-D Softail Deuce 88 c.i. TwinCam
Gen 3 Coupe Dreamer
-
04-17-2017, 09:51 PM
#524
AMAZING!!!!!
I'm very excited for you!
-
04-19-2017, 03:28 PM
#525
Steve >> aka: GoDadGo
All I Can Say Is: I'm So Jealous!
..Congratulations & It Won't Be Long Now!
-
04-19-2017, 03:39 PM
#526
 Administrator

Oof! That's stating to look kinda MEAN. Those 18's with big Wilwoods... nice! Color matched louvers, the only way to go (IMHO).
Lookin' REALLY good!

FFR 5369 Pin Drive, IRS, Trigos, Torsen, Wilwoods, FMS BOSS 302 "B" cam , Mass-flo. CA SB100 (SPCN) Registered
Delivered 4/23/06. "Finished" 4/2012 (still not done!)
-
04-20-2017, 08:11 AM
#527
Senior Member
Delivery day - Christmas in April
Loaded up and headed my way!


Loaded it up on the same trailer 9 months ago today! If anyone is taking their car to Whitby and wants to hire transport this company is based in Greensboro. I have dealt with them 3 times now. Very reasonable price and I highly recommend them. Message me for details.
Last edited by wareaglescott; 04-20-2017 at 08:15 AM.
MK4 #8900 - complete kit - Coyote, TKO600, IRS - Delivered 6/28/16 First Start 10/6/16 Go cart - 10/16/16 Build completed - 4/26/17 - 302 days to build my 302 CI Coyote Cobra - Registered and street legal 5/17/17
Build Thread
http://thefactoryfiveforum.com/showt...e-build-thread
PHIL 4:13 INSTAGRAM - @scottsrides
-
04-20-2017, 05:34 PM
#528
Scott-
I saw a picture of your car on Whitby's FB page and now here' she looks awesome! Congratulations on getting her home for the weekend. Will you even come out of the garage this weekend? I think I would bring in my sleeping bag...
The color combination really looks terrific, and your stripe is very unique. I look forward to seeing your results from the weekend!
Regards,
Steve
-
04-20-2017, 07:11 PM
#529
Senior Member
Delivery and final assembly begin
Well she is home. Cant wipe the smile off my face!

Drove right into the garage and put it up on jack stands to get to work. My first surprise was now that the body is on I can no longer insert the low profile jack from the front to raise the car for the forward jack stands. The jack is still low enough but will not reach the cross bar with the body in position. That led me to jacking it up at the corners. Previously I would jack the front up put the stands up front. Then jack the rear and insert the rear stands on the highest settings and then jack the front the rest of the way. Now I was doing all sorts of maneuvering to get it up on stands. It actually made me pretty uncomfortable. This will hopefully be the last time I use the jack stands and after this will use the lift. I thought using jack stands would make it easier to install the splash guards.


After that the first thing I had to do was install the custom painted engine cover. Looks amazing!

Didn't have a lot of time left at that point so I just got organized for tomorrow to spend the day working. Currently 38 items remaining on my final assembly list.
I will say working on the painted body is somewhat intimidating. It looks so great I am nervous about dinging it. I will just take things slow and be very careful. The thought of drilling the holes for the license plate holder is making me a little sick at this point! haha
MK4 #8900 - complete kit - Coyote, TKO600, IRS - Delivered 6/28/16 First Start 10/6/16 Go cart - 10/16/16 Build completed - 4/26/17 - 302 days to build my 302 CI Coyote Cobra - Registered and street legal 5/17/17
Build Thread
http://thefactoryfiveforum.com/showt...e-build-thread
PHIL 4:13 INSTAGRAM - @scottsrides
-
04-20-2017, 07:20 PM
#530
Scott,
The car looks awesome! Really like to engine cover. Congrats!
Len
1972 Corvette Stingray 350 c.i. Manual Steering & Brakes
2003 H-D Softail Deuce 88 c.i. TwinCam
Gen 3 Coupe Dreamer
-
04-20-2017, 07:49 PM
#531
Senior Member
Whitby review
After seeing the final paint work today I have to say I am really impressed. It really exceeded my expectations and I could not be happier with the work!
I knew when I ordered the car I wanted nothing to do with bodywork. I looked around locally and did not find anyone I was comfortable with. I previously worked with a custom guy in Atlanta who I really like. Spoke to him and he said he would want the entire car for 6 months. Through reading the forums I learned about Whitby Motorcars.
I liked the idea they had their own frame and could concurrently do the body work while I built my part. I had no set time table on the project but knew I did not want to finish the go cart and then have to wait 6 months with it away. Every person I spoke to about Whitby raved about the quality of the work. Three weeks after I took delivery of my kit I shipped the body off to Whitby and was told to expect 6 months.
Today happens to be 9 months to the day that the body left my house. 3 months longer than the initial estimate. Honestly at times I had some frustration in the timetable and received some comments from friends questioning the process and what was taking so long. Jeff advised me I should have the car there for body fitting and assembly at the beginning of March. Because of my schedule and the shippers schedule I ended up getting it to Whitby a little early in late February. The time my go cart was out of my possession was about 8 weeks but would have only been 6 if it were delivered when they requested.
Now that it is complete I would like to make a few comments on that. First off the extra time was definitely worth the wait! The people working at Whitby are really an outstanding group. Work took me to Greensboro periodically and I made 4 visits to the shop. Every visit was great and the group really cares about the product they are putting out. Jeff Collins runs the operation and he told me he would like to do better on the timeline but his first priority is the quality of their work. He said he would not rush on the car before mine to get to mine just like he would not rush on mine to get to the next one. I can really respect that attitude. At one time months ago he told me they had brought on some additional staff and had increased their output. He never said it but from the outside looking in I think they got way behind a while back and are now starting to get caught up. On my first visit there last year they had probably 20 cars/ body waiting for work. I have talked to previous clients of theirs whose cars were there over a year. It seems they are working in the right direction on reducing their time line.
One thing I didn't even understand until about 4 months in was that my car was just waiting in line to be worked on. Some people have the impression they are actively working on your car the entire time it is there and they are incredibly slow. That was my initial impression as well. The simple fact is they have such a good reputation for quality work they just have a very high demand for their service and that created a backlog. Jeff explained every car has different challenges and a set timetable is just not realistic. The problem with taking on cars with all different levels of completion and different amounts of work needed on each one makes the timing variable. They never know what issues they will have to rectify on each car. Keep in mind Whitby isn't just a painter. They will do any work on the car you request. In addition to painting I had them install the windshield and a few other jobs. The installation work on my order took 29 hours of labor. Some cars may take less and some much more. They never know until they get into it. Some builders are lucky and have local resources they can use. I did not happen to find that and felt really limited on my options. Once they started working on my car it went pretty fast. They seem to work on a few cars at a time and let them sit a week or two at certain stages of the process for cure time or whatever. I really don't know anything about the different steps and whether the waiting period is needed or not but after seeing the work at various stages and now the finished project I can say whatever process they use is a good one!
Ultimately my review is this: They are a great group of people who do outstanding work. I am very pleased with my decision to use them. I feel really good about they way they treat their work and the way they treated me. Once they started working on my car Jeff sent me tons of pictures as you can see in this thread. It was really satisfying being able to follow the progress from far away. I am seriously eyeing a Gen 3 coupe project next and if I do it there is no question Whitby will be painting that car. If you are like me and don't find a local option you like I would not hesitate to send your car there.
I give them my highest recommendation and would not hesitate to recommend anyone to have their car painted at Whitby.
Last edited by wareaglescott; 04-21-2017 at 04:26 AM.
MK4 #8900 - complete kit - Coyote, TKO600, IRS - Delivered 6/28/16 First Start 10/6/16 Go cart - 10/16/16 Build completed - 4/26/17 - 302 days to build my 302 CI Coyote Cobra - Registered and street legal 5/17/17
Build Thread
http://thefactoryfiveforum.com/showt...e-build-thread
PHIL 4:13 INSTAGRAM - @scottsrides
-
04-20-2017, 09:43 PM
#532
Senior Member

That looks awesome. You have done a great job. 9 months seems like a long time but that is beautiful and worth the wait. Have fun. Im jealous.
FFR MK4 Complete Kit #8952
Build Thread
Bodywork Thread
3 Link Rear Suspension, Gordon Levy 347 SBF with T5
First start Feb 20, 2017, First Go Kart March 5, 2017, Registered & Title April 25, 2017
-
04-21-2017, 06:44 AM
#533
Senior Member

Looks great congratulations. Look into getting a long reach low profile jack, I got one from Harbor Freight and it was able to reach the cross bar with the body on no problem.http://www.harborfreight.com/2-ton-l...ump-60678.html
-
04-21-2017, 06:54 AM
#534
Senior Member

Whoo hoo! So excited for you Scott
-
04-21-2017, 07:41 AM
#535
Scott-
Yes!! She looks great, and she looks perfect in your garage. I think your smile says it all.
I appreciate your write-up in Whitby. Based on other feedback I have read, I think you are spot on. They do very fine work!
I have a hunch that your punch list will get worked through in short order, and the miles will begin to build very quickly.
I look forward to seeing your graduation pics!
Regards,
Steve
-
04-21-2017, 08:37 AM
#536
Senior Member
Originally Posted by
DavidW
I have that jack. Doesn't work for me. If I put it in from the front it hits the oil cooler opening on the body before getting to the cross member. Maybe my ride height is lower.
MK4 #8900 - complete kit - Coyote, TKO600, IRS - Delivered 6/28/16 First Start 10/6/16 Go cart - 10/16/16 Build completed - 4/26/17 - 302 days to build my 302 CI Coyote Cobra - Registered and street legal 5/17/17
Build Thread
http://thefactoryfiveforum.com/showt...e-build-thread
PHIL 4:13 INSTAGRAM - @scottsrides
-
04-21-2017, 08:58 AM
#537
Senior Member

Originally Posted by
wareaglescott
I have that jack. Doesn't work for me. If I put it in from the front it hits the oil cooler opening on the body before getting to the cross member. Maybe my ride height is lower.
Same issue here with the same jack. The oil cooler opening is just too low. I have two of the smallest HF aluminum racing jacks (can't ever have too many jacks it seems...) that will reach the front of the 4-inch frame tubes right behind the tow hooks. I go under the body at an angle outside the oil cooler opening on each side. If only needing to lift a little, that's all that's necessary. If needing to lift more, like to put it on jack stands, then easy enough to then reach under with the big low profile jack. Either way, you have to do a little at a time. Lift the back too high and jacks won't go under the front. Lift the front too high and hard to reach the center section in the back, which is where I lift on that end. When you're all done, your 4-post will hopefully make all this moot.
Your car looks amazing BTW. Have fun getting it finished.
Build 1: Mk3 Roadster #5125. Sold 11/08/2014.
Build 2: Mk4 Roadster #7750. Sold 04/10/2017.
Build Thread
Build 3: Mk4 Roadster 20th Anniversary #8674. Sold 09/07/2020.
Build Thread and
Video.
Build 4: Gen 3 Type 65 Coupe #59. Gen 3 Coyote. Legal 03/04/2020.
Build Thread and
Video
Build 5: 35 Hot Rod Truck #138. LS3 and 4L65E auto. Rcvd 01/05/2021. Legal 04/20/2023.
Build Thread. Sold 11/9/2023.
-
04-21-2017, 11:25 AM
#538
Not a waxer

I made a couple of these years ago out of 1 3/4" by 11 7/8" LVL scraps that I had laying around. Gets it high enough for even a non-low profile jack to go under.
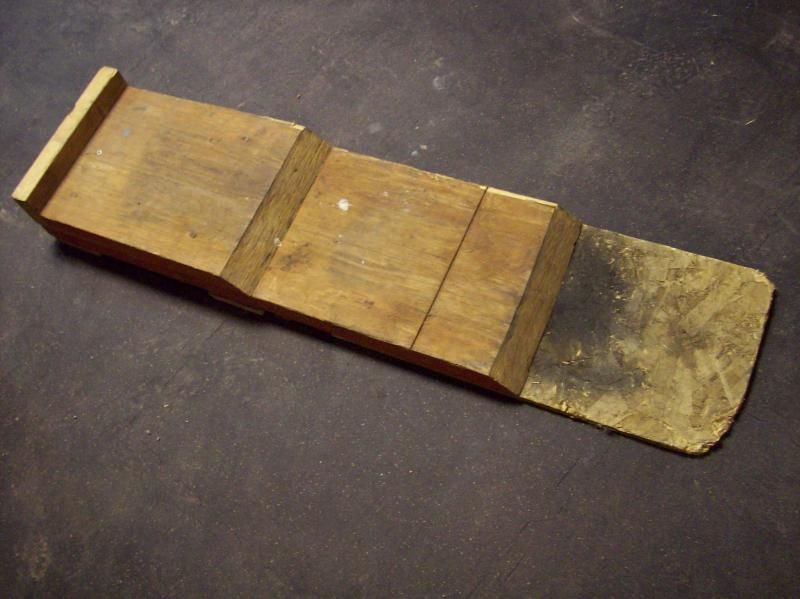
Even with a deep bevel cut they will tend to slide on a painted or smooth floor when the wheels contact them so I added a "tongue" extending about 12" farther than the lower tier. I used 7/16" OSB because I had it (when you build apartments, condos and houses you've pretty much got a never ending supply of this kind of stuff  ) but 1/4" or 1/2" plywood would do. The wheels will easily roll up onto this thinner surface rather than pushing the ramps and then the weight of the car keeps the whole contraption stationary when the tires hit the bigger step ups.
Cheers,
Jeff
-
04-21-2017, 03:45 PM
#539
Senior Member
Originally Posted by
Jeff Kleiner
I made a couple of these years ago out of 1 3/4" by 11 7/8" LVL scraps that I had laying around. Gets it high enough for even a non-low profile jack to go under.
Even with a deep bevel cut they will tend to slide on a painted or smooth floor when the wheels contact them so I added a "tongue" extending about 12" farther than the lower tier. I used 7/16" OSB because I had it (when you build apartments, condos and houses you've pretty much got a never ending supply of this kind of stuff
) but 1/4" or 1/2" plywood would do. The wheels will easily roll up onto this thinner surface rather than pushing the ramps and then the weight of the car keeps the whole contraption stationary when the tires hit the bigger step ups.
Cheers,
Jeff
Great Idea Jeff. Thanks for posting. I am considering just dropping the tires onto a section of 2 x10 now that it is already up. I am hoping this will be the last time on jack stands anyways and it will be on my lift in the future.
MK4 #8900 - complete kit - Coyote, TKO600, IRS - Delivered 6/28/16 First Start 10/6/16 Go cart - 10/16/16 Build completed - 4/26/17 - 302 days to build my 302 CI Coyote Cobra - Registered and street legal 5/17/17
Build Thread
http://thefactoryfiveforum.com/showt...e-build-thread
PHIL 4:13 INSTAGRAM - @scottsrides
-
04-21-2017, 04:17 PM
#540
Senior Member
Final assembly progress
Spent about 8 hours in the garage today. First thing I did was work on the under door aluminum. The passenger side fit in perfect. Had to trim the drivers side a bit for best fit. It has been a while since I had drilled any aluminum panels. Funny how when I started this build it was a big step for me to drill and rivet a panel. Now I actually know exactly what to do. It amazes me how much you learn doing one of these cars.

After that I went to install my high back seats. I spent a substantial amount of time on a mounting system for these as shown in posts 262 and 276-278 earlier in the build thread. The most common advice was not to try and mount the high back seats without the body in position. I ended up coming up with a mount location that I thought would work but could not be sure. I also had a back up plan of how I could move them if the body fit caused a problem. It would have been a pain but could have been done. I did expect to need to bend the outside shoulder bolster in for fit. Luckily everything worked out great after the bend. Seat went in just as I hoped and couldn't be any further back. My goal with these seats was to maximize leg room for my 6'3" frame and that worked out great.
I ended up using a larger pipe wrench and sandwiched some boards in between for good force distribution. The seat bent quite easily. I did a little bit at a time and had the seats in and out of the car 4 times until I got it right. Was nerve racking lifting the seat in and out around the fresh paint. I did tape some foam padding on the paint in the danger areas!

Here you can see how close the fit is on the passenger side(sort of! shadows are killing the detail)

For whatever reason the drivers side ended up having a little more room. Mounted both seats as close to the transmission tunnel as I could. It was nice the drivers went in even easier.
After the seats were in I did the under door carpet, hooked up the seat heaters, installed the transmission tunnel and swapped back to my fighter stick shift. The interior is almost done. Need to put the C channel trim under the door but will do that tomorrow after the carpet adhesive is good and dry.
Next thing I did was work on the rear lights. I was a little nervous about installing these because I have never drilled, cut or done anything with the fiberglass body and learning on the freshly painted body was less than optimal!! I had the precut holes from FFR. I was surprised how much I had to enlarge the holes to make the light sit flush. Also a tough reach to the backside of the lights to tighten the nuts. I did two and will save the other side for tomorrow.

MK4 #8900 - complete kit - Coyote, TKO600, IRS - Delivered 6/28/16 First Start 10/6/16 Go cart - 10/16/16 Build completed - 4/26/17 - 302 days to build my 302 CI Coyote Cobra - Registered and street legal 5/17/17
Build Thread
http://thefactoryfiveforum.com/showt...e-build-thread
PHIL 4:13 INSTAGRAM - @scottsrides
-
04-21-2017, 04:26 PM
#541
Senior Member
door panels
I also installed the door panels today. These are the panels that ********** sells. They looked nice coming out of the package. The instructions that come with them include screws to attach them to the door. On the advice of EdwardB I went another direction. I used the 3m dual lock reclosable fastener tape.
I bought it on amazon. They have a couple different kinds. This one has an acrylic adhesive. The website showed that being able to withstand higher temps so i thought it was a good option.

I applied both sides of the tape to the back of the panel. Also on EdwardBs suggestion when I was doing the under door carpet I brushed on some of the same adhesive we used for the carpet to the inside of the door. Once that got tacky I took the wrap off of the 3M tape and stuck it to the door. It seems really well adhered. I don't anticipate it coming off. Maybe it will but I preferred to try it without screwing into the door.

Here they are installed. That is it for today. Look forward to getting back at it tomorrow!

MK4 #8900 - complete kit - Coyote, TKO600, IRS - Delivered 6/28/16 First Start 10/6/16 Go cart - 10/16/16 Build completed - 4/26/17 - 302 days to build my 302 CI Coyote Cobra - Registered and street legal 5/17/17
Build Thread
http://thefactoryfiveforum.com/showt...e-build-thread
PHIL 4:13 INSTAGRAM - @scottsrides
-
04-21-2017, 05:35 PM
#542
Scott,
Really nice looking interior and door handles! The car is super nice and you have done a great job. Look forward to pics in the sun! Enjoy!
Len
1972 Corvette Stingray 350 c.i. Manual Steering & Brakes
2003 H-D Softail Deuce 88 c.i. TwinCam
Gen 3 Coupe Dreamer
-
04-21-2017, 05:59 PM
#543
Senior Member
Originally Posted by
Vette1972
Scott,
Really nice looking interior and door handles! The car is super nice and you have done a great job. Look forward to pics in the sun! Enjoy!
Len
thanks Len!!!
MK4 #8900 - complete kit - Coyote, TKO600, IRS - Delivered 6/28/16 First Start 10/6/16 Go cart - 10/16/16 Build completed - 4/26/17 - 302 days to build my 302 CI Coyote Cobra - Registered and street legal 5/17/17
Build Thread
http://thefactoryfiveforum.com/showt...e-build-thread
PHIL 4:13 INSTAGRAM - @scottsrides
-
04-21-2017, 10:25 PM
#544
unbelievable build, an inspiration!!!
Those door handles are incredible, where did you get them?
-
04-22-2017, 05:50 AM
#545
Senior Member
Originally Posted by
Brew211
unbelievable build, an inspiration!!!
Those door handles are incredible, where did you get them?
Thanks for the nice comment.
Not exactly sure what you are asking? I suspect maybe you meant panels and it autocorrected to handles?? If so the panels come from **********
https://www.**********accessories.co...nel-vinyl.aspx
If you are talking about the interior latches those come with the complete kit.
MK4 #8900 - complete kit - Coyote, TKO600, IRS - Delivered 6/28/16 First Start 10/6/16 Go cart - 10/16/16 Build completed - 4/26/17 - 302 days to build my 302 CI Coyote Cobra - Registered and street legal 5/17/17
Build Thread
http://thefactoryfiveforum.com/showt...e-build-thread
PHIL 4:13 INSTAGRAM - @scottsrides
-
04-22-2017, 12:44 PM
#546
Thank you. I didn't realize the chrome latches came with the kit.
Like I said, your build is unbelievable!
-
04-22-2017, 04:50 PM
#547
Senior Member
Final assembly beat me up today
Frustrating day today. Just one of those days where nothing seemed to go smoothly and not much got accomplished.
Started off mounting the license plate holder. The directions indicate there is a template in Appendix A of the manual. I have two build manuals of different dates and neither one of them had it in there. FFR instructions really do leave a lot to be desired. Wasn't that big of a problem to make my own. I got it mounted and that went fine. I put it up as high as I could to line up with the area on the body for it. Also did the famous mod to the plate holder. It still seems like I will have to trim the bottom of my plate a small amount.

My first problem arose when I went to run the harness I had previously layed into the trunk up to connect it to the light. I wasn't sure how to get it into the area between the two layers of the trunk. I drilled a hole where I thought I could get it through. Having a very difficult time making any progress on fishing anything through there. Pretty sure I have drilled in the wrong spot and now have a very ugly hole to look at every time I open the trunk. I was so disgusted with that I just decided to shut the trunk and walk away and come back to the wiring another day.
I did install the C channel trim around the door opening now that my carpet adhesive was all dry from yesterday. No problems there.
Then I went up front to work on the headlights. Those installed pretty good. I had a hard time interpreting the directions on the first one and trying to look at the crappy pictures. Took a while to figure it out. Once I did the second went in very easy. Previously I installed weather pack connectors on all the lights. I didn't consider how the bucket orientation would be and found that I made the length I left to short on the front passenger side. Ended up having to cut the weather pack out and rewire after it was in place. Note to new builders - the light bundle comes out at the top of the bucket so consider that when you are running your wiring.

Then I went down to the front parking lights. I have the body mounts that these go through on the backside. Whitby had mounted the body and had one screw holding them in position. I had to take those out to drill out the holes and get the light through. Once I go to that I saw the body mount wasn't lining up with the holes the light would be sticking through. I ended up taking the body mount off and drilling it out some so I had some movement available to make it work.

Now I don't know anything about mounting the body but it seems like it would be darn hard to have the body where you want it and to have those things perfectly aligned with the holes for the light to be centered on the body mounting area. Once I took that off I realized the nose had drooped some and the gap at the hood was looking off. UGHHHH. Worked through getting both of the lights in and the mounts drilled out some and back installed. The hood gap is darn close again but I realized when I put the bumpers on I will be unscrewing those again and will have to get it right then. I would have liked to just done the bumper while I was there but I had not done the radiator aluminum yet and surely don't want the bumper in the way when I try to mess with that. Another first timer suggestion would be to do the radiator aluminum first before moving on to the lights and then bumper. My order here is going to cause me extra work.
Hopefully things will go smoother tomorrow. If anyone has pics of how they ran their trunk harness up to the license plate light please post.
MK4 #8900 - complete kit - Coyote, TKO600, IRS - Delivered 6/28/16 First Start 10/6/16 Go cart - 10/16/16 Build completed - 4/26/17 - 302 days to build my 302 CI Coyote Cobra - Registered and street legal 5/17/17
Build Thread
http://thefactoryfiveforum.com/showt...e-build-thread
PHIL 4:13 INSTAGRAM - @scottsrides
-
04-22-2017, 05:55 PM
#548
Steve >> aka: GoDadGo
Hang In There & Walk Away If You Get Frustrated!
You Are Almost There So Take Your Time!
Heck, Fly To NOLA & Come Help Me!
That Will Take Your Mind Off Of It!
Again, Hang In There!
-
04-23-2017, 08:38 AM
#549
Senior Member

Take your time, it's not a race.
I had to modify my front parking brackets too, but mostly removing material on the bracket itself as it interfered with the air scoops I bought from **********. If you haven't bought them yet, do yourself a favor and buy the ********** offset grommets for the front bumper bolts. They are a life saver when trying to align everything and not chip the paint. The front end has about 2" of play in it (up/down) when aligning the brackets/front bumper and you can just hold it up by hand. It's easier with a helper though holding up the front nose and watching the hood alignment.
-
04-23-2017, 08:47 AM
#550
Not a waxer
-
04-23-2017, 04:02 PM
#551
Senior Member
final assembly trunk wires, rear bumper. side pipes and heat shields
Back on track today. I was very pleased with my progress and things went much smoother than yesterday.
I started with the forward splash guards. I had to trim both of them around the perimeter for best fit. Completed the installation on those. I did have one issue with those I will chalk up to a rookie mistake. Following EdwardBs lead as usual I had planned to install those with rivnuts. Early on in the build I installed the rivnuts along the edge of the F panel and drilled the corresponding holes in the splash guard so when the time came it would be simple to just screw them in place. Well once I trimmed the panel for fit my holes no longer lined up. I had to preserve the bent part at the bottom that attaches to the body on the splash guard so there was really on one way to trim and that did not allow me to preserve my holes. Next time I would know better on the pre drill. I also fitted the rear splash guards. Very minimal trimming was needed on those. I have not permanently installed them yet because I have a wiring issue with my brake lights I need to sort out before closing that area up.
I had posted yesterday asking about fishing the license plate wire through the trunk. I appreciate Jeff Kleiner posting the picture. I followed his lead with hole location and grommet. Worked great. I did scuff up the area around the hole while drilling even though I had taped off everything. The grommet covers the damage though so that is good. Turns out 1 of my two bulbs in there did not work so I will have to replace that. I think I damaged it taking the bulb out when I did the license plate mod.

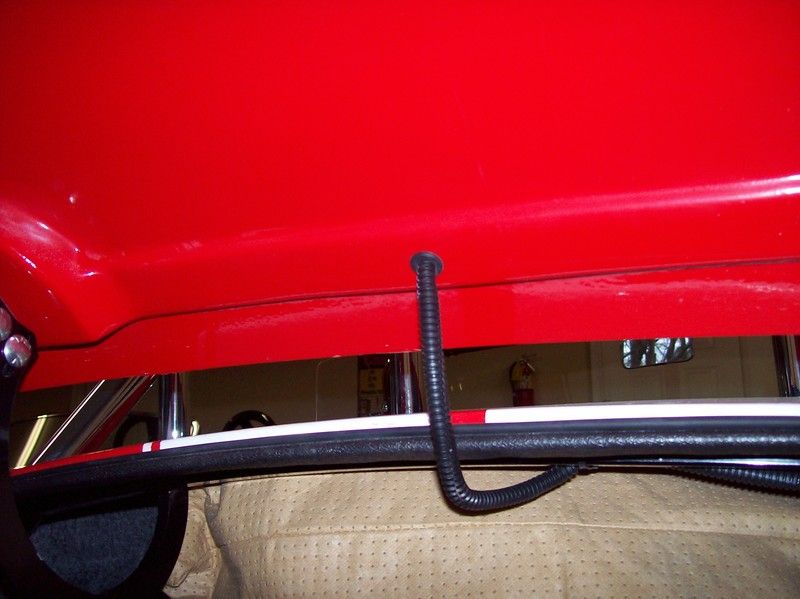
Next I installed the rear bumper. I had previously done the threaded rod mod so I didn't have to drop the tank to get the bolts in and out. I noticed both EdwardB and Jeff Kleiner had different methods of mounting the bumpers on the rods. I ended up following EdwardB on that one. The only tricky part was getting the nylon lock nut that holds it all together started. Getting my fat fingers in there to start the thread was difficult. Particularly on the top nut on the narrower end of the bumper piece. Once I got it started it worked great using a closed end wrench with an angled head.
You can see what I am describing here with the wrench on the lock nut.

Visually the rear end is done. Love the way it looks. Just need to square away my light wiring issue tomorrow.

After that I went to install the side pipe hangers and the Drummer Mike heat shields. The passenger hanger went on with no problem. These are the FFR pipes. The drivers side must sit about a 1/4 higher than the passenger side because the hanger was hitting the frame. I just cut the end off and drilled a new hole. Worked perfect then. This was another occasion where it dawned on me how much I have learned on this project. I remember when I first put the pipes on for the first start that I realized there was an issue with the fit on that hanger and didn't have a clue what to do. This time when I saw it I had a solution in about 2 seconds. The confidence you develop as you proceed with a project like this is really a nice part of the build. Another reminder for anyone reading and unsure of their abilities to build one of these. You can do it and you can learn a ton. I knew almost nothing when I started this build last June!

Here are the installed pipes and heat shields. I like the safety aspect of the shields but think the visual enhancement is a nice added benefit as well. I think they look really cool.

Question for tomorrow concerning the brake duct cover pieces. I ordered them, looked at them and noticed they were the same shape as the hole and didn't give it much thought. Figured I would trim them, pop them in the hole and use some silicone to adhere them. Today I pull them out and they are way bigger than the hole. What is the purpose of forming the piece the shape of the hole if it does not fit in there? Am I missing something? What do you do to make them fit?
MK4 #8900 - complete kit - Coyote, TKO600, IRS - Delivered 6/28/16 First Start 10/6/16 Go cart - 10/16/16 Build completed - 4/26/17 - 302 days to build my 302 CI Coyote Cobra - Registered and street legal 5/17/17
Build Thread
http://thefactoryfiveforum.com/showt...e-build-thread
PHIL 4:13 INSTAGRAM - @scottsrides
-
04-23-2017, 04:40 PM
#552
Scott,
The tail looks great! Nice job. Keep up the good work.
Len
1972 Corvette Stingray 350 c.i. Manual Steering & Brakes
2003 H-D Softail Deuce 88 c.i. TwinCam
Gen 3 Coupe Dreamer
-
04-23-2017, 04:51 PM
#553
Senior Member
Originally Posted by
wareaglescott
Question for tomorrow concerning the brake duct cover pieces. I ordered them, looked at them and noticed they were the same shape as the hole and didn't give it much thought. Figured I would trim them, pop them in the hole and use some silicone to adhere them. Today I pull them out and they are way bigger than the hole. What is the purpose of forming the piece the shape of the hole if it does not fit in there? Am I missing something? What do you do to make them fit?
Glad to see you making progress. Looks great getting everything all together, doesn't it? I agree those screens could fit better. Trim the edges so the screen fits flush against the back of the duct openings, then glue 'em in wherever the screen contacts the body. May not be too close to the opening, but it doesn't matter. Just put silicone all around wherever they contact. I usually do it two steps. First time just to get the screens held in place. Then a second time to make sure there's a good build-up all around.
Build 1: Mk3 Roadster #5125. Sold 11/08/2014.
Build 2: Mk4 Roadster #7750. Sold 04/10/2017.
Build Thread
Build 3: Mk4 Roadster 20th Anniversary #8674. Sold 09/07/2020.
Build Thread and
Video.
Build 4: Gen 3 Type 65 Coupe #59. Gen 3 Coyote. Legal 03/04/2020.
Build Thread and
Video
Build 5: 35 Hot Rod Truck #138. LS3 and 4L65E auto. Rcvd 01/05/2021. Legal 04/20/2023.
Build Thread. Sold 11/9/2023.
-
04-24-2017, 04:35 PM
#554
Senior Member
Final assembly continues
Made some more good progress today.
Started off installing the front overriders and bumper. I opted for both bumpers when I ordered the kit. When it came time to install today I decided I just wasn't feeling the look of the front one. I decided just to install the over riders and leave it at that. I like the look.

After that I did the radiator aluminum. No pictures because they are powder coated black and it is just a dark hole in there. I used the kit supplied pieces. The sides went in nicely with no trimming required. The front piece I had to trim a little at the sides to fit around the bolts/brackets for my breeze lower radiator support kit. I riveted the front piece to the bottom of the radiator. The build manual calls for riveting it to the nose of the body as well. Mine was pretty firmly in position without any rivets and I did not want to put any holes in the body in that position so I did not attach it at the front. Since it carries no structural purpose I did not think that would be a problem. If anyone has a reason why that is a bad idea please speak up.
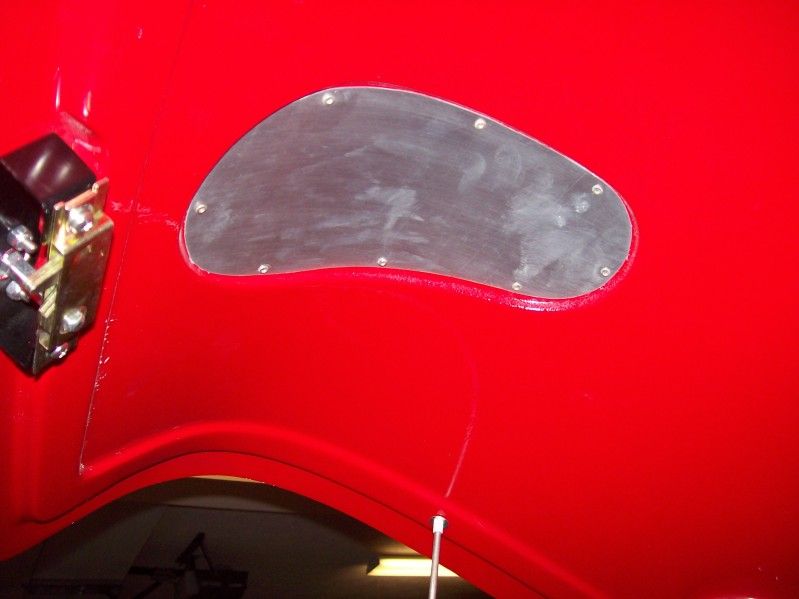
Next I worked on the brake inlet cover pieces. I was asking about them yesterday. I was thinking about them incorrectly. I thought they were supposed to go up inside the hole in the body. I was backwards. Once I realized they should be turned the other direction it made much more sense. I read silicone works good to hold them in position. I rigged up some zip ties to hold them snuggly in position while the silicone dried. I also painted them body color to match. Since I originally was going to put them in backwards now both sides are painted!

Since I decided against the front bumper I thought a similar mesh to the brake duct openings would look good for the oiler cooler opening. Ordered one of those up from Breeze.
I then installed the sun visors and wind wings. I had previously assembled them so simply had to bolt them in position. I also got the dark water customs bracket for mounting the mirror on the top of the windshield.

I like the look of it and think the visibility is as good as you can get with the small mirror. I saw another tip on the forum to buy small diameter vacuum tubing and put it in the trim at the top of the windshield. I did that and you can see it in this picture. To the left of the mirror it is installed and not yet to the right of the mirror. The picture isn't great but it adds a nice finished look.

After that I mocked up my manually operated windshield wiper. This car will never see rain and I have talked to the state inspector about the requirement for a wiper. He says the code calls for ONE and says nothing about what powers it. I will put it on for the inspection and never see it again after that. I guess I will drive with one hand and shift with another and operate that with my mouth! haha

I had an issue with my passenger headlight shining only half intensity. Electrical is certainly not my strong point. I messaged with EdwardB and Jeff Kleiner a couple days ago and both indicated to check the grounds and wiring. EdwardB was nice enough to talk me through testing everything with my multi meter today and we tracked it down to a faulty ground. SO a huge thanks to Paul and Jeff for getting me squared away on that. The generosity of the people on this forum is really great and the help available here really turns some potential frustrations into great learning experiences.
I am getting really close to being done at this point. Have an issue with my rear lights I need to figure out tomorrow and after that is solved I have very few items remaining on my punch list. I am hoping to call it basically complete (for now anyways) in the next couple days!!
MK4 #8900 - complete kit - Coyote, TKO600, IRS - Delivered 6/28/16 First Start 10/6/16 Go cart - 10/16/16 Build completed - 4/26/17 - 302 days to build my 302 CI Coyote Cobra - Registered and street legal 5/17/17
Build Thread
http://thefactoryfiveforum.com/showt...e-build-thread
PHIL 4:13 INSTAGRAM - @scottsrides
-
04-25-2017, 01:32 PM
#555
Senior Member
Final assembly almost finished!
Pretty much finished final assembly today.
Still making rookie mistakes. When I wired the rear weather pack connectors a couple months ago I swapped two wires in all of them. This caused my lights to be at full intensity all the time so when the lights were on you could not tell the blinkers or brake lights were activating. Today I fixed all four of those. After that I installed the rear splash guards, put the wheels on and put it on the ground.
My last item to install was the front, rear and fender badges. Spent a lot of time lining them up correctly and they look great.
Also Garry Bopp from the forum was nice enough to send me his extra finish line clear vinyl protectors for the rear fender splats. They are the static cling variety. I put those on to protect from rock chips. I ended up ordering some more permanent film but do not want to install it quite yet because my paint is only about 30 days old. I have read it is best to wait 60-90 days. The finish line pieces went on great. I did have to trim them a little to fit the MK4 body. Thanks Garry!
I still have some very minor items to clean up but for all intensive purposes the car is built and ready for state inspection. I am not ready to call the build thread complete quit yet. I have a friend that is a photographer for USA Today Sports and tomorrow she is coming over to shoot the car. She has mentioned some action shots from moving vehicles and such. She shot the indycar race last Sunday so I think it may be a little underwhelming for her! It should be fun. I took a few pics today when I took the car on a test run but am hoping to really get some good shots tomorrow.
Now I am just waiting for word the state has processed my paperwork so I can get inspected and registered.
Here are a couple pics from today. First time the completed car has seen sunlight!


Cant stop smiling for some reason!!

Last edited by wareaglescott; 04-25-2017 at 02:36 PM.
MK4 #8900 - complete kit - Coyote, TKO600, IRS - Delivered 6/28/16 First Start 10/6/16 Go cart - 10/16/16 Build completed - 4/26/17 - 302 days to build my 302 CI Coyote Cobra - Registered and street legal 5/17/17
Build Thread
http://thefactoryfiveforum.com/showt...e-build-thread
PHIL 4:13 INSTAGRAM - @scottsrides
-
04-25-2017, 01:36 PM
#556
Looks amaing! Those are 18 inch rims right?
-
04-25-2017, 01:45 PM
#557
Scott,
Car looks great in the sun. Nice color combo. ENJOY!
Len
1972 Corvette Stingray 350 c.i. Manual Steering & Brakes
2003 H-D Softail Deuce 88 c.i. TwinCam
Gen 3 Coupe Dreamer
-
04-25-2017, 02:37 PM
#558
Senior Member
Originally Posted by
Mick_d
Looks amaing! Those are 18 inch rims right?
Yes 18"
I originally had the ride height set to 5". When Whitby put the body on they said the wheel gap was a little big and lowered it for looks. The thing really sits low now it seems!
MK4 #8900 - complete kit - Coyote, TKO600, IRS - Delivered 6/28/16 First Start 10/6/16 Go cart - 10/16/16 Build completed - 4/26/17 - 302 days to build my 302 CI Coyote Cobra - Registered and street legal 5/17/17
Build Thread
http://thefactoryfiveforum.com/showt...e-build-thread
PHIL 4:13 INSTAGRAM - @scottsrides
-
04-25-2017, 05:13 PM
#559
Congratulations! Beautiful car, quality work. I've enjoyed following your thread and appreciate all that you have contributed. Go out and run the wheels off of her. Oh, and let us know when you order your next project. The over and under line is 8 months.
-Steve
-
04-25-2017, 06:44 PM
#560
Senior Member
Originally Posted by
Straversi
Congratulations! Beautiful car, quality work. I've enjoyed following your thread and appreciate all that you have contributed. Go out and run the wheels off of her. Oh, and let us know when you order your next project. The over and under line is 8 months.
-Steve
Thanks Steve. Cant wait to get registered and do some real driving!
MK4 #8900 - complete kit - Coyote, TKO600, IRS - Delivered 6/28/16 First Start 10/6/16 Go cart - 10/16/16 Build completed - 4/26/17 - 302 days to build my 302 CI Coyote Cobra - Registered and street legal 5/17/17
Build Thread
http://thefactoryfiveforum.com/showt...e-build-thread
PHIL 4:13 INSTAGRAM - @scottsrides
 Posting Permissions
- You may not post new threads
- You may not post replies
- You may not post attachments
- You may not edit your posts
-
Forum Rules

Visit our community sponsor


 Reply With Quote