
Visit our community sponsor

Thanks:
225

Likes:
220
-
Senior Member

Gen 3 Coyote CMCV Plumbing
Ford added Charge Motion Control Valves (CMCV) to the Gen 2 Coyote when it was released in 2015. Also sometimes referred to as Intake Manifold Runner Controls (IMRC), which were used on some versions of the previous mod motors. But apparently this time around they are serving a different purpose, so technically not the same thing. According to Ford literature “…charge motion control valves… partially close off port flow at lower engine speeds. This increases the air charge tumble and swirl for improved air-fuel mixing, resulting in better fuel economy, idle stability, and lower emissions.”
It was common in former times to lock these out. Also common today with the Coyote by the performance crowd. But if you do, you’ll need a custom tune otherwise the PCM will throw trouble codes. I’m fine with leaving them, as I did on the Gen 2 Coyote in #8674. But out of the crate the vacuum required is not plumbed. There have been several threads and lots of posts about this, including from me. It was relatively simple to do, but still caused lots of discussion. Ford didn’t help by changing the plumbing slightly in later versions of the Gen 2. There’s also been some discussion about whether the CMCV function is even active in the special crate motor PCM tune. What I can say is (1) if you don’t plumb them you will get trouble codes (personal experience) and (2) when I reviewed the log files while working with Lund Racing on the custom tune in #8674, I could clearly see they were being commanded. I can’t confirm whether this was from the original tune or from Lund’s custom tune. But regardless they were in use. For whatever reason, which I don’t understand to this day, neither Factory Five or Ford Performance address the CMCV function in their instructions.
So with this as background, now the Gen 3 Coyote in my Coupe build. The Gen 3 Coyote has a brand new intake manifold. Side note: It apparently is a nice performance upgrade. Many are fitting the 2018 Gen 3 intake onto previous generation Coyotes with good results. The Gen 3 does still have the CMCV function. But the plumbing is changed. Perhaps because of the Direct Injection (DI) on the Gen 3 Coyote which takes up real estate under the intake that used to be open, there are no longer any vacuum or vent hoses from the back of the intake. Everything is on the front. Additionally, the Gen 3 vents the vacuum motors to atmosphere, like later versions of the Gen 2. There’s no vent tube to the intake like on early Gen 2’s, including mine in #8674.
So let’s get down to it. Here’s the intake area on my Gen 3 Coyote, with the various connections annotated and explained. I’ll cover more than the CMCV and vacuum required, just for information and clarity:
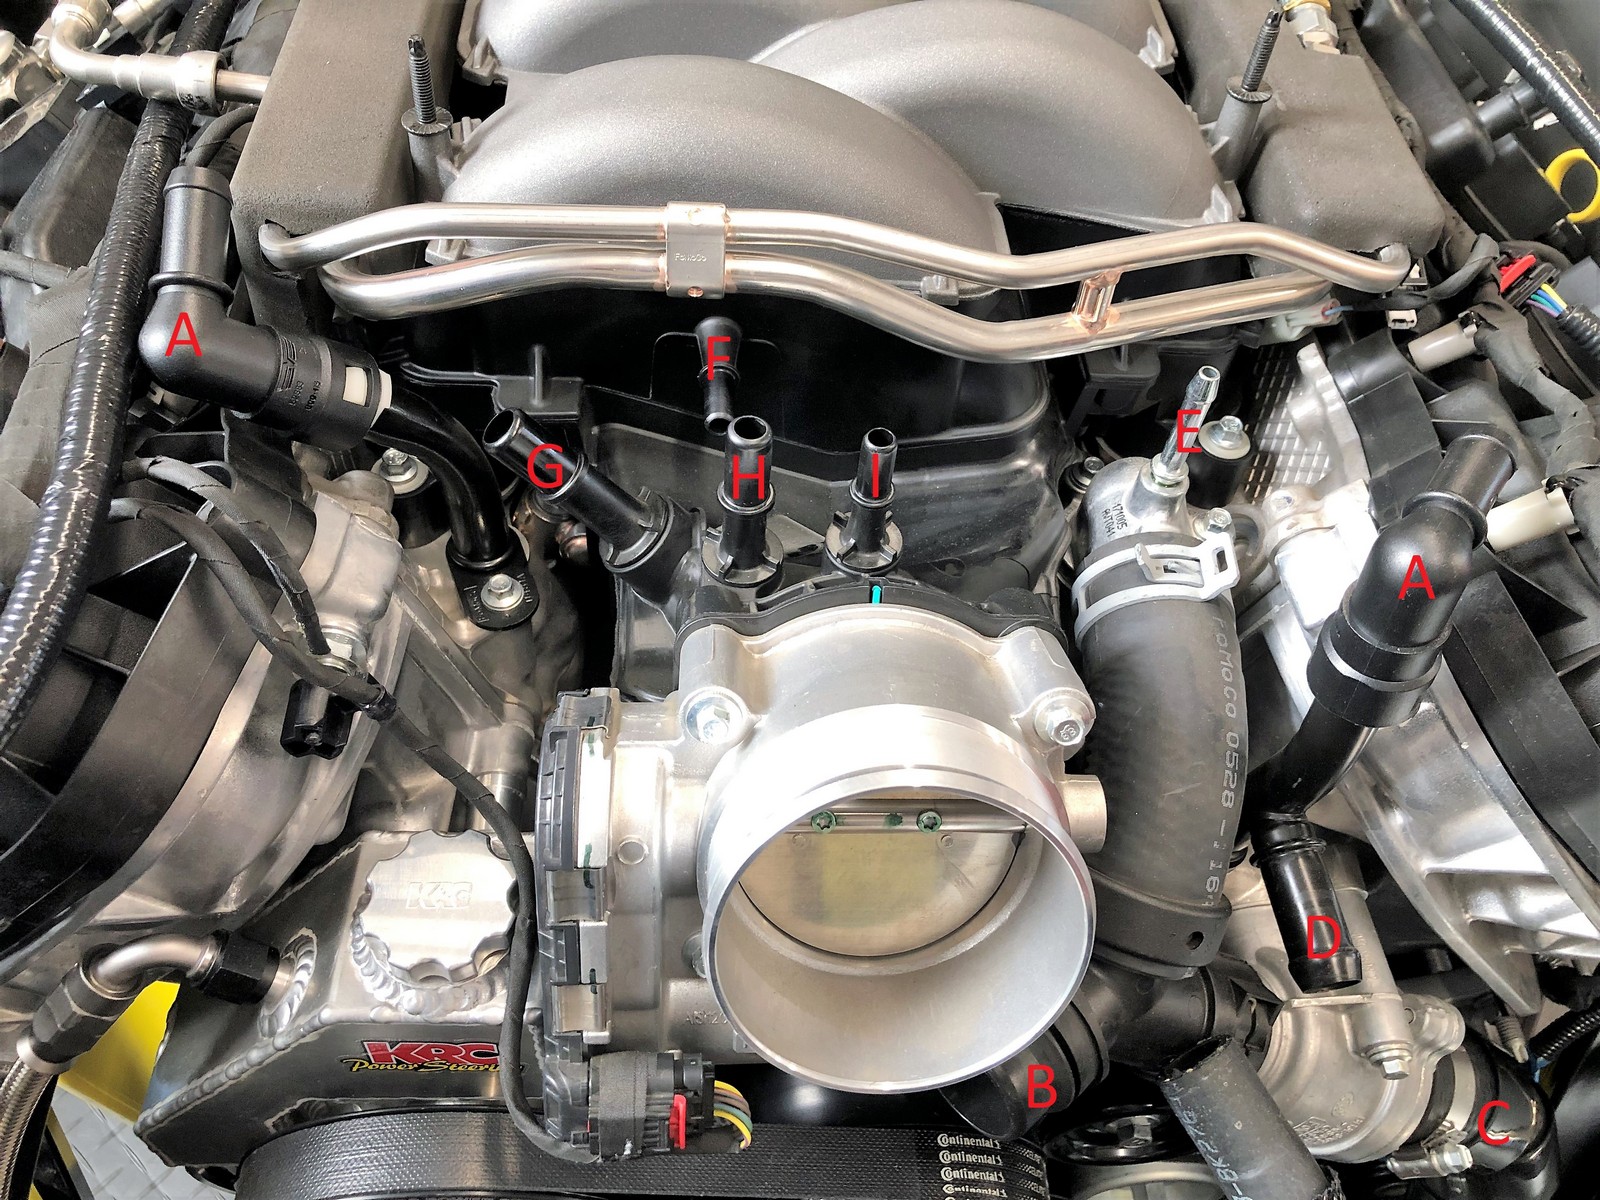
A = Heater hose connections
B = Upper radiator hose connection
C = Lower radiator hose connection
D and E = Connections to coolant expansion tank. Note: Capped if using Factory Five instructed T-filler and overflow tank.
F = Vacuum connection for CMCV function. This replaces the similar connection that was on the back of the Gen 2 Coyote.
G = Right side PCV connection.
H = Main vacuum port. This connects to a manifold setup in the Mustang (not included with the crate motor) which supplies vacuum to the CMCV plus the power brakes.
I = Vacuum port for evaporative emissions canister purge valve. The 2018 intake no longer has the purge valve as part of the assembly like before. It’s separate and not included with the crate motor. The only thing left is the vacuum connection. More on this later.
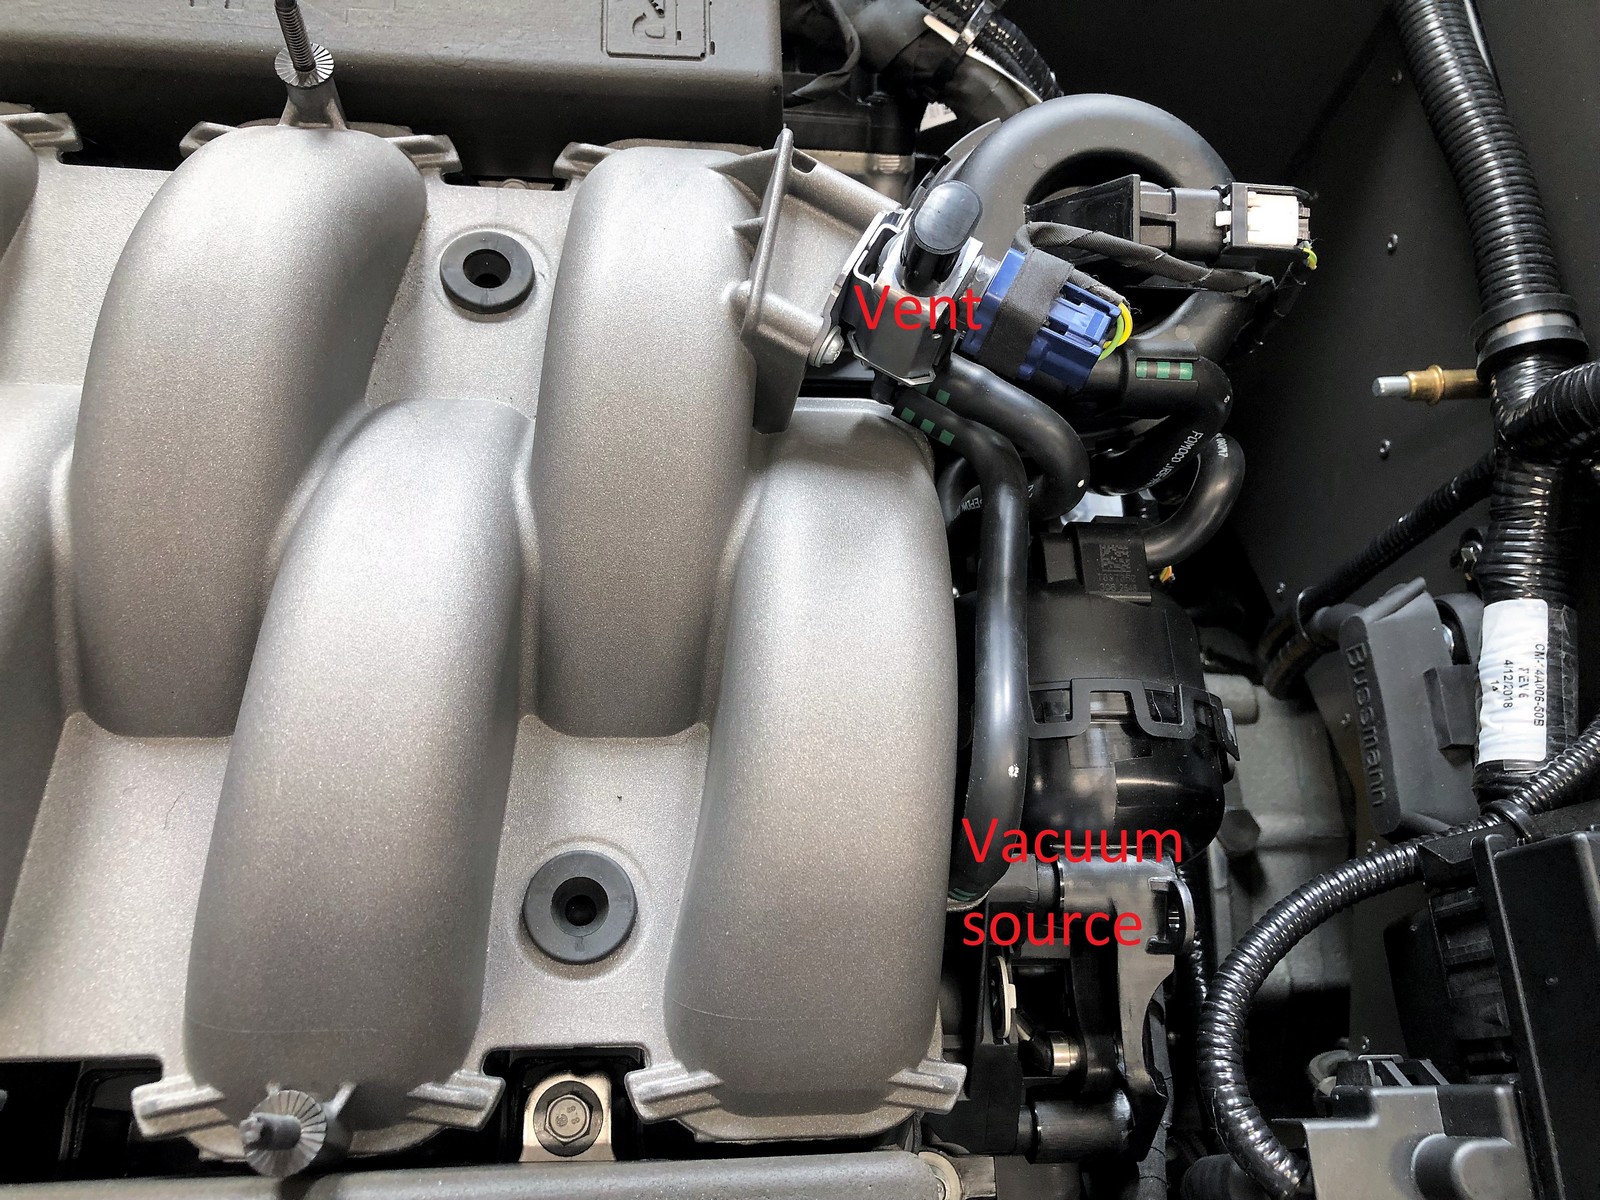
At the back of the intake, two things. At the top of the picture is where the system vents. To atmosphere like later generation Gen 2’s. At the bottom of the picture is the vacuum source. It's connected to item F in the previous picture. Based on the way it acted when I was testing, I suspect there’s an internal reservoir like the Gen 2’s. But I don’t have a source that confirms. Regardless, it’s a direct connection.
So, armed with that information, the vacuum connection to activate the CMCV function on the Gen 3 Coyote appears to be as simple as making a single connection between one of the two vacuum sources at the front of the intake and the vacuum connection for the CMCV. I chose to use the smaller vacuum connection, which is used for the purge valve in a stock setup as already mentioned. But since there’s no purge valve here, and I had a connector that already fit, I used that one and capped the larger vacuum source. Note I removed the throttle body and confirmed both vacuum sources are open into the intake. So for this purpose I believe they are interchangeable.
The other consideration is the vacuum signal for the fuel regulator. Both the Ford Performance and Factory Five instructions show using a fuel pressure regulator with a vacuum signal reference. Some builds use the GM style regulator back by the fuel tank, which is fixed and doesn’t have provision for a vacuum reference signal. Apparently it works fine. But, on a side note, the Ford Performance instructions for the Gen 3 Coyote say to set the fuel regulator at 65 PSI. Clearly more than the 55 PSI for the previous versions, and more than the fixed 58 PSI of the GM style regulator. Additionally, some custom tuners will tell you to remove the vacuum reference line, plug it, and let the regulator vent to atmosphere. Lund Racing told me that for #8674 and I’ve heard the same from at least one other tuner. Not sure about any of that. For my build with the Gen 3 I’m using a typical Aeromotive regulator, will set it for 65 PSI as instructed, and will plumb the vacuum line. If the vacuum reference signal isn't required in the future, easy to remove. So this means a “T” or “Y” connection in the vacuum line.
So I came up with this combination of parts to connect everything, mostly with parts I already had on hand. It’s not elegant, but it should do the job.

Installed, looks like this. As you can see, I capped the larger vacuum connection as mentioned before. Also all the other connections (heater hoses, PCV, radiator, etc.) are now completed.

That’s it! As they say on one of the car shows, “Job done.” Hopefully... Yesterday I filled the system with 50/50 Prestone. Put in just under 4 gallons. I’ll check it and top off if needed once it’s run. Running out of things to do with the Coyote installation. Digging deep into wiring in the cockpit now. First start is getting closer.
Last edited by edwardb; 12-29-2018 at 07:00 AM.
Build 1: Mk3 Roadster #5125. Sold 11/08/2014.
Build 2: Mk4 Roadster #7750. Sold 04/10/2017.
Build Thread
Build 3: Mk4 Roadster 20th Anniversary #8674. Sold 09/07/2020.
Build Thread and
Video.
Build 4: Gen 3 Type 65 Coupe #59. Gen 3 Coyote. Legal 03/04/2020.
Build Thread and
Video
Build 5: 35 Hot Rod Truck #138. LS3 and 4L65E auto. Rcvd 01/05/2021. Legal 04/20/2023.
Build Thread. Sold 11/9/2023.
 Posting Permissions
- You may not post new threads
- You may not post replies
- You may not post attachments
- You may not edit your posts
-
Forum Rules

Visit our community sponsor


 Reply With Quote